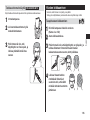
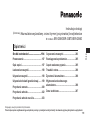
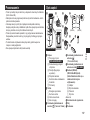
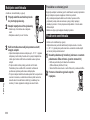
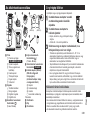
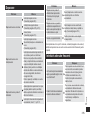
Panasonic ER-GB80 Manual do usuário
- Categoria
- Aparadores de cabelo
- Tipo
- Manual do usuário

Operating Instructions
(Household) AC/Rechargeable Beard/Hair Trimmer
Model No. ER-GB80/ER-GB70/ER-GB60
The illustrations in these operating instructions are of the ER-GB80 model.

2
English 3
Deutsch 21
Français 39
Italiano 57
Nederlands 73
Español 91
Dansk 109
Português 125
Norsk 143
Svenska 159
Suomi 175
Polski 191
Česky 209
Slovensky 225
Magyar 243
Română 261

3
English
Operating Instructions
(Household) AC/Rechargeable Beard/Hair Trimmer
Model No. ER-GB80/ER-GB70/ER-GB60
Thank you for purchasing this Panasonic product.
Before operating this unit, please read these instructions completely and save them for future use.
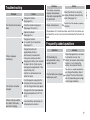
Safety precautions.....................6
Intendeduse........................................9
Partsidentication..............................9
Chargingthetrimmer........................10
Usingthetrimmer..............................10
Usingthecombattachment.............11
Trimmingbeard..................................12
Trimminghair.....................................14
Trimmingbodyhair...........................15
Cleaningthetrimmer.........................15
Troubleshooting................................17
Frequentlyaskedquestions.............17
Bladelife.............................................18
Batterylife..........................................18
Removingthebuilt-inrechargeable
battery.................................................18
Specications....................................19
Contents

4
English
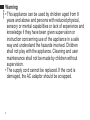
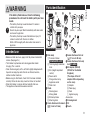
Warning
•This appliance can be used by children aged from 8
years and above and persons with reduced physical,
sensory or mental capabilities or lack of experience and
knowledge if they have been given supervision or
instruction concerning use of the appliance in a safe
way and understand the hazards involved. Children
shall not play with the appliance. Cleaning and user
maintenance shall not be made by children without
supervision.
•The supply cord cannot be replaced. If the cord is
damaged, the AC adaptor should be scrapped.

5
English
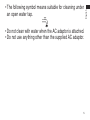
•The following symbol means suitable for cleaning under
an open water tap.
•Do not clean with water when the AC adaptor is attached.
•Do not use anything other than the supplied AC adaptor.

6
English
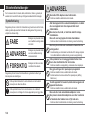
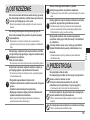
Safety precautions
To reduce the risk of injury, loss of life, electric shock, fire, and
damage to property, always observe the following safety
precautions.
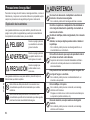
Explanation of symbols
The following symbols are used to classify and describe the level
of hazard, injury, and property damage caused when the
denotation is disregarded and improper use is performed.
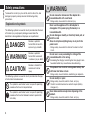
DANGER Denotes a potential
hazard that will result in
serious injury or death.
WARNING Denotes a potential
hazard that could result
in serious injury or death.
CAUTION Denotes a hazard that
could result in minor
injury.
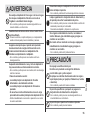
The following symbols are used to classify and describe the type
of instructions to be observed.
This symbol is used to alert users to a specific operating
procedure that must not be performed.
This symbol is used to alert users to a specific operating
procedure that must be followed in order to operate the
unit safely.
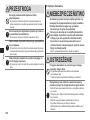
WARNING
Do not connect or disconnect the adaptor to a
household outlet with a wet hand.
-Doing so may cause electric shock or injury.
Never use the appliance if the AC adaptor is
damaged or if the power plug fits loosely in a
household outlet.
Do not damage or modify, or forcefully bend, pull, or
twist the cord.
Also, do not place anything heavy on or pinch the
power cord.
-Doing so may cause electric shock or fire due to a short
circuit.
Do not use in a way exceeding the rating of the
household outlet or the wiring.
-Exceeding the rating by connecting too many plugs to one
household outlet may cause fire due to overheating.
This product has a built-in rechargeable battery. Do
not throw into flame or heat.
-Doing so may cause fluid leak, overheating, or explosion.
Do not modify or repair.
-Doing so may cause fire, electric shock, or injury.
Contact an authorized service centre for repair (battery
change, etc.).
Never disassemble except when disposing of the
product.
-Doing so may cause fire, electric shock, or injury.

7
English
WARNING
Do not immerse the AC adaptor in water or wash it
with water.
Do not place the AC adaptor over or near water
filled sink or bathtub.
-Doing so may cause electric shock or fire due to a short
circuit.
Do not store within the reach of children or infants.
Do not let them use it.
-Putting the blade, the cleaning brush and/or oil container
in the mouth may cause accidents and injury.
Always ensure the appliance is operated on an
electric power source matched to the rated voltage
indicated on the AC adaptor.
Fully insert the adaptor.
-Failure to do so may cause fire or electric shock.
Immediately stop using and remove the adaptor if
there is an abnormality or malfunction.
-Failure to do so may cause fire, electric shock, or injury.
<Abnormality or malfunction cases>
•The main unit or AC adaptor is deformed or
abnormally hot.
•The main unit or AC adaptor smells of burning.
•There is abnormal sound during use or charging of
the main unit or AC adaptor.
-Immediately request inspection or repair at an authorized
service centre.
Always unplug the adaptor from a household outlet
when cleaning.
-Failure to do so may cause electric shock or injury.
Regularly clean the power plug and the appliance
plug to prevent dust from accumulating.
-Failure to do so may cause fire due to insulation failure
caused by humidity.
Disconnect the adaptor and wipe with a dry cloth.
If the oil is consumed accidentally, do not induce
vomiting, drink a large amount of water, and contact
a physician.
If the oil comes into contact with eyes, immediately
wash thoroughly with running water, and contact a
physician.
-Failure to do so may result in physical problems.
CAUTION
Do not press the blade against the skin.
Do not use this product for any purpose other than
trimming beard, hair and body hair.
Do not directly apply the blades on ears or rough
skin (such as swellings, injuries or blemishes).
-Doing so may cause skin injury.
Do not allow pins or trash to adhere to the power
plug or the appliance plug.
-Doing so may cause electric shock or fire due to a short
circuit.
Do not drop or subject to shock.
-Doing so may cause injury.
Do not wrap the cord around the adaptor when
storing.
-Doing so may cause the wire in the cord to break with the
load, and may cause fire due to short circuit.

8
English
CAUTION
Check that the blades are not damaged or deformed
before use.
-Failure to do so may cause skin injury.
Disconnect the adaptor from the household outlet
when not using.
-Failure to do so may cause electric shock or fire due to
electrical leakage resulting from insulation deterioration.
Disconnect the adaptor or the appliance plug by
holding onto the adaptor or the appliance plug
instead of the cord.
-Failure to do so may cause electric shock or injury.
►Disposing of the rechargeable battery
DANGER
The rechargeable battery is exclusively for use with
this trimmer. Do not use the battery with other
products.
Do not charge the battery after it has been removed
from the product.
•Do not throw into fire or apply heat.
•Do not solder, disassemble, or modify the battery.
•Do not let the positive and negative terminals of
the battery get in contact with each other through
metallic objects.
•Do not carry or store the battery together with
metallic jewellery such as necklaces and hairpins.
•Never peel off the tube.
-Doing so may cause fluid leak, overheating, or explosion.
WARNING
After removing the rechargeable battery, do not
keep it within reach of children and infants.
-The battery will harm the body if accidentally swallowed.
If this happens, consult a physician immediately.

9
English
WARNING
If the battery fluid leaks out, take the following
procedures. Do not touch the battery with your bare
hands.
-The battery fluid may cause blindness if it comes in
contact with your eyes.
Do not rub your eyes. Wash immediately with clean water
and consult a physician.
-The battery fluid may cause inflammation or injury if it
comes in contact with the skin or clothes.
Wash it off thoroughly with clean water and consult a
physician.
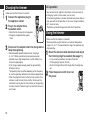
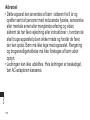
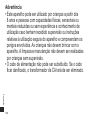
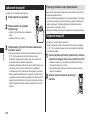
Intended use
•Before and after each use, apply oil at the places marked with
arrows. (See page 16.)
•The trimmer may become warm during operation and/or
charging. This is normal.
•Clean the housing only with a soft cloth slightly dampened with
tap water or soapy tap water. Do not use thinner, benzine,
alcohol or other chemicals.
•Before using an attachment, check that it has been installed
correctly. Failure to do so may cause hair to be cut too short.
•Store the trimmer in a place with low humidity after use.
•The appliance should not be used on animals.
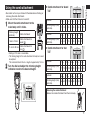
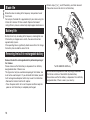
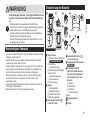
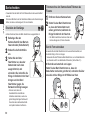
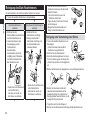
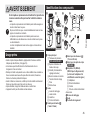
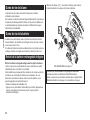
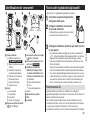
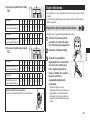
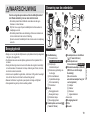
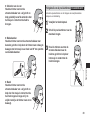
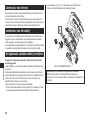
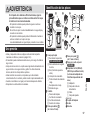
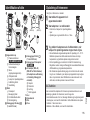
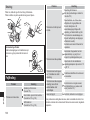
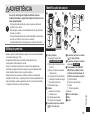
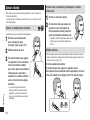
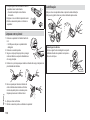
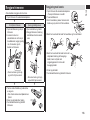
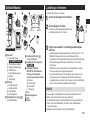
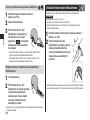
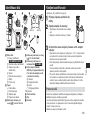
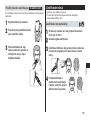
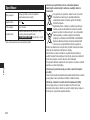
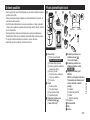
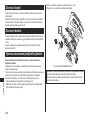
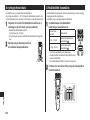
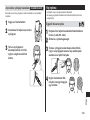
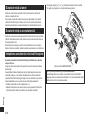
Parts identification
(RE9-49) (RE9-52)
ER-GB80/ER-GB70
ER-GB60
A B C
D
E
F
G
I
H
A Main body
Precision trimmer
ER-GB80/ER-GB70
Trimming height indication
mark
Dial (Height adjustment
control)
Power switch
Charge status lamp
Appliance socket
Water inlet
B Blade
Cleaning lever
Moving blade
Stationary blade
Mounting hook
C Comb attachment for beard
[ ] (1 mm to 10 mm)
D Comb attachment for hair
[ ] (11 mm to 20 mm)
E Comb attachment for body
hair ER-GB80
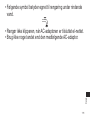
F AC adaptor (RE9-49)
(RE9-52 for the United
Kingdom)
(The shape of the AC
adaptor differs depending
on the area.)
Adaptor
Power plug
Cord
Appliance plug
Accessories
G Cleaning brush
H Oil
I Pouch

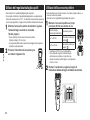
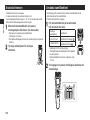
10
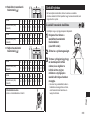
English
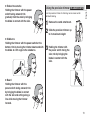
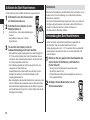
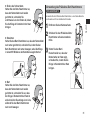
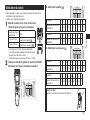
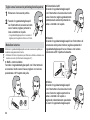
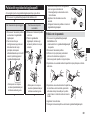
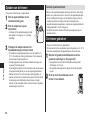
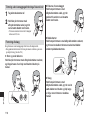
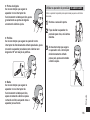
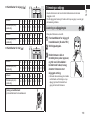
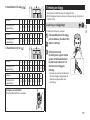
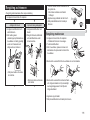
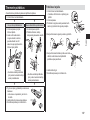
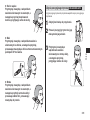
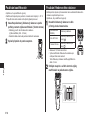
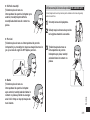
Charging the trimmer
•Make sure that the trimmer is turned off.
1
1Connect the appliance plug to
the appliance socket.
2
2Plug in the adaptor into a
household outlet.
•Check that the charge status lamp glows.
•Charging is completed after approx.
1 hour. 1
2
3
3Disconnect the adaptor when the charge status
lamp stops glowing.
•Recommended ambient temperature for charging is
0 – 35 °C. Battery performance may decrease under
extremely low or high temperatures, and the battery may
not be charged properly.
•A full charge supplies enough power for approximately
50 minutes of use.
The operating time may differ depending on the frequency
of use, the operating method and the ambient temperature.
•When charging the trimmer for the first time or when it has
not been in use for more than 6 months, the lamp on the
main body may not glow for a few minutes, or the operating
time may shorten. Please charge it for more than 8 hours in
such cases.
AC operation
If you connect the AC adaptor to the trimmer in the same way as
for charging, and turn on the power, you can use it.
•If the remaining battery is too low, the blades may move slowly or
stop, even with the AC operation. In this case, charge the battery
for 1 minute or more.
•The battery will be discharged, even with the AC operation.
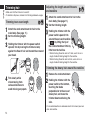
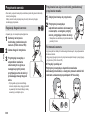
Using the trimmer
•Make sure that the trimmer is turned off.
•We recommend using the trimmer in an ambient temperature
range of 0 – 35 °C. If used outside this range, the appliance may
stop operating.
1
1Mount the desired comb attachment and adjust
the trimming height as needed. (See page 11.)
•It can also be used without the comb attachment.
(Trimming height: approx. 0.5 mm)
•Actual hair length will be a little longer than the height you
set.
2
2Press the power switch to turn on
the power.

11
English
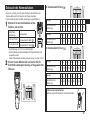
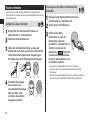
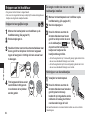
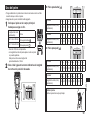
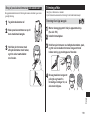
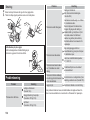
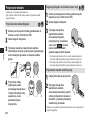
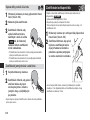
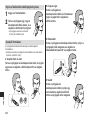
Using the comb attachment
•Be careful not to cut your hand with the blade when attaching or
removing the comb attachment.
•Make sure that the trimmer is turned off.
1
1Mount the comb attachment to the
main body until it clicks.
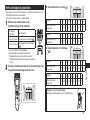
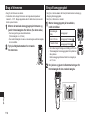
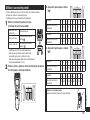
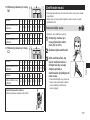
Trimming height
(estimate) Comb attachment
1 mm to 10 mm Comb attachment for
beard [ ]
11 mm to 20 mm Comb attachment for
hair [ ]
•Setting of 10.5 mm is unavailable.
•The trimming height of the comb attachment for body hair cannot
be adjusted.
This comb attachment trims to a length of approximately 1.5 mm.
2
2Turn the dial and adjust the trimming height
indication mark to the desired height.
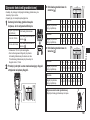
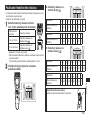
►Comb attachment for beard
[ ]
Indicator 12 3 4 5
Trimming height (mm)
(estimate) 1 1.5 2 2.5 3 3.5 4 4.5 5 5.5
Indicator 67 8 9 10
Trimming height (mm)
(estimate) 6 6.5 7 7.5 8 8.5 9 9.5 10
►Comb attachment for hair
[]
Indicator 11 12 13 14 15
Trimming height (mm)
(estimate) 11
11.5
12
12.5
13
13.5
14
14.5
15
15.5
Indicator 16 17 18 19 20
Trimming height (mm)
(estimate) 16
16.5
17
17.5
18
18.5
19
19.5
20
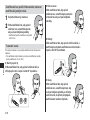
Removing the comb attachment
Remove the comb attachment from the main body.

12
English
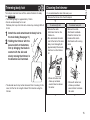
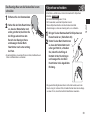
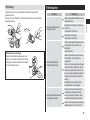
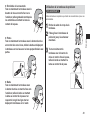
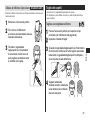
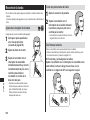
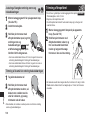
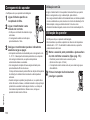
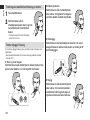
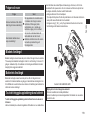
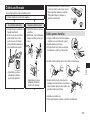
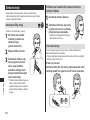
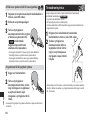
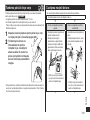
Trimming beard
•Do not use with shaving foam applied or when the beard is wet.
A wet beard may stick to the skin or bunch up, making it difficult
to trim.
Adjusting the beard length
•Make sure that the trimmer is turned off.
1
1Attach the comb
attachment for beard to the
main body. (See page 11.)
2
2Set the trimming height.
3
3Holding the trimmer with
the power switch facing
upward, trim by bringing
the blade in contact with
the skin and moving the
trimmer against the flow of
the beard.
•Hair trimmings may collect inside
the attachment when a large
volume of beard is cut, so discard
hair trimmings after each use.
Trimming without the comb attachment/
trimming the downy hair
1
1Remove the comb attachment.
2
2Holding the trimmer with the
power switch facing outwards,
trim by bringing the blade in
contact with the skin.
•The trimmer cannot trim hair to lengths
less than 0.5 mm.
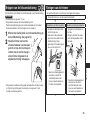
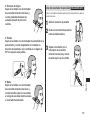
Beard shaping
Use the trimmer without any comb attachments to properly shape
your beard.
•Use the precision trimmer for trimming narrow areas and for
detailed trimming. (See page 13.)
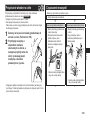
►Above and below lips
Holding the trimmer with the power switch at the
bottom, cut across a line with the blade at a 90°
angle to the skin.

13
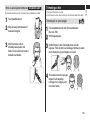
English
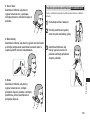
►Ends of moustache
Holding the trimmer with the power
switch facing outward, trim
gradually from the ends by bringing
the blade in contact with the skin.
►Sideburns
Holding the trimmer with the power switch at the
bottom, trim by moving the trimmer downward with
the blade at a 90° angle to the sideburns.
►Beard
Holding the trimmer with the
power switch facing outward, trim
by bringing the blade in contact
with the skin and cutting along a
line while moving the trimmer
forward.
Using the precision trimmer ER-GB80/ER-GB70
Use the precision trimmer for trimming narrow areas and for
detailed trimming.
1
1Remove the comb attachment.
2
2Slide the precision trimmer up
to its maximum height.
3
3Holding the trimmer with
the power switch facing the
skin, trim by bringing the
blade in contact with the
skin.

14
English
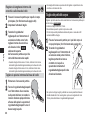
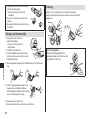
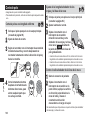
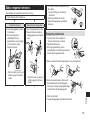
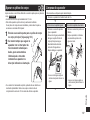
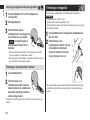
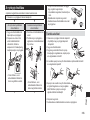
Trimming hair
•Make sure that the trimmer is turned off.
•To maintain sharpness, remove hair trimmings between usages.
Trimming to an even length
1
1Attach the comb attachment for hair to the
main body. (See page 11.)
2
2Set the trimming height.
3
3Holding the trimmer with the power switch
upward, trim by moving the trimmer slowly
against the flow of hair and toward the crown of
your head.
4
4Trim slowly while
crisscrossing from
various directions to
avoid missing any spots.
Adjusting the length around the ears
and neckline
1
1Attach the comb attachment for hair to the
main body. (See page 11.)
2
2Set the trimming height.
3
3Holding the trimmer with the
power switch upward, trim
around the ears and neckline
() by lifting the tip of
the comb attachment little by
little from the hairline.
•When trimming the entire area to 12 mm, use 9 mm as a
rough standard trimming height for the neckline.
•When trimming the entire area to 9 mm, use 6 mm as a
rough standard trimming height for the neckline.
Trimming the downy hair around the neckline
1
1
Remove the comb attachment.
2
2Holding the trimmer with the
power switch at the bottom,
touching the blade
perpendicular to the area of
downy hair, and move the
trimmer downward along the
skin.
•It is recommended to ask someone else to trim around your own
ears and neckline.

15
English
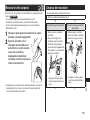
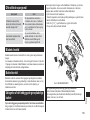
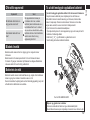
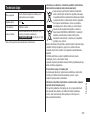
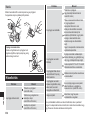
Trimming body hair
Trim armpits and bikini lines with the comb attachment for body
hair. ER-GB80
•The trimming height is approximately 1.5 mm.
•Do not use when body hair is wet.
Wet body hair may stick to the skin or bunch up, making it difficult
to trim.
1
1Attach the comb attachment for body hair to
the main body. (See page 11.)
2
2Holding the trimmer with the
power switch at the bottom,
trim by bringing the blade in
contact with the skin and
slowly moving the trimmer in
the direction as illustrated.
•The desired results may not be achieved if hair is too long. In this
case, trim the hair to a length of about 10 mm before using the
trimmer.
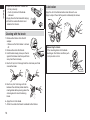
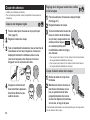
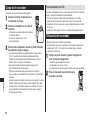
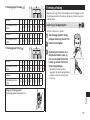
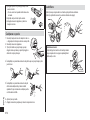
Cleaning the trimmer
•It is recommended to clean after every use.
1. Remove the trimmer from the AC adaptor.
▼ ▼
To remove light dirt To remove heavy dirt
2. Remove the comb
attachment and turn the
trimmer on.
3. Run water down the water
inlet at the front of the main
body, rinse thoroughly for
approximately 20 seconds,
and then turn the trimmer
off.
•Rinse with water and
shake up and down
several times to remove
the water.
2. Remove the comb
attachment and blade.
3. Clean the trimmer, the
blade and the comb
attachments with running
water.
•Rinse with water and
shake up and down
several times to remove
the water.
▼ ▼

16
English
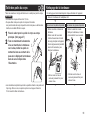
4. Wipe off the water with a towel and
let it dry naturally.
•It will dry faster with the blade
removed.
5. Apply the oil to the blade after drying.
6. Attach the comb attachment and
blade to the trimmer.
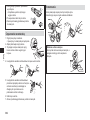
Cleaning with the brush
1. Remove the trimmer from the AC
adaptor.
•Make sure that the trimmer is turned
off.
2. Remove the comb attachment.
3. Hold the main body, place your thumb
against the blades and then push them
away from the main body.
4. Brush off any hair trimmings from the main body and from
around the blade.
5. Brush any hair trimmings out from
between the stationary blade and the
moving blade while pressing down the
cleaning lever to raise the moving
blade.
6. Apply the oil to the blade.
7. Attach the comb attachment and blade to the trimmer.
Lubrication
Apply the oil to the trimmer before and after each use.
Apply a drop of the oil to the points indicated by the arrows.
Remounting the blade
Fit the mounting hook into the blade
mounting on the trimmer and then push
in until you hear a click.

17
English
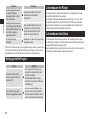
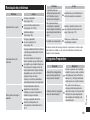
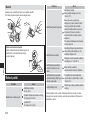
Troubleshooting
Problem Action
The trimmer has become
blunt.
Charge the trimmer.
(See page 10.)
Clean the blade and apply oil.
(See pages 15 and 16.)
Replace the blade.
(See page 16.)
Trimmer stopped
functioning.
Charge the trimmer.
Or use with the AC operation.
(See page 10.)
Charge the battery for
approximately 8 hours
continuously to rejuvenate it.
If few uses remain even after
charging, the battery has reached
the end of its life. (Fluid may be
leaking due to degradation at the
end of battery life.)
Contact an authorized service
centre for repair.
The trimmer cannot be
charged.
Push the appliance plug into the
main body all the way and make
sure the charge status lamp glows.
Charge within the recommended
charging temperature of 0 °C to
35 °C.
Trimmer can be used for
only about 10 minutes
even after charging.
Have the battery replaced by an
authorized service centre.
Problem Action
The trimmer cannot be
properly cleaned even
after water is poured from
the water inlet.
When the trimmer is very dirty,
remove the blade and wash with
water. (See page 15.)
Makes a loud sound. Confirm that the blade is properly
attached.
If the problems still cannot be solved, contact the store where you
purchased the unit or a service centre authorized by Panasonic for
repair.
Frequently asked questions
Question Answer
Will the battery be
exhausted after a long
period of disuse?
When the appliance is not used
for 6 months or more, the
battery will weaken (leak battery
fluid, etc.). Fully charge the
battery once every 6 months.
Can the battery be charged
before every use?
Yes, but it is recommended that
you charge the battery when it
is empty. The life of the battery
will vary depending upon usage
and storage conditions.

18
English
Blade life
Blade life varies according to the frequency and period of use of
the trimmer.
For example, the blade life is approximately 3 years when using the
trimmer for 5 minutes 10 times a month. Replace the blades if
cutting efficiency reduces substantially despite proper maintenance.
Battery life
Battery life will vary according to the frequency and length of use.
If the battery is charged once a month, the service life will be
approximately 3 years.
If the operating time is significantly shorter even after a full charge,
the battery has reached the end of its life.
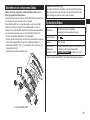
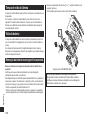
Removing the built-in rechargeable battery
Remove the built-in rechargeable battery before disposing of
the trimmer.
Please make sure that the battery is disposed of at an officially
designated location if there is one.
This figure must only be used when disposing of the trimmer, and
must not be used to repair it. If you dismantle the trimmer yourself,
it will no longer be waterproof, which may cause it to malfunction.
•Remove the trimmer from the AC adaptor.
•Press the power switch to turn on the power and then keep the
power on until the battery is completely discharged.
•Perform steps to and lift the battery, and then remove it.
•Please take care not to short-circuit the battery.
*
*for ER-GB80/ER-GB70 only
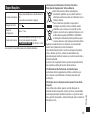
For environmental protection and recycling of materials
This trimmer contains a Nickel-Metal Hydride battery.
Please make sure that the battery is disposed of at an officially
assigned location, if there is one in your country.

19
English
Specifications
Power source See the name plate on the AC adaptor.
(Automatic voltage conversion)
Motor voltage 1.2 V
Charging time Approx. 1 hour
Airborne
Acoustical Noise
In trimmer mode: 64 (dB (A) re 1 pW)
In precision trimmer mode
ER-GB80/ER-GB70 : 63 (dB (A) re 1 pW)
This product is intended for household use only.
InformationforUsersonCollectionandDisposalofOld
EquipmentandusedBatteries
Thesesymbolsontheproducts,packaging,and/or
accompanyingdocumentsmeanthatusedelectrical
andelectronicproductsandbatteriesshouldnotbe
mixedwithgeneralhouseholdwaste.
Forpropertreatment,recoveryandrecyclingofold
productsandusedbatteries,pleasetakethemto
applicablecollectionpoints,inaccordancewithyour
nationallegislationandtheDirectives2002/96/ECand
2006/66/EC.
Bydisposingoftheseproductsandbatteriescorrectly,
youwillhelptosavevaluableresourcesandprevent
anypotentialnegativeeffectsonhumanhealthandtheenvironment
whichcouldotherwisearisefrominappropriatewastehandling.
Formoreinformationaboutcollectionandrecyclingofoldproducts
andbatteries,pleasecontactyourlocalmunicipality,yourwaste
disposalserviceorthepointofsalewhereyoupurchasedtheitems.
Penaltiesmaybeapplicableforincorrectdisposalofthiswaste,in
accordancewithnationallegislation.
ForbusinessusersintheEuropeanUnion
Ifyouwishtodiscardelectricalandelectronicequipment,please
contactyourdealerorsupplierforfurtherinformation.
[InformationonDisposalinotherCountriesoutsidethe
EuropeanUnion]
ThesesymbolsareonlyvalidintheEuropeanUnion.Ifyouwishto
discardtheseitems,pleasecontactyourlocalauthoritiesordealer
andaskforthecorrectmethodofdisposal.

20
A página está carregando ...
A página está carregando ...
A página está carregando ...
A página está carregando ...
A página está carregando ...
A página está carregando ...
A página está carregando ...
A página está carregando ...
A página está carregando ...
A página está carregando ...
A página está carregando ...
A página está carregando ...
A página está carregando ...
A página está carregando ...
A página está carregando ...
A página está carregando ...
A página está carregando ...
A página está carregando ...
A página está carregando ...
A página está carregando ...
A página está carregando ...
A página está carregando ...
A página está carregando ...
A página está carregando ...
A página está carregando ...
A página está carregando ...
A página está carregando ...
A página está carregando ...
A página está carregando ...
A página está carregando ...
A página está carregando ...
A página está carregando ...
A página está carregando ...
A página está carregando ...
A página está carregando ...
A página está carregando ...
A página está carregando ...
A página está carregando ...
A página está carregando ...
A página está carregando ...
A página está carregando ...
A página está carregando ...
A página está carregando ...
A página está carregando ...
A página está carregando ...
A página está carregando ...
A página está carregando ...
A página está carregando ...
A página está carregando ...
A página está carregando ...
A página está carregando ...
A página está carregando ...
A página está carregando ...
A página está carregando ...
A página está carregando ...
A página está carregando ...
A página está carregando ...
A página está carregando ...
A página está carregando ...
A página está carregando ...
A página está carregando ...
A página está carregando ...
A página está carregando ...
A página está carregando ...
A página está carregando ...
A página está carregando ...
A página está carregando ...
A página está carregando ...
A página está carregando ...
A página está carregando ...
A página está carregando ...
A página está carregando ...
A página está carregando ...
A página está carregando ...
A página está carregando ...
A página está carregando ...
A página está carregando ...
A página está carregando ...
A página está carregando ...
A página está carregando ...
A página está carregando ...
A página está carregando ...
A página está carregando ...
A página está carregando ...
A página está carregando ...
A página está carregando ...
A página está carregando ...
A página está carregando ...
A página está carregando ...
A página está carregando ...
A página está carregando ...
A página está carregando ...
A página está carregando ...
A página está carregando ...
A página está carregando ...
A página está carregando ...
A página está carregando ...
A página está carregando ...
A página está carregando ...
A página está carregando ...
A página está carregando ...
A página está carregando ...
A página está carregando ...
A página está carregando ...
A página está carregando ...
A página está carregando ...
A página está carregando ...
A página está carregando ...
A página está carregando ...
A página está carregando ...
A página está carregando ...
A página está carregando ...
A página está carregando ...
A página está carregando ...
A página está carregando ...
A página está carregando ...
A página está carregando ...
A página está carregando ...
A página está carregando ...
A página está carregando ...
A página está carregando ...
A página está carregando ...
A página está carregando ...
A página está carregando ...
A página está carregando ...
A página está carregando ...
A página está carregando ...
A página está carregando ...
A página está carregando ...
A página está carregando ...
A página está carregando ...
A página está carregando ...
A página está carregando ...
A página está carregando ...
A página está carregando ...
A página está carregando ...
A página está carregando ...
A página está carregando ...
A página está carregando ...
A página está carregando ...
A página está carregando ...
A página está carregando ...
A página está carregando ...
A página está carregando ...
A página está carregando ...
A página está carregando ...
A página está carregando ...
A página está carregando ...
A página está carregando ...
A página está carregando ...
A página está carregando ...
A página está carregando ...
A página está carregando ...
A página está carregando ...
A página está carregando ...
A página está carregando ...
A página está carregando ...
A página está carregando ...
A página está carregando ...
A página está carregando ...
A página está carregando ...
A página está carregando ...
A página está carregando ...
A página está carregando ...
A página está carregando ...
A página está carregando ...
A página está carregando ...
A página está carregando ...
A página está carregando ...
A página está carregando ...
A página está carregando ...
A página está carregando ...
A página está carregando ...
A página está carregando ...
A página está carregando ...
A página está carregando ...
A página está carregando ...
A página está carregando ...
A página está carregando ...
A página está carregando ...
A página está carregando ...
A página está carregando ...
A página está carregando ...
A página está carregando ...
A página está carregando ...
A página está carregando ...
A página está carregando ...
A página está carregando ...
A página está carregando ...
A página está carregando ...
A página está carregando ...
A página está carregando ...
A página está carregando ...
A página está carregando ...
A página está carregando ...
A página está carregando ...
A página está carregando ...
A página está carregando ...
A página está carregando ...
A página está carregando ...
A página está carregando ...
A página está carregando ...
A página está carregando ...
A página está carregando ...
A página está carregando ...
A página está carregando ...
A página está carregando ...
A página está carregando ...
A página está carregando ...
A página está carregando ...
A página está carregando ...
A página está carregando ...
A página está carregando ...
A página está carregando ...
A página está carregando ...
A página está carregando ...
A página está carregando ...
A página está carregando ...
A página está carregando ...
A página está carregando ...
A página está carregando ...
A página está carregando ...
A página está carregando ...
A página está carregando ...
A página está carregando ...
A página está carregando ...
A página está carregando ...
A página está carregando ...
A página está carregando ...
A página está carregando ...
A página está carregando ...
A página está carregando ...
A página está carregando ...
A página está carregando ...
A página está carregando ...
A página está carregando ...
A página está carregando ...
A página está carregando ...
A página está carregando ...
A página está carregando ...
A página está carregando ...
A página está carregando ...
A página está carregando ...
A página está carregando ...
A página está carregando ...
A página está carregando ...
A página está carregando ...
A página está carregando ...
A página está carregando ...
A página está carregando ...
A página está carregando ...
A página está carregando ...
A página está carregando ...
A página está carregando ...
A página está carregando ...
A página está carregando ...
A página está carregando ...
A página está carregando ...
A página está carregando ...
A página está carregando ...
-
 1
1
-
 2
2
-
 3
3
-
 4
4
-
 5
5
-
 6
6
-
 7
7
-
 8
8
-
 9
9
-
 10
10
-
 11
11
-
 12
12
-
 13
13
-
 14
14
-
 15
15
-
 16
16
-
 17
17
-
 18
18
-
 19
19
-
 20
20
-
 21
21
-
 22
22
-
 23
23
-
 24
24
-
 25
25
-
 26
26
-
 27
27
-
 28
28
-
 29
29
-
 30
30
-
 31
31
-
 32
32
-
 33
33
-
 34
34
-
 35
35
-
 36
36
-
 37
37
-
 38
38
-
 39
39
-
 40
40
-
 41
41
-
 42
42
-
 43
43
-
 44
44
-
 45
45
-
 46
46
-
 47
47
-
 48
48
-
 49
49
-
 50
50
-
 51
51
-
 52
52
-
 53
53
-
 54
54
-
 55
55
-
 56
56
-
 57
57
-
 58
58
-
 59
59
-
 60
60
-
 61
61
-
 62
62
-
 63
63
-
 64
64
-
 65
65
-
 66
66
-
 67
67
-
 68
68
-
 69
69
-
 70
70
-
 71
71
-
 72
72
-
 73
73
-
 74
74
-
 75
75
-
 76
76
-
 77
77
-
 78
78
-
 79
79
-
 80
80
-
 81
81
-
 82
82
-
 83
83
-
 84
84
-
 85
85
-
 86
86
-
 87
87
-
 88
88
-
 89
89
-
 90
90
-
 91
91
-
 92
92
-
 93
93
-
 94
94
-
 95
95
-
 96
96
-
 97
97
-
 98
98
-
 99
99
-
 100
100
-
 101
101
-
 102
102
-
 103
103
-
 104
104
-
 105
105
-
 106
106
-
 107
107
-
 108
108
-
 109
109
-
 110
110
-
 111
111
-
 112
112
-
 113
113
-
 114
114
-
 115
115
-
 116
116
-
 117
117
-
 118
118
-
 119
119
-
 120
120
-
 121
121
-
 122
122
-
 123
123
-
 124
124
-
 125
125
-
 126
126
-
 127
127
-
 128
128
-
 129
129
-
 130
130
-
 131
131
-
 132
132
-
 133
133
-
 134
134
-
 135
135
-
 136
136
-
 137
137
-
 138
138
-
 139
139
-
 140
140
-
 141
141
-
 142
142
-
 143
143
-
 144
144
-
 145
145
-
 146
146
-
 147
147
-
 148
148
-
 149
149
-
 150
150
-
 151
151
-
 152
152
-
 153
153
-
 154
154
-
 155
155
-
 156
156
-
 157
157
-
 158
158
-
 159
159
-
 160
160
-
 161
161
-
 162
162
-
 163
163
-
 164
164
-
 165
165
-
 166
166
-
 167
167
-
 168
168
-
 169
169
-
 170
170
-
 171
171
-
 172
172
-
 173
173
-
 174
174
-
 175
175
-
 176
176
-
 177
177
-
 178
178
-
 179
179
-
 180
180
-
 181
181
-
 182
182
-
 183
183
-
 184
184
-
 185
185
-
 186
186
-
 187
187
-
 188
188
-
 189
189
-
 190
190
-
 191
191
-
 192
192
-
 193
193
-
 194
194
-
 195
195
-
 196
196
-
 197
197
-
 198
198
-
 199
199
-
 200
200
-
 201
201
-
 202
202
-
 203
203
-
 204
204
-
 205
205
-
 206
206
-
 207
207
-
 208
208
-
 209
209
-
 210
210
-
 211
211
-
 212
212
-
 213
213
-
 214
214
-
 215
215
-
 216
216
-
 217
217
-
 218
218
-
 219
219
-
 220
220
-
 221
221
-
 222
222
-
 223
223
-
 224
224
-
 225
225
-
 226
226
-
 227
227
-
 228
228
-
 229
229
-
 230
230
-
 231
231
-
 232
232
-
 233
233
-
 234
234
-
 235
235
-
 236
236
-
 237
237
-
 238
238
-
 239
239
-
 240
240
-
 241
241
-
 242
242
-
 243
243
-
 244
244
-
 245
245
-
 246
246
-
 247
247
-
 248
248
-
 249
249
-
 250
250
-
 251
251
-
 252
252
-
 253
253
-
 254
254
-
 255
255
-
 256
256
-
 257
257
-
 258
258
-
 259
259
-
 260
260
-
 261
261
-
 262
262
-
 263
263
-
 264
264
-
 265
265
-
 266
266
-
 267
267
-
 268
268
-
 269
269
-
 270
270
-
 271
271
-
 272
272
-
 273
273
-
 274
274
-
 275
275
-
 276
276
-
 277
277
-
 278
278
-
 279
279
-
 280
280


Panasonic ER-GB80 Manual do usuário
- Categoria
- Aparadores de cabelo
- Tipo
- Manual do usuário
em outros idiomas
- español: Panasonic ER-GB80 Manual de usuario
- français: Panasonic ER-GB80 Manuel utilisateur
- italiano: Panasonic ER-GB80 Manuale utente
- Nederlands: Panasonic ER-GB80 Handleiding
- slovenčina: Panasonic ER-GB80 Používateľská príručka
- Deutsch: Panasonic ER-GB80 Benutzerhandbuch
- dansk: Panasonic ER-GB80 Brugermanual
- svenska: Panasonic ER-GB80 Användarmanual
- română: Panasonic ER-GB80 Manual de utilizare
Artigos relacionados
-
Panasonic ER-GC71-S503 Manual do proprietário
-
-
-
Panasonic ER-GB40 Manual do proprietário
-
Panasonic ER2211 Manual do proprietário
-
-
Panasonic ER-GY10 Operating Instructions Manual