Black & Decker STC1820PC Manual do usuário
- Categoria
- Aparadores de grama
- Tipo
- Manual do usuário

www.blackanddecker.eu
14
11
5
7
6
89 32
10
STC1820PC

2
3
A
12
B
E
20
20
F
13
C
10
18
16
16
19
14
15
17
D

2
3
G
21
H
5˚-10˚
J1
J2
6
I J

4
5
60cm
J3
7
1 2
K
23
22
22
N
O1
O2
O
L M

4
5
T
P
24 25
O2
Q
26
27
R
29
28
S

6
ENGLISH
(Original instructions)
Intended use
Your BLACK+DECKER STC1820PC
trimmer has been
designed for trimming and finishing lawn edges and to cut
grass in confined spaces. This appliance is intended for
consumer use only.
Safety instructions
Warning! When using mains-powered
appliances, basic safety precautions,
including the following, should always be
followed to reduce the risk of re, electric
shock, personal injury and material dam-
age.
Warning! When using the machine the
safety rules must be followed. For your
own safety and bystanders please read
these instructions before operating the
machine. Please keep the instructions
safe for later use.
u Read all of this manual carefully before
operating the appliance.
u The intended use is described in this
manual. The use of any accessory
or attachment or the performance
of any operation with this appliance
other than those recommended in this
instruction manual may present a risk
of personal injury.
u Retain this manual for future refer-
ence.
Using your appliance
Always take care when using the appli-
ance.
u Always use safety glasses or goggles.
u Never allow children or people unfa-
miliar with the instructions to use the
appliance.
u Do not allow children or animals to
come near the work area or to touch
the appliance or power supply cord.
u Close supervision is necessary when
the appliance is used near children.
u This appliance is not intended for use
by young or inrm persons without
supervision.
u This appliance is not to be used as a
toy.
u Only use the appliance in daylight or
good articial light.
u Use in a dry location only. Do not allow
the appliance to become wet.
u Avoid using the appliance in bad
weather conditions, especially when
there is a risk of lightning.
u Do not immerse the appliance in water.
u Do not open the body casing. There
are not user-serviceable parts inside.
u Do not operate the appliance in
explosive atmospheres, such as in the
presence of ammable liquids, gases
or dust.
u To reduce the risk of damage to plugs
or cords, never pull the cable to re-
move the plug from a socket.
u The appliance is only to be used with
the power supply unit provided with the
appliance.
Safety of others
u Never allow children, persons with
reduced physical, sensory or mental
capabilities or lack of experience and
knowledge or people unfamiliar with
these instructions to use the machine,
local regulations may restrict the age
of the operator.
u Never operate the machine while
people, especially children, or pets are
nearby.
Residual risks.
Additional residual risks may arise when
using the tool which may not be included
in the enclosed safety warnings.
These risks can arise from misuse, pro-
longed use etc.

7
ENGLISH
(Original instructions)
Even with the application of the relevant
safety regulations and the implementa-
tion of safety
devices, certain residual
risks can not be avoided. These include:
u Injuries caused by touching any rotat-
ing/moving parts.
u Injuries caused when changing any
parts, blades or accessories.
u Injuries caused by prolonged use
of a tool. When using any tool for
prolonged periods ensure you take
regular breaks.
u Impairment of hearing.
u Health hazards caused by breathing
dust developed when using your tool
(example:- working with wood, espe-
cially oak, beech and MDF.)
After use
u When not in use, the appliance should
be stored in a dry, well ventilated place
out of reach of children.
u Children should not have access to
stored appliances.
u When the appliance is stored or trans-
ported in a vehicle it should be placed
in the boot or restrained to prevent
movement following sudden changes
in speed or direction.
Inspection and repairs
u Before use, check the appliance for
damaged or defective parts. Check for
breakage of parts and any other condi-
tions that may affect its operation.
u Do not use the appliance if any part is
damaged or defective.
u Have any damaged or defective parts
repaired or replaced by an authorised
repair agent.
u Never attempt to remove or replace
any parts other than those specied in
this manual.
Additional safety instructions for
grass trimmers
Warning! Cutting elements continue to
rotate after the motor is switched off.
u Be familiar with the controls and the
proper use of the appliance.
u Always remove the battery from the
appliance whenever the appliance is
unattended, before clearing a block-
age, before cleaning and maintenance,
after striking a foreign object or when-
ever the appliance starts vibrating
abnormally.
u Do not use the appliance if the cords
are damaged or worn.
u Wear stout shoes or boots to protect
your feet.
u Wear long trousers to protect your
legs.
u Before using the appliance, check that
your cutting path is free from sticks,
stones, wire and any other obstacles.
u Only use the appliance in the upright
position, with the cutting line near the
ground. Never switch the appliance on
in any other position.
u Move slowly when using the appliance.
Be aware that
freshly cut grass is
damp and slippery.
u Do not work on steep slopes. Work
across the face of slopes, not up and
down.
u Never cross gravel paths or roads
while the appliance is running.
u Never touch the cutting line while the
appliance is running.
u Do not put the appliance down until the
cutting line
has come to a complete
standstill.
u Use only the appropriate type of cut-
ting line. Never use metal cutting line
or shing line.

8
ENGLISH
(Original instructions)
u Be careful not to touch the line trim-
ming blade.
u Keep hands and feet away from the
cutting line at all times, especially
when switching on the motor.
u Before using the appliance and after
any impact, check for signs of wear or
damage and repair as necessary.
u Never operate the appliance with
damaged guards or without guards in
place.
u Take care against injury from any de-
vice tted for trimming the lament line
length. After extending new cutter line
always return the machine to its nor-
mal operating position before switching
on.
u Always ensure that the ventilation slots
are kept clear of debris.
u Do not use the lawn trimmer (edge
trimmer), if the cords are damaged or
worn.
Vibration
The declared vibration emission values
stated in the technical data and the
declaration of conformity have been
measured in accordance with a standard
test method provided by EN 60745 and
may be used for comparing one tool with
another.
The declared vibration emission value
may also be used in a preliminary as-
sessment of exposure.
Warning! The vibration emission value
during actual use of the power tool can
differ from the declared value depending
on the ways in which the tool is used.
The vibration level may increase above
the level stated.
When assessing vibration exposure to
determine safety measures required by
2002/44/EC to protect persons regularly
using power tools in employment, an
estimation of vibration exposure should
consider, the actual conditions of use and
the way the tool is used, including tak-
ing account of all parts of the operating
cycle such as the times when the tool is
switched off and when it is running idle in
addition to the trigger time.
Additional safety instructions for
batteries and chargers
Batteries
u Never attempt to open for any reason.
u Do not expose the battery to water.
u Do not store in locations where the
temperature may exceed 40 °C.
u Charge only at ambient temperatures
between 10 °C and 40 °C.
u Charge only using the charger pro-
vided with the tool.
u When disposing of batteries, follow
the instructions given in the section
"Protecting the environment".
Chargers
u Use your BLACK+DECKER charger
only to charge the battery in the tool
with which it was supplied. Other bat-
teries could burst, causing personal
injury and damage.
u Never attempt to charge non-recharge-
able batteries.
u Have defective cords replaced immedi-
ately.
u Do not expose the charger to water.
u Do not open the charger.
u Do not probe the charger.

9
ENGLISH
(Original instructions)
$
The charger is intended for
indoor use only.
Read the instruction manual
before use.
Electrical safety
#
Your charger is double insu-
lated; therefore no earth wire is
required. Always check that the
mains voltage corresponds to the
voltage on the rating plate. Never
attempt to replace the charger
unit with a regular mains plug.
u If the supply cord is damaged, it must
be replaced by the manufacturer or an
authorised BLACK+DECKER Service
Centre in order to avoid a hazard.
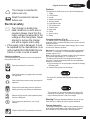
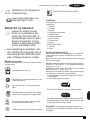
Labels on appliance
The following warning symbols are found on the appliance
along with the date code:
Read the manual prior to operation.
Wear safety glasses or goggles when operating
this appliance.
N
Wear suitable ear protectors when operating this
appliance.
Always remove the battery from the appliance
before performing any cleaning or maintenance.
K
Beware of ying objects. Keep bystanders away
from the cutting area.
R
Do not expose the appliance to rain or high
humidity.
96
Directive 2000/14/EC guaranteed sound power.
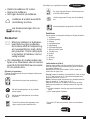
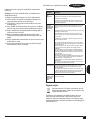
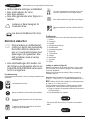
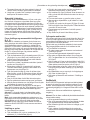
Features
This appliance includes some or all of the following features.
1. Trigger
2. Lock off button
3. Handle
4. Speed control switch
5. Auxiliary handle
6. Height adjust collar
7. Flip to edge collar
8. Trimmer head
9. Edge wheel
10. Guard
11. Spool housing
12. Battery
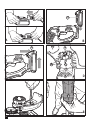
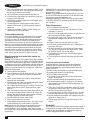
Charging the battery (Fig. A)
The battery needs to be charged before rst use and
whenever it fails to produce sufcient power on jobs that were
easily done before.
The battery may become warm while charging; this is normal
and does not indicate a problem.
Warning! Do not charge the battery at ambient temperatures
below 10 °C or above 40 °C. Recommended charging tem-
perature: approx. 24 °C.
Note: The charger will not charge a battery if the cell tempera-
ture is below approximately 10 °C or above 40 °C.
The battery should be left in the charger and the charger
will begin to charge automatically when the cell temperature
warms up or cools down.
u Plug the charger into an appropriate outlet before inserting
the battery pack.
u Insert the battery pack into the charger.
The green LED will ash indicating that the battery is being
charged.
The completion of charge is indicated by the green LED
remaining on continuously. The pack is fully charged and
may be used at this time or left in the charger
Warning! Recharge discharged batteries as soon as pos-
sible after use or battery life may be greatly diminished.
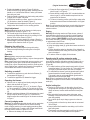
Charger diagnostics
This charger is designed to detect certain problems that can
arise with the battery packs or the power source. Problems
are indicated by one LED ashing in different patterns.

10
ENGLISH
(Original instructions)
Bad Battery
The charger can detect a weak or damaged battery. The
red LED ashes in the pattern indicated on the label. If you
see this bad battery blink pattern, do not continue to charge
the battery. Return it to a service centre or a collection site
for recycling
Hot/Cold Pack Delay
When the charger detects a battery that is excessively
hot or excessively cold, it automatically starts a Hot/Cold
Pack delay, suspending charging until the battery has
normalised. After this happens, the charger automatically
switches to the Pack Charging mode. This feature ensures
maximum battery life. The red LED ashes in the pattern
indicated on the label when the Hot/Cold pack delay is
detected.
Leaving the battery in the charger
The charger and battery pack can be left connected with the
LED glowing indenitely. The charger will keep the battery
pack fresh and fully charged.
Important charging notes
u Longest life and best performance can be obtained if
the battery pack is charged when the air temperature is
between 65°F and 75°F (18°- 24°C). DO NOT charge the
battery pack in an air temperature below +40°F (+4.5°C),
or above +105°F (+40.5°C). This is important and will
prevent serious damage to the battery pack .
u The charger and battery pack may become warm to touch
while charging. This is a normal condition, and does not
indicate a problem. To facilitate the cooling of the battery
pack after use, avoid placing the charger or battery pack
in a warm environment such as in a metal shed, or an
uninsulated trailer
u If the battery pack does not charge properly:
u Check current at receptacle by plugging in a lamp or
other appliance
u Check to see if receptacle is connected to a light switch
which turns power off when you turn out the lights.
u Move charger and battery pack to a location where the
surrounding air temperature is approximately 65°F
- 75°F (18°- 24°C).
u If charging problems persist, take the appliance, battery
pack and charger to your local service center.
u The battery pack should be recharged when it fails to
produce sufcient power on jobs which were easily done
previously. DO NOT CONTINUE to use under these
conditions. Follow the charging procedure. You may also
charge a partially used pack whenever you desire with no
adverse affect on the battery pack.
u Foreign materials of a conductive nature such as, but
not limited to, steel wool, aluminium foil, or any buildup
of metallic particles should be kept away from charger
cavities. Always unplug the charger from the power supply
when there is no battery pack in the cavity. Unplug charger
before attempting to clean.
u Do not freeze or immerse charger in water or any other
liquid.
Warning! Shock hazard. Do not allow any liquid to get inside
charger. Never attempt to open the battery pack for any
reason.
If the plastic housing of the battery pack breaks or cracks,
return to a service center for recycling.
Installing and removing the battery pack from the
appliance
Warning! Make certain the lock-off button is not engaged to
prevent switch actuation before removing or installing battery.
To install battery pack
Insert battery (12) into appliance until an audible click is
heard (Figure B). Ensure battery pack is fully seated and fully
latched into position.
To remove battery pack
Depress the battery release button (13) as shown in Figure C
and pull battery pack out of appliance.
Assembly
Warning! Before assembly, make sure that the tool is
switched off and the battery has been removed.
Assembly tools required (not supplied):
Phillips Screwdriver.
Fitting the guard
Warning! Remove the battery from the appliance before
attempting to attach the guard, edge guide or handle. Never
operate appliance without guard rmly in place. The guard
must always be on the appliance to protect the user.
u Remove the screw from the guard.
u Turn the trimmer upside down so that you are looking
down at the spool cap (14).
u Turn the guard (10) upside down and slide it fully onto the
motor housing (15). Make sure the tabs (16) on the guard
engage the ribs (17) on the motor housing as shown.
u Continue to slide the guard on until you hear it “snap” into
place. The locking tab (18) should snap into the housing
slot (19).
u Using a phillips screwdriver, insert the guard screw and
tighten securely as shown in Figure E to complete the
guard assembly.
u Once the guard is installed, remove the covering from the
line cut-off blade, located on the edge of the guard.
Warning! Never use the tool unless the guard is properly
tted.
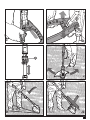
Attaching the auxiliary handle
u To attach the handle, press in on the buttons (20) on both
sides of the upper housing as shown in Figure F.

11
ENGLISH
(Original instructions)
u Position the handle as shown in Figure G (with the
BLACK+DECKER logo facing upward). Partially push the
handle on so it will hold the buttons in when you release
them with your hand.
u Push the handle completely onto the housing and position
it slightly until it “snaps” into place.
u To adjust the handle up or down, press in on the button
(21) and raise or lower the handle (Figure H).
u The handle should be adjusted so that your front arm is
straight when the trimmer is in the working position.
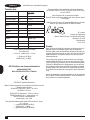
Height adjustment
Warning! Adjust the length of the trimmer to obtain proper
working positions shown in Figures J - J3.
u The overall height of the trimmer can be adjusted by
loosening the height-adjust collar (6) by rotating it in the
direction of the arrow shown in Figure I.
u Move the upper housing straight up or down. When the
desired height is achieved, tighten the collar by rotating it
opposite of the direction shown in Figure I.
Releasing the cutting line
In transit, the cutting line is taped to the spool housing.
u Remove the tape holding the cutting line to the spool
housing.
Operation
Warning! Always use proper eye protection.
Warning! Before you begin trimming, only use the appropriate
type of cutting line.
Note: inspect area to be trimmed and remove any wire, cord,
or string-like objects which could become entangled in the
rotating line or spool. Be particularly careful to avoid any wire
which might be bent outwardly into the path of the appliance,
such as barbs at the base of a chain link fence.
Switching on and off
u To switch the appliance on, push the lock-off button (2),
and squeeze the trigger (1).
u To switch the appliance off, release the trigger.
Operating the trimmer
u With the unit on, angle unit and slowly swing the trimmer
side to side as shown in Figure J.
u Maintain a cutting angle of 5° to 10° as shown in Figure
J1. Do not exceed 10° (Figure J2). Cut with the tip of the
line. To keep distance from hard surfaces use edge wheel
(9).
u Maintain a minimum distance of 60 cm between the guard
and your feet as shown in Figure J3. To acheive this
distance adjust the overall height of the trimmer as shown
in Figure I.
Convert to edging mode
Warning! The wheeled edge guide should only be used when
in the edging mode.The trimmer can be used in trimming
mode or edging mode to trim overhanging grass along lawn
edges and ower beds. For edging, the trimmer head should
be in the position shown in Figure l. If it is not:
u Remove the battery from the trimmer.
u Grasp the flip-to-edge collar (7) and push down as
shown in part 1 of Figure K.
u Rotate the ip-to-edge collar 180° counterclockwise as
shown in part 2, until the handle snaps back into the
upper half of the trimmer.
u To return to trimming position, pull the ip-to-edge collar
down and rotate the head clockwise back to its original
position.
Note: You will experience faster than normal cutting line wear
if the trimmer line is positioned directly over the sidewalk or
abrasive surface.
Edging
Warning! When being used as an Edger, stones, pieces of
metal and other objects can be thrown out at high speed by
the line. The trimmer and guard are designed to reduce the
danger. However, MAKE SURE that other persons and pets
are at least 30m away. Optimum cutting results are achieved
on edges deeper than 50 mm.
u Do not use this trimmer to create trenches.
u Using the edging wheel (9), guide the trimmer as shown in
Figure l.
u Position the edging wheel on the edge of the sidewalk or
abrasive surface so the cutting line is over the grass or dirt
area to be edged.
u To make a closer cut, slightly tilt the trimmer.
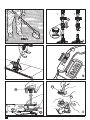
Speed control & runtime extension mode
This string trimmer gives you the choice to operate at a
more efcient speed to extend the runtime for larger jobs, or
accelerate the trimmer speed for high-performance cutting
(Figure M).
u To extend runtime, pull the speed-control switch (4) back
toward the battery (12) into position #1. This mode is best
for larger projects that require more time to complete.
u To accelerate the trimmer, push the speed-control switch
forward toward the trimmer head (8) into position #2.
This mode is best to cut through heavier growth and for
applications that need higher RPM.
Note: When in acceleration mode (#2), runtime will be de-
creased as compared to when trimmer is in extended runtime
mode (#1).
Helpful cutting tips
u Use the tip of the string to do the cutting; do not force
string head into uncut grass. Use edge guide along such
things as fences, houses and ower beds for best prac-
tices.
u Wire and picket fences cause extra string wear, even
breakage. Stone and brick walls, curbs, and wood may
wear string rapidly.
u Do not allow spool cap to drag on ground or other sur-
faces.
u In long growth cut from the top down and do not exceed
300 mm high.
u Keep trimmer tilted toward the area being cut; this is the
best cutting area.
u The trimmer cuts when passing the unit from the right to
left. This will avoid throwing debris at the operator.

12
ENGLISH
(Original instructions)
u Avoid trees and shrubs. Tree bark, wood moldings, siding,
and fence posts can easily be damaged by the string.
Cutting line / line feeding
Your trimmer uses 1.65 mm diameter, Round nylon line.
During use, the tips of the nylon lines will become frayed and
worn and the special self feeding spool will automatically feed
and trim a fresh length of line. Cutting line will wear faster and
require more feeding if the cutting or edging is done along
sidewalks or other abrasive surfaces or heavier weeds are
being cut. The advanced automatic line feeding mechanism
senses when more cutting line is needed and feeds and
trims the correct length of line whenever it’s required. Do not
bump unit on ground in attempt to feed line or for any other
purposes.
Clearing jams and tangled line (Figures N, O, P)
Warning! Remove the battery from the trimmer before making
any assembly, adjustments or changing accessories. Such
preventive safety measures reduce the risk of starting the
appliance accidentally. From time to time, especially when cut-
ting thick or stalky weeds, the line feeding hub may become
clogged with sap or other material and the line will become
jammed as a result. To clear the jam, follow the steps listed
below.
u Remove the battery from the trimmer.
u Press the release tabs (22) on the line spool cap (23),
as shown in Figure N and remove the cap by pulling it
straight off.
u Pull the nylon line spool out and clear any broken line or
cutting debris from the spool area.
u Place spool and line into spool cap with line “parked” in
slots provided as shown in Figure O1.
u Insert the line end through the appropriate hole in the
spool housing. Pull slack line through until it pulls out of
the holding slots as shown in Figure O2.
u Press the spool down gently and rotate it until you feel it
drop into place and then push to snap into place. (When
in place, the spool will turn a few degrees left and right
freely).
u Take care to keep the line from becoming trapped under
the spool.
u Align the spool cap tabs with the slots on the spool hous-
ing.
u Snap the spool cap back on as shown in Figure P by
depressing lugs and pressing into spool housing.
Note: Make sure that cover is fully positioned, listen for two
audible clicks to ensure both lugs are correctly located. Power
the appliance on. In a few seconds or less you’ll hear the
nylon line being cut automatically to the proper length.
Warning! To avoid appliance damage, if the cutting line
protrudes beyond the trimming blade, cut it off so that it just
reaches the blade.
Note: Other replacement parts (guards, spool caps, etc.) are
available through BLACK+DECKER service centers. To nd
your local service location visit www.blackanddecker.com.
Warning! The use of any accessory not recommended by
BLACK+DECKER for use with this appliance could be hazard-
ous.
Replacing the spool
u Remove battery from appliance.
u Depress the tabs (20) and remove the spool cap (21) from
the spool housing (11) (Figure N).
u Grasp empty spool with one hand and spool housing with
other hand and pull spool out.
u If lever (24) (Figure Q) in base of housing becomes
dislodged, replace in correct position before inserting new
spool into housing.
u Remove any dirt and grass from the spool and housing.
u Unfasten the end of the cutting line and guide the line into
the eyelet (O2) Figure O.
u Take the new spool and push it onto the boss (25) (Figure
Q) in the housing. Rotate the spool slightly until it is
seated. The line should protrude approximately 136mm
from the housing.
u Align the tabs on the spool cap with the slots in the hous-
ing (Figure P).
u Push the cap onto the housing until it snaps securely into
place.
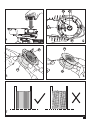
Rewinding spool from bulk line
Bulk line is also available for purchase from your local retailer.
Note: Hand wound spools from bulk line are likely to become
tangled more frequently than BLACK+DECKER factory wound
spools.
For best results, factory wound spools are recommended. To
install bulk line, follow the steps below:
u Remove battery from appliance.
u Remove the empty spool from the appliance as described
in “Replacing the spool.”
u Remove any remaining cutting line from the spool.
u Make a fold at the end of the cutting line at about 19mm
(26). Feed the cutting line into one of the line anchoring
slots (27) as shown in Figure R.
u Insert the 19mm end of the bulk line into the hole (28) in
the spool adjacent to the slot as shown in Figure S. Make
sure the line is pulled tight against the spool as shown in
Figure S.
u Wind the cutting line onto the spool in the direction of the
arrow on the spool. Make sure to wind the line on neatly
and in layers. Do not crisscross (Figure T).
u When the wound cutting line reaches the recesses (29),
cut the line (Figure S).
u Fit the spool onto the appliance as described in “Replac-
ing the spool”.
Maintenance
Your BLACK+DECKER corded/cordless appliance/tool has
been designed to operate over a long period of time with a
minimum of maintenance. Continuous satisfactory opera-
tion depends upon proper tool/appliance care and regular
cleaning.
Your charger does not require any maintenance apart from
regular cleaning.
Warning! Before performing any maintenance on corded/
cordless power tools:
u Switch off and unplug the appliance/tool.
u Or switch off and remove the battery from the appliance/
tool if the appliance/tool has a separate battery pack.
u Or run the battery down completely if it is integral and then
switch off.

13
ENGLISH
(Original instructions)
u Unplug the charger before cleaning it. Your charger does
not require any maintenance apart from regular cleaning.
u Regularly clean the ventilation slots in your tool/appliance
and charger using a soft brush or dry cloth.
u Regularly clean the motor housing using a damp cloth. Do
not use any abrasive or solvent-based cleaner.
u Regularly clean the cutting line and spool using a soft
brush or dry cloth.
u Regularly use a blunt scraper to remove grass and dirt
from the underneath of the guard.
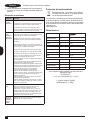
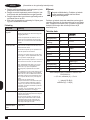
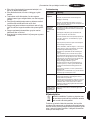
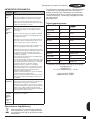
Troubleshooting
Problem
Solution
Appliance runs slowly. Remove battery from trimmer.
Check that the spool housing can rotate
freely. Carefully clean it if necessary.
Check that the cutting line does not pro-
trude more than approximately 122mm
from the spool. If it does, cut it off so that
it just reaches the line trimming blade
Automatic line feed does not
feed line.
More line is fed when the line shortens
to approximately 76mm. To determine if
the line is not feeding, let line wear past
this point.
Keep the tabs depressed and remove the
spoolcap with the spool from the spool
housing in the trimmer head.
Ensure that the line is not crisscrossed
on the spool as detailed in (Fig.T). If it
is unwind the cutting line and rewind
it neatly.
Inspect tracks at the bottom of spool for
damage. If damaged, replace spool.
Pull the cutting line until it protrudes
approximately 122mm from the spool. If
insufcient cutting line is left on the spool,
install a new spool of cutting line.
Align the tabs on the spool cap with the
cut outs in the housing.
Push the spool cap onto the housing until
it snaps securely into place.
If the cutting line protrudes beyond the
trimming blade, cut it off so that it just
reaches the blade. If the automatic line
feed still does not work or the spool is
jammed, try the following suggestions:
Carefully clean the spool and housing.
Make sure you are using correct line size
and diameter (2.00 mm) - smaller and
larger line sizes will affect the functional-
ity of the auto feed system.
Remove the spool and check if the lever
in the spool housing can move freely.
Remove the spool and unwind the cutting
line, then wind it on neatly again. Replace
the spool into the housing.
Overfeeding Ensure you are cutting with the tip of the
line 177mm from the spool. Use the edge
guide if needed to ensure proper space
is maintained.
Ensure you are not exceeding a 10º an-
gle as shown in (Fig.M). Avoid contact of
the line with hard surfaces such as brick,
concrete, wood etc. This will prevent
excessive wear and/or overfeed of line.
Cut with the tip of the line
Line unravels when cap or
spool is removed
Make sure to park the lines in holding
slots (Figure R) before removing.
Protecting the environment
Z
Separate collection. Products and batteries
marked with this symbol must not be disposed of
with normal household waste.
Products and batteries contain materials that can be recov-
ered or recycled, reducing demand for raw materials. Please
recycle electrical products and batteries according to local
provisions. Further information is available at
www.2helpU.com
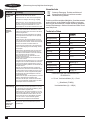
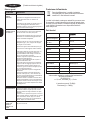
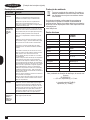
Technical data
STC1820PC
H2
Input Voltage
V
DC
18V
No-Load Speed
min
-1
5500/7400
Weight
kg
2.55Kg
Battery
BL2018
Voltage
V
DC
18V
Capacity
Ah
2.0
Type
Li-Ion
Charger
905902**(typ.1)
Input Voltage
V
DC
230
Output Voltage
V
DC
18
Current
mA
Input:
400
Hand/arm weighted vibration value according to
EN 50636-2-91:
= < 2,5 m/s
2
, uncertainty (K) = 1.5 m/s
2
.
L
PA
(sound pressure) 79 dB(A)
uncertainty (K) = 3 dB(A)

14
ENGLISH
(Original instructions)
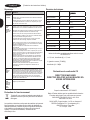
EC declaration of conformity
MACHINERY DIRECTIVE
OUTDOOR NOISE DIRECTIVE
%
STC1820PC Cordless String Trimmer
Black & Decker declares that these products described under
"technical data" are in compliance with:
2006/42/EC, EN 60335-1:2012 + A11:2014
EN 50636-2-91:2014
2000/14/EC, Lawn Trimmer, L ≤ 50 cm, Annex VI
DEKRA Certication B.V., Utrechtseweg 310,
6802 ED Arnhem, The Netherlands
Noti
ed Body ID No.: 0344
Level of acoustic power according to 2000/14/EC
(Article 12, Annex III, L ≤ 50 cm:
L
WA
(measured sound power) 93 dB(A)
uncertainty (K) = 3 dB(A)
L
WA
(guaranteed sound power) 96 dB(A)
These products also comply with Directive 2014/108/EC (until
19.04.2016), 2014/30/EU (from 20.04.2016) and 2011/65/EU.
For more information, please contact Black & Decker at the
following address or refer to the back of the manual.
The undersigned is responsible for compilation of the technical
le and makes this declaration on behalf of Black & Decker.
R. Laverick
Director of Engineering
Black & Decker Europe, 210 Bath Road, Slough,
Berkshire, SL1 3YD
United Kingdom
17/11/2015
Guarantee
Black & Decker is condent of the quality of its products
and offers consumers a 24 month guarantee from the date
of purchase. This guarantee is in addition to and in no way
prejudices your statutory rights. The guarantee is valid within
the territories of the Member States of the European Union
and the European Free Trade Area.
To claim on the guarantee, the claim must be in accordance
with Black&Decker Terms and Conditions and you will need to
submit proof of purchase to the seller or an authorised repair
agent. Terms and conditions of the Black&Decker 2 year
guarantee and the location of your nearest authorised repair
agent can be obtained on the Internet at www.2helpU.com, or
by contacting your local Black & Decker ofce at the address
indicated in this manual.
Please visit our website www.blackanddecker.co.uk to register
your new Black & Decker product and receive updates on new
products and special offers.

15
(Übersetzung der ursprünglichen Anweisungen)
DEUTSCH
Verwendungszweck
Ihr BLACK+DECKER Rasentrimmer STC1820PC wurde
für das Trimmen und Zuschneiden von Rasenkanten sowie
für das Schneiden von Gras in beengten Platzverhältnissen
entwickelt. Dieses Gerät ist nicht für den gewerblichen Einsatz
vorgesehen.
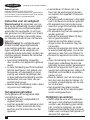
Sicherheitshinweise
Warnung! Beachten Sie beim Umgang
mit netzstrombetriebenen Geräten stets
die grundlegenden Sicherheitshinweise,
die im Folgenden beschrieben werden.
Dadurch verhindern Sie Brände, Strom-
schläge sowie Sach- und Personenschä-
den.
Warnung! Beachten Sie beim Verwen-
den des Geräts unbedingt die Sicher-
heitsregeln. Lesen Sie zu Ihrer eigenen
Sicherheit und zum Schutz in der Nähe
bendlicher Personen vor Gebrauch des
Geräts die folgende Bedienungsanlei-
tung. Heben Sie diese Anleitung zur spä-
teren Verwendung gut auf.
u Lesen Sie diese Anleitung vollständig
und aufmerksam durch, bevor Sie das
Gerät verwenden.
u Der vorgesehene Verwendungszweck
ist in dieser Anleitung beschrieben. Bei
Verwendung von Zubehör oder An-
bauteilen, die nicht in dieser Anleitung
empfohlen werden, sowie bei der Ver-
wendung des Geräts in Abweichung
von den in dieser Anleitung beschrie-
benen Verfahren besteht Verletzungs-
gefahr.
u Bewahren Sie diese Anleitung auf.
Verwendung des Geräts
Verwenden Sie das Gerät stets mit Um-
sicht.
u Tragen Sie stets eine Schutzbrille.
u Das Gerät darf nicht von Kindern und
Personen genutzt werden, die die vor-
liegenden Anleitungen nicht gelesen
haben.
u Achten Sie darauf, dass sich im Ar-
beitsbereich keine Kinder oder Tiere
aufhalten. Verhindern Sie, dass Kinder
das Gerät oder das Netzkabel berüh-
ren.
u Seien Sie besonders vorsichtig, wenn
Sie das Gerät in der Nähe von Kindern
verwenden.
u Das Gerät ist nicht für die unbeaufsich-
tigte Verwendung durch Kinder oder
gebrechliche Personen vorgesehen.
u Das Gerät ist kein Spielzeug.
u Betreiben Sie das Gerät nur bei Tages-
licht oder bei ausreichender Beleuch-
tung.
u Verwenden Sie das Gerät nur in trok-
kener Umgebung. Achten Sie darauf,
dass das Gerät nicht nass wird.
u Vermeiden Sie, das Gerät bei schlech-
tem Wetter zu verwenden, vor allem,
wenn das Risiko von Blitzen besteht.
u Tauchen Sie das Gerät nicht in Was-
ser.
u Versuchen Sie nicht, das Gehäuse zu
öffnen. Im Inneren benden sich keine
zu wartenden Teile.
u Betreiben Sie das Gerät nicht in ex-
plosionsgefährdeter Umgebung, in der
sich brennbare Flüssigkeiten, Gase
oder Staub benden.
u Ziehen Sie niemals am Kabel, wenn
Sie den Stecker aus der Steckdose
ziehen möchten. Kabel und Stecker
könnten sonst beschädigt werden.
u Das Gerät darf nur mit dem im Liefer-
umfang enthaltenen Netzteil betrieben
werden.

16
(Übersetzung der ursprünglichen Anweisungen)
DEUTSCH
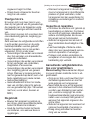
Sicherheit anderer Personen
u Lassen Sie diese Maschine niemals
von Personen mit eingeschränkten
körperlichen, sensorischen oder geisti-
gen Fähigkeiten oder mangelnder
Erfahrung und Wissen in Bezug auf
diese Anweisungen bedienen; örtliche
Bestimmungen können das Alter des
Benutzers einschränken.
u Es sollte stets ein Sicherheitsabstand
zu anderen Personen, insbesondere
Kindern, und Haustieren eingehalten
werden.
Restrisiken.
Beim Gebrauch dieses Geräts verbleiben
zusätzliche Restrisiken, die möglicher-
weise nicht in den Sicherheitswarnungen
genannt werden.
Diese Risiken bestehen beispielsweise
bei Missbrauch oder längerem Gebrauch.
Auch bei der Einhaltung der entspre-
chenden Sicherheitsvorschriften und der
Verwendung aller Sicherheitsgeräte be-
stehen weiterhin bestimmte Restrisiken.
Diese sind:
u Verletzungen, die durch das Berühren
von sich drehenden/bewegenden Tei-
len verursacht werden.
u Verletzungen, die durch das Austau-
schen von Teilen, Sägeblättern oder
Zubehör verursacht werden.
u Verletzungen, die durch längeren
Gebrauch eines Geräts verursacht
werden. Legen Sie bei längerem Ge-
brauch regelmäßige Pausen ein.
u Beeinträchtigung des Gehörs.
u Gesundheitsrisiken durch das Einat-
men von Staub beim Gebrauch des
Geräts (beispielsweise bei Holzarbei-
ten, insbesondere Eiche, Buche und
Pressspan).
Nach dem Gebrauch
u Bewahren Sie das Gerät bei Nichtge-
brauch an einem trockenen, gut be-
lüfteten Ort außerhalb der Reichweite
von Kindern auf.
u Kinder sollten keinen Zugang zu auf-
bewahrten Geräten haben.
u Wenn das Gerät in einem Fahrzeug
transportiert oder gelagert wird, be-
wahren Sie es im Kofferraum oder
einer geeigneten Ablage auf, damit es
bei plötzlichen Geschwindigkeits- oder
Richtungsänderungen nicht in Bewe-
gung geraten kann.
Inspektion und Reparaturen
u Prüfen Sie das Gerät vor der Verwen-
dung auf beschädigte oder defekte
Teile. Prüfen Sie, ob Teile beschädigt
sind oder andere Bedingungen vorlie-
gen, die die Funktion beeinträchtigen
können.
u Betreiben Sie das Gerät nicht, wenn
ein Teil beschädigt oder defekt ist.
u Lassen Sie beschädigte oder defekte
Teile in einer Vertragswerkstatt repa-
rieren oder austauschen.
u Ersetzen oder entfernen Sie keine
Teile, für die in dieser Anleitung keine
entsprechende Beschreibung enthal-
ten ist.
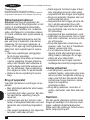
Zusätzliche Sicherheitshinweise
für Rasentrimmer
Warnung! Die Schneidevorrichtung ro-
tiert nach Abschalten des Geräts einige
Sekunden lang weiter.
u Machen Sie sich mit den Bedienele-
menten und dem ordnungsgemäßen
Gebrauch des Geräts vertraut.

17
(Übersetzung der ursprünglichen Anweisungen)
DEUTSCH
u Entfernen Sie den Akku aus dem Ge-
rät, wenn das Gerät unbeaufsichtigt
ist, bevor eine Blockierung, vor Reini-
gungs- und Wartungsarbeiten, nach-
dem ein Fremdkörper oder wenn das
Gerät startet abnormal vibriert.
u Verwenden Sie das Gerät nicht, wenn
die Kabel beschädigt oder abgenutzt
sind.
u Tragen Sie stabile Schuhe oder Stie-
fel, um Ihre Füße zu schützen.
u Tragen Sie lange Hosen, um Ihre Bei-
ne zu schützen.
u Vergewissern Sie sich vor Verwenden
des Geräts, dass die zu beschnei-
dende Fläche frei von Ästen, Steinen,
Draht und anderen Objekten ist.
u Verwenden Sie das Gerät ausschließ-
lich in aufrechter Stellung und mit
Schneidfaden in Bodennähe. Schalten
Sie das Gerät keinesfalls in einer an-
deren Stellung ein.
u Achten Sie bei Verwendung des
Geräts auf langsame Bewegungen.
Bedenken Sie, dass frisch gemähtes
Gras feucht und rutschig sein kann.
u Arbeiten Sie nie an steilen Hängen.
Schieben Sie das Gerät immer parallel
zum Hang, nie den Hang hinauf oder
hinunter.
u Schalten Sie das Gerät vor dem Über-
queren von Kieswegen und Straßen
aus.
u Berühren Sie niemals den Schneidfa-
den, während sich das Gerät in Betrieb
bendet.
u Warten Sie stets, bis der Schneidfaden
vollständig zum Stillstand gekommen
ist, bevor Sie das Gerät absetzen.
u Verwenden Sie ausschließlich geeig-
nete Schneidfäden. Verwenden Sie
keinesfalls Schneidfäden aus Metall
oder Angelschnur.
u Berühren Sie auf keinen Fall das Fa-
denschneidemesser.
u Achten Sie darauf, dass das Strom-
kabel nicht in die Nähe des Schneid-
fadens gerät. Achten Sie stets auf die
Lage des Stromkabels.
u Halten Sie Hände und Füße stets vom
Schneidfaden fern, insbesondere beim
Einschalten des Geräts.
u Überprüfen Sie das Gerät vor Ge-
brauch und nach Stößen auf Beschä-
digungen und Verschleiß, und veran-
lassen Sie notwendige Reparaturmaß-
nahmen.
u Betreiben Sie keinesfalls das Gerät,
wenn die Schutzvorrichtungen beschä-
digt oder nicht ordnungsgemäß ange-
bracht sind.
u Schützen Sie sich vor Verletzungen
beim Verwenden von Geräten zum
Verkürzen des Schneidfadens. Bringen
Sie nach Herausziehen des neuen
Schneidfadens das Gerät vor dem
Einschalten in die normale Betriebspo-
sition.
u Stellen Sie stets sicher, dass die Lüf-
tungsschlitze frei von Verschmutzun-
gen sind.
u Verwenden Sie den Rasentrimmer
(Kantentrimmer) nicht, wenn die Kabel
beschädigt oder abgenutzt sind.
u Halten Sie Verlängerungskabel von
der Schneidevorrichtung fern.
Vibration
Die in den Abschnitten „Technische
Daten“ und „EG-Konformitätserklärung“
angegebenen Werte für die Vibrations-
emission wurden mit einer Standard-
Prüfmethode nach EN 50636 ermittelt
und können zum Vergleich verschiedener
Geräte herangezogen werden.

18
(Übersetzung der ursprünglichen Anweisungen)
DEUTSCH
Außerdem kann mit Hilfe dieses Werts
die Belastung bei Verwendung des
Geräts schon im Voraus eingeschätzt
werden.
Warnung! Die bei Verwendung des
Geräts auftretende Vibrationsemission
hängt von der Art des Gerätegebrauchs
ab und kann dementsprechend von dem
angegebenen Wert abweichen. Gege-
benenfalls kann die Vibration über dem
angegebenen Wert liegen.
Für die Ermittlung der Vibrationsbela-
stung müssen die tatsächlichen Ein-
satzbedingungen und Verwendungen
des Geräts während des gesamten
Arbeitsgangs berücksichtigt werden,
einschließlich der Zeiten, wenn das Gerät
nicht verwendet oder im Leerlauf betrie-
ben wird. Diese Werte werden benötigt,
um die gemäß 2002/44/EG erforderlichen
Sicherheitsmaßnahmen zum Schutz von
Personen festlegen zu können.
Zusätzliche Sicherheitshinweise
für Akkus und Ladegeräte
Akkus
u Keinesfalls versuchen, den Akku zu
öffnen.
u Achten Sie darauf, dass der Akku nicht
mit Wasser in Berührung kommt.
u Nicht bei Temperaturen über 40 °C
lagern.
u Laden Sie den Akku nur bei Umge-
bungstemperaturen von 10 °C bis
40 °C auf.
u Verwenden Sie ausschließlich das
mitgelieferte Ladegerät.
u Beachten Sie zur Entsorgung von
Akkus oder Batterien die Hinweise im
Abschnitt „Umweltschutz“.
Ladegeräte
u Verwenden Sie das BLACK+DECKER
Ladegerät nur für den Akku des Werk-
zeugs, mit dem es geliefert wurde.
Andere Akkus können platzen und
Sachschäden oder Verletzungen ver-
ursachen.
u Versuchen Sie keinesfalls, nicht auf-
ladbare Batterien zu laden.
u Lassen Sie beschädigte Kabel sofort
austauschen.
u Achten Sie darauf, dass das Ladegerät
nicht mit Wasser in Berührung kommt.
u Versuchen Sie nicht, das Ladegerät zu
öffnen.
u Nehmen Sie am Ladegerät keine Ver-
änderungen vor.
$
Das Ladegerät darf nur im In-
nenbereich verwendet werden.
Vor Gebrauch die Anleitung
lesen.
Elektrische Sicherheit
#
Das Ladegerät ist schutzisoliert,
daher ist keine Erdleitung erfor-
derlich. Stellen Sie sicher, dass
die Netzspannung der auf dem
Typenschild des Geräts ange-
gebenen Spannung entspricht.
Ersetzen Sie das Ladegerät
keinesfalls durch ein normales
Netzkabel.
u Bei einer Beschädigung des Netzka-
bels muss dieses durch den Hersteller
oder eine BLACK+DECKER Vertrags-
werkstatt ausgetauscht werden, um
mögliche Gefahren zu vermeiden.

19
(Übersetzung der ursprünglichen Anweisungen)
DEUTSCH
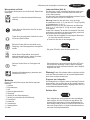
Warnsymbole am Gerät
Die folgenden Warnsymbole sind am Gerät inkl. Datumscode
angebracht:
Lesen Sie vor Inbetriebnahme die Bedienungs-
anleitung.
Tragen Sie eine Schutzbrille, wenn Sie mit dem
Gerät arbeiten.
N
Tragen Sie einen geeigneten Gehörschutz, wenn
Sie mit dem Gerät arbeiten.
Entfernen Sie den Akku aus dem Gerät, bevor
Reinigungs- oder Wartungsarbeiten durchgeführt
werden.
K
Achten Sie auf Gegenstände, die eventuell
umhergeschleudert werden. Halten Sie andere
Personen von der Schneidzone fern.
R
Schützen Sie das Gerät vor Feuchtigkeit und
Regen.
96
Garantierter Schalldruckpegel, gemessen nach
Richtlinie 2000/14/EG.
Merkmale
Dieses Gerät verfügt über einige oder alle der folgenden
Merkmale:
1. Auslöser
2. Einschaltsperre
3. Griff
4. Geschwindigkeitsschalter
5. Zusatzgriff
6. Stellring für die Höhenanpassung
7. Stellring zum Umstellen der Schnittführung
8. Trimmerkopf
9. Kantenrad
10. Schutzhaube
11. Spulengehäuse
12. Akku
Laden des Akkus (Abb. A)
Der Akku muss vor der erstmaligen Benutzung sowie immer
dann aufgeladen werden, wenn das Gerät nicht mehr mit
voller Leistung arbeitet.
Der Akku kann sich während des Auadens erwärmen. Das ist
normal und deutet nicht auf ein Problem hin.
Warnung! Laden Sie den Akku nicht, wenn die Umge-
bungstemperatur unter 10 °C oder über 40 °C liegt. Empfohle-
ne Ladetemperatur: ca. 24 °C.
Hinweis: Ein Akku, bei dem die Temperatur der Akkuzellen
unter ca. 10 °C oder über 40 °C liegt, wird vom Ladegerät
nicht geladen.
Lassen Sie in diesem Fall den Akku im Ladegerät. Das Lade-
gerät beginnt automatisch mit dem Ladevorgang, sobald sich
die Zellen erwärmt bzw. abgekühlt haben.
u Stecken Sie das Ladegerät in eine geeignete Steckdose
ein, bevor Sie den Akku einsetzen.
u Setzen Sie den Akku in das Ladegerät ein.
Die grüne LED blinkt, wenn der Akku geladen wird.
Der Abschluss der Ladung wird durch die grüne LED noch
auf kontinuierlich angezeigt. Dieses Paket ist vollständig
aufgeladen und kann zu diesem Zeitpunkt in das Ladegerät
eingesetzt oder links
Warnung! Laden Sie entladene Akkus so bald wie möglich
nach dem Gebrauch wieder auf, da sonst die Batterielebens-
dauer stark verringert werden kann.
Diagnose des Ladegeräts
Das Ladegerät ist so konzipiert, dass es bestimmte Probleme
erkennen kann, die am Akku oder der Stromquelle auftreten
können. Probleme werden dadurch angezeigt, dass eine LED
in verschiedenen Sequenzen blinkt.
Defekter Akku
Das Ladegerät kann einen schwachen oder beschädigten
Akku erkennen. Die rote LED blinkt mit dem Muster, das
auf dem Etikett angegeben ist. Wenn das Blinkmuster für
einen defekten Akku zu sehen ist, laden Sie den Akku nicht
weiter auf. Bringen Sie ihn zu einem Kundendienstzentrum
oder einer Recycling-Sammelstelle.

20
(Übersetzung der ursprünglichen Anweisungen)
DEUTSCH
Verzögerung heißer/kalter Akku
Wenn das Ladegerät erkennt, dass ein Akku übermäßig
heiß oder kalt ist, startet es automatisch eine “Verzöge-
rung heißer/kalter Akku”, bis sich der Akku normalisiert
hat. Danach schaltet das Ladegerät automatisch in den
Akku-Lademodus. Diese Funktion gewährleistet eine
maximale Lebensdauer des Akkus. Die rote LED blinkt
mit dem Muster, das auf dem Etikett angegeben ist, wenn
die”Verzögerung heißer/kalter Akku” erkannt wird.
Belassen des Akkus im Ladegerät
Sie können den Akku auch im Ladegerät belassen. In diesem
Fall leuchtet die LED-Anzeige dauerhaft. Das Ladegerät hält
den Akku in einem vollständig geladenen Zustand.
Wichtige Hinweise zum Auaden
u Die längste Lebensdauer und beste Leistung wird erhal-
ten, wenn der Akku bei einer Lufttemperatur zwischen
18°und 24°C aufgeladen wird. Laden Sie den Akku
NICHT bei einer Umgebungstemperatur unter +4,5°C oder
über +40,5°C auf. Dies ist wichtig und verhindert schwere
Schäden am Akku.
u Das Ladegerät und der Akku können sich während des
Ladevorgangs warm anfühlen. Dies ist ein normaler
Zustand und weist nicht auf ein Problem hin. Um das
Abkühlen des Akkus nach dem Gebrauch zu erleichtern,
platzieren Sie das Ladegerät und den Akku nicht in einer
warmen Umgebung, wie beispielsweise in einem Metall-
schuppen oder einem nicht isolierten Wohnwagen.
u Wenn der Akku nicht richtig aufgeladen wird:
u Prüfen Sie, ob die Steckdose unter Spannung steht,
indem Sie eine Lampe oder ein anderes Gerät an die
Steckdose anschließen.
u Überprüfen Sie, ob die Steckdose mit einem
Lichtschalter verbunden ist, der auch das Gerät
ausschaltet, wenn das Licht ausgeschaltet wird.
u Bringen Sie Ladegerät und Akku an einen Ort, wo die
Umgebungstemperatur ca. 18°-24°C beträgt.
u Wenn die Ladeprobleme bestehen bleiben, bringen Sie
Gerät, Akku und Ladegerät zu Ihrer lokalen
Vertragswerkstatt.
u Der Akku sollte aufgeladen werden, wenn das Gerät nicht
mehr die volle Leistung bringt. Betreiben Sie das Werk-
zeug in diesem Fall NICHT WEITER. Befolgen Sie die
Anweisungen bezüglich des Auadens. Sie können auch
jederzeit einen teilweise entleerten Akku auaden, ohne
dass dies nachteilige Auswirkungen auf den Akku hat.
u Leitfähige Fremdmaterialien, z.B. unter anderem Stahl-
wolle, Alufolie oder angesammelte Metallpartikel, sollten
von Hohlräumen des Ladegeräts ferngehalten werden.
Ziehen Sie den Netzstecker des Ladegerätes immer aus
der Steckdose, wenn kein Akku in der Vertiefung steckt.
Ziehen Sie den Netzstecker des Ladegerätes vor dem
Reinigen aus der Steckdose.
u Gerät keinem Spritzwasser aussetzen oder in Wasser
oder andere Flüssigkeiten tauchen.
Warnung! Stromschlaggefahr. Keine Flüssigkeiten in das
Ladegerät gelangen lassen. Keinesfalls versuchen, den Akku
zu öffnen.
Wenn das Kunststoffgehäuse des Akkus Brüche oder Risse
aufweist, bringen Sie es zum Recycling zu einer Vertrags-
werkstatt.
Anbringen und Entfernen des Akkus
Warnung! Der Verriegelungsknopf muss eingerastet sein, da-
mit keine unbeabsichtigte Bedienung des Ein-/Aus-Schalters
vor dem Anbringen bzw. Entfernen des Akkus erfolgen kann.
Anbringen des Akkus
Setzen Sie den Akku (12) in das Gerät ein, bis ein Klicken
zu hören ist (Abbildung B). Stellen Sie sicher, dass der Akku
vollständig eingesetzt und eingerastet ist.
Entfernen des Akkus
Drücken Sie den Akku-Löseknopf (13) wie in Abbildung C
gezeigt und ziehen Sie den Akku aus dem Gerät.
Montage
Warnung! Vergewissern Sie sich vor der Montage, dass das
Gerät ausgeschaltet ist und der Akku entfernt wurde.
Erforderliche Montagewerkzeuge (nicht mitgeliefert):
Kreuzschlitzschraubendreher.
Montage der Schutzvorrichtung
Warnung! Nehmen Sie den Akku aus dem Gerät, bevor
Sie die Schutzvorrichtung, die Schnittführung oder den
Griff anbringen. Betreiben Sie das Gerät niemals, wenn die
Schutzvorrichtung nicht fest angebracht wurde. Zum Schutz
des Benutzers muss die Schutzvorrichtung immer am Gerät
angebracht sein.
u Entfernen Sie die Schraube von der Schutzvorrichtung.
u Drehen Sie den Trimmer um, sodass Sie auf den Spulen-
deckel (14) schauen.
u Drehen Sie die Schutzvorrichtung (10) mit der Oberseite
nach unten und schieben Sie sie vollständig auf das
Motorgehäuse (15). Die Laschen (16) an der Schutz-
einrichtung müssen wie in der Abbildung gezeigt in die
Rippen (17) des Motorgehäuses einrasten.
u Schieben Sie die Schutzvorrichtung weiter, bis die Ver-
riegelungslasche hörbar einrastet. Die Verriegelungsla-
sche (18) muss in den Gehäuseschlitz (19) einrasten.
u Bringen Sie zum Abschluss die Schraube der Schutzvor-
richtung mit einem Kreuzschlitzschraubendreher wieder
wie in Abbildung E gezeigt an und ziehen Sie sie fest.
u Nach Anbringen der Schutzvorrichtung entfernen Sie die
Abdeckung des Trennmessers für den Schneidfaden, das
sich am Rand der Schutzvorrichtung bendet.
Warnung! Verwenden Sie das Gerät ausschließlich mit
ordnungsgemäß angebrachter Schutzvorrichtung.
Anbringen des Zusatzgriffs
u Um den Griff zu befestigen, drücken Sie die Knöpfe (20)
an beiden Seiten des oberen Gehäuses wie in Abbil-
dung F gezeigt herein.
A página está carregando...
A página está carregando...
A página está carregando...
A página está carregando...
A página está carregando...
A página está carregando...
A página está carregando...
A página está carregando...
A página está carregando...
A página está carregando...
A página está carregando...
A página está carregando...
A página está carregando...
A página está carregando...
A página está carregando...
A página está carregando...
A página está carregando...
A página está carregando...
A página está carregando...
A página está carregando...
A página está carregando...
A página está carregando...
A página está carregando...
A página está carregando...
A página está carregando...
A página está carregando...
A página está carregando...
A página está carregando...
A página está carregando...
A página está carregando...
A página está carregando...
A página está carregando...
A página está carregando...
A página está carregando...
A página está carregando...
A página está carregando...
A página está carregando...
A página está carregando...
A página está carregando...
A página está carregando...
A página está carregando...
A página está carregando...
A página está carregando...
A página está carregando...
A página está carregando...
A página está carregando...
A página está carregando...
A página está carregando...
A página está carregando...
A página está carregando...
A página está carregando...
A página está carregando...
A página está carregando...
A página está carregando...
A página está carregando...
A página está carregando...
A página está carregando...
A página está carregando...
A página está carregando...
A página está carregando...
A página está carregando...
A página está carregando...
A página está carregando...
A página está carregando...
A página está carregando...
A página está carregando...
A página está carregando...
A página está carregando...
A página está carregando...
A página está carregando...
A página está carregando...
A página está carregando...
A página está carregando...
A página está carregando...
A página está carregando...
A página está carregando...
A página está carregando...
A página está carregando...
A página está carregando...
A página está carregando...
A página está carregando...
A página está carregando...
A página está carregando...
A página está carregando...
A página está carregando...
A página está carregando...
A página está carregando...
A página está carregando...
A página está carregando...
A página está carregando...
A página está carregando...
A página está carregando...
A página está carregando...
A página está carregando...
A página está carregando...
A página está carregando...
A página está carregando...
A página está carregando...
A página está carregando...
A página está carregando...
A página está carregando...
A página está carregando...
A página está carregando...
A página está carregando...
-
 1
1
-
 2
2
-
 3
3
-
 4
4
-
 5
5
-
 6
6
-
 7
7
-
 8
8
-
 9
9
-
 10
10
-
 11
11
-
 12
12
-
 13
13
-
 14
14
-
 15
15
-
 16
16
-
 17
17
-
 18
18
-
 19
19
-
 20
20
-
 21
21
-
 22
22
-
 23
23
-
 24
24
-
 25
25
-
 26
26
-
 27
27
-
 28
28
-
 29
29
-
 30
30
-
 31
31
-
 32
32
-
 33
33
-
 34
34
-
 35
35
-
 36
36
-
 37
37
-
 38
38
-
 39
39
-
 40
40
-
 41
41
-
 42
42
-
 43
43
-
 44
44
-
 45
45
-
 46
46
-
 47
47
-
 48
48
-
 49
49
-
 50
50
-
 51
51
-
 52
52
-
 53
53
-
 54
54
-
 55
55
-
 56
56
-
 57
57
-
 58
58
-
 59
59
-
 60
60
-
 61
61
-
 62
62
-
 63
63
-
 64
64
-
 65
65
-
 66
66
-
 67
67
-
 68
68
-
 69
69
-
 70
70
-
 71
71
-
 72
72
-
 73
73
-
 74
74
-
 75
75
-
 76
76
-
 77
77
-
 78
78
-
 79
79
-
 80
80
-
 81
81
-
 82
82
-
 83
83
-
 84
84
-
 85
85
-
 86
86
-
 87
87
-
 88
88
-
 89
89
-
 90
90
-
 91
91
-
 92
92
-
 93
93
-
 94
94
-
 95
95
-
 96
96
-
 97
97
-
 98
98
-
 99
99
-
 100
100
-
 101
101
-
 102
102
-
 103
103
-
 104
104
-
 105
105
-
 106
106
-
 107
107
-
 108
108
-
 109
109
-
 110
110
-
 111
111
-
 112
112
-
 113
113
-
 114
114
-
 115
115
-
 116
116
-
 117
117
-
 118
118
-
 119
119
-
 120
120
-
 121
121
-
 122
122
-
 123
123
-
 124
124


Black & Decker STC1820PC Manual do usuário
- Categoria
- Aparadores de grama
- Tipo
- Manual do usuário
em outras línguas
- español: Black & Decker STC1820PC Manual de usuario
- français: Black & Decker STC1820PC Manuel utilisateur
- italiano: Black & Decker STC1820PC Manuale utente
- English: Black & Decker STC1820PC User manual
- Nederlands: Black & Decker STC1820PC Handleiding
- Deutsch: Black & Decker STC1820PC Benutzerhandbuch
- dansk: Black & Decker STC1820PC Brugermanual
- svenska: Black & Decker STC1820PC Användarmanual
- suomi: Black & Decker STC1820PC Ohjekirja
Artigos relacionados
-
Black & Decker ST182320 Manual do usuário
-
-
-
Black & Decker BDST182ST1 Manual do usuário
-
BLACK DECKER STC1820EPCF Manual do proprietário
-
-
-
Black & Decker STC5433B Manual do proprietário
-
-