Siemens ET475FYB1E Instruções de operação
- Tipo
- Instruções de operação


en
3
Table of contents
enI nst r uct i on manual
8 Intended use. . . . . . . . . . . . . . . . . . . . . . . . . . . . . 4
( Important safety information . . . . . . . . . . . . . . . 4
] Causes of damage . . . . . . . . . . . . . . . . . . . . . . . . 5
7 Environmental protection . . . . . . . . . . . . . . . . . . 5
Tips on energy saving . . . . . . . . . . . . . . . . . . . . . . . . . 5
Environmentally-friendly disposal . . . . . . . . . . . . . . . . . 5
* Getting to know your appliance . . . . . . . . . . . . . 6
Your new teppanyaki . . . . . . . . . . . . . . . . . . . . . . . . . . 6
Control panel . . . . . . . . . . . . . . . . . . . . . . . . . . . . . . . . 6
Controls . . . . . . . . . . . . . . . . . . . . . . . . . . . . . . . . . . . . 7
Residual heat indicator. . . . . . . . . . . . . . . . . . . . . . . . . 7
K Before using for the first time. . . . . . . . . . . . . . . 7
Cleaning the appliance . . . . . . . . . . . . . . . . . . . . . . . . 7
Heating up the teppanyaki surface. . . . . . . . . . . . . . . . 7
1 Operating the appliance . . . . . . . . . . . . . . . . . . . 8
Switching on or off . . . . . . . . . . . . . . . . . . . . . . . . . . . . 8
Setting the temperature . . . . . . . . . . . . . . . . . . . . . . . . 8
Keep warm setting . . . . . . . . . . . . . . . . . . . . . . . . . . . . 8
Cleaning level. . . . . . . . . . . . . . . . . . . . . . . . . . . . . . . . 8
Switching off the rear heating zone . . . . . . . . . . . . . . . 8
Table of cooking settings . . . . . . . . . . . . . . . . . . . . . . . 9
Tips and tricks . . . . . . . . . . . . . . . . . . . . . . . . . . . . . .10
A Childproof lock. . . . . . . . . . . . . . . . . . . . . . . . . . 10
Switching on. . . . . . . . . . . . . . . . . . . . . . . . . . . . . . . . 10
Switching off. . . . . . . . . . . . . . . . . . . . . . . . . . . . . . . . 10
Automatic childproof lock . . . . . . . . . . . . . . . . . . . . . 10
O Time-setting options . . . . . . . . . . . . . . . . . . . . . 11
Kitchen timer . . . . . . . . . . . . . . . . . . . . . . . . . . . . . . . 11
Stopwatch . . . . . . . . . . . . . . . . . . . . . . . . . . . . . . . . . 11
b Automatic safety cut-out. . . . . . . . . . . . . . . . . . 11
k Wipe protection . . . . . . . . . . . . . . . . . . . . . . . . . 12
Switching on. . . . . . . . . . . . . . . . . . . . . . . . . . . . . . . . 12
Switching off. . . . . . . . . . . . . . . . . . . . . . . . . . . . . . . . 12
[ Energy consumption indicator . . . . . . . . . . . . . 12
Q Basic settings. . . . . . . . . . . . . . . . . . . . . . . . . . . 13
Changing the basic settings. . . . . . . . . . . . . . . . . . . . 13
D Cleaning . . . . . . . . . . . . . . . . . . . . . . . . . . . . . . . 14
Do not use these cleaners . . . . . . . . . . . . . . . . . . . . . 14
Cleaning the appliance . . . . . . . . . . . . . . . . . . . . . . . 14
3 Trouble shooting . . . . . . . . . . . . . . . . . . . . . . . . 15
E-report in the displays. . . . . . . . . . . . . . . . . . . . . . . .15
4 Customer service. . . . . . . . . . . . . . . . . . . . . . . . 16
E number and FD number . . . . . . . . . . . . . . . . . . . . .16
Produktinfo
Additional information on products, accessories,
replacement parts and services can be found at
www.siemens-home.bsh-group.com and in the online
shop www.siemens-home.bsh-group.com/eshops

en Intended use
4
8Intended use
Intended use
Read these instructions carefully. Only then
will you be able to operate your appliance
safely and correctly. Retain the instruction
manual and installation instructions for future
use or for subsequent owners.
Check the appliance for damage after
unpacking it. Do not connect the appliance if it
has been damaged in transport.
Only a licensed professional may connect
appliances without plugs. Damage caused by
incorrect connection is not covered under
warranty.
This appliance is intended for private domestic
use and the household environment only. The
appliance must only be used for the
preparation of food and beverages. The
cooking process must be supervised. A short
cooking process must be supervised without
interruption. Only use the appliance in
enclosed spaces.
This appliance is intended for use up to a
maximum height of 2000 metres above sea
level.
Do not use any unsuitable safety devices or
child protection grilles. These can cause
accidents.
This appliance is not intended for operation
with an external clock timer or a remote
control.
This appliance may be used by children over
the age of 8 years old and by persons with
reduced physical, sensory or mental
capabilities or by persons with a lack of
experience or knowledge if they are
supervised or are instructed by a person
responsible for their safety how to use the
appliance safely and have understood the
associated hazards.
Children must not play with, on, or around the
appliance. Children must not clean the
appliance or carry out general maintenance
unless they are at least 15 years old and are
being supervised.
Keep children below the age of 8 years old at
a safe distance from the appliance and power
cable.
(Important safety
information
Impor t ant saf et y informat i on
This appliance must be installed according to
the installation instructions included.
:Warning. Risk of fire!
■ Hot oil and fat can ignite very quickly. Never
leave hot fat or oil unattended. Never use
water to put out burning oil or fat. Switch off
the hotplate. Extinguish flames carefully
using a lid, fire blanket or something similar.
Risk of fire!
■ The appliance becomes very hot and
flammable materials could catch fire. Never
store or use flammable objects (e.g. spray
cans, cleaning agents) under the appliance
or in its immediate vicinity. Never place
flammable items on or in the appliance.
:Warning. Risk of burns!
■ The accessible parts become very hot when
in operation. Never touch hot parts. Keep
children at a safe distance.
Risk of burns!
■ The appliance will remain hot for a long time
even after you switch it off. Do not touch the
appliance while the residual heat indicator is
flashing.
Risk of burns!
■ When the appliance cover is closed, this
leads to a build-up of heat. Only operate or
switch on the appliance when the appliance
cover is open. Do not use the appliance
cover for keeping warm or setting down.
Only close the appliance cover once the
appliance has cooled down.
Caution!
Damage to the appliance
Remove spilled liquids before opening the
appliance cover.
:Warning. Risk of electric shock and
serious injury!
■ The cable insulation on electrical appliances
may melt when touching hot parts of the
appliance. Never bring electrical appliance
cables into contact with hot parts of the
appliance.
Risk of electric shock!
■ Do not use any high-pressure cleaners or
steam cleaners, which can result in an
electric shock.
Risk of electric shock!
■ A defective appliance may cause electric
shock. Never switch on a defective
appliance. Unplug the appliance from the
mains or switch off the circuit breaker in the
fuse box. Contact the after-sales service.
Risk of electric shock!
■ Incorrect repairs are dangerous. Repairs
may only be carried out by one of our
trained after-sales engineers. If the
appliance is faulty, unplug the mains plug or
switch off the fuse in the fuse box. Contact
the after-sales service.

Causes of damage en
5
]Causes of damage
Causes of damage
The stainless steel grilling surface is sturdy and
smooth, but, like any good pan, will show signs of use
over time. These do not impair the product use. A slight
yellowing of the stainless steel grilling surface is normal.
Caution!
■ Scratches or scores on the grilling surface: Never
use a knife to cut on the grilling surface. Turn food
using the spatula provided. Do not hit the grilling
surface with the spatula.
■ If hard or sharp objects fall on the glass ceramic
panel or the glass ceramic cover, damage could
occur.
■ Glass ceramic cover: Only close the glass ceramic
cover after the appliance has cooled down
completely. Never switch the appliance on with the
cover closed. Do not use the cover as a cooker
surface or warming zone.
7Environmental protection
En v i r o n ment al pr ot ec t i on
In this section, you can find information about saving
energy and disposing of the appliance.
Tips on energy saving
■ Pre-heat the appliance only until the required
temperature is reached.
■ If you are preparing small amounts of food, use the
option to switch on the front zone only.
■ Use the edge of the frying surface to keep food that
is already cooked warm, whilst continuing to prepare
food in the middle.
■ Switch to a lower temperature in good time.
■ Select an appropriate temperature. Using a
temperature that is too high wastes energy.
■ Use the residual heat of the teppanyaki. For longer
cooking times, switch the appliance off 5-10minutes
before the end of the cooking time.
Environmentally-friendly disposal
Dispose of packaging in an environmentally-friendly
manner.
This appliance is labelled in accordance with
European Directive 2012/19/EU concerning
used electrical and electronic appliances
(waste electrical and electronic equipment -
WEEE). The guideline determines the
framework for the return and recycling of used
appliances as applicable throughout the EU.

en Getting to know your appliance
6
*Getting to know your
appliance
Get t i ng to know your appl i ance
In this section, we will explain the indicators and
controls. You will also find out about the various
functions of your appliance.
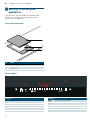
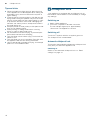
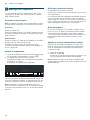
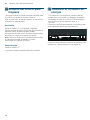
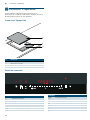
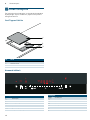
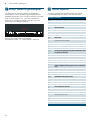
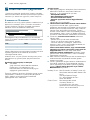
Your new teppanyaki
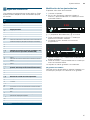
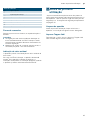
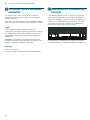
Control panel
No. Name
1 Glass ceramic cover
2 Frying surface
3 Control panel
f
S
³
«
9
|
Ñ
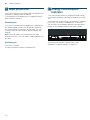
Indicators
û
Appliance is on
Ñ
Wipe protection
p
Heating indicator
•/œ
Residual heat
‚
Childproof lock
÷
Energy consumption indicator
‹‹‹
Temperature/cooking time
V
Kitchen timer
ö
Cooking time
þ
Stopwatch
Indicators

Before using for the first time en
7
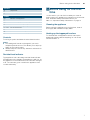
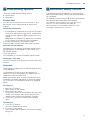
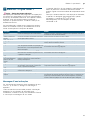
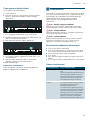
Controls
Touching a symbol activates the associated function.
Notes
■ The settings will remain unchanged if you touch
multiple symbols at once. This allows you to wipe up
spills on the control panel.
■ Always keep the controls dry. Moisture reduces their
effectiveness.
Residual heat indicator
The appliance has a two-stage residual heat indicator.
If • appears on the display, the appliance is still hot. As
the appliance cools down further, the indicator changes
to œ. The indicator goes out when the appliance has
cooled sufficiently.
KBefore using for the first
time
Be f o r e usi ng for the first time
In this section, you can find out what you must do
before using your appliance to prepare food for the first
time. Read the safety information before you
start.~ "Important safety information" on page 4
Cleaning the appliance
Before using the appliance for the first time, clean it
thoroughly with lukewarm soapy water.
Heating up the teppanyaki surface
To eliminate the new-appliance smell, heat up the
teppanyaki surface without anything on it for a few
minutes at 200°C.
°C Temperature
ù
Rear heating zone switched off
Controls
#
Switches on the appliance
„
Activates the wipe protection/childproof lock
…
Switches on the cleaning setting
f
Switches on the warming setting
0||240° Sets the temperature
ù
Switches off the rear heating zone
0
Switches on the kitchen timer/stopwatch
Indicators

en Operating the appliance
8
1Operating the appliance
Oper at i ng the appl i ance
In this section, you can find out how to set your
appliance. In the table, you can find the settings for
various dishes.
Switching on or off
Note: The appliance switches off automatically when
the temperature setting remains at 0for more than
20 seconds.
Switching on
Touch the # symbol.
An audible signal sounds. The indicator above the main
switch lights up. The appliance is ready to use.
Switching off
Touch the # symbol until the indicator above the main
switch goes out.
The appliance is switched off. The residual heat
indicator remains lit until the appliance has cooled
down sufficiently.
Setting the temperature
1. Switch on the appliance with the main switch.
‹‹‹ lights up on the temperature display.
2. Slide your finger along the control panel until the
required temperature appears on the display.
The heating indicator flashes.
Once the set temperature has been reached, an audible
signal sounds and the heating indicator goes out. Now
you can place the food onto the teppanyaki.
Note: The appliance regulates the temperature by
switching the heat on and off. The heat may switch on
and off even at the highest setting.
Keep warm setting
The Teppan Yaki must be switched on.
Select the keep warm setting f in the settings range.
Do not try to keep too much food warm at once. All
food to be kept warm should be in contact with the
grilling surface, as otherwise it will cool down. Do not
keep food warm for too long as it will dry out.
Cleaning level
At the … cleaning setting, the appliance heats to
40 °C. This enables you to leave the dirt to soak once
you have poured a little water and added a drop of
washing-up liquid on the frying surface (1hour
maximum). You can begin cleaning once the dirt has
begun to soften.
Switching off the rear heating zone
If you are preparing small amounts of food, you can
also just use the front heating zone. You can use the
rear heating zone for keeping food warm.
1. Switch on the appliance.
2. Touch the ù symbol.
The display above the symbol lights up. The rear
heating zone is switched off.
Note: The next time you switch the appliance on, this
setting will be retained. You can change this behaviour
in the basic settings.
S

Operating the appliance en
9
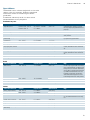
Table of cooking settings
The values in the tables are given as a guide and are
based on a pre-heated appliance. The values may vary
depending on the type and amount of food to be
cooked.
Do not place the food onto the frying surface until the
pre-heating time has elapsed.
Meat/poultry
Fish
Vegetables
--------
Roast Temperature Cooking time Amount/thickness Information
Beefsteak, medium Searing 230- 240 °C 2- 3min. on each side Approx. 2cm For example, entrecôte, fillet steak,
rump steak. The steak is medium
when meat juice escapes.
Frying 180 °C 5- 7min.
Pork neck steaks, boned 210- 220 °C 15- 20min. Approx. 2cm
Pork medallions 170- 180 °C 13- 17min. Max. 2cm Press firmly down on the frying sur-
face, turn several times.
Escalope, pork or veal,
breaded
190- 200 °C 10- 13min. 0.5- 1cm Use sufficient oil to prevent the bread-
crumb coating from drying out and
burning.
Turkey steak 210- 220 °C 8- 15min. 1- 1.5cm
Chicken breast fillet 180- 190 °C 15- 20min. 2.5- 3cm
Strips of meat/diced
meat, beef or pork, mari-
nated
200- 210 °C 8- 10min. 600- 700g Spread out the strips of meat/poultry
so they are not touching.
Strips of turkey breast 180- 190 °C 7- 9min. 600- 700g Spread out the strips of meat/poultry
so they are not touching.
Minced meat 230- 240 °C 9- 11min. Approx. 600g
Hamburgers 180- 190 °C 13- 16min. Max. 1cm
Roast Temperature Cooking time Amount/thickness Information
Fish fillet 190- 200 °C 7- 10min. Approx. 2cm Use types of fish that are suitable for
frying, e.g. salmon, tuna, monkfish,
perch and pike-perch. To prevent the
fish fillets sticking to the teppanyaki
they can be rolled in flour before fry-
ing. Start by frying them skin-side
down and turn just once if possible.
Salmon steak 170- 180 °C 18- 20min. Approx. 3cm
Tuna steak 190- 200 °C 18- 20min. Approx. 3cm
Prawns 210- 220 °C 8- 10min. 30g each
Roast Temperature Cooking time Amount/thickness Information
Carrots, julienne 190- 200 °C 6- 8min. Approx. 500g
Sliced peppers 200- 210 °C 4- 6min. Approx. 500g
Aubergines, sliced 200- 210 °C 6- 8min. Approx. 500g Salt the aubergines before frying,
leave for 30minutes and dry off.
Courgettes, sliced 190- 200 °C 6- 8min. Approx. 500g
Onion rings 190- 210 °C 5- 7min. Approx. 500g
Mushrooms, sliced 230- 240 °C 10- 12min. Approx. 500g
Potatoes, boiled, sliced 210- 220 °C 10- 12min. Approx. 500g

en Childproof lock
10
Tips and tricks
■ When the heating up light goes off, place the food
on the appliance. This also applies when raising the
temperature to fry a second item which requires a
higher setting.
■ Press the pieces of meat, poultry or fish flat onto the
frying surface using the spatula. Only turn the meat,
when it comes away from the surface easily, in order
to protect the structure of the meat. Damaging the
structure can cause juices to escape and results in
the meat drying out.
■ Keep the pieces of meat, poultry or fish apart so that
they do not draw any liquid.
■ Avoid pricking or cutting meat before or during
frying, in order to retain meat juices.
■ Do not salt the food before frying, to prevent liquid
and soluble nutrients from escaping.
■ Turn fish fillets in flour before frying. The fish will be
easier to turn.
■ Turn fish fillets only once if possible. Place fish onto
the appliance with the skin facing downward.
■ Use oil and fat that is suitable for frying, for example
plant oil or concentrated butter.
AChildproof lock
Ch i l d p r o o f lock
Your appliance is equipped with a childproof lock so
that children cannot switch it on accidentally or change
any settings.
Switching on
1. Switch off the appliance.
2. Touch the „ symbol for at least 4 seconds.
The ‚ indicator lights up for approximately
10 seconds. The appliance is locked.
Switching off
Touch the „ symbol until the 1 symbol goes out.
The childproof lock is deactivated.
Automatic childproof lock
This function automatically activates the childproof lock
every time you switch the appliance off.
Switching on
Switch on the automatic childproof lock.~ "Basic
settings" on page 13

Time-setting options en
11
OTime-setting options
Ti me- s et t i ng opt i ons
There are 2different time-setting options:
■ Kitchen timer
■ Stopwatch
Kitchen timer
You can use the kitchen timer to set a time of up to
99 minutes. It runs independently of all the other
settings.
Setting the kitchen timer
1. If the appliance is switched off, touch the 0 symbol
once; if it is switched on, touch the 0 symbol twice.
The V indicator lights up. ‹‹ min lights up on the
display.
Note: When the appliance is switched on, pressing
the 0 symbol once switches on the stopwatch.
2. Set the desired time in the settings range.
The timer starts counting down after a few seconds.
When the time has elapsed
When the time has elapsed, an audible signal sounds
and ‹‹ flashes on the display for 10seconds. The
V indicator flashes.
Touch any symbol.
The indicators go out and the audible signal ceases.
Setting the correct time
Use the 0 symbol to select the kitchen timer and reset
the time.
Stopwatch
The stopwatch displays the time that has passed since
it was activated.
The stopwatch only works when the appliance is
switched on. When the appliance is switched off, the
stopwatch is switched off as well.
Note: If the kitchen timer is selected in addition to the
stopwatch, the setting will appear on the timer display
for 10 seconds. The stopwatch will then be displayed
again.
Switching on
1. Touch the 0 symbol.
‹‹ is shown on the display.
2. Touch the control panel.
Timing starts. Seconds are displayed during the first
minute, then minutes. After 10 seconds the timer
display goes out and the temperature is shown.
3. Touch the 0 symbol to show the timer display
again.
Switching off
1. Touch the 0 symbol.
The timer display will be shown.
2. Touch the control panel.
The stopwatch will be switched off. The timer display
will go out.
bAutomatic safety cut-out
Au t o mat i c saf et y cut - out
If an appliance has been switched on for a long time
without the setting being changed, the automatic switch-
off is activated.
The appliance stops heating. ” ‰ and the residual heat
indicator •/œ flash alternately on the display.
The indicator goes out when you touch any of the
controls. You can implement new settings.
When the time limit is activated depends on the
temperature selected (2to 4 hours).

en Wipe protection
12
kWipe protection
Wipe pr ot ect i on
If you wipe over the control panel while the appliance is
switched on, settings may be altered.
To prevent this from happening, your appliance has a
wipe protection function.
Switching on
Touch the „ symbol when the appliance is switched on.
An audible signal sounds. The Ñ indicator lights up.
The control panel is locked for 30 seconds. You can
now wipe over the control panel without altering any
settings.
Note: The main switch is excluded from the wipe
protection function. You can switch off the appliance at
any time.
Switching off
Touch the „ symbol.
The wipe protection function is switched off.
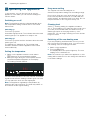
[Energy consumption
indicator
Ener gy consumpt i on indicator
You can use this function to display the total energy
consumption between switching the appliance on and
off.
Once switched off, the energy consumption in kilowatt
hours (e.g. 1.87 kWh) is displayed for 10 seconds.
The accuracy of the display depends, amongst other
things, on the voltage quality of the power supply.
The energy consumption display may not be
activated.~ "Basic settings" on page 13
f
S
³
«
9
|
Ñ

Basic settings en
13
QBasic settings
Ba s i c set t i ngs
Your appliance has various basic settings. You can
adapt these settings to suit your own needs.
Changing the basic settings
The appliance must be switched off.
1. Switch on the appliance.
2. Within the next 10seconds, touch the „ symbol for
approximately 4seconds until an audible signal
sounds.
™ and ‚ flash alternately and ‹ lights up.
3. Touch the „ symbol as many times as necessary
until the required indicator appears.
4. Set the desired value on the control panel.
5. Repeat steps 3and 4until all the required settings
have been changed.
6. Touch the „ symbol for approximately 4 seconds
until an audible signal sounds.
The settings have been saved.
Discarding the changes
To exit the basic settings, switch off the appliance with
the main switch. Changes are not saved.
Display Function
™‹
Reset the basic settings
‹
Switched off.*
‚
Switched on.
™‚
Childproof lock
‹
Automatic childproof lock switched off.*
‚
Automatic childproof lock switched on.
ƒ Manual and automatic childproof lock switched off.
™ƒ
Audible signal
‹
Confirmation signal and operation error signal switched
off (main switch signal always remains on).
‚
Only the operation error signal is switched on.
ƒ
Only the confirmation signal is switched on.
„
Confirmation signal and operation error signal switched
on.*
™„
Energy consumption display (Ask your electricity
supply company what the mains voltage is.)
‹
Consumption display switched off.*
‚
Consumption display with mains voltage at 230 V.
„
Consumption display with mains voltage at 220 V.
…
Consumption display with mains voltage at 240 V.
™†
Automatic switch-off (The higher the level selected,
the longer the period of time until the appliance
switches off.)
‹
Switch off after 2-4 hours.*
‚
Switch off after 1-2 hours.
ƒ
Switch off after 30-60 minutes.
™‡
Duration of the timer end signal
‚
10seconds.*
ƒ
30seconds.
„
1minute.
™ˆ
Activation of the heating elements
‹
When the appliance is switched on, the rear heating zone
is off.
‚
When the appliance is switched on, both heating zones
are on.*
ƒ
When the appliance is switched on, the last setting before
it was switched off is retained.
™‰
Demo mode
‹
Switched off.*
‚
Switched on. Appliance can be operated but does not
heat up.
*Basic setting

en Cleaning
14
DCleaning
Cl eani ng
With good care and cleaning, your appliance will retain
its appearance and remain fully functioning for a long
time to come. We will explain here how you should
correctly care for and clean your appliance.
Suitable maintenance and cleaning products can be
purchased from the after-sales service or in our e-Shop.
:Warning – Risk of electric shock!
Do not use any high-pressure cleaners or steam
cleaners, which can result in an electric shock.
:Warning – Risk of burns!
The appliance becomes hot during operation. Allow the
appliance to cool down before cleaning.
:Warning – Risk of burns!
When you add water or ice cubes to the hot grilling
surface, it will spit and steam will form. Do not bend
over the appliance. Keep a safe distance away.
Do not use these cleaners
■ Scouring or chemically aggressive cleaners
■ Don't allow acidic cleaners (e.g. vinegar, citric acid,
etc.) to get on the frame or panel.
■ Cleaners containing chlorine or with a high content
of alcohol
■ Oven cleaner
■ Hard and scratchy sponges, brushes or scouring
pads
■ Thoroughly wash out new sponge cloths before
using them.
Cleaning the appliance
Clean the appliance after each use once it has cooled
down. Burnt-on residues can only be removed with
difficulty.
Remove large clumps of residue using a spatula.
Ice cubes are better suited to cleaning the hot
appliance than water as they cause less splashing of
hot water and less steam.
Carefully remove cleaner residues before next using the
appliance.
Cleaning the appliance when it is hot
1. Switch off the appliance. Leave the appliance to cool
down for at least 15 minutes.
2. Pour ice cubes or water onto the frying surface. Add
a few drops of washing-up liquid. Leave the dirt to
soak.
3. Do not start cleaning until the residual heat indicator
has changed from • to œ.
Cleaning the appliance once it has cooled down
1. Pour a little water and add a drop of washing-up
liquid on the frying surface so that it is just covered.
2. Switch on the appliance. Set the cleaning setting.
Leave the dirt to soak (max. 1hour).
3. Begin cleaning once the dirt has begun to soften.
Cleaning between uses
1. Switch off the appliance.
2. Use a spatula to push 4– 5ice cubes over the hot
frying surface.
3. Use a spatula to remove dirt which has begun to
soften.
4. Switch the appliance on again. Wait until the
appliance has reached the set temperature again
before placing food on the frying surface.
Appliance part/sur-
face
Recommended cleaning
Frying surface Use hot water and washing-up liquid to
remove greasy residues.
Depending on what has been cooked, whit-
ish stains may remain on the frying surface.
Remove these with lemon juice or vinegar.
Then thoroughly wipe the frying surface with
a damp cloth. Lemon juice and vinegar must
not be allowed to come into contact with the
control panel.
Frying surface, burnt-on
dirt
For heavy soiling, use our stainless-steel
cleaner (order no. 00311499). This gives
dull stainless steel its shine back.
Apply our grill cleaner gel (order no.
00463582) to stubborn dirt once the appli-
ance has cooled down and let it work for at
least 2 hours, or overnight for heavy soiling.
Then rinse off thoroughly and dry. Follow
the instructions on the cleaner's packaging.
Stainless steel frame Clean using a soft, damp cloth and some
washing-up liquid.
For heavy soiling, use our stainless-steel
cleaner (order no. 00311499). This gives
dull stainless steel its shine back.
Control panel Clean using a soft, damp cloth and some
washing-up liquid; the cloth must not be too
wet. Dry with a soft cloth.
Appliance part/sur-
face
Recommended cleaning

Trouble shooting en
15
3Trouble shooting
Tr oubl e s hoot i ng
:Warning – Risk of electric shock!
Incorrect repairs are dangerous. Repairs may only be
carried out by one of our trained after-sales engineers. If
the appliance is faulty, unplug the mains plug or switch
off the fuse in the fuse box. Contact the after-sales
service.
Faults often have simple explanations. Please read the
information in the table before calling the after-sales
service.
The electronics of your appliance are underneath the
control panel. For various reasons, the temperature in
this area may rise sharply.
So that the electronics do not overheat, the appliance is
automatically switched off as required. ”ƒ or ”… is
displayed alternately with the residual heat indicator •
or œ.
E-report in the displays
When an error message with "E" appears in the display,
e.g. E0111, switch the appliance off and on again.
If it was a one-off error, the display goes out. If the error
message appears again, call the after-sales service and
quote the exact error message.
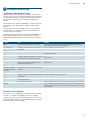
Display Error Remedy
None The power supply has been disconnected. Check the household fuse for the appliance. Check whether there is a
power cut by trying other electronic appliances.
All displays flash The touch controls are wet or an object is rest-
ing on them.
Dry the controls or remove the object.
”‹ / ”‡/ ”ˆ
Appliance fault Switch the appliance off and back on again. If this is displayed again, call
the after-sales service.
”ƒ
The appliance has been grilling for a long time
at a high setting. To protect the electronics, the
front heating zone has been switched off.
Wait until the electronics have cooled down sufficiently. Touch any control.
”ƒ goes out.
”… Despite the switch-off by ”ƒ, the electronics
have become hot again. The appliance has
therefore been switched off.
Wait until the electronics have cooled down sufficiently. Touch any control.
”… goes out.
Ӡ and the tempera-
ture flash alternately.
An audible signal can
be heard.
Warning: There is a hot object near the control
panel. There is a risk that the electronics will
overheat.
Remove the object. The fault indicator goes out.
Ӡ and audible signal
There is a hot object near the control panel. To
protect the electronics, the appliance has been
switched off.
Remove the object. Wait until the electronics have cooled down suffi-
ciently. Touch any control. Ӡ goes out.
”‰
The appliance was in operation for too long and
has switched itself off.
Switch the appliance on again.
š“ Appliance does not
heat up
Demo mode is switched on Switch off demo mode: Disconnect the appliance from the power supply
for 30 seconds (switch off the household fuse or the circuit breaker in the
fuse box). Touch any touch control in the next 3 minutes. Demo mode will
be switched off.

en Customer service
16
4Customer service
Cu s t o mer ser vi ce
Our after-sales service is there for you if your appliance
needs to be repaired. We will always find an
appropriate solution, also in order to avoid after-sales
personnel having to make unnecessary visits.
E number and FD number
When calling us, please quote the product number (E
no.) and the production number (FD no.) so that we can
provide you with the correct advice. The rating plate
containing these numbers is found on the underside of
the appliance.
To save time, you can make a note of the number of
your appliance and the telephone number of the after-
sales service in the space below, should it be required.
Please note that a visit from an after-sales service
engineer is not free of charge in the event of misuse of
the appliance, even during the warranty period.
Please find the contact data of all countries in the
enclosed customer service list.
To book an engineer visit and product advice
Rely on the professionalism of the manufacturer. You
can therefore be sure that the repair is carried out by
trained service technicians who carry original spare
parts for your appliances.
E-Nr Number FD Number
After-sales service O
GB 03448928999
Calls charged at local or mobile rate.
IE 014502655
0.03 € per minute at peak. Off peak 0.0088 €
per minute.
=1U)'(1U
7\SH

Customer service es
17
Índice
esI ns t r uc ci ones de us o
8 Uso correcto del aparato. . . . . . . . . . . . . . . . . . 18
( Indicaciones de seguridad importantes . . . . . 18
] Causas de los daños . . . . . . . . . . . . . . . . . . . . . 19
7 Protección del medio ambiente . . . . . . . . . . . . 19
Consejos para ahorrar energía . . . . . . . . . . . . . . . . . 19
Eliminación de residuos respetuosa con el medio
ambiente . . . . . . . . . . . . . . . . . . . . . . . . . . . . . . . . . . 19
* Presentación del aparato . . . . . . . . . . . . . . . . . 20
Su nuevo Teppan Yaki . . . . . . . . . . . . . . . . . . . . . . . . 20
Panel de mando. . . . . . . . . . . . . . . . . . . . . . . . . . . . . 20
Sensores de selección. . . . . . . . . . . . . . . . . . . . . . . . 21
Indicador de calor residual . . . . . . . . . . . . . . . . . . . . 21
K Antes del primer uso . . . . . . . . . . . . . . . . . . . . . 21
Limpiar el aparato . . . . . . . . . . . . . . . . . . . . . . . . . . . 21
Calentar el Teppan Yaki. . . . . . . . . . . . . . . . . . . . . . . 21
1 Manejo del aparato. . . . . . . . . . . . . . . . . . . . . . . 22
Conexión o desconexión . . . . . . . . . . . . . . . . . . . . . . 22
Ajustar la temperatura . . . . . . . . . . . . . . . . . . . . . . . . 22
Nivel para conservar caliente. . . . . . . . . . . . . . . . . . . 22
Nivel de limpieza . . . . . . . . . . . . . . . . . . . . . . . . . . . .22
Apagar la zona de calentamiento trasera . . . . . . . . . 22
Tabla de ajustes. . . . . . . . . . . . . . . . . . . . . . . . . . . . . 23
Consejos y trucos . . . . . . . . . . . . . . . . . . . . . . . . . . . 24
A Seguro para niños . . . . . . . . . . . . . . . . . . . . . . . 24
Activación. . . . . . . . . . . . . . . . . . . . . . . . . . . . . . . . . . 24
Desactivación. . . . . . . . . . . . . . . . . . . . . . . . . . . . . . . 24
Seguro automático para niños . . . . . . . . . . . . . . . . . . 24
O Funciones de programación del tiempo . . . . . 25
Reloj avisador . . . . . . . . . . . . . . . . . . . . . . . . . . . . . . 25
Cronómetro . . . . . . . . . . . . . . . . . . . . . . . . . . . . . . . . 25
b Desconexión automática de seguridad . . . . . . 25
k Bloqueo del control para limpieza . . . . . . . . . . 26
Activación. . . . . . . . . . . . . . . . . . . . . . . . . . . . . . . . . . 26
Desactivación. . . . . . . . . . . . . . . . . . . . . . . . . . . . . . . 26
[ Visualizar el consumo de energía . . . . . . . . . . 26
Q Ajustes básicos . . . . . . . . . . . . . . . . . . . . . . . . . 27
Modificación de los ajustes básicos . . . . . . . . . . . . . 27
D Limpieza . . . . . . . . . . . . . . . . . . . . . . . . . . . . . . . 28
No use los medios de limpieza siguientes. . . . . . . . . 28
Limpiar el aparato . . . . . . . . . . . . . . . . . . . . . . . . . . . 28
3 ¿Qué hacer en caso de avería? . . . . . . . . . . . . 29
Mensaje E en los indicadores . . . . . . . . . . . . . . . . . .29
4 Servicio de Asistencia Técnica. . . . . . . . . . . . . 30
Número de producto (E) y número de
fabricación (FD) . . . . . . . . . . . . . . . . . . . . . . . . . . . . .30
Produktinfo
Encontrará más información sobre productos,
accesorios, piezas de repuesto y servicios en internet:
www.siemens-home.bsh-group.com y también en la
tienda online: www.siemens-home.bsh-group.com/
eshops

es Uso correcto del aparato
18
8Uso correcto del aparato
Us o cor r ect o del ap ar at o
Leer con atención las siguientes
instrucciones. Solo así se puede manejar el
aparato de forma correcta y segura.
Conservar las instrucciones de uso y montaje
para utilizarlas más adelante o para posibles
futuros compradores.
Comprobar el aparato al sacarlo de su
embalaje. El aparato no debe conectarse en
caso de haber sufrido daños durante el
transporte.
Los aparatos sin enchufe deben ser
conectados exclusivamente por técnicos
especialistas autorizados. Los daños
provocados por una conexión incorrecta no
están cubiertos por la garantía.
Este aparato ha sido diseñado exclusivamente
para uso doméstico. Utilizar el aparato
únicamente para preparar alimentos y
bebidas. Debe vigilarse el proceso de
cocción. Si el proceso de cocción es breve,
debe vigilarse ininterrumpidamente. El aparato
solo debe utilizarse en espacios interiores.
Este aparato está previsto para ser utilizado a
una altura máxima de 2.000 metros sobre el
nivel del mar.
No usar dispositivos de protección o
protecciones para niños inapropiados.
Pueden provocar accidentes.
Este aparato no está previsto para el
funcionamiento con un reloj temporizador
externo o un mando a distancia.
Este aparato puede ser utilizado por niños a
partir de 8 años y por personas con
limitaciones físicas, sensoriales o psíquicas, o
que carezcan de experiencia y conocimientos,
siempre y cuando sea bajo la supervisión de
una persona responsable de su seguridad o
que le haya instruido en el uso correcto del
aparato siendo consciente de los daños que
se pudieran ocasionar.
No dejar que los niños jueguen con el
aparato. La limpieza y el mantenimiento
rutinario no deben encomendarse a los niños
a menos que sean mayores de 15 años y lo
hagan bajo supervisión.
Mantener a los niños menores de 8 años
alejados del aparato y del cable de conexión.
(Indicaciones de seguridad
importantes
I ndi cac i ones de s egur i dad impor t ant es
Este aparato tiene que ser instalado según
las instrucciones de montaje incluidas.
:Advertencia – ¡Peligro de incendio!
■ El aceite caliente y la grasa se inflaman con
facilidad. Estar siempre pendiente del
aceite caliente y de la grasa. No apagar
nunca con agua un fuego. Apagar la zona
de cocción. Sofocar con cuidado las llamas
con una tapa, una tapa extintora u otro
medio similar.
¡Peligro de incendio!
■ El aparato se calienta mucho, los
materiales inflamables se pueden incendiar.
No almacenar ni usar objetos inflamables
(p. ej. aerosoles o productos de limpieza)
debajo o demasiado cerca del aparato. No
colocar objetos inflamables sobre el
aparato o dentro de él.
:Advertencia – ¡Peligro de quemaduras!
■ Las partes accesibles se calientan durante
el funcionamiento. No tocar nunca las
partes calientes. No dejar que los niños se
acerquen.
¡Riesgo de sufrir quemaduras!
■ El aparato se mantiene caliente durante un
largo periodo incluso después de
desconectar el aparato. No tocar el aparato
mientras el indicador de calor residual
parpadee.
¡Riesgo de sufrir quemaduras !
■ Al tener la tapa del aparato cerrada se
produce una acumulación de calor.
Conectar o encender el aparato sólo con la
tapa abierta. No deberá usarse para
conservar alimentos calientes o colocar
cosas encima. No cerrar la tapa del aparato
hasta que este se haya enfriado.
¡Atención!
Daños en el aparato
Líquidos derramados antes de abrir la tapa
del aparato.

Causas de los daños es
19
:Advertencia – ¡Peligro de descarga
eléctrica!
■ El aislamiento del cable de un aparato
eléctrico puede derretirse al entrar en
contacto con componentes calientes. No
dejar que el cable de conexión de un
aparato eléctrico entre en contacto con los
componentes calientes.
¡Peligro de descarga eléctrica!
■ No utilizar ni limpiadores de alta presión ni
por chorro de vapor. La humedad interior
puede provocar una descarga eléctrica.
¡Peligro de descarga eléctrica!
■ Un aparato defectuoso puede ocasionar
una descarga eléctrica. No conectar nunca
un aparato defectuoso. Desenchufar el
aparato de la red o desconectar el
interruptor automático del cuadro eléctrico.
Avisar al Servicio de Asistencia Técnica.
¡Peligro de descarga eléctrica!
■ Las reparaciones inadecuadas son
peligrosas.Las reparaciones solo pueden
ser efectuadas por personal del Servicio de
Asistencia Técnica debidamente
instruido.Si el aparato está defectuoso,
extraer el enchufe o desconectar el fusible
en la caja de fusibles. Avisar al Servicio de
Asistencia Técnica.
]Causas de los daños
Causas de los daños
La superficie de asado de acero inoxidable es robusta
y lisa pero con el tiempo acusa la huella del uso, como
una buena sartén. Sin embargo, esto no afecta al
funcionamiento de uso. Es normal que se produzca una
ligera decoloración amarillenta en la superficie de
asado de acero inoxidable.
¡Atención!
■ Ralladuras o muescas sobre la superficie de
asado: No cortar nunca con cuchillo sobre la
superficie de asado. Para dar la vuelta a los platos,
utilizar la espátula suministrada. No golpear la
superficie de asado con la espátula.
■ La pantalla o la tapa vitrocerámicas pueden resultar
dañadas si se dejan caer objetos duros o
puntiagudos sobre ellas.
■ Tapa vitrocerámica: Colocar la tapa vitrocerámica
una vez que el aparato se ha enfriado
completamente. No encender nunca el aparato con
la tapa puesta. No usar nunca la tapa como
superficie de apoyo o zona calientaplatos.
7Protección del medio
ambiente
Pr ot ec ci ón del medi o ambi ent e
Este capítulo ofrece información sobre ahorro de
energía y la eliminación del aparato.
Consejos para ahorrar energía
■ Calentar el aparato solo hasta alcanzar la
temperatura deseada.
■ Para cocinar pequeñas cantidades se puede
encender únicamente la zona de cocción delantera.
■ Utilizar la zona de los bordes de la superficie de
asado para mantener calientes los alimentos
cocidos, mientras se sigue cocinando en el centro.
■ Seleccionar la temperatura más baja que mantenga
la cocción.
■ Seleccionar la temperatura adecuada. Con una
temperatura demasiado elevada, se malgasta
energía.
■ Utilizar el calor residual del Teppan Yaki. Apagar el
aparato 5-10minutos antes del final de la cocción
cuando se hayan programado tiempos de cocción
prolongados.
Eliminación de residuos respetuosa con el
medio ambiente
Eliminar el embalaje de forma ecológica.
Este aparato está marcado con el símbolo de
cumplimiento con la Directiva Europea 2012/
19/UE relativa a los aparatos eléctricos y
electrónicos usados (Residuos de aparatos
eléctricos y electrónicos RAEE).
La directiva proporciona el marco general
válido en todo el ámbito de la Unión Europea
para la retirada y la reutilización de los residuos
de los aparatos eléctricos y electrónicos.

es Presentación del aparato
20
* Presentación del aparato
Pr esent ac i ón del apar at o
En este capítulo se describen los mensajes y mandos.
También se explican las diferentes funciones del
aparato.
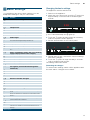
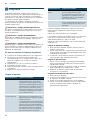
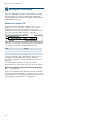
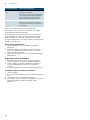
Su nuevo Teppan Yaki
Panel de mando
N.º Denominación
1 Tapa vitrocerámica
2 Superficie de asado
3 Panel de mando
f
S
³
«
9
|
Ñ
Mostrar
û
El aparato está conectado
Ñ
Protección para limpieza
p
Indicador de calentamiento
•/œ
Calor residual
‚
Seguro para niños
÷
Indicador de consumo de energía
‹‹‹
Temperatura/duración
V
Reloj avisador
ö
Duración
þ
Cronómetro
°C Temperatura
ù
Zona de calentamiento trasera apagada
Mostrar
A página está carregando...
A página está carregando...
A página está carregando...
A página está carregando...
A página está carregando...
A página está carregando...
A página está carregando...
A página está carregando...
A página está carregando...
A página está carregando...
A página está carregando...
A página está carregando...
A página está carregando...
A página está carregando...
A página está carregando...
A página está carregando...
A página está carregando...
A página está carregando...
A página está carregando...
A página está carregando...
A página está carregando...
A página está carregando...
A página está carregando...
A página está carregando...
A página está carregando...
A página está carregando...
A página está carregando...
A página está carregando...
A página está carregando...
A página está carregando...
A página está carregando...
A página está carregando...
A página está carregando...
A página está carregando...
A página está carregando...
A página está carregando...
A página está carregando...
A página está carregando...
A página está carregando...
A página está carregando...
-
 1
1
-
 2
2
-
 3
3
-
 4
4
-
 5
5
-
 6
6
-
 7
7
-
 8
8
-
 9
9
-
 10
10
-
 11
11
-
 12
12
-
 13
13
-
 14
14
-
 15
15
-
 16
16
-
 17
17
-
 18
18
-
 19
19
-
 20
20
-
 21
21
-
 22
22
-
 23
23
-
 24
24
-
 25
25
-
 26
26
-
 27
27
-
 28
28
-
 29
29
-
 30
30
-
 31
31
-
 32
32
-
 33
33
-
 34
34
-
 35
35
-
 36
36
-
 37
37
-
 38
38
-
 39
39
-
 40
40
-
 41
41
-
 42
42
-
 43
43
-
 44
44
-
 45
45
-
 46
46
-
 47
47
-
 48
48
-
 49
49
-
 50
50
-
 51
51
-
 52
52
-
 53
53
-
 54
54
-
 55
55
-
 56
56
-
 57
57
-
 58
58
-
 59
59
-
 60
60


Siemens ET475FYB1E Instruções de operação
- Tipo
- Instruções de operação
em outras línguas
Outros documentos
-
Bosch Vario Teppan Yaki Instruções de operação
-
-
BALAY 3EB640LQ/01 Manual do usuário
-
-
-
-
Bosch ELECTRIC COOKTOP Instruções de operação
-
-
-