Dell 3400MP Manual do usuário
- Categoria
- Projetores de dados
- Tipo
- Manual do usuário
Este manual também é adequado para

Model XXX
www.dell.com | support.dell.com
Dell™ 3400MP Projector
Owner’s Manual

Notes, Notices, and Cautions
NOTE: A NOTE indicates important information that helps you make better use
of your projector.
NOTICE: A NOTICE indicates either potential damage to hardware or loss of
data and tells you how to avoid the problem.
CAUTION: A CAUTION indicates a potential for property damage, personal
injury, or death.
____________________
Information in this document is subject to change without notice.
© 2005 Dell Inc. All rights reserved.
Reproduction in any manner whatsoever without the written permission of Dell Inc. is strictly
forbidden.
Trademarks used in this text: Dell , the DELL logo, Dimension, OptiPlex, Dell Precision, Lati-
tude, Inspiron, DellNet, PowerApp, PowerEdge, PowerConnect, and PowerVault are trade-
marks of Dell Inc.; DLP and Texas Instruments are trademarks of Texas Instruments
Corporation; Microsoft and Windows are registered trademarks of Microsoft Corporation;
Macintosh is a registered trademark of Apple Computer, Inc.
Other trademarks and trade names may be used in this document to refer to either the entities
claiming the marks and names or their products. Dell Inc. disclaims any proprietary interest in
trademarks and trade names other than its own.
Restrictions and Disclaimers
The information contained in this document, including all instructions, cautions, and regulatory
approvals and certifications, is based upon statements provided to Dell by the manufacturer and
has not been independently verified or tested by Dell. Dell disclaims all liability in connection
with any deficiencies in such information.
All statements or claims regarding the properties, capabilities, speeds, or qualifications of the
part referenced in this document are made by the manufacturer and not by Dell. Dell specifi-
cally disclaims any knowledge of the accuracy, completeness, or substantiation for any such
statements.
____________________
May 2005 Rev. A00

Contents 3
Contents
1 Your Dell Projector
About Your Projector . . . . . . . . . . . . . . . 6
2 Connecting Your Projector
Connecting to a Computer . . . . . . . . . . . . . . 8
Connecting to a DVD Player
. . . . . . . . . . . . . . 8
Connecting a DVD Player with an S-video Cable
. . 8
Connecting a DVD Player with a Composite Cable
. 9
Connecting a DVD Player with a Component Cable
9
3 Using Your Projector
Turning Your Projector On . . . . . . . . . . . . . . . 11
Turning Your Projector Off
. . . . . . . . . . . . . . 11
Adjusting the Projected Image . . . . . . . . . . . . 12
Raising the Projector Height
. . . . . . . . . . . 12
Lowering the Projector Height . . . . . . . . . . 12
Adjusting the Projector Zoom and Focus . . . . . . . . 13
Adjusting Projection Image Size
. . . . . . . . . . . 14
Using the Control Panel
. . . . . . . . . . . . . . . . 15

4 Contents
Using the Remote Control . . . . . . . . . . . . . . 16
Using the On-Screen Display
. . . . . . . . . . . . 18
Image Settings
. . . . . . . . . . . . . . . . . 18
Audio Menu
. . . . . . . . . . . . . . . . . . 20
Management Menu
. . . . . . . . . . . . . . . 20
Language Menu . . . . . . . . . . . . . . . . 21
Factory Reset Menu
. . . . . . . . . . . . . . 21
Computer Source Menu
. . . . . . . . . . . . . 22
Video Source Menu . . . . . . . . . . . . . . . 22
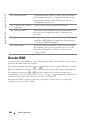
4 Troubleshooting Your Projector
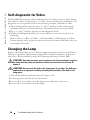
Self-diagnostic for Video . . . . . . . . . . . . . . 26
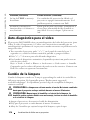
Changing the Lamp
. . . . . . . . . . . . . . . . . 26
5 Specifications
6 Contacting Dell
7 Appendix: Regulatory Notices
FCC Notices (U.S. Only) . . . . . . . . . . . . . 61
NOM Information (Mexico Only) . . . . . . . . . 62
8 Glossary
9 Index

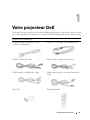
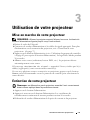
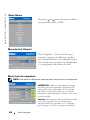
Your Dell Projector 5
1
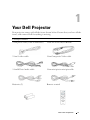
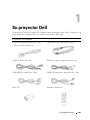
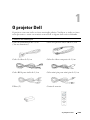
Your Dell Projector
Your projector comes with all the items shown below. Ensure that you have all the
items, and contact Dell if anything is missing.
Package Contents
1.8m power cord (3.0m in Americas) 1.8m M1 to D-sub/USB cable
2.0m S-video cable 1.8m Composite Video cable
1.8m RCA to Audio cable 1.8m mini pin to mini pin cable
Batteries (2) Remote control

www.dell.com | support.dell.com
6 Your Dell Projector
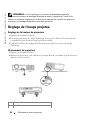
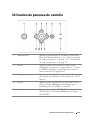
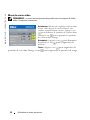
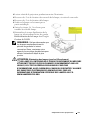
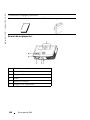
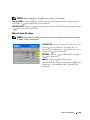
About Your Projector
Documentation Carrying case
1 Control panel
2 Elevator button
3 Remote control receiver
4 Lens
5 Focus ring
6 Zoom tab
Package Contents
(continued)

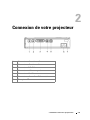
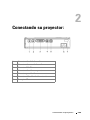
Connecting Your Projector 7
2
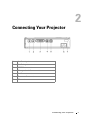
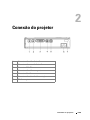
Connecting Your Projector
1 Audio output connector
2 Audio input connector
3 M1-DA connector
4 Composite video connector
5 S-video connector
6 Power cord connector
7 IR receiver

www.dell.com | support.dell.com
8 Connecting Your Projector
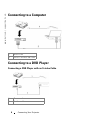
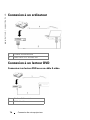
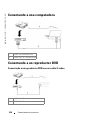
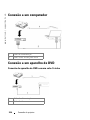
Connecting to a Computer
Connecting to a DVD Player
Connecting a DVD Player with an S-video Cable
1 Power cord
2 M1A to D-sub/USB cable
1 Power cord
2 S-video cable

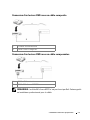
Connecting Your Projector 9
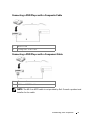
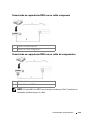
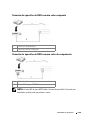
Connecting a DVD Player with a Composite Cable
Connecting a DVD Player with a Component Cable
NOTE: The M1-A to HDTV cable is not provided by Dell. Consult a professional
installer for the cable.
1 Power cord
2 Composite video cable
1Power cord
2 M1-A to HDTV cable

www.dell.com | support.dell.com
10 Connecting Your Projector

Using Your Projector 11
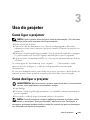
3
Using Your Projector
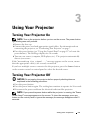
Turning Your Projector On
NOTE: Turn on the projector before you turn on the source. The power button
light blinks green until pressed.
1
Remove the lens cap.
2
Connect the power cord and appropriate signal cables. For information about
connecting the projector, see "Connecting Your Projector" on page 7.
3
Press the power button (see "Using the Control Panel" on page 15" to locate the
power button). The Dell logo displays for 30 seconds.
4
Turn on your source (computer, DVD player, etc.). The projector automatically
detects your source.
If the "Searching for signal..." message appears on the screen, ensure
that the appropriate cable(s) are securely connected.
If you have multiple sources connected to the projector, press the Source button
on the remote control or control panel to select the desired source.
Turning Your Projector Off
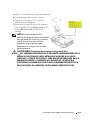
NOTICE: Do not unplug the projector before properly shutting down as
explained in the following procedure.
1
Press the power button.
2
Press the power button again. The cooling fans continue to operate for 90 seconds.
3
Disconnect the power cord from the electrical outlet and the projector.
NOTE: If you press the power button while the projector is running, the "Power
Off the Lamp?" message appears on the screen. To clear the message, press any
button on the control panel or ignore the message; the message disappears after 5
seconds.

www.dell.com | support.dell.com
12 Using Your Projector
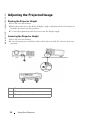
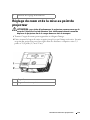
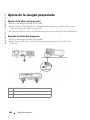
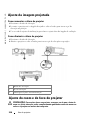
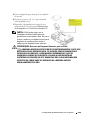
Adjusting the Projected Image
Raising the Projector Height
1
Press the elevator button.
2
Raise the projector to the desired display angle, and then release the button to
lock the elevator foot into position.
3
Use the tilt adjustment wheel to fine-tune the display angle.
Lowering the Projector Height
1
Press the elevator button.
2
Lower the projector, and then release the button to lock the elevator foot into
position.
1 Elevator button
2 Elevator foot
3 Tilt adjustment wheel

Using Your Projector 13
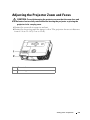
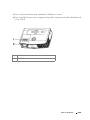
Adjusting the Projector Zoom and Focus
CAUTION: To avoid damaging the projector, ensure that the zoom lens and
elevator foot are fully retracted before moving the projector or placing the
projector in its carrying case.
1
Rotate the zoom tab to zoom in and out.
2
Rotate the focus ring until the image is clear. The projector focuses at distances
from 4.9 ft to 39.4 ft (1.5 m to 12 m).
1 Zoom tab
2 Focus ring

www.dell.com | support.dell.com
14 Using Your Projector
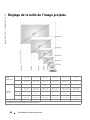
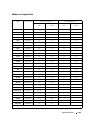
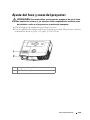
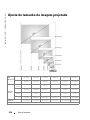
Adjusting Projection Image Size
Screen
(Diagonal)
Max. 36.9"
(93.8cm)
84.0"
(213.4cm)
135.0"
(342.9cm)
189.8"
(482.0cm)
241.5"
(613.4cm)
295.5"
(750.6cm)
Min. 31.7"
(80.5cm)
72.1"
(183.1cm)
115.9"
(294.3cm)
162.9"
(413.7cm)
207.3"
(526.5cm)
253.6"
(644.3cm)
Screen
Size
Max.
(WxH)
29.5"X22.1" 67.2" X50.4" 108.0" X
81.0"
151.8" X113.9" 193.2" X
144.9"
236.4" X
177.3"
(75.0cm X
56.3cm)
(170.7cm X
128.0cm)
(274.3cm X
205.7cm)
(385.6cm X
289.2cm)
(490.7cm X
368.0cm)
(600.5cmX
450.3cm)
Min.
(WxH)
25.3" X 19.0" 57.7" X
43.3"
92.7" X 69.5" 130.3" X 97.7" 165.8" X
124.4"
202.9" X
152.2"
(64.4cm X
48.3cm)
(146.5cm X
109.9cm)
(235.5cm X
176.6cm)
(331.0cm X
248.2cm)
(421.2cm X
315.9cm)
(515.4cm X
386.6cm)
Distance 4.9' (1.5m) 11.2' (3.4m) 18.0' (5.5m) 25.3' (7.7m) 32.2' (9.8m) 39.4'
(12.0m)
* This graph is for user reference only.

Using Your Projector 15
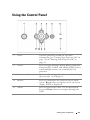
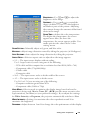
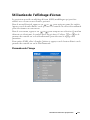
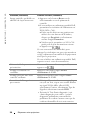
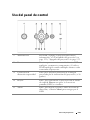
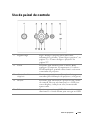
Using the Control Panel
1 Power Turn the projector on and off. For more
information, see "Turning Your Projector On" on
page 11 and "Turning Your Projector Off" on
page 11.
2 Source Press to toggle through Analog RGB, Composite,
Component-i, S-video, and Analog YPbPr sources
when multiple sources are connected to the
projector.
3 Keystone adjustment Press to adjust image distortion caused by tilting
the projector. (±16 degrees)
4 Resync Press to synchronize the projector to the input
source. Resync does not operate if the on-screen
display (OSD) is displayed.
5 Menu Press to activate the OSD. Use the directional
keys and Menu button to navigate through the
OSD.

www.dell.com | support.dell.com
16 Using Your Projector
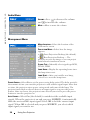
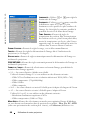
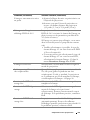
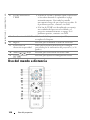
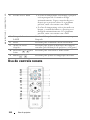
Using the Remote Control
6 TEMP warning light
• If the TEMP light is solid orange, the projector
has overheated. The display automatically shuts
down. Turn the display on again after the
projector cools down. If the problem persists,
contact Dell.
• If the TEMP light is blinking orange, a projector
fan has failed and the projector automatically
shuts down. If the problem persists, contact
Dell.
7 LAMP warning light If the LAMP light is solid orange, replace the
lamp.
8 Enter Press to confirm the selection item.
9 Keystone adjustment Press to adjust image distortion caused by tilting
the projector. (±16 degrees)
10 Up and Down Press to select the OSD items.
11 and buttons Press to adjust the OSD setting.

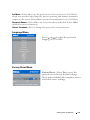
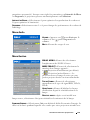
Using Your Projector 17
1 Power Turn the projector on and off. For more
information, see "Turning Your Projector On" on
page 11 and "Turning Your Projector Off" on
page 11.
2 Press to adjust the OSD setting.
3 Laser Aim the remote control at the screen, press and
hold the laser button to activate the laser light.
4 Volume Press to increase the volume.
5 Mute Press to mute or un-mute the projector speaker.
6 Volume Press to decrease the volume.
7 Right click Mouse right click.
8 Video mode The Dell 3400MP Micro-projector has preset
configurations that are optimized for displaying
data (PC Graphics) or video (movies, games,
etc.). Press Video Mode button to toggle between
PC mode, Movie mode, Game Mode, sRGB, or
User mode (for user to setup and save preferred
settings). Pressing the Video Mode button once
will show the current display mode. Pressing the
Video Mode button again will switch between
modes.
9 Blank screen Press to hide the image, press again to resume
display of the image.
10 LED light LED indicator.
11 Up button Press to select OSD items.
12 Enter button Press to confirm the selection.
13 Press to adjust the OSD setting.
14 Menu Press to activate the OSD.
15 Down button Press to select OSD items.
16 Page Press to move to previous page.
17 Page Press to move to next page.
18 Directional pad The directional pad can be used to control mouse
movement. The mouse function is enabled using
the M1 cable to connect your computer and the
projector.

www.dell.com | support.dell.com
18 Using Your Projector
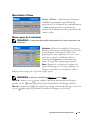
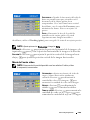
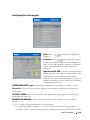
Using the On-Screen Display
The projector has a multi-language On-Screen Display (OSD) that can be
displayed with or without an input source present.
In the Main Menu, press or to navigate through the tabs. Press Enter
button on the control panel or the remote control to select a submenu.
In the submenu, press or to make a selection. When an item is selected, the
color changes to dark gray. Use or on the control panel or the remote
control to make adjustments to a setting.
To exit the OSD, go to Exit tab and press Enter button on the control panel or the
remote control.
Image Settings
19 Left click Mouse left click
20 Auto keystone Press to enable the auto correction for image
distortion due to tilting the projector.
21 Source Press to switch between Analog RGB, Digital
RGB, Composite, Component-i, S-video, and
Analog YPbPr sources.
22 Auto adjust Press to synchronize the projector to the input
source. Auto adjust does not operate if the OSD
(On-Screen Display) is displayed.

Using Your Projector 19
BRIGHTNESS—Use
and to
adjust the
brightness of the image.
C
ONTRAST—Use
and
to control the
degree of difference between the brightest
and darkest parts of the picture. Adjusting
the contrast changes the amount of black and
white in the image.
C
OLOR TEMP.—Adjust the color temperature.
The higher the temperature, the screen
appears more blue; the lower the
temperature, the screen appears redder. User
mode activates the values in the "color
setting" menu.
C
OLOR SETTING—Manually adjust red, green, and blue color.
K
EYSTONE—Adjust image distortion caused by tilting the projector (
±16 degrees).
AUTO KEYSTONE—Auto adjust the image distortion by tilting the projector.
A
SPECT RATIO—Select an aspect ratio to adjust how the image appears.
• 1:1 — The input source displays without scaling.
Use 1:1 aspect ratio if you are using one of the following:
– VGA cable and the computer has a resolution less than XGA (1024 x 768)
– Component cable (576p/480i/480p)
–S-Video cable
– Composite cable
• 16:9 — The input source scales to fit the width of the screen.
• 4:3 — The input source scales to fit the screen.
Use 16:9 or 4:3 if you are using one of the following:
– Computer resolution greater than XGA
– Component cable (1080i or 720p)
VIDEO MODE—Select a mode to optimize the display image based on how the
projector is being used: Movie, Game, PC, sRGB (provides more accurate color
representation), and User (set your preferred settings). If you adjust the settings
for White Intensity or Degamma, the projector automatically switches to User.
W
HITE INTENSITY—Setting 0 to maximize the color reproduction and 10 to
maximize the brightness.
D
EGAMMA—Adjust between 1 and 4 to change the color performance of the display.

www.dell.com | support.dell.com
20 Using Your Projector
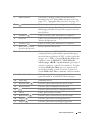
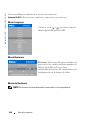
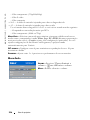
Audio Menu
VOLUME—Press
to decrease the volume
and to increase the volume.
MUTE—Allow to mute the volume.
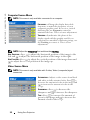
Management Menu
MENU LOCATION—Select the location of the
OSD on the screen.
P
ROJECTION MODE—Select how the image
appears:
• Front Projection-Desktop (the default).
• Rear Projection-Desktop — The
projector reverses the image so you can project
from behind a translucent screen.
SIGNAL TYPE—Manually select signal type RGB,
YCbCr, YPbPr.
L
AMP HOUR—Display the operating hours since
the lamp timer reset.
L
AMP RESET—After you install a new lamp,
select Yes to reset the lamp timer.
P
OWER SAVING—Select Yes to set the power saving delay period. The delay period is
the amount of time you want the projector to wait without signal input. After that
set time, the projector enters power saving mode and turns off the lamp. The
projector turns back on when it detects an input signal or you press the power
button. After two hours, the projector turns off and you need to press the power
button to turn the projector on.
A
UTO SOURCE—
Select
On
(the default) to autodetect the available input
signals. When the projector is on and you press
SOURCE
, it automatically
finds the next available input signal. Select
Off
to lock the current input
signal. When
Off
is selected and you press
SOURCE
, you select which
input signal you want to use.
A página está carregando...
A página está carregando...
A página está carregando...
A página está carregando...
A página está carregando...
A página está carregando...
A página está carregando...
A página está carregando...
A página está carregando...
A página está carregando...
A página está carregando...
A página está carregando...
A página está carregando...
A página está carregando...
A página está carregando...
A página está carregando...
A página está carregando...
A página está carregando...
A página está carregando...
A página está carregando...
A página está carregando...
A página está carregando...
A página está carregando...
A página está carregando...
A página está carregando...
A página está carregando...
A página está carregando...
A página está carregando...
A página está carregando...
A página está carregando...
A página está carregando...
A página está carregando...
A página está carregando...
A página está carregando...
A página está carregando...
A página está carregando...
A página está carregando...
A página está carregando...
A página está carregando...
A página está carregando...
A página está carregando...
A página está carregando...
A página está carregando...
A página está carregando...
A página está carregando...
A página está carregando...
A página está carregando...
A página está carregando...
A página está carregando...
A página está carregando...
A página está carregando...
A página está carregando...
A página está carregando...
A página está carregando...
A página está carregando...
A página está carregando...
A página está carregando...
A página está carregando...
A página está carregando...
A página está carregando...
A página está carregando...
A página está carregando...
A página está carregando...
A página está carregando...
A página está carregando...
A página está carregando...
A página está carregando...
A página está carregando...
A página está carregando...
A página está carregando...
A página está carregando...
A página está carregando...
A página está carregando...
A página está carregando...
A página está carregando...
A página está carregando...
A página está carregando...
A página está carregando...
A página está carregando...
A página está carregando...
A página está carregando...
A página está carregando...
A página está carregando...
A página está carregando...
A página está carregando...
A página está carregando...
A página está carregando...
A página está carregando...
A página está carregando...
A página está carregando...
A página está carregando...
A página está carregando...
A página está carregando...
A página está carregando...
A página está carregando...
A página está carregando...
A página está carregando...
A página está carregando...
A página está carregando...
A página está carregando...
A página está carregando...
A página está carregando...
A página está carregando...
A página está carregando...
A página está carregando...
A página está carregando...
A página está carregando...
A página está carregando...
A página está carregando...
A página está carregando...
A página está carregando...
A página está carregando...
A página está carregando...
A página está carregando...
A página está carregando...
A página está carregando...
A página está carregando...
A página está carregando...
A página está carregando...
A página está carregando...
A página está carregando...
A página está carregando...
A página está carregando...
A página está carregando...
A página está carregando...
A página está carregando...
A página está carregando...
A página está carregando...
A página está carregando...
A página está carregando...
A página está carregando...
A página está carregando...
A página está carregando...
A página está carregando...
A página está carregando...
A página está carregando...
A página está carregando...
A página está carregando...
A página está carregando...
A página está carregando...
A página está carregando...
A página está carregando...
A página está carregando...
A página está carregando...
A página está carregando...
A página está carregando...
A página está carregando...
A página está carregando...
A página está carregando...
A página está carregando...
A página está carregando...
A página está carregando...
A página está carregando...
A página está carregando...
A página está carregando...
A página está carregando...
A página está carregando...
A página está carregando...
A página está carregando...
A página está carregando...
A página está carregando...
A página está carregando...
A página está carregando...
A página está carregando...
A página está carregando...
A página está carregando...
A página está carregando...
A página está carregando...
A página está carregando...
A página está carregando...
A página está carregando...
A página está carregando...
A página está carregando...
A página está carregando...
A página está carregando...
A página está carregando...
A página está carregando...
A página está carregando...
A página está carregando...
A página está carregando...
A página está carregando...
A página está carregando...
A página está carregando...
A página está carregando...
A página está carregando...
A página está carregando...
A página está carregando...
A página está carregando...
A página está carregando...
A página está carregando...
A página está carregando...
A página está carregando...
A página está carregando...
A página está carregando...
A página está carregando...
A página está carregando...
A página está carregando...
A página está carregando...
A página está carregando...
A página está carregando...
A página está carregando...
A página está carregando...
A página está carregando...
A página está carregando...
A página está carregando...
A página está carregando...
A página está carregando...
A página está carregando...
A página está carregando...
A página está carregando...
A página está carregando...
A página está carregando...
A página está carregando...
A página está carregando...
A página está carregando...
A página está carregando...
A página está carregando...
A página está carregando...
A página está carregando...
A página está carregando...
A página está carregando...
A página está carregando...
A página está carregando...
A página está carregando...
A página está carregando...
A página está carregando...
A página está carregando...
A página está carregando...
A página está carregando...
A página está carregando...
A página está carregando...
A página está carregando...
A página está carregando...
A página está carregando...
A página está carregando...
A página está carregando...
A página está carregando...
A página está carregando...
A página está carregando...
A página está carregando...
A página está carregando...
A página está carregando...
A página está carregando...
A página está carregando...
A página está carregando...
A página está carregando...
A página está carregando...
A página está carregando...
A página está carregando...
A página está carregando...
A página está carregando...
A página está carregando...
A página está carregando...
A página está carregando...
A página está carregando...
A página está carregando...
A página está carregando...
A página está carregando...
A página está carregando...
A página está carregando...
A página está carregando...
A página está carregando...
A página está carregando...
A página está carregando...
A página está carregando...
A página está carregando...
A página está carregando...
A página está carregando...
A página está carregando...
A página está carregando...
A página está carregando...
A página está carregando...
-
 1
1
-
 2
2
-
 3
3
-
 4
4
-
 5
5
-
 6
6
-
 7
7
-
 8
8
-
 9
9
-
 10
10
-
 11
11
-
 12
12
-
 13
13
-
 14
14
-
 15
15
-
 16
16
-
 17
17
-
 18
18
-
 19
19
-
 20
20
-
 21
21
-
 22
22
-
 23
23
-
 24
24
-
 25
25
-
 26
26
-
 27
27
-
 28
28
-
 29
29
-
 30
30
-
 31
31
-
 32
32
-
 33
33
-
 34
34
-
 35
35
-
 36
36
-
 37
37
-
 38
38
-
 39
39
-
 40
40
-
 41
41
-
 42
42
-
 43
43
-
 44
44
-
 45
45
-
 46
46
-
 47
47
-
 48
48
-
 49
49
-
 50
50
-
 51
51
-
 52
52
-
 53
53
-
 54
54
-
 55
55
-
 56
56
-
 57
57
-
 58
58
-
 59
59
-
 60
60
-
 61
61
-
 62
62
-
 63
63
-
 64
64
-
 65
65
-
 66
66
-
 67
67
-
 68
68
-
 69
69
-
 70
70
-
 71
71
-
 72
72
-
 73
73
-
 74
74
-
 75
75
-
 76
76
-
 77
77
-
 78
78
-
 79
79
-
 80
80
-
 81
81
-
 82
82
-
 83
83
-
 84
84
-
 85
85
-
 86
86
-
 87
87
-
 88
88
-
 89
89
-
 90
90
-
 91
91
-
 92
92
-
 93
93
-
 94
94
-
 95
95
-
 96
96
-
 97
97
-
 98
98
-
 99
99
-
 100
100
-
 101
101
-
 102
102
-
 103
103
-
 104
104
-
 105
105
-
 106
106
-
 107
107
-
 108
108
-
 109
109
-
 110
110
-
 111
111
-
 112
112
-
 113
113
-
 114
114
-
 115
115
-
 116
116
-
 117
117
-
 118
118
-
 119
119
-
 120
120
-
 121
121
-
 122
122
-
 123
123
-
 124
124
-
 125
125
-
 126
126
-
 127
127
-
 128
128
-
 129
129
-
 130
130
-
 131
131
-
 132
132
-
 133
133
-
 134
134
-
 135
135
-
 136
136
-
 137
137
-
 138
138
-
 139
139
-
 140
140
-
 141
141
-
 142
142
-
 143
143
-
 144
144
-
 145
145
-
 146
146
-
 147
147
-
 148
148
-
 149
149
-
 150
150
-
 151
151
-
 152
152
-
 153
153
-
 154
154
-
 155
155
-
 156
156
-
 157
157
-
 158
158
-
 159
159
-
 160
160
-
 161
161
-
 162
162
-
 163
163
-
 164
164
-
 165
165
-
 166
166
-
 167
167
-
 168
168
-
 169
169
-
 170
170
-
 171
171
-
 172
172
-
 173
173
-
 174
174
-
 175
175
-
 176
176
-
 177
177
-
 178
178
-
 179
179
-
 180
180
-
 181
181
-
 182
182
-
 183
183
-
 184
184
-
 185
185
-
 186
186
-
 187
187
-
 188
188
-
 189
189
-
 190
190
-
 191
191
-
 192
192
-
 193
193
-
 194
194
-
 195
195
-
 196
196
-
 197
197
-
 198
198
-
 199
199
-
 200
200
-
 201
201
-
 202
202
-
 203
203
-
 204
204
-
 205
205
-
 206
206
-
 207
207
-
 208
208
-
 209
209
-
 210
210
-
 211
211
-
 212
212
-
 213
213
-
 214
214
-
 215
215
-
 216
216
-
 217
217
-
 218
218
-
 219
219
-
 220
220
-
 221
221
-
 222
222
-
 223
223
-
 224
224
-
 225
225
-
 226
226
-
 227
227
-
 228
228
-
 229
229
-
 230
230
-
 231
231
-
 232
232
-
 233
233
-
 234
234
-
 235
235
-
 236
236
-
 237
237
-
 238
238
-
 239
239
-
 240
240
-
 241
241
-
 242
242
-
 243
243
-
 244
244
-
 245
245
-
 246
246
-
 247
247
-
 248
248
-
 249
249
-
 250
250
-
 251
251
-
 252
252
-
 253
253
-
 254
254
-
 255
255
-
 256
256
-
 257
257
-
 258
258
-
 259
259
-
 260
260
-
 261
261
-
 262
262
-
 263
263
-
 264
264
-
 265
265
-
 266
266
-
 267
267
-
 268
268
-
 269
269
-
 270
270
-
 271
271
-
 272
272
-
 273
273
-
 274
274
-
 275
275
-
 276
276
-
 277
277
-
 278
278
-
 279
279
-
 280
280
-
 281
281
-
 282
282
-
 283
283
-
 284
284
-
 285
285
-
 286
286
-
 287
287
-
 288
288
-
 289
289
-
 290
290
-
 291
291
-
 292
292


Dell 3400MP Manual do usuário
- Categoria
- Projetores de dados
- Tipo
- Manual do usuário
- Este manual também é adequado para
em outras línguas
- español: Dell 3400MP Manual de usuario
- français: Dell 3400MP Manuel utilisateur