Grandstream GWN7610 Quick Installation Guide
- Tipo
- Quick Installation Guide

GWN7610
Wireless Access Point
Quick Installation Guide
For Warranty and RMA information, please visit www.grandstream.com
Grandstream Networks, Inc.
126 Brookline Ave, 3rd Floor
Boston, MA 02215. USA
Tel : +1 (617) 566 - 9300
Fax: +1 (617) 249 - 1987
www.grandstream.com
In all EU member states, operation of 5150
- 5350 MHz is restricted to indoor use only.

Content
English.................................................................................1
简体中文............................................................................7
Español..............................................................................13
Français..............................................................................19
Deutsch..............................................................................25
Italiano...............................................................................31
Polski................................................................................ 37
Português.......................................................................... 43
Русскй...............................................................................49

~ 1 ~ ~ 2 ~
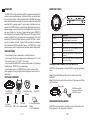
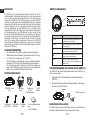
PRECAUTIONS
• Do not attempt to open, disassemble, or modify the device.
• Do not expose this device to temperatures outside range of 0 °C to 50
°C for operating and -10 °C to 60 °C for storage.
• Do not expose the GWN7610 to environments outside of the following
humidity range: 10-90% RH (non-condensing).
• Do not power cycle your GWN7610 during system boot up or rm-
ware upgrade. You may corrupt rmware images and cause the unit to
malfunction.
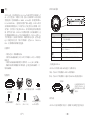
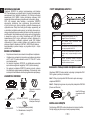
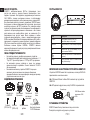
1x GWN7610
Access Point
1 x Quick Installation
Guide
1 x GPL Statement
3 x Screw
(PM 3 x 50)
3 x Plastic
Expansion Bolt
3 x Screw
(PA 3.5 x 20)
EN
Mounting
Bracket
Ceiling Mounting
Bracket
OVERVIEW
The GWN7610 is a high-performance 802.11ac wireless access point for
small to medium sized businesses, multiple oor oces, commercial loca-
tions and branch oces. It oers dual-band 4x4:4 MU-MIMO technology
and a sophisticated antenna design for maximum network throughput and
expanded Wi-Fi coverage range. To ensure easy installation and man-
agement, the GWN7610 uses a controller-less distributed network man-
agement design in which the controller is embedded within the product’s
web user interface. For the sake of large-scale deployment, GWN7610
also supports to be managed by GWN Cloud system. With support for fast
roaming, advanced QoS, low-latency real-time applications, 200+ client
devices per AP and dual Gigabit network ports with PoE/PoE+, combin-
ing with the features of Mesh, Captive Portal and seamless connection
with Grandstream WP8XX series Wi-Fi phone, the GWN7610 is an ideal
wireless access point for large and small wireless network deployments.
PACKAGE CONTENT
3x M3 NUT
Port Description
P O W E R Power adapter connector (DC24V, 1A)
Note: Power adapter is not provided.
NET/POE Ethernet RJ45 port (10/100/1000Mbps) supporting
PoE.
NET Ethernet RJ45 port (10/100/1000Mbps) to your
router or another GWN7610.
USB 2.0 port (for future IOT & location based ap-
plications)
RESET Factory reset button. Press for 7 seconds to reset
factory default settings.
GWN7610 PORTS
POWERING AND CONNECTING THE GWN7610
GWN7610 can be powered on using PoE/PoE+ switch using following
steps:
Step 1: Plug a RJ45 Ethernet cable into the network port of the
GWN7610
Step 2: Plug the other end into the uplink port of the power over Ether-
net (PoE) switch.
RJ45 Ethernet Cable
to power over Ethernet
(PoE/PoE+) Switch
Network Port
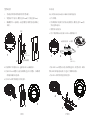
HARDWARE INSTALLATION
GWN7610 can be mounted on the wall or ceiling, Please refer to the
following steps for the appropriate installation.

~ 3 ~ ~ 4 ~
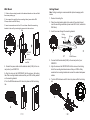
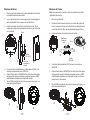
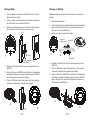
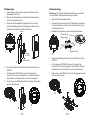
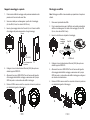
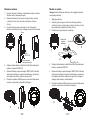
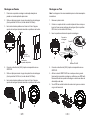
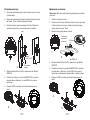
Wall Mount
1. Position the mounting bracket at the desired location on the wall with
the arrow pointing up.
2. Use a pencil to mark the four mounting holes (screw holes DIA
5.5mm, reticle hole DIA 25mm).
3. Insert screw anchors into the 5.5 mm holes. Attach the mounting
bracket to the wall by inserting the screws into the anchors.
Wall
PA3.5 x 20
Screw
Plastic Expansion
Bolt
PA3.5x20
Screw
Plastic Expan-
sion Bolt
Wall
4. Connect the power cable and the ethernet cable (RJ45) to the cor-
rect ports of your GWN7610.
5. Align the arrow on the GWN7610AP with the arrow on the locking
tab of the mounting bracket and ensure that your GWN is rmly seated
on the mounting bracket.
6.Turn the GWN clockwise until it locks into place and ts the locking
tab.
4
5
6
Ceiling Mount
Note: Ceiling mounting is recommended for optimal coverage perfor-
mance.
1. Remove the ceiling tile.
2. Place the ceiling backing plate in the center of the ceiling tile and
mark the mounting screw holes (screw holes DIA 5.5mm, reticle hole
DIA 25mm).
3. Insert the screws through the mounting bracket.
4. Connect the Ethernet cable (RJ45) to the correct ports of your
GWN7610.
5. Align the arrow on the GWN7610AP with the arrow on the locking
tab of the mounting bracket and ensure that your GWN is rmly
seated on the mounting bracket and connect the network and power
cables.
6. Turn the GWN clockwise untill it locks into place and ts the locking
tab.
1
2
3
M3.0x50 screw
M3 nut
Ceiling
Mounting
4
5
6

~ 5 ~ ~ 6 ~
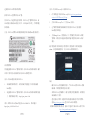
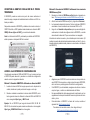
CONNECT TO GWN7610 DEFAULT Wi-Fi NETWORK
GWN7610 can be used as standalone access point out of box, or after
factory reset with Wi-Fi enabled by default.
After powering the GWN7610 and connecting it to the network, GWN7610
will broadcast a default SSID based on its MAC address GWN[MAC’s
last 6 digits] and a random password.
Note: GWN7610’s default SSID and password information are printed
on the MAC tag of the unit.
A computer connected to the GWN7610’s SSID, or to the same network
as the GWN7610 can discover and access its conguration interface us-
ing one of the below methods:
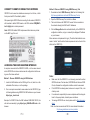
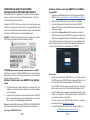
Method 1: Discover GWN7610 using its MAC Address
1. Locate the MAC address on the MAC tag of the unit, which is on the
underside of the device, or on the package.
2. From a computer connected to same network as the GWN7610, type
in following address using GWN7610’s MAC address on your browser
https://gwn_<mac>.local
Example: If a GWN7610 has the MAC address 00:0B:82:8C:4D:F8, this
unit can be accessed by typing https://gwn_000b828c4df8.local on the
browser.
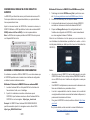
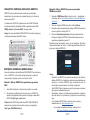
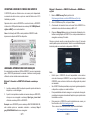
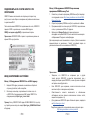
ACCESSING THE CONFIGURATION INTERFACE
Method 2: Discover GWN7610 using GWN Discovery Tool
1. Download and install GWN Discovery Tool from the following link:
http://www.grandstream.com/tools/GWNDiscoveryTool.zip
2. Open the GWN DiscoveryTool, and click on Scan.
3. The tool will discover all GWN76XX Access Points connected on
the network showing their MAC and IP addresses.
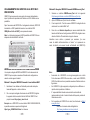
4. Click on Manage Device to be redirected directly to the GWN7610’s
conguration interface, or type in manually the displayed IP address
on your browser.
Enter username and password to login. (The default administrator user-
name is “admin” and the default random password can be found at the
sticker on the GWN7610).
● Make sure that the GWN7610 is not already paired with another
GWN76xx Access Point as slave, GWN7000 Router Series or GWN.
Cloud, otherwise the conguration interface cannot be accessed
● If the GWN7610 is already paired, make sure to unpair it rst, or do
a factory reset.
● It is customer’s responsibility to ensure compliance with local regula-
tions for frequency bands, transmit power and others.
● To manage GWN7610 over cloud, please refer to https://www.gwn.
cloud.
Refer to online documents and FAQ for more detailed information:
http://www.grandstream.com/our-products
Notes:

~ 7 ~ ~ 8 ~
概述
GWN7610是一款支持新的Wi-Fi802.11ac协议的高性价比无线接入点
AP,为中小型企业、多楼层写字楼、医院、商业场所和办公分支机构
等量身定做。它使用最新的3x3 MIMO 802.11ac技术,同时提供双频Wi-
Fi(2.4GHz和5GHz),提高信号强度和扩展Wi-Fi覆盖。GWN7610使用
无控制器的网络管理方式,允许每个接入点独立管理自己的网络,同时
每个接入 点可管理50个独立的GWN7610,而不需要绑定到中央网络控制
器,更节约用户成本。GWN7610可以搭配任何第三方的路由器使用,也
可以搭配潮流网络GWN7000千兆VPN路由器使用。GWN7610支持250+
个用户数量接入(实际用户数因使用 环境等因素存在差异,支持先进的
QoS,低延迟的实时应用,千兆以太网络端口,支持802.3af PoE/802.3at
PoE+,是 您部署无线网络的理想选择。
注意事项
• 不要尝试打开,拆解或修改设备。
• 不要将本设备暴露在温度 0℃至50℃的工作环境或 -10℃至 60℃的储存
环境以外
• 不要将本设备暴露在环境湿度如下范围以外:10-90%RH(无冷凝)。
• 系统启动或固件升级期间不要中断电源。这可能会损坏设备固件,并
导致设备故障。
1x GWN7610
无线热点
1 x 快速安装手册
1 x GPL 声明t
3x 螺丝
(PM 3×50
3 x 螺丝
(PA 3.5×20)
3x 塑料膨胀螺栓
1x 安装支架
1x 天花板安装支架
3x M3螺帽
包装内容
GWN7610 端口
端口 描述
POWER
电源适配器(DC24V,1A)
注:不包含电源适配器。
NET/POE
以太网RJ45端口(10/100 /1000Mbps),需要支持
PoE 。
NET
以太网RJ45端口(10/100 /1000Mbps),连接至路由
器或另一个GWN7610。
USB 2.0端口(用于未来的IOT或定位应用)
RESET
恢复出厂设置按钮。按7秒恢复出厂默认设置。
上电和连接GWN7610
GWN7610可以使用PoE或PoE+的通过以下步骤来供电:
第1步:将RJ45以太网电缆插入GWN7610的网络端口。
硬件安装
GWN7610可安装在墙壁或天花板上,请参阅下列步骤进行适当的安装。
网络端口
RJ45电缆连接到以太网
供电的(PoE/PoE+)交
换机或者PoE/PoE+供电
转换头。
第2步:将RJ45以太网电缆的另一端插入有PoE/PoE+供电的交换机口。
ZH

~ 9 ~ ~ 10 ~
壁挂式安装
1. 将安装支架放置在所需安装的位置并箭头朝上。
2. 铅笔标出四个安装孔(螺丝孔直径5.5mm的十字线孔直径25mm)
3. 膨胀螺栓放入5.5毫米的孔。通过将螺丝拧入螺栓把安装支架固定
在墙上。
1
2
3
Wall
PA3.5 x 20
Screw
Plastic Expansion
Bolt
4. 将电源和以太网电缆(RJ45)连接到GWN7610正确的端口。
5. 将在GWN7610AP的箭头与安装支架的锁定选项卡上的箭头,并确保您
的周报牢固就位安装支架。
6. 将GWN7610顺时针旋转直至其锁定到位。
墙壁
螺丝
(PA 3.5x20)
塑料膨胀螺栓
4
5
6
顶式安装
备注: 推荐将设备安装在天花板上以确保信号的最优覆盖性能
1
2
3
1. 拆下吊顶板。
2. 将吊顶板放在天花板的中央并标记安装螺丝孔(螺丝孔直径5.5mm的十
字线孔直径25毫米)。
3. 将螺钉放入安装托架。
4. 将以太网电缆的RJ45端口插入GWN7610的网络端口中.
天花板安装支架 M3螺帽
5. 将在GWN7610AP的箭头与安装支架的锁定选项卡上的箭头对齐。确保
您的GWN牢固地安装在支架上并连接上了网络和电源线。
6. 将GWN7610顺时针旋转直至其锁定到位。
螺丝
(PM 3×50)
4
5
6

~ 11 ~ ~ 12 ~
连接到GWN7610默认的无线网络
新的GWN7610会有默认的Wi-Fi广播。
将GWN7610上电起机并连接至网络,GWN7610会广播默认的SSID。该
SSID是基于设备的MAC地址后六位: GWN[MAC后六位],并且使用随
机的密码。
注意:GWN7610的默认SSID和随机密码打印在设备的MAC地址贴纸上。
访问配置界面
将电脑连接到GWN7610广播的无线网,或GWN7610所在的局域网。就可
以用以下的几种方式来发现并访问GWN7610的配置页面:
方法1:用MAC地址来发现GWN7610。
1. 在设备的背面的贴纸上,或者设备的外包装盒上可以找到设备的
MAC地址。
2. 在连接到GWN7610广播的无线网,或GWN7610所在的局域网的电脑
上,用浏览器输入网址:https://gwn_<mac>.local
比如:如果GWN7610的MAC地址为00:0B:82:8B:4E:28,那么则输入
https://gwn_000b828b4e28.local
方法2:用GWNDiscoveryTool发现GWN7610。
1. 从下面的连接下载GWNDiscoveryTool: http://www.grandstream.
com/tools/GWNDiscoveryTool.zip
2. 打开GWNDiscoveryTool,并点击Scan(扫描)。
3. 这个软件将帮助你发现局域网下所有的GWN7610并显示他们
MAC地址和IP地址。
4. 点击Manage Device(管理设备)后,你将被引导到GWN7610的配
置界面。或者也可以通过在浏览器中输入所查找到GWN7610的IP
地址。
输入管理员用户名和密码登入管理界面(管理员用 户名的缺省值为:
admin; 缺省密码为随机值,写 于GWN7610机体的贴纸上)
备注:
• 确认GWN7610并没有被配对到另一个GWN7610或者GWN7000系列
路由器,否则配置界面将会是关闭的。
• 如果GWN7610已经被配对,请从它的配主那里接触配对,或者恢复
该设备的出厂设置。
• 遵守当地关于频带、发射功率及其他相关法规是每个用户的责任。
• 请在https://www.gwn.cloud.进行GWN7610的云端管理 。
欲获取详细的话机使用信息,请在以下链接中下载GWN7610用户手册。
http://www.grandstream.com/support

~ 13 ~ ~ 14 ~
1x Punto de Acceso
GWN7610
1x Guía de
instalación Rápida
1x Declaración GPL
3x Tornillos
(PM 3x50)
3 x Screw
(PA 3.5 x 20)
ES
1x Soporte
de Montaje
1x Soporte para
montaje en techo
RESUMEN
El GWN7610 es un punto de acceso inalámbrico 802.11ac de alto ren-
dimiento para pequeñas a medianas empresas, ocinas de múltiples pi-
sos, centros comerciales y sucursales. Ofrece tecnología 3x3:3 MIMO de
doble banda y un sosticado diseño de antena para máximo rendimiento
de red y alcance de cobertura Wi-Fi expandida. Para arantizar facilidad
de instalación y manejo, el GWN7610 usa un diseño de administración
de redes distribuidas sin controlador en donde el controlador está incor-
porado dentro de la interfaz de usuario basada en la web del producto.
Esto permite a cada punto de acceso administrar su propia red de mane-
ra independiente sin necesidad de un hardware/software de controlador
separado y sin un punto único de fallo. Este punto de acceso inalámbrico
puede conectarse con routers externos, así como routers de la serie
GWN de Grandstream. Con soporte para QoS avanzado, aplicaciones
en tiempo real de baja latencia, más de 250 dispositivos clientes por pun-
to de acceso y dos puertos de red Gigabit con PoE/PoE+, el GWN7610
es un punto de acceso inalámbrico ideal para implementaciones de red
inalámbrica grandes y pequeñas.
PACKAGE CONTENT
3x M3 NUT
PRECAUCIONES
• No intente abrir, desarmar o modicar el dispositivo.
• No exponga este dispositivo a temperaturas fuera del rango de 0
°C a 50 °C en funcionamiento y desde -10 °C a 60 °C cuando se
encuentre almacenado
• No exponga el GWN7610 a entornos fuera del siguiente rango de
humedad: 10-90% RH (sin condensación).
• No apague su GWN7610 durante el reinicio del sistema o actual-
ización de Firmware. Puede corromper la imagen del rmware y
causar un mal funcionamiento de la unidad.
3x Pernos de
expansión de
plástico
PUERTOS GWN7610
ENCENDIENDO Y CONECTANDO EL GWN7610
El GWN puede ser alimentado usando un switch PoE/PoE+ por medio
de los siguientes pasos:
Paso 1: Conecte un cable Ethernet RJ45 en el puerto de red del
GWN7610.
Paso 2: Conecte el otro extremo del cable en el puerto del switch
(PoE/PoE+).
Puerto de Red
Cable de Red RJ45
para Switch (PoE/
PoE+)
INSTALACIÓN DE HARDWARE
El GWN7610 puede ser montado en la pared o techo, por favor con-
sulte los siguientes pasos para la instalación apropiada.
Puerto Descripción
POWER Conector de adaptador de corriente (DC24V, 1A)
Nota: el adaptador de corriente no está previsto.
NET/POE Puerto Ethernet RJ45 (10/100/1000Mbps) con so-
porte de PoE.
NET Puerto Ethernet RJ45 (10/100/1000Mbps) para su
router u otro GWN7610.
Puerto USB 2.0 (para futuros IOT y aplicaciones
basadas en ubicación).
RESET Botón de reinicio de fábrica. Presione por 7 segun-
dos para llevar a los ajustes de fábrica.

~ 15 ~ ~ 16 ~
1. Situe el soporte de montaje en la locación deseada sobre la pared
con la echa apuntando hacia arriba.
2. use un lápiz para marcar los cuatro agujeros de montaje (agujeros
de los tornillos DIA 5.5mm, agujero retícula DIA 25mm).
3. Inserte los anclajes de tornillo en los oricios de 5.5mm. Fije el
soporte de montaje a la pared mediante la inserción de los tornillos
en los anclajes.
1
3
Wall
PA3.5 x 20
Screw
Plastic Expansion
Bolt
2
4
5
6
Montura de Techo
Nota: Se recomienda un montaje en el techo para obtener un óptimo
rendimiento de cobertura.
1. Retire la losa del techo.
2. Coloque la placa de soporte de techo en el centro de la placa de
techo y marque los oricios de los tornillos de montaje (oricios de
los tornillos de 5.5mm DIA, retícula diámetro del agujero 25mm).
3. Inserte los tornillos a través del soporte de montaje.
1
2
3
M3 nut
Tornillos
(M3.0x50)
4. Conecte el cable de alimentación y el cable ethernet (RJ45) a los
puertos correspondientes de su GWN7610.
5. Alinee la echa sobre el GWN7610AP con la echa en la lengüeta
de bloqueo del soporte de montaje y asegúrese de que su GWN
esté rmemente asentado en el soporte de montaje.
6. Gire el GWN al sentido del reloj hasta que encaje en su lugar y se
ajuste la lengüeta de jación.
Pared
Pernos de
expansión de
plástico
Tornillos
(PA 3.5X20)
Soporte para
montaje en
techo
Montura de Pared
4. Conecte el cable de ethernet (RJ45) al puerto correcto de su
GWN7610.
5. Alinee la echa sobre el GWN7610AP con la echa en la lengüeta
de bloqueo del soporte de montaje y asegúrese de que su GWN
esté rmemente asentado en el soporte de montaje y conecte los
cables de red y alimentación.
6. Gire el GWN al sentido del reloj hasta que encaje en su lugar y se
ajuste la lengüeta de jación.
4
5
6

~ 17 ~ ~ 18 ~
CONECTAR AL GWN7610 CON LA RED Wi-Fi PREDE-
TERMINADA
El GWN7610 puede ser usado como punto de acceso autónomo al
sacarlo de caja, o después del restablecimiento de fábrica con Wi-Fi ac-
tivado por defecto.
Después de encender el GWN7610 y establecer la conexión a la red, el
GXW7610 emitirá un SSID predeterminado basado en su dirección MAC
GWN[6 últimos dígitos del MAC] y una contraseña aleatoria.
Nota: La información del SSID y contraseña por defecto del GWN7610
están impresas en la etiqueta MAC de la unidad.
Un ordenador conectado al SSID del GWN7610, o en la misma red que
el GWN7610 puede descubrir y acceder a su interfaz de conguración
usando uno de los siguientes métodos:
Método 1: Descubrir GWN7610 utilizando su dirección MAC
1. Localice la dirección MAC del equipo que esta en la etiqueta de la
unidad, ubicada en la parte posterior del equipo o en la caja
2. Desde un ordenador conectado a la misma red del GWN7610, escri-
ba la siguiente dirección utilizando la dirección MAC del GWN7610
en su navegador https://gwn_ <MAC>.local
Ejemplo: De un GWN7610 que tenga la dirección MAC 00: 0B: 82:
8B: 4E: 28, esta unidad se puede acceder escribiendo en el navegador
https://gwn_000b828b4e28.local en el navegador.
ACESSO A LA INTERFAZ DE CONFIGURACIÓN
Método 2: Descubrir el GWN7610 utilizando la herramienta
GWNDiscoveryTool
1. Descargar e instalar el GWNDiscoveryTool desde el siguiente en-
lace: http://www.grandstream.com/tools/GWNDiscoveryTool.zip
2. Abrir la herramienta GWNDiscoveryTool, y haga clic en Escanear
3. La herramienta descubrirá todos los Puntos de Acceso GWN7610
conectados a la red mostrando sus direcciones MAC´s e IP´s.
4. Haga clic en Administrar dispositivos para que sea redirigido di-
rectamente a la interfaz de conguración de la GWN7610, o escriba
manualmente la dirección IP que se muestra en su navegador.
Introduzca el nombre de usuario y la contraseña para iniciar sesión. (El
nombre de usuario de administrador predeterminado es “admin” y la con-
traseña aleatoria predeterminada puede ser encontrada en la etiqueta
del GWN7610).
Nota :
• Asegúrese que el GWN7610 no esté vinculado con otro punto de ac-
ceso GWN7610 como esclavo, o algún router de la serie GWN7000,
de lo contrario no podrá ingresar a la interfaz de conguración.
• Si el GWN7610 ya está enlazado, asegúrese de eliminar el enlace
en primer lugar, o realizar un restablecimiento de fábrica.
• Es responsabilidad del cliente asegurarse del cumplimiento con las
regulaciones locales para bandas de frecuencia, potencia de trans-
misión y otros.
• Para administrar el GWN7610 a través de la nube, consulte el
siguiente link https://www.gwn.cloud.
Para obtener el manual de usuario, favor haga click aquí:
http://www.grandstream.com/our-products

~ 19 ~ ~ 20 ~
PRESENTATION
Le GWN7610 est un point d’accès sans l 802.11 ac de haute perfor-
mance pour petites et moyennes entreprises,bâtiments de bureaux de
plusieurs étages, emplacements commerciaux et succursales. Il ore
une technologie bibande MIMO 3x3:3 et une antenne sophistiquée con-
çue pour un débit réseau maximum et une portée Wi-Fi étendue. Pour
permettre une installation et une gestion faciles, le GWN7610 utilise une
conception de gestion réseau distribuée sans contrôleur dans laquelle le
contrôleur est intégré dans l’interface utilisateur du produit. Cela permet
à chaque point d’accès de gérer son propre réseau de façon indépendan-
te, sans avoir besoin de séparer le matériel ou le logiciel du contrôleur et
sans un seul point de défaillance. Ce point d’accès sans l peut être cou-
plé sans les routeurs d’un tiers ni les routeurs Grandstream de la série
GWN. Avec la prise en charge de QoS avancés, d’applications à faible
latence en temps réel, 250 et plus dispositifs de clients par point d’accès
et des ports réseau Gigabit doubles avec PoE/PoE+, le GWN7610 est un
point d’accès sans l idéal pour les déploiements réseau petits et mas-
sifs sans l.
PRECAUTIONS
• Ne pas tenter d’ouvrir, de désassembler, ou de modier le dispositif.
• Ne pas exposer cet appareil à des températures situées hors de la
plage de 0 °C à 50 °C en opération et -10 °C à 60 °C en stockage.
• Ne pas exposer cet appareil à un environnement avec humidité hors
de la plage de 10-90% RH (sans condensation).
• Ne pas éteindre le GWN7610 pendant le démarrage du système
ou la mise à jour du rmware. Cela risque de rompre l’image du
rmware et en conséquence rendre l’unité inutilisable.
EN
FR
CONTENU DU PACK
PORTS DU GWN7610
ALIMENTATION ET RACCORDEMENT DU GWN7610
GWN7610 peut être alimenté avec un switch PoE/PoE+ en suivant les
étapes ci-dessous.
Etape 1: Brancher un câble Ethernet RJ45 au port réseau du GWN7610.
Port Réseau
Câble Ethernet RJ45
au Switch PoE/PoE+.
Etape 2: Brancher l’autre extrémité au port Uplink du Switch PoE/PoE+.
INSTALLATION PHYSIQUE
GWN7610 peut être monté sur le mur ou le plafond. Veuillez se référer
aux étapes suivantes pour l’installation appropriée.
1x Point d’Accès
GWN7610
1 x Guide d’installation
rapide
1 x Licence GPL
3x Vis
(PM 3×50)
3x Vis
(PA 3.5×20)
1x Support
de montage
1x Support de
montage mural
3x Ecrou M3
3 x Boulon
expansion en
plastique
Port Description
POWER Connecteur Adaptateur Secteur (DC24V, 1A)
Note: L’adapteur secteur n’est pas fourni dans le
pack.
NET/POE Port Ethernet RJ45 (10/100/1000Mbps) supportant
PoE.
NET Port Ethernet RJ45 (10/100/1000Mbps) connecter
à votre router ou à un autre GWN7610.
Port USB 2.0 (Pour interopérabilité & applications
basées sur localisation ultérieurement )
RESET Bouton de réinitialisation. Appuyez pendant 7 sec-
ondes pour réinitialiser les paramètres d'usine.

~ 21 ~ ~ 22 ~
Montage Mural
1. Placer le support de montage à l’endroit désiré sur le mur avec la
èche pointant vers le haut.
2. Utiliser un crayon pour marquer les quatre trous de montage (trous
de vis DIA 5.5mm, trou de réticule DIA 25mm).
3. Insérer les vis d’ancrages dans les trous 5.5 mm. Fixez le support
de montage au mur en insérant les vis dans les ancres.
1
2
3
Wall
PA3.5 x 20
Screw
Plastic Expansion
Bolt
4. Brancher le câble Ethernet (RJ45) aux ports appropriés de votre
GWN7610.
5. Aligner la èche sur le GWN7610 avec la èche sur la languette de
verrouillage du support de montage et veiller à ce que votre GWN
est bien en place sur le support de montage.
6. Pivoter le GWN dans le sens horaire jusqu’à ce qu’il se verrouille
en place et correspond à la languette de verrouillage.
Mur
Boulon expansion
en plastique
Vis
(PA 3.5×20)
4
5
6
Montage au Plafond
Note: Le montage au plafond est recommandé pour une couverture
optimale.
1
3
1. Retirer la dalle de plafond.
2. Placer la plaque du support de plafond dans le centre de la dalle de
plafond et marquer les trous des vis de montage (les trous de vis
DIA 5.5mm, trou réticule DIA 25mm).
3. Insérer les vis dans le support de montage.
Support de
montage mural
2
Vis M3.0x50
4
5
6
4. Brancher le câble Ethernet (RJ45) aux ports appropriés de votre
GWN7610.
5. Pivoter le GWN dans le sens horaire jusqu’à ce qu’il se verrouille
en place et correspond à la languette de verrouillage.
6. Aligner la èche sur le GWN7610 avec la èche sur la languette de
verrouillage du support de montage et veiller à ce que votre GWN
est bien en place sur le support de montage et de connecter les
câbles réseau et d’alimentation.
Ecrou M3

~ 23 ~ ~ 24 ~
CONNEXION AU RESEAU Wi-Fi PAR DEFAUT DU
GWN7610
Le GWN7610 peut être utilisé comme point d’accès autonome avec Wi-
Fi activé par défaut lors de la première utilisation, ou après réinitialisa-
tion aux paramètres d’usine.
Après la mise sous tension du GWN7610 et connexion au réseau, le
GWN7610 diusera un SSID par défaut en fonction de son adresse MAC
GWN[6 derniers chires du MAC] et un mot de passe aléatoire.
Note: Le SSID et mot de passe par défaut du GWN7610 sont imprimés
sur l’étiquette MAC de l’unité.
Un ordinateur connecté au SSID du GWN7610, ou au même réseau que
le GWN7610 peut découvrir et accéder à son interface de conguration
en utilisant une des méthodes suivantes:
Méthode 1: Détecter le GWN7610 via son adresse MAC
1. Localisez l’adresse MAC sur l’étiquette MAC de l’unité située à la
face arrière de l’unité, ou sur l’emballage.
2. A partir d’un ordinateur connecté au même réseau que le
GWN7610, tapez l’adresse suivante en utilisant l’adresse MAC du
GWN7610 sur votre navigateur: https://gwn_<mac>.local
Exemple: Un GWN7610 avec l’adresse MAC 00:0B:82:8B:4E:28
peut être accessible à partir d’un navigateur web en utilisant l’URL:
https://gwn_000b828b4e28.local
ACCEDER A L’INTERFACE DE CONFIGURATION
Méthode 2: Détecter le GWN7610 via GWNDiscoveryTool
1. Téléchargez et installez GWNDiscoveryTool à partir du lien suiv-
ant: http://www.grandstream.com/tools/GWNDiscoveryTool.zip
2. Ouvrez le GWNDiscoveryTool, et cliquez sur Scan.
3. L’outil permettra de découvrir tous les points d’accès GWN7610
connectés sur le réseau montrant leurs adresses MAC et IP.
4. Cliquez sur Manage Device pour être redirigé directement à
l’interface de conguration du GWN7610, ou saisir manuellement
sur votre navigateur l’adresse IP achée.
Entrez le nom d’utilisateur et mot de passe pour vous connecter. (Le
nom d’utilisateur de l’administrateur par défault est « admin » et le le
mot de passe aléatoire par défaut peut être trouvé sur l’autocollant du
GWN7610).
Notes :
• Assurez-vous que le GWN7610 n’est pas déjà associé à une autre
GWN7610 Access Point en tant qu’esclave, GWN7000 Router Se-
ries ou GWN.Cloud, sinon l’interface de conguration ne sera pas
accessible.
• Si le GWN7610 est déjà associé, assurez-vous de le dissocier ou de
faire une réinitialisation aux paramètres d’usine.
• Il est de la responsabilité du client de s’assurer de la conformité
aux réglementations locales concernant les bandes de fréquence, la
puissance de transmission et d’autres.
• Pour gérer le GWN7610 via cloud, veuillez se référer à https://www.
gwn.cloud.
Pour plus de détails, veuillez consulter le manuel d’utilisation sur:
http://www.grandstream.com/our-products

~ 25 ~ ~ 26 ~
GWN7610 ANSCHLÜSS
STROMVERSORGUNG UND ANSCHLUß DES GWN7610
Der GWN7610 kann wie nachfolgend beschrieben über PoE/PoE+ mit
Strom versorgt werden:
1. Stecken Sie das RJ45 Ethernetkabel in den Netzwerk-Port am
GWN7610.
2. Stecken Sie das andere Ende des Netzwerkkabels in den passen-
den Port am PoE/PoE+ Switch.
Netzwerk
Port
RJ45 Ethernet kabel
ÜBERSICHT
Der GWN7610 ist ein hoch-performanter WLAN Access-Point für alle Un-
ternehmensgrößen, Bürogebäude,Einkaufszentren, Hotels, Krankenhäuser
sowie in vielen weiteren Anwendungsbereichen. Durch die Verwendung der
modernsten 3x3 MIMO 802.11ac Technologie bietet er simultane Dual-Wi-Fi
(2,4 GHz und 5GHz) Anbindung, maximale Bandbreitennutzung, optimierte
Signalstärke und Stabilität sowie eine erhöhte Reichweite. Um eine möglichst
einfache Installation sowie ein unkompliziertes verwalten mehrerer Access-
Points zu gewährleisten, hat jeder GWN7610 einen in das Web-Interface
eingebetteten Controller und benötigt somit keine zusätzliche Management-
und Verwaltungssoftware. Der WLAN-Access-Point kann sowohl mit den
Routern der Grandstream GWN Serie als auch mit Routern von Drittanbiet-
ern betrieben werden. Der Access-Point verfügt über zwei Gigabit-Netzwerk-
schnittstellen mit PoE/PoE+ und unterstützt erweiterte Quality of Services
(QoS) für Low-Latency-Echtzeit-Applikationen. Ferner kann ein GWN7610
über 250 drahtlose Endgeräte verwalten und ist somit eine leistungsstarke
und exible Lösung für kleine und mittlere WLAN Anbindungen sowie großen
Enterprise-WiFi Projekten.
VERPACKUNGSINHALT
SICHERHEITSHINWEISE
• Das Produkt darf nicht geönet, zerlegt oder verändert werden.
• Bitte beachten Sie die zulässigen Temperaturbereiche für Nutzung
• (0 °C bis 50 °C) und Lagerung (-10 °C bis 60 °C).
• Das Produkt darf nur in Umgebungen mit einem relativen Luftfeuchte-
bereichs von10% bis 90% (nicht kondensierend) genutzt werden.
• Die Stromversorgung darf während des Start- bzw. Upgradevor-
gangs nicht unterbrochen werden. Dies kann die Firmware beschä-
digen und zu unerwünschten Fehlfunktionen führen.
DE
HARDWARE-INSTALLATION
Der GWN7610 kann sowohl an der Wand, als auch an der Decke mon-
tiert werden. Beide Varianten sind nachfolgend beschrieben.
GWN7610 Access
Point
1x Kurzinstallationsanlei-
tung
1x GPL Erklärung
3x Schraube
(PM 3x50)
3x Schraube
(PA 3.5X20)
1x Montage-
winkel
3x M3
Muttern
3x Abstand-
stüllen
1x Halterung
für die
Deckenmontage
Port Beschreibung
POWER Anschluss für das Netzteil (Wechselstrom 24V/1A)
Hinweis: Netzteil nicht enthalten.
NET/POE RJ45 Ethernet-Anschluß (10/100/1000MBit/s) mit
PoE Unterstützung.
NET RJ45 Ethernet-Anschluß (10/100/1000MBit/s) zum
Router oder einem weiteren GWN7610.
USB 2.0 Port (für zukünftige Anwendungen sowie
Standort-basierende Applikationen).
RESET Reset-Taste. Drücken Sie die Taste min. 7
Sekunden, um das Produkt auf Werkseinstellung
zurückzusetzen.

~ 27 ~ ~ 28 ~
1. Positionieren der Halterung an der gewünschten Stelle mit dem
Richtungspfeil nach oben.
2. Markieren der Montagelöcher mit einem Stift. (Lochdurchmesser
5,5mm, Lochkreisradius 25mm).
3. Stecken Sie die Montagedübel in die gebohrten 5,5mm Löcher.
Halten Sie die Halterung über die Montagelöcher, stecken Sie die
Schrauben in die Dübel und ziehen Sie diese fest.
1
3
Wall
PA3.5 x 20
Screw
Plastic Expansion
Bolt
2
Deckenmontage
Bemerkung: Wir empfehlen das Produkt an der Decke zu montieren,
um eine optimale Leistung und Ausleuchtung zu erzielen.
1. Nehmen Sie die Deckenplatte heraus.
2. Platzieren Sie den Access-Point in der Plattenmitte und markieren
Sie die Montagelöcher mit einem Stift. (Lochdurchmesser 5,5mm,
Lochkreisradius 25mm).
3. Befestigen Sie die Halterung mit den beiliegenden Schrauben.
4
6
5
4. Stecken Sie das Ethernet-Kabel (RJ45) in den Netzwerk-Port des
GWN7610.
5. Zur Montage des GWN7610AP muss der Richtungspfeil am
Access-Point mit dem Richtungspfeil an der montierten Halterung
übereinstimmen, die Geräte passen nur so korrekt zusammen.
6. Drehen Sie nun den GWN Access-Point im Uhrzeigersinn bis dieser
fest in der Halterung sitzt.
1
2
3
Halterung für die
Deckenmontage
Schraube M3 x 50
Wand
Schraube
(PA 3.5X20)
Abstandstüllen
M3 Muttern
Wandmontage
4
5
6
4. Stecken Sie das Ethernet-Kabel (RJ45) in den Netzwerk-Port des
GWN7610.
5. Zur Montage des GWN7610AP muss der Richtungspfeil am
Access-Point mit dem Richtungspfeil an der montierten Halterung
übereinstimmen, die Geräte passen nur so korrekt zusammen.
6. Drehen Sie nun den GWN Access-Point im Uhrzeigersinn bis dieser
fest in der Halterung sitzt.

~ 29 ~ ~ 30 ~
VERBINDEN SIE SICH MIT DEM VOREIN-
GESTELLTEN Wi-Fi-NETZWERK DES GWN7610
Der GWN7610 kann als “Stand-alone” Access-Point direkt verwendet
werden - oder nach einem Reset auf Werkseinstellungen - Wi-Fi ist in
der Grundeinstellung immer aktiviert.
Sobald der GWN7610 mit Strom versorgt und an das Netzwerk ange-
schlossen ist, sendet der Access-Point eine voreingestellte SSID, diese
basiert auf der MAC Adresse des Gerätes (die letzten sechs Ziern/Bu-
chstaben der MAC Adresse) sowie einem Zufallspasswort.
HINWEIS: Die SSID und Passwortinformationen benden sich auf dem
MAC-Adressen Aufkleber auf der Rückseite des Gerätes.
ZUGANG ZUR KONFIGURATIONSSCHNITTSTELLE
Sobald ein Computer zur SSID des GWN7610 oder im selben Netzwerk
angeschlossen ist, kann nach ihm gesucht werden um so zur Kongura-
tionsschnittstelle zu gelangen:
Methode 1: Suche nach dem GWN7610 via MAC Ad-
resse
1. Die MAC-Adresse des Gerätes bendet sich entweder auch dem
Aufkleber auf der Unterseite des Gerätes, oder auf dem Aufkleber
an der Verpackung.
2. Nutzen Sie einen Computer im selben Netzwerk wie der GWN7610
geben Sie die MAC Adresse in den Internetbrowser ein, nutzen Sie
bitte nur dieses Format: https://gwn_<mac>.local
Beispiel: Lautet die MAC Adresse des GWN7610 z.B. 00:0B:82:8B:4E:28
dann tippen Sie diese bitte wie folgt in die Adresszeile des Browsers:
https://gwn_000b828b4e28.local
Methode 2: Suche nach dem GWN7610 via GWNDis-
coveryTool
1. Laden Sie das GWNDiscoveryTool von der Grandstream Support-
Website: http://www.grandstream.com/tools/GWNDiscoveryTool.zip
2. Önen Sie das GWNDiscoveryTool und klicken Sie auf Scan.
3. Das Tool (Werkzeug) wird alle im Netz installierten GWN7610
Access-Points nden und deren MAC Adresse sowie die jeweilige
IP Adresse anzeigen.
4. Klicken Sie auf Manage Device (Gerät verwalten) um direkt auf
die Kongurationsseite des GWN7610 zu gelangen oder tippen Sie
einfach die angezeigte IP Adresse in die Adresszeile des Browsers.
Bemerkung:
• Stellen Sie sicher, dass der GWN7610 nicht schon einem anderen
GMN7610 oder einem GWN7000 Router zugeordnet (Paired) ist, da
sich ansonsten das Kongurationsfenster nicht önen lässt.
• Ist der GWN7610 bereits zugeordnet, lösen Sie diese Zuordnung
oder setzen Sie den Access Point auf Werkseinstellungen zurück.
• Für die Einhaltung der im jeweiligen Anwendungsland gültigen Reg-
ularien für Frequenzen, Übertragungsbandbreite, Sendeleistung
usw. ist der Anwender verantwortlich.
• Um einen oder mehrere GWN7610 über die Cloud zu verwalten,
wechseln Sie bitte zu https://www.gwn.cloud
Das ausführliche Benutzerhandbuch kann geladen werden von:
http://www.grandstream.com/our-products
Geben Sie Benutzername und Passwort ein. Der voreingestellte Admin-
istrator-Benutzername lautet “admin”, das Zufallspasswort bendet sich
auf dem Produktaufkleber auf der Rückseite der GWN7610.

~ 31 ~ ~ 32 ~
PANORAMICA
.
Il GWN7610 è un punto di accesso wireless 802.11ac ad alte prestazi-
oni per piccole e medie imprese, uci multipiano, locali commerciali e
liali. Esso ore una tecnologia a doppia banda 3x3:3 MIMO e un so-
sticato design di antenna per capacità di rete massima e gamma di
copertura Wi-Fi estesa. Per assicurare qualsiasi installazione e gestione,
il GWN7610 usa design di gestione di rete distribuito senza centralina
in cui la centralina è nascosta nell’interfaccia utente web del prodotto.
Ciò consente a ogni punto di accesso di gestire la propria rete in modo
indipendente senza la necessità di hardware/software centralina sepa-
rato e senza punto di guasto singolo. Questo punto di accesso wireless
può essere accoppiato con qualsiasi router di terze parti nonché router
serie GWN Grandstream. Con supporto per QoS avanzato, applicazioni
in tempo reale a bassa latenza, 250+ dispositivi client per AP e porte di
rete Gigabit doppie con PoE/PoE+, il GWN7610 è un punto di accesso
wireless ideale per impiego in reti wireless grandi e piccole.
PRECAUZIONI
• Non tentare di aprire, smontare o modicare il dispositivo.
• Non esporre il dispositivo a temperature esterne alla gamma da 0 °C
a 50 °C per il funzionamento e alla gamma da -10 °C a 60 °C per la
conservazione .
• Non esporre GWN7610 ad ambienti fuori dal seguente intervallo di
umidità: 10-90% UR (senza condensa).
• Non spegnere/accendere il GWN7610 durante l’avvio del sistema o
l’aggiornamento del rmware. Ciò potrebbe comportare il danneg-
giamento del rmware e il malfunzionamento dell’unità.
CONTENUTO DELLA CONFEZIONE
IT
PORTE GWN7610
ACCENSIONE E COLLEGAMENTO DEL GWN7610
GWN7610 possono essere alimentati usando l’interruttore PoE/PoE+
mediante i passi seguenti:
Passo 1: Collegare il cavo Ethernet RJ45 alla porta di rete del GWN 7610.
Passo 2: Collegare l’altra estremità nella porta uplink dell’interruttore
power over Ethernet (PoE/PoE+).
Porta di rete
Cavo Ethernet RJ45 a
interruttore Alimentazione
su Ethernet (PoE/PoE+
)
INSTALLAZIONE HARDWARE
GWN7610 può essere montato a parete o sotto. Fare riferimento ai
passi seguenti per la corretta installazione.
Punto di accesso
GWN7610
1x Kurzinstallationsanl
1x GPL Erklärung
3x Viti (PM
3x50)
3x Viti (PA
3.5x20)
Stae di
montaggio
3x Dadi
M3
3x Perni di espan-
sione di plastica
Staa per mon-
taggio a sotto
Porta Descrizione
POWER Connettore alimentatore (CC24V, 1A)
Nota: Alimentatore non fornito.
NET/POE Porta Ethernet RJ45 (10/100/1000Mbps) che sup-
porta PoE.
NET Porta Ethernet RJ45 (10/100/1000Mbps) al proprio
router o altro GWN7610.
Porta USB 2.0 (per applicazioni basate su IOT e
località)
RESET Pulsante ripristino di fabbrica. Premere per 7
secondi per ripristinare le impostazioni predenite
di fabbrica.

~ 33 ~ ~ 34 ~
Supporto montaggio a parete
1. Posizionare la staa di montaggio nella posizione desiderata sulla
parete con la freccia rivolta verso l’alto.
2. Usare una matita per contrassegnare i quattro fori di montaggio
(fori vite DIA 5,5 mm, foro reticolo DIA 25 mm).
3. Inserire gli ancoraggi delle viti nel foro da 5,5 mm. Fissare la staa
di montaggio alla parete inserendo le viti negli ancoraggi.
1
2
3
Wall
PA3.5 x 20
Screw
Plastic Expansion
Bolt
4. Collegare il cavo di alimentazione Ethernet (RJ45) alle porte cor-
rette del proprio GWN7610.
5. Allineare la freccia sul GWN7610AP con la freccia sulla linguetta
di bloccaggio della staa di montaggio e assicurare che il proprio
GWN sia posto in modo saldo sulle stae di montaggio.
6. Ruotare il GWN in senso orario no a quando si blocca in posizione
e si adatta alla linguetta di bloccaggio.
Parete
Viti
(PA 3.5x20)
Perni di espansione
di plastica
Montaggio a softto
Nota: Montaggio a sotto è raccomandato per prestazioni di copertura
ottimali.
1. Rimuovere la piastrella del sotto.
2. Porre la piastra posteriore per il sotto al centro della piastrella del
sotto e contrassegnare i fori delle viti di montaggio (fori vite DIA
5,5 mm, foro reticolo DIA 25 mm).
3. Inserire le viti attraverso la piastra di montaggio.
4
5
6
1
3
Staa per
montaggio
a sotto
2
Viti M3.0x50
Dadi 3M
4. Collegare il cavo di alimentazione Ethernet (RJ45) alle porte cor-
rette del proprio GWN7610.
5. Allineare la freccia sul GWN7610AP con la freccia sulla linguetta
di bloccaggio della staa di montaggio e assicurare che il proprio
GWN sia posto in modo saldo sulle stae di montaggio e collegare i
cavi di rete e di alimentazione.
6. Ruotare il GWN in senso orario no a quando si blocca in posizione
e si adatta alla linguetta di bloccaggio.
4
5
6

~ 35 ~ ~ 36 ~
COLLEGAMENTO DEL GWN7610 ALLA RETE Wi-Fi
PRE DEFINITA
GWN7610 può essere usato come punto di accesso indipendente o
dopo il ripristino alle impostazioni di fabbrica con Wi-Fi abilitato come
predenito.
Dopo l’accensione del GWN7610 e il collegamento alla rete, GWN7610
trasmetterà un SSID predenito basato sul suo indirizzo MAC
GWN[ultime 6 cifre del MAC] e una password casuale.
Nota: Le informazioni password e SSID predenito di GWN7610 sono
stampate sull’etichetta MAC dell’unità.
ACCESSO ALL’INTERFACCIA DI CONFIGURAZIONE
Un computer collegato all’SSID del GWN7610 o alla stessa rete del
GWN7610 può scoprire e accedere all’interfaccia di congurazione
usando uno dei seguenti metodi:
Metodo 1: Scoprire GWN7610 usando il suo indirizzo MAC
1. Individuare il mac address sull’etichetta posizionata nella parte
bassa dell’apparato o sulla confezione.
2. Da un computer collegato alla stessa rete del GWN7610, digitare
il seguente indirizzo usando l’indirizzo MAC del GWN7610 sul
proprio browser https://gwn_<mac>.local
Esempio: se un GWN7610 ha come indirizzo MAC 00:0B:82:8B:4E:28,
è possibile accedere a questa unità digitando
https://gwn_000b828b4e28.local sul browser.
Metodo 2: Scoprire GWN7610 usando GWNDiscoveryTool
1. Scaricare e installare GWNDiscoveryTool dal link seguente:
http://www.grandstream.com/tools/GWNDiscoveryTool.zip
2. Aprire il GWNDiscoveryTool e fare clic su Scan.
3. Il tool scoprirà tutti i Punti di accesso GWN7610 collegati alla rete
mostrando i loro indirizzi MAC e IP.
4. Fare clic su on Gestisci dispositivo per essere reindirizzati diret-
tamente all’interfaccia di congurazione GWN7610 o digitare manu-
almente l’indirizzo IP visualizzato sul proprio browser.
Immettere nome utente e password per accedere. (Lo user-
name di default dell’amministratore è “admin” e la password ca-
suale di default può essere trovata sull’etichetta del GWN7610).
Nota :
• Assicurarsi che il GWN7610 non sia già accoppiato con un altro
Punto di accesso GWN7610 come slave, o serie router GWN7000,
GWN.Cloud altrimenti non è possibile accedere all’interfaccia di con-
gurazione.
• Se il GWN7610 è già accoppiato, scollegarlo prima o eettuare un
ripristino alle impostazioni di fabbrica.
• E’ responsabilità del cliente assicurarsi della conformità alle
regolamentazioni locali in termini di bande di frequenza, potenza di
trasmissione e altro.
• Per la gestione del GWN7610 sul cloud, fare riferimento a https://
www.gwn.cloud.
Scaricare il manuale utente dettagliato da:
http://www.grandstream.com/our-products
A página está carregando...
A página está carregando...
A página está carregando...
A página está carregando...
A página está carregando...
A página está carregando...
A página está carregando...
A página está carregando...
A página está carregando...
-
 1
1
-
 2
2
-
 3
3
-
 4
4
-
 5
5
-
 6
6
-
 7
7
-
 8
8
-
 9
9
-
 10
10
-
 11
11
-
 12
12
-
 13
13
-
 14
14
-
 15
15
-
 16
16
-
 17
17
-
 18
18
-
 19
19
-
 20
20
-
 21
21
-
 22
22
-
 23
23
-
 24
24
-
 25
25
-
 26
26
-
 27
27
-
 28
28
-
 29
29


Grandstream GWN7610 Quick Installation Guide
- Tipo
- Quick Installation Guide
em outras línguas
- español: Grandstream GWN7610
- français: Grandstream GWN7610
- italiano: Grandstream GWN7610
- Deutsch: Grandstream GWN7610
- polski: Grandstream GWN7610
Artigos relacionados
-
Grandstream GWN7625 Guia de instalação
-
Grandstream GWN7615 Quick Installation Guide
-
Grandstream GWN7605LR Guia de instalação
-
-
Grandstream GWN7662 Guia de instalação
-
-
Grandstream GWN7664LR Guia de instalação
-
Grandstream GWN7661 Guia de instalação
-
Grandstream GWN7000 Guia de usuario
-
Grandstream GWN7630 Quick Installation Guide