
Quick Setup Guide
Guia de instalação rápida
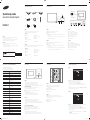
Checking the Components
Vericando os componentes
1 2 3
4 5 6
7 8
Reverse Side
Verso
Control Panel
Painel de controle
English
The warranty will be void in the event of a breakdown due to exceeding the maximum
recommended hours of use per day of 16 hours.
The color and the appearance may differ depending on the product, and the specifications
are subject to change without prior notice to improve the performance.
Português
A garantia pode ficar anulada no caso de falha decorrente de se exceder o máximo
recomendado de 16 horas de uso diário.
A cor e a aparência pode diferir no produto, e as especificações estão sujeitas a alteração sem
prévia notificação para aprimorar o desempenho.
DB22D-P
BN6806748G00
The terms HDMI and HDMI High-Definition Multimedia
Interface, and the HDMI Logo are trademarks or
registered trademarks of HDMI Licensing LLC in the
United States and other countries.
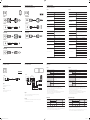
SOURCE
3
21
RGB IN RJ45RS232C IN
USB
HDMI IN(DVI) AUDIO IN
USB
1
2 3 4 5 6 7
English
1
Connect to a USB memory device.
2
Connects to MDC using an RS232C-Stereo cable.
3
Connects to a source device using an HDMI cable.
4
Connects to a source device using a D-SUB cable.
5
Connects to MDC using a LAN cable.
6
Receives sound from a PC via an audio cable.
7
Connect to the power cord.
EnglishEnglish
1
Selects the input source that an external device is connected to.
2
Use this button for turning the Display on and off.
3
Remote sensor
Press a button on the remote control pointing at the sensor on the front of the product to perform the
corresponding function.
- Using other display devices in the same space as the remote control of this product can cause the other
display devices to be inadvertently controlled.
Português
1
Conecta-se a um pen drive.
2
Conecta-se ao MDC usando um cabo estéreo RS232C.
3
Conecta-se a um dispositivo de origem usando um cabo HDMI.
4
Conecta-se a um dispositivo de origem usando um cabo D-SUB.
5
Conecta-se ao MDC usando um cabo LAN.
6
Recebe o som de um PC via um cabo de áudio.
7
Conecte ao cabo de energia.
1
Seleciona a fonte de entrada com a qual um dispositivo externo está conectado.
2
Use este botão para ligar e desligar o monitor.
3
Sensor remoto
Pressione um botão no controle remoto apontado para o sensor na face do produto para executar a
função correspondente.
- Usar outros dispositivos de exibição no mesmo espaço que o controle remoto deste produto pode fazer
com que outros dispositivos de exibição sejam inadvertidamente controlados.
Português
English
Source allows you to select a variety of sources and change source device names.
You can display the screen of a source device connected to the product.
Select a source from source list to display the screen of the selected source.
- The input source can also be changed by using the SOURCE button on the remote control.
- The screen may not display correctly if an incorrect source is selected for the source device you want to
convert to.
- To view detailed information about connected source devices, press the TOOLS button from the Source page.
- The displayed image may differ depending on the model.
Entrada permite a você selecionar uma variedade de origens e alterar os nomes dos dispositivos de origem.
Você pode exibir a tela de um dispositivo de origem conectado ao produto.
Selecione uma origem de uma lista de origens para exibir a tela da origem selecionada.
- A origem de entrada também pode ser alterada usando o botão SOURCE no controle remoto.
- A tela pode não ser exibida corretamente se uma origem incorreta for selecionada para o dispositivo de
origem que você deseja converter.
- Para visualizar informações detalhadas sobre dispositivos-fonte conectados, pressione o botão TOOLS na
página Entrada.
- A imagem exibida poderá variar dependendo do modelo.
Português
Contact SAMSUNG WORLD WIDE
Entre em contato com a SAMSUNG WORLDWIDE
Web site: www.samsung.com/displaysolutions
- Download the user manual from the website for further details.
- Baixe o manual do usuário no site para obter mais detalhes.
Country Customer Care Center
U.S.A 1-800-SAMSUNG (726-7864)
CANADA 1-800-SAMSUNG (726-7864)
ARGENTINE 0800-333-3733
BOLIVIA 800-10-7260
BRAZIL
0800-124-421 (Demais cidades e regiões)
4004-0000 (Capitais e grandes centros)
CHILE 800-SAMSUNG (726-7864)
COLOMBIA
Bogotá 600 12 72
Gratis desde cualquier parte del país 01 8000 112 112 ó desde su celular #SAM(726)
COSTA RICA
0-800-507-7267
00-800-1-SAMSUNG (726-7864)
DOMINICA 1-800-751-2676
ECUADOR
1-800-10-72670
1-800-SAMSUNG (72-6786)
EL SALVADOR 800-6225
GUATEMALA
1-800-299-0013
1-800-299-0033
HONDURAS
800-27919267
800-2791-9111
JAMAICA
1-800-234-7267
1-800-SAMSUNG (726-7864)
MEXICO 01-800-SAMSUNG (726-7864)
NICARAGUA 001-800-5077267
PANAMA
800-7267
800-0101
PARAGUAY 009-800-542-0001
PERU 0-800-777-08
PUERTO RICO 1-800-682-3180
TRINIDAD & TOBAGO 1-800-SAMSUNG (726-7864)
URUGUAY 000-405-437-33
VENEZUELA 0-800-SAMSUNG (726-7864)
Contact the vendor where you purchased the product if any components are missing.
The appearance of the components may differ from the images shown.
Components
1
Quick setup guide 2
Warranty card
(Not available in some locations)
3
Regulatory guide 4
Power cord
5
Batteries
(Not available in some locations)
6
Remote Control
7
D-SUB cable 8
RS232C-Stereo cable
Anti-theft Lock
Trava antifurto
English
- An anti-theft lock allows you to use the product securely even in public places.
- The locking device shape and locking method depend on the manufacturer.
Refer to the user guide provided with your anti-theft locking device for details.
- The following images are for reference only. Real-life situations may differ from what is shown in the images.
To lock an anti-theft locking device:
1
Fix the cable of your anti-theft locking device to a heavy object such as a desk.
2
Put one end of the cable through the loop on the other end.
3
Insert the locking device into the anti-theft lock slot at the back of the product.
4
Lock the locking device.
- An anti-theft locking device can be purchased separately.
- Refer to the user guide provided with your anti-theft locking device for details.
- Anti-theft locking devices can be purchased at electronics retailers or online.
- Uma trava antifurto permite usar o produto com segurança mesmo em locais públicos.
- A forma do dispositivo de trava e o método de trava dependem do fabricante.
Consulte o guia do usuário fornecido com o dispositivo de trava antifurto para obter os detalhes.
- As seguintes imagens são somente para referência. Situações da vida real podem diferir do que é mostrado
nas imagens.
Para prender um dispositivo de trava antifurto:
1
Fixe o cabo do dispositivo de trava antifurto a um objeto pesado como uma mesa.
2
Passe uma extremidade do cabo através da alça na outra extremidade.
3
Insira o dispositivo de trava na ranhura de trava antifurto na parte traseira do produto.
4
Trave o dispositivo.
- Um dispositivo de trava antifurto pode ser comprado separadamente.
- Consulte o guia do usuário fornecido com o dispositivo de trava antifurto para obter os detalhes.
- Dispositivos de trava antifurto podem ser comprados em revendedores de produtos eletrônicos ou on-line.
Português
POWER
Source
HDMI
PC
----
Screen Mirroring
To go to Options, press and hold the Enter button.
Entrada
HDMI
PC
----
Screen Mirroring
Para ir para Opções, mantenha pressionada a tecla Enter.
Remote Control
Controle remoto
English
1
Display or hide the onscreen display menu, or return to the previous menu.
2
Move to the upper, lower, left or right menu, or adjust an option's setting.
Confirm a menu selection.
3
Return to the previous menu.
4
Display information about the current input source.
5
Exit the current menu.
1
Exibe ou oculta o menu de exibição na tela ou retorna para o menu anterior.
2
Move para o menu superior, inferior, esquerdo ou direito, ou ajusta a definição de uma opção.
Confirma uma seleção do menu.
3
Volta ao menu anterior.
4
Exibe informações sobre a fonte de entrada atual.
5
Sai do menu atual.
Português
TOOLS INFO
EXITRETURN
HOME
MENU MagicInfo
Player I
Changing the Input source
Alterando a origem da entrada
Português
Entre em contato com o fornecedor onde você adquiriu o produto se houver qualquer componente faltando.
A aparência dos componentes pode ser diferente das imagens mostradas.
Componentes
1
Guia de instalação rápida 2
Cartão de garantia
(Não disponível em alguns locais)
3
Guia regulatório 4
Cabo de alimentação
5
Pilhas
(Não disponível em alguns locais)
6
Controle remoto
7
Cabo D-SUB 8
Cabo RS232C estéreo
[DB22D-P-QSG-BRAZIL]BN68-06748G-00.indd 1 2015-01-14 5:30:21

PowerSaver
PowerSaver
Normal Operation
Power saving mode
(SOG Signal : Not Support the DPM Mode)
Power off
Rating Typical Max
Power Indicator Off Blinking On
Power
Consumption
40 W 30 W 44 W 0.5 W 0.5 W
-
The displayed power consumption level can vary in different operating conditions or when settings are changed.
- SOG(Sync On Green) is not supported.
- To reduce the power consumption to 0, disconnect the power cord. Disconnect the power cable if you will
not be using the product for an extended period of time (during vacation, etc.)
Economia de energia
Economia de energia
Operação normal
Modo de economia de energia
(Sinal SOG : Sem suporte para o
modo DPM)
Desligado
Taxa Típico Máx.
Indicador de energia Desativar Piscando Ligado
Consumo de energia 40 W 30 W 44 W 0.5 W 0.5 W
-
O nível de consumo de energia exibido pode varias dependendo das condições ou quando as configurações
forem alteradas.
- Não há suporte para sincronização em verde (SOG, Sync On Green).
- Para reduzir o consumo de energia a 0, desconecte o cabo de alimentação. Desconecte o cabo de energia
se não for usar o produto por um determinado período de tempo (durante as férias, etc.)
Model Name DB22D-P
Panel Size 22 CLASS (21.5 inches / 54 cm)
Display area 476.64 mm (H) x 267.786 mm (V) / 18.77 inches (H) x 10.54 inches (V)
Dimensions (W x H x D) 507.5 x 311.2 x 57.8 mm / 19.98 x 12.25 x 2.28 inches
Weight 3.6 kg / 7.94 Ibs
Power Supply AC 100 to 240 VAC (+/- 10%), 60 / 50 Hz ± 3 Hz
Refer to the label at the back of the product as the standard voltage can
vary in different countries.
Environmental
considerations
Operating Temperature : 32 °F - 104 °F (0 °C - 40 °C)
Humidity : 10 % - 80 %, non-condensing
Storage Temperature : -4 °F - 113 °F (-20 °C - 45 °C)
Humidity : 5 % - 95 %, non-condensing
- Plug-and-Play
This monitor can be installed and used with any Plug-and-Play compatible systems.
Two-way data exchange between the monitor and PC system optimizes the monitor settings.
Monitor installation takes place automatically.
However, you can customize the installation settings if desired.
- Due to the nature of the manufacturing of this product, approximately 1 pixel per million (1ppm) may
appear brighter or darker on the panel. This does not affect product performance.
- This device is a Class A digital apparatus.
Nome do modelo DB22D-P
Painel Tamanho Classe 22 (21.5 polegadas / 54 cm)
Área de exibição 476.64 mm (H) x 267.786 mm (V)
Dimensões (L x A x P) 507.5 x 311.2 x 57.8 mm
Peso 3.6 kg
Fornecimento de energia AC 100 para 240 VAC (+/- 10%), 60 / 50 Hz ± 3 Hz
Consulte o rótulo na parte traseira do produto. A voltagem pode
variar dependendo do país.
Considerações
ambientais
Operacional Temperatura : 0 °C - 40 °C (32 °F - 104 °F)
Umidade : 10 % - 80 %, sem condensação
Armazenamento Temperatura : -20 °C - 45 °C (-4 °F - 113 °F )
Umidade : 5 % - 95 %, sem condensação
- Plug-and-Play
Este monitor pode ser instalado e usado com qualquer sistema compatível com Plug-and-Play.
A troca de dados de duas vias entre o sistema do monitor e do PC otimiza as configurações do monitor.
A instalação do monitor é realizada automaticamente.
No entanto, você pode personalizar as configurações e instalação se desejar.
- Devido à natureza da fabricação deste produto, aproximadamente 1 pixel por milhão (1 ppm) poderá
parecer mais claro ou mais escuro no painel. Isso não afeta o desempenho do produto.
- Este dispositivo é um equipamento digital classe A.
Português
English
Specications
Especicações
Connecting to a PC
Conectando ao PC
Connecting to a Video Device
Conectando a um dispositivo de vídeo
Troubleshooting Guide
Guia de solução de problemas
Issues Solutions
The screen keeps switching on and off.
Check the cable connection between the product and PC, and ensure the
connection is secure.
No Signal is displayed on the screen.
Check that the product is connected correctly with a cable.
Check that the device connected to the product is powered on.
Not Optimum Mode is displayed.
This message is displayed when a signal from the graphics card exceeds
the product’s maximum resolution and frequency.
Refer to the Standard Signal Mode Table and set the maximum resolution
and frequency according to the product specifications.
The images on the screen look distorted. Check the cable connection to the product.
The screen is not clear.
The screen is blurry.
Adjust Coarse and Fine.
Remove any accessories (video extension cable, etc) and try again.
Set the resolution and frequency to the recommended level.
The screen appears unstable and shaky.
Check that the resolution and frequency of the PC and graphics card are
set within a range compatible with the product. Then, change the screen
settings if required by referring to the Additional Information on the
product menu and the Standard Signal Mode Table.
There are shadows or ghost images left on the
screen.
The screen is too bright.
The screen is too dark.
Adjust Brightness and Contrast.
Screen color is inconsistent. Go to Picture and adjust the Color Space settings.
White does not really look white. Go to Picture and adjust the White Balance settings.
There is no sound.
Check the connection of the audio cable or adjust the volume.
Check the volume.
The volume is too low.
Adjust the volume.
If the volume is still low after turning it up to the maximum level, adjust
the volume on your PC sound card or software program.
The remote control does not work.
Make sure that the batteries are correctly in place (+/-).
Check if the batteries are flat.
Check for power failure.
Make sure that the power cord is connected.
Check for any special lighting or neon signs switched on in the vicinity.
Problemas Soluções
A tela fica ligando e desligando.
Verifique a conexão do cabo entre o produto e o PC. Certifique-se também
de que a conexão esteja protegida.
Sem Sinal é exibido na tela.
Verifique se o produto está conectado corretamente com um cabo.
Verifique se o dispositivo conectado ao produto está ligado.
Modo Não Optimizado é exibido.
Esta mensagem é exibida quando um sinal da placa gráfica ultrapassa a
resolução e a frequência máxima do produto.
Consulte a tabela de modo de sinal padrão e defina a resolução e frequência
máximas de acordo com as especificações do produto.
As imagens na tela estão distorcidas. Verifique a conexão do cabo com o produto.
A tela não está nítida.
A tela está borrada.
Ajuste o Grosso e o Ajuste Fino.
Remova todos os acessórios (cabo extensor de vídeo, etc) e tente novamente.
Defina a resolução e a frequência para o nível recomendado.
A tela parece instável e trêmula.
Verifique se a resolução e a frequência do PC e da placa gráfica estão dentro
do intervalo compatível com o produto. Em seguida, mude as configurações
da tela caso solicitado consultando as informações adicionais no menu do
produto e a tabela de modo de sinal padrão.
Há sombras ou fantasmas na tela.
A tela está muito clara.
A tela está muito escura.
Ajuste o Brilho e o Contraste.
A cor da tela está inconsistente. Vá para Imagem e ajuste as configurações de Espaço de Cores.
O branco não se parece com branco. Vá para Imagem e ajuste as configurações de Estabilidade de Branco.
Não ouço som.
Verifique a conexão do cabo de áudio ou ajuste o volume.
Verifique o volume.
O volume está muito baixo.
Ajustar o volume.
Se o volume ainda estiver baixo depois de defini-lo para o nível máximo,
ajuste o volume na placa de som do seu PC ou no programa de software.
O controle remoto não funciona.
Verifique se as baterias foram inseridas corretamente (+/-).
Verifique se as baterias estão carregadas.
Verifique se houve falha de energia.
Verifique se o cabo de energia está conectado.
Verifique se há raios ou painéis em neon na vizinhança.
English Português
Connecting the LAN Cable
Conectando o cabo LAN
RJ45
English
Use Cat7(*STP Type) cable for the connection.
*Shielded Twist Pair
Utilize um cabo Cat. 7 (*tipo STP) para a conexão.
*Par torcido com proteção
Português
Para detalhes sobre como usar o programa MDC, consulte a Ajuda após a instalação do programa.
O programa MDC está disponível no site da web.
Connecting to MDC
Conectando-se ao MDC
RJ45
HUB
English
For details on how to use the MDC program, refer to Help after installing the program.
The MDC program is available on the website.
Português
RGB IN
AUDIO IN
HDMI IN(DVI)
HDMI IN(DVI)
AUDIO IN
HDMI IN(DVI)
HDMI IN(DVI)
AUDIO IN
[DB22D-P-QSG-BRAZIL]BN68-06748G-00.indd 2 2015-01-14 5:30:23
-
 1
1
-
 2
2

