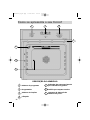
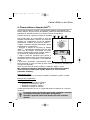
Fagor 5H-780X Manual do proprietário
- Categoria
- Churrascos
- Tipo
- Manual do proprietário

5H-780*
User Manual for Your Oven
Manual de utilización del horno
Guia de utilização do seu forno
Le guide d’utilisation de votre four
Bedienungsanleitung Ihres Backofens
PT
FR
DE
EN
ES
99636023_A_ML.qxp 11/04/2007 09:35 Page 1

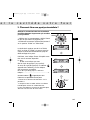
2
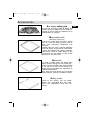
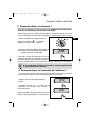
Throughout this manual,
indicates safety recommendations,
indicates advice to help you make the
best use of your oven
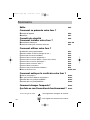
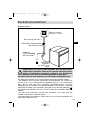
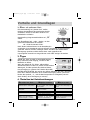
Introduction P.3
What does your oven look like ?
Description of the appliance P.4
A
ccessories
P.5
Safety recommendations
P.6
How to install your oven ?
Electrical connections P.7-8
Dimensions for installation use P.9
How to use your oven ? P.10-19
The oven programmer
P.10
How to set the clock
P.11
How to cook straightaway
P.12
How to programme the cooking
P.13
How to delay cooking (pre-selected end time)
P.14
How to cook economically
P.15
How to use the Grill+ feature
P.16
How to use the timer
P.17
How to adjust the brightness of the display panel
P.17
Cooking methods
P.18-19
Cleaning the oven cavity P.20-22
Pyrolysis explained P.20
When to clean by pyrolysis P.20
Starting pyrolysis straightway P.21
Delaying cleaning by pyrolysis P.22
Changing a bulb
P.22
Troubleshooting
P.23
Contents
99636023_A_ML.qxp 11/04/2007 09:35 Page 2

EN
3
Introduction
Dear Customer,
You have just acquired a FAGOR oven and we would like to thank you.
Our research teams have created this new generation of appliances for
you so that cooking is a pleasure every day.
With pure lines and modern aesthetics, your new FAGOR oven will
blend harmoniously into your kitchen and will perfectly combine cooking
performance and ease of use.
In the FAGOR product line, you will also find a wide range of hobs,
ventilation hoods, dishwashers and referigerators that you can coordinate
with your new FAGOR oven.
Of course, in an ongoing effort to best satisfy your demands with regard
to our products, our after-sales service department is at your disposal
and ready to listen in order to respond to all of your questions and
suggestions (contact information at the end of this booklet).
At the cutting edge of innovation, FAGOR helps to improve the quality of
everyday life by bringing you products that are ever more effective, easy
to use, environmentally friendly, attractive and reliable.
The FAGOR Brand
99636023_A_ML.qxp 11/04/2007 09:35 Page 3

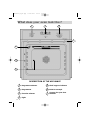
4
2
1
3
4
5
7
6
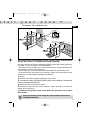
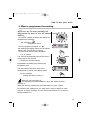
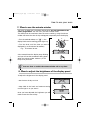
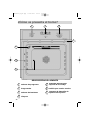
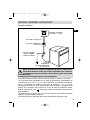
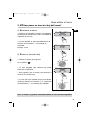
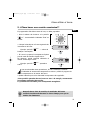
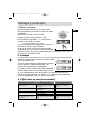
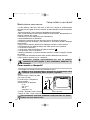
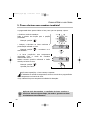
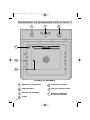
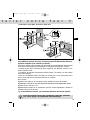
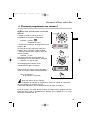
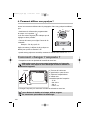
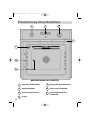
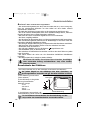
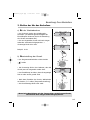
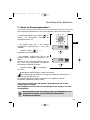
What does your oven look like ?
DESCRIPTION OF THE APPLIANCE
1
2
5
6
73
4
Programme selector
Programmer
Function selector
Light
Shelf support indicator
Hole for turnspit
Contact for open door
detector
99636023_A_ML.qxp 11/04/2007 09:35 Page 4

EN
5
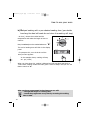
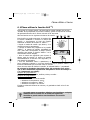
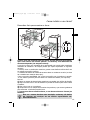
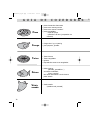
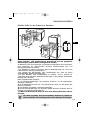
Accessories
Anti-tipping safety grid
The grid can be used to hold all dishes and
moulds containing foodstuffs to be cooked or
browned. It can be used for barbecues (to be
placed directly on the grid).
Multi-purpose dish
(cake dish or drip tray)
It serves as a cake dish and has a sloped
edge. It is used for cooking pastries such as
cream puffs, meringues, madeleines, puff
pastry, etc.
Inserted under the grid, it catches barbecue
juices and grease. It can also be used half-full
of water for double-boiler cooking methods.
Avoid placing roasts or meats directly in the
dish because you are certain to have major
splattering on the oven walls.
Hollow dish
It is used to collect juices and grease from
cooking with the high grill or the pulsed grill.
It can be used as a cooking dish when suitable
for the size of the item to be cooked (e.g.
whole poultry surrounded with vegetables, at
moderate temperature).
Never place this dish directly on the bottom
heating element, except in the GRILL position.
Sliding system
Thanks to this system, you can totally
remove your enamelled dish and easily
access your preparations while they are
cooking.
REAR
FRONT
99636023_A_ML.qxp 11/04/2007 09:35 Page 5

6
Safety recommendations
Please read these instructions before installing and using your oven.
The oven has been designed for domestic use only for cooking food. No asbestos
has been used in its construction.
USING FOR THE FIRST TIME :
Before you use your oven for the first time, leave it empty and, with the door
closed, turn it on to maximum temperature and let it heat up for 15 minutes. This
"burns off the newness of the oven". During this time there may be some smell
from the mineral wool that insulates the oven and there could be some smoke.
This is perfectly normal.
NORMAL USE :
- Always close the door properly. The oven is fitted with a seal designed to
work with a closed door.
- Never lean or let anyone sit on the oven door when it is open.
- The oven parts and accessories can become hot when the door is
left partially open and the grill on. Always keep children at a safe distance.
- When the oven is on it will get hot. Take care not to touch the heating
elements inside the oven.
- Always protect your hands with oven gloves or something similar when
removing food, accessories or containers from the oven.
- Do not line your oven or grill pan with kitchen foil. The metal will increase
the heat produced and could ruin the food and damage the enamel.
- Never use a spray or a high-pressure washer to clean the oven.
- During self-cleaning, surfaces can become hotter than in normal use.
Children must be kept at a distance.
During the action of pyrolysis, accessible surfaces become much hotter than
during normal cooking. Keep children at a distance.
Always check that the oven is off before you clean the inside.
- For your safety your oven is equipped with an AUTOMATIC STOP should
you inadvertently forget to turn off your oven. After 10 hours' operation, the AS
(Automatic Stop) function is activated and your oven stops heating. AS is
displayed in place of the time and a series of 2 successive pips is sounded for a
certain time.
ENVIRONMENTAL PROTECTION :
This appliance’s packaging material is recyclable. Help recycle it and protect the
environment by dropping it off in the municipal receptacles provided for this purpose.
Your appliance also contains a great amount of recyclable material. It is
marked with this label to indicate the used appliances that should not be
mixed with other waste. This way, the appliance recycling organised by
your manufacturer will be done under the best possible conditions, in
compliance with European Directive 2002/96/EC on Waste Electrical and
Electronic Equipment. Contact your town hall or your retailer for the used
appliance collection points closest to your home.
We thank you doing your part to protect the environment.
IMPORTANT
:
For pyrolysis cleaning it is very important to take all accessories not suitable for
pyrolysis such as (telescopic runners and chrome shelves) out of the oven,
and all other containers. Both the standard tray and the deep tray can be left in
the oven during pyrolysis cleaning however, as they have a special pyrolytic
enamel coating which makes them suitable for this process.
Ensure that the function selector is returned to 0 to re-use your
oven.
99636023_A_ML.qxp 11/04/2007 09:35 Page 6

EN
7
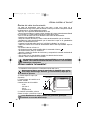
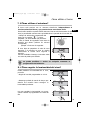
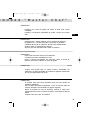
Electricity meter (mains)
(20A, single-phase
220-240 V alternating
current 50 Hz)
Socket
2 -pin with earth
220-240 V single phase
alternating current supply
Electrical connections
Connecting cable
approx 1.50 m.
long
Fused 16A or differential
circuit breaker
Before connecting your oven, make sure you are using the cor-
rect size cable. The cross-section should be the same as the cable
connected to the oven. Use a 16-amp fuse.
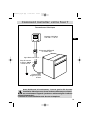
How to install your oven ?
99636023_A_ML.qxp 11/04/2007 09:35 Page 7

8
How to install yo
We cannot accept any liability in the event of an accident
resulting from non-existent or faulty earthing.
• The supply cable (H05 RR-F, H05 RN-F or H05 W-F) must be long enough to allow
the oven to rest on the floor in front of its housing.
With the oven sitting on the floor and disconnected:
• Open the trapdoor at the bottom right hand side at the back of the oven by
removing the 2 screws and swinging the door away.
• Remove the sheath from each wire in the new cable up to 12 mm.
• Twist the ends carefully together.
• Unscrew the terminal screws and remove the wires that need changing.
• Pass the new cable through the wire clamp to the right of the terminals.
• Connect the wires up in accordance with the markings on the terminals.
• Make sure all wires are trapped under the screws.
• The brown wire (live) going to terminal marked L.
• The green and yellow wire (earth) going to the one marked .
• The blue wire (neutral) going to the terminal marked N.
• Tighten the screws and check, by tugging on each wire, that they are firmly connected.
• Tighten the clamp to hold the cable.
• Close the trapdoor using the two screws.
Fitting new wiring and/or changing cables.
The electrical connections are made before the oven is installed in its housing.
• The oven must be connected using an approved 3-core cable (live, neutral and
earth
) with 1.5 mm square conductors. This should be connected via a 3- pin-
socket (live, neutral, and earth to the main supply which should be should be a
220-240V, alternating single-phase current. If the oven is not connected using a
plug and socket, it must be connected to a multi-pole switch with a minimum gap
of 3 mm between contacts. The earth wire (green and yellow) should be connected
to the terminal marked with the earth symbol on the appliance and to the earth
in the switch.
• Where the oven is connected using a separate plug and socket this must be
accessible after the oven has been installed.
• The neutral wire (blue) of the oven must be connected to the neutral in the main supply.
99636023_A_ML.qxp 11/04/2007 09:35 Page 8

EN
9
If you are unsure about fitting this oven yourself please use a
qualified electrician.
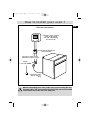
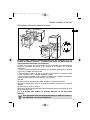
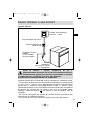
Dimensions for installation use
The oven may be housed either under a work surface or built into a
column that is open* or closed with a suitable opening.
Your oven works at its best and produces excellent results when cooking and clea-
ning itself, if its air circulation is not compromised:
• The oven must be centred in the unit so that there is a minimum distance of 5
mm between it and the surrounding unit.
• The housing unit or its outer surface must be capable of withstanding heat.
• To ensure the oven rests firmly in the housing, screw it to the housing unit using
the holes on the side uprights provided (see diagram).
To do this:
1) Remove the rubber stoppers masking the fixing holes.
2) To prevent the housing unit splintering, drill two holes 3 mm in diameter in the wall of the
housing unit opposite the fixing holes.
3) Attach the oven using the two screws.
4) Conceal the hole using the rubber stoppers. (These also help to cushion the
closing of the oven door).
(*) If the housing unit is open at the back, the gap must not be more
than 70 mm.
stall your oven ?
99636023_A_ML.qxp 11/04/2007 09:35 Page 9

10
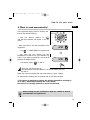
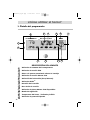
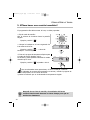
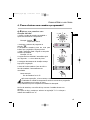
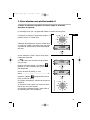
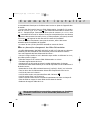
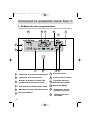
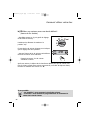
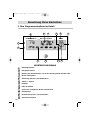
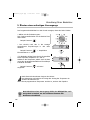
1. The oven programmer
13
5
7
8
9
6
2
4
10
11
12
Temperature increase indicator
ECO (economical) cooking indicator
Recommended shelf position for dish
EASY COOK indicator
Time display (time of day and timer)
Grill+ indicator
1
3
4
5
6
2
Length of cooking time
End of cooking time
EASY COOK dishes indicator
Control knob
Oven temperature and
pyrolysis indicator
Door locked indicator
7
9
10
8
11
12
How to use your oven ?
+
99636023_A_ML.qxp 11/04/2007 09:35 Page 10

EN
11
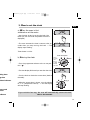
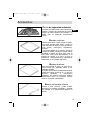
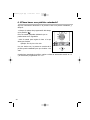
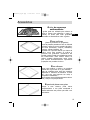
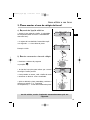
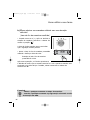
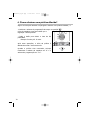
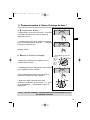
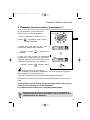
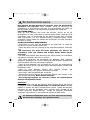
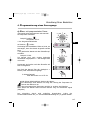
a) When the oven is first
switched on at the mains
• Set the time of day by turning the knob (the
faster you turn the knob the quicker the time is
displayed).
• The oven assumes the time is correct a few se-
conds after you stop turning the knob -> The
display stops blinking.
Time chosen is 12.30.
b) Altering the clock
• Turn the programme selector to the re-set posi-
tion “ ”
• The time display blinks and you can alter the time.
• Turn the knob to obtain the correct time (back or
forwards).
• When the correct time is shown, turn the selector
to ”T°c” (temperature control) -> and the display
will stop blinking.
T˚
c
T˚
c
If you omit the last step, the oven will automatically assume the time
after a few seconds.
2. How to set the clock
Timer
Cooking
time
End of
cooking
Altering
the clock
Knob description
oking time
ng time
dishes indicator
ature and
cator
ndicator
99636023_A_ML.qxp 11/04/2007 09:35 Page 11

12
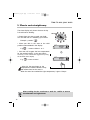
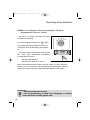
How to use your oven
The timer display only shows the time of day.
It should not be blinking.
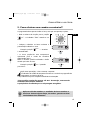
• Choose how you want to cook your food:
Turn the dial until it is indicating your choice.
Example : position " ".
• Place your dish in the oven at the shelf
position recommended in the display.
E.g" " -> means shelves 1 or 2.
• Your oven will suggest the best temperature
for the method chosen. In this case 200ºC.
However, you can override the suggestion by using
the knob below the display.
E.g " " is now at 190ºC.
After this, the oven heats up, the
temperature increase indicator is busy
and reflects how hot the oven is.
When the oven has reached the right temperature, it gives 3 beeps.
After cooking the fan continues to work for a while to ensure
the elements cool right down.
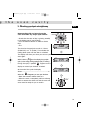
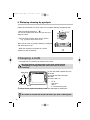
3. How to cook straightaway
99636023_A_ML.qxp 11/04/2007 09:35 Page 12

EN
13
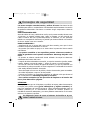
How to use your oven
a) To turn on the oven manually but
programme the oven to turn off (delayed
cooking)
• Choose the method of cooking and adjust the
temperature if necessary.
The example is " "
Temperature 200°C
• Turn the programme selector to
“”
The cooking time display shows 0:00 and blinks.
You can now set how long to cook for.
•
Turn the knob until the time is displayed.
E.g. 25 minutes
The oven will automatically assume this time is
correct after a few seconds
-> The display will stop blinking.
Immediately the display stops blinking the
countdown starts.
The time cooking will finish (start time +
cooking time) is shown in the display panel.
For this example:
cooking will end at 12:55 pm
After this, the oven heats up,
the temperature increase indicator is busy and reflects how hot
the oven is.
When the oven has reached the right temperature, it gives 3 beeps.
At the end of the cooking time, the oven gives a series of beeps for some
minutes. To switch the beeps off, turn the method selector to TºC and the
feature selector to 0.
T˚
c
4. How to programme the cooking
99636023_A_ML.qxp 11/04/2007 09:35 Page 13

14
b) Delayed cooking with a pre-selected cooking time (you decide
how long the food will cook for and when the cooking will stop)
• As for a), choose the method and the
temperature and select the length of time to
cook for.
Now, immediately turn the method selector to
“”.
The end of cooking time will blink in the display
panel.
• To postpone this, turn the knob until the
time you want appears.
In the example shown, cooking will stop
at 1 pm (13:00)
When you have done this, cooking is delayed and will start later and finish at
13:00. When cooking finishes the oven gives a series of beeps until you turn the
feature switch to “0”.
How to use your oven
T˚
c
After you have programmed in the times you can still:
- Change the length of cooking time
- Cancel the programme at any time by re-setting the cooking
time to 0:00
99636023_A_ML.qxp 11/04/2007 09:35 Page 14

EN
15
How to use your oven
5. How to cook economically*
The programme display must be showing the
time of day without blinking.
• Turn the feature selector to " ".
and the ECO indicator will appear in the
panel.
• Place your dish in the oven according to the
suggestion.
E.g " " -> means shelves 1 or 2 are the best
• Your oven will now display the best
temperature to cook at for your method. E.g.
200ºC. If you want to change this, use the knob
beneath the display panel.
The display shows " " at 190ºC.
After this, the oven heats up,
the temperature increase indicator is busy and reflects how hot
the oven is.
When the oven has reached the right temperature, it gives 3 beeps.
To optimise ECO cooking, do not preheat and do not open the door.
*This setting is designed to reduce the energy required for cooking by
up to 20%, while still producing the same results.
ECO means it is energy-efficient as stated on the label.
After cooking the fan continues to work for a while to ensure
the elements cool right down.
99636023_A_ML.qxp 11/04/2007 09:35 Page 15

16
How to use your oven
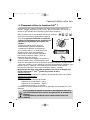
6. How to use the Grill+ feature
T˚
c
You can either switch this feature on or off during the main co-
oking period. Simply turn the knob below the display.
You can also use this feature during a delayed cooking cycle.
This feature enables you to brown the top of the dish after it has been cooked by
another method. For the last 5 minutes of cooking time, the grill switches on.
It will only operate in conjunction with the following functions: .
After selecting one of the above functions GRIL+ is selected by adding 5 minutes
to the cooking time or turning the feature selector to GRILL+ when cooking ends.
• Set the cooking method and alter the
temperature if required.
• Turn the programme selector to GRILL+, the
cooking time will blink 0:05 (this is the minimum
time this feature operates for when used with
another cooking method).
• Turn the knob to add the normal cooking time.
After a few seconds, the display will stop
blinking.
• When you have done all three, the oven will
warm up and a horizontal bar will light up in the
display panel under the word GRILL+ to indicate
it is working. 5 minutes after the main cooking
ends the GRILL+ indicator will start blinking.
Never place dishes too close to the grill element or the food will burn
rather than brown gently. Always use a shelf position at the bottom of
the oven (1 or 2).
Sui
table dishes:
• Cheese-topped pasta, leeks in cheese sauce, fish in sauces, fruit crumble etc..
T
ypical example of this feature in use :
Cauliflower cheese sprinkled with extra cheese:
• 1.Select cooking method
• 2.Select temperature (180ºC)
• 3.Select GRILL+
• 4.Select time: 25 minutes.
The sauce will heat for 20 minutes and then the cheese topping will brown for 5.
99636023_A_ML.qxp 11/04/2007 09:35 Page 16

EN
17
Your oven is fitted with a separate minute timer. It is not connected to the
oven's programmes. You can use it just like a kitchen timer.
This feature can be used even when the oven is working. Using the minute
minder will cause the time of day to disappear temporarily from the display.
• Turn the method selector to “ ” -> the
display blinks and a small egg-timer lights up.
• Turn the knob until the time you want is
displayed (up to 59 minutes 59 seconds)
E.g.: 15 minutes 30 secs
A few seconds later the display stops blinking
and you will see the countdown taking place.
When the minute minder reaches 0, it will
beep to let you know.
7. How to use the minute minder
How to use your oven
T˚
c
You can alter or switch the minute minder off at any time.
8. How to adjust the brightness of the display panel
To adjust the brightness of the display panel:
• Set the time of day to 12:10
• Keep hold of the knob and continue turning
until the light is as you want it.
Once you have adjusted the brightness you will
need to reset the time of day.
99636023_A_ML.qxp 11/04/2007 09:35 Page 17

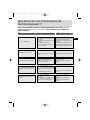
18
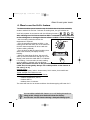
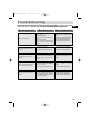
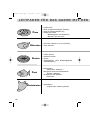
Symbol
Name of cooking mode Description of cooking mode
Traditional ECO
Cooking controlled by the upper and
lower heating elements with no fan.
Grill
Cooking controlled by the upper
element without the fan.
This position allows for energy
savings while preserving the
quality of the cooking.
The ECO position is used for
the energy label performance.
Preheat the oven for five
minutes.
Slide the drip tray onto the
bottom shelf support.
Hold warm function
Heat regulated by the upper and
lower elements with use of fan.
Stabilisation at low temperatures.
Traditional fan heating
Cooking controlled by the upper and
lower heating elements and by the
fan.
Quick temperature increase.
Some dishes can be placed in
the oven while it is still cold.
Fan heating
Cooking controlled by the heating
element located at the back of the
oven and by the fan.
Cooking controlled by the
heating element located at
the back of the oven and
by the fan.
*
*
ECO
Bottom-cooking, fan-assisted
Cooking controlled by the bottom
element combined with a slight dose
of the grill and the fan.
Cooking heat from the bottom
with a small amount of heat
from the top.
Place the grid on the lower
shelf support.
Grill (fan-assisted)
Cooking controlled, alternately, by the
upper element and by the fan.
No need for preheating
Roasts and poultry that are
juicy and crispy all over.
The turnspit continues to work
until the door is opened.
Slide the drip tray onto the
bottom shelf support.
Oven cooking modes
Traditional
Cooking controlled by the upper
and lower heating elements with
no fan.
Requires preheating before
placing the dish in the oven.
* Programme(s) used to obtain the results indicated on the energy label in compliance with European standa
99636023_A_ML.qxp 11/04/2007 09:36 Page 18

EN
19
Recommendations
Oven cooking modes
Recommended for all poultry or roasts on the
turnspit.
For sealing and thoroughly cooking lamb roasts,
beef cuts.
For preserving tenderness in filets of fish.
Recommended for quiches, potpies and juicy
fruit tarts.
Recommended for grilling chops, sausages,
slices of bread, prawns placed on the grid.
Recommended for letting dough rise for bread,
brioche, kouglof... without exceeding 40° C
(plate warming, defrosting).
Recommended for preserving tenderness in
white meats, fish, vegetables.
For cooking multiple items on up to three levels.
Recomm T°
min. recomm. max.
T°
35 180 235
Recommended for meats, fish and vegetables,
preferably placed in a terra-cotta dish.
Recommended for moist dishes (quiches, juicy
fruit tarts, etc.).
The crust will be thoroughly cooked on the bottom.
Recommended for dishes that rise (cake,
brioche, kouglof, etc.) and for soufflés that will not
be stuck by a crust formed on the top.
Recommended for slow, gentle cooking: tender
game meat, etc.
To seal roasts of red meat.
To simmer in a covered stew pan dishes that
were begun on the hob (coq au vin, stew, etc.).
min. recomm. max.
T°
35 200 275
min. recomm. max.
T°
35 225 275
min. recomm. max.
T°
35 200 275
min. recomm. max.
T°
35 205 275
min. recomm. max.
T°
180 200 230
min. recomm. max.
T°
180 275 275
min. recomm. max.
T°
35 80 100
abel in compliance with European standard EN 50304 and in accordance with European Directive 2002/40/EC.
99636023_A_ML.qxp 11/04/2007 09:36 Page 19

20
-Your oven is self-cleaning. It does this by burning off the spatters and drips
produced, at high temperature. The smoke and smells that this produces are
removed as the air passes through a catalyst.
- It is not necessary to run the pyrolysis feature after every use of the oven, simply
when the oven is dirty.
- To make it more efficient, this oven has 2 pyrolytic cleaning cycles.
- An energy-saving one (PYRO ECO) lasting 90 minutes (plus cooling down
time means the oven is locked for 2 hours) and consuming 25% less energy than
the standard cycle. Used after the second or third time you cook meat, this feature
will ensure your oven stays clean.
- Standard cycle (PYRO) lasting 2 hours (plus cooling down time means the
oven is locked for 2½ hours) and suitable for cleaning a really dirty oven.
- As a safety measure, once the temperature is higher than normal use the door
automatically locks. You cannot unlock it even by turning the pyrolysis feature off.
1. Pyrolysis explained
C leaning the ove
2. When to clean by pyrolysis
FOOD WITH LITTLE Biscuits, vegetables, cakes You do not need to use
SPATTERING quiches, soufflés pyrolysis feature
FOOD THAT Meat, fish (in an open dish) Use the pyrolysis feature
SPATTERS stuffed vegetables after 3 oven uses
FOOD THAT Large pieces of If a lot of spitting occurs,
SPITS BADLY meat on the spit run the pyrolysis feature
afterwards.
If your oven smokes when the pre-heat feature is on or if there is a lot of
smoke during a cooking cycle run the pyrolysis cycle. You can also use this
feature if there is an unpleasant smell of cooking when the oven is cold.
Do not wait until the oven is coated in dirt before cleaning it.
99636023_A_ML.qxp 11/04/2007 09:36 Page 20
A página está carregando...
A página está carregando...
A página está carregando...
A página está carregando...
A página está carregando...
A página está carregando...
A página está carregando...
A página está carregando...
A página está carregando...
A página está carregando...
A página está carregando...
A página está carregando...
A página está carregando...
A página está carregando...
A página está carregando...
A página está carregando...
A página está carregando...
A página está carregando...
A página está carregando...
A página está carregando...
A página está carregando...
A página está carregando...
A página está carregando...
A página está carregando...
A página está carregando...
A página está carregando...
A página está carregando...
A página está carregando...
A página está carregando...
A página está carregando...
A página está carregando...
A página está carregando...
A página está carregando...
A página está carregando...
A página está carregando...
A página está carregando...
A página está carregando...
A página está carregando...
A página está carregando...
A página está carregando...
A página está carregando...
A página está carregando...
A página está carregando...
A página está carregando...
A página está carregando...
A página está carregando...
A página está carregando...
A página está carregando...
A página está carregando...
A página está carregando...
A página está carregando...
A página está carregando...
A página está carregando...
A página está carregando...
A página está carregando...
A página está carregando...
A página está carregando...
A página está carregando...
A página está carregando...
A página está carregando...
A página está carregando...
A página está carregando...
A página está carregando...
A página está carregando...
A página está carregando...
A página está carregando...
A página está carregando...
A página está carregando...
A página está carregando...
A página está carregando...
A página está carregando...
A página está carregando...
A página está carregando...
A página está carregando...
A página está carregando...
A página está carregando...
A página está carregando...
A página está carregando...
A página está carregando...
A página está carregando...
A página está carregando...
A página está carregando...
A página está carregando...
A página está carregando...
A página está carregando...
A página está carregando...
A página está carregando...
A página está carregando...
A página está carregando...
A página está carregando...
A página está carregando...
A página está carregando...
A página está carregando...
A página está carregando...
A página está carregando...
A página está carregando...
A página está carregando...
A página está carregando...
A página está carregando...
A página está carregando...
A página está carregando...
A página está carregando...
A página está carregando...
A página está carregando...
A página está carregando...
A página está carregando...
A página está carregando...
A página está carregando...
A página está carregando...
A página está carregando...
A página está carregando...
A página está carregando...
A página está carregando...
A página está carregando...
A página está carregando...
A página está carregando...
-
 1
1
-
 2
2
-
 3
3
-
 4
4
-
 5
5
-
 6
6
-
 7
7
-
 8
8
-
 9
9
-
 10
10
-
 11
11
-
 12
12
-
 13
13
-
 14
14
-
 15
15
-
 16
16
-
 17
17
-
 18
18
-
 19
19
-
 20
20
-
 21
21
-
 22
22
-
 23
23
-
 24
24
-
 25
25
-
 26
26
-
 27
27
-
 28
28
-
 29
29
-
 30
30
-
 31
31
-
 32
32
-
 33
33
-
 34
34
-
 35
35
-
 36
36
-
 37
37
-
 38
38
-
 39
39
-
 40
40
-
 41
41
-
 42
42
-
 43
43
-
 44
44
-
 45
45
-
 46
46
-
 47
47
-
 48
48
-
 49
49
-
 50
50
-
 51
51
-
 52
52
-
 53
53
-
 54
54
-
 55
55
-
 56
56
-
 57
57
-
 58
58
-
 59
59
-
 60
60
-
 61
61
-
 62
62
-
 63
63
-
 64
64
-
 65
65
-
 66
66
-
 67
67
-
 68
68
-
 69
69
-
 70
70
-
 71
71
-
 72
72
-
 73
73
-
 74
74
-
 75
75
-
 76
76
-
 77
77
-
 78
78
-
 79
79
-
 80
80
-
 81
81
-
 82
82
-
 83
83
-
 84
84
-
 85
85
-
 86
86
-
 87
87
-
 88
88
-
 89
89
-
 90
90
-
 91
91
-
 92
92
-
 93
93
-
 94
94
-
 95
95
-
 96
96
-
 97
97
-
 98
98
-
 99
99
-
 100
100
-
 101
101
-
 102
102
-
 103
103
-
 104
104
-
 105
105
-
 106
106
-
 107
107
-
 108
108
-
 109
109
-
 110
110
-
 111
111
-
 112
112
-
 113
113
-
 114
114
-
 115
115
-
 116
116
-
 117
117
-
 118
118
-
 119
119
-
 120
120
-
 121
121
-
 122
122
-
 123
123
-
 124
124
-
 125
125
-
 126
126
-
 127
127
-
 128
128
-
 129
129
-
 130
130
-
 131
131
-
 132
132
-
 133
133
-
 134
134
-
 135
135
-
 136
136


Fagor 5H-780X Manual do proprietário
- Categoria
- Churrascos
- Tipo
- Manual do proprietário
em outras línguas
- español: Fagor 5H-780X El manual del propietario
- français: Fagor 5H-780X Le manuel du propriétaire
- English: Fagor 5H-780X Owner's manual
- Deutsch: Fagor 5H-780X Bedienungsanleitung


