
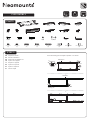
FL50-540BL1
IT
EN
NL
DE
FR
ES
PT
DK
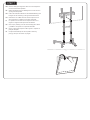
Floor stand
Vloersteun
Bodenständer
Support au sol
Supporto da pavimento
Soporte de suelo
Suporte de chão
Gulvstander
NO
SE
FI
PL
CS
SK
RO
Gulv stativ
Golvstativ
Lattiateline
Stojak podłogowy
Podlahový stojan
Podlahový stojan
Stativ pentru podea
1285mm or 1340mm or 1395mm or 1450mm
871mm
620mm
min100-max600mm
min100-max400mm
max1665mm
430mm
133mm
678mm
+5°
-12°
Ø50mm
Ø45mm
WWW.NEOMOUNTS.COM
INSTRUCTION MANUAL

PARTS
FL50-540BL1
Tool
M-A. M5x14
(x4)
M-B. M6x14
(x4)
M-C. M6x30
(x4)
M-D. M8x30
(x4)
M-E. M8x50
(x4)
M-F. D5-D8
(x4)
M-G. Ø15xØ8x5
(x8)
M-H. Ø15xØ8x15
(x8)
K. M10x35
(x2)
L. M6x35
(x2)
M. M8x60
(x4)
A. (x1)
E. (x2) F. (x2)
N. D8
(x4)
O. 14-17mm
(x1)
G. (x1) H. (x1) I. (x1) J. (x6)
B. (x1) C. (x1) D. (x2)
100x100 -
600x400 mm
0-50 kg
128,5-145 cm
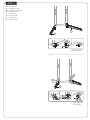
Adjust the stands
Stel de staanders in
Stellen Sie die Ständer auf
Ajustez les supports
Regolare i supporti
Ajuste los soportes
Ajuste os suportes
Ustaw stojaki
EN
NL
DE
FR
IT
ES
PT
PL
STEP 1
P. 5mm
(x1)
Q. 8mm
(x1)
Press the locking pin and adjust to position 1 as shown.
locking pin
locking pin
Position 1
Position 1
A
J

Install the feet
Installeer de voeten
Installieren Sie die Füße
Installer les pieds
Installa i piedi
Instalar los pies
Instale os pés
Zainstaluj stopy
EN
NL
DE
FR
IT
ES
PT
PL
STEP 2
>10mm
B
C
K
Q
D
P
LQ
Note: Do not tighten
the screw entirely
Note: Tighten the
screw entirely

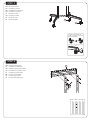
Install the casters
Installeer de wielen
Installieren Sie die Rollen
Installez les roulettes
Installa le rotelle
Instalar las ruedas
Instale as rodas
Zainstaluj kółka
EN
NL
DE
FR
IT
ES
PT
PL
Install the VESA plate
Installeer de VESA plaat
Montieren Sie die VESA-Platte
Installation de la plaque VESA
Installare la piasta VESA
Instalar la placa VESA
Instalar a placa VESA
Instalowanie płytki VESA
EN
NL
DE
FR
IT
ES
PT
PL
STEP 3
STEP 4
Lock the caster brakes to
avoid any sudden movement
during installation.
a b c d
E
F
O
G
P
N
M

* Not Included
Install the adapter brackets and use spacers if necessary
Bevestig de adapter steunen en gebruik afstandhouders
indien nodig
Montage die Halterungsschienen und verwenden Sie
Distanzscheiben wenn nötig
Installation des adaptateurs sur l'écran et utilisez des
entretoises si nécessaire
Monti il supporto del adattatore e utilizzare distanziatori
se necessario
Conecte los soportes del adaptador y utilice espacia-
dores si es necesario
Instalação de braços adaptadores e utilize separadores
se necessário
Zainstaluj ramiona uchwytu i użyj dystansów jeśli jest
taka potrzeba
EN
NL
DE
FR
IT
ES
PT
PL
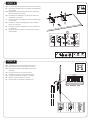
Attach the screen onto the bracket and secure it
Bevestig het scherm aan de steun en zet vast
Montage und Sicherung des Bildschirmes an die
Halterung
Accrochez l'écran sur le cadre et fixez-le
Appendere lo schermo sulla staffa e fissarlo
Cuelgue la pantalla en el soporte y asegúrela
Pendure a tela no suporte e prenda-a
Zawieś ekran na wsporniku i zabezpiecz go
EN
NL
DE
FR
IT
ES
PT
PL
STEP 5
STEP 6
Too long Too Short
VESA600
VESA500
VESA400
VESA300
VESA200
VESA100
I
H
M-A
M-F M-F
M-F
M-G M-G
M-H M-H
M-B
M-C
M-D M-E
M-F

Run the cable(s) through the cable cover and adjust the
mount to the desired position
Geleid de kabel(s) door de kabelgoot en stel de steun in
op de gewenste positie
Führen Sie das/die Kabel durch die Kabelabdeckung und
bringen Sie die Halterung in die gewünschte Position
Positionnez vos câbles dans les chemins prévus à cet
effet et ajustez le support à la position souhaitée
Far passare il cavo attraverso la copertura del cavo e
regolare il supporto nella posizione desiderata
Pase el (los) cable(s) a través de la bandeja para cables
y establecer el soporte en la posición deseada
Passe o cabo pela tampa do cabo e ajuste o suporte na
posição desejada
Przeprowadź kabel przez osłonę kabla i dostosuj
pozycję uchwytu do twoich wymagań
EN
NL
DE
FR
IT
ES
PT
PL
STEP 7


-
 1
1
-
 2
2
-
 3
3
-
 4
4
-
 5
5
-
 6
6
-
 7
7
-
 8
8


em outras línguas
- español: Neomounts FL50-540BL1 Manual de usuario
- français: Neomounts FL50-540BL1 Manuel utilisateur
Artigos relacionados
-
 Neomounts NS-M1250BLACK Manual do usuário
-
 Neomounts NS-M3800BLACK Manual do usuário
-
 Neomounts NS-M3600BLACK Manual do usuário
-
 Neomounts DS70-700BL1 Manual do usuário
-
 Neomounts WL95-900BL16 Video Wall Mount Manual do usuário
-
Neomounts ds75s-950bl2 Manual do usuário
-
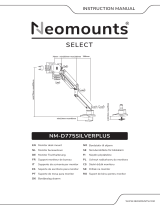 Neomounts NM-D775SILVERPLUS Manual do usuário
-
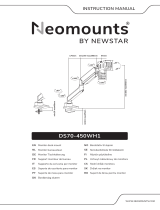 Neomounts DS70-450BL1 Manual do usuário
-
Neomounts DS75-450BL2 Manual do usuário
-
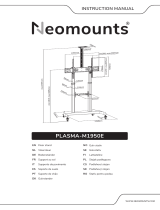 Neomounts PLASMA-M1950E Manual do usuário


