
P8083-R
SERIES
VOLUME
100
USB
POWER
PROG/
REPEAT SD/USB
DEL
SD
CARD
1 2 3 4 5 6 7 8 9 0
REC COPY A-B FOLDER REW F.WD
STOP
IR
PLAY/
O
|
SD Card/USB
SOUND SYSTEM SPECIALIST
P8083-R
Lettore/Registratore audio digitale MP3
INSTRUCTIONS FOR USE
Introduction
While thanking you for having chosen a PASO product, we would
like to remind you that our company works according to a certified
Quality System. This means that all our products are checked during
every phase of manufacturing in order to ensure that you will be
fully satisfied with your purchase. In any case, the guarantee will
cover any manufacturing flaws during the guarantee period. We
recommend that you read the following instructions for use and
follow them carefully in order to exploit in full the performance of
this product and use it correctly.
ISTRUZIONI PER L’USO
Introduzione
Nel ringraziarVi per aver scelto un prodotto PASO, vogliamo
ricordarVi che la nostra azienda opera con sistema di qualità
certificato. Tutti i nostri prodotti vengono pertanto controllati in
ogni fase della produzione per garantirVi la piena soddisfazione del
Vostro acquisto. Per ogni evenienza la garanzia coprirà, nel periodo
di validità, eventuali difetti di fabbricazione. Vi raccomandiamo
di leggere attentamente le seguenti istruzioni d’uso per sfruttare
appieno le prestazioni offerte da questo prodotto e per evitare
eventuali problemi.
Digital MP3 Audio Recorder/Player
INDICE
1. Descrizione generale
1.1 Pannello frontale .......................................................2
1.2 Pannello posteriore ...................................................2
2. Avvertenze generali
2.1 Installazione .............................................................3
2.2 Alimentazione e messa a terra ...................................3
2.3 Note di sicurezza .......................................................3
3. Uso
Descrizione display LCD ....................................................3
3.1 Riproduzione file audio ..............................................4
3.2 Registrazione ............................................................4
3.3 Programmazione .......................................................4
• Selezione tracce singole ..........................................4
• Selezione intere cartelle ..........................................4
3.4 Copia .......................................................................4
• Copia di traccia singola ...........................................4
• Copia di un’intera cartella ........................................4
• Copia di più tracce o cartelle ...................................4
3.5 Ripetizione ...............................................................5
• Ripetizione di una sezione di traccia .........................5
3.6 Cancellazione dei file .................................................5
• Cancellazione singola traccia ...................................5
• Cancellazione cartella ..............................................5
• Cancellazione di tutti i file .......................................5
3.7 Telecomando ............................................................5
• Funzione RANDOM .................................................5
• Funzione MUTE ......................................................5
4. Montaggio a rack ..........................................................6
Caratteristiche tecniche ....................................................... 6
Prima di usare l’apparecchio, prendere conoscenza di tutte le
caratteristiche leggendo attentamente le istruzioni contenute nel
manuale cartaceo o su supporto cd, ponendo particolare attenzione
alle note di sicurezza.
Before using the equipment, make yourself aware of all
characteristics by reading carefully the instructions included in the
printed manual or on the CD, paying particular attention to the
safety notes.
INDEX
1. General description
1.1 Front panel ...............................................................2
1.2 Rear panel ................................................................2
2. General precautions
2.1 Installation ...............................................................3
2.2 Power supply and earthing ........................................3
2.3 Safety notes .............................................................3
3. Use
LCD Display description ....................................................3
3.1 Playing out audio tracks ............................................4
3.2 Recording .................................................................4
3.3 Programming ............................................................4
• Selecting single tracks.............................................4
• Selecting entire folders ...........................................4
3.4 Copy ........................................................................4
• Copy of a single track .............................................4
• Copy the entire folder .............................................4
• Copy of multiple files or folders ...............................4
3.5 Repeat .....................................................................5
• Repeating a section of track ....................................5
3.6 Deleting files.............................................................5
• Deleting single track ...............................................5
• Deleting folder .......................................................5
• Deleting all files ......................................................5
3.7 Remote control .........................................................5
• RANDOM function ...................................................5
• MUTE function........................................................5
4. Rack mounting .............................................................6
Technical specifications .......................................................6
P8083-R
2
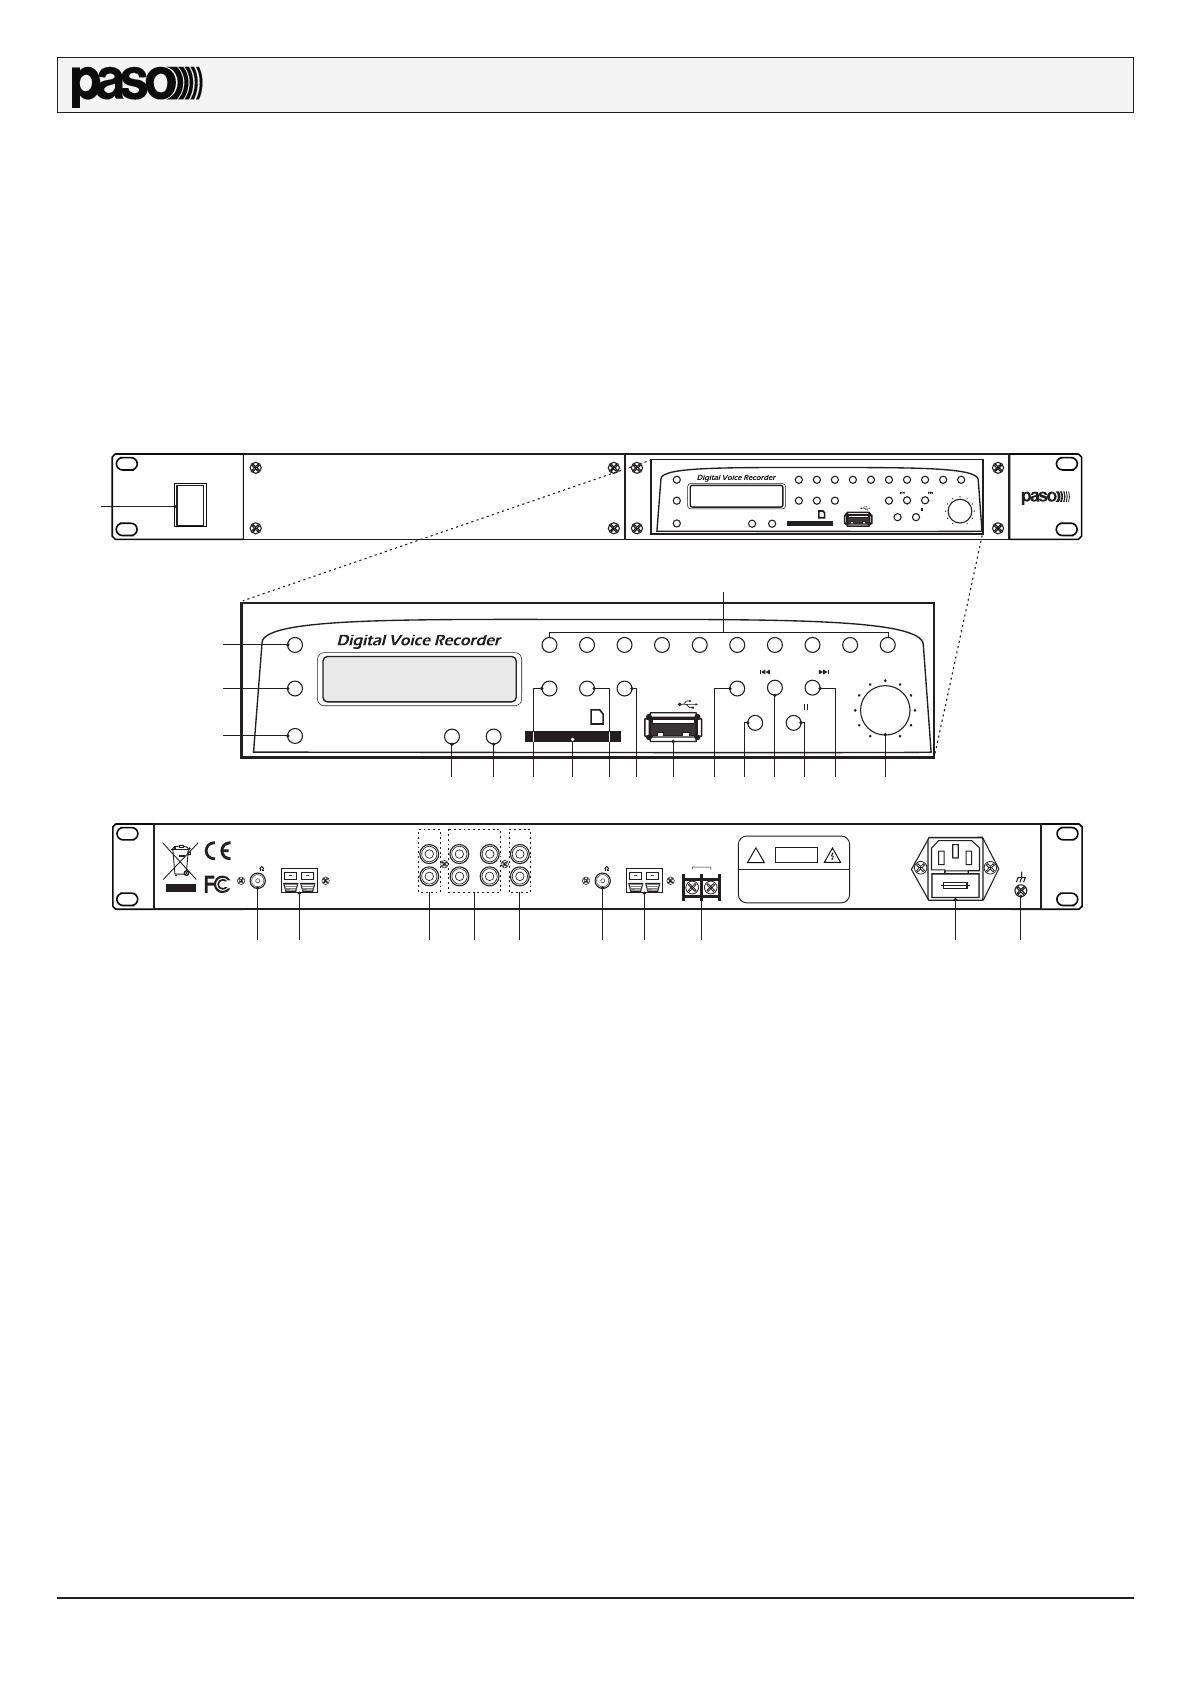
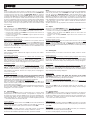
1.1 Pannello frontale
1) Interruttore di rete.
2) Tasto POWER (accensione del registratore/riproduttore).
3) Display.
4) Tasti numerici (0÷9) per selezione tracce/cartelle.
5) Tasto funzioni PROG/REPEAT.
6) Sensore infrarosso per telecomando.
7) Tasto cancellazione.
8) Tasto selezione dispositivo (SD/USB).
9) Tasto REC (attivazione registrazione).
10) Slot per inserimento SD card.
11) Tasto COPY (funzione copia tracce/cartelle).
12) Tasto A>B (ripetizione sezione).
13) Presa USB per connessione a dispositivi esterni.
14) Tasto FOLDER (selezione cartella/regolazione qualità registrazione).
15) Tasto STOP (interruzione riproduzione).
16) Tasto PLAY/PAUSE (avvio/sospensione della riproduzione).
17) Regolazione di volume uscita di linea.
18) Tasto REV (traccia precedente/arretramento veloce).
19) Tasto F.WD (traccia successiva/avanzamento veloce).
1.2 Pannello posteriore
20) Prese per antenna FM (non utilizzate).
21) Prese per antenna AM (non utilizzate).
22) Uscita di linea.
23) Uscite di linea non utilizzate.
24) Ingresso di linea per registrazione.
25) Morsettiera per alimentazione esterna in corrente continua @24 VCC.
26) Spina di rete con fusibile incorporato.
27) Connessione telaio.
1. DESCRIZIONE GENERALE
Il P8083-R è un registratore/riproduttore digitale di file audio in formato
*.mp3. Le caratteristiche principali sono le seguenti:
• Gestione di memorie esterne da 128 MB a 16 GB (SD Card/USB).
• Numero massimo di tracce audio registrabili: 99.
• Formato di registrazione: *.mp3.
• Riproduzione di file audio in formato *.mp3 e *.wma.
• Qualità di registrazione selezionabile (128 Kbps o 192 Kbps).
• Possibilità di programmare sequenze di riproduzione personalizzate e di
selezionare e ripetere una singola sezione di brano.
• Display LCD retroilluminato per la visualizzazione delle funzioni.
• Ingresso di linea posteriore.
• Regolazione volume generale.
1.1 Front panel
1) Mains switch.
2) POWER key (recorder/player ON/OFF).
3) Display.
4) Numerical keys (0÷9) for tracks/folder selection.
5) PROG/REPEAT function key.
6) Infrared remote control eye.
7) Deleting key.
8) Device selection key (SD/USB).
9) REC key (activation of recording).
10) Slot for inserting the SD card.
11) COPY key (copy of tracks/folders).
12) A>B key (section repeat play).
13) USB socket for connection to external devices.
14) FOLDER key (folder selection/recording quality adjustment).
15) STOP key (stop playing).
16) PLAY/PAUSE key (start/pause playing).
17) Line output volume adjustment.
18) REV key (backward to last track/fast reverse the track).
19) F.WD key (forward to next track/fast forward the track).
1.2 Rear panel
20) Sockets for FM antenna (not used).
21) Sockets for AM antenna (not used).
22) Line output.
23) Line outputs not used.
24) Recording line input.
25) Terminal strip for external 24VDC power supply.
26) Mains plug with built-in fuse.
27) Frame connection.
VOLUME
100
USB
POWER
PROG/
REPEAT SD/USB
DEL SD CARD
1 2 3 4 5 6 7 8 9 0
REC COPY A-B FOLDER REW F.WD
STOP
IR
PLAY/
2
5
6
7 8 10 12 15 171913
4
11
918
14 16
P8083-R
SERIES
O
|
VOLUME
100
USB
POWER
PROG/
REPEAT SD/USB
DEL SD CARD
1 2 3 4 5 6 7 8 9 0
REC COPY A-B FOLDER REW F.WD
STOP
IR
PLAY/
1
!
CAUTION
RISK OF ELECTRIC
SHOCK DO NOT OPEN
CAUTION: TO REDUCE THE RISK OF ELECTRIC SHOCK.
DO NOT REMOVE COVER (OR BACK)
NO USER SERVICEABLE PARTS INSIDE.
REFER SERVICING TO QUALIFIED SERVICE
PERSONEL.
OUTPUT OUTPUT REC IN
L
R
L
R
DC 24 V
+-
AC 230 V 50HZ
AC 45VA
FUSE T1A 250V
PRIORITY
OUTPUT
FM ANT
75
AM
LOOP ANT
20 21
FM ANT
75
AM
LOOP ANT
20 2122 23 24 25 26 27
1. GENERAL DESCRIPTION
The P8083-R is a digitale recorder/player for *.mp3 audio files. Its main
features are:
• External memory management 128 MB up to 16 GB (SD Card/USB).
• Max number of recordable audio tracks: 99.
• Recording format: *.mp3.
• Playing *.mp3 and *.wma audio files.
• Selectable recording quality (128 Kbps or 192 Kbps).
• Possibility to create custom playlist and to repeat a specific section of a single
track.
• Backlighted LCD display for viewing the functions.
• Rear line input.
• General volume control.

P8083-R
3
2. AVVERTENZE GENERALI
2.1 Installazione
Tutti gli apparecchi PASO sono costruiti nel rispetto delle più severe normative
internazionali di sicurezza ed in ottemperanza ai requisiti della Comunità
Europea. Per un corretto ed efficace uso dell’apparecchio è importante prendere
conoscenza di tutte le caratteristiche leggendo attentamente le presenti istruzioni
ed in particolare le note di sicurezza. Durante il funzionamento dell’apparecchio è
necessario assicurare un’adeguata ventilazione. Evitare di racchiudere l’apparecchio
in un mobile privo di aerazione o di tenerlo in prossimità di sorgenti di calore.
2.2 Alimentazione e messa a terra
Questo apparecchio è predisposto per il funzionamento con tensione di rete a
230 V ± 10% 50/60 Hz. L’interruttore di accensione (1) agisce sulla tensione di
rete. In dotazione all’apparecchio é fornito un cavo di alimentazione con filo di
terra; il terminale di terra della spina di rete non deve essere rimosso in alcun
caso. Collegare la spina di rete (26) dell’apparecchio alla rete elettrica utilizzando
l’apposito cavo fornito in dotazione; assicurarsi che la presa di corrente sia
dotata di collegamento di terra a norma di legge. Il circuito di alimentazione del
P8083-R è protetto da un fusibile situato sulla presa di rete dell’apparecchio.
2.3 Note di sicurezza
Ogni intervento all’interno dell’apparecchio, quale operazioni di manutenzione
od altro, deve essere effettuato solo da personale specializzato: la rimozione
del coperchio rende accessibili parti con rischio di scosse elettriche. Prima di
rimuovere il coperchio accertarsi sempre che il cavo di rete sia staccato. Nel caso
di accidentale caduta di liquidi sull’apparecchio, staccare immediatamente la spina
di rete ed interpellare il centro di assistenza PASO più vicino. La connessione
di telaio consente di collegare altre apparecchiature per la sola funzione di
schermatura dei segnali a basso livello: questa presa non deve essere utilizzata
per il collegamento di sicurezza del telaio alla terra.
2. GENERAL PRECAUTIONS
2.1 Installation
All PASO equipment is manufactured in accordance with the most stringent
international safety standards and in compliance with European Community
requisites. In order to use the equipment correctly and effectively, it is important
to be aware of all its characteristics by reading these instructions and in particular
the safety notes carefully. While the equipment is working, it is necessary to
provide adequate ventilation. The equipment must not be closed inside cabinets
without ventilation or kept in the vicinity of sources of heat.
2.2 Power supply and earthing
This equipment is designed for use with a mains voltage of 230 V ± 10%
50/60 Hz. The ON/OFF switch (1) controls the mains voltage. The equipment
is supplied with its own powersupply cable, which is equipped with an earthing
wire. The earth terminal of the mains plug should never be removed under any
circumstances. Connect the mains plug (26) of the equipment to the power
mains using the cable included in the supply. Make sure that the power outlet
is equipped with a connection to earth in accordance with the law. The power-
supply circuit of the P8083-R is protected by a fuse installed on the mains plug
of the equipment.
2.3 Safety notes
Any activities inside the equipment such as maintenance and so on may only be
carried out by specialised personnel: when the cover is removed, parts liable to
cause electric shocks are exposed. Before removing the cover, always make sure
that the power cord has been disconnected.
In the event that liquid is accidentally spilt onto the apparatus, disconnect the
mains plug immediately and contact the nearest PASO Service Centre. The
chassis connection may be used to connect other equipment only for the purpose
of shielding the low signals: this socket may not be used to connect the chassis
to earth for safety purposes.
3. USO
Accendere l’apparecchio portando in posizione | l’interruttore (1) e quindi
premere il tasto POWER (2) sul pannellino. Il display si illumina e ricerca
eventuali dispositivi inseriti. Dopo aver posizionato l’SD card o il dispositivo USB,
il display visualizzerà il totale di tracce e cartelle presenti sul supporto. In caso
venissero inseriti entrambi i dispositivi, utilizzare il tasto (8) per selezionare
l’attivazione dell’uno o dell’altro.
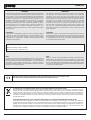
Descrizione display LCD
LINE Ingresso di linea collegato.
DEL Funzione cancellazione attivata.
USB Modalità USB attivata.
REC Registrazione in corso.
SD Modalità SD attivata.
COPY Funzione COPY attivata.
RAN Riproduzione casuale attivata.
REP Ripetizione traccia in corso.
REP ALL Ripetizione di tutte le tracce.
REP F Ripetizione di una specifica cartella.
A->B Ripetizione di una specifica sezione di traccia.
M Funzione MUTE attivata.
PROG Modalità programmazione attivata.
Pos. A Riproduzione in corso.
Pos. B Riproduzione sospesa (pausa).
Pos. C Numero di cartelle (file *.mp3).
Pos. D Numero traccia in riproduzione.
Pos. E Durata della traccia.
Pos. F Indicatore di registrazione in corso.
LINE DEL USB REC SD COPY RAN
REPALL F A B M PROG
A
B
C D E F
3. USE
Turn on the equipment positioning the switch (1) on | position, then press
the POWER key (2) on the panel. The display lights and search any devices
inserted. After placing the SD card or USB device, the display will show the total
number of tracks and folders on the media. If both devices were inserted, use
the button (8) to select the activation of either.
LCD Display description
LINE Line input connected.
DEL DELETE function ON.
USB USB mode ON.
REC Recording in progress.
SD SD mode ON.
COPY COPY function ON.
RAN RANDOM playing ON.
REP Repeat of current track.
REP ALL Repeat of all tracks.
REP F Repeat of a folder.
A->B Repeat of a specific section of a track.
M MUTE funtion ON.
PROG PROGRAM mode ON.
Pos. A Playing.
Pos. B Playing suspended (pause).
Pos. C Number of folders (*.mp3 files).
Pos. D Current playing track.
Pos. E Duration of the playing track.
Pos. F Recording in progress indicator.

P8083-R
4
3.3 Programmazione
Questa funzione (da utilizzare a lettore fermo) consente di selezionare delle
sequenze di tracce specifiche.
Selezione tracce singole
• Premere il tasto STOP (15).
• Premere il tasto PROG/REPEAT (5), sul display appare la scritta PROG.
Selezionare la traccia desiderata con il tastierino numerico (4) e/o con i tasti
REV (18) e F.WD (19). Premere nuovamente il tasto (5) per salvare la 1a
selezione (il display visualizza
00 01
).
• Selezionare la 2a traccia desiderata (il display visualizza
00 02
) e ripetere
queste operazioni fino a che si è ottenuta la sequenza completa.
• Senza uscire dalla programmazione, premere PLAY (16) per avviare la
riproduzione della sequenza programmata o COPY (11) per copiare i file
selezionati sul dispositivo esterno (vedi 3.4).
Selezione intere cartelle
• Premere il tasto STOP (15).
• Premere il tasto PROG/REPEAT (5), sul display appare la scritta PROG.
Dopo aver premuto il tasto FOLDER (14), selezionare la cartella desiderata
con il tastierino numerico (4) e/o con i tasti REV (18) e F.WD (19). Premere
nuovamente il tasto (5) per salvare la 1a selezione.
• Selezionare la 2a cartella desiderata e ripetere queste operazioni fino a che si
è ottenuta la sequenza completa.
• Senza uscire dalla programmazione, premere PLAY (16) per avviare la
riproduzione della sequenza programmata o COPY (11) per copiare le cartelle
selezionate sul dispositivo esterno (vedi 3.4).
3.2 Registrazione
Utilizzando il tasto REC (9) è possibile registrare il segnale proveniente da una
sor
gente esterna (ad es. un lettore CD) collegato alla presa posteriore REC IN (24).
È possibile selezionare la qualità di registrazione tenendo premuto il tasto FOLDER
(14) per almeno 3 secondi: premere i tasti REV/F.WD per scegliere un valore tra
128 Kbps e 192 Kbp2. In fase di registrazione si distinguono due situazioni:
Se nel modulo sono inseriti sia un dispositivo USB che una SD card:
• Premere il tasto REC (9): sul display verrà richiesto di scegliere su quale
supporto registrare.
• Premere il tasto SD/USB (8) per selezionare il supporto di destinazione.
• Premere nuovamente REC per avviare la registrazione; il display lampeggia
ad indicare il comando acquisito.
• Premere il tasto STOP (15) per interrompere la registrazione.
Se nel modulo è inserito un solo dispositivo (USB o SD card):
• Premere REC (9) per iniziare a registrare; il display lampeggia ad indicare il
comando acquisito.
• Premere STOP (15) per interrompere la registrazione.
Le registrazioni effettuate vengono salvate sul dispositivo esterno in una directory
denominata
RECORD/LINE_IN
. Per riprodurre i file registrati, premere il tasto
FOLDER (14): sul display appare la lettera “F”. Usare i tasti REV (18) e F.WD
(19) per selezionare sul display la directory
REC
, quindi premere PLAY (16) per
avviare la riproduzione. I file archiviati nella directory
RECORD/LINE_IN
vengono
denominati automaticamente 001.mp3, 002.mp3 e così via.
3.1 Riproduzione tracce audio
Dopo aver selezionato il supporto da riprodurre con il tasto SD/USB (8) premere
PLAY (16) per avviare la riproduzione. La manopola VOLUME (17) regola il
volume generale d’uscita. Per sospendere temporaneamente la riproduzione,
premere nuovamente il tasto (16). Per terminare la riproduzione, premere il tasto
STOP (15). Le funzione specifica di ciascun tasto è evidenziata a pag. 2.
3.4 Copia
Utilizzando il tasto COPY (11) a lettore fermo, è possibile copiare i dati da USB
a SD card e viceversa. Per fare questo, premere il tasto STOP (15) ed inserire
nelle apposite sedi i due dispositivi. Quindi, premere il tasto SD/USB (8) per
selezionare il dispositivo da copiare e scegliere una delle seguenti opzioni:
Copia di traccia singola
Con questa opzione è possibile copiare un singolo file; selezionare la traccia da
copiare utilizzando i tasti REV/F.WD, quindi premere COPY (11) per iniziare il
processo di copia sul dispositivo selezionato.
Copia di un’intera cartella
Questa opzione consente di copiare tutto il contenuto di una o più cartelle.
Premere il tasto FOLDER (14): sul display appare la lettera “F”. Usare i tasti
REV (18) e F.WD (19) per selezionare la cartella da copiare. Premere il tasto
COPY (11) per avviare la copia dei file sul dispositivo selezionato.
Copia di più tracce o cartelle
Con questa opzione è possibile copiare più file e/o cartelle. Dopo aver programmato
le cartelle desiderate (vedi punto 3.3), senza uscire dalla programmazione,
premere il tasto COPY (11) per copiare le tracce sul dispositivo selezionato.
3.1 Playing out audio tracks
After selecting the media to play with the button SD/USB (8) press PLAY (16)
to start playback. The VOLUME control (17) adjusts the overall volume output.
To pause playback, press again the button (16). To stop playback, press STOP
(15). The specific function of each button is highlighted on page. 2.
3.2 Recording
Using the REC button (9) you can record the signal from an external source (eg.
CD players) connected to the rear REC IN socket (24). It is possible to select the
recording quality pressing FOLDER key (14) for at least 3 seconds, then press the
REV/F.WD keys to select a value between 128 Kbps and 192 Kbps. In recording
mode, there are two situations:
When USB and SD Card are both connected to the equipment:
• Press the REC key (9): the display will be asked to choose which media to
record.
• Press the SD/USB key (8) to select the destination media.
• Press again the REC key to start recording; the display flashes to indicate the
command acquired.
• Press the STOP key (15) to stop recording.
When only a device is connected to the equipment (USB or SD card):
• Press the REC key (9) to start recording; the display flashes to indicate the
command acquired.
• Press the STOP (15) key to stop recording.
The recordings are saved in the external device into a directory called
RECORD/
LINE_IN
. To play recorded files, then press the FOLDER button (14): the display
shows the letter “F”. Use the keys REV (18) and F.WD (19) to select the
display directory
REC
and press PLAY (16) to start playback. The files stored in
RECORD/LINE_IN
directory entries are automatically called 001.mp3, 002.mp3,
and so on.
3.3 Programming
This function (for use in stop mode) to select sequences specific tracks.
Selecting single tracks
• Press the STOP key (15).
• Press the PROG/REPEAT key (5), the display shows PROG. Select the
desired track with the numeric keypad (4) and/or REV/F.WD keys (18/19).
Press again the key (5) to save the first selection (display shows
00 01
).
• Select the second desired track (on display
00 02
) and repeat these steps until
you have obtained the complete sequence.
• Without exit programming, press PLAY (16) to begin playing the programmed
sequence or COPY (11) to copy the selected files on the external device (see
point 3.4).
Selecting entire folders
• Press the STOP key (15).
• Press
the PROG/REPEAT key (5), the display shows PROG. After pressing
the FOLDER key (14), select the folder desired with the numeric keypad (4)
and/or REV/F.WD keys (18/19). Press the again the key (5) to save the first
selection.
• Select the second desired folder and repeat these steps until you have
obtained the complete sequence.
• W
ithout exit programming, press PLAY (16) to start playback of the programmed
sequence or CO
PY (11) to copy the selected folders to the external device
(see point 3.4).
3.4 Copy
Using the COPY key (11) in stop mode, you can copy data from USB to SD card
and vice versa. To do this, press the STOP key (15) and insert into their seats
the two devices. Then, press the SD/USB key (8) to select the device to copy and
choose the following options:
Copy of a single track
With this option you can copy a single file; select the track you want to copy by
pressing the REV/F.WD keys (18/19), then press the COPY key (11) to begin
the process of copying on the selected device.
Copy the entire folder
This option allows you to copy the entire contents of one or more folders. Press
the FOLDER key (14), the display shows the letter ‘F’. Use the keys REV/F.WD
(18/19) to select the folder to copy. Press COPY key (11) to start copying files
on the selected device.
Copy multiple tracks or folders
With this option you can copy multiple files and/or folders. After programming
the desired folders (see point 3.3), without leaving the programming mode, press
COPY key (11) to copy the track on the selected device.

P8083-R
5
Note
Le tracce copiate C
OPY vengono salvate sul dispositivo esterno in una directory
denominata
RECORD/COPY
. Per riprodurre questi file premere il tasto FOLDER ( 14):
sul display appare la lettera “F”. Usare i tasti REV/F.WD (18/19) per selezionare
sul display la directory
CPY
, quindi premere PLAY (16) per avviare la riproduzione.
La f
unzione COPY non riporta sul dispositivo la suddivisione per cartelle originale.
Ad esempio, nel caso si copino 3 cartelle contenenti ciascuna 5 file (per un totale
di 15 file), sul dispositivo queste tracce verranno archiviate nella cartella
RECORD/
COPY
e rinominate in sequenza (FILE_001.mp3, FILE_002.mp3…FILE_015.mp3).
Nel caso venisse copiato un altro file, verrebbe archiviato come FILE_016.mp3 e
così via.
Il tempo richiesto per la copia dipende dal numero di file selezionati e dalla
loro dimensione.
3.5 Ripetizione
Questa funzione del tasto PROG/REPEAT (5), da utilizzare a lettore avviato,
consente di ripetere una o più tracce, secondo queste opzioni:
• Premuto 1 volta, il display visualizza REP: viene ripetuta la traccia in corso.
• Premuto 2 volte, il display visualizza REP F: viene ripetuta l’intera cartella in cui
è contenuta la traccia in corso.
• Premuto 3 volte, il display visualizza REP ALL: vengono ripetute tutte le tracce
contenute nel supporto.
• Premuto 4 volte, sul display la scritta scompare e la funzione viene annullata.
3.6 Cancellazione dei file
Questa funzione consente di eliminare dal supporto una traccia, una cartella o
tutti i file presenti:
Cancellazione singola traccia
Questa operazione può essere effettuata sia a lettore fermo che avviato. Dopo
aver selezionato la traccia desiderata, premere il tasto DEL (7): il display visualizza
DEL FILE
. Premere nuovamente il tasto (7) per eliminare la traccia in corso: il
display visualizza la scritta
DEL END
. Per uscire dalla modalità di cancellazione,
attendere che il display termini di lampeggiare e che la scritta scompaia.
Cancellazione cartella
Questa o
perazione può essere effettuata sia a lettore fermo che avviato. Premere
il tasto FOLDER (14) e selezionare la cartella da eliminare, quindi premere il tasto
DEL (7): il display visualizza
DEL FOLDER
. Premere nuovamente il tasto (7) per
eliminare la cartella selezionata: il display visualizza la scritta
DEL END
. Per uscire
dalla modalità di cancellazione, attendere che il display termini di lampeggiare e
che la scritta scompaia.
Cancellazione di tutti i file
ATTENZIONE! Questa operazione porterà alla cancellazione definitiva
di TUTTI i file presenti sul supporto (formattazione). Pertanto, se nel
supporto fossero presenti file di natura diversa da quella audio, si consiglia di
effettuare una copia di backup prima di procedere alla cancellazione.
Questa operazione può essere effettuata solo a lettore fermo.
Dopo aver premuto il tasto STOP (15), tenere premuto il tasto DEL (7) per
almeno 5 secondi: il display visualizza la scritta
DEL ALL
ricordando che si stanno
per cancellare TUTTI i file presenti.
Premere nuovamente il tasto DEL (7) per eliminare definitivamente i file dal supporto.
Per uscire dalla modalità di cancellazione, attendere che il display termini di
lampeggiare e che la scritta scompaia.
3.7 Telecomando
In dotazione al P8083-R è fornito un telecomando per il controllo remoto
dell’apparecchio. Per una ricezione ottimale, è consigliabile non superare i 3m
di distanza dal sensore infrarosso IR (6) posto sul frontale dell’apparecchio.
La batteria (tipo CR2025 3V) deve essere inserita nell’apposito vano posteriore.
Questo telecomando che – oltre a riportare tutti i comandi eseguibili da pannello
– consente di attivare altre funzioni utili quali:
Funzione RANDOM
Questa funzione, attivabile premendo il tasto RAN, consiste nella riproduzione in
ordine casuale delle tracce. Il display visualizza la scritta
RAN
. Per ritornare alla
modalità di riproduzione normale, premere nuovamente il tasto RAN.
Funzione MUTE
Questa funzione, attivabile premendo il tasto M, consente di ammutolire
temporaneamente la riproduzione audio. Il display visualizza la scritta
M
.
Per ritornare alla modalità di riproduzione normale, ripremere il tasto M.
Ripetizione di una sezione di traccia
Questa funzione consente di attivare la ripetizione di una specifica sezione di
traccia. Per fare ciò, durante la riproduzione, premere il tasto A-B (12) una prima
volta per inserire il punto di partenza (A) e premerlo nuovamente per inserire il
punto finale (B). Il P8083-R continuerà quindi a riprodurre la sezione di brano
compresa tra i punti A e B, fino a che la funzione non verrà disabilitata da una
ulteriore pressione del tasto (12).
Notes
The copied tracks are saved in the external device into a directory called
RECORD/
COPY
. To play these files, press the FOLDER button (14): the display shows the
letter “F”. Use the keys REV/F.WD (18/19) to select the display directory
CPY
and press PLAY (16) to start playback.
The COPY function on the device does
not report a breakdown by original folders. For example, if you copied 3 folders
each containing 5 file (for a total of 15 files), these tracks are stored on the device
folder
RECORD/COPY
and renamed in sequence (FILE_001.mp3, FILE_002.mp3
... FILE_015.mp3). In the case were copied to another file would be stored as
FILE_016.mp3 and so on.
The time required for the copy depends on the number of selected files and their
size.
3.5 Repeat
This function of the PROG/REPEAT key (5) - to be used while playing, you can
repeat one or more tracks, according to these options:
• Pressed 1 time, the display shows REP: repeats the current track.
• Pressed 2 times, the display shows REP F: repeats the entire folder that
contains the current track.
• Pressed 3 times, the display REP ALL: repeats all the tracks contained in the
device.
• Pressed 4 times, function is canceled.
Repeating a section of track
This feature enables the repetition of a specific section of track. To do so, during
playback, press the A-B key (12) once to enter the starting point (A) and press
it again to place the ending point (B). The P8083-R will continue to play the
section of track between points A and B, until the feature is disabled by pressing
again the key (12).
3.6 Deleting files
This feature allows you to delete a track from the media, a folder or all files:
Deleting single track
This can be done during the playing or while the playing is stopped. After selecting
the desired track, press the DEL key (7): the display shows
DEL FILE
. Press again
the key (7) to delete the current track: the display shows
DEL END
. To exit the
delete mode, wait until the display stops flashing and the message disappears.
Deleting folder
This can be done during the playing or while the playing is stopped. Press the
FOLDER button (14) and select the folder to delete, then press the DEL key (7):
the display shows
DEL FOLDER
. Press again the key (7) to delete the selected
folder: the display shows
DEL END
. To exit the delete mode, wait until the display
stops flashing and the message disappears.
Deleting all files
WARNING! This operation will delete ALL the files on the media
(formatting). Therefore, if on the media were present file different from that
audio, we recommend making a backup before deletion.
This operation can only be taken at the stop mode.
After pressing the STOP key (15), hold down the DEL key (7) at least for 5
seconds, the display shows
DEL ALL
remembering that you are about to delete
ALL files.
Press again the DEL key (7) to permanently delete files from the media. To
exit the delete mode, wait until the display stops flashing and the message
disappears.
3.7 Remote control
The P8083-R is provided of a remote control. For best reception, you should not
exceed 3m away from the infrared sensor IR (6) on the front of the equipment.
The battery (CR2025 3V type) must be inserted into the rear compartment. This
remote control - in addition to bring out all the executable commands for panel
- can activate other useful functions like:
RANDOM function
This feature can be activated by pressing the RAN key and allows you to shuffle
the tracks.The display shows
RAN
. To return to normal playback, press the button
again RAN.
MUTE function
This feature can be activated by pressing the M key and allows you to temporarily
mute the audio. The display shows the message
M
.
To return to normal playback, press the key again M.

P8083-R
6
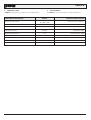
CARATTERISTICHE TECNICHE P8083-R TECHNICAL SPECIFICATIONS
Gestione memoria esterna 128 MB ÷ 16 GB
SD / SDHC / USB External memory management
Qualità di registrazione (selezionabile) 128 Kbps / 192 Kbps Recording quality (selectable)
Livello uscita 0,9 V Output level
Alimentazione da rete 230 V / 115 V ±10%
50/60 Hz Mains power supply
Alimentazione esterna in c.c. 24 V DC external power supply
Consumo da rete 45 VA Mains consumption
Consumo in c.c. 300 mA (max) DC consumption
Dimensioni (L x A x P) 482 x 44 x 285 mm Dimensions (W x H x D)
Peso 4 Kg Weight
4. MONTAGGIO A RACK
Il P8083-R è predisposto per il montaggio in rack standard PASO 19”. 4. RACK MOUNTING
The P8083-R is ready to be be fitted in a 19” PASO standard rack.

P8083-R
7
WARRANTY
This product is warranted to be free from defects in raw materials
and assembly. The warranty period is governed by the applicable
provisions of law. Paso will repair the product covered by this
warranty free of charge if it is faulty, provided the defect has occurred
during normal use. The warranty does not cover products that are
improperly used or installed, mechanically damaged or damaged
by liquids or the weather. If the product is found to be faulty, it
must be sent to Paso free of charges for shipment and return. This
warranty does not include any others, either explicit or implicit, and
does not cover consequential damage to property or personal injury.
For further information concerning the warranty contact your local
PASO distributor.
Important!
Should the user wish to avail himself of servicing under the warranty, he
must provide evidence of the purchase (invoice or receipt). The user shall
also indicate the date of purchase, model and serial number indicated
on the equipment. For this reason, you should complete the box below
as a reminder of the data required.
GARANZIA
Questo prodotto è garantit
o esente da difetti nelle sue materie prime
e nel suo montaggio; il periodo di garanzia è regolamentato dalle
norme vigenti. La Paso riparerà gratuitamente il prodotto difettoso
qui garantito se il difetto risulterà essersi verificato durante l’uso
normale; la garanzia non si estende quindi a prodotti usati ed
installati in modo errato, danneggiati meccanicamente, danneggiati
da liquidi o da agenti atmosferici. Il prodotto, risultato difettoso,
dovrà essere inviato alla Paso franco di spese di spedizione e ritorno.
Questa garanzia non ne comprende altre, esplicite od implicite, e
non comprende danni o incidenti conseguenti a persone o cose.
Contattare i distributori PASO della zona per maggiori informazioni
sulla garanzia.
Importante!
L’utente ha la responsabilità di produrre una prova d’acquisto (fattura
o ricevuta) se vuole servirsi dell’assistenza coperta da garanzia. Dovrà
inoltre fornire data di acquisto, modello e numero di serie riportati
sull’apparecchio; a questo scopo, compilare come promemoria dei dati
richiesti lo spazio qui sotto.
MODELLO / MODEL: ................................................................................................................................................................................
NUMERO DI SERIE / SERIAL NUMBER: .....................................................................................................................................................
DATA D’ACQUISTO / PURCHASE DATE: ....................................................................................................................................................
Avvertenze per lo smaltimento del prodotto ai sensi della Direttiva Europea 2002/96/EC
Alla fine della sua vita utile il prodotto non deve essere smaltito insieme ai rifiuti urbani, ma deve essere consegnato presso gli
appositi centri di raccolta differenziata predisposti dalle amministrazioni comunali, oppure presso i rivenditori che forniscono questo
servizio. Smaltire separatamente un rifiuto elettrico e/o elettronico (RAEE) consente di evitare possibili conseguenze negative per
l’ambiente e per la salute derivanti da un suo smaltimento inadeguato e permette di recuperare i materiali di cui è composto al fine
di ottenere un importante risparmio di energia e di risorse. Su ciascun prodotto è riportato a questo scopo il marchio del contenitore
di spazzatura barrato.
Important information for correct disposal of the product in accordance with EC Directive 2002/96/EC
This product must not be disposed of as urban waste at the end of its working life. It must be taken to a special waste collection
centre licensed by the local authorities or to a dealer providing this service. Separate disposal of electric and/or electronic equipment
(WEEE) will avoid possible negative consequences for the environment and for health resulting from inappropriate disposal, and
will enable the constituent materials to be recovered, with significant savings in energy and resources. As a reminder of the need
to dispose of this equipment separately, the product is marked with a crossed-out wheeled dustbin.
Questo prodotto è conforme alle Direttive della Comunità Europea sotto le quali lo stesso ricade.
This product is in keeping with the relevant European Community Directives.
Nota
La PASO S.p.A declina ogni responsabilità per danni a cose e/o persone
derivanti dall’uso non corretto dell’apparecchio o da procedure non
rispondenti a quanto riportato sul presente libretto. Nel continuo intento
di migliorare i propri prodotti, la PASO S.p.A. si riserva il diritto di
apportare modifiche ai disegni e alle caratteristiche tecniche in qualsiasi
momento e senza alcun preavviso.
Note
PASO S.p.A will not accept any liability for damage to property and/or
persons arising out of incorrect use of the equipment or of procedures
that do not comply with the instructions provided in this booklet. PASO
S.p.A. strive to improve their products continuously, and therefore reserve
the right to make changes to the drawings and technical specifications
at any time and without notice.

S.p.A
Via Settembrini, 34 - 20020 Lainate (MI) - ITALIA
TEL. +39-02-580 77 1 (15 linee r.a.) - FAX +39-02-580 77 277
http://www.paso.it - UDT - 06/10 - 11/669-A
-
 1
1
-
 2
2
-
 3
3
-
 4
4
-
 5
5
-
 6
6
-
 7
7
-
 8
8


em outras línguas
- italiano: Paso P8083-R Manuale del proprietario
- English: Paso P8083-R Owner's manual
Artigos relacionados
Outros documentos
-
Roadstar HIF-1902HP Manual do usuário
-
aqprox! APPMPR1TDT Manual do usuário
-
Sanyo DC-DA 1400M Manual do usuário
-
Roland MC-80 Manual do usuário
-
X-Micro XMP3E-20F Manual do usuário
-
Panasonic RRXS450E Manual do usuário
-
Lexibook DMP20 SP, DMP23 SP Manual do usuário
-
Roland Fantom-G6 Manual do usuário
-
Difrnce MP1510 2GB BLACK Manual do usuário
-
Conceptronic Media Giant Pro, 500GB Manual do usuário