
DC740, DC750
Cordless Adjustable Clutch Driver/Drill
Taladro/Destornillador Inalámbrico con Embrague Ajustable
Parafusadeira/furadeira com controle de torque
INSTRUCTION MANUAL
MANUAL DE INSTRUCCIONES
MANUAL DE INSTRUÇÕES
INSTRUCTIVO DE OPERACIÓN, CENTROS DE SERVICIO Y PÓLIZA DE
GARANTÍA. ADVERTENCIA: LÉASE ESTE INSTRUCTIVO ANTES DE USAR
EL PRODUCTO.
INSTRUÇÕES DE OPERAÇÃO, CENTRO DE SERVIÇOS E CERTIFICADO
DE GARANTIA. ADVERTÊNCIA: LEIA ESTAS INSTRUÇÕES ANTES DE
UTILIZAR O PRODUTO.
Questions? Visit us on the internat at www.dewalt.com
¿Dudas? Visítenos en Internet: www.dewalt.com
Dúvidas? Visite-nos na Internet em www.dewalt.com.br


1
English
1
General Safety Rules – For All Battery
Operated Tools
WARNING! Read and understand all instructions. Failure to
follow all instructions listed below may result in electric shock,
fire and/or serious personal injury.
SAVE THESE INSTRUCTIONS
WORK AREA
• Keep your work area clean and well lit. Cluttered benches
and dark areas invite accidents.
• Do not operate power tools in explosive atmospheres, such
as in the presence of flammable liquids, gases, or dust.
Power tools create sparks which may ignite the dust or fumes.
• Keep bystanders, children, and visitors away while operating
a power tool. Distractions can cause you to lose control.
ELECTRICAL SAFETY
• Do not abuse the cord. Never use the cord to carry the tool.
Keep cord away from heat, oil, sharp edges or moving parts.
Replace damaged cords immediately. Damaged cords may
create a fire.
• A battery operated tool with integral batteries or a separate
battery pack must be recharged only with the specified
charger for the battery. A charger that may be suitable for one
type of battery may create a risk of fire when used with another
battery.
• Use battery operated tool only with the specifically
designated battery pack. Use of any other batteries may
create a risk of fire.
PERSONAL SAFETY
• Stay alert, watch what you are doing and use common
sense when operating a power tool. Do not use tool while
tired or under the influence of drugs, alcohol, or medication. A
moment of inattention while operating power tools may result in
serious personal injury,
• Dress properly. Do not wear loose clothing or jewelry.
Contain long hair. Keep your hair, clothing, and gloves away
from moving parts. Loose clothing, jewelry, or long hair can be
caught in moving parts.
Air vents often cover moving parts and
should also be avoided.
• Avoid accidental starting. Be sure switch is in the locked or off
position before inserting battery pack. Carrying tools with your
finger on the switch or inserting the battery pack into a tool with
the switch on invites accidents.
• Remove adjusting keys or wrenches before turning the tool
on. A wrench or a key that is left attached to a rotating part of
the tool may result in personal injury.
• Do not overreach. Keep proper footing and balance at all times.
Proper footing and balance enables better control of the tool in
unexpected situations.
• Use safety equipment. Always wear eye protection. Dust
mask, non-skid safety shoes, hard hat, or hearing protection
must be used for appropriate conditions.
TOOL USE AND CARE
• Use clamps or other practical way to secure and support
the workpiece to a stable platform. Holding the work by hand
or against your body is unstable and may lead to a loss of
control.
• Do not force tool. Use the correct tool for your application.
The correct tool will do the job better and safer at the rate for
which it is designed.
• Do not use tool if switch does not turn it on or off. A tool that
cannot be controlled with the switch is dangerous and must be
repaired.
• Disconnect battery pack from tool or place the switch in
the locked or off position before making any adjustments,

2
English
2
changing accessories, or storing the tool. Such preventative
safety measures reduce the risk of starting the tool accidentally.
• Store idle tools out of reach of children and other untrained
persons. Tools are dangerous in the hands of untrained users.
• When battery pack is not in use, keep it away from other
metal objects like: paper clips, coins, keys, nails, screws,
or other small metal objects that can make a connection
from one terminal to another. Shorting the battery terminals
together may cause sparks, burns, or a fire.
• Maintain tools with care. Keep cutting tools sharp and
clean. Properly maintained tools, with sharp cutting edges are
less likely to bind and are easier to control.
• Check for misalignment or binding of moving parts,
breakage of parts, and any other condition that may affect
the tools operation. If damaged, have the tool serviced before
using. Many accidents are caused by poorly maintained tools.
• Use only accessories that are recommended by the
manufacturer for your model. Accessories that may be
suitable for one tool, may create a risk of injury when used on
another tool.
SERVICE
• Tool service must be performed only by qualified repair
personnel. Service or maintenance performed by unqualified
personnel result in a risk of injury.
• When servicing a tool, use only identical replacement parts.
Follow instructions in the Maintenance section of this manual.
Use of unauthorized parts or failure to follow Maintenance
Instructions may create a risk of shock or injury.
Additional Safety Rules
• Hold tool by insulated gripping surfaces when performing
an operation where the tool may contact hidden wiring.
Contact with a “live” wire will also make exposed metal parts of
the tool “live” and shock the operator.
WARNING: ALWAYS use safety glasses. Everyday eyeglasses
are NOT safety glasses. Also use face or dust mask if cutting
operation is dusty. ALWAYS WEAR CERTIFIED SAFETY
EQUIPMENT:
• ANSI Z87.1 eye protection (CAN/CSA Z94.3)
• ANSI S12.6 (S3.19) hearing protection
• NIOSH/OSHA/MSHA respiratory protection.
WARNING: Some dust created by power sanding, sawing,
grinding, drilling, and other construction activities contains chemicals
known to cause cancer, birth defects or other reproductive harm.
Some examples of these chemicals are:
• lead from lead-based paints,
• crystalline silica from bricks and cement and other masonry
products, and
• arsenic and chromium from chemically-treated lumber
(CCA).
Your risk from these exposures varies, depending on how often you
do this type of work. To reduce your exposure to these chemicals:
work in a well ventilated area, and work with approved safety
equipment, such as those dust masks that are specially designed
to filter out microscopic particles.
• Avoid prolonged contact with dust from power
sanding, sawing, grinding, drilling, and other
construction activities. Wear protective clothing and
wash exposed areas with soap and water. Allowing
dust to get into your mouth, eyes, or lay on the skin may
promote absorption of harmful chemicals.
CAUTION: Wear appropriate personal hearing protection
during use. Under some conditions and duration of use, noise
from this product may contribute to hearing loss.
CAUTION: When not in use, place tool on its side on a stable
surface where it will not cause a tripping or falling hazard.

3
English
3
Some tools with large battery packs will stand upright on the
battery pack but may be easily knocked over.
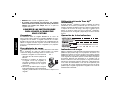
• The label on your tool may include the following symbols. The
symbols and their definitions are as follows:
V ..........volts A ...........amperes
Hz ........hertz W ..........watts
min ......minutes
.........alternating current
....direct current
n
o .........no load speed
........Class I Construction ..........earthing terminal
............(grounded)
..........safety alert symbol
........Class II Construction .../min ....revolutions per minute
............(double insulated) BPM ......beats per minute
SAVE THESE INSTRUCTIONS
Important Safety Instructions for
Battery Packs
Your tool uses either a 12, 14.4 or 18 Volt DEWALT battery pack.
When ordering replacement battery packs, be sure to include
catalog number and voltage: Extended Run-Time battery packs
deliver 25% more run-time than standard battery packs.
NOTE: Your tool will accept either standard or Extended Run Time
battery packs. However, be sure to select proper voltage.
The battery pack is not fully charged out of the carton. Before
using the battery pack and charger, read the safety instructions
below. Then follow charging procedures outlined.
READ ALL INSTRUCTIONS
• Do not incinerate the battery pack even if it is severely
damaged or is completely worn out. The battery pack can
explode in a fire.
• A small leakage of liquid from the battery pack cells may
occur under extreme usage or temperature conditions.
This does not indicate a failure. However, if the outer seal is
broken and this leakage gets on your skin:
a. Wash quickly with soap and water.
b. Neutralize with a mild acid such as lemon juice or vinegar.
c. If battery liquid gets into your eyes, flush them with clean
water for a minimum of 10 minutes and seek immediate
medical attention. (Medical note: The liquid is 25-35%
solution of potassium hydroxide.)
• Do not carry extra battery packs in aprons, pockets, or tool
boxes along with other metal objects. Battery pack could be
short circuited causing damage to the battery pack and possibly
causing severe burns or fire.
• Charge the battery packs only in D
EWALT chargers.
• DO NOT splash or immerse in water or other liquids.
• Do not store or use the tool and battery pack in locations
where the temperature may reach or exceed 105°F (such as
outside sheds or metal buildings in summer).
DANGER: Electrocution hazard. Never attempt to open the
battery pack for any reason. If battery pack case is cracked or
damaged, do not insert into charger. Electric shock or electrocution
may result. Damaged battery packs should be returned to service
center for recycling.
NOTE: Battery storage and carrying caps are provided
for use whenever the battery is out of the tool or
charger. Remove cap before placing battery in charger
or tool.
WARNING: Fire hazard. Do not store or carry
battery so that metal objects can contact exposed
battery terminals. For example, do not place battery in aprons,
pockets, tool boxes, product kit boxes, drawers, etc., with loose
nails, screws, keys, etc. without battery cap. Transporting batteries
can possibly cause fires if the battery terminals inadvertently
come in contact with conductive materials such as keys,

4
English
4
coins, hand tools and the like. The US Department of
Transportation Hazardous Material Regulations (HMR) actually
prohibit transporting batteries in commerce or on airplanes (i.e.,
packed in suitcases and carry-on luggage) UNLESS they are
properly protected from short circuits. So when transporting
individual batteries, make sure that the battery terminals are
protected and well insulated from materials that could contact them
and cause a short circuit.
CAUTION: Battery pack must be securely attached to tool. If
battery pack is detached, personal injury may result.
Important Safety Instructions for
Battery Chargers
SAVE THESE INSTRUCTIONS: This manual contains important
safety instructions for battery chargers.
• Before using charger, read all instructions and cautionary
markings on charger, battery pack, and product using battery
pack.
DANGER: Electrocution hazard. 120V and 220V are present at
charging terminals. Do not probe with conductive objects. Electric
shock or electrocution may result.
WARNING: Shock hazard. Do not allow any liquid to get inside
charger. Electric shock may result.
CAUTION: Burn hazard. To reduce the risk of injury, charge only
D
EWALT rechargeable batteries. Other types of batteries may burst
causing personal injury and damage.
CAUTION: Under certain conditions, with the charger plugged in
to the power supply, the exposed charging contacts inside the
charger can be shorted by foreign material. Foreign materials of a
conductive nature such as, but not limited to, steel wool, aluminum
foil, or any buildup of metallic particles should be kept away from
charger cavities. Always unplug the charger from the power supply
when there is no battery pack in the cavity. Unplug charger before
attempting to clean.
• DO NOT attempt to charge the battery pack with any
chargers other than the ones in this manual. The charger
and battery pack are specifically designed to work together.
• These chargers are not intended for any uses other than
charging D
EWALT rechargeable batteries. Any other uses
may result in risk of fire, electric shock or electrocution.
• Do not expose charger to rain or snow.
• Pull by plug rather than cord when disconnecting charger.
This will reduce risk of damage to electric plug and cord.
• Make sure that cord is located so that it will not be stepped
on, tripped over, or otherwise subjected to damage or
stress.
• Do not use an extension cord unless it is absolutely
necessary. Use of improper extension cord could result in risk
of fire, electric shock, or electrocution.
• An extension cord must have adequate wire size (AWG
or American Wire Gauge) for safety. The smaller the gauge
number of the wire, the greater the capacity of the cable, that is
16 gauge has more capacity than 18 gauge. When using more
than one extension to make up the total length, be sure each
individual extension contains at least the minimum wire size.
• Do not place any object on top of charger or place the
charger on a soft surface that might block the ventilation
slots and result in excessive internal heat. Place the
charger in a position away from any heat source. The charger
is ventilated through slots in the top and the bottom of the
housing.
• Do not operate charger with damaged cord or plug — have
them replaced immediately.
• Do not operate charger if it has received a sharp blow, been
dropped, or otherwise damaged in any way. Take it to an
authorized service center.

5
English
5
• Do not disassemble charger; take it to an authorized
service center when service or repair is required. Incorrect
reassembly may result in a risk of electric shock, electrocution
or fire.
• Disconnect the charger from the outlet before attempting
any cleaning. This will reduce the risk of electric shock.
Removing the battery pack will not reduce this risk.
• NEVER attempt to connect 2 chargers together.
• The charger is designed to operate on standard household
electrical power (120 Volts). Do not attempt to use it on
any other voltage. This does not apply to the vehicular
charger.
SAVE THESE INSTRUCTIONS FOR
FUTURE USE
Chargers
Your tool uses a 12.0, 14.4, 18.0 Volt DEWALT Charger. Your
battery can be charged in D
EWALT 1 Hour Chargers, 15 Minute
Chargers or Vehicular 12 volt charger. Be sure to read all safety
instructions before using your charger. Consult the chart at the end
of this manual for compatibility of chargers and battery packs.
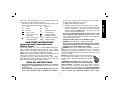
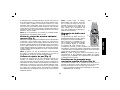
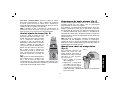
Charging Procedure (Fig. 1)
DANGER: Electrocution hazard. 120V and 220V present at
charging terminals. Do not probe with conductive objects. Danger
of electric shock or electrocution.
1. Plug the charger into an appropriate outlet
FIG. 1
before inserting battery pack.
2. Insert the battery pack into the charger.
The red (charging) light will blink
continuously indicating that the charging
process has started.
3. The completion of charge will be indicated
by the red light remaining ON continuously. The pack is fully
charged and may be used at this time or left in the charger.
Using Automatic Tune-Up™ Mode
The automatic Tune-Up™ Mode equalizes or balances the
individual cells in the battery pack allowing it to function at peak
capacity. Battery packs should be tuned up weekly or after 10
charge/discharge cycles or whenever the pack no longer delivers
the same amount of work. To use the Automatic Tune-Up™, place
the battery pack in the charger and leave it for at least 8 hours.
Indicator Light Operation
Charge Indicators
Some chargers are designed to detect certain problems that can
arise with battery packs. Problems are indicated by the red light
flashing at a fast rate. If this occurs, re-insert battery pack into
the charger. If the problem persists, try a different battery pack to
determine if the charger is OK. If the new pack charges correctly,
then the original pack is defective and should be returned to a
service center or other collection site for recycling. If the new
battery pack elicits the same trouble indication as the original, have
the charger tested at an authorized service center.
HOT/COLD PACK DELAY
Some chargers have a Hot/Cold Pack Delay feature: when the
charger detects a battery that is hot, it automatically starts a Hot
Pack Delay, suspending charging until the battery has cooled. After
the battery has cooled, the charger automatically switches to the

6
English
6
Pack Charging mode. This feature ensures maximum battery life.
The red light flashes long, then short while in the Hot Pack Delay
mode.
PROBLEM POWER LINE
Some chargers have a Problem Power Line indicator. When
the charger is used with some portable power sources such as
generators or sources that convert DC to AC, the charger may
temporarily suspend operation, flashing the red light with two
fast blinks followed by a pause. This indicates the power source
is out of limits.
LEAVING THE BATTERY PACK IN THE CHARGER
The charger and battery pack can be left connected with the red
light glowing indefinitely. The charger will keep the battery pack
fresh and fully charged.
NOTE: A battery pack will slowly lose its charge when kept out of
the charger. If the battery pack has not been kept on maintenance
charge, it may need to be recharged before use. A battery pack
may also slowly lose its charge if left in a charger that is not
plugged into an appropriate AC source.
WEAK BATTERY PACKS: Chargers can also detect a weak
battery. Such batteries are still usable but should not be expected
to perform as much work. In such cases, about 10 seconds after
battery insertion, the charger will beep rapidly 8 times to indicate a
weak battery condition. The charger will then go on to charge the
battery to the highest capacity possible.
Important Charging Notes
1. Longest life and best performance can be obtained if the
battery pack is charged when the air temperature is between
65°F and 75°F (18°- 24°C). DO NOT charge the battery pack
in an air temperature below +40°F(+4.5°C), or above +105°F
(+40.5°C). This is important and will prevent serious damage to
the battery pack.
2. The charger and battery pack may become warm to touch
while charging. This is a normal condition, and does not
indicate a problem. To facilitate the cooling of the battery pack
after use, avoid placing the charger or battery pack in a warm
environment such as in a metal shed, or an uninsulated trailer.
3. If the battery pack does not charge properly:
a. Check current at receptacle by plugging in a lamp or other
appliance
b. Check to see if receptacle is connected to a light switch
which turns power off when you turn out the lights.
c. Move charger and battery pack to a location where the
surrounding air temperature is approximately 65°F - 75°F
(18°- 24°C).
d. If charging problems persist, take the tool, battery pack and
charger to your local service center.
4. The battery pack should be recharged when it fails to produce
sufficient power on jobs which were easily done previously.
DO NOT CONTINUE to use under these conditions. Follow
the charging procedure. You may also charge a partially used
pack whenever you desire with no adverse affect on the battery
pack.
5. Under certain conditions, with the charger plugged into the
power supply, the exposed charging contacts inside the
charger can be shorted by foreign material. Foreign materials
of a conductive nature such as, but not limited to, steel wool,
aluminum foil, or any buildup of metallic particles should be
kept away from charger cavities. Always unplug the charger
from the power supply when there is no battery pack in the
cavity. Unplug charger before attempting to clean.
6. Do not freeze or immerse charger in water or any other liquid.
WARNING: Shock hazard. Do not allow any liquid to get inside
charger. Electric shock may result.

7
English
7
CAUTION: Never attempt to open the battery pack for any
reason. If the plastic housing of the battery pack breaks or cracks,
return to a service center for recycling.
FIG. 3
FIG. 2
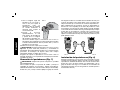
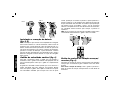
Installing and Removing the Battery
Pack (Fig. 2, 3)
NOTE: Make sure your battery pack is fully charged.
To install the battery pack into the tool handle, align the base of
the tool with the notch inside the tool’s handle (Fig. 2) and slide the
battery pack firmly into the handle until you hear the lock snap into
place. To remove the battery pack from the tool, press the release
buttons and firmly pull the battery pack out of the tool handle
as shown in Fig. 3. Insert it into the charger as described in the
charger section of this manual.
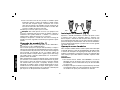
Variable Speed Switch (Fig. 4)
To turn the tool on, squeeze the trigger switch (A). To turn the tool
off, release the trigger switch. Your tool is equipped with a brake.
The chuck will stop as soon as the trigger switch is fully released.
The variable speed switch enables you to select the best speed
for a particular application. The farther you squeeze the trigger,
the faster the tool will operate. Use lower speeds for starting holes
without a centerpunch, drilling in metals or plastics, driving screws
and drilling ceramics, or in any application requiring high torque.
Higher speeds are better for drilling in wood, wood compositions
and for using abrasive and polishing accessories. For maximum
tool life, use variable speed only for starting holes or fasteners.
NOTE: Continuous use in variable speed range is not recommended.
It may damage the switch and should be avoided.
A
B
B
FIG. 4
Forward/Reverse Control Button (Fig. 4)
A forward/reverse control button (B) determines the direction of the
tool and also serves as a lock off button. To select forward rotation,
release the trigger switch and depress the forward/reverse control
button on the right side of the tool.To select reverse, depress the
forward/reverse control button on the left side of the tool. The center
position of the control button locks the tool in the off position. When
changing the position of the control button, be sure the trigger is
released.
NOTE: The first time the tool is run after changing the direction of
rotation, you may hear a click on start up. This is normal and does
not indicate a problem.

8
English
8
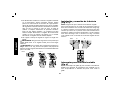
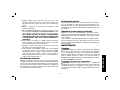
Torque Adjustment Collar (Fig. 5)
The torque adjustment collar (A) is clearly
A
B
FIG. 5
marked with numbers and a drill bit symbol.
The collar should be rotated until the
desired setting is located at the top of the
tool. Locators are provided in the collar to
eliminate the guess work when selecting
fastening torque. The higher the number
on the collar, the higher the torque and the
larger the fastener which can be driven. To
lock the clutch for drilling operations, move
to the drill bit position.
NOTE: When using the Drill/Driver for
drilling holes, be sure that the Torque
Adjusting Collar is set so the figure of the
drill is aligned with the arrow on the top
of the tool. Failure to do this will allow the
clutch to slip while attempting to drill
Dual Range Gearing (Fig. 5)
The dual range feature of your Driver/Drill allows you to shift gears
for greater versatility.
To select the low speed, high torque setting, turn the tool off and
permit to stop. Slide the gear shifter (B) forward (towards the chuck)
(position 1), as shown. To select the high speed, low torque setting,
turn the tool off and permit to stop. Slide the gear shifter back (away
from chuck, position 2).
NOTE: Do not change gears when the tool is running. If you are
having trouble changing gears, make sure that the dual range
gear shifter is either completely pushed forward or completely
pushed back.
Keyless Single Sleeve Chuck (Fig. 6)
Your tool features a keyless chuck with one rotating sleeve for
one-handed operation of the chuck. To insert a drill bit or other
accessory, follow these steps.
1. Lock the trigger in the OFF
FIG. 6
position.
2. Grasp the black sleeve of
the chuck with one hand
and use the other hand to
secure the tool. Rotate the
sleeve counterclockwise far
enough to accept the desired
accessory.
3. Insert the accessory about 3/4"
(19 mm) into the chuck and
tighten securely by rotating the
chuck sleeve clockwise with one hand while holding the tool
with the other. Your tool is equipped with an automatic spindle
lock mechanism. This allows you to open and close the chuck
with one hand.
To release the accessory, repeat step 2 above.
WARNING: Do not attempt to tighten drill bits (or any other
accessory) by gripping the front part of the chuck and turning the
tool on. Damage to the chuck and personal injury may result.
Always lock off trigger switch when changing acces sories.
Be sure to tighten chuck with one hand on the chuck sleeve and
one hand holding the tool for maximum tightness.
Chuck Removal (Fig. 7)
WARNING: Always wear ANSI Z87.1 eye protection (CAN/CSA
Z94.3) eye protection.
Turn the adjustment collar to the “drill” position and low speed gear
shifter to position 1. Tighten the chuck around the shorter end of

9
English
9
a hex key (not supplied) of 1/4" or greater size. Using a wooden
mallet or similar object, strike the longer end in the clockwise
direction, as shown. This will loosen the screw inside the chuck.
Open chuck jaws fully, insert screwdriver (or Torx tool if required)
into front of chuck between jaws to engage screw head. Remove
screw by turning clockwise (left-hand-thread). Place hex key in
chuck and tighten, as shown in Fig. 8. Using a wooden mallet or
similar object, strike key sharply in the counterclockwise direction.
This will loosen the chuck so that it can be unscrewed by hand.
FIG. 8FIG. 7
Chuck Installation (Fig. 8)
Screw the chuck on by hand as far as it will go and insert
screw (LH thread). Tighten screw securely. Tighten the chuck
around the shorter end of a 1/4” or larger hex key (not supplied)
strike the longer end in the clockwise direction with a wooden
mallet, as shown. Tighten the screw once again by turning in a
counterclockwise direction.
Operation as a Drill
Turn the collar to the drill bit symbol. Install and tighten the desired
drill bit in the chuck. Select the desired speed/torque range using the
dual range gear shifter to match the speed and torque to the planned
operation. Follow these instructions for best results when drilling.
DRILLING
1. Use sharp drill bits only. For WOOD, use twist drill bits, spade
bits, power auger bits, or hole saws. For METAL, use high
speed steel twist drill bits or hole saws.
2. Be sure the material to be drilled is anchored or clamped
firmly. If drilling thin material, use a “back-up” block to prevent
damage to the material.
3. Always apply pressure in a straight line with the bit. Use enough
pressure to keep the drill bit biting, but do not push hard enough
to stall the motor or deflect the bit.
4. Hold tool firmly to control the twisting action of the drill.
5. IF DRILL STALLS, it is usually because it is being overloaded.
RELEASE TRIGGER IMMEDIATELY, remove drill bit from work,
and determine cause of stalling. DO NOT CLICK TRIGGER
OFF AND ON IN AN ATTEMPT TO START A STALLED DRILL
– THIS CAN DAMAGE THE DRILL.
6. To minimize stalling or breaking through the material, reduce
pressure on drill and ease the bit through the last fractional part
of the hole.
7. Keep the motor running when pulling the bit back out of a drilled
hole. This will help prevent jamming.
8. With variable speed drills there is no need to center punch
the point to be drilled. Use a slow speed to start the hole and
accelerate by squeezing the trigger harder when the hole is
deep enough to drill without the bit skipping out. Operate at full
on after starting the bit.
Drilling in Wood
Holes in wood can be made with the same twist drills used for metal.
These bits may overheat unless pulled out frequently to clear chips
from the flutes. For larger holes, use low speed wood bits. Work that
is likely to splinter should be backed up with a block of wood.

10
English
10
Drilling in Metals
Use a cutting lubricant when drilling metals. The exceptions are cast
iron and brass which should be drilled dry. The cutting lubricants that
work best are sulphurized cutting oil or lard oil; bacon grease will
also serve the purpose.
Operation as a Screwdriver
Select the desired speed/torque range using the dual range gear
shifter on the top of tool to match the speed and torque to the
planned operation.
Insert the desired fastener accessory into the chuck as you would
any drill bit. Make a few practice runs in scrap or unseen areas to
determine the proper position of the clutch collar.
MAINTENANCE
Cleaning
WARNING: Blow dirt and dust out of all air vents with dry air at
least once a week. To minimize the risk of eye injury, always wear
ANSI Z87.1 approved eye protection when performing this. Exterior
plastic parts may be cleaned with a damp cloth and mild detergent.
Although these parts are highly solvent resistant, NEVER use
solvents.
CHARGER CLEANING INSTRUCTIONS
WARNING: Shock hazard. Disconnect the charger from the AC
outlet before cleaning. Dirt and grease may be removed from the
exterior of the charger using a cloth or soft non-metallic brush. Do
not use water or any cleaning solutions.
Accessories
WARNING: The use of any non-recommended accessory may
be hazardous.
Recommended accessories for use with your tool are available at
extra cost from your local service center.
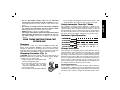
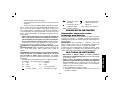
MAXIMUM RECOMMENDED CAPACITIES
Low Range- 1 High Range- 2
BITS, METAL DRILLING 3/8" (.95 cm) 1/4" (.64 cm)
WOOD, FLAT BORING 3/4" (1.91 cm) 1/2" (1.27 cm)
HOLE SAWS 3/4" (1.91 cm) 5/8" (1.59 cm)
Repairs
To assure product SAFETY and RELIABILITY, repairs, maintenance
and adjustment (including brush inspection and replacement)
should be performed by a D
EWALT factory service center, a
D
EWALT authorized service center or other qualified service
personnel. Always use identical replacement parts.
SPECIFICATIONS
DC740 12V 0-350/ 0-1200 rpm
DC750 9,6 V 0-300 / 0-1100 rpm

11
Español
11
Reglas generales de seguridad – Para
todas las herramientas operadas con
baterías
¡ADVERTENCIA! Lea y comprenda todas las instrucciones.
No seguir las instrucciones listadas a continuación puede
resultar en un choque eléctrico, incendio y(o) lesiones personales
graves.
CONSERVE ESTAS INSTRUCCIONES
ÁREA DE TRABAJO
• Conserve su área de trabajo limpia y bien iluminada.
Las bancas amontonadas y las zonas oscuras propician los
accidentes.
• No opere herramientas eléctricas en atmósferas explosivas,
como en presencia de líquidos, gases o polvos inflamables.
Las herramientas eléctricas producen chispas que pueden
originar la ignición de los polvos o los vapores.
• Conserve a observadores, niños y visitantes alejados
mientras opera una herramienta eléctrica. Las distracciones
pueden ocasionar que pierda el control.
SEGURIDAD ELÉCTRICA
• No maltrate el cable. Nunca tome el cable para transportar
una herramienta ni para desconectarla de la toma de
corriente. Consérvelo alejado de calor aceite, bordes afilados
o piezas móviles. Cambie inmediatamente los cables dañados.
Los cables dañados aumentan el riego de choque eléctrico.
• Una herramienta operada con baterías integradas o por
separado debe recargarse con el cargador especificado
para la batería. Un cargador que es adecuado para un tipo de
baterías puede crear riesgos de incendio cuando se emplea con
otra batería.
• Utilice la herramienta únicamente con la batería
específicamente diseñada para ella. El uso de otras baterías
puede crear riesgos de incendio.
SEGURIDAD PERSONAL
• Esté alerta, concéntrese en lo que está haciendo. Recurra
al sentido común cuando opere una herramienta eléctrica.
No opere ninguna herramienta si se encuentra fatigado o bajo la
influencia de drogas, alcohol o medicamentos. Un momento de
desatención mientras se operan herramientas eléctricas puede
ocasionar lesiones graves.
• Vístase de manera adecuada. No vista ropas o artículos de
joyería flojos. Cubra su cabello si lo tiene largo. Conserve
su cabello, sus ropas y guantes alejados de las piezas móviles.
Las piezas de vestir flojas, las joyas y el cabello largo pueden
resultar atrapados por las piezas móviles.
• Evite el encendido accidental. Asegúrese que el interruptor
esté en posición de apagado antes de insertar la batería.
Sostener una herramienta con el dedo en el interruptor o
colocar la batería sin fijarse si el interruptor está en posición de
encendido propicia los accidentes.
• Retire las llaves de ajuste antes de encender la herramienta.
Una llave que se deja en una pieza giratoria puede ocasionar
lesiones personales.
• No se sobreextienda. Conserve siempre los pies bien
apoyados, al igual que el equilibrio. La posición correcta de los
pies y el equilibrio permiten controlar mejor la herramienta en
situaciones inesperadas.
• Utilice equipo de seguridad. Siempre utilice protección en
los ojos. Se deben utilizar mascarillas contra polvo, zapatos
antiderrapantes, casco o protectores para los oídos para tener
las condiciones apropiadas.

12
Español
12
USO Y CUIDADOS DE LA HERRAMIENTA
• Utilice prensas u otros medios prácticos para asegurar
y apoyar la pieza de trabajo en una plataforma estable.
Sujetar las piezas con la mano o contra su cuerpo es inestable
y puede originar la pérdida de control.
• No fuerce la herramienta. Utilice la herramienta apropiada
para su aplicación. La herramienta apropiada hará el trabajo
mejor y de manera más segura bajo las especificaciones para
las que se diseñó.
• No utilice la herramienta si el interruptor no enciende y
apaga. Cualquier herramienta que no pueda controlarse por
medio del interruptor es peligrosa y debe repararse.
• Desconecte la batería de la herramienta o coloque el
interruptor en posición de apagado antes de hacer cualquier
ajuste, cambio de accesorios o de guardar la herramienta.
Tales medidas de seguridad preventivas reducirán el riesgo de
que la herramienta se encienda accidentalmente.
• Guarde las herramientas fuera del alcance de los niños
y de otras personas no entrenadas. Las herramientas son
peligrosas en manos de personas no capacitadas.
• Cuando no use la batería consérvela alejada de otros
objetos metálicos como: clips, monedas, llaves, clavos,
tornillos y otros objetos metálicos pequeños que puedan
hacer conexión de una terminal a otra. Hacer un corto
entre las terminales puede causar chispas, quemaduras o un
incendio.
• Cuide sus herramientas. Conserve las herramientas de
corte afiladas y limpias. Las herramientas que reciben
un mantenimiento adecuado, con piezas de corte afiladas,
difícilmente se atascan y son más fáciles de controlar.
• Verifique la alineación de las piezas móviles, busque
fracturas en las piezas y cualesquiera otras condiciones
que puedan afectar la operación de las herramientas. Si
está dañada, lleve su herramienta a servicio antes de usarla
de nuevo. Muchos accidentes se deben a herramientas con
mantenimiento pobre.
• Solamente use accesorios que el fabricante recomiende
para su modelo de herramienta. Los accesorios que estén
diseñados para una herramienta, pueden volverse peligrosos
cuando se emplean con otra.
SERVICIO
• El servicio a las herramientas lo debe efectuar únicamente
personal calificado. El servicio o mantenimiento realizado por
personal no calificado puede originar riesgos de lesiones.
• Cuando efectúe servicio a una herramienta, utilice
únicamente refacciones idénticas. Siga las instrucciones
de la sección de Mantenimiento de este manual. El empleo
de piezas no autorizadas o no seguir las instrucciones de
mantenimiento puede originar riegos de choque eléctrico o
lesiones.
Reglas de seguridad adicionales
• Sujete la herramienta de las superficies aislantes cuando
efectúe una operación en la que la herramienta de corte
pueda hacer contacto con cableado oculto o con su propio
cable. El contacto con un cable “vivo” hará que las partes
metálicas expuestas queden “vivas” y descarguen hacia el
operador.
ADVERTENCIA: Use SIEMPRE lentes de seguridad. Los
anteojos de uso diario NO son lentes de seguridad. Utilice también
máscaras faciales o para polvo si el corte produce polvillo. UTILICE
SIEMPRE EQUIPOS DE SEGURIDAD CERTIFICADOS:
• Protección para los ojos ANSI Z87.1(CAN/CSA Z94.3)
• Protección auditiva según la norma ANSI S12.6 (S3.19)

13
Español
13
• Protección respiratoria según las normas NIOSH/OSHA/
MSHA.
ADVERTENCIA: Algunas partículas originadas al lijar, aserrar,
amolar, taladrar y realizar otras actividades de construcción
contienen productos químicos que producen cáncer, defectos de
nacimiento y otros problemas reproductivos. Algunos ejemplos de
estos productos químicos son:
• el plomo de las pinturas de base plomo,
• la sílice cristalina de ladrillos, cemento y otros productos de
mampostería, y
• el arsénico y el cromo de la madera con tratamiento
químico.
El riesgo derivado de estas exposiciones varía según la frecuencia
con la que se realice este tipo de trabajo. Para reducir la exposición
a estos productos químicos, se recomienda trabajar en áreas bien
ventiladas y usar equipos de seguridad aprobados, como las
máscaras para polvo especialmente diseñadas para filtrar las
partículas microscópicas.
• Evite el contacto prolongado con las partículas de polvo
originadas al lijar, aserrar, esmerilar, taladrar y realizar
demás actividades de la construcción. Use indumentaria
protectora y lave las áreas expuestas con agua y jabón.
Evite que el polvo entre en la boca y en los ojos o se deposite
en la piel, para impedir la absorción de productos químicos
nocivos.
PRECAUCIÓN: Mientras use la herramienta, utilice la
protección auditiva adecuada. En determinadas condiciones y
según el período de uso, el ruido provocado por este
producto puede originar pérdida de audición.
PRECAUCIÓN: Cuando no se utilice, coloque la
herramienta de costado en una superficie estable en la que
no provocará tropezones o caídas. Algunas herramientas con
paquetes de baterías grandes permanecerán en forma vertical,
pero pueden ser derribadas fácilmente.
• La etiqueta de su herramienta puede incluir los siguientes
símbolos. Los símbolos y sus definiciones son los siguientes:
V ..........voltios A ...........amperios
Hz ........hertz W ..........vatios
min ......minutos
.........corriente alterna
....corriente directa
n
o .........velocidad sin carga
........Construcción Clase I ..........terminal a tierra
............(con conexión a tierra)
..........símbolo de alerta
........Construcción Clase II ..............de seguridad
............(con aislamiento doble) …/min ...revoluciones por
BPM ....golpes por minuto ..............minuto
GUARDE ESTAS INSTRUCCIONES
Instrucciones de seguridad
importantes para los paquetes
de baterías
Su herramienta utiliza un paquete de baterías DEWALT de 12,
14,4 o 18 voltios Al solicitar paquetes de baterías de repuesto,
asegúrese de incluir el número de catálogo y el voltaje: los
paquetes de baterías de duración prolongada brindan un 25%
más de tiempo de funcionamiento que los paquetes de baterías
estándar. Consulte el gráfico al final del manual para conocer la
compatibilidad entre los cargadores y los paquetes de baterías.
NOTA: la herramienta aceptará paquetes de baterías estándar o
de duración prolongada. No obstante, asegúrese de seleccionar el
voltaje adecuado.
El paquete de baterías incluido en la caja no está completamente
cargado. Antes de utilizar el paquete de baterías y el cargador,
lea las instrucciones de seguridad a continuación. Luego siga los
procedimientos de carga descriptos.

14
Español
14
LEA TODAS LAS INSTRUCCIONES
• No incinere el paquete de baterías, aun si tiene daños
importantes o está completamente desgastado. El paquete
de baterías puede explotar en el fuego.
• Una pequeña pérdida de líquido de las celdas del paquete
de baterías puede presentarse en condiciones de uso o
temperatura extremas. Esto no indica una falla. Sin embargo,
si el sello externo está roto y esta pérdida toca su piel:
a. Lave rápidamente con agua y jabón.
b. Neutralice con un ácido suave como jugo de limón o
vinagre.
c. Si el líquido de la batería entra en contacto con sus ojos,
lávelos con agua limpia durante 10 minutos como mínimo y
busque atención médica inmediata. (Nota médica: el líquido
es una solución de hidróxido de potasio del 25% al 35%.)
• No transporte paquetes de baterías adicionales en
delantales, bolsillos o cajas de herramientas junto con
otros objetos metálicos. El paquete de baterías podría
producir cortocircuitos causando daños al paquete y podría
provocar quemaduras o incendio.
• Cargue los paquetes de baterías sólo con cargadores
D
EWALT.
• NO salpique o sumerja en agua u otros líquidos.
• No almacene ni utilice la herramienta y el paquete de
baterías en lugares en los que la temperatura puede llegar
a o superar los 40,5 °C (105 °F) (como en toldos al aire libre
o construcciones de metal en verano).
PELIGRO: Riesgo de electrocución. Nunca intente abrir el
paquete de baterías por ningún motivo. Si la caja del paquete de
baterías está agrietada o dañada, no la introduzca en el
cargador. Esto puede provocar descargas eléctricas o electrocución.
Los paquetes de baterías dañados deben devolverse al centro de
mantenimiento para su reciclado.
NOTA: se proveen tapas para almacenamiento
y transporte de las baterías, para utilizar siempre
cuando la batería esté fuera de la herramienta o del
cargador. Retire la tapa antes de colocar la batería en
el cargador o en la herramienta.
ADVERTENCIA: Peligro de incendio. No guarde o transporte
la batería de ninguna manera que permita que los terminales
expuestos de la batería entren en contacto con objetos
metálicos. Por ejemplo, no coloque la batería en delantales,
bolsillos, cajas de herramientas, cajas de juegos de productos,
cajones, etc. con clavos, llaves, tornillos sueltos, etc. sin la tapa de
batería. Transportar baterías puede provocar incendios si los
terminales de la batería entran en contacto accidentalmente
con materiales conductores como llaves, monedas,
herramientas de mano u objetos similares. Las Normas para
Materiales Peligrosos (Hazardous Material Regulations, HMR) del
Departamento de Transporte de los Estados Unidos concretamente
prohíben transportar baterías comercialmente o en aviones (es
decir, empacadas en valijas y equipaje de mano) A MENOS que
estén debidamente protegidas contra cortocircuitos. Por lo tanto,
cuando transporte baterías individuales, asegúrese que los
terminales de la batería estén protegidos y bien aislados de
materiales que puedan hacer contacto y causar un cortocircuito.
PRECAUCIÓN: El paquete de baterías debe fijarse en forma
segura a la herramienta. Si el paquete de baterías se desprende,
puede causar lesiones personales graves.
Instrucciones de seguridad importantes
para los cargadores de baterías
CONSERVE ESTAS INSTRUCCIONES: este manual contiene
instrucciones importantes de seguridad para los cargadores de
baterías.
• Antes de utilizar el cargador, lea todas las instrucciones y las
prevenciones en el cargador, en el paquete de baterías y en el
producto que utiliza el paquete de baterías.

15
Español
15
PELIGRO: Riesgo de electrocución. Hay 120/220 voltios en los
terminales de carga. No realice pruebas con objetos conductores.
Esto puede provocar descargas eléctricas o electrocución.
ADVERTENCIA: Riesgo de descarga eléctrica. No permita que
ningún líquido entre en el cargador. Podría provocar descargas
eléctricas.
PRECAUCIÓN: Peligro de quemaduras. Para reducir el riesgo de
lesiones, cargue solamente las baterías recargables de D
EWALT.
Otros tipos de baterías pueden estallar y provocar daños personales
y materiales.
PRECAUCIÓN: En determinadas condiciones, con el cargador
enchufado en el tomacorriente, algunos materiales extraños
pueden provocar un cortocircuito en los contactos de carga
expuestos dentro del cargador. Se deben mantener lejos de las
cavidades del cargador los materiales extraños de naturaleza
conductora, entre los que se incluyen la lana de acero, el papel de
aluminio o cualquier acumulación de partículas metálicas. Éstos
son sólo algunos ejemplos y no constituyen una lista taxativa
Siempre desenchufe el cargador del tomacorriente cuando no haya
un paquete de baterías en la cavidad. Desenchufe el cargador
antes de intentar limpiarlo.
• NO intente cargar el paquete de baterías con cargadores
distintos de aquéllos mencionados en este manual. El
cargador y el paquete de baterías están específicamente
diseñados para funcionar en conjunto.
• Estos cargadores no están diseñados para usos
distintos de la carga de baterías recargables de D
EWALT.
Otros usos pueden provocar riesgo de incendio, descarga
eléctrica o electrocución.
• No exponga el cargador a la lluvia ni a la nieve.
• Tire del enchufe y no del cable al desconectar el cargador.
Esto reducirá el riesgo de dañar el enchufe o el cable.
• Asegúrese que el cable esté ubicado de modo que no lo
pise o se tropiece con él y que no esté sujeto a daños o
tensiones de alguna otra forma.
• No utilice un cable de extensión a menos que sea
absolutamente necesario. El uso de un cable de extensión
incorrecto puede provocar riesgo de incendio, descarga eléctrica
o electrocución.
• Para garantizar la seguridad, un cable de extensión debe
tener un tamaño de cable adecuado (AWG o Calibre del
conductor de Estados Unidos). Cuanto más pequeño sea
el número de calibre del conductor, mayor será la capacidad
del cable; es decir, un calibre 16 tiene más capacidad que un
calibre 18. Cuando se utiliza más de una extensión para lograr
la longitud total, asegúrese que cada extensión tenga la medida
mínima del conductor.
• No coloque objetos en la parte superior del cargador ni
coloque el cargador en una superficie blanda que pueda
bloquear las ranuras de ventilación y provocar un calor
interno excesivo. Coloque el cargador en una posición alejada
de cualquier fuente de calor. El cargador se ventila a través de
ranuras en la parte superior e inferior de la unidad.
• No opere el cargador con un cable o enchufe dañados:
reemplácelos de inmediato.
• No opere el cargador si éste ha recibido un golpe fuerte,
se cayó o presenta algún daño. Llévelo a un centro de
mantenimiento autorizado.
• No desarme el cargador; cuando deba realizar un
mantenimiento o reparaciones, llévelo a un centro de
mantenimiento autorizado. El armado incorrecto puede
implicar un riesgo de descarga eléctrica, electrocución o
incendio.
• Antes de limpiarlo, desconecte el cargador del tomacorriente.
Esto reducirá el riesgo de descarga eléctrica. Quitar el
paquete de baterías no reducirá este riesgo.

16
Español
16
• NUNCA intente conectar 2 cargadores juntos.
• El cargador está diseñado para funcionar con corriente
eléctrica doméstica estándar (120 o 220 voltios). No intente
utilizarlo con ningún otro voltaje. Esto no se aplica al
cargador vehicular.
CONSERVE LAS INSTRUCCIONES
PARA VOLVER A CONSULTAR
EN EL FUTURO
Cargadores
Su herramienta utiliza un cargador DEWALT de 12, 14,4 o 18
voltios. Puede cargar la batería en cargadores D
EWALT de 1 hora,
cargadores de 15 minutos o cargador vehicular de 12 voltios.
Asegúrese de leer todas las instrucciones de seguridad antes de
utilizar su cargador. Consulte el gráfico al final del manual para
conocer la compatibilidad entre los cargadores y los paquetes
de baterías.
Procedimiento de carga
PELIGRO: Riesgo de electrocución. Hay 120 voltios o 220 voltios
en los terminales de carga. No realice pruebas con objetos
conductores. Riesgo de descarga eléctrica o electrocución.
1. Enchufe el cargador en un tomacorriente
FIG. 1
adecuado antes de insertar el paquete de
baterías.
2. Introduzca el paquete de baterías en
el cargador. La luz roja (cargando) se
encenderá y apagará en forma continua
indicando que el proceso de carga ha
comenzado.
3. Una luz roja fija indicará que la carga ha
finalizado. El paquete está completamente
cargado y puede utilizarse en este momento o dejarse en el
cargador.
Utilización del modo Tune Up
TM
Automático
El modo Tune-Up
TM
automático ecualiza o equilibra las células
individuales de la batería, permitiendo que ésta funcione a su
máxima capacidad. Se debería ajustar la batería semanalmente
o después de 10 ciclos de carga y descarga o siempre que la
batería no rinda por igual. Para usar el Tune-Up
TM
automático,
ponga la batería en el cargador y déjela allí por lo menos durante
8 horas.
Operación de la luz indicadora
Indicadores de carga
Algunos cargadores están diseñados para detectar determinados
problemas que pueden surgir con los paquetes de baterías. Los
problemas se indican con una luz roja que se encenderá y apagará
rápidamente. De ser así, vuelva a introducir el paquete de baterías
en el cargador. Si el problema persiste, intente utilizar un paquete
de baterías diferente para determinar si el cargador está en
buenas condiciones. Si el nuevo paquete se carga correctamente
significa que el paquete original es defectuoso y debe devolverse
a un centro de mantenimiento u otro sitio de recopilación para
su reciclado. Si el nuevo paquete de baterías presenta el mismo
problema que el original, haga probar el cargador en un centro de
mantenimiento autorizado.

17
Español
17
RETRASO POR PAQUETE CALIENTE/FRÍO
Algunos cargadores pueden tener una función de Retraso por
paquete caliente/frío: cuando el cargador detecta una batería
caliente, enciende automáticamente un Retraso por paquete
caliente que suspende la carga hasta que la batería se enfríe.
Después de que la batería se ha enfriado, el cargador cambia
automáticamente al modo de Paquete cargando. Esta función
garantiza la duración máxima de la batería. La luz roja se enciende
y apaga durante largos períodos, luego cortos durante el modo de
Retraso para paquete caliente.
LÍNEA DE POTENCIA CON PROBLEMAS
Algunos cargadores poseen un indicador de Línea de potencia con
problemas. Cuando el cargador se utiliza con algunas fuentes de
potencia portátiles como generadores o fuentes que convierten CD
a CA, el cargador puede suspender temporalmente la operación,
ocasión en la que la luz roja se encenderá y apagará rápidamente
dos veces, seguido de una pausa. Esto indica que la fuente de
potencia está fuera de los límites.
DEJAR EL PAQUETE DE BATERÍAS EN EL CARGADOR
El cargador y el paquete de baterías se pueden dejar conectados
con la luz roja encendida indefinidamente. El cargador mantendrá
el paquete de baterías como nuevo y completamente cargado.
NOTA: un paquete de baterías perderá lentamente su carga
cuando se mantenga fuera del cargador. Si el paquete de baterías
no ha permanecido en carga de mantenimiento, podría ser
necesario cargarlo nuevamente antes de su uso. Un paquete de
baterías también podría perder su carga lentamente si se deja
en un cargador que no esté conectado a un suministro de CA
apropiado.
PAQUETE DE BATERÍAS DÉBIL: los cargadores también pueden
detectar una batería agotada. Estas baterías aún se pueden
utilizar, pero no se espera que realicen mucho trabajo. En estos
casos, el cargador emitirá un sonido rápido 8 veces para indicar
una condición de batería agotada al cabo de unos 10 segundos
de introducida la batería. El cargador continuará con la carga de
la batería a la máxima capacidad posible.
Notas importantes sobre la carga
1. Obtendrá una duración más prolongada y un mejor rendimiento
si el paquete de baterías se carga cuando la temperatura
ambiental está entre 18 °C y 24 °C (65 °F y 75 °F). NO
cargue el paquete de batería con una temperatura ambiental
por debajo de +4,5 °C (+40 °F) o por encima de +40,5 °C
(+105 °F). Esto es importante y evitará daños graves en el
paquete de baterías.
2. El cargador y el paquete de baterías pueden estar calientes
al tacto durante la carga. Esto es una condición normal y no
indica un problema. Para facilitar el enfriado del paquete de
baterías después de su uso, evite colocar el cargador o el
paquete de baterías en un ambiente cálido, como debajo de
un toldo de metal o en un remolque sin aislamiento.
3. Si el paquete de baterías no se carga adecuadamente:
a. Revise el tomacorriente enchufando una lámpara u otro
aparato
b. Verifique si el tomacorriente está conectado a un interruptor
que corta la energía cuando usted apaga la luz.
c. Mueva el cargador y el paquete de baterías a un lugar
donde la temperatura ambiental sea de aproximadamente
18 °C a 24 °C (65 °F a 75 °F).
d. Si los problemas de carga persisten, lleve la herramienta, el
paquete de baterías y el cargador al centro de mantenimiento
local.
4. Se debe recargar el paquete de baterías cuando no produce
energía suficiente para tareas que previamente realizaba
con facilidad. NO CONTINÚE utilizando la herramienta en
estas condiciones. Siga el procedimiento de carga. También
se puede cargar un paquete de baterías parcialmente usado
cuando se desee, sin ningún efecto negativo sobre éstas.

18
Español
18
5. En determinadas condiciones, estando el cargador enchufado
en el tomacorriente, algunos materiales extraños pueden
provocar un cortocircuito en los contactos de carga expuestos
dentro del cargador. Se deben mantener lejos de las cavidades
del cargador los materiales extraños de naturaleza conductora,
entre los que se incluyen la lana de acero, el papel de
aluminio o cualquier acumulación de partículas metálicas.
Éstos son sólo algunos ejemplos y no constituyen una lista
taxativa Siempre desenchufe el cargador del tomacorriente
cuando no haya un paquete de baterías en la cavidad.
Desenchufe el cargador antes de intentar limpiarlo.
6. No congele ni sumerja el cargador en agua ni en ningún otro
líquido.
ADVERTENCIA: Riesgo de descarga eléctrica. No permita que
ningún líquido entre en el cargador. Podría provocar descargas
eléctricas.
PRECAUCIÓN: nunca intente abrir el paquete de baterías por
ningún motivo. Si la caja protectora de plástico del paquete de
baterías se rompe o agrieta, devuélvala a un centro demantenimiento
para su reciclado.
FIG. 3
FIG. 2
Instalación y remoción de la batería
(Fig. 2, 3)
NOTA: Asegúrese de que la batería esté totalmente cargada.
Para instalar la batería en el mango de la herramienta, alinee la
base de la herramienta con la muesca del interior del mango (Fig.
2) y deslice la batería con firmeza dentro del mango hasta que
escuche que asienta en su posición. Para retirar la batería de la
herramienta, oprima los botones de liberación y tire de la batería
hacia fuera del mango como se muestra en la Fig. 3. Insértela
en el cargador como se describe la sección del cargador de este
manual.
A
B
B
FIG. 4
Interruptor para velocidad variable
(Fig. 4)
Oprima el interruptor de gatillo (A) para encender la herramienta.
Suéltelo para apagarla. Su herramienta está equipada con un
freno. El portabrocas se detendrá tan pronto como suelte el
gatillo.
A página está carregando ...
A página está carregando ...
A página está carregando ...
A página está carregando ...
A página está carregando ...
A página está carregando ...
A página está carregando ...
A página está carregando ...
A página está carregando ...
A página está carregando ...
A página está carregando ...
A página está carregando ...
A página está carregando ...
A página está carregando ...
A página está carregando ...
A página está carregando ...
A página está carregando ...
A página está carregando ...
A página está carregando ...
A página está carregando ...
-
 1
1
-
 2
2
-
 3
3
-
 4
4
-
 5
5
-
 6
6
-
 7
7
-
 8
8
-
 9
9
-
 10
10
-
 11
11
-
 12
12
-
 13
13
-
 14
14
-
 15
15
-
 16
16
-
 17
17
-
 18
18
-
 19
19
-
 20
20
-
 21
21
-
 22
22
-
 23
23
-
 24
24
-
 25
25
-
 26
26
-
 27
27
-
 28
28
-
 29
29
-
 30
30
-
 31
31
-
 32
32
-
 33
33
-
 34
34
-
 35
35
-
 36
36
-
 37
37
-
 38
38
-
 39
39
-
 40
40


DeWalt DC740 Manual do usuário
- Categoria
- Ferramentas elétricas
- Tipo
- Manual do usuário
em outros idiomas
- español: DeWalt DC740 Manual de usuario
- English: DeWalt DC740 User manual
Artigos relacionados
-
DeWalt DCD930 Manual do usuário
-
DeWalt DCD950KX-BR Manual do usuário
-
-
-
DeWalt DCF630B Manual do usuário
-
-
-
-
DeWalt DW268 Manual do usuário
Outros documentos
-
BLACK+DECKER BCD382XN Manual do usuário
-
Stanley FMC628 Manual do usuário
-
Black & Decker LD120VA TYPE1 Manual do proprietário
-
Stanley SFMCD715 Manual do proprietário
-
-
-
-
Black & Decker CD121K Manual do usuário
-
-
Black & Decker LDX112PK-B3 Manual do usuário