
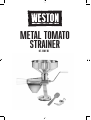
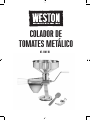
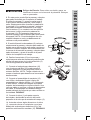
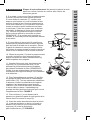
METAL TOMATO
STRAINER
07-1201-W

COMPONENT LIST
ASSEMBLY INSTRUCTIONS
FOOD TIPS
CLEANING INSTRUCTIONS
HELPFUL HINTS
RECIPES
WARRANTY
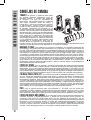
LISTA DE COMPONENTES
INSTRUCCIONES DE ENSAMBLADO
CONSEJOS DE COMIDA
INSTRUCCIONES DE LIMPIEZA
CONSEJOS ÚTILES
RECETAS
INFORMACIÓN DE GARANTÍA WESTON
LISTE DES PIÈCES
INSTRUCTIONS D’ASSEMBLAGE
CONSEILS ALIMENTAIRES
INSTRUCTIONS CONCERNANT LE NETTOYAGE
CONSEILS PRATIQUES
RECETTES
INFORMATION SUR LA GARANTIE
5
6-7
8
9
9
10
12
15
16-17
18
19
19
20
22
25
26-27
28
29
29
30
31
TABLE OF CONTENTS / ÍNDICE / TABLE DES MATIÈRES
2


ENGLISH INSTRUCTIONS
4
T
U
R
17
1
12
10
2
3
4
5
18
11
16
15
14
9
13
6
7
8
19
12

5
ENGLISH INSTRUCTIONS
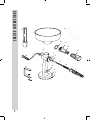
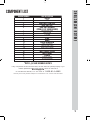
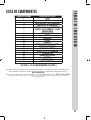
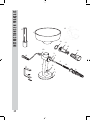
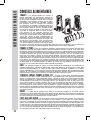
COMPONENT LIST
DIAGRAM NUMBER PART DESCRIPTION
1 HOPPER
2 BODY
3* DRIVE SHAFT O-RING SEAL
4* DRIVE SHAFT CLIP
5 DRIVE SHAFT ASSEMBLY
(SPRING, E-CLIP, O-RING INCLUDED)
6 SUCTION CUP BODY
7 SUCTION CUP
8 C-CLAMP
9 SPIRAL
10 HANDLE
11 SCREEN THUMBSCREW
12 CHUTE ASSEMBLY
13 SUCTION CUP LEVER
14* DRIVE SHAFT SPRING
15 MULTI-PURPOSE SCREEN
16 WASTE FUNNEL
17 STOMPER
18 SCREEN GASKET
19 PLASTIC BUSHING
If any components of this unit are broken, the unit does not operate properly or you
need a replacement instruction manual, visit us on the web at
WestonSupply.com
Or call Weston Brands, LLC Toll Free at 1-800-814-4895
Monday thru Friday 8:00am-5:00pm ET. Outside the U.S. call 001-216-901-6801
*PARTS 3, 4, & 14 ARE ASSEMBLED ON PART 5

6
ENGLISH INSTRUCTIONS
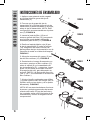
1. Apply a few drops of vegetable oil to the
rubber Drive Shaft O-Ring (3).
2. Ensure the Drive Shaft Clip (4) and Drive
Shaft O-Ring seal (3) are in place on the
drive shaft. NOTE: This conguration is
pre-assembled on rst use (5). FIGURE A
3. Insert the Screen Gasket (18) into the
large end of the Screen (15), making sure
the Gasket is under the Thumbscrew (11).
FIGURE B
4. Slide the red plastic Spiral (9) onto the
Drive Shaft (5) over the Spring (14). Be
sure to match the ats on the Drive Shaft
to the metal insert in the side of the Spiral.
FIGURE C
5. Align the notches of the Body (2) with
the notches in the Multi-Purpose Screen
(15). FIGURE D
6. Holding the Body rmly in one hand,
push the Multi-Purpose Screen (15) over
the Spiral (9) and Drive Shaft Assembly
(5) and compress, then turn 1/8th of a
turn counter-clockwise to lock it in place.
(NOTE: The “ON” - “OFF” direction arrows
are on the base of the Multi-Purpose
Screen.)
7. Tighten the Screen Thumbscrew (11)
to lock the Screen in place (NOTE: Finger
tighten only, do not over tighten). FIGURE
E
NOTE: Operating the Tomato Press
& Sauce Maker while empty is NOT
recommended. The juice from the fruits
and vegetables act as a lubricant for the
mechanisms and reduce wear on the
components.
FIGURE C
FIGURE D
FIGURE B
FIGURE A
FIGURE E
ASSEMBLY INSTRUCTIONS
4
5
14
3
15
18
11
9
14
5
2
15
11

7
ENGLISH INSTRUCTIONS
8. At this point you can attach the Tomato Press
& Sauce Maker to your work space. If utilizing
the Suction Cup (7), be sure the area you wish to
adhere to is smooth, clean, and dry. Simply raise
the Suction Cup Lever (13) and hold the Tomato
Press & Sauce Maker rmly in place with the
Suction Cup (7) in contact with the table surface,
then press the Suction Cup Lever (13) down. The
Suction Cup Lever will require rm pressure to
lock it into place. NOTE: If you have a rough or
dirty surface, the Suction Cup may not adhere to
the surface.
9. If utilizing the C-Clamp (8), simply position the
Tomato Press & Sauce Maker near the edge
of a table or counter. Slide the top end of the
C-Clamp into the slot at the base of the Tomato
Press & Sauce Maker and tighten the screw to
the underside of the work surface.
10. Slide the Handle (10) into the Tomato Press
& Sauce Maker making sure to align the slots in
the Drive Shaft (5) to the tabs on the Handle.
11. Attach the Waste Funnel (16) to the end of
the Screen (15) by pushing the small end with
the tabs over the end of the Screen. NOTE: Use
caution not to break the Waste Funnel when
attaching or detaching.
12. Attach the Chute Assembly (12) to the
Screen by sliding the lower half of the assembly
under the Screen (15). Securing the underside,
insert the hinges of the upper half of the
assembly into the lower half. Once in place, snap
the wire clamp in place. The Chute Assembly
should be positioned so that it covers the Screen
in its entirety. FIGURE F
13. Attach the Hopper (1) to the top of the
Strainer by sliding the small neck section of the
Hopper into the throat of the Body (2).
14. Before placing any food in the Hopper (1)
be sure to have a bowl or jar under both the
Waste Funnel (16) and the Squirt Guard/Chute
(12). FIGURE G
FIGURE F
FIGURE G
7
12
6
15
1
1
16
12
Entanglement Hazard:
To avoid serious injury do not reach
into grinder inlet. Always use stomper.
w WARNING

TOMATOES: The Tomato Press & Sauce
Maker will easily puree fresh tomatoes,
remove the seeds, core and skin with
no pre-cooking whatsoever. Fresh vine
ripened tomatoes work best. Remove
the stems, wash and quarter the
tomatoes, then load the Hopper half
way full with the quartered tomatoes.
Guide the tomatoes into the neck of
the Tomato Press & Sauce Maker
using the Stomper, turn the Handle
in a clockwise direction. The skins
and seeds will come out of the Waste
Funnel, while the delicious puree slides
into your bowl ready to be seasoned
and eaten. If the tomatoes are extra
pulpy, a little unripe or difcult to strain,
parboil them to make them softer. After
parboiling, allow to cool before straining. If excessive liquid backs up into the Hopper
continue turning the Handle until the liquid runs through the machine before guiding
more tomatoes into the neck of the Strainer.
APPLES AND PEARS: For best results apples and pears should be softened before
processing with the Tomato Press & Sauce Maker. This is easily accomplished
without peeling or even coring the apples! Quarter the fruit before or after softening.
Place the fruit in a pot with about 1/2 full of water. Set the heat to medium, cover,
and let them steam until they are soft. For a little extra avor you can use cider to
steam the apples. After removing the fruit from the pot, strain it through the Tomato
Press & Sauce Maker using the multi-purpose Screen. The cores, skins and seeds
will come out of the Waste Funnel, while the delicious puree slides into your bowl
ready to be seasoned and eaten. If the Tomato Press & Sauce Maker is too hard to
turn, or it jams, the fruit may need further softening.
BERRIES: The Tomato Press & Sauce Maker will make it easy to create homemade
jams and jellies. Combine different berries and fruits to create custom avors. With
the optional Berry Screen (Model No. 07-0855 sold separately) you can easily
separate even the tiniest seeds from raspberries and strawberries. If you like your
jellies thicker just add a few crushed berries to the puree or use a Screen with larger
holes.
PUMPKIN, SQUASH, POTATOES, ETC: Using the optional Pumpkin Screen (Model No.
07-0857 sold separately) creates incredibly smooth pie llings or purees. Use this
Screen to also make breads, cakes, or even mashed potatoes without peeling. Just
cut these products into 1” (2.5 cm) squares or slices. Boil or bake until tender. Allow
to cool. For pumpkin and squash scoop the pulp out of its skin and run it through the
Tomato Press & Sauce Maker. Potatoes can be cut into cubes, boiled until tender
then run right through the Tomato Press & Sauce Maker for super smooth or chunky
mashed potatoes with no peeling.
GRAPES: Using the optional Grape Spiral (Model No. 07-0856 sold separately) and
standard Screen, to create gallons of delicious grape juice in just minutes. Just wash
the grapes, pull them from the stems, and the Tomato Press & Sauce Maker does
the rest. Great for the home wine maker.
FRUITS WITH LARGER PITS: For fruits like peaches, cherries, mangos, avocados*, and
anything else with a large seed, you must remove the seed to prevent jamming the
mechanism. Don’t worry about the skin or the core, the Tomato Press & Sauce Maker
will easily remove them and send them out through the Waste Funnel. If the fruit is rm
like an apple or pear, remember to soften them by steaming or baking slightly before
loading them into the Tomato Press & Sauce Maker. * Avocados and mangos must
be peeled before straining.
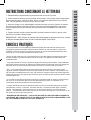
FOOD TIPS
8
ENGLISH INSTRUCTIONS

FOOD TIPS
9
ENGLISH INSTRUCTIONS
1. Fully disassemble the Tomato Press & Sauce Maker.
2. Wash all parts in hot soapy water. A stiff-bristled bottle brush may be needed
to clean the Screen. Pay extra attention to the seams of the Screen as seeds and
skin may gather there.
3. Before storing or reassembling the Tomato Press & Sauce Maker be sure all
the parts are thoroughly dry. It is recommended to apply a drop of vegetable oil on
the rubber Screen Gasket to keep it from drying and becoming brittle.
4. Keep the box the Tomato Press & Sauce Maker came in for easy storage.
NOTE: To prevent damage to the wooden stomper, do not leave submerged in
water and dry after washing.
CLEANING INSTRUCTIONS
• It is normal when straining large quantities of food with a high moisture content
like tomatoes, to see liquid back up into the Hopper. Simply continue turning the
Handle until all the liquid disappears from the Hopper and neck of the Tomato
Press & Sauce Maker.
• Depending on the food you are processing, it may be necessary to occasionally
scrape pulp from the Screen of the Tomato Press & Sauce Maker. A rubber
spatula is ideal for this.
• The Tomato Press & Sauce Maker is equipped with an extra Large Hopper. It is
best to ll the Hopper half full leaving space around the middle to guide food into
the throat of the Tomato Press & Sauce Maker using the Stomper.
• If there is excessive pulp exiting the Waste Funnel, run the pulp through the
Tomato Press & Sauce Maker a second time to fully extract every bit of juice. To
get the most out of the fruits and vegetables, strain the skins and seeds from the
Waste Funnel a second time.
• Operating the Tomato Press & Sauce Maker while empty is not recommended.
The juice from the fruits and vegetables act as a lubricant for the mechanism and
reduces wear on the components.
• The standard Screen that comes with the Tomato Press & Sauce Maker is
ideal for most foods, such as: Apples*, Tomatoes, Apricots*, Avocados (must be
peeled), Carrots*, Cherries, Cranberries*, Peaches (remove pit before straining),
Potatoes*, Pears*. *These foods should be softened by steaming, parboiling or
baking before straining.
• IMPORTANT NOTE: ALWAYS FOLLOW RECOMMENDED CANNING,
FREEZING AND DEHYDRATING PROCEDURES WHEN PRESERVING ANY
FOODS.
HELPFUL HINTS

10
ENGLISH INSTRUCTIONS
INSTRUCTIONS
.
Run the fresh tomatoes through the Tomato Press & Sauce Maker using the
Multi-Purpose Screen to yield 12 cups of fresh tomato puree
.
Heat the olive oil in a large pan
.
Sauté the onions and garlic until tender, do not overly brown
.
Add the rest of the ingredients
.
Bring mixture to a boil, reduce heat and simmer partially covered for 2 hours or
until sauce has reduced to desired consistency
.
Stir occasionally
.
Serve or allow to cool then refrigerate or freeze
.
Ingredients like sliced mushrooms, cooked/drained sausage, hamburger,
etc. can be added to taste
LARGE BATCH ITALIAN TOMATO SAUCE
INGREDIENTS
1/2 CUP OLIVE OIL 3 MEDIUM ONIONS, CHOPPED
3 TBSP BROWN SUGAR 1 TBSP DRIED OREGANO
2 TSP DRIED BASIL 1 TSP BLACK PEPPER
2 CLOVES GARLIC, MINCED 4 TSP SALT
12LB FRESH TOMATOES
RECIPES
INSTRUCTIONS
.
Heat the olive oil in a large saucepan
.
Cover and cook the onions, celery, and carrots over medium-low heat for about
15 minutes, stir occasionally
.
Uncover and stir over heat for an additional 5 to 10 minutes, or until the vegetables
are soft and slightly golden
.
Add the tomato sauce, sugar, and pepper
.
Cover and simmer gently for 15 minutes
.
Serve or allow to cool then refrigerate or freeze
MARINARA SAUCE
INGREDIENTS
1 CUP CARROTS, FINELY MINCED 6 LBS RIPE ITALIAN-STYLE TOMATO
PUREE
1 CUP ONION, FINELY MINCED 1/2 CUP CELERY, FINELY MINCED
1/2 CUP OLIVE OIL 1 TSP SUGAR
2 CLOVES GARLIC, MINCED 4 TSP SALT
GROUND WHITE PEPPER, TO TASTE
OPTIONAL SEASONING (ANY ONE OF THE FOLLOWING):
2 TSP GROUND CORIANDER
1/2-1 TSP DRIED MARJORAM
1 TSP DRIED BASIL
1/4 TO 1/2 TSP DRIED OREGANO
1 TO 2 TSP SALT


12
ONE-YEAR LIMITED WARRANTY
This warranty applies to products purchased and used in the U.S. and Canada. This is the only
express warranty for this product and is in lieu of any other warranty or condition.
This product is warranted to be free from defects in material and workmanship for a period of
one (1) year from the date of original purchase. During this period, your exclusive remedy is
repair or replacement of this product or any component found to be defective, at our option. If
the product or component is no longer available, we will replace with a similar one of equal or
greater value.
This warranty does not cover unauthorized repairs or service to products, products sold “as-
is” by retailers, glass, filters, wear from normal use, use not in conformity with the printed
directions, or damage to the product resulting from accident, alteration, abuse, or misuse.
This warranty extends only to the original consumer purchaser or gift recipient and is not
transferable. Keep the original sales receipt, as proof of purchase is required to make a
warranty claim.
We exclude all claims for special, incidental and consequential damages caused by breach of
express or implied warranty. All liability is limited to the amount of the purchase price. Every
implied warranty, including any statutory warranty or condition of merchantability or
fitness for a particular purpose, is disclaimed except to the extent prohibited by law, in
which case such warranty or condition is limited to the duration of this written warranty.
This warranty gives you specific legal rights. You may have other legal rights that vary
depending on where you live. Some states or provinces do not allow limitations on implied
warranties or special, incidental, or consequential damages, so the foregoing limitations may
not apply to you.
To make a warranty claim, do not return this appliance to the store. Please call 1.800.814.4895
(001.216.901.6801 outside the US) or visit WestonSupply.com.

COLADOR DE
TOMATES METÁLICO
07-1201-W

INSTRUCCIONES EN ESPAÑOL
14
T
U
R
17
1
12
10
2
3
4
5
18
11
16
15
14
9
13
6
7
8
19
12

15
INSTRUCCIONES EN ESPAÑOL
LISTA DE COMPONENTES
NÚMERO DE DIAGRAMA DESCRIPCIÓN DE LA PIEZA
1 TOLVA
2 CUERPO
3* JUNTA TÓRICA DEL EJE DE TRANSMISIÓN
4* GRAPA DEL EJE DE TRANSMISIÓN
5
ENSAMBLADO DEL EJE DE TRANSMISIÓN
(RESORTE, CLIP EN FORMA DE E Y JUNTA
TÓRICA INCLUIDOS)
6 CUERPO DE VENTOSA
7 VENTOSA
8 ABRAZADERA
9 ESPIRAL
10 MANIVELA
11 TORNILLO MOLETEADO PARA EL FILTRO
12 ENSAMBLAJE DE CANALETA
13 PALANCA DE LA VENTOSA
14* RESORTE DEL EJE DE TRANSMISIÓN
15 FILTRO MULTIUSO
16 EMBUDO PARA DESECHOS
17 PISADOR
18 JUNTA DE FILTRO
19 CEPILLO DE PLÁSTICO
Si alguno de los componentes de la unidad está dañado, o la unidad no funciona correctamente, o
bien necesita un manual de instrucciones de reemplazo, puede visitar nuestro sitio web, en
WestonSupply.com
Asimismo, puede llamar a Weston Brands, LLC, llamada gratuita, al 1-800-814-4895
De lunes a viernes de 8:00 a. m. a 5:00 p. m., hora del este. Fuera de los EE. UU., puede llamar
al 001-216-901-6801
*LAS PIEZAS 3, 4 Y 14 ESTÁN ENSAMBLADAS EN LA PARTE 5

16
INSTRUCCIONES EN ESPAÑOL
1. Aplique unas gotas de aceite vegetal
en la junta tórica de goma del eje de
transmisión (3).
2. Procure que la grapa del eje de
transmisión (4) y la junta tórica del eje de
transmisión (3) estén ubicadas en su lugar,
sobre el eje de transmisión. NOTA: Esta
conguración se preensambla en el primer
uso (5). FIGURA A
3. Inserte la junta de ltro (18) en el
extremo grande del ltro (15), procurando
que la junta quede debajo del tornillo
moleteado para el ltro (11). FIGURA B
4. Deslice el espiral plástico rojo (9) por
el eje de transmisión (5) sobre el resorte
(14). Asegúrese de hacer coincidir las
partes planas del eje de transmisión con la
inserción de metal en el lateral del espiral.
FIGURA C
5. Alinee las muescas del cuerpo (2) con
las del ltro multiuso (15). FIGURA D
6. Sosteniendo el cuerpo rmemente con
una mano, presione el ltro multiuso (15)
sobre el espiral (9) y el ensamblado del
eje de transmisión (5), y comprima. Luego,
gírelo 1/8 de vuelta, en sentido contrario
a las agujas del reloj, para bloquearlo en
su lugar. (NOTA: Las echas de dirección
“ON” y “OFF” se encuentran en la base del
ltro multiuso.)
7. Ajuste el tornillo moleteado para el ltro
(11) para sujetar el ltro en el lugar (NOTA:
Ajústelo solo con los dedos y no lo apriete
demasiado). FIGURA E
NOTA: NO se recomienda hacer funcionar
la prensa y máquina para salsa de tomate
cuando está vacía. El jugo de las frutas y
los vegetales actúa como lubricante de los
mecanismos y reduce el desgaste de los
componentes.
FIGURA C
FIGURA D
FIGURA B
FIGURA A
FIGURA E
INSTRUCCIONES DE ENSAMBLADO
14
3
15
18
11
9
14
5
2
15
11
4
5

17
INSTRUCCIONES EN ESPAÑOL
8. En este punto, puede jar la prensa y máquina
para salsa de tomate en su espacio de trabajo.
Si utiliza la ventosa (7), procure que la zona a
la que desea adherirla sea lisa y esté limpia y
seca. Simplemente debe levantar la palanca de
la ventosa (13) y sostener la prensa y máquina
para salsa de tomate rmemente en su lugar,
con la ventosa (7) en contacto con la supercie
de la mesa. Luego, presione la palanca de
la ventosa (13). Es necesario presionar con
rmeza la palanca de la ventosa para que quede
bloqueada. NOTA: Si está trabajando en una
supercie áspera o sucia, probablemente la
ventosa no se pueda adherir.
9. Si está utilizando la abrazadera (8), coloque
simplemente la prensa y máquina para salsa de
tomate cerca del borde de una mesa o encimera.
Deslice el extremo superior de la abrazadera por
la ranura de la base de la prensa y máquina para
salsa de tomate, y ajuste el tornillo de la parte
inferior de la supercie de trabajo.
10. Deslice la manivela (10) en la prensa y
máquina para salsa de tomate asegurándose de
alinear las ranuras en el eje de transmisión (5)
con las lengüetas de la manivela.
11. Conecte el embudo para desechos (16)
con el extremo del ltro (15) presionando el
extremo pequeño con las lengüetas sobre el
extremo del ltro. NOTA: Tenga cuidado de no
romper el embudo para desechos al conectarlo o
desconectarlo.
12. Conecte el ensamblaje de canaleta (12)
con el ltro, deslizando la parte inferior del
ensamblaje por debajo del ltro (15). Sujetando
el lado inferior, inserte las bisagras de la parte
superior del ensamblaje en la parte inferior. Una
vez que estén en su lugar, coloque la abrazadera
del cable. El ensamblaje de canaleta debería
quedar ubicado de forma tal que cubra el ltro en
su totalidad. FIGURA F
13. Conecte la tolva (1) a la parte superior
del colador, deslizando la sección del cuello
pequeño de la tolva por la entrada del cuerpo (2).
14. Antes de colocar algún alimento en la tolva
(1), recuerde colocar un recipiente o una jarra
debajo del embudo para desechos (16) y del
protector antichorreo/la canaleta (12). FIGURA G
FIGURA F
FIGURA G
7
12
6
15
1
1
16
12
Peligro de Enredo: Para evitar una lesión grave, no
introduzca la mano en la boca de la picadora. Siempre
use un prensador.
w ADVERTENCIA

TOMATES: La prensa y máquina para salsa
de tomate realizará fácilmente puré de
tomates frescos y quitará las semillas,
el corazón y la piel, sin necesidad de
precocción. Los tomates frescos y maduros
dan mejor resultado. Quite los tallos, y
luego lave y corte los tomates en cuartos.
A continuación, cargue la tolva hasta la
mitad con los trozos de tomates. Utilizando
el pisador, introduzca los tomates en el
cuello de la prensa y máquina para salsa de
tomate. Gire la manivela en el sentido de las
agujas del reloj. La piel y las semillas saldrán
por el embudo para desechos y el delicioso
puré caerá en su recipiente, listo para ser
condimentado y comido. Si los tomates son
demasiado pulposos, no están tan maduros
o son difíciles de colar, sancóchelos para
ablandarlos. A continuación, deje que se
enfríen antes de colarlos. Si el exceso de
líquido vuelve a la tolva, continúe girando la manivela hasta que el líquido pase por la
máquina, antes de colocar más tomates en el cuello del colador.
MANZANAS Y PERAS: Para obtener los mejores resultados, es necesario ablandar las
manzanas y las peras antes de procesarlas con la prensa y máquina para salsa de
tomate. ¡Esto se logra fácilmente sin necesidad de pelarlas ni de quitarles el corazón a
las manzanas! Corte las frutas en cuartos, antes o después de ablandarlas. Coloque
las frutas en una olla con agua hasta la mitad. Lleve a fuego medio, tape y deje que
se cuezan al vapor hasta que queden tiernas. Para obtener un poco más de sabor,
puede agregar sidra para cocer las manzanas. Después de retirar las frutas de la olla,
utilice el ltro multiuso para colarlas en la prensa y máquina para salsa de tomate.
El centro, la piel y las semillas saldrán por el embudo para desechos, y el delicioso
puré caerá en su recipiente, listo para ser condimentado y comido. Si le cuesta girar
la prensa y máquina para salsa de tomate, o bien si esta se atasca, es probable que
deba ablandar aún más las frutas.
FRUTAS DEL BOSQUE: Con la prensa y máquina para salsa de tomate podrá preparar
fácilmente mermeladas y jaleas caseras. Combine diferentes frutas para crear sabores
personales. Con el ltro opcional para frutas del bosque (Modelo n.º 07-0855, que se
vende por separado) puede separar fácilmente hasta las semillas más pequeñas de
las frutillas/fresas y las frambuesas. Si le gusta que las jaleas le salgan más espesas,
agregue algunas frutas trituradas al puré o utilice un ltro con oricios más grandes.
CALABAZA, ZAPALLO, PAPAS, ETC.: Con el ltro opcional de calabaza (Modelo n.º 07-0857,
que se vende por separado) puede crear purés o rellenos de pastel increíblemente
suaves. También puede utilizar este ltro para elaborar panes, tortas o incluso puré
de papas sin pelarlas. Solo debe cortar estos productos en cubos o rebanadas de 1”
(2.5 cm). Hiérvalos u hornéelos hasta que queden tiernos. A continuación, deje que se
enfríen. Quíteles la pulpa a las calabazas y los zapallos, y luego pásela por la prensa y
máquina para salsa de tomate. Las papas se pueden cortar en cubos, hervirse hasta
que queden tiernas y luego pasarlas por la prensa y máquina para salsa de tomate,
para obtener un puré de papas muy suave sin necesidad de pelarlas.
UVAS: Con el espiral opcional para uvas (Modelo n.º 07-0856, que se vende por
separado) y el ltro estándar, puede elaborar litros de delicioso jugo de uvas en unos
pocos minutos. Solo debe lavar las uvas y quitarles los tallos, y la prensa y máquina
para salsa de tomate se ocupará del resto. Ideal para quienes elaboran vino casero.
FRUTAS CON CAROZOS MÁS GRANDES: En el caso de frutas como duraznos/melocotones,
cerezas, mangos y paltas/aguacates*, y todas las que tengan carozo grande, es
necesario que retire el carozo para evitar que se atasque el mecanismo. No se
preocupe por la piel o el corazón, la prensa y máquina para salsa de tomate los elimina
fácilmente y los envía hacia afuera, a través del embudo para desechos.Si la fruta
es rme, como la manzana o la pera, recuerde que deberá ablandarlas, mediante
cocción al vapor o al horno, antes de cargarlas en la prensa y máquina para salsa de
tomate. *Las paltas/aguacates y los mangos se deben pelar antes de colarlos.
CONSEJOS DE COMIDA
18
INSTRUCCIONES EN ESPAÑOL

CONSEJOS DE COMIDA
19
INSTRUCCIONES EN ESPAÑOL
1. Desensamble completamente la prensa y máquina para salsa de tomate.
2. Lave todas las piezas en agua jabonosa. Es posible que necesite un cepillo de
cerdas para botellas, para limpiar el ltro. Preste mucha atención a las juntas del ltro,
para que no queden acumulados semillas y trozos de piel.
3. Antes de almacenar o volver a ensamblar la prensa y máquina para salsa de
tomate, asegúrese de que todas las partes estén bien secas. Se recomienda aplicar
una gota de aceite vegetal en la junta del ltro de goma, para que no se seque y se
vuelva quebradizo.
4. Guarde la caja de la prensa y máquina para salsa de tomate, para almacenarla
más fácilmente.
NOTA: Para evitar que se dañe el pisador de madera, no lo deje sumergido en
agua y séquelo después de lavarlo.
INSTRUCCIONES DE LIMPIEZA
• Al ltrar grandes cantidades de alimentos con alto contenido de humedad, como los
tomates, es normal que quede líquido en la tolva. Solo siga girando la manivela hasta que
desaparezca el líquido de la tolva y del cuello de la prensa y máquina para salsa de tomate.
• Según los alimentos que esté procesando, es probable que de vez en cuando necesite
raspar pulpa del ltro de la prensa y máquina para salsa de tomate. Para ello, es ideal
utilizar una espátula de goma.
• La prensa y máquina para salsa de tomate viene equipada con una tolva extragrande.
Se recomienda cargar la tolva hasta la mitad, dejando espacio alrededor del centro, para
colocar los alimentos en la entrada de la prensa y máquina para salsa de tomate, con
el pisador.
• Si sale demasiada pulpa del embudo para desechos, pase nuevamente la pulpa por la
prensa y máquina para salsa de tomate, para extraer todo el jugo. Para aprovechar las
frutas y los vegetales al máximo, cuele nuevamente la piel y las semillas con el embudo
para desechos.
• NO se recomienda hacer funcionar la prensa y máquina para salsa de tomate cuando
está vacía. El jugo de las frutas y los vegetales actúa como lubricante de los mecanismos y
reduce el desgaste de los componentes.
• El ltro estándar de la prensa y máquina para salsa de tomate es ideal para la mayoría
de los alimentos, por ejemplo: manzanas*, tomates, damascos/albaricoques*, paltas/
aguacates (deben estar pelados), zanahorias*, cerezas, arándanos*, duraznos/
melocotones (quitar el carozo antes de colar), papas*, peras*. *Estos alimentos se deben
ablandar mediante cocción al vapor, al horno o sancochado, antes de colarlos.
• AVISO IMPORTANTE: CUANDO QUIERA CONSERVAR ALIMENTOS, SIGA
SIEMPRE LOS PROCEDIMIENTOS RECOMENDADOS DE CONSERVACIÓN,
CONGELACIÓN Y DESHIDRATACIÓN.
CONSEJOS ÚTILES

20
INSTRUCCIONES EN ESPAÑOL
INSTRUCCIONES
.
Pase los tomates frescos por la prensa y máquina para salsa de tomate con
el ltro multiuso, para producir 12 tazas de puré de tomate fresco.
.
En una sartén grande, caliente el aceite de oliva.
.
Sofría el ajo y las cebollas hasta que queden tiernos, pero sin tostarse demasiado.
.
Agregue el resto de los ingredientes.
.
Lleve a punto de ebullición, reduzca el fuego y cocine a fuego lento durante
2 horas, tapando parcialmente la sartén, o hasta que la salsa se reduzca a la
consistencia deseada.
.
Revuelva ocasionalmente.
.
Sirva o deje enfriar y luego lleve al refrigerador o congele.
.
Para dar sabor, puede agregar distintos ingredientes, como hongos en rebanadas,
salchichas cocidas y escurridas, hamburguesas, etc.
SALSA DE TOMATE ITALIANA EN GRAN CANTIDAD
INGREDIENTES
1/2 TAZA DE ACEITE DE OLIVA 3 CEBOLLAS MEDIANAS PICADAS
3 CUCHARADAS DE AZÚCAR MORENO 1 CUCHARADA DE ORÉGANO SECO
2 CUCHARADITAS DE ALBAHACA
SECA
1 CUCHARADITA DE PIMIENTA NEGRA
2 DIENTES DE AJO PICADOS 4 CUCHARADITAS DE SAL
12 LIBRAS (5.5 KG) DE TOMATES
FRESCOS
RECETAS
INSTRUCCIONES
.
En una sartén grande, caliente el aceite de oliva.
.
Tape y cocine las cebollas, el apio y las zanahorias a fuego medio-bajo, durante
15 minutos aproximadamente, revolviendo ocasionalmente.
.
Destape y revuelva sobre el fuego durante 5 o 10 minutos más o hasta que los
vegetales estén tiernos y algo dorados.
.
Agregue la salsa de tomate, el azúcar y la pimienta.
.
Tape y cocine a fuego lento durante 15 minutos.
.
Sirva o deje enfriar y luego lleve al refrigerador o congele.
SALSA MARINARA
INGREDIENTES
1 TAZA DE ZANAHORIAS, FINAMENTE
PICADAS
6 LIBRAS (2.5 KG) DE PURÉ DE TOMATE
MADURO AL ESTILO ITALIANO
1 TAZA DE CEBOLLA PICADA
FINAMENTE
1/2 TAZA DE APIO PICADO FINAMENTE
1/2 TAZA DE ACEITE DE OLIVA 1 CUCHARADITA DE AZÚCAR
2 DIENTES DE AJO PICADOS 4 CUCHARADITAS DE SAL
PIMIENTA BLANCA MOLIDA, A GUSTO
ADEREZO OPCIONAL (ALGUNO DE LOS SIGUIENTES):
2 CUCHARADITAS DE CILANTRO MOLIDO
1/2 O 1 CUCHARADITA DE MEJORANA SECA
1 CUCHARADITA DE ALBAHACA SECA
1/4 O 1/2 CUCHARADITA DE ORÉGANO SECO
1 O 2 CUCHARADITAS DE SAL
A página está carregando...
A página está carregando...
A página está carregando...
A página está carregando...
A página está carregando...
A página está carregando...
A página está carregando...
A página está carregando...
A página está carregando...
A página está carregando...
A página está carregando...
A página está carregando...
-
 1
1
-
 2
2
-
 3
3
-
 4
4
-
 5
5
-
 6
6
-
 7
7
-
 8
8
-
 9
9
-
 10
10
-
 11
11
-
 12
12
-
 13
13
-
 14
14
-
 15
15
-
 16
16
-
 17
17
-
 18
18
-
 19
19
-
 20
20
-
 21
21
-
 22
22
-
 23
23
-
 24
24
-
 25
25
-
 26
26
-
 27
27
-
 28
28
-
 29
29
-
 30
30
-
 31
31
-
 32
32


em outras línguas
- español: Weston 07-1201-W Guía del usuario
- français: Weston 07-1201-W Mode d'emploi
- English: Weston 07-1201-W User guide
Artigos relacionados
Outros documentos
-
KitchenAid 5KRAV Manual do usuário
-
Philips HR2200/80 Recipe book
-
 Courant CPM-1240R Manual do usuário
-
Sunbeam 2692 Manual do usuário
-
Silvercrest SKM 550 A1 Operating Instructions Manual
-
Hamilton Beach 70510 Guia de usuario
-
-
Morphy Richards 48730 Manual do proprietário
-
Silvercrest SPM 200 A1 Operating Instructions Manual
-
Sammic CA-301 Manual do usuário
