Rega BRIO Manual do usuário

Tipo
Manual do usuário

Este manual também é adequado para

Integrated Amplifier
User manual
Contents
2English
6Français
8Deutsche
10 Italiano
12 Español
14 Português
16 Nederlands
18 Dansk
20 Svenska
22 Polski
Introduction
Thank you for purchasing the new Brio amplifier, the 6th generation of Rega’s best-selling amplifier.
The Brio has a completely new case to house its improved circuits and parts. It now sits in a fully aluminium
two part case which boosts the Brios heatsinking capabilities and improves on Rega’s already solid build
quality and reliability. The sleek and minimal look was designed to bring elegance to Rega’s classic style but
still harks back to the swooped features hidden away in Rega’s past amplifiers. Combining all these aspects
makes this Brio case a unique standpoint amongst the competition.
Key improvements have been made to the circuits. The PCB layout has been fully upgraded to handle
higher specifications for all critical parts. A second raw power supply has been added to provide further
isolation between output stage and the driver stage/line and phono amplifiers. This improves the isolation
between high and low level signal stages of the amplifier. Higher specification MUSES operational amplifiers
have been used in the line and phono amplifier.
For convenience the Brio has the capability to drive standard hi-fi headphones from the internal amplifier.
Adding a headphone socket was only possible by finding a way to reduce its impact on the main signal path
so it doesn’t disrupt the overall sound quality. We have paid special attention to the switch that deactivates
the main speakers. This is achieved by the same relay used in Rega’s other amplifier models.
Throughout the design process the Brio has been meticulously improved in every aspect, from the quality of
materials to the manufacturing process, to make this new Brio a step ahead in Rega’s engineering and
design for amplifiers.
English
2
Setting up
The Brio will work well on most surfaces, such as a shelf or table, provided there is sufficient air around the
amplifier to prevent overheating. If using a turntable, magnetic interference can be avoided by positioning
the amplifier as far away from the cartridge as the tonearm lead will allow. It is recommended not to stack
other hi-fi equipment directly on top of the amplifier. Never place it on fabric or carpet.
Speakers
Fuse
Power
LEFT
RIGHT
1 2 3 4 5 6
Record
output
Phono
Inputs
Connectivity
All line level inputs and outputs are made via RCA (phono) connectors.
Earthing
The Brio is fully earthed, but you may need to earth your turntable via the tonearm. For Rega turntables,
earthing is achieved via the Phono lead ground therefore a separate earth is not necessary. If your tonearm
has a separate earth lead it will need to be connected to the earthing nut located on the underside of the
amplifier. You can use the nut to clamp down onto the earthing wire, but ensure that the turntable and Brio
are as far away as possible whilst ensuring the safety of both products.
English
3
This input is a phono
stage that can be used
with moving magnet
(MM) or specifically
high output moving
coil (MC) cartridges.
Line inputs enable the
connection of any
additional sources
such as CD players,
BluRay players,
streamers etc. Note
the record output is
disabled when input 5
is selected.
For connection to any
recordable device. The
output is a ‘record
signal’ as selected by
the main input selector
1-4. This output is not
affected by the volume
control.
For earthing tonearms,
located on bottom of
Brio.
Top row: Left speaker
Red and Black.
Bottom row: Right
speaker Red and Black.
1. Phono stage input 2-5. Line level input 6. Record output Earthing nut Loudspeaker output
WARNING: CASE CAN GET HOT.
Loudspeakers
The Brio is capable of driving all normal hi-fi loudspeakers. Rega recommends using loudspeakers with a
nominal impedance of 8Ω. It is possible to run speakers as low as 4Ω however such units may cause the
case to exceed 40° C above the ambient temperature.
If in the event that the speaker leads are shorted, the fold back short circuit protection will protect the
output stage from excessive currents. This protection circuit is not placed in the audio signal path and
therefore does not affect sound quality.
English
WARNING: ALWAYS TURN OFF THE AMPLIFIER WHEN CHANGING LEADS AND SPEAKER CABLES.
Headphones
The Brio is capable of driving all standard hi-fi headphones. The headphone output has been characterised
to match most commonly used headphones. See specifications for the output levels.
When a headphone is inserted into the socket, the speakers will automatically be turned off. However it is
recommended to reduce the volume of the Brio before connecting any headphones to ensure they are not
damaged and prevent any hearing damage.
WARNING: TO PREVENT POSSIBLE HEARING DAMAGE, DO NOT LISTEN TO
HEADPHONES AT HIGH LEVELS FOR LONG PERIODS OF TIME.
Input selection
4
1 2 3 4 5
To change between inputs, press
the small black button located
next to the row of input digits to
cycle through 1-5. The selected
input is highlighted by the
number lighting up in red. Input
selection can also be changed
with the remote.
The Brio has been set up to drive
the most common hi-fi
headphones. When a headphone
jack is inserted into the
headphone socket, the
loudspeaker output will
automatically be turned off.
The volume control has a
minimum and maximum value
which is indicated by the notch.
The volume does not reset after
each use. Before plugging in
headphones make sure the
volume is reduced.
To turn the Brio on press the silver
power button. After a few
seconds you will hear a relay ‘click’
and the Brio will be operational.
On/off button Headphone socket Input display Volume control
English
5
Warnings
Recommended ambient operating temperature 5 to 35°C
Allow adequate air circulation around the whole of the Brio especially its sides as this is where most of the
heat is dispersed, this is crucial when the amplifier is running at high listening levels and for extended
periods of time. This unit is intended for use in moderate climates.
To reduce the risk of fire, electric shock or product damage, do not expose the unit to rain, moisture,
dripping or splashing and ensure that no objects filled with liquids, such as vases, shall be placed upon it. Do
not remove the case covers. There are no user serviceable parts inside.
No naked flame sources, such as lit candles, should be placed on the apparatus.
Specifications
Input sensitivities for rated output level:
Input 1 (phono) input sensitivity = 2.1mV at 47KΩ in parallel with 220pF.
Maximum Input 1 (phono) input level = 100mV
Input 2-5 (line) input sensitivity = 210mV at 47kΩ
Maximum input 2-5 (line) input level = 10.25V
Power outputs at 230/115V supply voltage:
50Watts RMS both channels driven into the rated load of 8Ω
58Watts RMS one channel driven into the rated load of 8Ω
73Watts RMS both channels driven into the rated load of 4Ω
93Watts RMS one channel driven into the rated load of 4Ω
Continued high level use into 4Ω may cause the case to exceed 40° C above the ambient temperature.
Headphone output:
No load = 8V
32Ω = 1.8V
54Ω = 2.6V
300Ω = 5.9V
Source impedance = 109Ω
Power consumption:
195Watts at 230V/220V/115V/100V into the rated load of 8Ω
Record output level:
Record output level (with rated input levels) = 210Mv.
Record output impedance = 470Ω
Frequency response:
Phono 15Hz to 40KHz (-3dB Points) / 27Hz to 20.5KHz (-1dB Points)
RIAA accuracy (100Hz to 10KHz) ± 0.4dB typically better than ± 0.3dB
Line 12Hz (-1dB points) to 43KHz (-3dB points)
Remote control batteries included – 2 x AAA Alkaline.
Fuse ratings:
T2AL 250V - 230V/50Hz and 220V/60Hz
T3.15AL 250V - 115V/60Hz and 100V 50/60Hz
Manufacturer:
Rega Research Limited
6 Coopers Way,
Temple Farm Industrial Estate
Southend-On-Sea
Essex
SS2 5TE
Introduction
Merci d'avoir choisi le nouvel amplificateur Brio, nouvelle incarnation du savoir-faire qui fait la popularité de Rega.
Le Brio offre les améliorations suivantes:
Nouvelle conception de boîtier, maintenant entièrement fabriqué en aluminium pour optimiser la dissipation
thermique et la fiabilité.
Nouveau look épuré et minimaliste pour ajouter une touche d'élégance au style Rega classique et robuste.
Composants de boîtier de qualité supérieure et nouvelle méthode d'assemblage pour renforcer la construction
déjà exceptionnellement solide.
Prise pour casque intégrée, développée pour ne pas affecter la qualité générale du son ou interférer avec le
signal principal.
Circuits imprimés de qualité supérieure avec composants aux spécifications plus exigeantes, et isolation améliorée
entre les signaux de haute et basse tension.
Des amplificateurs aux caractéristiques techniques supérieures ont aussi été utilisés dans les étages phono et
ligne.
-
-
-
-
-
-
-
-
-
-
-
-
-
-
Installation
Connectivité
Mise à la terre
Enceintes
Le Brio fonctionnera très bien sur la plupart des surfaces plates, sauf sur tissus et moquettes.
Si vous utilisez le Brio avec une platine vinyle, installez l'amplificateur aussi loin que possible pour éviter toute
interférence magnétique.
Il est également déconseillé de superposer d'autres appareils hi-fi directement sur le Brio.
Veillez à ce que la ventilation soit suffisante autour du boîtier pour permettre à la chaleur de se dissiper.
- Toutes les entrées et sorties de niveau ligne s'effectuent par des connecteurs RCA (phono).
La mise à la terre séparée n'est pas nécessaire pour les bras de lecture Rega ; la mise à la terre s'effectue par le
câble phono.
Connectez tout bras de lecture qui a besoin d'une mise à la terre à l'écrou situé sous le Brio.
Rega vous conseille d'utiliser des enceintes d'une impédance nominale de 8 Ω.
Le Brio peut fonctionner avec une impédance allant jusqu'à 4 Ω, mais une telle utilisation pourrait faire chauffer le
boîtier à une température excédant 40°C.
Pour une utilisation
avec des cellules à
aimant mobile sur
toutes les platines.
Les entrées ligne sont
standard pour toutes les
sources média.
Pour une connexion
avec tout appareil
enregistreur.
Pour une mise à la
terre des bras de
lecture, situé en bas
du Brio.
Rangée supérieure:
enceinte de gauche, Rouge
et Noir.
Rangée inférieure: enceinte
de droite, Rouge et Noir.
AVERTISSEMENT: LE BOÎTIER PEUT DEVENIR CHAUD.
AVERTISSEMENT : ÉTEIGNEZ TOUJOURS L'AMPLIFICATEUR POUR PROCÉDER AU CHANGEMENT DE CORDONS ET CÂBLES D'ENCEINTES.
6
Speakers
Fuse
Power
LEFT
RIGHT
1 2 3 4 5 6
Record
output
Phono
Inputs
Français
1. Entrée de l'étage phono 2-5. Entrées de
niveau ligne
6. Sortie Record
(enregistrement)
Écrou de mise à la
terre
Sortie Enceintes
1 2 3 4 5
Sélection d'entrée
Avertissements
Spécifications
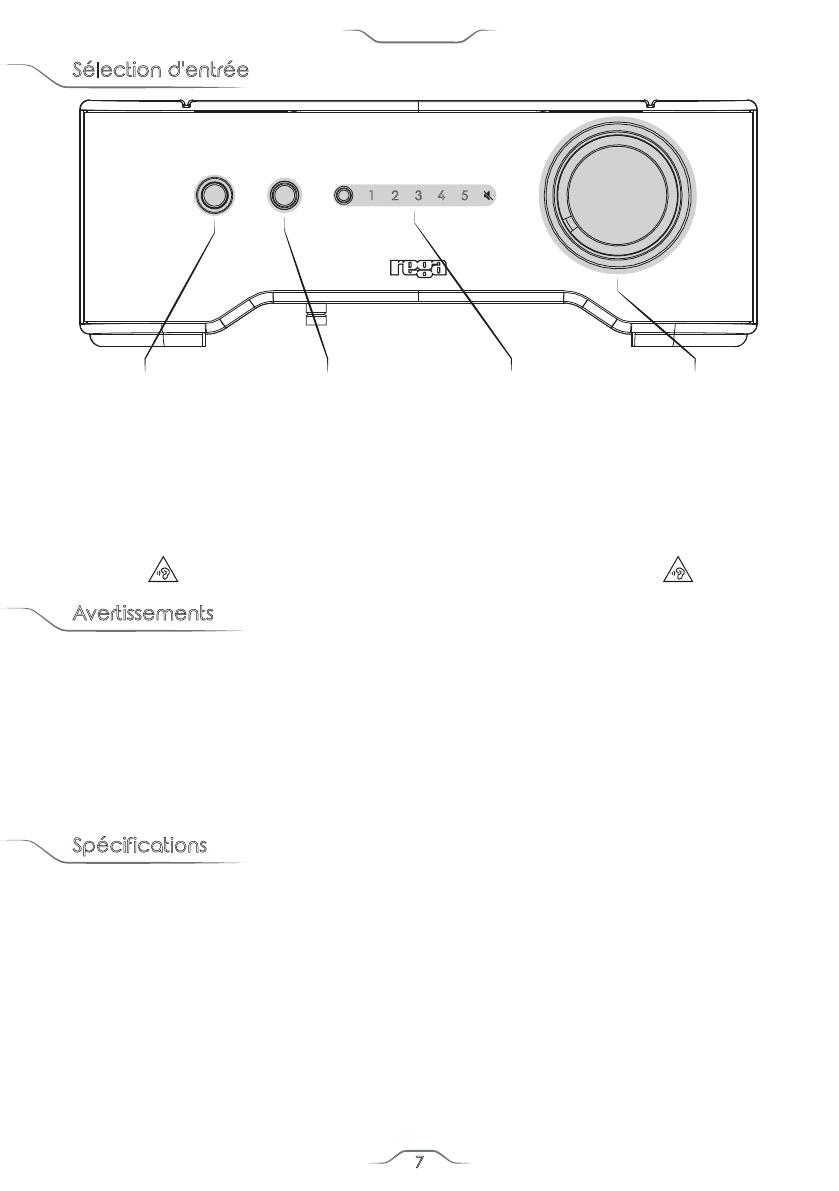
Pour changer d'entrée, appuyez
sur le petit bouton noir situé à
côté de la rangée des chiffres
d'entrée que vous pouvez faire
défiler de 1 à 5. Le chiffre
correspondant à l'entrée
sélectionnée s'allume en rouge.
L'entrée peut aussi être
sélectionnée à l'aide de la
télécommande.
Le Brio est configuré pour
fonctionner avec les casques hi-fi
les plus répandus. Lorsque le jack
d'un casque est inséré dans la
prise, la sortie enceintes est
automatiquement désactivée.
Le contrôle du volume possède
une valeur minimale et maximale,
indiquée par l'encoche. Le
volume n'est pas réinitialisé après
chaque utilisation. Avant de
brancher un casque, assurez-vous
que le volume est suffisamment
bas.
Pour allumer le Brio, appuyez sur
le bouton Marche argenté. Le
Brio se mettra à fonctionner après
quelques secondes.
Pour un fonctionnement optimal, nous conseillons l'utilisation à une température ambiante de 5°C à 35°C.
Installez toujours le Brio de façon à laisser l'air circuler autour de l'appareil pour permettre la dissipation de la
chaleur.
Le Brio chauffera si vous l'utilisez à un volume élevé pendant de longues périodes.
Cet appareil est conçu pour une utilisation dans des climats tempérés.
Pour éviter tout risque d'incendie ou d'électrocution, et pour ne pas endommager le produit, ne l'exposez pas à
la pluie, à l'humidité, aux infiltrations ou aux éclaboussures, et ne placez aucun objet rempli de liquide sur
l'appareil.
Ne retirez aucune partie du boîtier. Celui-ci ne contient aucun composant réparable par l'utilisateur.
Ne jamais placer de flammes nues sur le Brio.
Sorties à 230/115 V de tension :
50 Watts RMS les deux canaux sous 8 Ω
58 Watts RMS un canal sous 8 Ω
73 Watts RMS deux canaux sous 4 Ω
93 Watts RMS un canal sous 4 Ω
L'utilisation continue à haut niveau avec une charge nominale de
4 Ω peut faire chauffer le boîtier à une température excédant la
température ambiante, jusqu'à 40°C.
Sortie casque :
Hors charge = 8 V
32 Ω = 1,8 V
54 Ω = 2,6 V
300 Ω = 5,9 V
Impédance source = 109 Ω
Consommation d'énergie :
195 Watts à 230/115 V sous 8 Ω
Niveau de sortie Record :
Niveau de sortie Record (avec niveaux d'entrée nominaux) = 210
m V.
Impédance de sortie Record : 470 Ω
Bande passante :
Phono : de 15 Hz à 40KHz (-3 dB) / de 27 Hz à 20,5 KHz (-1 dB)
Courbe RIAA : (de 100 Hz à 10 KHz) ± 0,4 dB, performance
habituellement supérieure à ± 0,3 dB
Ligne : de 12 Hz (-1 dB) à 43 KHz (-3dB)
Piles de la télécommande fournies : 2 piles alcalines AAA.
Fusibles :
T2AL 250 V - 230V/50 Hz et 220 V/60 Hz
T3.15AL 250 V - 115 V/60 Hz et 100 V 50/60 Hz
AVERTISSEMENT: POUR ÉVITER DE NUIRE À VOTRE SANTÉ AUDITIVE, N'UTILISEZ PAS VOTRE
CASQUE À UN VOLUME ÉLEVÉ PENDANT DES PÉRIODES PROLONGÉES.
AVERTISSEMENT : EN CAS DE COURT-CIRCUIT DES CÂBLES D'ENCEINTES, LA PROTECTION
INTÉGRÉE PROTÉGERA L'ÉTAGE SORTIE DES COURANTS EXCESSIFS.
7
Français
Bouton Marche/Arrêt Prise pour casque Affichage de l'entrée Contrôle du volume
-
-
-
-
-
-
-
Einführung
Vielen Dank für Ihren Kauf des neuen Brio Verstärkers, der neuesten Inkarnation des erfolgreichsten
Verstärkers von Rega. Der Brio kann jetzt mit folgenden Verbesserungen aufwarten:
Komplett neues Gehäuse-Design, jetzt vollständig aus Aluminium, das als Kühlkörper für eine höhere
Betriebssicherheit sorgt.
Neuer schlanker und minimalistischer Look, der dem klassisch robusten Stil von Rega Eleganz verleiht.
Qualitativ verbesserte Gehäuseteile und eine neue Konstruktionsmethode für einen noch solideren Aufbau.
Integrierte Kopfhörerbuchse, welche die Klangqualität nicht mindert und den Hauptsignalweg nicht
unterbricht.
Nochmals verbesserte Platinen mit höher selektierten Bauteilen und besserer Isolierung zwischen den NF-
und HF Signalen.
Spezielle Verstärkerstufen für die Phono- und Hochpegel -Eingänge.
-
-
-
-
-
-
-
-
-
-
-
-
-
Aufstellung
Anschlüsse
Erdung
Lautsprecher
Der Brio funktioniert auf den meisten Oberflächen gut, sofern diese eben und nicht aus Stoff oder Teppich sind.
Halten Sie den Brio bei Betrieb mit einem Plattenspieler so weit wie möglich von diesem entfernt, um
magnetische Störungen zu vermeiden.
Wir empfehlen, keine anderen Hi-Fi-Geräte direkt auf dem Brio zu stapeln.
Stellen Sie sicher, dass das Gehäuse gut belüftet ist, um einen Wärmestau zu vermeiden.
- Alle Line-Level-Eingänge und -Ausgänge weisen RCA- (Cinch) Anschlüsse auf.
Eine gesonderte Erdung für die Rega-Tonarme ist nicht erforderlich, da sie über die Phono-Leitung geerdet
sind.
Verbinden Sie Plattenspieler, die geerdet werden müssen, mit der Erdungsmutter an der Unterseite des Brio.
Rega empfiehlt die Verwendung von Lautsprechern mit einer Nennimpedanz von 8 Ω.
Der Brio kann auch mit 4 Ω-Lautsprechern betrieben werden, dadurch kann die Gehäusetemperatur
jedoch 40 °C übersteigen.
Ermöglicht den Betrieb
von MM
(Moving-Magnet)Ton-
abnehmer-Systemen
ihres Plattenspielers.
Standardmäßige
Line-Level-Eingänge
für alle Medienquellen.
Für die Verbindung mit
Aufnahmegeräten.
An der Unterseite des
Brio, für Plattenspieler
mit separater
Erdungsleitung.
Oben: Linker
Lautsprecher, rot und
schwarz.
Unten: Rechter
Lautsprecher, rot und
schwarz.
ACHTUNG: GEHÄUSE KANN HEIß WERDEN.
ACHTUNG: DEN VERSTÄRKER BEIM WECHSEL VON ANSCHLÜSSEN UND LAUTSPRECHERKABELN IMMER AUSSCHALTEN.
8
Speakers
Fuse
Power
LEFT
RIGHT
1 2 3 4 5 6
Record
output
Phono
Inputs
Deutsche
1. Phono-Eingang 2-5. Line-Level-Eingang 6. Record-Ausgang Erdungsmutter Lautsprecher-Ausgang
1 2 3 4 5
Eingangswahl
Deutsche
Warnhinweise
Um zwischen den Eingängen zu
wechseln, drücken Sie auf den
kleinen schwarzen Knopf neben der
Reihe der Eingangsnummern, um
die Eingänge 1-5 zu durchlaufen.
Der ausgewählte Eingang wird
angezeigt, indem die entsprechende
Nummer rot aufleuchtet. Die
Eingangsauswahl kann auch mit der
Fernbedienung getätigt werden.
Der Brio ist mit allen gängigen
Hi-Fi-Kopfhörern kompatibel.
Wird ein Kopfhörerstecker in den
Kopfhöreranschluss gesteckt, wird
der Lautsprecherausgang
automatisch ausgeschaltet.
Der Lautstärkeregler weist einen
minimalen und maximalen Wert
auf, der durch die Einkerbung
gekennzeichnet ist. Die Lautstärke
setzt sich nach dem Ausschalten
nicht zurück. Stellen Sie sicher,
dass die Lautstärke niedrig ist,
bevor Sie Kopfhörer anschließen.
Drücken Sie auf den silbernen
Knopf, um den Brio einzuschalten.
Er ist nach ein paar Sekunden
funktionsbereit.
Empfohlene Umgebungstemperatur zwischen 5 °C und 35 °C.
Für ideale Kühlung immer für ausreichende Luftzirkulation um den gesamten Brio herum sorgen.
Mit steigender Lautstärke steigt die Temperatur des Brio an.
Der Verstärker ist für den Gebrauch in gemäßigtem Klima vorgesehen.
Um einen Brand, elektrischen Schlag oder Produktschäden zu vermeiden, setzen Sie das Gerät weder
Regen noch Feuchtigkeit, Tropfen oder Spritzern aus. Stellen Sie außerdem sicher, dass sich keine mit
Flüssigkeiten gefüllten Objekte auf dem Verstärker befinden.
Entfernen Sie keine Gehäuseteile, da sich im Inneren keine vom Benutzer zu wartenden Teile befinden.
Platzieren Sie keine offenen Flammen auf dem Brio.
ACHTUNG: UM MÖGLICHE HÖRSCHÄDEN ZU VERMEIDEN, SOLLTEN SIE KOPFHÖRER NICHT
LÄNGERE ZEIT MIT HOHER LAUTSTÄRKE VERWENDEN.
An-/Aus-Schalter Kopfhörerbuchse Eingangsanzeige Lautstärkeregler
-
-
-
-
-
-
-
Technische Daten
Leistung: 230 / 115V Versorgungsspannung:
2 x 50 Watt RMS (8 Ω)
1 x 58 Watt RMS (8 Ω)
2 x 73 Watt RMS (4 Ω)
1 x 93 Watt RMS (4 Ω)
Dauerhaft hohe Lautstärken bei Betrieb an Lautsprechern mit
einer Impedanz von 4 Ohm kann zur Aufheizung des Gehäuses
auf mehr als 40°C führen.
Kopfhörerausgang:
Leerlauf = 8 V
32 Ω = 1,8 V
54 Ω = 2,6 V
300 Ω = 5,9 V
Quellenimpedanz = 109 Ω
Stromverbrauch:
195 Watt bei 230 / 115 V für Nennlast 8 Ω
Record-Ausgang:
Record-Ausgang (mit Eingangsnennpegel) = 210 Mv.
Record-Ausgangsimpedanz = 470 Ω
Frequenzgang:
Phono : 15 Hz bis 40 KHz (- 3 dB) / 27 Hz bis 20,5 KHz (- 1 dB)
RIAA-Präzision : (100 Hz bis 10 KHz) ± 0,4 dB ,normalerweise
besser als ± 0,3 dB
Line: 12Hz (- 1 dB) bis 43 KHz (- 3 dB)
Inklusive Batterien für Fernbedienung: 2 x AAA Alkaline.
Sicherungswerte:
T2AL 250 V – 230 V / 50 Hz und 220 V / 60 Hz
T3 15AL 250 V – 115 V / 60 Hz und 100 V, 50 / 60 Hz
ACHTUNG: WERDEN DIE LAUTSPRECHERKABEL GEKÜRZT, SCHÜTZT DER ZURÜCKKLAPPBARE
KURZSCHLUSSSCHUTZ DIE AUSGANGSSTUFE VOR ÜBERMÄßIGEM STROM.
9
Presentazione
Grazie per aver acquistato il nuovo amplificatore Brio, la nuovissima versione del più venduto amplificatore
REGA. Ecco le migliorie del nuovo Brio:
Cabinet dal design completamente rinnovato, ora interamente in alluminio per una migliore dissipazione
di calore e affidabilità.
Nuovo look raffinato e minimale, che conferisce eleganza al classico stile compatto Rega.
Elementi del cabinet di qualità superiore e nuovo metodo di costruzione, che rafforza la già solida qualità
costruttiva.
Presa cuffie integrata che non influisce sulla qualità complessiva del suono e non disturba il percorso del
segnale.
PCB aggiornata con parti dalle specifiche superiori e isolamento migliorato tra gli stadi di segnale alto e
basso.
Amplificatori con specifiche superiori sono stati usati nei livelli degli stadi phono e linea.
-
-
-
-
-
-
Italiano
-
-
-
-
Installazione
Connettività
Brio funziona bene su quasi tutte le superfici, purché siano piatte e non ricoperte da tessuto o tappeti.
Se si usa Brio con un giradischi, tenere gli apparecchi il più lontano possibile, per evitare interferenze
magnetiche.
Si raccomanda di non appoggiare altri impianti hi-fi direttamente sopra Brio.
Assicurarsi che il cabinet abbia sufficiente spazio di areazione intorno per disperdere il calore.
- Tutti gli ingressi e le uscite linea avvengono tramite connettori RCA (phono).
Da usare con testine a
magnete mobile su
tutti i giradischi.
Ingressi linea standard
per tutte le sorgenti
media.
Da connettere a
qualsiasi dispositivo di
registrazione.
Per mettere a terra i
bracci. Collocato nella
parte inferiore di Brio.
Fila superiore: Cassa
sinistra rossa e nera.
Fila inferiore: Cassa
destra rossa e nera.
ATTENZIONE: IL CASE PUÒ SURRISCALDARSI.
Speakers
Fuse
Power
LEFT
RIGHT
1 2 3 4 5 6
Record
output
Phono
Inputs
1. Ingresso phono 2-5. Ingresso linea 6. Uscita
registratore
Morsetto di messa a
terra
Uscita cassa
-
-
-
-
Messa a terra
Enceintes
Non è necessaria una messa a terra separata per i bracci Rega. La messa a terra avviene attraverso il cavo
phono.
Collegare i bracci che necessitano di messa a terra al morsetto di messa a terra nella parte inferiore di Brio.
Rega consiglia di usare diffusori con una impedenza nominale di 8Ω.
Brio funziona anche a 4Ω, ma questo può causare un surriscaldamento del cabinet superiore ai 40°C.
ATTENZIONE: SPEGNERE SEMPRE LAMPLIFICATORE QUANDO SI CAMBIANO I CAVI DI INTERCONNESSIONE E PER I DIFFUSORI.
10
Selezione ingresso
Italiano
1 2 3 4 5
Per passare da un ingresso a un
altro, premere il piccolo tasto
nero accanto ai numeri degli
ingressi per andare da 1 a 5.
L’ingresso selezionato è indicato
dalla luce rossa lampeggiante. È
anche possibile selezionare
l’ingresso con il telecomando.
Brio è stato progettato per
funzionare con le più comuni
cuffie hi-fi. Quando si inserisce un
jack di una cuffia nella presa
cuffia, l’uscita diffusori si spegne
automaticamente.
Il controllo del volume ha un
valore massimo e un valore
minimo indicato dalla tacca. Il
volume non si resetta dopo ogni
uso. Prima di inserire le cuffie,
assicurarsi di abbassare il volume.
Per accendere Brio, premere il
tasto di accensione argento. Brio
si accenderà in qualche secondo.
ATTENZIONE: PER EVITARE POSSIBILI DANNI ALL’UDITO, NON USARE LE CUFFIE A UN
VOLUME ALTO PER PERIODI PROLUNGATI.
Tasto on/off Presa cuffie Indicatore ingresso Controllo del volume
Avvertenze
Temperatura ambiente operativa consigliata da 5 a 35°C.
Garantire sempre una sufficiente circolazione d'aria intorno a Brio per massimizzare la dispersione di
calore.
Brio si surriscalda se usato a volume alto.
L'apparecchio è inteso per uso in climi temperati.
Per ridurre il rischio di incendi, shock elettrici o danni al prodotto, non esporre l'apparecchio a pioggia,
umidità, perdite o schizzi e assicurarsi di non collocarci sopra oggetti che contengono liquidi.
Non rimuovere alcuna parte del cabinet. Non ci sono parti all’interno riparabili dall’utente.
Non collocare sorgenti di fiamme libere su Brio.
-
-
-
-
-
-
-
Specifiche
Potenza di uscita a una tensione di 230/115V:
50 Watt RMS con entrambi i canali pilotati al carico nominale di 8Ω
58 Watt RMS con un canale pilotato al carico nominale di 8Ω
73 Watt RMS con entrambi i canali pilotati al carico nominale di 4Ω
93 Watt RMS con un canale pilotati al carico nominale di 4Ω
Un utilizzo continuato ad alto livello con un carico di 4Ω può
portare il cabinet a superare di 40°C la temperatura ambiente.
Uscita cuffie:
A vuoto = 8V
32Ω = 1,8V
54Ω = 2,6V
300Ω = 5,9V
Impedenza di sorgente = 109Ω
Assorbimento:
195 Watt a 230/115V con carico nominale di 8Ω
Livello uscita registrazione:
Livello uscita registrazione (con livelli di potenza nominale) = 210Mv
Impedenza di uscita registrazione = 470Ω
Risposta in frequenza:
Phono da 15Hz a 40KHz (-3dB) / da 27Hz a 20,5KHz (-1dB)
Precisione RIAA (da 100Hz a 10KHz) ± 0.4dB solitamente di ± 0.3Db
Linea da 12Hz (-1dB) a 43KHz (-3db)
Pile telecomando incluse - 2 x pile alcaline AAA.
Potenza fusibili:
T2AL 250V - 230V/50Hz e 220V/60Hz
T3.15AL 250V - 115V/60Hz e 100V 50/60Hz
ATTENZIONE: SE I CAVI DEI DIFFUSORI VANNO IN CORTOCIRCUITO, LA PROTEZIONE CONTRO I CIRCUITI
ELETTRICI PROTEGGE LO STADIO D’USCITA DA CORRENTE ECCESSIVA.
11
Introducción
Gracias por adquirir el nuevo amplificador Brio, la última encarnación del amplificador superventas de
Rega. El Brio ahora cuenta con las siguientes mejoras:
Diseño de la carcasa totalmente nuevo, ahora todo de aluminio para mejorar el interior térmico y la
fiabilidad.
El nuevo diseño elegante y minimalista aporta elegancia al clásico estilo robusto de Rega.
Las piezas de la carcasa de mayor calidad y el nuevo método de fabricación sirven para reforzar la calidad
del conjunto, ya de por sí sólido. Enchufe integrado para auriculares que no afecta a la calidad del sonido
ni interrumpe la ruta principal de la señal.
Placa de circuito impreso con piezas de mayor calidad y un mayor aislamiento entre las etapas de señal
alta y baja.
Los amplificadores de alta calidad se han utilizado en las etapas de nivel de línea y sonido.
-
-
-
-
-
Español
-
-
-
-
Instalación
El Brio funciona bien en la mayoría de superficies, siempre y cuando sean planas y no sean de tela o
moqueta.
Si utiliza un tocadiscos, mantenga el Brio lo más lejos posible para evitar interferencias magnéticas.
Se recomienda no almacenar otros equipos de alta definición directamente encima del Brio.
Asegúrese de que la carcasa cuenta con un buen flujo de aire a su alrededor para ayudar a la dispersión
del calor.
ADVERTENCIA: LA CARCASA PUEDE CALENTARSE.
Conectividad
- Todas las entradas y salidas a nivel de línea se realizan mediante conectores RCA (sonido).
Para su uso con
cartuchos magnéticos
móviles en todos los
tocadiscos.
Entradas a nivel de
línea estándar para
todas las fuentes
multimedia.
Para su conexión a
cualquier dispositivo
de grabación.
Para brazos de toma
de tierra, ubicados en
la parte inferior del
Brio.
Fila superior: Altavoz
izquierdo rojo y negro.
Fila inferior: Altavoz
derecho rojo y negro.
Speakers
Fuse
Power
LEFT
RIGHT
1 2 3 4 5 6
Record
output
Phono
Inputs
1. Entrada a nivel de
sonido
2-5. Entrada a
nivel de línea
6. Salida de
grabación
Tuerca de puesta a
tierra
Salida de altavoces
-
-
-
-
Toma a tierra
Altavoces
No se requiere una puesta a tierra separada para los brazos Rega; se pone a tierra mediante los plomos
de sonido.
Conecte cualquier brazo que tenga que ponerse a tierra a la tuerca correspondiente en la parte inferior
del Brio.
Rega recomienda el uso de altavoces con una resistencia nominal de 8 Ω.
El Brio puede funcionar hasta a 4 Ω, pero podría provocar que se superaran los 40°C.
ADVERTENCIA: APAGUE SIEMPRE EL AMPLIFICADOR AL CAMBIAR LOS PLOMOS Y LOS CABLES DEL ALTAVOZ.
12
Selección de entrada
Español
1 2 3 4 5
Para alternar entre entradas,
presione el pequeño botón negro
ubicado junto a la fila de dígitos
de entrada para cambiar de 1 a 5.
La entrada seleccionada se resalta
con el número iluminado en rojo.
También se puede cambiar la
selección de entrada con el
mando a distancia.
El Brio está configurado para
utilizar los auriculares de alta
definición más comunes. Cuando
se inserte un jack de auriculares
en el conector para auriculares, la
salida del altavoz se apagará
automáticamente.
El control de volumen tiene un
valor máximo y un valor mínimo
que se indica con la marca. El
volumen no se reinicia después
de cada uso. Antes de conectar
los auriculares, asegúrese de que
ha reducido el volumen.
Para encender el Brio, presione el
botón de alimentación plateado.
El Brio empezará a funcionar tras
unos segundos.
Botón de encendido/apagado Conector para auriculares Visualización de entrada Control de volumen
Advertencias
La temperatura ambiente de funcionamiento recomendada es de 5 a 35°C.
Permita siempre que haya una circulación correcta del aire alrededor del Brio para maximizar su interior
térmico.
El Brio se calentará a volúmenes de sonido alto.
La unidad ha de utilizarse en climas moderados.
Para reducir el riesgo de incendio, descarga eléctrica o daño en el producto, no lo exponga a la lluvia, la
humedad, el goteo o salpicaduras, y asegúrese de no colocar sobre él ningún objeto lleno de liquido.
No retire ninguna pieza de la carcasa, en el interior no hay piezas que puedan ser reparadas por el
usuario.
No acerque llamas a la parte superior del Brio.
ADVERTENCIA: PARA EVITAR POSIBLES DAÑOS AUDITIVOS, NO ESCUCHE SONIDO CON
AURICULARES A VOLÚMENES ALTOS DURANTE LARGOS PERIODOS DE TIEMPO.
-
-
-
-
-
-
-
Especificaciones
Salidas de alimentación a 230/115 V, tensión:
50 vatios RMS ambos canales en la carga de 8 Ω
58 vatios RMS un canal en la carga de 8 Ω
73 vatios RMS ambos canales en la carga de 4 Ω
93 vatios RMS un canal en la carga de 4 Ω
Un uso continuado a 4 Ω podría provocar que la carcasa
superara los 40°C por encima de la temperatura ambiente.
Salida de auriculares:
Sin carga = 8 V
32 Ω = 1,8 V
54 Ω = 2,6 V
300 Ω = 5,9 V
Resistencia de la fuente = 109 Ω
Consumo de electricidad:
195 vatios a 230/115 V en la carga de 8 Ω
Nivel de salida de grabación:
Nivel de salida de grabación (con niveles de entrada calificados) =
210 Mv.
Resistencia de salida de grabación = 470 Ω
Respuesta de frecuencia:
Sonido 15 Hz a 40 KHz (-3 dB puntos) / 27 Hz a 20,5 KHz (-1 dB
puntos)
precisión RIAA (100 Hz a 10 KHz) ± 0.4 dB normalmente mejor
que ± 0.3 Db
Línea 12 Hz (-1dB puntos) a 43 KHz (-3db puntos)
Pilas del mando a distancia incluidas – 2 x AAA alcalinas.
Capacidad del fusible:
T2AL 250 V - 230 V/50 Hz y 220 V/60 Hz
T3.15AL 250 V - 115 V/60 Hz y 100 V 50/60 Hz
ADVERTENCIA: SI LOS CABLES DEL ALTAVOZ SE ACORTAN, LA PROTECCIÓN DEL CIRCUITO
PORTÁTIL PROTEGERÁ LA SALIDA DE CORRIENTES EXCESIVAS.
13
Introdução
Obrigado por adquirir o novo amplificador Brio, a última encarnação do amplificador Rega, um sucesso
de vendas. O Brio possui agora as seguintes melhorias:
Design exterior completamente novo, agora totalmente em alumínio para aumentar a dissipação de calor
e para maior confiabilidade.
Novo visual elegante e minimalista que adiciona elegância ao estilo robusto clássico Rega.
Maior qualidade das peças exteriores e um novo método de construção para reforçar a qualidade de
construção já sólida. Tomada integrada para auscultadores que não tem impacto na qualidade sonora
geral nem perturba o caminho do sinal principal.
PCB atualizado com peças de especificação superiores e melhor isolamento entre nível alto e baixo das
fases de sinal.
Amplificadores com especificação mais elevada foram utilizados nas fases fono e de nível de linha.
-
-
-
-
-
Português
-
-
-
-
Instalação
O Brio vai funcionar bem na maioria das superfícies, desde que estas sejam planas e não sejam de tecido
ou carpete.
Se utilizar com um gira-discos, manter o Brio tão longe quanto possível para evitar interferências
magnéticas.
Não é aconselhável empilhar outro equipamento Hi-Fi diretamente em cima do Brio.
Certificar-se de que a parte externa tem uma boa circulação de ar para ajudar a dispersar o calor.
AVISO: A PARTE EXTERNA PODE FICAR QUENTE.
Conetividade
- Todas as entradas e saídas de nível de linha são feitas através de conetores RCA (fono).
Para uso com
cartuchos de íman
móveis em todos os
gira-discos.
Entradas de nível de
linha padrão para
todas as fontes de
áudio.
Para ligação a
qualquer dispositivo
gravável.
Para ligação à terra
dos braços de timbre
localizados na parte
inferior do Brio.
Fila superior: Coluna
esquerda vermelha e
preta.
Fila inferior: Coluna
direita vermelha e
preta.
Speakers
Fuse
Power
LEFT
RIGHT
1 2 3 4 5 6
Record
output
Phono
Inputs
1. Entrada da fase fono 2-5. Entrada de
nível de linha
6. Saída de
gravação
Porca de ligação à
terra
Saída para colunas
-
-
-
-
Ligação terra
Colunas
Não é necessária uma ligação terra separada para os braços de timbre Rega; eles possuem ligação terra
através da ligação fono.
Ligar quaisquer braços de timbre que precisam de ligação terra à porca de ligação terra na parte inferior
do Brio.
A Rega recomenda o uso de colunas com uma impedância nominal de 8Ω.
O Brio pode funcionar tão baixo quanto 4Ω, mas isso pode causar com que a parte exterior exceda os 40°C.
AVISO: DESLIGUE SEMPRE O AMPLIFICADOR QUANDO MUDAR FIOS E CABOS DA COLUNA.
14
Seleção de entrada
Português
1 2 3 4 5
Para alterar entre entradas, prima
o botão preto pequeno
localizado ao lado da linha de
dígitos de entrada para percorrer
de 1 a 5. A entrada selecionada é
realçada pelo número que fica
iluminado a vermelho. A seleção
de entrada também pode ser
alterada com o controlo remoto.
O Brio foi configurado para se
adaptar aos auscultadores Hi-Fi
mais comuns. Quando é inserida
uma tomada de auscultadores, a
saída para colunas será desligada
automaticamente.
O controlo de volume tem um
valor mínimo e máximo que é
indicado pelo entalhe. O volume
não é reposto após cada
utilização. Antes de ligar os
auscultadores certifique-se de
reduzir o volume.
Para ligar o Brio prima o botão de
ligar prateado. O Brio começará a
funcionar após alguns segundos.
Botão on/off (ligar/desligar) Tomada para auscultadores Mostrador de entrada Controlo de volume
Advertências
Temperatura ambiente operativa recomendada de 5 a 35°C.
Permita sempre uma circulação de ar adequada à volta do Brio para maximizar a sua dissipação de calor.
O Brio ficará quente com níveis auditivos elevados.
Esta unidade destina-se a uma utilização em climas moderados.
Para reduzir o risco de incêndio, choque elétrico ou danos ao produto, não exponha o aparelho à chuva,
humidade, pingos ou salpicos e certifique-se de que nenhum objeto com líquidos é colocado em cima
dele.
Não remova peças da parte exterior. Nenhum dos elementos internos pode ser reparado pelo utilizador.
Não coloque quaisquer tipos de chamas em cima do Brio.
AVISO: PARA EVITAR POSSÍVEIS DANOS AUDITIVOS, NÃO UTILIZE OS AUSCULTADORES EM
SONS ELEVADOS DURANTE LONGOS PERÍODOS DE TEMPO.
-
-
-
-
-
-
-
Especificações
Saídas de alimentação a uma voltagem de alimentação de
230/115V:
50Watts RMS ambos os canais acionados para a carga nominal
de 8Ω
58Watts RMS um canal acionado para a carga nominal de 8Ω
73Watts RMS ambos os canais acionados para a carga nominal
de 4Ω
93Watts RMS um canal acionado para a carga nominal de 4Ω
O uso contínuo num nível elevado em 4Ω pode causar
temperaturas superiores a 40°C acima da temperatura ambiente
à parte externa.
Saída para auscultadores:
Sem carga = 8V
32Ω = 1,8V
54Ω = 2,6V
300Ω = 5,9V
Impedância da fonte = 109Ω
Consumo de energia:
195Watts a 230/115V para a carga nominal de 8Ω
Nível de saída de gravação:
Nível de saída de gravação (com níveis de entrada nominal) =
210Mv.
Impedância de saída de gravação = 470Ω
Resposta de frequência:
Fono de 15Hz a 40KHz (-3dB pontos) / 27Hz a 20,5KHz (-1dB
pontos)
Precisão RIAA (100Hz a 10KHz) ± 0.4dB normalmente melhor do
que ± 0,3Db
Linha 12Hz (-1dB pontos) a 43KHz (-3db pontos)
Pilhas do controle remoto incluídas – 2 pilhas AAA alcalinas.
Potência do disjuntor:
T2AL 250V - 230V/50Hz e 220V/60Hz
T3,15AL 250V - 115V/60Hz e 100V 50/60Hz
AVISO: SE OS CABOS DA COLUNA ESTIVEREM EM CURTO-CIRCUITO, A PROTEÇÃO DE
CURTO-CIRCUITO IRÁ PROTEGER A FASE DE SAÍDA DE CORRENTES EXCESSIVAS.
15
Inleiding
Bedankt voor het aanschaffen van de nieuwe Brio versterker, het nieuwste model van de succesvolle
versterker van Rega. De nieuwe Bio is voorzien van de volgende verbeteringen:
Een geheel nieuw behuizingsontwerp, volledig vervaardigd van aluminium ter verbetering van
warmteafvoer en betrouwbaarheid.
De gestroomlijnde en minimalistische uitstraling geeft de klassieke, stoere stijl van Rega een elegante touch.
Behuizingsonderdelen van extra goede kwaliteit en een nieuwe constructiemethode zorgen voor een extra
solide ontwerp. De geïntegreerde hoofdtelefoonaansluiting behoudt de algehele geluidskwaliteit en
verstoort het hoofdsignaalpad niet.
Een nieuwere PCB (printplaat) met extra hoogwaardige onderdelen en een verbeterde isolatie tussen de
signaalfases van hoog en laag.
We hebben hoogwaardige versterkers gebruikt voor de phono - en lijnfases.
-
-
-
-
-
-
-
-
-
-
-
-
-
Installatie
Aansluiting
Aarde
Luidsprekers
De Brio werkt goed op de meeste oppervlakken zolang deze vlak zijn en niet bekleed zijn met stof of
vloerbedekking.
Wanneer u de Brio gebruikt in combinatie met een draaitafel dient de Brio zo ver mogelijk verwijderd te
zijn van deze tafel om magnetische interferentie te voorkomen.
We raden het af andere hi-fi-apparatuur direct bovenop de Brio te plaatsen of apparatuur te stapelen.
Zorg ervoor dat er voldoende lucht kan circuleren rondom de behuizing, zodat warmte goed kan worden
verdreven.
- Alle lijningangen en -uitgangen worden gebruikt met RCA-connectoren (phono).
Afzonderlijke aarde is niet vereist voor de toonarmen van Rega; deze zijn geaard middels de
phonoaansluiting.
Sluit eventuele toonarmen die moeten worden geaard aan op de aardcontactmoer aan de onderzijde van
de Brio.
Rega raadt het gebruik van luidsprekers aan met een nominale impedantie van 8Ω.
De Brio gaat wel zo laag als 4Ω; dit kan er echter voor zorgen dat de behuizing warmer wordt dan 40°C.
Voor gebruik met
pickup-elementen van
Moving Magnet, geschikt
voor uiteenlopende
draaitafels.
Standaard lijningangen
voor alle mediabron-
nen.
Voor aansluiting op
willekeurige
opname-apparatuur.
Voor het aarden van
toonarmen, aan de
onderzijde van de
Brio.
Bovenste rij:
Linkerluidspreker, rood
en zwart.
Onderste rij:
Rechterluidspreker,
rood en zwart.
WAARSCHUWING: DE BEHUIZING KAN HEET WORDEN.
WAARSCHUWING: SCHAKEL DE VERSTERKER ALTIJD UIT WANNEER U SNOEREN EN LUIDSPREKERKABELS VERWISSELT.
16
Speakers
Fuse
Power
LEFT
RIGHT
1 2 3 4 5 6
Record
output
Phono
Inputs
Nederlands
1. Phonofaseingang 2-5. Lijningangen 6. Opname-uitgangen Aardcontactmoer Luidsprekeruitgangen
1 2 3 4 5
Ingangselectie
Waarschuwingen
Specificaties
Druk op het kleine zwarte knopje
naast de reeks ingangscijfers om
te schakelen tussen de
verschillende ingangen 1 - 5. Het
getal van de geselecteerde
ingang licht rood op. De
ingangweergave kan ook met de
afstandsbediening worden
gewijzigd.
De Brio is geschikt voor gebruik
met de meeste gangbare
hi-fi-koptelefoons. Wanneer u
een hoofdtelefoon aansluit op de
hoofdtelefoonaansluiting, worden
de luidsprekeruitgangen
automatisch uitgeschakeld.
De volumeregeling heeft een
minimum- en maximumwaarde.
De inkeping op de volumeknop
geeft het maximum volumeniveau
aan. Het volume wordt niet naar
de nulwaarde hersteld na ieder
gebruik. Stel het volume naar
beneden bij alvorens u een
hoofdtelefoon aansluit.
Druk op de zilveren power-knop
om de Brio in te schakelen. De
Brio is na een paar seconden
gebruiksklaar.
De aangeraden omgevingstemperatuur voor het gebruik van dit apparaat bedraagt 5 tot 35°C.
Zorg er altijd voor dat er voldoende lucht kan circuleren rondom de Brio, om een maximale warmteafvoer
te garanderen.
De Brio wordt heet wanneer u veelvuldig gebruik maakt van het apparaat.
Dit apparaat is bedoeld voor gebruik in gematigde klimaten.
Stel het apparaat nooit bloot aan regen, vocht, druppelende of spetterende vloeistoffen en plaats nooit
met vloeistof gevulde objecten op het apparaat, om het risico van vuur, elektrische schokken of
productschade te beperken.
Verwijder nooit onderdelen van de behuizing; dit apparaat bevat geen onderdelen die door de gebruiker
zelf kunnen worden onderhouden.
Zet geen kaarsen of ander open vuur bovenop de Brio.
Uitgangsvermogen bij 230/115V netspanning:
50 Watt RMS (effectieve waarde) beide kanalen aan nominale
belasting van 8Ω
58 Watt RMS (effectieve waarde) één kanaal aan nominale
belasting van 8Ω
73 Watt RMS (effectieve waarde) beide kanalen aan nominale
belasting van 4Ω
93 Watt RMS (effectieve waarde) één kanaal aan nominale
belasting van 4Ω
Constant gebruik hoge belasting aan 4Ω kan ervoor zorgen dat
de behuizing warmer wordt dan 40°C boven de omgevingstem-
peratuur.
Uitgang hoofdtelefoon:
Geen belasting = 8V. 32Ω = 1,8V. 54Ω = 2,6V. 300Ω = 5,9V
Bronimpedantie = 109Ω
Stroomverbruik:
195 Watt bij 230/115V aan nominale waarde van 8Ω
Opname-uitgang:
Opname-uitgang (met nominale ingangswaarden) = 210Mv.
Impedantie opname-uitgang = 470Ω
Frequentierespons:
Phono 15Hz tot 40KHz (-3dB punten) / 27Hz to 20,5KHz (-1dB
punten)
RIAA-nauwkeurigheid (100Hz tot 10KHz) ± 0,4dB doorgaans beter
dan ± 0,3Db
Lijn 12Hz (-1dB punten) tot 43KHz (-3db punten)
Batterijen afstandsbediening inbegrepen - 2 x AAA Alkaline.
Zekeringsclassificaties:
T2AL 250V - 230V/50Hz en 220V/60Hz
T3.15AL 250V - 115V/60Hz en 100V 50/60Hz
WAARSCHUWING: VOORKOM GEHOORSCHADE. HOUDT HET VOLUME OP UW
HOOFDTELEFOON LAAG WANNEER U LANGERE PERIODEN NAAR MUZIEK LUISTERT.
WAARSCHUWING: WANNEER DE LUIDSPREKERKABELS WORDEN INGEKORT, BESCHERMT DE
OMVOUWBARE KORTSLUITINGSBESCHERMING DE UITGANGEN TEGEN PIEKEN.
17
Nederlands
Aan/uit-knop Hoofdtelefooningang Ingangweergave Volumeregeling
-
-
-
-
-
-
-
Indledning
Tak for dit køb af den nye Brio-forstærker, den sidste nye version af Regas topsælgende forstærker. Brio
har nu følgende forbedringer:
Helt nyt kabinetdesign, som nu er helt i aluminium for at øge varmebortledningen og pålideligheden.
Nyt enkelt og minimalistisk look, der giver Regas klassiske og robuste stil elegance.
Kabinetdele i højere kvalitet og en ny konstruktionsmetode for at forstærke den allerede solide kvalitet.
Integreret hovedtelefonstik, der ikke har nogen indvirkning på den overordnede lydkvalitet eller forstyrrer
den overordnede signalvej.
Opgraderet PCB med dele, der har højere specifikationer, og forbedret isolering mellem signaltrin på højt
og lavt niveau.
Der er anvendt forstærkere med højere specifikationer i phono- og linjeniveau-trinnene.
-
-
-
-
-
-
-
-
-
-
-
-
-
Installation
Tilslutning
Jordforbindelse
Højttalere
Brio fungerer fint på de fleste overflader, hvis de er plane og ikke er stof eller gulvtæppe.
Hvis Brio benyttes med en pladespiller, skal Brio holdes så langt væk som muligt for at undgå magnetisk
interferens.
Det anbefales ikke at stable andet hi-fi-udstyr direkte oven på Brio.
Sørg for, at kabinettet har god luftcirkulation for at sikre god varmebortledning.
- Alle linjeniveauindgange og -udgange foretages via RCA-stik (phono-stik).
Separat jordforbindelse er ikke påkrævet for Regas pickuparme. Den jordes via phono-ledningen.
Tilslut eventuelle pickuparme, der kræver jordforbindelse, til jordmøtrikken i bunden af Brio.
Rega anbefaler at bruge højttalere med en nominel impedans på 8Ω.
Brio kan køre så lavt som 4Ω, men dette kan få kabinettet til at overskride 40 °C.
Til brug med Moving
Magnet-pickuphoved-
er på alle pladespillere.
Standard
linjeniveauindgang for
alle mediekilder.
Til tilslutning af enhver
optageenhed.
Til jordforbindelse af
tonearme, sidder i
bunden af Brio.
Øverste række:
Venstre højttaler Rød
og Sort.
Nederste række: Højre
højttaler Rød og Sort.
ADVARSEL: KABINETTET KAN BLIVE VARMT.
ADVARSEL: SLUK ALTID FORSTÆRKEREN VED UDSKIFTNING AF LEDNINGER OG HØJTTALERKABLER.
18
Speakers
Fuse
Power
LEFT
RIGHT
1 2 3 4 5 6
Record
output
Phono
Inputs
Dansk
1. Phono-trinindgang 2-5. Linjeniveauindgang 6. Optagerudgang Jordmøtrik Højttalerudgang
  • Page 1 1
  • Page 2 2
  • Page 3 3
  • Page 4 4
  • Page 5 5
  • Page 6 6
  • Page 7 7
  • Page 8 8
  • Page 9 9
  • Page 10 10
  • Page 11 11
  • Page 12 12
  • Page 13 13
  • Page 14 14
  • Page 15 15
  • Page 16 16
  • Page 17 17
  • Page 18 18
  • Page 19 19
  • Page 20 20
  • Page 21 21
  • Page 22 22
  • Page 23 23
  • Page 24 24
  • Page 25 25
  • Page 26 26
  • Page 27 27
  • Page 28 28

Rega BRIO Manual do usuário

Tipo
Manual do usuário
Este manual também é adequado para