Makita LF1000 Manual do usuário
- Categoria
- Serras de esquadria
- Tipo
- Manual do usuário

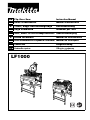
GB Flip Over Saw
Instruction Manual
F Scies retournables
Manuel d’instructions
D Tisch-, Kapp- und Gehrungssäge
Betriebsanleitung
I Sega combinata
Istruzioni per l’uso
NL
Tafel-, afkort- en verstekzaagcombinatie
Gebruiksaanwijzing
E Sierra reversible
Manual de instrucciones
P
Serra combinada de esquadria e bancada
Manual de instruções
DK
Vende-sav Brugsanvisning
GR Ανάπδ πρινι δηγίες ρήσεως
LF1000

2
12
34
56
78
10 9
11
15
17 16
13
12
14
8
6
7
5
4
3
2
1
006027 006028
006029 006030
006031 006073
001540 006033

3
910
11 12
13 14
15 16
29
22
23
24
25
26
21
28
19
27
21
22
19
21
20
19
18
14
006034 006035
006036 006037
006038 006039
006040 006041

4
17
18
34
33
32
30 31
012645
006043

5
19
20 21
22 23
34 33
32
738
38 7
21
37
35
30
36
40
39 40
38
006044
012641 006046
006047 006048

6
35
41
38
44
42
43
51
47
ABC
38
D
51
47
55
49
50
24 25
26 27
28 29
30 31
51
47
52
38
53
54
47
48
49
50
51
10 46
35
5 - 6 mm
38
10
012642 012643
006051 012644
006053 006054
006055 006056
35
10
45

7
A
B
56
47
57
51
59
60
61
32 33
34 35
37
36 38
63
64
62
63
006058
006059 006060
005560
006061 006062
006057
58 38
51

8
39 40
41 42
43 44
67
66
18
68
14
62
65
21
A
B
15
17
006063
006066
015233
006064 006065
18
14
006067

9
45
46 47
48 49
29
BA
006070
006068
006071
006072 006069
45-A 45-B 45-C
45-D45-E45-F
10 10 45
10
45
10
18
69
21
70
71

10
50 51
52
53 54
10 9
11
29
BA
10 45
10
45
10
10
52-A 52-B 52-C
52-D52-E
72
72
006073 006074
006075
006078 006079

11
54
55
56
57 58
59 60
72
73
74
75
73
6 mm 50 mm
130 mm
300 mm
50 mm
120 mm 300 mm
76
130 mm
77
19
9.5 mm
50 mm
78
8 mm 100 mm
9.5 mm
76 460 mm
19 mm 120 mm 40 mm
140 mm
80
001844
006080
006082
006083
006081
79
006084

12
81
80
61
62
63 64
65 66
87
29
006085
006086
006088 006087
006089 006090
82 83
84 85
61
60
86

13
92
93
94 20
95
96
97
67 68
69 70
71 72
73
006091 006092
006093 001819
006094
006095
89 90
88
38
91
14
38
88
001145

14
END213-9
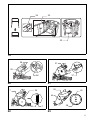
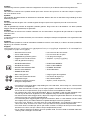
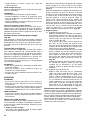
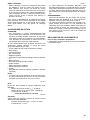
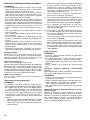
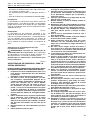
Symbols
The following show the symbols used for the equipment. Be sure that you understand their meaning before use.
Symboles
Nous donnons ci-dessous les symboles utilisés pour l’outil. Assurez-vous que vous en avez bien compris la significa-
tion avant d’utiliser l’outil.
Symbole
Die folgenden Symbole werden für die Maschine verwendet. Machen Sie sich vor der Benutzung unbedingt mit ihrer
Bedeutung vertraut.
Simboli
Per questo utensile vengono usati i simboli seguenti. Bisogna capire il loro significato prima di usare l’utensile.
Symbolen
Voor dit gereedschap worden de volgende symbolen gebruikt. Zorg ervoor dat u de betekenis van deze symbolen
begrijpt alvorens het gereedschap te gebruiken.
Símbolos
A continuación se muestran los símbolos utilizados con esta herramienta. Asegúrese de que entiende su significado
antes de usarla.
Símbolos
O seguinte mostra os símbolos utilizados para a ferramenta. Certifique-se de que compreende o seu significado antes
da utilização.
Symboler
Nedenstående symboler er anvendt i forbindelse med denne maskine. Vær sikker på, at De har forstået symbolernes
betydning, før maskinen anvendes.
Σύµλα
Τα ακλυθα δείνυν τα σύµλα πυ ρησιµπιύνται για τ µηάνηµα. Βεαιωθείτε τι καταλααίνετε
τη σηµασία τυς πριν απ τη ρήση.
• Read instruction manual. • Lea el manual de instrucciones.
• Lire le mode d’emploi. • Leia o manual de instruções.
• Bitte Bedienungsanleitung lesen. • Læs brugsanvisningen.
• Leggete il manuale di istruzioni. • ∆ιαάστε τις δηγίες ρήσης.
• Lees de gebruiksaanwijzing.
• DOUBLE INSULATION • DOBLE AISLAMIENTO
• DOUBLE ISOLATION • DUPLO ISOLAMENTO
• DOPPELT SCHUTZISOLIERT • DOBBELT ISOLERET
• DOPPIO ISOLAMENTO • ∆ΙΠΛΗ ΜΝΩΣΗ
• DUBBELE ISOLATIE
• Wear safety glasses. • Póngase gafas de seguridad.
• Portez des lunettes de sécurité. • Use óculos de segurança.
• Schutzbrille tragen. • Bær sikkerhedsbriller.
• Indossare occhiali di sicurezza. • Φράτε γυαλιά ασφαλείας.
• Draag een veiligheidsbril.
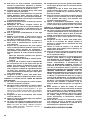
• To avoid injury from flying debris, keep holding the saw head down, after making cuts, until the blade
has come to a complete stop.
• Pour éviter les blessures causées par les objets projetés, maintenez la tête de la scie en position
basse une fois la coupe terminée, jusqu’à ce que la lame soit complètement arrêtée.
• Um Verletzungen durch herausgeschleuderte Teile zu vermeiden, halten Sie den Sägekopf nach
Ausführung von Schnitten abgesenkt, bis das Sägeblatt völlig zum Stillstand gekommen ist.
• Per evitare lesioni dalle schegge volanti, dopo aver eseguito il taglio tenere abbassata la testa sega
finché la lama non si è arrestata completamente.
• Om verwonding door weggeslingerd zaagafval te voorkomen, dient u na het voltooien van een snede
de zaagkop omlaag te houden totdat het zaagblad volledig tot stilstand is gekomen.
• Para evitar sufrir heridas a causa de restos que salen despedidos, siga sujetando la cabeza de la
sierra hacia abajo, al terminar los cortes, hasta que el disco se haya parado completamente.
• Para evitar danos causados por aparas que saltem, mantenha a cabeça da serra para baixo, depois
de terminar os cortes, até que a lâmina esteja completamente parada.
• For at undgå at komme til skade på grund af flyvende affald, skal man holde savhovedet nede efter
skæring, indtil savklingen står helt stille.

15
• Για να απφύγετε τραυµατισµ απ ιπτάµενα τεµαίδια, κρατάτε τ πρινι µε τ κεφάλι
πρς τα κάτω, αφύ κάνετε κπές, µέρι η λάµα να σταµατήσει τελείως.
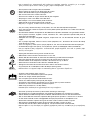
• Do not place hand or fingers close to the blade.
• Ne pas placer les mains ou les doigts près de la lame.
• Halten Sie Hände oder Finger vom Sägeblatt fern.
• Non avvicinare le mani o le dita alla lama.
• Kom met uw handen of vingers niet te dicht bij het zaagblad.
• No ponga la mano ni los dedos cerca del disco.
• Não coloque a sua mão ou dedos perto da lâmina.
• Hold hænder og fingre på god afstand af klingen.
• Μη άετε τ έρι ή τα δάκτυλα κντά στην λάµα.
• For your safety, remove the chips, small pieces, etc. from the table top before operation.
• Pour votre sécurité, retirez les copeaux et autres petites pièces présentes sur la table avant de com-
mencer le travail.
• Zur Sicherheit sollte die Tischplatte vor dem Betrieb von Spänen, Kleinteilen usw. gesäubert werden.
• Per la propria sicurezza, togliere i trucioli, frammenti, ecc., dalla superficie superiore del piano di
taglio prima di procedere.
• Verwijder voor uw eigen veiligheid zaagafval, stukjes hout e.d. van de werktafel alvorens te gaan
zagen.
• Por su propia seguridad, retire las virutas, trozos pequeños, etc., de encima de la mesa de trabajo
antes de iniciar la tarea.
• Para sua segurança, retire aparas, peças pequenas, etc., de cima da bancada antes da operação.
• Af sikkerhedsårsager skal spåner, små stykker etc. fjernes fra bordtoppen inden anvendelsen.
• Για την ασφάλειά σας, αφαιρέστε τα απκπίδια, µικρά κµµάτια, κλπ. απ τ τραπέι πριν
απ την λειτυργία.
• Unplug the tool before turning it over around the axis.
• Débranchez l’outil avant de le faire tourner sur son axe.
• Ziehen Sie den Netzstecker ab, bevor Sie das Werkzeug um die Drehachse kippen.
• Staccare l’utensile dalla presa di corrente prima di ruotarlo intorno agli assi.
• Trek de stekker uit het stopcontact voordat u de machine om zijn as draait.
• Desenchufe la herramienta antes voltearla alrededor del eje.
• Desligue a ferramenta da corrente antes de a rodar à volta da linha central.
• Tag maskinen ud af forbindelse, inden det drejes omkring aksen.
• Απσυνδέστε τ εργαλεί πριν τ αναπδγυρίσετε γύρω στν άνά τυ.
• Position hands properly when carrying.
• Placez vos mains correctement pour le transporter.
• Hände zum Tragen korrekt positionieren.
• Per il trasporto, posizionare correttamente le mani.
• Plaats uw handen op de juiste wijze bij het dragen.
• Transporte la herramienta agarrándola con las manos por las partes correctas.
• Posicione as mãos correctamente quando transporta.
• Hold saven på korrekt vis, når den bæres.
• Τπθετήστε κατάλληλα τα έρια σας ταν τ µεταφέρετε.
• Do not lift up the top end of the rip fence when installing or removing it.
• Ne soulevez pas le garde parallèle par son extrémité supérieure pour l’installer ou le retirer.
• Heben Sie den Parallelanschlag beim Installieren oder Entfernen nicht an der Oberseite hoch.
• Non si deve sollevare l’estremità superiore della guida pezzo quando la si installa o la si rimuove.
• Til het verste uiteinde van de schulpgeleider niet op bij het plaatsen of verwijderen ervan.
• No levante el extremo superior de la guía de corte al hilo cuando la instale o la quite.
• Não levante a extremidade superior da guia paralela quando a instala ou retira.
• Løft ikke den øveste ende af kløveanslaget op, når De monterer eller afmonterer det.
• Μην ανυψώνετε την άνω άκρη τυ φράκτη σισίµατς κατά την τπθέτηση ή την αφαίρεση
τυ.

16
• To loosen the bolt, turn it clockwise.
• Pour desserrer le boulon, tournez-le vers la droite.
• Drehen Sie die Schraube zum Lösen im Uhrzeigersinn.
• Per allentare il bullone, girarlo in senso orario.
• Draai de bout rechtsom los.
• Para aflojar el perno, gírelo hacia la derecha.
• Para desapertar o perno, rode-o no sentido dos ponteiros do relógio.
• Bolten løsnes ved at den drejes i retningen med uret.
• Για να εσφίετε τν κλία, περιστρέψτε δειστρφα.
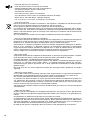
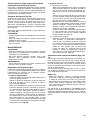
• Only for EU countries
Due to the presence of hazardous components in the equipment, used electrical and electronic equip-
ment may have a negative impact on the environment and human health.
Do not dispose of electrical and electronic appliances with household waste!
In accordance with the European Directive on waste electrical and electronic equipment and its adapta-
tion to national law, used electrical and electronic equipment should be collected separately and deliv-
ered to a separate collection point for municipal waste, operating in accordance with the environmental
protection regulations.
This is indicated by the symbol of the crossed-out wheeled bin placed on the equipment.
• Pour les pays de l’Union européenne uniquement
En raison de la présence de composants dangereux dans l’équipement, les équipements électriques et
électroniques usagés peuvent avoir un impact négatif sur l’environnement et la santé humaine.
Ne jetez pas les appareils électriques et électroniques avec les ordures ménagères !
Conformément à la directive européenne relative aux déchets d’équipements électriques et électron-
iques et à son adaptation à la législation nationale, les équipements électriques et électroniques
usagés doivent être collectés séparément et déposés dans un point de collecte distinct pour déchets
urbains, conformément aux réglementations en matière de protection de l’environnement.
Cela est indiqué par le symbole de la poubelle à roulettes barrée sur l’équipement.
• Nur für EU-Länder
Aufgrund des Vorhandenseins gefährlicher Komponenten in der Ausrüstung können Elektro- und Elek-
tronik-Altgeräte sich negativ auf die Umwelt und die menschliche Gesundheit auswirken.
Entsorgen Sie Elektro- und Elektronikgeräte nicht mit dem Hausmüll!
In Übereinstimmung mit der Europäischen Richtlinie über Elektro- und Elektronik-Altgeräte und ihrer
Anpassung an nationales Recht sollten Elektro- und Elektronik-Altgeräte gemäß den Umwelts-
chutzbestimmungen getrennt gesammelt und zu einer getrennten Sammelstelle für Siedlungsabfälle
geliefert werden.
Dies wird durch das am Gerät angebrachte Symbol der durchgestrichenen Abfalltonne auf Rädern
angezeigt.
• Solo per le nazioni dell’EU
A causa della presenza di componenti pericolosi nelle apparecchiature, le apparecchiature elettriche
ed elettroniche usate potrebbero produrre un impatto negativo sull’ambiente e sulla salute umana.
Non smaltire elettrodomestici elettrici ed elettronici insieme ai rifiuti domestici!
In conformità alla direttiva europea sui rifiuti di apparecchiature elettriche ed elettroniche (RAEE), e al
suo adattamento alle normative nazionali, le apparecchiature elettriche ed elettroniche usate vanno
sottoposte a raccolta differenziata e conferite a un punto di raccolta separato per i rifiuti comunali, ope-
rando in conformità alle normative per la protezione dell’ambiente.
Tale requisito viene indicato mediante il simbolo del bidone della spazzatura con ruote barrato apposto
sull’apparecchio.
• Alleen voor EU-landen
Als gevolg van de aanwezigheid van schadelijke componenten in het apparaat, kunnen gebruikte elek-
trische en elektronische apparaten negatieve gevolgen hebben voor het milieu en de gezondheid van
mensen.
Gooi elektrische en elektronische apparaten niet met het huisvuil weg!
In overeenstemming met de Europese richtlijn inzake oude elektrische en elektronische apparaten en
de toepassing daarvan binnen de nationale wetgeving, dienen gebruikte elektrische en elektronische
apparaten gescheiden te worden ingezameld en te worden ingeleverd bij een apart inzamelingspunt
voor huishoudelijk afval dat de milieubeschermingsvoorschriften in acht neemt.
Dit wordt op het apparaat aangegeven door het symbool van een doorgekruiste afvalcontainer.

17
• Sólo para países de la Unión Europea
Debido a la presencia de componentes peligrosos en el equipo, el equipo eléctrico y electrónico
desechado puede tener un impacto negativo para el medioambiente y la salud humana.
¡No tire los aparatos eléctricos y electrónicos junto con los residuos domésticos!
De conformidad con las Directivas Europeas sobre residuos de aparatos eléctricos y electrónicos, y su
adaptación a la ley nacional, el equipo eléctrico y electrónico desechado deberá ser recogido por sep-
arado y trasladado a un punto distinto de recogida de desechos municipales, que cumpla con los regla-
mentos de protección medioambiental.
Esto se indica mediante el símbolo de cubo de basura tachado colocado en el equipo.
• Apenas para países da UE
Devido à presença de componentes perigosos no equipamento, o equipamento elétrico e eletrónico
usado pode ter um impacto negativo no meio ambiente e na saúde humana.
Não elimine aparelhos elétricos e eletrónicos juntamente com resíduos domésticos!
De acordo com a Diretiva europeia relativa aos resíduos de equipamentos elétricos e eletrónicos e a
respetiva adaptação à legislação nacional, os equipamentos elétricos e eletrónicos usados devem ser
recolhidos separadamente e entregues num ponto de recolha separado para resíduos municipais, que
opere de acordo com os regulamentos de proteção ambiental.
Tal é indicado pelo símbolo de contentor de lixo com rodas barrado com uma cruz colocado no equipa-
mento.
• Kun for lande inden for EU
Brugt elektrisk og elektronisk udstyr kan have en negativ indvirkning på miljøet og folkesundheden på
grund af tilstedeværelsen af farlige komponenter i udstyret.
Bortskaf ikke elektriske og elektroniske apparater sammen med husholdningsaffald!
I overensstemmelse med EF-direktiv om affaldshåndtering af elektrisk og elektronisk udstyr, og i over-
ensstemmelse med national lovgivning, skal brugt elektrisk og elektronisk udstyr opbevares separat og
leveres til et separat indsamlingssted til kommunalt affald, der er etableret i henhold til bestemmelserne
om miljøbeskyttelse.
Dette er angivet ved symbolet på den krydsede skraldespand, der er placeret på udstyret.
•Μν για τις ώρες της ΕΕ
Λγω της παρυσίας των επικίνδυνων συστατικών µερών στν επλισµ,
ρησιµπιηµένς ηλεκτρικς και ηλεκτρνικς επλισµς µπρεί να έει αρνητική επίδραση
στ περιάλλν και την ανθρώπινη υγεία.
Μην απρρίπτετε τις ηλεκτρικές και ηλεκτρνικές συσκευές µαί µε τα ικιακά απρρίµµατα!
Σύµφωνα µε την Ευρωπαϊκή δηγία για τν απλητ ηλεκτρικ και ηλεκτρνικ επλισµ,
καθώς και την πρσαρµγή της στην εθνική νµθεσία, ρησιµπιηµένς ηλεκτρικς και
ηλεκτρνικς επλισµς θα πρέπει να συλλέγεται εωριστά και να παραδίδεται σε
εωριστ σηµεί συλλγής για δηµτικά απλητα, τ πί λειτυργεί σύµφωνα µε τυς
καννισµύς πρστασίας τυ περιάλλντς.
Αυτ υπδεικνύεται απ τ σύµλ τυ διαγραµµένυ τρφρυ κάδυ πυ ρίσκεται
αναρτηµέν επάνω στν επλισµ.

18
ENGLISH (Original instructions)
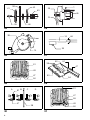
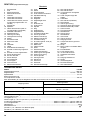
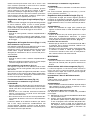
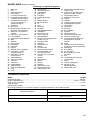
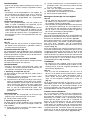
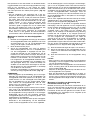
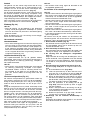
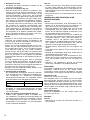
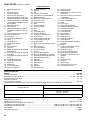
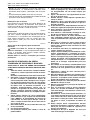
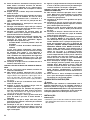
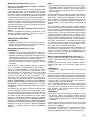
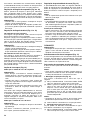
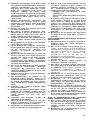
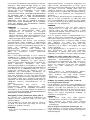
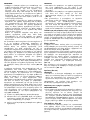
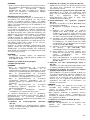
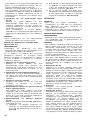
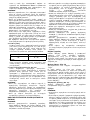
Explanation of general view
1 Adjusting nut
2 Foot
3 Fix plate
4Hex bolt
5 U-shaped grooves
6 Lower blade guard A
7 Lower blade guard B
8 Lower blade guard C (used in
the miter saw mode only)
9 Push button
10 Riving knife
11 Top blade gurad (used in the
table saw mode)
12 Top surface of turn base
13 Periphery of blade
14 Guide fence
15 Lower limit stopper
16 Nut
17 Adjusting bolt
18 Clamping screw
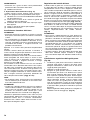
19 Handle
20 Turn table
21 Lever
22 Cutting depth adjusting knob
23 Switch in the miter saw mode
24 Switch in the table saw mode
25 Lock-off button
26 Switch trigger
27 On button
28 Off button
29 Stopper pin
30 Hex wrench
31 Wrench holder
32 Hook
33 Feet
34 Stopper hook
35 Hex socket bolt
36 Shaft lock
37 Lifting lever
38 Saw blade
39 Blade case
40 Arrow
41 Outer flange
42 Inner flange
43 Spindle
44 Ring
45 Clamping nut
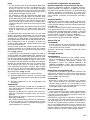
46 Blade width
47 Rip fence holder
48 Guide rail
49 Clamping screw (A)
50 Clamping screw (B)
51 Rip fence
52 Line to be aligned with: Line (A)
53 Top table
54 Workpiece
55 Square nut
56 Scale
57 Adjusting screw
58 Top blade guard
59 Miter gauge fence
60 Miter gauge
61 Grooves
62 Dust nozzle
63 Dust bag
64 Fastener
65 Elbow
66 Vise rod
67 Vise knob
68 Vise arm
69 Saw head locked in the fully
lowered position
70 Area of lever for hand/finger to
be placed on
71 Hooking parts
72 Vise (accessory)
73 Spacer block
74 Guide fence
75 Aluminum extrusion
76 Face/edge parallel
77 Wood screw
78 Guide together
79 Push stick
80 Auxiliary fence
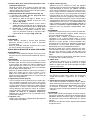
81 Push block
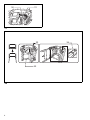
82 Cross cutting
83 Mitering
84 Bevel cutting
85 Compound mitering (angles)
86 Knob
87 Tool part to be held carrying
88 Triangular rule
89 0° adjusting bolt
90 45° adjusting bolt
91 Top surface of turn table
92 Arm
93 Bevel scale
94 Pointer
95 Limit mark
96 Brush holder cap
97 Screwdriver
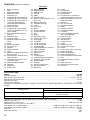
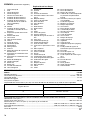
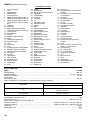
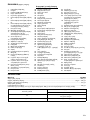
SPECIFICATIONS
Model LF1000
Blade diameter .................................................................................................................................................... 260 mm
Blade body thickness ........................................................................................................................... 1.8 mm – 2.0 mm
Riving knife thickness........................................................................................................................................... 2.2 mm
Hole diameter
For European countries......................................................................................................................................... 30 mm
Max. Cutting capacities (H x W) with blade 260 mm in diameter in the miter saw mode
Max. Cutting capacities at 90° in the table saw (bench saw mode) ...................................................................... 70 mm
No load speed (min–1)............................................................................................................................................. 2,700
Table size (W x L)................................................................................................................................500 mm x 555 mm
Dimensions (L x W x H1 (note 1) / H2 (note 2)) at miter saw mode................660 mm x 650 mm x 1,220 mm / 800 mm
in table saw mode ...........................................................................................660 mm x 650 mm x 1,060 mm / 845 mm
Net weight ................................................................................................................................................................36 kg
Safety class............................................................................................................................................................... /II
(Note 1) H1: Height up to the tool head
(Note 2) H2: Height up to the table
Bevel angle Miter angle
0°
0° 20 mm x 180 mm
68 mm x 155 mm
45° (left) 50 mm x 150 mm

19
• Due to our continuing program of research and devel-
opment, the specifications herein are subject to change
without notice.
• Specifications may differ from country to country.
• Weight according to EPTA-Procedure 01/2003
ENE061-1
Intended use
The tool is intended for accurate straight and miter cut-
ting in wood. The tool can be used both in miter saw
mode and in table saw mode by turning over the table
around its axis.
ENF002-2
Power supply
The tool should be connected only to a power supply of
the same voltage as indicated on the nameplate, and can
only be operated on single-phase AC supply. They are
double-insulated and can, therefore, also be used from
sockets without earth wire.
GEA010-1
General Power Tool Safety Warnings
WARNING Read all safety warnings and all
instructions. Failure to follow the warnings and
instructions may result in electric shock, fire and/or
serious injury.
Save all warnings and instructions for future refer-
ence.
ENB094-6
FLIP OVER SAW SAFETY WARNINGS
FOR BOTH MITER SAW MODE AND TABLE SAW
(BENCH SAW) MODE:
1. Check the blade carefully for cracks or deforma-
tion before operation.
Replace damaged blade immediately.
2. Do not operate saw without guards and riving
knife in place, especially after a mode change.
Check blade guards for proper closing before
each use. Do not operate saw if blade guards do
not move freely and close instantly. Never clamp
or tie the blade guards into the open position.
Any irregular operation of the blade guards
should be corrected immediately.
3. Use only saw blades specified by the manufac-
turer and which conform to EN847-1. The groove
width of the cut must be thicker than the riving
knife and the blade body must be thinner than
the riving knife.
4. Do not use saw blades manufactured from high
speed steel.
5. Wear eye protection.
6. Wear hearing protection to reduce the risk of
hearing loss.
7. Wear gloves for handling saw blades (saw
blades shall be carried in a holder wherever
practicable) and rough material.
8. Connect the tool to a dust collecting device
when sawing.
9. Always store the push-stick when it is not in use.
10. Keep the floor area around the tool level well
maintained and free of loose materials e.g. chips
and cut-offs.
11. The operator is adequately trained in the use,
adjustment and operation of the tool.
12. Stop and unplug the saw when unattended.
13. To reduce the emitted noise, always be sure that
the blade is sharp and clean.
14. Use only saw blades that are marked with a max-
imum speed equal to or higher than the no load
speed marked on the tool.
15. Never remove any cut-offs or other parts of the
workpiece from the cutting area whilst the tool is
running with an unguarded saw blade.
16. The tool should not be used for slotting, rebating
or grooving.
17. Clean and be careful not to damage the spindle,
flanges (especially the installing surface) and
fixing bolt before or when installing the blade.
Damage to these parts could result in blade
breakage. Poor installation may cause vibration/
wobbling or slippage of the blade. Use only
flanges specified for this tool.
18. Always use accessories recommended in this
manual. Use of improper accessories such as
abrasive cut-off wheels may cause an injury.
19. Select the correct saw blade for the material to
be cut.
20. Do not cut metal objects such as nails and
screws. Inspect for and remove all nails, screws
and other foreign material from the workpiece
before operation.
21. Knock out any loose knots from workpiece
BEFORE beginning to cut.
22. Do not use the tool in the presence of flammable
liquids or gases.
23. For your safety, remove the chips, small pieces,
etc. from the work area and table top before
plugging the tool and starting operation.
24. Keep hands and make your bystander and your-
self position out of path of and not in line with
saw blade. Avoid contact with any coasting
blade. It can still cause severe injury and never
reach around saw blade.
25. Be alert at all times, especially during repetitive,
monotonous operations. Do not be lulled into a
false sense of security. Blades are extremely
unforgiving.
26. Make sure the shaft lock is released before the
switch is turned on.
27. Before using the tool on an actual workpiece, let
it run for a while. Watch for vibration or wobbling
that could indicate poor installation or a poorly
balanced blade.
28. Wait until the blade attains full speed before cut-
ting.
29. Refrain from removing any cut-offs or other
parts of the workpiece from the cutting area
whilst the tool is running and the saw head is not
in the rest position.
30. Stop operation immediately if you notice any-
thing abnormal.
31. Turn off tool and wait for saw blade to stop
before moving workpiece or changing settings.
32. Unplug tool before changing blade, servicing or
not in use.
33. Some dust created from operation contains
chemicals known to cause cancer, birth defects
or other reproductive harm. Some examples of
these chemicals are:
- lead from lead-based-painted material and,
- arsenic and chromium from chemically-
treated lumber.

20
Your risk from these exposures varies, depend-
ing on how often you do this type of work. To
reduce your exposure to these chemicals: work
in a well ventilated area and work with approved
safety equipment, such as those dust masks
that are specially designed to filter out micro-
scopic particles.
34. Make sure that the table is securely fixed with
the lever after turning it over.
WHEN USING IN MITER SAW MODE:
35. Do not use the saw to cut other than wood, alu-
minum or similar materials.
36. Do not perform any operation freehand. The
workpiece must be secured firmly against the turn
table and guide fence with the vise during all opera-
tions. Never use your hand to secure the workpiece.
37. Ensure that the tool is stable before each cut.
38. Support long workpieces with appropriate addi-
tional supports.
39. Never cut so small workpiece which cannot be
securely held by the vise. Improperly held work-
piece may cause kickback and serious personal
injury.
40. Make sure that the turn table is properly secured
so it will not move during operation.
41. Make sure that the arm is securely fixed when
beveling. Tighten the lever clockwise to fix the
arm.
42. Make sure the blade does not contact the turn
table in the lowest position and is not contacting
the workpiece before the switch is turned on.
43. Hold the handle firmly. Be aware that the saw
moves up or down slightly during start-up and
stopping.
WHEN USING IN THE TABLE SAW (BENCH SAW)
MODE:
44. Do not perform any operation freehand. Free-
hand means using your hands to support or
guide the workpiece, in lieu of a rip fence.
45. Make sure that the turn table is fixed securely.
46. Make sure that the arm is securely fixed in the
working position. Tighten the lever clockwise to
fix the arm.
47. Use a push stick or a push block to avoid work-
ing with the hands and fingers close to the saw
blade.
48. Make sure the blade is not contacting the riving
knife or workpiece before the switch is turned
on.
49. Pay particular attention to instructions for reduc-
ing risk of KICKBACK. KICKBACK is a sudden
reaction to a pinched, bound or misaligned saw
blade. KICKBACK causes the ejection of the
workpiece from the tool back towards the opera-
tor. KICKBACKS CAN LEAD TO SERIOUS PER-
SONAL INJURY. Avoid KICKBACKS by keeping
the blade sharp, by keeping the rip fence parallel
to the blade, by keeping the riving knife and
blade guard in place and operating properly, by
not releasing the workpiece until you have
pushed it all the way past the blade, and by not
ripping a workpiece that is twisted or warped or
does not have a straight edge to guide along the
fence.
50. Avoid abrupt, fast feeding. Feed as slowly as
possible when cutting hard workpieces. Do not
bend or twist workpiece while feeding. If you
stall or jam the blade in the workpiece, turn the
tool off immediately. Unplug the tool. Then clear
the jam.
51. Before turning over the tool, always make sure
that the stopper pin has securely locked the tool
head in the lowest position.
SAVE THESE INSTRUCTIONS.
WARNING:
DO NOT let comfort or familiarity with product
(gained from repeated use) replace strict adherence
to safety rules for the subject product. MISUSE or
failure to follow the safety rules stated in this instruc-
tion manual may cause serious personal injury.
INSTALLATION
CAUTION:
• Keep the floor area around the tool level well main-
tained and free of loose materials such as chips and
cut-offs.
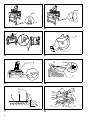
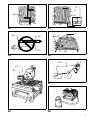
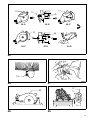
Bench mounting (Fig. 1, 2 & 3)
For the fully-extended feet set up as the high table
When the tool cannot be set up stable, turn the adjusting
nut at the foot of the tool for proper stability. Turn counter-
clockwise in top viewing to make the foot shorter and
clockwise in top viewing to make it longer. After adjust-
ment, make sure that the tool keep stable.
Install the fix plates with its angled end pointing outwards
onto three feet of the tool with hex bolts. And secure the
tool to the stable and level surface using bolt holes pro-
vided in the fix plates with three bolts.
For the folded feet set up as the low table
When the tool is ready in the foot-folded position, secure
the tool by using U-shaped grooves shown in the figure.
FUNCTIONAL DESCRIPTION
CAUTION:
• Always be sure that the tool is switched off and
unplugged before adjusting or checking function on the
tool.
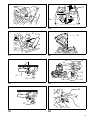
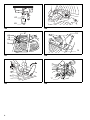
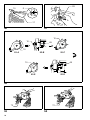
Blade guard (Fig. 4, 5 & 6)
CAUTION:
• Make sure that the handle cannot be lowered without
pushing the lever nearby the handle to the left.
• Make sure that the lower blade guards A dose not open
unless the lever near the handle is pushed at the top-
most position of the handle.
• Make sure that the lower blade guard C is installed
before using in miter saw mode.
A página está carregando...
A página está carregando...
A página está carregando...
A página está carregando...
A página está carregando...
A página está carregando...
A página está carregando...
A página está carregando...
A página está carregando...
A página está carregando...
A página está carregando...
A página está carregando...
A página está carregando...
A página está carregando...
A página está carregando...
A página está carregando...
A página está carregando...
A página está carregando...
A página está carregando...
A página está carregando...
A página está carregando...
A página está carregando...
A página está carregando...
A página está carregando...
A página está carregando...
A página está carregando...
A página está carregando...
A página está carregando...
A página está carregando...
A página está carregando...
A página está carregando...
A página está carregando...
A página está carregando...
A página está carregando...
A página está carregando...
A página está carregando...
A página está carregando...
A página está carregando...
A página está carregando...
A página está carregando...
A página está carregando...
A página está carregando...
A página está carregando...
A página está carregando...
A página está carregando...
A página está carregando...
A página está carregando...
A página está carregando...
A página está carregando...
A página está carregando...
A página está carregando...
A página está carregando...
A página está carregando...
A página está carregando...
A página está carregando...
A página está carregando...
A página está carregando...
A página está carregando...
A página está carregando...
A página está carregando...
A página está carregando...
A página está carregando...
A página está carregando...
A página está carregando...
A página está carregando...
A página está carregando...
A página está carregando...
A página está carregando...
A página está carregando...
A página está carregando...
A página está carregando...
A página está carregando...
A página está carregando...
A página está carregando...
A página está carregando...
A página está carregando...
A página está carregando...
A página está carregando...
A página está carregando...
A página está carregando...
A página está carregando...
A página está carregando...
A página está carregando...
A página está carregando...
A página está carregando...
A página está carregando...
A página está carregando...
A página está carregando...
A página está carregando...
A página está carregando...
A página está carregando...
A página está carregando...
A página está carregando...
A página está carregando...
A página está carregando...
A página está carregando...
A página está carregando...
A página está carregando...
A página está carregando...
A página está carregando...
A página está carregando...
A página está carregando...
A página está carregando...
A página está carregando...
A página está carregando...
A página está carregando...
A página está carregando...
A página está carregando...
-
 1
1
-
 2
2
-
 3
3
-
 4
4
-
 5
5
-
 6
6
-
 7
7
-
 8
8
-
 9
9
-
 10
10
-
 11
11
-
 12
12
-
 13
13
-
 14
14
-
 15
15
-
 16
16
-
 17
17
-
 18
18
-
 19
19
-
 20
20
-
 21
21
-
 22
22
-
 23
23
-
 24
24
-
 25
25
-
 26
26
-
 27
27
-
 28
28
-
 29
29
-
 30
30
-
 31
31
-
 32
32
-
 33
33
-
 34
34
-
 35
35
-
 36
36
-
 37
37
-
 38
38
-
 39
39
-
 40
40
-
 41
41
-
 42
42
-
 43
43
-
 44
44
-
 45
45
-
 46
46
-
 47
47
-
 48
48
-
 49
49
-
 50
50
-
 51
51
-
 52
52
-
 53
53
-
 54
54
-
 55
55
-
 56
56
-
 57
57
-
 58
58
-
 59
59
-
 60
60
-
 61
61
-
 62
62
-
 63
63
-
 64
64
-
 65
65
-
 66
66
-
 67
67
-
 68
68
-
 69
69
-
 70
70
-
 71
71
-
 72
72
-
 73
73
-
 74
74
-
 75
75
-
 76
76
-
 77
77
-
 78
78
-
 79
79
-
 80
80
-
 81
81
-
 82
82
-
 83
83
-
 84
84
-
 85
85
-
 86
86
-
 87
87
-
 88
88
-
 89
89
-
 90
90
-
 91
91
-
 92
92
-
 93
93
-
 94
94
-
 95
95
-
 96
96
-
 97
97
-
 98
98
-
 99
99
-
 100
100
-
 101
101
-
 102
102
-
 103
103
-
 104
104
-
 105
105
-
 106
106
-
 107
107
-
 108
108
-
 109
109
-
 110
110
-
 111
111
-
 112
112
-
 113
113
-
 114
114
-
 115
115
-
 116
116
-
 117
117
-
 118
118
-
 119
119
-
 120
120
-
 121
121
-
 122
122
-
 123
123
-
 124
124
-
 125
125
-
 126
126
-
 127
127
-
 128
128


Makita LF1000 Manual do usuário
- Categoria
- Serras de esquadria
- Tipo
- Manual do usuário
em outras línguas
- español: Makita LF1000 Manual de usuario
- français: Makita LF1000 Manuel utilisateur
- italiano: Makita LF1000 Manuale utente
- Nederlands: Makita LF1000 Handleiding
- Deutsch: Makita LF1000 Benutzerhandbuch
- dansk: Makita LF1000 Brugermanual