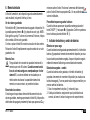
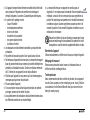
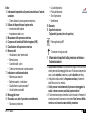
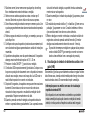
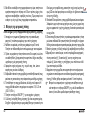
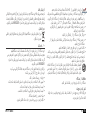
Microlife BPW1 Basic Manual do usuário
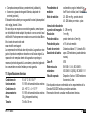
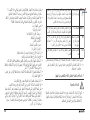
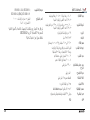
- Categoria
- Unidades de pressão arterial
- Tipo
- Manual do usuário


Microlife BP W1 Basic
18
2
5
6
1
15
11
14
17 16 13 12
10
7
8
9
3
4
BP W1 BasicGuarantee Card
Name of Purchaser / Nom de l'acheteur / Nome del rivenditore /
Name des Käufers / Nombre del comprador / Nome do comprador /
Naam koper / Ονοματεπώνυμο αγοραστή / /
Serial Number / Numéro de série / Numero di serie / Serien-Nr. /
Número de serie / Número de série / Serienummer / Αριθμός
σειράς / /
Date of Purchase / Date d'achat / Data d’acquisto / Kaufdatum /
Fecha de compra / Data da compra / Datum van aankoop /
Ημερομηνία αγοράς / /
Specialist Dealer / Revendeur / Categoria rivenditore / Fachhändler /
Distribuidor especializado / Revendedor autorizado / Specialist
Dealer / Εξειδικευμένος αντιπρόσωποςa / /
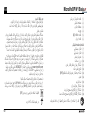
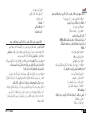
١٢ AR
ﺔﻟﺎﻔﻜﻟا ﺔﻗﺎﻄﺑ
(ﻲﻔﻠﺨﻟا ءﺎﻄﻐﻟا ﺮﻈﻧا) ﺔﻟﺎﻔﻜﻟا ﺔﻗﺎﻄﺑ
:يﺮﺘﺸﻤﻟا ﻢﺳا
:ﻞﻳدﻮﻤﻟا
:ﻞﺴﻠﺴﺘﻟا ﻢﻗر
:ءاﺮﺸﻟا ﺦﻳرﺎﺗ
:ﺺﺘﺨﻤﻟا ﺮﺟﺎﺘﻟا
١٢ AR
ﺔﻟﺎﻔﻜﻟا ﺔﻗﺎﻄﺑ
(ﻲﻔﻠﺨﻟا ءﺎﻄﻐﻟا ﺮﻈﻧا) ﺔﻟﺎﻔﻜﻟا ﺔﻗﺎﻄﺑ
:يﺮﺘﺸﻤﻟا ﻢﺳا
:ﻞﻳدﻮﻤﻟا
:ﻞﺴﻠﺴﺘﻟا ﻢﻗر
:ءاﺮﺸﻟا ﺦﻳرﺎﺗ
:ﺺﺘﺨﻤﻟا ﺮﺟﺎﺘﻟا
١٢ AR
ﺔﻟﺎﻔﻜﻟا ﺔﻗﺎﻄﺑ
(ﻲﻔﻠﺨﻟا ءﺎﻄﻐﻟا ﺮﻈﻧا) ﺔﻟﺎﻔﻜﻟا ﺔﻗﺎﻄﺑ
:يﺮﺘﺸﻤﻟا ﻢﺳا
:ﻞﻳدﻮﻤﻟا
:ﻞﺴﻠﺴﺘﻟا ﻢﻗر
:ءاﺮﺸﻟا ﺦﻳرﺎﺗ
:ﺺﺘﺨﻤﻟا ﺮﺟﺎﺘﻟا
١٢ AR
ﺔﻟﺎﻔﻜﻟا ﺔﻗﺎﻄﺑ
(ﻲﻔﻠﺨﻟا ءﺎﻄﻐﻟا ﺮﻈﻧا) ﺔﻟﺎﻔﻜﻟا ﺔﻗﺎﻄﺑ
:يﺮﺘﺸﻤﻟا ﻢﺳا
:ﻞﻳدﻮﻤﻟا
:ﻞﺴﻠﺴﺘﻟا ﻢﻗر
:ءاﺮﺸﻟا ﺦﻳرﺎﺗ
:ﺺﺘﺨﻤﻟا ﺮﺟﺎﺘﻟا

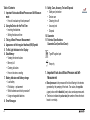
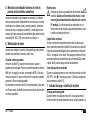
1BP W1 Basic EN
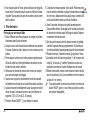
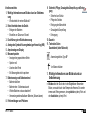
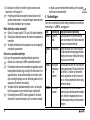
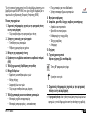
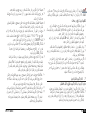
Display
Read the instructions carefully before using this device.
Intended use:
This oscillometric blood pressure monitor is intended for measuring
non-invasive blood pressure in people aged 12 years or older.
Dear Customer,
Your new
Microlife
blood pressure monitor is a reliable medical device
for taking measurements on the wrist. It is simple to use, accurate and
comes highly recommended for blood pressure monitoring in your
home. This device was developed in collaboration with physicians and
clinical tests prove its measurement accuracy to be very high.*
If you have any questions, problems or want to order spare parts
please contact your local Microlife-Customer Service. Your dealer or
pharmacy will be able to give you the address of the Microlife dealer
in your country. Alternatively, visit the internet at www.microlife.com
where you will find a wealth of invaluable information on our products.
Stay healthy – Microlife AG!
* This device uses the same measuring algorithm as the award
winning BP W100 model tested according to the British and Irish
Hypertension Society (BIHS) protocol.
Microlife BP W1 Basic EN
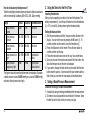
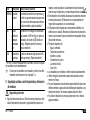
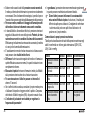
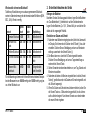
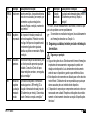
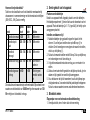
1ON/OFF button
2Display
3Battery Compartment
4Cuff
5M-button (memory)
6Time Button
7Systolic Value
8Diastolic Value
9Pulse Rate
AT Date/Time
AK Traffic Light Indicator
AL Stored Value
AM Irregular Heartbeat (IHB) Symbol
AN Pulse Indicator
AO Battery Display
AP Arm Movement Indicator
AQ Cuff Check Indicator
AR LED Positioning Indicator

2
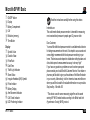
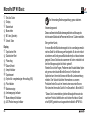
Table of Contents
1. Important Facts about Blood Pressure and Self-Measure-
ment
• How do I evaluate my blood pressure?
2. Using the Device for the First Time
• Inserting the batteries
• Setting the date and time
3. Taking a Blood Pressure Measurement
4. Appearance of the Irregular Heartbeat (IHB) Symbol
5. Traffic Light Indicator in the Display
6. Data Memory
• Viewing the stored values
• Memory full
• Clearing all values
• How not to store a reading
7. Battery Indicator and Battery change
• Low battery
• Flat battery – replacement
• Which batteries and which procedure?
• Using rechargeable batteries
8. Error Messages
9. Safety, Care, Accuracy Test and Disposal
• Safety and protection
•Device care
• Cleaning the cuff
• Accuracy test
•Disposal
10. Guarantee
11. Technical Specifications
Guarantee Card (see Back Cover)
Type BF applied part
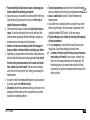
1. Important Facts about Blood Pressure and Self-
Measurement
Blood pressure
is the pressure of the blood flowing in the arteries
generated by the pumping of the heart. Two values, the
systolic
(upper) value and the
diastolic
(lower) value, are always measured.
The device indicates the pulse rate (the number of times the heart
beats in a minute).
Keep dry

3BP W1 Basic EN
Permanently high blood pressure values can damage your
health and must be treated by your doctor!
Always discuss your values with your doctor and tell him/her if you
have noticed anything unusual or feel unsure. Never rely on
single blood pressure readings.
There are several causes of excessively high blood pressure
values. Your doctor will explain them in more detail and offer
treatment where appropriate. Besides medication, weight loss
and exercise can also lower your blood pressure.
Under no circumstances should you alter the dosages of
drugs or initiate a treatment without consulting your doctor.
Depending on physical exertion and condition, blood pressure is
subject to wide fluctuations as the day progresses. You should
therefore take your measurements in the same quiet condi-
tions and when you feel relaxed! Take at least two readings
every time (in the morning and in the evening) and average the
measurements.
It is quite normal for two measurements taken in quick succession
to produce significantly different results.
Deviations between measurements taken by your doctor or in the
pharmacy and those taken at home are quite normal, as these
situations are completely different.
Several measurements
provide much more reliable information
about your blood pressure than just one single measurement.
Leave a small break of at least 15 seconds between two
measurements.
If you suffer from a cardiac arrhythmia consult with your doctor
before using the device. See also chapter «Appearance of the
Irregular Heartbeat (IHB) Symbol» of this user manual.
The pulse display is not suitable for checking the frequency
of heart pacemakers!
If you are pregnant, you should monitor your blood pressure
regularly as it can change drastically during this time.
A number of factors can affect the accuracy of measure-
ments taken on the wrist. In some cases, the result may
differ from the measurement taken on the upper arm. We
therefore advise you to compare these values with those
produced by the upper arm measurement and discuss them
with your doctor.

4
How do I evaluate my blood pressure?
The higher value is the one that determines the evaluation. Example:
a blood pressure value of 140/80 mmHg or a value of 130/90 mmHg
indicates «blood pressure too high».
2. Using the Device for the First Time
Inserting the batteries
After you have unpacked your device, first insert the batteries. The
battery compartment
3
is at the top of the device. Insert the batteries
(
2
x 1.5 V, size
AAA
), thereby observing the indicated polarity.
Setting the date and time
1. After the new batteries are fitted, the year number flashes in the
display. You can set the year by pressing the M-button 5. To
confirm and then set the month, press the time button 6.
2. Press the M-button to set the month. Press the time button to
confirm and then set the day.
3. Follow the instructions above to set the day, hour and minutes.
4. Once you have set the minutes and pressed the time button, the
date and time are set and the time is displayed.
5. If you want to change the date and time, press and hold the time
button down for approx. 3 seconds until the year number starts to
flash. Now you can enter the new values as described above.
3. Taking a Blood Pressure Measurement
Checklist for taking a reliable measurement
1. Avoid activity, eating or smoking immediately before the measurement.
2. Sit down on a back-supported chair and relax for 5 minutes. Keep
the feet flat on the floor and do not cross your legs.
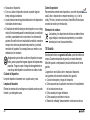
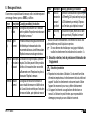
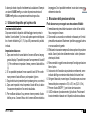
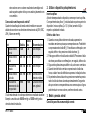
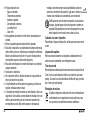
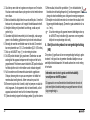
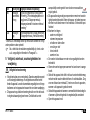
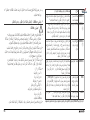
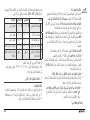
Table for classifying home blood pressure values in adults in accordance
with the international Guidelines (ESH, ESC, JSH). Data in mmHg.
Range Systolic Diastolic Recommendation
1. blood pressure
normal < 120 < 74 Self-check
2. blood pressure
optimum 120 - 129 74 - 79 Self-check
3. blood pressure
elevated 130 - 134 80 - 84 Self-check
4. blood pressure too
high 135 - 159 85 - 99 Seek medical
advice
5. blood pressure
dangerously high ≥ 160 ≥ 100 Urgently seek
medical advice!

5BP W1 Basic EN
3. Always measure in a sitting position and on the same wrist. Use
the wrist which usually shows higher blood pressure values.
4. Remove any items of clothing and your watch, for example, so
that your wrist is free.
5. Always ensure that the cuff is positioned correctly, as shown in the
pictures illustrated on the short instruction card.
6. Fit the cuff comfortably but not too tight. The cuff will cover a wrist
circumference of 13.5 - 21.5 cm (5.25 - 8.5 inches).
7. Press the ON/OFF button 1 to start the measurement.
8. The LED Positioning Indicator AR is activated. Support your arm
in a relaxed position with the device at the same height as your
heart, move your arm until the LED light is at its brightest and
appears to be in the center of the indicator.
9. After 5 seconds, the cuff will pump up automatically. Relax, do not
move and do not tense your arm muscles until the measurement
result is displayed. Breathe normally and do not talk.
10.When the correct pressure is reached, the pumping stops and the
pressure falls gradually. If the required pressure was not reached,
the device will automatically pump some more air into the cuff.
11.During the measurement, the pulse indicator
AN
flashes in the display.
12.The result, comprising the systolic 7 and the diastolic 8 blood
pressure and the pulse rate 9 is displayed. Note also the expla-
nations on further display symbols in this booklet.
13.Remove and switch off the monitor and enter the result in the
enclosed blood pressure pass. (The monitor does switch off auto-
matically after approx. 1 min.).
You can stop the measurement at any time by pressing the
ON/OFF button (e.g. if you feel uneasy or an unpleasant pres-
sure sensation).
4. Appearance of the Irregular Heartbeat (IHB) Symbol
This symbol AM indicates that an irregular heartbeat was detected. In
this case, the measured blood pressure may deviate from your actual
blood pressure values. It is recommended to repeat the measure-
ment.
5. Traffic Light Indicator in the Display
The bars on the left-hand edge of the display AK show you the range
within which the indicated blood pressure value lies. Depending on
the height of the bar, the readout value is either within the optimum
(green), elevated (yellow), too high (orange) or dangerously high
Information for the doctor in case of repeated appearance of
the IHB symbol:
This device is an oscillometric blood pressure monitor that also
measures the pulse during blood pressure measurement and
indicates when the heart rate is irregular.

6
(red) range. The classification corresponds to the 4 ranges in the
table as defined by the international guidelines (ESH, ESC, JSH), as
described in «Section 1.».
6. Data Memory
At the end of each measurement, this device automatically stores the
result, including date and time.
Viewing the stored values
Press the M-button
5
briefly, when the device is switched off. The
display first shows «
M
»
AL
and then a value, e.g. «
M 17
». This means
that there are 17 values in the memory. The device then switches to the
last stored result.
Pressing the M-button again displays the previous value. Pressing the M-
button repeatedly enables you to move from one stored value to another.
Memory full
Pay attention that the maximum memory capacity of 60 memo-
ries is not exceeded.
When the 60 memory is full, the oldest
value is automatically overwritten with the 61st value.
Values should be evaluated by a doctor before the memory
capacity is reached – otherwise data will be lost.
Clearing all values
If you are sure that you want to permanently remove all stored
values, hold down the M-button (the device must have been switched
off beforehand) until «CL» appears and then release the button. To
permanently clear the memory, press the M-button while «CL» is
flashing. Individual values cannot be cleared.
How not to store a reading
As soon as the reading is displayed press and hold the ON/OFF
button 1 until «M» AL is flashing. Confirm to delete the reading by
pressing the M-button 5.
7. Battery Indicator and Battery change
Low battery
When the batteries are approximately ¾ empty the battery symbol AO
will flash as soon as the device is switched on (partly filled battery
displayed). Although the device will continue to measure reliably, you
should obtain replacement batteries.
Flat battery – replacement
When the batteries are flat, the battery symbol AO will flash as soon
as the device is switched on (flat battery displayed). You cannot take
any further measurements and must replace the batteries.
1. Open the battery compartment 3 by pulling off the cap.
2. Replace the batteries – ensure correct polarity as shown by the
symbols in the compartment.
3. To set date and time, follow the procedure described in «Section 2.».
The memory retains all values although date and time must be
reset – the year number therefore flashes automatically after
the batteries are replaced.

7BP W1 Basic EN
Which batteries and which procedure?
Use 2 new, long-life 1.5 V, size AAA alkaline batteries.
Do not use batteries beyond their date of expiry.
Remove batteries if the device is not going to be used for a
prolonged period.
Using rechargeable batteries
You can also operate this device using rechargeable batteries.
Only use «NiMH» type reusable batteries.
Batteries must be removed and recharged when the flat
battery symbol appears. They should not remain inside the
device as they may become damaged (total discharge as a
result of low use of the device, even when switched off).
Always remove the rechargeable batteries if you do not intend
to use the device for a week or more.
Batteries cannot be charged in the blood pressure monitor.
Recharge batteries in an external charger and observe the
information regarding charging, care and durability.
8. Error Messages
If an error occurs during the measurement, the measurement is inter-
rupted and an error message, e.g. «ERR 3», is displayed. * Please immediately consult your doctor, if this or any other problem
occurs repeatedly.
If you think the results are unusual, please read through the
information in «Section 1.» carefully.
Error Description Potential cause and remedy
«
ERR 1
» Signal too
weak
The pulse signals on the cuff are too weak. Re-
position the cuff and repeat the measurement.*
«
ERR 2
»
AP
Error signal During the measurement, error signals were
detected by the cuff, caused for instance by
movement or muscle tension. Repeat the
measurement, keeping your arm still.
«
ERR 3
»
AQ
No pres-
sure in the
cuff
An adequate pressure cannot be generated
in the cuff. A leak may have occurred. Check
that the cuff is correctly connected and is not
too loose. Replace the batteries if necessary.
Repeat the measurement.
«
ERR 5
» Abnormal
result
The measuring signals are inaccurate and no
result can therefore be displayed. Read through
the checklist for performing reliable measure-
ments and then repeat the measurement.*
«
HI
» Pulse or cuff
pressure too
high
The pressure in the cuff is too high (over
299 mmHg) OR the pulse is too high (over
200 beats per minute). Relax for 5 minutes
and repeat the measurement.*
«
LO
» Pulse too
low The pulse is too low (less than 40 beats per
minute). Repeat the measurement.*
Error Description Potential cause and remedy

8
9. Safety, Care, Accuracy Test and Disposal
Safety and protection
Follow instructions for use. This document provides important
product operation and safety information regarding this device.
Please read this document thoroughly before using the device and
keep for future reference.
This device may only be used for the purposes described in these
instructions. The manufacturer cannot be held liable for damage
caused by incorrect application.
This device comprises sensitive components and must be treated
with caution. Observe the storage and operating conditions
described in the «Technical Specifications» section.
Protect it from:
- water and moisture
- extreme temperatures
- impact and dropping
- contamination and dust
- direct sunlight
- heat and cold
The cuffs are sensitive and must be handled with care.
Only pump up the cuff once fitted.
Do not use this device close to strong electromagnetic fields such
as mobile telephones or radio installations. Keep a minimum
distance of 3.3 m from such devices when using this device.
Do not use this device if you think it is damaged or notice anything
unusual.
Never open this device.
If the device is not going to be used for a prolonged period the
batteries should be removed.
Read the additional safety information provided within the individual
sections of this instruction manual.
The measurement results given by this device is not a diagnosis.
It is not replacing the need for the consultation of a physician,
especially if not matching the patient’s symptoms. Do not rely on
the measurement result only, always consider other potentially
occurring symptoms and the patient’s feedback. Calling a doctor
or an ambulance is advised if needed.
Ensure that children do not use this device unsupervised; some
parts are small enough to be swallowed. Be aware of the risk of
strangulation in case this device is supplied with cables or tubes.
Device care
Clean the device only with a soft, dry cloth.
Cleaning the cuff
Carefully remove any marks on the cuff with a damp cloth and mild
detergent.

9BP W1 Basic EN
Accuracy test
We recommend this device is tested for accuracy every 2 years or
after mechanical impact (e.g. being dropped). Please contact your
local Microlife-Service to arrange the test (see foreword).
Disposal
Batteries and electronic devices must be disposed of in accordance
with the locally applicable regulations, not with domestic waste.
10.Guarantee
This device is covered by a 5 year guarantee from the date of
purchase. During this guarantee period, at our discretion, Microlife
will repair or replace the defective product free of charge.
Opening or altering the device invalidates the guarantee.
The following items are excluded from the guarantee:
Transport costs and risks of transport.
Damage caused by incorrect application or non-compliance with
the instructions for use.
Damage caused by leaking batteries.
Damage caused by accident or misuse.
Packaging/storage material and instructions for use.
Regular checks and maintenance (calibration).
Accessories and wearing parts: Batteries, power adapter
(optional).
The cuff is covered by a functional guarantee (bladder tightness) for
2 years.
Should guarantee service be required, please contact the dealer
from where the product was purchased, or your local Microlife
service. You may contact your local Microlife service through our
website:
www.microlife.com/support
Compensation is limited to the value of the product. The guarantee
will be granted if the complete product is returned with the original
invoice. Repair or replacement within guarantee does not prolong or
renew the guarantee period. The legal claims and rights of
consumers are not limited by this guarantee.
11.Technical Specifications
Operating conditions: 10 - 40 °C / 50 - 104 °F
15 - 95 % relative maximum humidity
Storage conditions: -20 - +55 °C / -4 - +131 °F
15 - 95 % relative maximum humidity
Weight: 124
g (including batteries)
Dimensions: 73 x 66 x 38
mm
Cuff size: 13.5 - 21.5 cm (5.25 - 8.5 inches)
Measuring procedure:
oscillometric, corresponding to Korotkoff
method: Phase I systolic, Phase V diastolic

10
This device complies with the requirements of the Medical Device
Directive 93/42/EEC.
Technical alterations reserved.
Measurement range: 20 - 280 mmHg – blood pressure
40 - 200 beats per minute – pulse
Cuff pressure
display range: 0 - 299 mmHg
Resolution: 1 mmHg
Static accuracy: pressure within ± 3 mmHg
Pulse accuracy: ± 5 % of the readout value
Voltage source: 2 x 1.5 V alkaline batteries; size AAA
Battery lifetime: approx. 320 measurements
(using new batteries)
IP Class: IP20
Reference to
standards: EN 1060-1 /-3 /-4; IEC 60601-1;
IEC 60601-1-2 (EMC); IEC 60601-1-11
Expected service life: Device: 5 years or 10000 measurements
Accessories: 2 years


12
Pantalla
Lea atentamente las instrucciones antes de utilizar este
dispositivo.
Uso previsto:
Este monitor de presión arterial oscilométrico está diseñado para
medir la presión arterial no invasiva en personas de 12 años o más.
Estimado cliente,
Su nuevo tensiómetro
Microlife
es un dispositivo médico de alta fiabi-
lidad para tomar mediciones en la muñeca. Es fácil de usar, preciso y
altamente recomendado para realizar un seguimiento de la presión arte-
rial en casa. Este dispositivo ha sido desarrollado en colaboración con
médicos y su muy alta precisión ha sido probada en ensayos clínicos.*
Si tiene cualquier pregunta o problema o si desea pedir piezas de
recambio, no dude en contactar con su servicio de atención al cliente
de Microlife local. Su distribuidor o farmacia podrá indicarle la direc-
ción del distribuidor de Microlife en su país. También puede visi-
tarnos en Internet en www.microlife.com donde encontrará informa-
ción útil sobre nuestros productos.
¡Cuide su salud con Microlife AG!
Microlife BP W1 Basic ES
1Botón ON/OFF (Encendido/Apagado)
2Pantalla
3Compartimento de baterías
4Brazalete
5Botón M (Memoria)
6Botón Hora
7Valor sistólico
8Valor diastólico
9Frecuencia del pulso
AT Fecha/Hora
AK Indicador de semáforo
AL Valor guardado
AM Símbolo de latidos irregulares (IHB)
AN Indicador del pulso
AO Indicador de batería
AP Indicador de movimiento del brazo
AQ Indicador de comprobación del manguito
AR Indicador LED de posición

13BP W1 Basic ES
* Este dispositivo utiliza el mismo algoritmo de medición que el
premiado modelo BP W100, probado de acuerdo con el protocolo de
la Sociedad Británica e Irlandesa de Hipertensión (BIHS).
Índice
1. Datos importantes acerca de la presión arterial y la auto-
medición
• ¿Cómo he de evaluar mi presión arterial?
2. Uso del dispositivo por primera vez
• Colocar las baterías
• Ajuste de fecha y hora
3. Medición de la presión arterial
4. Apariencia del símbolo de latidos irregulares (IHB)
5. Indicador de semáforo en la pantalla
6. Memoria de datos
• Ver los valores guardados
• Memoria llena
• Borrar todos los valores
• Procedimiento para no guardar la lectura
7. Indicador de baterías y cambio de baterías
• Baterías con poca carga
• Baterías descargadas – cambio
• ¿Qué baterías y qué procedimiento?
• Uso de baterías recargables
8. Mensajes de error
9. Seguridad, cuidado, control de precisión y eliminación de
residuos
• Seguridad y protección
• Cuidado del dispositivo
• Limpieza del brazalete
• Control de precisión
• Eliminación de residuos
10. Garantía
11. Especificaciones técnicas
Tarjeta de garantía (véase reverso)
Pieza aplicada tipo BF
Mantener en lugar seco

14
1. Datos importantes acerca de la presión arterial y la
automedición
La
presión arterial
es la presión de la sangre que circula por las arte-
rias, generada por el bombeo del corazón. Se miden siempre dos
valores, el valor
sistólico
(superior) y el valor
diastólico
(inferior).
El dispositivo indica también la frecuencia del pulso (el número
de latidos del corazón en un minuto).
¡Una presión arterial permanentemente alta puede perjudicar
su salud y debe ser tratada por su médico!
Consulte siempre con su médico los valores medidos y coméntele
si ha notado algo inusual o si tiene alguna duda. No confíe nunca
en una sola lectura de presión arterial.
Existen muchas causas de valores de presión arterial excesi-
vamente altos. Su médico se las explicará en detalle y, en caso
de necesidad, le ofrecerá el tratamiento adecuado. Además de la
medicación, la pérdida de peso y el ejercicio físico también
pueden disminuir la presión arterial.
Bajo ninguna circunstancia debe modificar las dosis de medi-
camentos o iniciar un tratamiento sin consultar a su médico
Dependiendo de la condición y el esfuerzo físico, la presión arte-
rial está sujeta a amplias fluctuaciones durante el transcurso del
día. ¡Por esta razón, debe realizar la medición siempre en las
mismas condiciones de tranquilidad y estando relajado!
Realice dos lecturas cada vez (por la mañana y por la noche) y
haga una media de los resultados de las mediciones.
Es completamente normal que dos mediciones tomadas en rápida
sucesión puedan producir
resultados que difieran
significativamente.
Las diferencias entre las mediciones tomadas por su médico o
en la farmacia y las tomadas en casa son muy normales, debido
a que estas situaciones son completamente diferentes.
Varias mediciones proporcionan información más fiable sobre la
presión arterial que una sola medición.
Deje pasar un breve intervalo de tiempo de al menos
15 segundos entre dos mediciones.
Si sufre una arritmia cardíaca, consulte con su médico antes de
usar el dispositivo. Consulte también el capítulo «Apariencia del
símbolo de latidos irregulares (IHB)» de este manual del usuario.
¡El indicador de pulsaciones no es apropiado para
comprobar la frecuencia de los marcapasos!
Si está
embarazada
, debe controlar su presión arterial con regula-
ridad, ya que puede cambiar drásticamente durante este tiempo.
Una serie de factores pueden afectar a la precisión de las
mediciones efectuadas en la muñeca. En algunos casos, el
resultado puede diferir de la medición tomada en el brazo. Por
esta razón, le aconsejamos que compare estos valores con
los resultados de las mediciones realizadas en el brazo y los
consulte con su médico.

15BP W1 Basic ES
¿Cómo he de evaluar mi presión arterial?
El valor superior es el que determina la evaluación. Ejemplo: un valor
de la presión arterial de 140/80 mm Hg o 130/90 mm Hg indica
«presión arterial demasiado alta».
2. Uso del dispositivo por primera vez
Colocar las baterías
Después de desembalar el dispositivo, en primer lugar, inserte las
baterías. El compartimento de las baterías 3 está en la parte supe-
rior del dispositivo. Inserte las baterías (2 x 1,5 V, tamaño AAA) de
acuerdo con las marcas de polaridad indicadas.
Ajuste de fecha y hora
1. Una vez activadas las baterías, el número del año parpadea en la
pantalla. Ajuste el año pulsando el botón M 5. Para confirmarlo
y ajustar a continuación el mes, pulse el botón Hora 6.
2. Ahora puede ajustar el mes usando el botón M. Pulse el botón
Hora para confirmar y, a continuación, ajuste el día.
3. Por favor, siga las instrucciones anteriores para ajustar el día, la
hora y los minutos.
4. Una vez que haya ajustado los minutos y pulsado el botón Hora,
la fecha y la hora quedan establecidas y se visualiza la hora.
5. Si desea cambiar la fecha y la hora, pulse y mantenga pulsado el
botón Hora durante aprox. 3 segundos hasta que comience a
parpadear el número del año. Ahora, podrá introducir los nuevos
valores tal como se ha descrito anteriormente.
3. Medición de la presión arterial
Lista de chequeo para efectuar una medición fiable
1. Evite comer o fumar, así como cualquier otra actividad inmediata-
mente antes de la medición.
2. Siéntese en una silla con respaldo y relájese durante 5 minutos.
Mantenga los pies planos sobre el piso y no cruce las piernas.
3. Efectúe la medición siempre en la misma muñeca, estando en
una posición sentada. Use la muñeca que generalmente muestra
valores más altos de presión arterial.
4. Quítese cualquier prenda de vestir y, dado el caso, su reloj, para
que su muñeca quede libre.
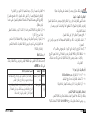
Tabla de clasificación de los valores de la presión arterial en adultos
según las Normas Internacionales (ESH, ESC, JSH). Datos en mmHg.
Nivel Sistólico Diastó-
lico Recomendación
1. presión arterial
normal < 120 < 74 Autocontrol
2. presión arterial
óptima 120 - 129 74 - 79 Autocontrol
3. presión arterial
elevada 130 - 134 80 - 84 Autocontrol
4. presión arterial
demasiado alta 135 - 159 85 - 99 Acudir al médico
5.
presión arterial peli-
grosamente alta
≥ 160 ≥ 100 ¡Acudir urgente-
mente al médico!

16
5. Compruebe siempre que el manguito esté posicionado correcta-
mente, tal como está representado en los dibujos en la tarjeta de
instrucciones breves.
6. Ajuste el manguito de manera que quede cómoda pero no dema-
siado apretada. El manguito cubre una circunferencia de muñeca
de 13,5 - 21,5 cm (5,25 - 8,5 pulgadas).
7. Presione el botón ON/OFF 1 para iniciar la medición.
8. El indicador LED de posición
AR
se activa. Deje reposar el brazo en
una posición relajada, con el dispositivo a la misma altura que el
corazón. Mueva el brazo hasta que la luz LED alcance su máximo
brillo y se sitúe en el centro del indicador.
9. Después de 5 segundos, el manguito se inflará automáticamente.
Relájese, no se mueva y no tense los músculos del brazo hasta que se
visualice el resultado de la medición. Respire normalmente y no hable.
10.Una vez alcanzada la presión correcta, el inflado se detiene y la
presión disminuye gradualmente. Si no se alcanzó la presión nece-
saria, el dispositivo bombeará automáticamente más aire al manguito.
11.Durante la medición, el indicador de pulso
AN
parpadea en la pantalla.
12.Se visualiza el resultado compuesto por la presión arterial sistólica
7
, diastólica
8
, y la frecuencia del pulso
9
. Tenga en cuenta
también las explicaciones de otras indicaciones en este manual.
13.Quítese el tensiómetro y apáguelo y apunte el resultado en la
cartilla adjunta para la presión arterial. (El tensiómetro se apaga
automáticamente al cabo de aprox. 1 min.).
La medición se puede detener en cualquier momento presio-
nando el botón ON/OFF (p. ej., si no se encuentra bien o en
caso de tener una sensación de presión desagradable).
4. Apariencia del símbolo de latidos irregulares (IHB)
Este símbolo AM indica que se detectó un latido cardíaco irregular.
En este caso, la presión arterial medida puede diferir de sus valores
reales de presión arterial. Se recomienda repetir la medición.
5. Indicador de semáforo en la pantalla
Las barras en el borde izquierdo de la pantalla AK muestran el rango
de valores de la presión arterial. Dependiendo de la altura de la
barra, el valor indicado es óptimo (verde), elevado (amarillo), dema-
siado alto (naranja) o peligrosamente alto (rojo). Esta clasificación se
corresponde con los 4 rangos definidos por las normas internacio-
nales (ESH, ESC, JSH) e indicados en la tabla del «Apartado 1.».
Información para su doctor en caso de aparición repetida
del símbolo IHB
Este dispositivo es un monitor oscilométrico de presión arterial
que también mide el pulso durante la medición de la presión
arterial e indica cuándo el ritmo cardiaco es irregular.

17BP W1 Basic ES
6. Memoria de datos
Al final de la medición, este dispositivo guarda automáticamente
cada resultado, incluyendo la fecha y la hora.
Ver los valores guardados
Pulse el botón M 5 brevemente estando apagado el dispositivo. En
la pantalla aparece primero «M» AL y después un valor, p.ej. «M 17».
Esto significa que hay 17 valores en la memoria. Entonces, el dispo-
sitivo cambia al último valor guardado.
Al volver a pulsar el botón M se vuelve a visualizar el valor anterior.
Pulsando el botón M repetidamente se puede cambiar de un valor
guardado a otro.
Memoria llena
Tenga cuidado de no exceder la capacidad máxima de la
memoria que es de 60 valores. Cuando la memoria está
llena, el valor más antiguo es reemplazado por el valor
número 61. Los valores deberán ser evaluados por un
médico antes de alcanzar la capacidad máxima de la
memoria; en caso contrario, se perderán los datos.
Borrar todos los valores
Si está seguro de que desea eliminar definitivamente todos los
valores guardados, mantenga presionado el botón M (el dispositivo
debe haber sido apagado previamente) hasta que aparezca «CL» y
entonces suelte el botón. Para borrar la memoria definitivamente,
pulse el botón M mientras parpadee «CL». No es posible borrar
valores individuales.
Procedimiento para no guardar la lectura
Cuando la lectura aparezca en la pantalla mantenga pulsado el
botón ON/OFF 1 hasta que «M» AL parpadee. Confirme que desea
borrar la lectura pulsando el botón M 5.
7. Indicador de baterías y cambio de baterías
Baterías con poca carga
Cuando las baterías están gastadas aproximadamente ¾, el símbolo de
baterías
AO
parpadea al momento de encender el dispositivo (se visua-
liza una batería parcialmente cargada). Aunque el dispositivo seguirá
midiendo de manera fiable, tenga a mano baterías de recambio.
Baterías descargadas – cambio
Cuando las baterías están gastadas, el símbolo de baterías AO
parpadea al momento de encender el dispositivo (se visualiza una
batería descargada). Ya no se puede realizar ninguna medición y es
preciso cambiar las baterías.
1. Abra el compartimento de pilas 3 retirando la tapa.
2. Sustituya las baterías; asegúrese de que la polaridad sea la
correcta, tal como lo indican los signos en el compartimiento.

18
3. Para ajustar la fecha y la hora, siga el procedimiento descrito en
el «Apartado 2.».
La memoria retiene todos los valores, aunque haya que rese-
tear la fecha y la hora; para este fin, el número del año
parpadea automáticamente después de cambiar las baterías.
¿Qué baterías y qué procedimiento?
Utilice 2 baterías alcalinas nuevas de tamaño AAA, de 1,5 V,
de larga duración.
No utilice baterías caducadas.
Si no va a usar el dispositivo durante un período prolongado,
extraiga las baterías.
Uso de baterías recargables
Este dispositivo también se puede usar con baterías recargables.
Utilice únicamente baterías reutilizables del tipo «NiMH».
Las baterías se deben extraer y recargar, cuando aparezca el
símbolo de batería (batería descargada). No deben perma-
necer en el interior del dispositivo, ya que se pueden dañar
(descarga total como resultado de un uso poco frecuente del
dispositivo, incluso estando apagado).
Retire siempre las baterías recargables si no va a usar el
dispositivo en una semana o más.
¡Las baterías NO se pueden recargar dentro del tensiómetro!
Recargue las baterías en un cargador externo y observe la
información relativa a la recarga, el cuidado y a la duración.
8. Mensajes de error
Si se produce un error durante la medición, esta se interrumpe y se
visualiza un mensaje de error, p. ej., «ERR 3».
Error Descripción Posible causa y solución
«
ERR 1
» Señal dema-
siado débil
Las señales del pulso en el manguito son
demasiado débiles. Vuelva a colocar el
manguito y repita la medición.*
«
ERR 2
»
AP
Señal de
error
Durante la medición se han detectado
señales de error por el manguito, causadas,
por ejemplo, por el movimiento o la contrac-
ción de un músculo. Repita la medición
manteniendo el brazo quieto.
«
ERR 3
»
AQ
No hay
presión en el
manguito
No se puede generar una presión adecuada
en el manguito. Se puede haber producido
una fuga. Compruebe que el manguito esté
conectado correctamente y que no esté
demasiado suelto. Cambie las baterías si
fuese necesario. Repita la medición.
A página está carregando...
A página está carregando...
A página está carregando...
A página está carregando...
A página está carregando...
A página está carregando...
A página está carregando...
A página está carregando...
A página está carregando...
A página está carregando...
A página está carregando...
A página está carregando...
A página está carregando...
A página está carregando...
A página está carregando...
A página está carregando...
A página está carregando...
A página está carregando...
A página está carregando...
A página está carregando...
A página está carregando...
A página está carregando...
A página está carregando...
A página está carregando...
A página está carregando...
A página está carregando...
A página está carregando...
A página está carregando...
A página está carregando...
A página está carregando...
A página está carregando...
A página está carregando...
A página está carregando...
A página está carregando...
A página está carregando...
A página está carregando...
A página está carregando...
A página está carregando...
A página está carregando...
A página está carregando...
A página está carregando...
A página está carregando...
A página está carregando...
A página está carregando...
A página está carregando...
A página está carregando...
A página está carregando...
A página está carregando...
A página está carregando...
A página está carregando...
A página está carregando...
A página está carregando...
A página está carregando...
A página está carregando...
A página está carregando...
A página está carregando...
A página está carregando...
A página está carregando...
A página está carregando...
A página está carregando...
A página está carregando...
A página está carregando...
A página está carregando...
A página está carregando...
A página está carregando...
A página está carregando...
A página está carregando...
A página está carregando...
A página está carregando...
A página está carregando...
A página está carregando...
A página está carregando...
A página está carregando...
A página está carregando...
A página está carregando...
A página está carregando...
A página está carregando...
A página está carregando...
A página está carregando...
A página está carregando...
A página está carregando...
A página está carregando...
A página está carregando...
A página está carregando...
A página está carregando...
A página está carregando...
A página está carregando...
A página está carregando...
A página está carregando...
A página está carregando...
A página está carregando...
-
 1
1
-
 2
2
-
 3
3
-
 4
4
-
 5
5
-
 6
6
-
 7
7
-
 8
8
-
 9
9
-
 10
10
-
 11
11
-
 12
12
-
 13
13
-
 14
14
-
 15
15
-
 16
16
-
 17
17
-
 18
18
-
 19
19
-
 20
20
-
 21
21
-
 22
22
-
 23
23
-
 24
24
-
 25
25
-
 26
26
-
 27
27
-
 28
28
-
 29
29
-
 30
30
-
 31
31
-
 32
32
-
 33
33
-
 34
34
-
 35
35
-
 36
36
-
 37
37
-
 38
38
-
 39
39
-
 40
40
-
 41
41
-
 42
42
-
 43
43
-
 44
44
-
 45
45
-
 46
46
-
 47
47
-
 48
48
-
 49
49
-
 50
50
-
 51
51
-
 52
52
-
 53
53
-
 54
54
-
 55
55
-
 56
56
-
 57
57
-
 58
58
-
 59
59
-
 60
60
-
 61
61
-
 62
62
-
 63
63
-
 64
64
-
 65
65
-
 66
66
-
 67
67
-
 68
68
-
 69
69
-
 70
70
-
 71
71
-
 72
72
-
 73
73
-
 74
74
-
 75
75
-
 76
76
-
 77
77
-
 78
78
-
 79
79
-
 80
80
-
 81
81
-
 82
82
-
 83
83
-
 84
84
-
 85
85
-
 86
86
-
 87
87
-
 88
88
-
 89
89
-
 90
90
-
 91
91
-
 92
92
-
 93
93
-
 94
94
-
 95
95
-
 96
96
-
 97
97
-
 98
98
-
 99
99
-
 100
100
-
 101
101
-
 102
102
-
 103
103
-
 104
104
-
 105
105
-
 106
106
-
 107
107
-
 108
108
-
 109
109
-
 110
110
-
 111
111


Microlife BPW1 Basic Manual do usuário
- Categoria
- Unidades de pressão arterial
- Tipo
- Manual do usuário
em outras línguas
- español: Microlife BPW1 Basic Manual de usuario
- français: Microlife BPW1 Basic Manuel utilisateur
- italiano: Microlife BPW1 Basic Manuale utente
Artigos relacionados
-
Microlife BP W1 Basic Manual do usuário
-
-
-
Microlife BP A2 BASIC Manual do usuário
-
Microlife BP A2 Manual do usuário
-
-
-
Microlife BP W3 Comfort Manual do usuário
-
Microlife BP A3 Plus Automatic Blood Pressure Monitor Manual do usuário