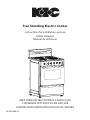
KIC KFS 900 BL Guia de usuario
- Categoria
- Fornos
- Tipo
- Guia de usuario
Este manual também é adequado para

Free Standing Electric Cooker
Instructions for installation and use
Mode d’emploi
Manual de utilizacao
KEEP THESE INSTRUCTIONS IN A SAFE PLACE
CONSERVER CETTE NOTICE EN LIEU SÛR
GUARDE ESTAS INSTRUÇÕES NUM LOCAL SEGURO
501961066113


3
Thank you for choosing our product.
We advise you to read this manual carefully. It contains all necessary instructions for maintaining
unaltered the appearance and functional qualities of the appliance.
CONTENTS
IMPORTANT SAFETY INSTRUCTIONS 5
SAFEGUARDING THE ENVIRONMENT 10
DISPOSAL OF PACKING MATERIAL 10
SCRAPPING THE PRODUCT 10
INSTALLATION AND PREPARATIONS FOR USE 11
INSTALLATION OF PRODUCT 11
ELECTRIC CONNECTION AND SAFETY 12
ADJUSTMENT OF FEET 13
LEVELLING YOUR APPLIANCE 14
FITTING THE SAFETY CHAIN AND HOOK 14
PRODUCT DESCRIPTION 15
LIST OF COMPONENTS: 15
OPERATION INSTRUCTIONS 16
OVEN FUNCTION KNOB: 17
OVEN THERMOSTAT CONTROL KNOB: 17
OVEN OPERATION INSTRUCTIONS: 17
RED LIGHT 18
YELLOW LIGHT THERMOSTAT 18
USE OF THE TIMER 120 MINUTES 18
WARMING DRAWER OPERATION INSTRUCTIONS. 18
OPERATION 18
WARMING TIMES 18
HOB OPERATION INSTRUCTIONS. 19
CONTROL SETTINGS GUIDE 19
HOB WITH CAST IRON ELECTRIC PLATES 19
HOB WITH VITRO CERAMIC ELECTRIC PLATES 20

4
SAFETY REQUIREMENTS FOR DEEP FAT FRYING 20
CLEANING AND MAINTENANCE 21
OVEN EXTERIOR 21
OVEN INTERIOR 21
ACCESSORIES 21
REMOVING THE DOOR FOR EASIER CLEANING. 21
OVEN LAMP REPLACEMENT. 22
TROUBLESHOOTING 23
CUSTOMER SERVICE 23
AFTERSALES SERVICE 24

5
IMPORTANT SAFETY INSTRUCTIONS
YOUR SAFETY AND THE SAFETY OF OTHERS ARE VERY
IMPORTANT
This manual and the appliance itself provide important
safety messages, to be read and observed at all times.
This is the safety alert symbol, pertaining to
safety, which alerts users to potential hazards
to themselves and others.
All safety messages will follow the safety alert
symbol and either the terms:
Indicates a hazardous situation which, if not avoided, will
cause
serious injury.
Indicates a hazardous situation which, if not avoided, could
cause
serious injury.
This manual and the appliance itself provide important
safety advices, to be read and observed at all times.
All safety Warnings give specic details of the potential
risk present and indicate how to reduce risk of injury,
damage and electric shock resulting from improper
use of the appliance. Carefully observe the following
instructions:
•Failure to follow these instructions may involve risks.
•The manufacturer declines any liability for failure to follow
this guide.
•Keep these instructions for future reference.
•Use protective gloves to perform all unpacking and
installation operations.
DANGER
WARNING

6
•The appliance must be disconnected from the power
supply before carrying out any installation work.
•Installation and maintenance must be carried out by a
qualied technician, in compliance with the manufacturer’s
instructions and local safety regulations. Do not repair or
replace any part of the appliance unless specically stated
in the user manual.
•The power cable must be long enough for connecting the
appliance, once tted in its housing, to the power supply.
•Power cable replacement must be carried out by a qualied
Technician. Contact an authorized service centre.
•Regulations require that the appliance is earthed.
•For installation to comply with current safety regulations,
an omnipolar switch with minimum contact gap of 3 mm
must be utilized.
•Do not use multiple plug adapters or extension leads.
•Do not pull the power supply cable in order to unplug the
appliance.
•The electrical components must not be accessible to the
user after installation.
•During and after use, do not touch the heating elements
or interior surfaces of the appliance - risk of burns. Do not
allow the appliance to come into contact with cloths or
other ammable materials until all the components have
cooled suciently.
•At the end of cooking, exercise caution when
opening the appliance door, letting the hot air or
steam exit gradually before accessing the oven.
When the appliance door is shut, hot air is vented from
the aperture above the control panel. Do not obstruct the
vent apertures.
•Use oven gloves to remove pans and accessories, taking
care not to touch the heating elements.

7
•Do not place ammable materials in or near the appliance:
a re may break out if the appliance is inadvertently
switched on.
•Do not heat or cook sealed jars or containers in the
appliance. The pressure that builds up inside might cause
the jar to explode, damaging the appliance.
•Do not use containers made of synthetic materials.
•Overheated oils and fats catch re easily. Always remain
vigilant when cooking foods rich in fat and oil.
•Never leave the appliance unattended during food drying.
•If alcoholic beverages are used when cooking foods (e.g.
rum, cognac, wine), remember that alcohol evaporates at
high temperatures. As a result, there is a risk that vapours
released by the alcohol may catch re upon coming into
contact with the electrical heating element.
•The installation, and maintenance operations listed in
section «INSTRUCTIONS FOR THE INSTALLER» must only
be carried out by qualied personnel.
•This appliance is designed solely for use as a domestic
appliance for cooking food. No other type of use is
permitted (e.g. heating rooms). The manufacturer declines
all responsability for inappropiate use or incorrect setting
of the controls.
•Once the packaging has been removed from the outer
surfaces and the various inner parts, thoroughly check
that the appliance is in perfect condition. If you have any
doubts do not use the appliance and call in a qualied
person.
•The packaging materials used (cardboard, plastic bags,
polystyrene foam, nails, etc.) must not be left with in easy
reach of children because they are a potential hazard
source. All packaging materials used are environmentally-
friendly and recyclable.

8
•Before connecting the appliance ensure that the rating
plate data corresponds to that of the gas and electricity
supply (see section «TECHNICAL FEATURES»).
•If the surface of the glass hob is cracked, do not use it and
switch o the appliance to avoid the possibility of electric
shock.
•Do not touch the appliance with any wet part of the body
and do not operate in when barefoot.
•Do not use the appliance when barefoot.
•Do not leave the appliance exposed to the atmosphere
(rain, sun, etc.).
The appliance and its accessible parts become hot during
use. Care should be taken to avoid touching heating
element. Very young (0-3 years) and young Children (3-8
years) shall be kept away unless continuously supervised.
Keep children away from the product during the cooking
cycle.
Children from 8 years and above and persons with
reduced physical, sensory or mental capabilities or lack of
experience and knowledge can use this appliance only if
they are supervised or have been given instructions on safe
appliance use and if they understand the hazards involved.
Children shall not play with the appliance. Cleaning and
user maintenance shall not be made by children without
supervision.
ln order to prevent accidental tipping of the appliance, for
example by a child climbing over the open oven door, or too
high weights are leant on the open oven door, two chains
must be screwed on the back on the cooker and xed to the
wall with hooks. Ensure the chains are taut. Please refer to
instructions for installation. Unattended cooking on a hob
with fat or oil can be dangerous and may result in re.

9
•Never try to extinguish a re with water, but switch of
the appliance and then cover ame e.g. with a lid or a re
blanket.
•Do not store items on the cooking surfaces.
•Do not use harsh abrasive cleaners or sharp metal scrapers
to clean the oven glass door since they can scratch the
surface, which may result in shattering of the glass. Never
use sponges or abrasive products, and solvents to remove
stains or adhesives on the painted or stainless steel
surfaces.
•The appliance is not intended to be operated by means of
an external timer or separate remotecontrol system.
•Ensure that the appliance is switched o before replacing
the lamp to avoid the possibility of electric shock.
•Do not use a steam cleaner.
•The appliance is to be placed directly on the oor and shall
not be mounted on a base.
•If an electrical socket near the appliance is used, ensure
that the cables of any other electrical appliances do not
come into contact with the oven and are at a sucient
distance from the hot parts of the oven.
•After using the appliance ensure that all the controls are
in the o or closed position, and check that the “0” on the
knobcorrespondswiththesymbol“•“printedonthefront
panel.
•Before carrying out any kind of cleaning, or maintenance
operation, disconnect the appliance from the electricity
supplies.
•Clean from the cooking zone, any pieces of tin foil or plastic
objects that could have melted or stuck; likewise sugar or
sugary food spilled over during cooking.

10
IMPORTANT INSTRUCTIONS
• For this reason, we recommend that you to contact your nearest Service Centre specifying the
model of your appliance and the type of problem.
The appliance was designed and made in accordance with the European standards listed below:
=> EN 60 335-1 and EN 60 335-2-6 (electrical) plus relative amendments.
The appliance complies with the prescriptions of the European Directives as below:
=> 2006/95/EC concerning electrical safety (BT).
=> 2004/108/EC concerning electromagnetic compatibility (EMC).
Oven accessories that could come into contact with foodstus are made with materials that
comply with the provisions of the 1935/2004 EC directive.
SAFEGUARDING THE ENVIRONMENT
Disposal of packing material
The packing material is 100% recyclable and is marked with the recycle symbol ( ). The various
parts of the packing must therefore be disposed of responsibly and in full compliance with local
authority regulations governing waste disposal.
Scrapping the product
- This appliance is marked in compliance with European Directive 2002/96/EC, Waste Electrical and
Electronic Equipment (WEEE).
- By ensuring this product is disposed of correctly, you will help prevent potential negative
consequences for the environment and human health, which could otherwise be caused by
inappropriate waste handling of this product.
- The symbol on the product or on the accompanying documentation indicates that it should
not be treated as domestic waste but must be taken to an appropriate collection centre for the
recycling of electrical and electronic equipment.

11
INSTALLATION AND PREPARATIONS FOR USE
Important: This appliance must be installed by a qualied people according to the
manufacturers installation instructions, local building regulations and electrical wiring
instructions.
Installation of product
• The appliance can be placed close to other furniture on condition that in the area where the
oven is set up, the furniture’s height does not exceed the height of the cooker panel.
• Pay attention not to place it near the refrigerator, there must be no ammable or inammable
materials such as curtain, waterproof cloth, etc. that will begin to burn quickly.
• The furniture close to product must be manufactured resistant to temperatures up to 100°C
• If the kitchen furniture are higher than the cooktop, it must be at least 10 cm between cooker
lateral panels and furniture.
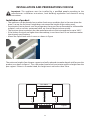
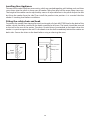
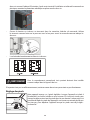
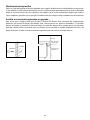
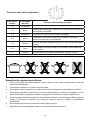
• Mount the Splash back with 4 screws as shown in Figure
The minimum heights from the pan support and wall cupboards to cooker hoods with fan over the
product, are shown in gure 1. Thus, the cooker hood must be at minimum 65cm height from the
pan support. If there is no cooker hood, this height must not be less than 70cm.
Min. 60cm
Figure 1
COOKER HOOD
Min. 42cm
Min. 42cm
Min. 65 cm (with hood)
Min. 70 cm (without hood)

12
Electric connection and safety
WARNING
Before obtaining access to terminals, all supply circuits must be
disconnected.
• IMPORTANT:
The wires in mains lead coloured in accordance with the following code:
GREEN and YELLOW ....... EARTH
BLUE ..................................... NEUTRAL
BROWN or RED ................. LIVE
• This appliance must be installed by authorized person in accordance with the latest edition of
the IEE regulations and in compliance with the manufacturer instructions.
• Before proceeding with the electrical connection, verify that the current carrying capacity of
the system and the socket is adequate for maximum power rating of the oven.
• Electrical installation of the residence and the electrical current plug in use must be earthed
and conform to safety regulations. If there is no appropriate earthed electric outlet with
regulations in the place where the appliance will be installed, immediately contact to our
authorized service. The earthed electric outlet must be close to the appliance. All pole
disconnection circuit breaker with a contact opening of at least 3 mm must be installed inside
the supply circuit.
• Fused switch must be accessible once the product has been installed.
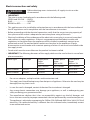
• IMPORTANT: The following diameters of the supply cable must be used at least in case of one
phase connection;
Cooker type Cable type Single-phase
Power
230V ac
Double-phase
Power
400V ac 2N
Three-phase
Power
400V ac 3N
cross-section cross-section cross-section
Electric cooker H05RR-F 3x4 mm
2
4x4 mm
2
5x2.5 mm
2
Electric cooker H07RN-F 3x4 mm
2
4x4 mm
2
5x2.5 mm
2
• Do not use adaptors, multiple sockets and/or extension cord.
• The supply cord should be kept away from hot parts of appliance. Otherwise the cord may be
damaged, causing short circuit.
• In case the cord is damaged, contact Authorized Service to have it changed.
• Any wrong electric connection may damage your appliance, as well as endangering your
safety rendering your guarantee invalid.
• The manufacturer declares that it has no responsibility against any kind of damages and
losses that are caused by improper connections that are performed by unauthorized person.
• The appliance is adjusted as appropriate for 230V or 220-240V and 400V 3N or 380-415V 3N of
electricity. If th network electricity is dierent than this informed value, immediately contact
to our authorized service.

13
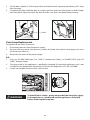
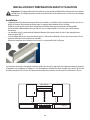
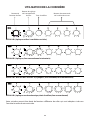
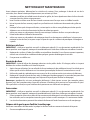
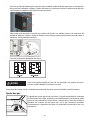
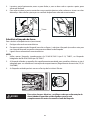
• To x the main cable, rst take o the security metal cover by removing the two screws
shown in the picture. After completing the installation and closed the plastic cover et the
cover metal with two screws
• Open the terminal board by inserting a screwdriver into the side tabs of the power code
cover. Use the screwdriver as a lever by pushing it down to open the cover as below:
• Connection diagram is given below.
WARNING
For single phase connection, three shortcut circuit bridge must be
installed as seen above picture.
If circuit bridge is not installed properly, some of cooking zones does not operate.
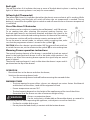
Adjustment of feet
Your product stands on 4 adjustable feet. When the product is placed
where to be used, check if the product is balanced. If it is not balanced,
you can make the adjustment by turning the feet clockwise if required.
It is possible to raise the appliance maximum 30mm by the feet. If the
feet are adjusted appropriately, it is required not to move the appliance
by dragging, it should be moved by lifting it up.

14
Levelling Your Appliance
Take out the 4 cooker feet from oven cavity, which was packed together with baking rack, and then
screw them into the plinth in lower part of cooker These feet level o the oven when necessary.
The height of the cooker can be adjusted by means of adjustable feet in the plinth Adjust the feet
by tilting the cooker from the side Then install the product into position. It is essential that the
cooker is standing level before installation.
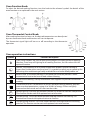
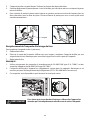
Fitting the safety chain and hook
To prevent the cooker from tipping forward, two lengths of chain MUST BE xed to the back of the
cooker, which should be secured to the hooks provided at all times. The hooks should be secured
to the wall at the rear of the cooker. The chains should always be attached to the hooks when the
cooker is in position against the wall. Fix the hooks into the wall immediately behind the cooker on
both sides. Secure the chain to the hook before using or cleaning the oven.
Hook
Wall
Cooker
Wall
Anti-tilt hook
Safety chain

15
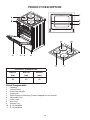
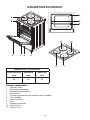
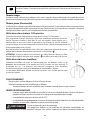
PRODUCT DESCRIPTION
PRODUCT DIMENSIONS
DEPTH
(cm)
WIDTH
(cm)
HEIGHT
(cm)
60 60 90
List of Components:
1. Cooktop
2. Control Panel
3. Oven Door Handle
4. Oven Door
5. Utility Drawer or Warming Drawer (depends on the model)
6. Adjustable Feet
7. Oven Lamp
8. Wire Grid
9. Shallow Tray
10. Ø 145 Hotplate
11. Ø 180 Hotplate

16
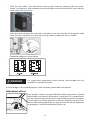
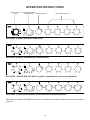
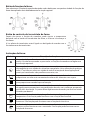
OPERATION INSTRUCTIONS
Oven Function
knob
Oven temperature
setting knob Warning drawer Hob control knobs
KFS 903 BL (4 plates and fan assisted oven)
KFS 900 BL (4 plates, conventional oven and timer)
KFS 901 BL - KFS 901 WH - KFS 901 IX (4 plates, conventional oven warming drawer)
KFS 902 BL (4 vitro ceramic plates, conventional oven warming drawer)
The cooker could be with dierent functions as below please refer to the functions for the cooker
you buy.

17
Oven Function Knob:
To select the desired cooking function, turn the knob to the released symbol. the details of the
oven functions are sxplained in the next section.
Oven Thermostat Control Knob:
After cooking function has been set, the desired temperature can be adjusted
by oven thermostat knob and the oven will start to operate.
The thermostat signal light will be on or o according to the thermostat
operation.
Oven operation instructions:
Symbol Function description
Oven Lamp: Enables the user to observe the progress of cooking without opening
the door. Oven lamp will lighting for all cooking functions, for the cooker with this
optional function.
Defrost: The circulation of air at room temperature enables quicker thawing of
frozen food, (without the use of any heat). It’s a gentle but quick way to speed up the
defrosting time and thawing of ready-made dishes and cream lled prodice etc.
Bottom heat: A concealed element in the bottom of the oven provides a more
concentrative heat to the base of food without blowing.
Conventional cooking: The top and bottom work together to provide convectional
cooking.
Convention with fan: Combination of the fan and both heating element provides
more even heat penetration, saving ul to 30-40% of energy. Dishes are lightly
browned on the outside and still moist on the inside.
Radiant grilling: The inner grill element switches on and o to maintain temperature.
This function can be work with optional rotisserie function.
Double grilling: The inside radiant element and top element are working. This
function can be work with optional rotisserie function.
Double grilling with fan: The inside radiant element and top element are working
with fan. This function can be work with optional rotisserie function.

18
Red Light
The red light when lit it indicates that one or more of the hob electric plates is working, the red
light is lit when warming drawer is on (only for some models)
Yellow Light (Thermostat)
The yellow light when lit it indicates that either the electric oven or electric grill is working. While
the oven is being used the light will switch o when the set temperature is reached. During
baking it is normal for the yellow light to switch on and o several times as the oven temperature
is controlled.
Use of the timer 120 minutes
This selector can be used to set a cooking time of between 1 and 120 minutes.
To set cooking time after selecting the required cooking function, turn
the knob right round in an clockwise direction and then turn it back in the
opposite direction to the desired cooking duration. At the end of the cooking
time the oven switches o and the selector remains positioned at “0”
To use the oven in manual mode, i.e. without setting a cooking time, make
sure that the programme selector is turned to the symbol “ ”.
CAUTION: When the selector is positioned on “0” the oven will not switch on.
to switch the oven on, set the selector to the symbol “ ” or set a cooking time.
Warming Drawer operation instructions.
The control heating element of the drawer is controlled by knob on control
panel. In the knob position 0 drawer is o. In the knob switch position 1 the
drawer is on. When the warming drawer operate the signal lamp on control
panel is lighted.
The electric heating element it’s only visible when the drawer is open and it’s
positioned on the top of the drawer.
OPERATION
- Place the dishes in the drawer and close the drawer,
- Switch on the warming drawer knob
− Turn the warming drawer knob o before removing the warmed dishes.
WARMING TIMES
− The time required to warm dishes, glasses, etc. depends on various factors like Material
and thickness of the dishes, Load and Arrangement of load.
− Drawer temperature are max 70°C
− The load capacity depends on the height of the appliance and the size of the dishes.
− Remember that the drawer can take a maximum weight of 8 kg.
WARNING
Always use protective gloves.
Do not store plastic, combustible or ammable objects or material in
the warming drawer. When operating the appliance, such objects can melt or catch re.
− Put food in suitable dish or pots.
− Do not place the food directly in contact with the bottom drawer.

19
Hob operation instructions.
Note: Always ensure that all controls are in the OFF position, when the appliance is not in
use.
Note: Under no circumstances should the hob be used with aluminum foil in contact with
the hob surface.
The knobs for the hobs can be rotated in either direction to provide variable heat control Turn
the hobs control knobs clockwise from OFF position to increase power, there are 6 positions for
dierent power rating. Turn the control to 6 for fast cooking. To cook more slowly or simmer, turn
the control to a lower setting according to the size of the saucepan and the amount of liquid. The
two small Hotplates are special for smaller pans, low temperature cooking and simmering.
Do not leave a hotplate switched on without a pan as this wastes energy and may shorten
the life of the hotplate
CONTROL SETTINGS GUIDE
This is provided only as a recommended guide - settings also depend on the type of pan used and
the quality of food
Hob with cast iron electric plates
Knob Position Type of food
1 To melt butter, chocolate, etc.
1 or 2
To heat foods gently
To keep small amount of water simmering.
To heat sauces, containing egg yolks and butter.
To simmer: stews, meat, sh, vegetables, fruit.
3
To heat solid and liquid foods.
Keeps water boiling
Thaw frozen vegetables.
Make 2-3 egg omelettes.
4 or 5
To cook foods, just above simmering.
To maintain “rolling” boil for preserve making.
5 or 6 To seal meat and fry sh
6
Frying potatoes.
Bringing water to the boil.
Deep fat frying.
Dissolve sugar for preserve making.

20
Hob with vitro ceramic electric plates
Position of
knobs
Heat
intensity
Possible cooking processes
0 O
1-2 Low To melt butter, chocolate, etc. To heat small amounts of liquid.
3-4 Moderate To heat greater quantities of liquid.
5-6 Slow Thawing frozen food and preparing stews, boiling or simmering.
7-8 Medium Bringing foods to boiling point. For delicate roasts and sh.
9-10 Strong For roasts, chops and steaks. For large amounts of boiled meat.
11 Hot Bringing large amounts of water to the boil. Frying.
Safety requirements for deep fat frying
1. Use a deep pan, large enough to completely cover the appropriate heating area.
2. Never ll the pan more than one-third full of oil.
3. Never leave oil or fat unattended during the heating or cooking period.
4. Never try to fry too much food at a time, especially frozen food. This only lowers the
temperature of the oil or fat too much, resulting in greasy food.
5. Always dry food thoroughly before frying, and lower it slowly into the hot oil or fat. Frozen
foods, in particular, will cause frothing and spitting, if added to quickly.
6. Never heat fat, or fry, with a lid on the pan.
7. Keep the outside of the pan clean and free from streaks of oil or fat.
A página está carregando...
A página está carregando...
A página está carregando...
A página está carregando...
A página está carregando...
A página está carregando...
A página está carregando...
A página está carregando...
A página está carregando...
A página está carregando...
A página está carregando...
A página está carregando...
A página está carregando...
A página está carregando...
A página está carregando...
A página está carregando...
A página está carregando...
A página está carregando...
A página está carregando...
A página está carregando...
A página está carregando...
A página está carregando...
A página está carregando...
A página está carregando...
A página está carregando...
A página está carregando...
A página está carregando...
A página está carregando...
A página está carregando...
A página está carregando...
A página está carregando...
A página está carregando...
A página está carregando...
A página está carregando...
A página está carregando...
A página está carregando...
A página está carregando...
A página está carregando...
A página está carregando...
A página está carregando...
A página está carregando...
A página está carregando...
A página está carregando...
A página está carregando...
A página está carregando...
A página está carregando...
A página está carregando...
A página está carregando...
A página está carregando...
A página está carregando...
A página está carregando...
A página está carregando...
A página está carregando...
A página está carregando...
A página está carregando...
A página está carregando...
-
 1
1
-
 2
2
-
 3
3
-
 4
4
-
 5
5
-
 6
6
-
 7
7
-
 8
8
-
 9
9
-
 10
10
-
 11
11
-
 12
12
-
 13
13
-
 14
14
-
 15
15
-
 16
16
-
 17
17
-
 18
18
-
 19
19
-
 20
20
-
 21
21
-
 22
22
-
 23
23
-
 24
24
-
 25
25
-
 26
26
-
 27
27
-
 28
28
-
 29
29
-
 30
30
-
 31
31
-
 32
32
-
 33
33
-
 34
34
-
 35
35
-
 36
36
-
 37
37
-
 38
38
-
 39
39
-
 40
40
-
 41
41
-
 42
42
-
 43
43
-
 44
44
-
 45
45
-
 46
46
-
 47
47
-
 48
48
-
 49
49
-
 50
50
-
 51
51
-
 52
52
-
 53
53
-
 54
54
-
 55
55
-
 56
56
-
 57
57
-
 58
58
-
 59
59
-
 60
60
-
 61
61
-
 62
62
-
 63
63
-
 64
64
-
 65
65
-
 66
66
-
 67
67
-
 68
68
-
 69
69
-
 70
70
-
 71
71
-
 72
72
-
 73
73
-
 74
74
-
 75
75
-
 76
76


KIC KFS 900 BL Guia de usuario
- Categoria
- Fornos
- Tipo
- Guia de usuario
- Este manual também é adequado para
em outras línguas
- français: KIC KFS 900 BL Mode d'emploi
- English: KIC KFS 900 BL User guide
Outros documentos
-
Cooke & Lewis CLCSB60 Manual do usuário
-
Whirlpool AKM330/IX Program Chart
-
Candy CVE660MI/E Manual do usuário
-
Electrolux EKG6013X Manual do usuário
-
-
 De Dietrich CE9005E1 Manual do proprietário
-
 De Dietrich CE9005E1 Manual do proprietário
-
 De Dietrich CE9000E1 Manual do proprietário
-
-
Beko GM15121DX Manual do proprietário


