Dell Latitude 7212 Rugged Extreme Guia rápido
- Tipo
- Guia rápido

Latitude 7212
Rugged Extreme Tablet
Quick Start Guide
Guide de démarrage rapide
Hızlı Başlangıç Kılavuzu
Guia de início rápido
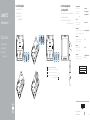
2 Connect the power adapter and
press the power button
Branchez l’adaptateur secteur et appuyez sur le bouton d’alimentation
Güç adaptörünü takıp güç düğmesine basın
Ligar o transformador e premir o botão para ligar/desligar
1 Insert uSIM card (optional)
Insérer une carte uSIM (en option)
uSIM kart takın (isteğe bağlı)
Inserir cartão uSIM (opcional)
uSIM
NOTE: Make sure the card is correctly aligned and is inserted all the way.
REMARQUE: assurez-vous que la carte est correctement alignée et insérée jusqu’au bout.
NOT: Kartı doğru yere takmaya ve yuvasına tamamen girmiş olmasına dikkat edin.
NOTA: certifique-se de que o cartão está corretamente alinhado e totalmente inserido.
:ةظحم
Product support and manuals
Assistance produits et manuels
Ürün desteği ve kılavuzlar
Suporte do produto e manuais
Dell.com/support
Dell.com/support/manuals
Dell.com/support/windows
Contact Dell
Contacter Dell | Dell’e başvurun
Contactar a Dell | Dell
Dell.com/contactdell
Regulatory and safety
Réglementations et sécurité | Mevzuat ve güvenlik
Regulamentos e segurança |
Dell.com/regulatory_compliance
Regulatory model
Modèle réglementaire | Yasal model numarası
Modelo regulamentar |
T03H
Regulatory type
Type réglementaire | Yasal tür
Tipo regulamentar |
T03H002
Computer model
Modèle de l’ordinateur | Bilgisayar modeli
Modelo do computador |
Latitude 7212 Rugged Extreme
Tablet
© 2017 Dell Inc. or its subsidiaries.
© 2017 Microsoft Corporation.
2017-06
Connection and use of this communications
equipment is permitted by the Nigerian
Communications Commission

Features
Caractéristiques | Özellikler | Funcionalidades |
Tablet Computer Intended Use Orientation:
The tablet computer screen-side held against the user’s body is not a Dell-specied usable orientation of a
tablet. Please keep the tablet computer’s “screen-side” at 15 mm (0.59 inches) or greater distance from the
user’s body under all circumstances when a transmitter is active. The other 5 sides of the product are a Dell
specied usable orientation of a tablet and can be used in close contact to the user’s body.
NOTE: Your Dell Rugged Tablet is designed to prevent damage due to dust or dirt entering the QuadCool
intake vent. It is however recommended to keep QuadCool vents clean and unobstructed for optimal
performance.
REMARQUE: votre tablette DellRugged est conçue pour prévenir les dommages causés par la poussière
ou la saleté pénétrant dans l’entrée d’air QuadCool. Pour des performances optimales, il est cependant
recommandé de garder les grilles de ventilationQuadCool propres et accessibles.
NOT: Dell Dayanıklı Tabletiniz, toz veya kirlerin QuadCool havalandırma girişine kaçmasını engelleyerek
cihaz hasarını önlemek için tasarlanmıştır. Ancak en iyi performans için QuadCool havalandırma girişlerinin
temiz tutulması ve havalandırma girişlerinin önüne herhangi bir engel koyulmaması önerilir.
NOTA: o tablet Dell Rugged está concebido para prevenir danos decorrentes da infiltração de poeiras ou
sujidade na entrada de ar QuadCool. Assim, recomenda-se a limpeza e desobstrução da entrada/saída de
ar QuadCool para obter um ótimo desempenho.
DellRugged:ةظحم
QuadCoolQuadCool
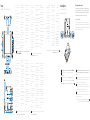
1. Microphone
2. Camera status light
3. Camera
4. Camera shutter switch
5. Ambient light sensor
6. Security card reader
7. Lanyard connector slot
for stylus
8. Stylus
9. Power button
10. Headset port
11. microSD card reader
12. USB 3.1 Gen 1 port with
PowerShare
13. DisplayPort with
PowerShare over USB
Type- C
14. Micro serial port
15. Power connector port
16. User programmable
button 3*
17. User programmable
button 2*
18. User programmable
button 1*
19. Docking pogo pins
20. Windows button
21. Volume buttons
22. Radio antennae
pass-through connector
23. Screen rotate lock
button
24. Dock-guide slots
25. Security cable slot
26. QuadCool vent output
27. Microphone
28. Contactless smart card
reader
29. Fingerprint reader
30. Rear camera
31. Camera shutter switch
32. Camera flash lens
33. Expansion module pogo
pins
34. Service tag label
35. QuadCool intake vent
36. uSIM card slot (remove
battery to access)
37. Battery release latch
38. Battery life meter
39. Battery
1. Microphone
2. Voyant d’état de la caméra
3. Caméra
4. Obturateur de l’appareil
photo
5. capteur de lumière
ambiante
6. Lecteur de carte de
sécurité
7. Emplacement du
connecteur du cordon
pour le stylet
8. Stylet
9. Bouton d’alimentation
10. Port casque
11. Lecteur de carte microSD
12. Port USB3.1 Gen1 avec
PowerShare
13. DisplayPort avec
PowerShare sur USB
type-C
14. Port série micro
15. Port du connecteur
d’alimentation
16. Touche programmable
par l’utilisateur3*
17. Touche programmable
par l’utilisateur2*
18. Touche programmable
par l’utilisateur1*
19. Broches de connexion
Pogo
20. Bouton Windows
21. Boutons de volume
22. Connecteur d’antenne
radio en sonde
23. Bouton de verrouillage
de la rotation de l’écran
24. Fentes de guidage pour
station d’accueil
25. Fente pour câble de
sécurité
26. Dispositif de sortie d’air
QuadCool
27. Microphone
28. Lecteur de cartes à puce
sans contact
29. Lecteur d’empreintes
digitales
30. Caméra arrière
31. Obturateur de l’appareil
photo
32. Flash de l’appareil photo
33. Broches pogo du module
d’extension
34. Étiquette du numéro de
série
35. Entrée d’air QuadCool
36. Logement de la carte
uSIM (retirer la batterie
pour y accéder)
37. Loquet de déverrouillage
de batterie
38. Indicateur de batterie
39. Batterie
1. Microfone
2. Luz de estado da câmara
3. Câmara
4. Obturador da câmara
5. Sensor de luz ambiente
6. Leitor de cartão de
segurança
7. Ranhura para ligação de
caneta
8. Caneta
9. Botão para ligar/desligar
10. Porta de auscultadores
11. Leitor de cartões microSD
12. Porta USB 3.1 Gen 1 com
PowerShare
13. DisplayPort com
PowerShare via USB
tipo C
14. Micro porta série
15. Porta do transformador
16. Botão 3* programável
pelo utilizador
17. Botão 2* programável
pelo utilizador
18. Botão 1* programável
pelo utilizador
19. Pinos pogo para
acoplamento
20. Botão do Windows
21. Botões de volume
22. Conector “pass-through”
de antena de rádio
23. Botão de bloqueio da
rotação do ecrã
24. Slots de guia do dock
25. Ranhura do cabo de
segurança
26. Saída de ar QuadCool
27. Microfone
28. Leitor de Smart Card
sem contactos
29. Leitor de impressões
digitais
30. Câmara posterior
31. Obturador da câmara
32. Lente flash da câmara
33. Pinos tipo “pogo” do
módulo de expansão
34. Rótulo da etiqueta de
serviço
35. Entrada de ar QuadCool
36. Ranhura para cartão
uSIM (remover bateria
para aceder)
37. Trava de liberação da
bateria
38. Medidor de carga da
bateria
39. Bateria
1. Mikrofon
2. Kamera durum ışığı
3. Kamera
4. Kamera deklanşör
düğmesi
5. Ortam ışığı sensörü
6. Güvenlik kartı okuyucu
7. Stylus için halat
konektör yuvası
8. Stylus
9. Güç düğmesi
10. Mikrofonlu kulaklık girişi
11. microSD kart okuyucu
12. PowerShare’e sahip USB
3,1 Gen 1 portu
13. USB Tip C üzerinden
PowerShare ile
DisplayPort
14. Mikro seri bağlantı
noktası
15. Güç konektörü bağlantı
noktası
16. Kullanıcı programlanabilir
düğme 3*
17. Kullanıcı programlanabilir
düğme 2*
18. Kullanıcı programlanabilir
düğme 1*
19. Pogo yerleştirme pimleri
20. Windows düğmesi
21. Ses düğmeleri
22. Radyo anteni düz geçiş
konektörü
23. Ekran döndürme kilidi
düğmesi
24. Yerleştirme kılavuzu
yuvaları
25. Güvenlik kablosu yuvası
26. QuadCool havalandırma
çıkışı
27. Mikrofon
28. Temassız akıllı kart
okuyucu
29. Parmak izi okuyucu
30. Arka kamera
31. Kamera deklanşör
düğmesi
32. Kamera flaş merceği
33. Genişletme modülü pogo
pim
34. Servis etiketi çıkartması
35. QuadCool havalandırma
girişi
36. uSIM kart yuvası (erişim
için pili çıkarın)
37. Pili serbest bırakma
mandalı
38. Pil ömrü ölçer
39. Pil
Removing Battery
Retrait de la batterie | Pili Çıkarma
Remoção da bateria |
NOTE: The Rugged Control Center software for your Rugged Tablet is available at Dell.com/support.
REMARQUE: le logiciel Rugged Control Center de votre tablette Rugged est disponible sur le site
Dell.com/support.
NOT: Dayanıklı Tabletiniz için Dayanıklı Kontrol merkezi yazılımını Dell.com/support adresinde bulabilirsiniz.
NOTA: o software Rugged Control Center para o tablet Rugged está disponível em Dell.com/support.
.Dell.com/supportRugged:ةظحم
NOTE: *To setup and configure Rugged Control Center (RCC) with the tablet, see the documentation
available at Dell.com/support/manuals
REMARQUE: *Pour installer et configurer le Rugged Control Center (RCC) avec la tablette, reportez-
vous à la documentation disponible sur Dell.com/support/manuals
NOTA: *para instalar e configurar o Rugged Control Center (RCC) no tablet, consultar a documentação
disponível em Dell.com/support/manuals
NOT: *Tablet ile Dayanıklı Kontrol Merkezi (RCC) kurulumunu yapmak ve ayarlamak için,
Dell.com/support/manuals adresindeki belgelere bakın
RCC* :ةظحم
dell.com/support/manuals
1 .
2 .
3 .
4 .
5 .
6 .
7 .
8 .
9 .
10 .
11 .
12 .
13 .
CUSB
14 .
15 .
16 .
17 .2
18 .
19 .
20 .
21 .
22 .
23 .
24 .
25 .
26 .
QuadCool
27 .
28 .
29 .
30 .
31 .
32 .
33 .
34 .
35 .QuadCool
36 . uSIM
37 .
38 .
39 .
Orientação prevista do tablet:
O ecrã do tablet, encostado ao corpo do utilizador, não é uma orientação especicada pela Dell a usar num
tablet. Quando o transmissor estiver ativo, manter sempre o ecrã do tablet a uma distância mínima de 15 mm
(0,59 polegadas) do corpo do utilizador. Os restantes 5 lados do tablet são uma orientação especicada pela
Dell e podem ser utilizados encostados ao corpo do utilizador.
-
 1
1
-
 2
2

