
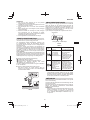
DH 36DPE
Handling instructions
Bedienungsanleitung
Mode d’emploi
Istruzioni per l’uso
Gebruiksaanwijzing
Instrucciones de manejo
Instruções de uso
Bruksanvisning
Brugsanvisning
Bruksanvisning
Käyttöohjeet
Οδηγίες χειρισμού
Instrukcja obsługi
Kezelési utasítás
Návod k obsluze
Kullanım talimatları
Instrucţiuni de utilizare
Navodila za rokovanje
Pokyny na manipuláciu
Инструкция за експлоатация
Uputstvo za rukovanje
Upute za rukovanje
en
de
fr
it
nl
es
pt
sv
da
no
fi
el
pl
hu
cs
tr
ro
sl
sk
bg
sr
hr
en
de
fr
it
nl
es
pt
sv
da
no
fi
el
pl
hu
cs
tr
ro
sl
sk
bg
sr
hr

2
1
2

3
3 4
56
7

4
89
10 11
12 13

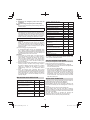
5
14 15
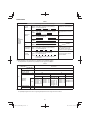
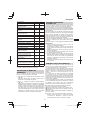
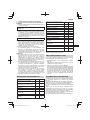
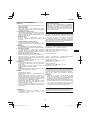
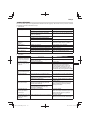
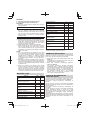
950 min-1
n0700
3170 4300
950
Bpm
16 17
18

6
19
ab
20
21

7
22

8
English
c) Prevent unintentional starting. Ensure the
switch is in the off -position before connecting
to power source and/or battery pack, picking up
or carrying the tool.
Carrying power tools with your fi nger on the switch
or energising power tools that have the switch on
invites accidents.
d) Remove any adjusting key or wrench before
turning the power tool on.
A wrench or a key left attached to a rotating part of
the power tool may result in personal injury.
e) Do not overreach. Keep proper footing and
balance at all times.
This enables better control of the power tool in
unexpected situations.
f) Dress properly. Do not wear loose clothing or
jewellery. Keep your hair and clothing away
from moving parts.
Loose clothes, jewellery or long hair can be caught in
moving parts.
g) If devices are provided for the connection of
dust extraction and collection facilities, ensure
these are connected and properly used.
Use of dust collection can reduce dust-related
hazards.
h) Do not let familiarity gained from frequent use
of tools allow you to become complacent and
ignore tool safety principles.
A careless action can cause severe injury within a
fraction of a second.
4) Power tool use and care
a) Do not force the power tool. Use the correct
power tool for your application.
The correct power tool will do the job better and safer
at the rate for which it was designed.
b) Do not use the power tool if the switch does not
turn it on and off .
Any power tool that cannot be controlled with the
switch is dangerous and must be repaired.
c) Disconnect the plug from the power source and/
or remove the battery pack, if detachable, from
the power tool before making any adjustments,
changing accessories, or storing power tools.
Such preventive safety measures reduce the risk of
starting the power tool accidentally.
d) Store idle power tools out of the reach of
children and do not allow persons unfamiliar
with the power tool or these instructions to
operate the power tool.
Power tools are dangerous in the hands of untrained
users.
e) Maintain power tools and accessories. Check
for misalignment or binding of moving parts,
breakage of parts and any other condition
that may aff ect the power toolʼs operation. If
damaged, have the power tool repaired before
use.
Many accidents are caused by poorly maintained
power tools.
f) Keep cutting tools sharp and clean.
Properly maintained cutting tools with sharp cutting
edges are less likely to bind and are easier to control.
g) Use the power tool, accessories and tool bits
etc. in accordance with these instructions,
taking into account the working conditions and
the work to be performed.
Use of the power tool for operations diff erent from
those intended could result in a hazardous situation.
h) Keep handles and grasping surfaces dry, clean
and free from oil and grease.
GENERAL POWER TOOL SAFETY
WARNINGS
WARNING
Read all safety warnings, instructions, illustrations and
specifi cations provided with this power tool.
Failure to follow all instructions listed below may result in
electric shock, fi re and/or serious injury.
Save all warnings and instructions for future reference.
The term “power tool” in the warnings refers to your mains-
operated (corded) power tool or battery-operated (cordless)
power tool.
1) Work area safety
a) Keep work area clean and well lit.
Cluttered or dark areas invite accidents.
b) Do not operate power tools in explosive
atmospheres, such as in the presence of
fl ammable liquids, gases or dust.
Power tools create sparks which may ignite the dust
or fumes.
c) Keep children and bystanders away while
operating a power tool.
Distractions can cause you to lose control.
2) Electrical safety
a) Power tool plugs must match the outlet. Never
modify the plug in any way. Do not use any
adapter plugs with earthed (grounded) power
tools.
Unmodifi ed plugs and matching outlets will reduce
risk of electric shock.
b) Avoid body contact with earthed or grounded
surfaces, such as pipes, radiators, ranges and
refrigerators.
There is an increased risk of electric shock if your
body is earthed or grounded.
c) Do not expose power tools to rain or wet
conditions.
Water entering a power tool will increase the risk of
electric shock.
d) Do not abuse the cord. Never use the cord for
carrying, pulling or unplugging the power tool.
Keep cord away from heat, oil, sharp edges or
moving parts.
Damaged or entangled cords increase the risk of
electric shock.
e) When operating a power tool outdoors, use an
extension cord suitable for outdoor use.
Use of a cord suitable for outdoor use reduces the
risk of electric shock.
f) If operating a power tool in a damp location
is unavoidable, use a residual current device
(RCD) protected supply.
Use of an RCD reduces the risk of electric shock.
3) Personal safety
a) Stay alert, watch what you are doing and use
common sense when operating a power tool.
Do not use a power tool while you are tired
or under the infl uence of drugs, alcohol or
medication.
A moment of inattention while operating power tools
may result in serious personal injury.
b) Use personal protective equipment. Always
wear eye protection.
Protective equipment such as a dust mask, non-skid
safety shoes, hard hat or hearing protection used for
appropriate conditions will reduce personal injuries.
(Original instructions)

9
English
Slippery handles and grasping surfaces do not
allow for safe handling and control of the tool in
unexpected situations.
5) Battery tool use and care
a) Recharge only with the charger specifi ed by the
manufacturer.
A charger that is suitable for one type of battery pack
may create a risk of fi re when used with another
battery pack.
b) Use power tools only with specifi cally
designated battery packs.
Use of any other battery packs may create a risk of
injury and fi re.
c) When battery pack is not in use, keep it away
from other metal objects, like paper clips, coins,
keys, nails, screws or other small metal objects,
that can make a connection from one terminal to
another.
Shorting the battery terminals together may cause
burns or a fi re.
d) Under abusive conditions, liquid may be ejected
from the battery; avoid contact. If contact
accidentally occurs, fl ush with water. If liquid
contacts eyes, additionally seek medical help.
Liquid ejected from the battery may cause irritation or
burns.
e) Do not use a battery pack or tool that is damaged
or modifi ed.
Damaged or modifi ed batteries may exhibit
unpredictable behaviour resulting in fi re, explosion
or risk of injury.
f) Do not expose a battery pack or tool to fi re or
excessive temperature.
Exposure to fi re or temperature above 130°C may
cause explosion.
g) Follow all charging instructions and do not
charge the battery pack or tool outside the
temperature range specifi ed in the instructions.
Charging improperly or at temperatures outside
the specifi ed range may damage the battery and
increase the risk of fi re.
6) Service
a) Have your power tool serviced by a qualifi ed
repair person using only identical replacement
parts.
This will ensure that the safety of the power tool is
maintained.
b) Never service damaged battery packs.
Service of battery packs should only be performed
by the manufacturer or authorized service providers.
PRECAUTION
Keep children and infi rm persons away.
When not in use, tools should be stored out of reach of
children and infi rm persons.
CORDLESS ROTARY HAMMER
SAFETY WARNINGS
Safety instructions for all operations
1. Wear ear protectors
Exposure to noise can cause hearing loss.
2. Use auxiliary handle(s), if supplied with the tool.
Loss of control can cause personal injury.
3. Hold the power tool by insulated gripping surfaces,
when performing an operation where the cutting
accessory may contact hidden wiring.
Cutting accessory contacting a "live" wire may make
exposed metal parts of the power tool "live" and could
give the operator an electric shock.
Safety instructions when using long drill bits with
rotary hammers
4. Always start drilling at low speed and with the bit tip
in contact with the workpiece.
At higher speeds, the bit is likely to bend if allowed to
rotate freely without contacting the workpiece, resulting
in personal injury.
5. Apply pressure only in direct line with the bit and do
not apply excessive pressure.
Bits can bend causing breakage or loss of control,
resulting in personal injury.
ADDITIONAL SAFETY WARNINGS
1. Do not allow foreign matter to enter the hole for
connecting the rechargeable battery.
2. Never disassemble the rechargeable battery and
charger.
3. Never short-circuit the rechargeable battery.
Shortcircuiting the battery will cause a great electric
current and overheat. It results in burn or damage to the
battery.
4. Do not dispose of the battery in fi re. If the battery is burnt,
it may explode.
5. When using this unit continuously, the unit may overheat,
leading to damage in the motor and switch. Please leave
it without using it for approximately 15 minutes.
6. Do not insert object into the air ventilation slots of the
charger. Inserting metal objects or infl ammables into the
charger air ventilation slots will result in electrical shock
hazard or damaged charger.
7. Bring the battery to the shop from which it was purchased
as soon as the post-charging battery life becomes too
short for practical use. Do not dispose of the exhausted
battery.
8. Before starting to break, chip or drill into a wall, fl oor or
ceiling, thoroughly confi rm that such items as electric
cables or conduits are not buried inside.
9. Ensure that the power switch is in the OFF position. If the
battery is installed while the power switch is in the ON
position, the power tool will start operating immediately,
which could cause a serious accident.
10. Do not touch the bit during or immediately after
operation. The bit becomes very hot during operation
and could cause serious burns.
11. Always hold the body handle and side handle of the
power tool fi rmly. Otherwise the counterforce produced
may result in inaccurate and even dangerous operation.
12. Wear a dust mask
Do not inhale the harmful dusts generated in drilling or
chiseling operation. The dust can endanger the health of
yourself and bystanders.
13. Make sure that the battery is installed fi rmly. If it is at all
loose it could come off and cause an accident.
14. To prevent accidents, make sure to turn the switch off
and pull out the battery before changing accessories,
storing, carrying or when not using the tools.
15. Mounting the drill bit
○ To prevent accidents, make sure to turn the switch off
and pull out the battery.
○ When using tools such as bull points, drill bits, etc.,
make sure to use the genuine parts designated by our
company.
○ Clean the shank portion of the drill bit.
○ Check the latching by pulling on the drill bit.
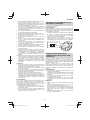
16. Operate the change lever only when the motor is at a
full stop. Operating the change lever while the motor is
running may cause the tip tool to unexpectedly rotate
and result in an accident. (Fig. 11)

10
English
17. Rotation + hammering
When the drill bit touches construction iron bar, the bit
will stop immediately and the rotary hammer will react
to revolve. Therefore fi rmly tighten the side handle, hold
the body handle and side handles.
18. Rotation only
○ To drill wood or metal material using the drill chuck and
chuck adapter (optional accessories).
○ Not using dust extractor system
○ Do not apply excessive force during operation. Doing so
will not only damage the tip of the drill bit, but also reduce
the service life of the rotary hammer.
○ A drill bit can snap off upon penetrating a drilled hole.
When the drill is near penetration, lighten the pressure on
the rotary hammer and continue drilling until penetration
is achieved.
○ Do not attempt to drill anchor holes or holes in concrete
with the machine set in the rotation only function.
○ Do not attempt to use the rotary hammer in the rotation
and striking mode with the drill chuck and chuck adapter
attached. This would seriously shorten the service life of
every component of the machine.
19. Hammering only
○ Not using dust extractor system
20. Do not look directly into the light. Such actions could
result in eye injury.
Wipe off any dirt or grime attached to the lens of the LED
light with a soft cloth, being careful not to scratch the
lens.
Scratches on the lens of the LED light can result in
decreased brightness.
21. Always use the tool and battery at temperatures between
-5°C and 40°C.
22. Always charge the battery at an ambient temperature of
0–40°C.
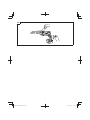
23. Make sure to securely hold the tool as shown in Fig. 22
during operation.
CAUTION ON LITHIUM-ION BATTERY
To extend the lifetime, the lithium-ion battery equips with the
protection function to stop the output.
In the cases of 1 to 3 described below, when using this
product, even if you are pulling the switch, the motor may
stop. This is not the trouble but the result of protection
function.
1. When the battery power remaining runs out, the motor
stops.
In such a case, charge it up immediately.
2. If the tool is overloaded, the motor may stop. In this
case, release the switch of tool and eliminate causes of
overloading. After that, you can use it again.
3. If the battery is overheated under overload work, the
battery power may stop.
In this case, stop using the battery and let the battery
cool. After that, you can use it again.
Furthermore, please heed the following warning and caution.
WARNING
In order to prevent any battery leakage, heat generation,
smoke emission, explosion and ignition beforehand, please
be sure to heed the following precautions.
1. Make sure that swarf and dust do not collect on the
battery.
○ During work make sure that swarf and dust do not fall on
the battery.
○ Make sure that any swarf and dust falling on the power
tool during work do not collect on the battery.
○ Do not store an unused battery in a location exposed to
swarf and dust.
○ Before storing a battery, remove any swarf and dust that
may adhere to it and do not store it together with metal
parts (screws, nails, etc.).
2. Do not pierce battery with a sharp object such as a
nail, strike with a hammer, step on, throw or subject the
battery to severe physical shock.
3. Do not use an apparently damaged or deformed battery.
4. Do not use the battery in reverse polarity.
5. Do not connect directly to an electrical outlets or car
cigarette lighter sockets.
6. Do not use the battery for a purpose other than those
specifi ed.
7. If the battery charging fails to complete even when a
specifi ed recharging time has elapsed, immediately stop
further recharging.
8. Do not put or subject the battery to high temperatures or
high pressure such as into a microwave oven, dryer, or
high pressure container.
9. Keep away from fi re immediately when leakage or foul
odor are detected.
10. Do not use in a location where strong static electricity
generates.
11. If there is battery leakage, foul odor, heat generated,
discolored or deformed, or in any way appears abnormal
during use, recharging or storage, immediately remove it
from the equipment or battery charger, and stop use.
12. Do not immerse the battery or allow any fl uids to fl ow
inside. Conductive liquid ingress, such as water, can
cause damage resulting in fi re or explosion. Store your
battery in a cool, dry place, away from combustible and
fl ammable items. Corrosive gas atmospheres must be
avoided.
CAUTION
1. If liquid leaking from the battery gets into your eyes,
do not rub your eyes and wash them well with fresh
clean water such as tap water and contact a doctor
immediately.
If left untreated, the liquid may cause eye-problems.
2. If liquid leaks onto your skin or clothes, wash well with
clean water such as tap water immediately.
There is a possibility that this can cause skin irritation.
3. If you fi nd rust, foul odor, overheating, discolor,
deformation, and/or other irregularities when using the
battery for the fi rst time, do not use and return it to your
supplier or vendor.
WARNING
If a conductive foreign matter enters in the terminal of lithium
ion battery, the battery may be shorted, causing fi re. When
storing the lithium ion battery, obey surely the rules of
following contents.
○ Do not place conductive debris, nail and wires such as
iron wire and copper wire in the storage case.
○ To prevent shorting from occurring, load the battery in
the tool or insert securely the battery cover for storing
until the ventilator is not seen.
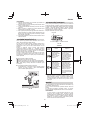
REGARDING LITHIUM-ION BATTERY
TRANSPORTATION
When transporting a lithium-ion battery, please observe the
following precautions.
WARNING
Notify the transporting company that a package contains a
lithium-ion battery, inform the company of its power output
and follow the instructions of the transportation company
when arranging transport.
○ Lithium-ion batteries that exceed a power output of
100 Wh are considered to be in the freight classifi cation
of Dangerous Goods and will require special application
procedures.
○ For transportation abroad, you must comply with
international law and the rules and regulations of the
destination country.

11
English
Wh
Power Output
2 to 3 digit number
USB DEVICE CONNECTION
PRECAUTIONS (UC18YSL3)
When an unexpected problem occurs, the data in a USB
device connected to this product may be corrupted or lost.
Always make sure to back up any data contained in the USB
device prior to use with this product.
Please be aware that our company accepts absolutely no
responsibility for any data stored in a USB device that is
corrupted or lost, nor for any damage that may occur to a
connected device.
WARNING
○ Prior to use, check the connecting USB cable for any
defect or damage.
Using a defective or damaged USB cable can cause
smoke emission or ignition.
○ When the product is not being used, cover the USB port
with the rubber cover.
Buildup of dust etc. in the USB port can cause smoke
emission or ignition.
NOTE
○ There may be an occasional pause during USB
recharging.
○ When a USB device is not being charged, remove the
USB device from the charger.
Failure to do so may not only reduce the battery life
of a USB device, but may also result in unexpected
accidents.
○ It may not be possible to charge some USB devices,
depending on the type of device.
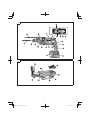
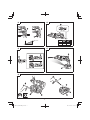
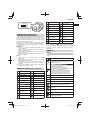
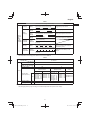
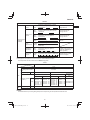
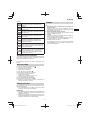
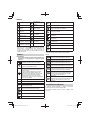
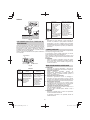
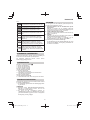
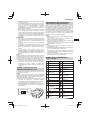
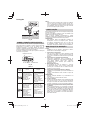
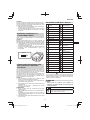
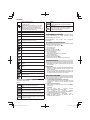
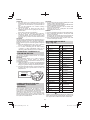
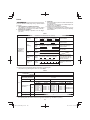
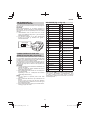
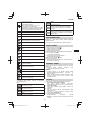
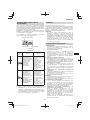
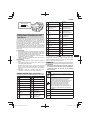
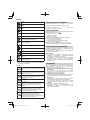
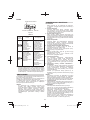
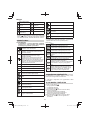
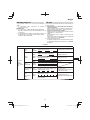
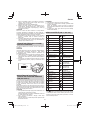
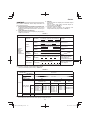
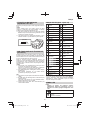
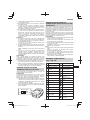
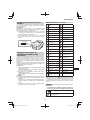
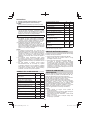
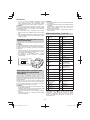
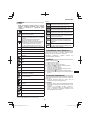
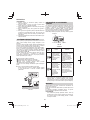
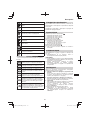
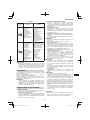
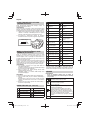
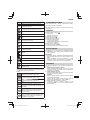
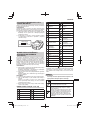
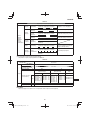
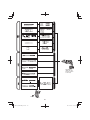
NAMES OF PARTS (Fig. 1–Fig. 22)
Handle Motor
Switch trigger LED light
Pushing button Battery
Housing Display panel
Side handle Changeover switch
Depth gauge Display lamp
Drill bit Auto stop lamp
Front cap Indicator lamp
Grip Nozzle
Name plate Depth adjustment
button
Change lever Nozzle adjustment
button
Gear cover Dust housing
Cap* Dust box
Dust box latch Auto stop lamp: Lights
Filter Battery sliding
grooves
Adapter Terminal (Product)
Latch Air gun
Charge indicator lamp Terminal (Battery)
Indicator lamp: Lights Sliding grooves
Grease Rubber cover
Pushing button
(Change lever) USB port
Cold chisel USB cable
Auto stop lamp: Blinks
* Do not remove the cap ( ) from the rotary hammer unless
you are installing the dust extractor system. Operating
the tool with the cap removed will decrease work output.
In addition, dust can clog the net which may result in
malfunction.
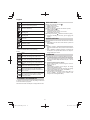
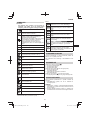
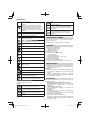
SYMBOLS
WARNING
The following show symbols used for the machine.
Be sure that you understand their meaning before
use.
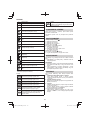
DH36DPE: Cordless Rotary Hammer
To reduce the risk of injury, user must read
instruction manual.
Only for EU countries
Do not dispose of electric tools together with
household waste material!
In observance of European Directive
2012/19/EU on waste electrical and electronic
equipment and its implementation in
accordance with national law, electric tools
that have reached the end of their life must
be collected separately and returned to an
environmentally compatible recycling facility.
V Rated voltage
n0No-load speed
Bpm Full-load impact rate
φ
max Drilling diameter, max.
kg
Weight*
(According to EPTA-Procedure 01/2014)
Concrete
Steel
Wood
Hammering only function

12
English
Rotation only function
Rotation and hammering function
Disconnect the battery
Switching ON
Switching OFF
Low mode
Normal mode
Clockwise rotation
Counterclockwise rotation
* Depending on attached battery. The heaviest weight is
measured with BSL36B18 (sold separately).
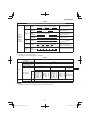
Battery
Lights ;
The battery remaining power is over 75%
Lights ;
The battery remaining power is 50%–75%.
Lights ;
The battery remaining power is 25%–50%.
Lights ;
The battery remaining power is less than 25%
Blinks ;
The battery remaining power is nearly empty.
Recharge the battery soonest possible.
Blinks ;
Output suspended due to high temperature.
Remove the battery from the tool and allow it to
fully cool down.
Blinks ;
Output suspended due to failure or malfunction.
The problem may be the battery so please
contact your dealer.
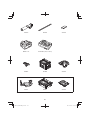
STANDARD ACCESSORIES
In addition to the main unit (1 unit), the package contains the
accessories listed on page 263.
Standard accessories are subject to change without notice.
APPLICATIONS
Rotation and hammering function
○ Drilling anchor holes
○ Drilling holes in concrete
○ Drilling holes in tile
Rotation only function (without dust extractor system)
○ Drilling in steel or wood
(with optional accessories)
○ Tightening machine screws, wood screws
(with optional accessories)
Hammering only function (without dust extractor system)
○ Light-duty chiselling of concrete, groove digging and
edging.
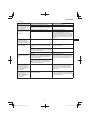
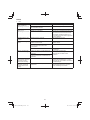
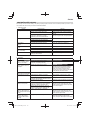
SPECIFICATIONS
The specifi cations of this machine are listed in the Table on
page 263.
*1 Specifi cations are for when a dust extractor system has
been installed.
NOTE
○ Existing batteries (BSL3660/3626X/3626/3625/3620,
BSL18xx and BSL14xx series) cannot be used with this
tool.
○ Due to HiKOKI’s continuing program of research and
development, the specifi cations herein are subject to
change without prior notice.
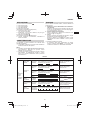
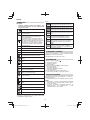
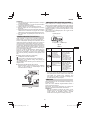
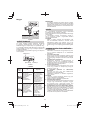
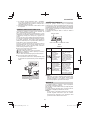
CHARGING
Before using the power tool, charge the battery as follows.
1. Connect the charger’s power cord to the receptacle.
When connecting the plug of the charger to a receptacle,
the charge indicator lamp will blink in red (At 1- second
intervals).
2. Insert the battery into the charger.
Firmly insert the battery into the charger as shown in
Fig. 4 (on page 3).
3. Charging
When inserting a battery in the charger, the charge
indicator lamp will blink in blue.
When the battery becomes fully recharged, the charge
indicator lamp will light up in green. (See Table 1)
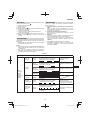
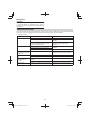
(1) Charge indicator lamp indication
The indications of the charge indicator lamp will be as
shown in Table 1, according to the condition of the
charger or the rechargeable battery.

13
English
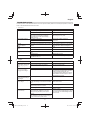
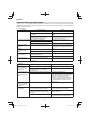
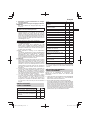
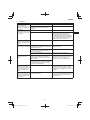
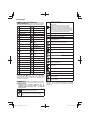
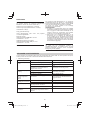
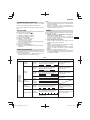
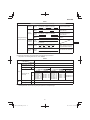
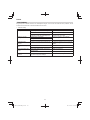
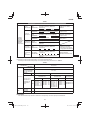
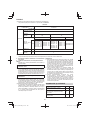
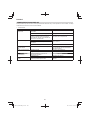
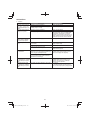
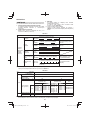
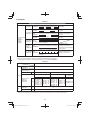
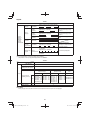
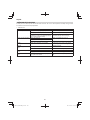
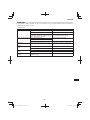
Table 1
Indications of the charge indicator lamp
Charge
indicator
lamp
(RED /
BLUE /
GREEN /
PURPLE)
Before
charging Blinks
(RED)
Lights for 0.5 seconds. Does not light for
0.5 seconds. (off for 0.5 seconds) Plugged into power source
While
charging
Blinks
(BLUE)
Lights for 0.5 seconds. Does not light for
1 second. (off for 1 second) Battery capacity at less than 50%
Blinks
(BLUE)
Lights for 1 second. Does not light
for 0.5 seconds. (off for 0.5 seconds) Battery capacity at less than 80%
Lights
(BLUE) Lights continuously Battery capacity at more than 80%
Charging
complete Lights
(GREEN)
Lights continuously
(Continuous buzzer sound: about 6
seconds)
Overheat
standby Blinks
(RED)
Lights for 0.3 seconds. Does not light for
0.3 seconds. (off for 0.3 seconds) Battery overheated. Unable to
charge. (Charging will commence
when battery cools)
Charging
impossible Flickers
(PURPLE)
Lights for 0.1 seconds. Does not light for
0.1 seconds. (off for 0.1 seconds)
(Intermittent buzzer sound: about 2
seconds)
Malfunction in the battery or the
charger
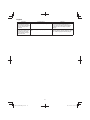
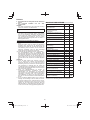
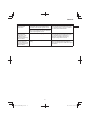
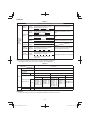
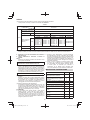
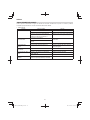
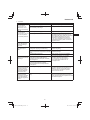
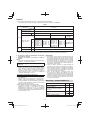
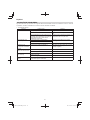
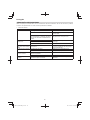
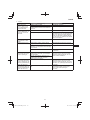
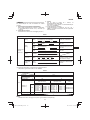
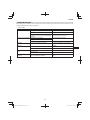
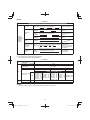
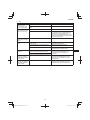
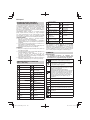
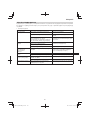
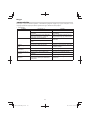
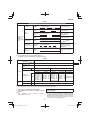
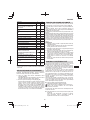
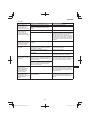
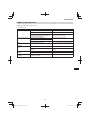
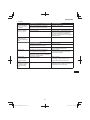
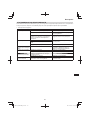
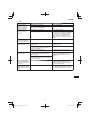
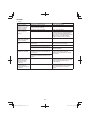
(2) Regarding the temperatures and charging time of the rechargeable battery
The temperatures and charging time will become as shown in Table 2.
Table 2
Charger UC18YSL3
Battery
Type of battery Li-ion
Temperatures at which the
battery can be recharged 0°C–50°C
Charging voltage V 14.4 18
Charging time,
approx. (At 20°C)
BSL14xx series BSL18xx series Multi volt
series
(4 cells) (8 cells) (5 cells) (10 cells) (10 cells)
min
BSL1415S
:
15
BSL1415
:
15
BSL1415X
:
15
BSL1420
:
20
BSL1425
:
25
BSL1430C
:
30
BSL1430
:
20
BSL1440
:
26
BSL1450
:
32
BSL1460
:
38
BSL1815S : 15
BSL1815 : 15
BSL1815X : 15
BSL1820 : 20
BSL1825 : 25
BSL1830C : 30
BSL1850C : 32
BSL1830 : 20
BSL1840 : 26
BSL1850 : 32
BSL1860 : 38
BSL36A18 : 32
BSL36B18 : 52
USB Charging voltage V 5
Charging current A 2
NOTE
The recharging time may vary according to the ambient temperature and power source voltage.

14
English
4. Disconnect the charger’s power cord from the
receptacle.
5. Hold the charger fi rmly and pull out the battery.
NOTE
Be sure to pull out the battery from the charger after use,
and then keep it.
Regarding electric discharge in case of new batteries,
etc.
As the internal chemical substance of new batteries and
batteries that have not been used for an extended period
is not activated, the electric discharge might be low when
using them the fi rst and second time. This is a temporary
phenomenon, and normal time required for recharging
will be restored by recharging the batteries 2–3 times.
How to make the batteries perform longer.
(1) Recharge the batteries before they become completely
exhausted.
When you feel that the power of the tool becomes
weaker, stop using the tool and recharge its battery. If
you continue to use the tool and exhaust the electric
current, the battery may be damaged and its life will
become shorter.
(2) Avoid recharging at high temperatures.
A rechargeable battery will be hot immediately after
use. If such a battery is recharged immediately after
use, its internal chemical substance will deteriorate, and
the battery life will be shortened. Leave the battery and
recharge it after it has cooled for a while.
CAUTION
○ If the battery is charged while it is heated because
it has been left for a long time in a location subject to
direct sunlight or because the battery has just been
used, the charge indicator lamp of the charger lights
for 0.3 seconds, does not light for 0.3 seconds (off for
0.3 seconds). In such a case, fi rst let the battery cool,
then start charging.
○ When the charge indicator lamp fl ickers (at 0.2-second
intervals), check for and take out any foreign objects in
the charger’s battery connector. If there are no foreign
objects, it is probable that the battery or charger is
malfunctioning. Take it to your authorized Service
Center.
○ Since the built-in micro computer takes about
3 seconds to confi rm that the battery being charged with
UC18YSL3 is taken out, wait for a minimum of 3 seconds
before reinserting it to continue charging. If the battery
is reinserted within 3 seconds, the battery may not be
properly charged.
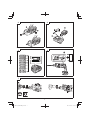
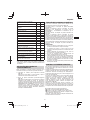
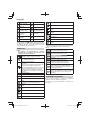
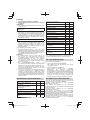
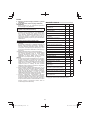
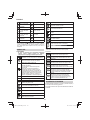
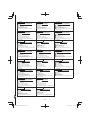
MOUNTING AND OPERATION
Action Figure Page
Names of parts - Cordless rotary
hammer 12
Names of parts - Dust extractor
system for Rotary hammer* 22
Removing and inserting the
battery 33
Charging 4 3
Remaining battery indicator 5 3
Indicator lamp lights when battery
is low 63
Installing / Removing the side
handle 73
Inserting SDS-plus drilling tools 8 4
Removing SDS-plus drilling tools 9 4
Selecting rotation direction 10 4
Selecting the operating mode 11 4
Adjusting the drilling depth 12 4
Changing the chisel position 13 4
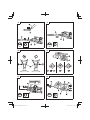
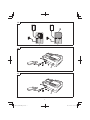
Switch operation 14 5
Setting the speed 15 5
Auto stop function 16 5
How to use the LED light 17 5
Cleaning of the battery installation
compartment 18 5
Charging a USB device from a
electrical outlet 19-a 6
Charging a USB device and
battery from a electrical outlet 19-b 6
How to recharge USB device 20 6
When charging of USB device is
completed 21 6
Selecting accessories ―264, 265
* For details on how to use the Dust extractor system, refer
to the system’s instruction manual.
SELECT OPERATION MODE
Pressing the changeover switch allows the selection of
rotation speed and the auto stop function.
○ Rotation speed (Low mode/Normal mode) (Fig. 15)
Select either Low mode or Normal mode and operate the
tool in the selected speed.
○ Auto stop mode (on/off ) (Fig. 16)
This product is equipped with an auto stop function to
support continuous drilling work. The function features a
memory mode for storing the work time for drilling from
switch ON to switch OFF, and an auto stop mode that
automatically stops the motor from the second drilling
onward should the work exceed the stored work time
while the switch is ON.
AUTO STOP FUNCTION
In selection mode, pressing the button for longer than two
seconds will move to memory mode. (Fig. 16)
(At the same time the auto stop lamp will blink.)
Conduct drilling when the auto stop lamp is fl ashing. The
time between switching ON and switching OFF is stored by
the tool.
(At the same time, the auto stop lamp will light up.)
Conduct drilling when the auto stop lamp is fl ashing.
Continuous drilling is possible as the memory storage time
will be recorded by the tool until the auto stop function’s auto
stop mode is cancelled.
The auto stop function is cancelled by pressing the
changeover switch once again for over two seconds.
(At the same time, the auto stop lamp will switch off .)

15
English
CAUTION
○ Switch ON the tool once you place the tip of the tool on
the work material.
○ The rotation speed and the level at which the switch is
pulled during drilling is not stored to memory.
○ Fully carry out drilling in one go during auto stop mode.
○ The motor will stop even if you switch OFF within the
memory storage time.
○ When you switch OFF within the memory storage time,
the count will be reset. If you rework a task in which a
hole has been partially drilled, the memory storage time
will be fully recounted.
○ The auto stop function will remain active until canceled.
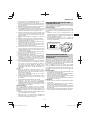
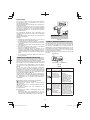
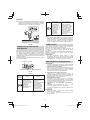
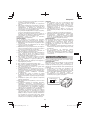
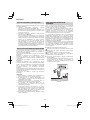
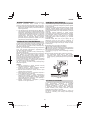
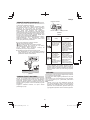
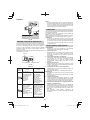
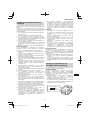
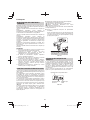
REACTIVE FORCE CONTROL
This product is equipped with a Reactive Force Control
(RFC) feature that reduces jerking of the tool body.
If the tool bit is suddenly overburdened, any jerking of the
tool body is reduced by activation of the slip clutch or by
stopping of the motor by the sensor built into the tool body.
If the motor is stopped because of overburdening detection
by the controller, the RFC indicator lamp will blink while the
switch is pulled. In addition, the lamp will continue blinking
for approximately three seconds after the switch is released.
The motor will remain stopped while the lamp is blinking.
(Fig. 23)
Because the RFC feature may not activate or its performance
may be insuffi cient depending on the working environment
and conditions, be careful not to suddenly overburden the
tool bit while operating.
● Possible causes of sudden overburdening
Tool bit biting into material
Impact against nails, metal or other hard objects
Tasks involving prying or any excess application of
pressure, etc.
Also, other causes include any combination of the
aforementioned.
● When the reactive force control (RFC) is triggered
When the RFC is triggered and the motor stops, turn
off the tool’s switch and remove the cause of the
overburdening before continuing operation.
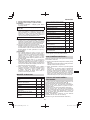
Fig. 23
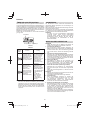
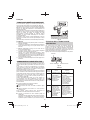
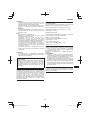
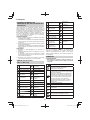
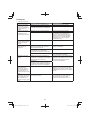
ABOUT THE PROTECTION
FUNCTION
This tool has a built-in protection circuit for preventing
damage to the unit in the event of an abnormality. Depending
on the following, the display lamp and the indicator lamp will
fl ash, and the unit will cease to operate. Verify the problem
indicated by the fl ashing and take the necessary steps to
correct the problem.
When pressing the changeover switch, do so when the
switch is not being pulled.
Changeover switch
Display lamp Indicator lamp
Fig. 24
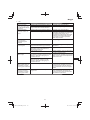
Table 3
Display
lamp
fl ashing Cause Solution
Operation has
ceased because the
internal temperature
has exceeded the
temperature limit.
(High temperature
protection function)
Allow the unit to cool
for 15 to 30 minutes.
When the temperature
goes down and the
display lamp and the
indicator lamp blinking
stops, pull the switch
trigger to recover
operation.
Sudden
overburdening of
the tool bit has
activated the RFC,
stopping further
operation of the
tool.
RFC (See page 15
“REACTIVE FORCE
CONTROL”)
Release the switch
trigger and leave it
until the display lamp
blinking stops. Pull the
switch trigger again to
recover operation.
Before continuing
operation, remove
the cause of the
overburden.
NOTE
Despite taking steps to correct a problem, the display
lamp may continue to blink. Should this be the case, the
unit may require repair. If so, please contact the outlet
from which this product was purchased for repairs.
LUBRICATION
This Rotary Hammer is of full air-tight construction to protect
against dust.
Therefore, this Rotary Hammer can be used without
lubrication for long periods.
After purchase, periodically replace grease. Ask for grease
replacement at the nearest authorized Service Center.
CAUTION
A specifi c grease is used with this machine, therefore,
the normal performance of the machine may be badly
aff ected by use of diff erent grease. Please be sure to let
one of our service centers to undertake replacement of
the grease.

16
English
MAINTENANCE AND INSPECTION
WARNING
Be sure to turned off the switch and remove the battery
before maintenance and inspection.
1. Inspecting the tool
Since use of as dull tool will degrade effi ciency and
cause possible motor malfunction, sharpen or replace
the tool as soon as abrasion is noted.
2. Inspecting the mounting screws
Regularly inspect all mounting screws and ensure that
they are properly tightened. Should any of the screws be
loose, retighten them immediately. Failure to do so could
result in serious hazard.
3. Maintenance of the motor
The motor unit winding is the very “heart” of the power
tool. Exercise due care to ensure the winding does not
become damaged and/or wet with oil or water.
4. Inspection of terminals (tool and battery)
Check to make sure that swarf and dust have not
collected on the terminals.
On occasion check prior, during and after operation.
CAUTION
Remove any swarf or dust which may have collected on
the terminals.
Failure to do so may result in malfunction.
5. Cleaning on the outside
When the power tool is stained, wipe with a soft dry cloth
or a cloth moistened with soapy water. Do not use chloric
solvents, gasoline or paint thinner, for they melt plastics.
6. Cleaning the battery installation compartment and
the battery
After drilling concrete, if concrete dust has accumulated
on the battery installation compartment and the battery,
clean off the accumulated concrete dust with an air gun
or a dry cloth before using the tool. (Fig. 18)
Also, after cleaning, ensure that the battery can be
installed and removed smoothly from the tool.
CAUTION
Using the tool when the battery is covered with concrete
dust may lead to accidents such as the battery falling
during use.
Furthermore, such use may cause a malfunction or
contact failure between the battery and the terminals.
7. Storage
Store the power tool and battery in a place in which
the temperature is less than 40°C and out of reach of
children.
NOTE
Storing lithium-ion batteries.
Make sure the lithium-ion batteries have been fully
charged before storing them.
Prolonged storage (3 months or more) of batteries with
a low charge may result in performance deterioration,
signifi cantly reducing battery usage time or rendering
the batteries incapable of holding a charge.
However, signifi cantly reduced battery usage time may
be recovered by repeatedly charging and using the
batteries two to fi ve times.
If the battery usage time is extremely short despite
repeated charging and use, consider the batteries dead
and purchase new batteries.
CAUTION
In the operation and maintenance of power tools, the
safety regulations and standards prescribed in each
country must be observed.
Important notice on the batteries for the HiKOKI
cordless power tools
Please always use one of our designated genuine
batteries. We cannot guarantee the safety and
performance of our cordless power tool when used with
batteries other than these designated by us, or when
the battery is disassembled and modifi ed (such as
disassembly and replacement of cells or other internal
parts).
GUARANTEE
We guarantee HiKOKI Power Tools in accordance with
statutory/country specifi c regulation. This guarantee does
not cover defects or damage due to misuse, abuse, or
normal wear and tear. In case of complaint, please send
the Power Tool, undismantled, with the GUARANTEE
CERTIFICATE found at the end of this Handling instruction,
to a HiKOKI Authorized Service Center.
Information concerning airborne noise and vibration
The measured values were determined according to
EN62841 and declared in accordance with ISO 4871.
Measured A-weighted sound power level: 102 dB (A)
Measured A-weighted sound pressure level: 91 dB (A)
Uncertainty K: 3 dB (A).
Wear hearing protection.
Vibration total values (triax vector sum) determined
according to EN62841.
Hammer drilling into concrete:
Vibration emission value ah, HD = 14.8 m/s2
Uncertainty K = 1.5 m/s2
Equivalent chiselling value:
Vibration emission value ah, CHeq = 9.7 m/s2
Uncertainty K = 1.5 m/s2
The declared vibration total value and the declared noise
emission value have been measured in accordance with a
standard test method and may be used for comparing one
tool with another.
They may also be used in a preliminary assessment of
exposure.
WARNING
○ The vibration and noise emission during actual use
of the power tool can diff er from the declared total
value depending on the ways in which the tool is used
especially what kind of workpiece is processed; and
○ Identify safety measures to protect the operator that
are based on an estimation of exposure in the actual
conditions of use (taking account of all parts of the
operating cycle such as the times when the tool is
switched off and when it is running idle in addition to the
trigger time)
NOTE
Due to HiKOKI’s continuing program of research and
development, the specifi cations herein are subject to
change without prior notice.

17
English
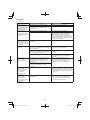
TROUBLESHOOTING
Use the inspections in the table below if the tool does not operate normally. If this does not remedy the problem, consult your
dealer or the HiKOKI Authorized Service Center.
1. Power tool
Symptom Possible cause Remedy
Tool doesn’t run No remaining battery power Charge the battery.
Battery isn’t securely attached. Push in the battery until a click is heard.
Concrete dust has accumulated on
the terminals of the battery installation
compartment as well as on the battery
sliding grooves.
Clean off the accumulated concrete dust
with an air gun or a dry cloth.
Tool suddenly stopped Tool was overburdened Get rid of the problem causing the
overburden.
Reactive force control was activated
The battery is overheated. Let the battery cool down.
Tool bits
-can’t be attached
-fall off
The shape of the attachment portion doesn’t
match For the SDS-plus shank type , use a bit with
a diameter that is within the designated
range.
Holes can’t be smoothly
drilled. The drill is worn Replace with a new drill.
The drill is rotating in reverse Switch to forward rotation.
Screw head slips or comes
loose. Bit number doesn’t match with the screw
size Install a suitable bit.
The bit is worn Replace with a new bit.
Battery cannot be installed Attempting to install a battery other than that
specifi ed for the tool. Please install a multi volt type battery.
2. Charger
Symptom Possible cause Remedy
The charge indicator lamp
rapidly fl ickers purple, and
battery charging doesn’t
begin.
The battery is not inserted all the way. Insert the battery fi rmly.
There is foreign matter in the battery
terminal or where the battery is attached. Remove the foreign matter.
The charge indicator lamp
blinks red, and battery
charging doesn’t begin.
The battery is not inserted all the way. Insert the battery fi rmly.
The battery is overheated. If left alone, the battery will automatically
begin charging if its temperature decreases,
but this may reduce battery life. It is
recommended that the battery be cooled in
a well-ventilated location away from direct
sunlight before charging it.
Battery usage time is short
even though the battery is
fully charged.
The battery’s life is depleted. Replace the battery with a new one.
The battery takes a long
time to charge. The temperature of the battery, the charger,
or the surrounding environment is extremely
low.
Charge the battery indoors or in another
warmer environment.
The charger’s vents are blocked, causing its
internal components to overheat. Avoid blocking the vents.
The cooling fan is not running. Contact a HiKOKI Authorized Service
Center for repairs.
Charging of a USB device
pauses midway. The charger was plugged into an electrical
socket while the USB device was being
charged using the battery as the power
source.
This is not a malfunction.
The charger pauses USB charging for about
5 seconds when it is diff erentiating between
power sources.
A battery was inserted into the charger while
the USB device was being charged using a
power socket as the power source.

18
English
Symptom Possible cause Remedy
Charging of the USB device
pauses midway when the
battery and the USB device
are being charged at the
same time.
The battery has become fully charged. This is not a malfunction.
The charger pauses USB charging for
about 5 seconds while it checks whether
the battery has successfully completed
charging.
Charging of the USB
device doesn’t start when
the battery and the USB
device are being charged
at the same time.
The remaining battery capacity is extremely
low. This is not a malfunction.
When the battery capacity reaches a certain
level, USB charging automatically begins.

19
Deutsch
f) Falls sich der Betrieb des Elektrowerkzeugs
in feuchter Umgebung nicht vermeiden lässt,
verwenden Sie eine Stromversorgung mit
Fehlerstromschutzeinrichtung (Residual
Current Device, RCD).
Durch den Einsatz einer
Fehlerstromschutzeinrichtung wird das Risiko eines
elektrischen Schlages reduziert.
3) Persönliche Sicherheit
a) Bleiben Sie wachsam, achten Sie auf das, was
Sie tun, und setzen Sie Ihren Verstand ein, wenn
Sie mit Elektrowerkzeugen arbeiten.
Benutzen Sie keine Elektrowerkzeuge, wenn
Sie müde sind oder unter Einfl uss von Drogen,
Alkohol oder Medikamenten stehen.
Bei der Arbeit mit Elektrowerkzeugen können bereits
kurze Phasen der Unaufmerksamkeit zu schweren
Verletzungen führen.
b) Benutzen Sie eine persönliche
Schutzausrüstung. Tragen Sie immer einen
Augenschutz.
Schutzausrüstung wie Staubmaske, rutschfeste
Sicherheitsschuhe, Schutzhelm und Gehörschutz
senken bei angemessenem Einsatz das
Verletzungsrisiko.
c) Vermeiden Sie unbeabsichtigtes Einschalten.
Achten Sie darauf, dass sich der Schalter
in der Aus- (Off -) Position befi ndet, ehe Sie
das Gerät mit der Stromversorgung und/
oder Batteriestromversorgung verbinden, es
aufheben oder herumtragen.
Das Herumtragen von Elektrowerkzeugen mit
dem Finger am Schalter oder das Herstellen der
Stromversorgung bei betätigtem Schalter zieht
Unfälle regelrecht an.
d) Entfernen Sie sämtliche Einstellwerkzeuge
(Einstellschlüssel), ehe Sie das Elektrowerkzeug
einschalten.
Ein an einem beweglichen Teil des Elektrowerkzeugs
angebrachter Schlüssel kann zu Verletzungen
führen.
e) Überstrecken Sie sich nicht. Achten Sie jederzeit
darauf, sicher zu stehen und das Gleichgewicht
zu bewahren.
Dadurch haben Sie das Elektrowerkzeug in
unerwarteten Situationen besser im Griff .
f) Tragen Sie geeignete Kleidung. Tragen Sie
keine lose Kleidung oder Schmuck. Halten Sie
Ihr Haar und Ihre Kleidung von beweglichen
Teilen fern.
Lose Kleidung, Schmuck oder langes Haar kann von
beweglichen Teilen erfasst werden.
g) Wenn Anschlüsse für Staubabsaug- und -
sammelvorrichtungen vorhanden sind, sorgen
Sie dafür, dass diese richtig angeschlossen und
eingesetzt werden.
Durch Entfernen des Staubes können
staubbezogene Gefahren vermindert werden.
h) Lassen Sie es nicht zu, dass die durch häufi gen
Gebrauch von Werkzeugen erworbene
Vertrautheit Sie nachlässig macht und Sie
die Sicherheitsrichtlinien für das Werkzeug
ignorieren.
Eine unvorsichtige Handlung kann in
Sekundenbruchteilen zu schweren Verletzungen
führen.
4) Einsatz und Pfl ege von Elektrowerkzeugen
a) Überbeanspruchen Sie Elektrowerkzeuge nicht.
Benutzen Sie das richtige Elektrowerkzeug für
Ihren Einsatzzweck.
ALLGEMEINE
SICHERHEITSHINWEISE FÜR
ELEKTROGERÄTE
WARNUNG
Bitte beachten Sie sämtliche mit diesem Elektrogerät
gelieferten Sicherheitshinweise, Anweisungen,
Illustrationen und technischen Angaben.
Wenn die nachfolgenden Anweisungen nicht befolgt
werden, kann es zu Stromschlag, Brand und/oder
ernsthaften Verletzungen kommen.
Bitte bewahren Sie alle Warnhinweise und
Anweisungen zum späteren Nachschlagen auf.
Der Begriff „Elektrowerkzeug“ bezieht sich in den
Warnhinweisen auf Elektrowerkzeuge mit Netz-
(schnurgebunden) oder Akkubetrieb (schnurlos).
1) Sicherheit im Arbeitsbereich
a) Sorgen Sie für einen sauberen und gut
ausgeleuchteten Arbeitsbereich.
Zugestellte oder dunkle Bereiche ziehen Unfälle
förmlich an.
b) Verwenden Sie Elektrowerkzeuge niemals an
Orten, an denen Explosionsgefahr besteht,
wie zum Beispiel in der Nähe von leicht
entfl ammbaren Flüssigkeiten, Gasen oder
Stäuben.
Bei der Arbeit mit Elektrowerkzeugen kann es zu
Funkenbildung kommen, wodurch sich Stäube oder
Dämpfe entzünden können.
c) Sorgen Sie bei der Arbeit mit Elektrowerkzeugen
dafür, dass sich keine Zuschauer (insbesondere
Kinder) in der Nähe befi nden.
Wenn Sie abgelenkt werden, können Sie die
Kontrolle über das Werkzeug verlieren.
2) Elektrische Sicherheit
a) Elektrowerkzeuge müssen mit passender
Stromversorgung betrieben werden. Nehmen
Sie niemals irgendwelche Änderungen am
Anschlussstecker vor. Verwenden Sie bei
Elektrowerkzeugen mit Schutzkontakt (geerdet)
niemals Adapterstecker.
Stecker im Originalzustand und passende
Steckdosen reduzieren das Stromschlagrisiko.
b) Vermeiden Sie Körperkontakt mit geerdeten
Gegenständen wie Rohrleitungen, Heizungen,
Herden oder Kühlschränken.
Bei Körperkontakt mit geerdeten Gegenständen
besteht ein erhöhtes Stromschlagrisiko.
c) Setzen Sie Elektrowerkzeuge niemals Regen
oder sonstiger Feuchtigkeit aus.
Wenn Flüssigkeiten in ein Elektrowerkzeug
eindringen, erhöht sich das Stromschlagrisiko.
d) Verwenden Sie das Anschlusskabel nicht
missbräuchlich. Tragen Sie das Elektrowerkzeug
niemals am Stromkabel, ziehen Sie es nicht
damit heran und ziehen Sie den Stecker nicht
am Anschlusskabel aus der Steckdose.
Halten Sie das Anschlusskabel von Hitzequellen,
Öl, scharfen Kanten und beweglichen Teilen
fern.
Beschädigte oder verdrehte Anschlusskabel
erhöhen das Stromschlagrisiko.
e) Verwenden Sie, wenn Sie ein Elektrowerkzeug
im Freien benutzen, ein für den Außeneinsatz
geeignetes Verlängerungskabel.
Ein für den Außeneinsatz geeignetes Kabel
vermindert das Stromschlagrisiko.
(Übersetzung der Original-Gebrauchsanweisung)

20
Deutsch
Das richtige Elektrowerkzeug erledigt seine Arbeit
bei bestimmungsgemäßem Einsatz besser und
sicherer.
b) Benutzen Sie das Elektrowerkzeug nicht, wenn
es sich nicht am Schalter ein- und ausschalten
lässt.
Jedes Elektrowerkzeug, das nicht mit dem Schalter
betätigt werden kann, stellt eine Gefahr dar und
muss repariert werden.
c) Ziehen Sie den Stecker der Stromversorgung
ab und/oder entfernen Sie den Akkupack
vom Elektrowerkzeug, falls abnehmbar, ehe
Sie Einstellarbeiten vornehmen, Zubehörteile
tauschen oder das Elektrowerkzeug verstauen.
Solche präventiven Sicherheitsmaßnahmen
verhindern den unbeabsichtigten Anlauf des
Elektrowerkzeugs und die damit verbundenen
Gefahren.
d) Lagern Sie nicht benutzte Elektrowerkzeuge
außerhalb der Reichweite von Kindern,
lassen Sie nicht zu, dass Personen das
Elektrowerkzeug bedienen, die nicht mit dem
Werkzeug selbst und/oder diesen Anweisungen
vertraut sind.
Elektrowerkzeuge in ungeschulten Händen sind
gefährlich.
e) Wartung von Elektrowerkzeugen und Zubehör.
Prüfen Sie sie auf Fehlausrichtungen,
Leichtgängigkeit beweglicher Teile,
Beschädigungen von Teilen und auf alle
anderen Umstände, die sich auf den Betrieb des
Elektrowerkzeugs auswirken können. Lassen
Sie das Elektrowerkzeug bei Beschädigungen
reparieren, ehe Sie es benutzen.
Viele Unfälle mit Elektrowerkzeugen sind auf
schlechte Wartung zurückzuführen.
f) Halten Sie Schneidwerkzeuge scharf und
sauber.
Richtig gewartete Schneidwerkzeuge mit scharfen
Schneiden bleiben weniger häufi g hängen und sind
einfacher zu beherrschen.
g) Benutzen Sie Elektrowerkzeuge, Zubehör,
Werkzeugspitzen und Ähnliches in
Übereinstimmung mit diesen Anweisungen
– beachten Sie dabei die jeweiligen
Arbeitsbedingungen und die Art der
auszuführenden Arbeiten.
Der Gebrauch des Elektrowerkzeugs für andere
als die vorgesehenen Anwendungen kann zu
gefährlichen Situationen führen.
h) Halten Sie Handgriff e und Greiffl ächen trocken,
sauber und frei von Öl und Fett.
Rutschige Handgriff e und Greiffl ächen lassen keine
sichere Handhabung und Kontrolle des Werkzeugs
in unerwarteten Situationen zu.
5) Verwendung und Pfl ege der Batterie
a) Laden Sie das Gerät nur mit dem vom Hersteller
empfohlenen Ladegerät auf.
Ein Ladegerät für einen speziellen Batterietyp
kann bei Verwendung mit anderen Batterien zu
Brandgefahr führen.
b) Verwenden Sie nur die für das Elektrowerkzeug
speziell empfohlenen Akkus.
Eine Verwendung von anderen Batterien kann zu
Verletzungen und Bränden führen.
c) Ist der Akku nicht in Gebrauch, achten Sie
darauf, dass er nicht mit Metallgegenständen,
beispielsweise Büroklammern, Münzen,
Schlüsseln, Nägeln, Schrauben oder anderen
kleinen Metallgegenständen in Kontakt kommt,
da diese Gegenstände einen Kurzschluss der
Anschlüsse verursachen können.
Ein Kurzschluss der Batterieanschlüsse kann zu
Verbrennungen oder Bränden führen.
d) Im Falle von missbräuchlichen Bedingungen
kann Flüssigkeit aus dem Akku austreten.
Vermeiden Sie in diesem Fall jeglichen Kontakt.
Sollten Sie dennoch mit der Batteriefl üssigkeit
in Berührung kommen, waschen Sie die
betroff ene Stelle gründlich mit Wasser ab. Ist
die Flüssigkeit ins Auge geraten, suchen Sie
einen Arzt auf.
Ausgetretene Batteriefl üssigkeiten können zu
Reizungen oder Verbrennungen führen.
e) Verwenden Sie keinen Akku oder kein Werkzeug,
der oder das beschädigt oder verändert ist.
Beschädigte oder veränderte Akkus können ein
unvorhersehbares Verhalten aufweisen, das zu
einem Feuer, einer Explosion oder Verletzung führen
kann.
f) Setzen Sie den Akku oder das Werkzeug keinem
Feuer oder keiner zu hohen Temperatur aus.
Die Einwirkung von Feuer oder einer Temperatur
über 130°C kann zu einer Explosion führen.
g) Befolgen Sie alle Anweisungen zum Aufl aden
und laden Sie den Akku oder das Werkzeug
nicht außerhalb des Temperarturbereichs auf,
der in der Anleitung angegeben ist.
Wenn Sie den Akku falsch oder bei Temperaturen
außerhalb des angegebenen Bereichs aufl aden,
kann der Akku beschädigt werden und die Gefahr
eines Brandes steigen.
6) Service
a) Lassen Sie Ihr Elektrowerkzeug durch
qualifi zierte Fachkräfte und nur unter Einsatz
der passenden Originalersatzteile warten.
Dies sorgt dafür, dass die Sicherheit des
Elektrowerkzeugs nicht beeinträchtigt wird.
b) Warten Sie niemals beschädigte Akkus.
Die Wartung von Akkus ist stets vom Hersteller oder
autorisierten Dienstleistern durchzuführen.
VORSICHT
Von Kindern und gebrechlichen Personen fernhalten.
Werkzeuge sollten bei Nichtgebrauch außerhalb der
Reichweite von Kindern und gebrechlichen Personen
aufbewahrt werden.
SICHERHEITSHINWEISE FÜR DEN
AKKU-BOHRHAMMER
Allgemeine Sicherheitshinweise
1. Gehörschutz tragen
Die Aussetzung zu lauten Geräuschen kann zu
Gehörverlust führen.
2. Benutzen Sie, falls mit dem Werkzeug mitgeliefert,
den/die Hilfsgriff (e).
Ein Verlust der Kontrolle kann zu Körperverletzungen
führen.
3. Halten Sie das Elektrowerkzeug an den isolierten
Griff fl ächen, wenn Sie Arbeiten ausführen, bei
denen das Schneidwerkzeug mit verborgenen
Kabeln in Kontakt geraten könnte.
Wenn Schneidewerkzeuge auf einen "gstromführenden"
Draht treff en, können die freigelegten Metallteile das
Elektrowerkzeug "gunter Strom setzen" und dem
Bediener einen elektrischen Schlag versetzen.
A página está carregando...
A página está carregando...
A página está carregando...
A página está carregando...
A página está carregando...
A página está carregando...
A página está carregando...
A página está carregando...
A página está carregando...
A página está carregando...
A página está carregando...
A página está carregando...
A página está carregando...
A página está carregando...
A página está carregando...
A página está carregando...
A página está carregando...
A página está carregando...
A página está carregando...
A página está carregando...
A página está carregando...
A página está carregando...
A página está carregando...
A página está carregando...
A página está carregando...
A página está carregando...
A página está carregando...
A página está carregando...
A página está carregando...
A página está carregando...
A página está carregando...
A página está carregando...
A página está carregando...
A página está carregando...
A página está carregando...
A página está carregando...
A página está carregando...
A página está carregando...
A página está carregando...
A página está carregando...
A página está carregando...
A página está carregando...
A página está carregando...
A página está carregando...
A página está carregando...
A página está carregando...
A página está carregando...
A página está carregando...
A página está carregando...
A página está carregando...
A página está carregando...
A página está carregando...
A página está carregando...
A página está carregando...
A página está carregando...
A página está carregando...
A página está carregando...
A página está carregando...
A página está carregando...
A página está carregando...
A página está carregando...
A página está carregando...
A página está carregando...
A página está carregando...
A página está carregando...
A página está carregando...
A página está carregando...
A página está carregando...
A página está carregando...
A página está carregando...
A página está carregando...
A página está carregando...
A página está carregando...
A página está carregando...
A página está carregando...
A página está carregando...
A página está carregando...
A página está carregando...
A página está carregando...
A página está carregando...
A página está carregando...
A página está carregando...
A página está carregando...
A página está carregando...
A página está carregando...
A página está carregando...
A página está carregando...
A página está carregando...
A página está carregando...
A página está carregando...
A página está carregando...
A página está carregando...
A página está carregando...
A página está carregando...
A página está carregando...
A página está carregando...
A página está carregando...
A página está carregando...
A página está carregando...
A página está carregando...
A página está carregando...
A página está carregando...
A página está carregando...
A página está carregando...
A página está carregando...
A página está carregando...
A página está carregando...
A página está carregando...
A página está carregando...
A página está carregando...
A página está carregando...
A página está carregando...
A página está carregando...
A página está carregando...
A página está carregando...
A página está carregando...
A página está carregando...
A página está carregando...
A página está carregando...
A página está carregando...
A página está carregando...
A página está carregando...
A página está carregando...
A página está carregando...
A página está carregando...
A página está carregando...
A página está carregando...
A página está carregando...
A página está carregando...
A página está carregando...
A página está carregando...
A página está carregando...
A página está carregando...
A página está carregando...
A página está carregando...
A página está carregando...
A página está carregando...
A página está carregando...
A página está carregando...
A página está carregando...
A página está carregando...
A página está carregando...
A página está carregando...
A página está carregando...
A página está carregando...
A página está carregando...
A página está carregando...
A página está carregando...
A página está carregando...
A página está carregando...
A página está carregando...
A página está carregando...
A página está carregando...
A página está carregando...
A página está carregando...
A página está carregando...
A página está carregando...
A página está carregando...
A página está carregando...
A página está carregando...
A página está carregando...
A página está carregando...
A página está carregando...
A página está carregando...
A página está carregando...
A página está carregando...
A página está carregando...
A página está carregando...
A página está carregando...
A página está carregando...
A página está carregando...
A página está carregando...
A página está carregando...
A página está carregando...
A página está carregando...
A página está carregando...
A página está carregando...
A página está carregando...
A página está carregando...
A página está carregando...
A página está carregando...
A página está carregando...
A página está carregando...
A página está carregando...
A página está carregando...
A página está carregando...
A página está carregando...
A página está carregando...
A página está carregando...
A página está carregando...
A página está carregando...
A página está carregando...
A página está carregando...
A página está carregando...
A página está carregando...
A página está carregando...
A página está carregando...
A página está carregando...
A página está carregando...
A página está carregando...
A página está carregando...
A página está carregando...
A página está carregando...
A página está carregando...
A página está carregando...
A página está carregando...
A página está carregando...
A página está carregando...
A página está carregando...
A página está carregando...
A página está carregando...
A página está carregando...
A página está carregando...
A página está carregando...
A página está carregando...
A página está carregando...
A página está carregando...
A página está carregando...
A página está carregando...
A página está carregando...
A página está carregando...
A página está carregando...
A página está carregando...
A página está carregando...
A página está carregando...
A página está carregando...
A página está carregando...
A página está carregando...
A página está carregando...
A página está carregando...
A página está carregando...
A página está carregando...
A página está carregando...
A página está carregando...
A página está carregando...
A página está carregando...
A página está carregando...
A página está carregando...
A página está carregando...
A página está carregando...
A página está carregando...
A página está carregando...
A página está carregando...
A página está carregando...
A página está carregando...
A página está carregando...
A página está carregando...
A página está carregando...
A página está carregando...
A página está carregando...
A página está carregando...
A página está carregando...
A página está carregando...
A página está carregando...
A página está carregando...
A página está carregando...
-
 1
1
-
 2
2
-
 3
3
-
 4
4
-
 5
5
-
 6
6
-
 7
7
-
 8
8
-
 9
9
-
 10
10
-
 11
11
-
 12
12
-
 13
13
-
 14
14
-
 15
15
-
 16
16
-
 17
17
-
 18
18
-
 19
19
-
 20
20
-
 21
21
-
 22
22
-
 23
23
-
 24
24
-
 25
25
-
 26
26
-
 27
27
-
 28
28
-
 29
29
-
 30
30
-
 31
31
-
 32
32
-
 33
33
-
 34
34
-
 35
35
-
 36
36
-
 37
37
-
 38
38
-
 39
39
-
 40
40
-
 41
41
-
 42
42
-
 43
43
-
 44
44
-
 45
45
-
 46
46
-
 47
47
-
 48
48
-
 49
49
-
 50
50
-
 51
51
-
 52
52
-
 53
53
-
 54
54
-
 55
55
-
 56
56
-
 57
57
-
 58
58
-
 59
59
-
 60
60
-
 61
61
-
 62
62
-
 63
63
-
 64
64
-
 65
65
-
 66
66
-
 67
67
-
 68
68
-
 69
69
-
 70
70
-
 71
71
-
 72
72
-
 73
73
-
 74
74
-
 75
75
-
 76
76
-
 77
77
-
 78
78
-
 79
79
-
 80
80
-
 81
81
-
 82
82
-
 83
83
-
 84
84
-
 85
85
-
 86
86
-
 87
87
-
 88
88
-
 89
89
-
 90
90
-
 91
91
-
 92
92
-
 93
93
-
 94
94
-
 95
95
-
 96
96
-
 97
97
-
 98
98
-
 99
99
-
 100
100
-
 101
101
-
 102
102
-
 103
103
-
 104
104
-
 105
105
-
 106
106
-
 107
107
-
 108
108
-
 109
109
-
 110
110
-
 111
111
-
 112
112
-
 113
113
-
 114
114
-
 115
115
-
 116
116
-
 117
117
-
 118
118
-
 119
119
-
 120
120
-
 121
121
-
 122
122
-
 123
123
-
 124
124
-
 125
125
-
 126
126
-
 127
127
-
 128
128
-
 129
129
-
 130
130
-
 131
131
-
 132
132
-
 133
133
-
 134
134
-
 135
135
-
 136
136
-
 137
137
-
 138
138
-
 139
139
-
 140
140
-
 141
141
-
 142
142
-
 143
143
-
 144
144
-
 145
145
-
 146
146
-
 147
147
-
 148
148
-
 149
149
-
 150
150
-
 151
151
-
 152
152
-
 153
153
-
 154
154
-
 155
155
-
 156
156
-
 157
157
-
 158
158
-
 159
159
-
 160
160
-
 161
161
-
 162
162
-
 163
163
-
 164
164
-
 165
165
-
 166
166
-
 167
167
-
 168
168
-
 169
169
-
 170
170
-
 171
171
-
 172
172
-
 173
173
-
 174
174
-
 175
175
-
 176
176
-
 177
177
-
 178
178
-
 179
179
-
 180
180
-
 181
181
-
 182
182
-
 183
183
-
 184
184
-
 185
185
-
 186
186
-
 187
187
-
 188
188
-
 189
189
-
 190
190
-
 191
191
-
 192
192
-
 193
193
-
 194
194
-
 195
195
-
 196
196
-
 197
197
-
 198
198
-
 199
199
-
 200
200
-
 201
201
-
 202
202
-
 203
203
-
 204
204
-
 205
205
-
 206
206
-
 207
207
-
 208
208
-
 209
209
-
 210
210
-
 211
211
-
 212
212
-
 213
213
-
 214
214
-
 215
215
-
 216
216
-
 217
217
-
 218
218
-
 219
219
-
 220
220
-
 221
221
-
 222
222
-
 223
223
-
 224
224
-
 225
225
-
 226
226
-
 227
227
-
 228
228
-
 229
229
-
 230
230
-
 231
231
-
 232
232
-
 233
233
-
 234
234
-
 235
235
-
 236
236
-
 237
237
-
 238
238
-
 239
239
-
 240
240
-
 241
241
-
 242
242
-
 243
243
-
 244
244
-
 245
245
-
 246
246
-
 247
247
-
 248
248
-
 249
249
-
 250
250
-
 251
251
-
 252
252
-
 253
253
-
 254
254
-
 255
255
-
 256
256
-
 257
257
-
 258
258
-
 259
259
-
 260
260
-
 261
261
-
 262
262
-
 263
263
-
 264
264
-
 265
265
-
 266
266
-
 267
267
-
 268
268
-
 269
269
-
 270
270
-
 271
271
-
 272
272
-
 273
273
-
 274
274
-
 275
275
-
 276
276


em outras línguas
- slovenčina: Hikoki DH36DPE Používateľská príručka
- dansk: Hikoki DH36DPE Brugermanual
- română: Hikoki DH36DPE Manual de utilizare
Artigos relacionados
-
Hikoki M3612DA 36V Cordless Multi-Volt Brushless Router Manual do usuário
-
Hitachi DH 18DL Manual do proprietário
-
Hitachi WM 10DBL Manual do usuário
-
-
Hitachi DH 14DSL Manual do usuário
-
-
-