
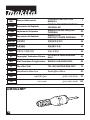
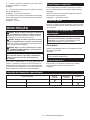
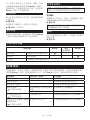
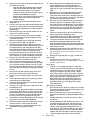
UB402MP
EN Blower Attachment ORIGINAL INSTRUCTION
MANUAL 7
ESMX Accesorio de Soplado
MANUAL DE INSTRUCCIONES
ORIGINALES
14
PTBR Implemento Soprador MANUAL DE INSTRUÇÕES
ORIGINAL 22
ES Accesorio de Soplado MANUAL DE
INSTRUCCIONES ORIGINAL 30
ZHCN 吹风附件 原版使用说明书 38
ZHTW 吹風機組 原始操作手冊 46
KO 브로어 어테치먼트 취급 설명서 54
ID Perangkat Tambahan Blower PETUNJUK PENGGUNAAN
ASLI 60
MS Alat Tambahan Penghembus MANUAL ARAHAN ASAL 68
VI 76
TH 83
AR 97
FA 103

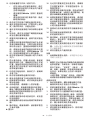
2
15 m
Fig.1
Fig.2
3
2
1
Fig.3
1
2
Fig.4
1
Fig.5
1
2
3
4
5
Fig.6
1
Fig.7
Fig.12
3
1
2
Fig.8

3
1
2 3
Fig.9
Fig.10
1
2
3
Fig.11
1
23
Fig.12
2
1
Fig.13
2
1
Fig.14

4
Fig.15
1
2
3
Fig.16
1
2
3
Fig.17
Fig.18
Fig.19
Fig.20
Fig.21

5
15m
Fig.22
Fig.23
Fig.24
Fig.25
2
1
Fig.26
1
Fig.27
Fig.28

6
1
Fig.29
Fig.30
Fig.31

7ENGLISH
ENGLISH (Original instructions)
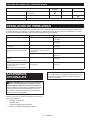
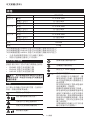
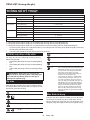
SPECIFICATIONS
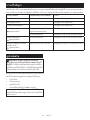
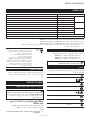
Model: UB402MP
Capacities *1 Air volume 0 - 6.2 m3/min
Air speed (average) 0 - 39.1 m/s
Air speed (max.) 0 - 47.4 m/s
Capacities *2 Air volume 0 - 6.2 m3/min
Air speed (average) 0 - 39.1 m/s
Air speed (max.) 0 - 47.4 m/s
Capacities *3 Air volume 0 - 6.2 m3/min
Air speed (average) 0 - 39.1 m/s
Air speed (max.) 0 - 47.4 m/s
Overall length 760 mm
Net weight 1.2 kg
*1. Capacities of blower attachment in conjunction with DUX60 Cordless Multi Function Power Head
*2. Capacities of blower attachment in conjunction with DUX18 Cordless Multi Function Power Head
*3. Capacities of blower attachment in conjunction with UX01G Cordless Multi Function Power Head
• Duetoourcontinuingprogramofresearchanddevelopment,thespecicationshereinaresubjecttochange
without notice.
• Specicationsmaydierfromcountrytocountry.
Approved power unit
Thisattachmentisapprovedtouseonlywiththefollow-
ing power unit(s):
• DUX60Cordlessmultifunctionpowerhead
• DUX18Cordlessmultifunctionpowerhead
• UX01GCordlessmultifunctionpowerhead
WARNING: Never use the attachment with
non-approved power unit. Non-approved combi-
nation may cause serious injury.
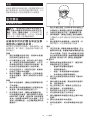
Symbols
Thefollowingsshowthesymbolswhichmaybeused
fortheequipment.Besurethatyouunderstandtheir
meaning before use.
Take particular care and attention.
Read instruction manual.
Keephandsawayfromrotatingparts.
Longhairmaycauseentanglement
accident.
Keepbystandersaway.
Weareyeandearprotection.
Do not expose to moisture.
Keep distance at least 15 m.
Ni-MH
Li-ion
OnlyforEUcountries
Due to the presence of hazardous com-
ponentsintheequipment,wasteelectrical
andelectronicequipment,accumulators
andbatteriesmayhaveanegativeimpact
on the environment and human health.
Do not dispose of electrical and electronic
appliances or batteries with household
waste!
InaccordancewiththeEuropeanDirective
on waste electrical and electronic equip-
ment and on accumulators and batteries
andwasteaccumulatorsandbatteries,
aswellastheiradaptationtonationallaw,
wasteelectricalequipment,batteriesand
accumulatorsshouldbestoredseparately
and delivered to a separate collection point
formunicipalwaste,operatinginaccor-
dance with the regulations on environmen-
tal protection.
Thisisindicatedbythesymbolofthe
crossed-out wheeled bin placed on the
equipment.
Intended use
Thisattachmentisdesignedforonlythepurposeof
blowing dust in conjunction with an approved power
unit. Never use the attachment for other purposes.
Abusingtheattachmentmaycauseseriousinjury.

8ENGLISH
SAFETY WARNINGS
Blower Safety Instructions
WARNING: Read all safety warnings, instruc-
with this machine as well as the instruction man-
ual of the power unit before using. Failure to follow
allinstructionslistedbelowmayresultinelectric
shock,re,and/orseriousinjurytotheoperatorand/
orbystanders.
Save all warnings and instruc-
tions for future reference.
The term “blower” and “machine” in the warnings and
precautions refer to the combination of the attachment
and the power unit.
Training
1. Read the instructions carefully. Be familiar
with the controls and the correct use of the
blower.
2. Never allow children, persons with reduced
physical, sensory or mental capabilities or
lack of experience and knowledge or people
unfamiliar with these instructions to use the
blower. Local regulations may restrict the age
of the operator.
3. Never operate the blower while people, espe-
cially children, or pets are nearby.
4. Keep in mind that the operator or user is
responsible for accidents or hazards occurring
to other people or their property.
Preparation
1. Always wear substantial footwear and long
trousers while operating the blower.
2. Do not wear loose clothing or jewellery that
can be drawn into the air inlet. Keep long hair
away from the air inlets.
3. Always wear protective goggles to protect
your eyes from injury when using power tools.
The goggles must comply with ANSI Z87.1 in
the USA, EN 166 in Europe, or AS/NZS 1336
in Australia/New Zealand. In Australia/New
Zealand, it is legally required to wear a face
shield to protect your face, too.
It is an employer's responsibility to enforce
the use of appropriate safety protective equip-
ments by the tool operators and by other per-
sons in the immediate working area.
4. To prevent dust irritation the wearing of a face
mask is recommended.
5. While operating the machine, always wear
non-slip and protective footwear.Non-skid,
closed-toedsafetybootsandshoeswillreducethe
riskofinjury.
6.
Exposuretonoisecancausehearingloss.
Operation
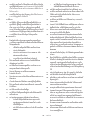
1. Clear the area of children, bystanders, and
pets. At a minimum, keep all children, bystand-
ers, and pets outside a 15 m radius; outside
the 15 m zone, there is still a risk of injury
from thrown objects. Bystanders should be
encouraged to wear eye protection. If you are
approached, stop the machine.
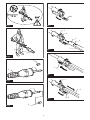
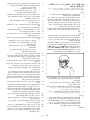
►Fig.1
2.
cartridge, and make sure that all moving parts
have come to a complete stop
• whenever you leave the blower.
• before clearing blockages.
• before checking, cleaning or working on
the blower.
• if the blower starts to vibrate abnormally.
3. Operate the blower only in daylight or in good
4. Do not overreach and keep proper balance and
footing at all times.
5. Always be sure of your footing on slopes.
6. Walk, never run.
7. Keep all cooling air inlets clear of debris.
8. Never blow debris in the direction of
bystanders.
9. Operate the blower in a recommended position
10. Do not operate the blower at high places.
11. Never point the nozzle at anyone in the vicinity
when using the blower.
12. Never block suction inlet and/or blower outlet.
• Be careful not to block suction inlet or
blower outlet with dust or dirt when oper-
ating in dusty area.
• Do not use nozzles other than the nozzles
provided by Makita.
•
rubber boat or the similar.
13. Do not operate the blower near open window,
etc.
14. Operating the blower only at reasonable hours
is recommended - not early in the morning or
late at night when people might be disturbed.
15. Using rakes and brooms to loosen debris
before blowing is recommended.
16. Before blowing, slightly dampen surfaces in
dusty conditions or use water mist sprayer if
necessary.

9ENGLISH
17. Adjust the length of the blower nozzle so that
the air stream can work close to the ground.
18. If the blower strikes any foreign objects or
should start making any unusual noise or
to stop it. Remove the battery cartridge, and
inspect the blower for damage before restart-
ing and operating the blower. If the blower
is damaged, ask Makita Authorized Service
Centers for repair.
19.
suction inlet or blower outlet.
20. Prevent unintentional starting. Ensure the
battery cartridge, picking up or carrying the
on the switch or energizing the blower that has
the switch on invites accidents.
21. Never blow dangerous materials, such as
nails, fragments of glass, or blades.
22.
materials.
23. Avoid operating the blower for a long time in
low temperature environment.
24. Before assembling or adjusting the machine,
cartridge.
25. Wear the personal protective equipments
before starting the motor.
26. Before starting the motor, inspect the machine
for damages, loose screws/nuts or improper
assembly. Check all control levers and
switches for easy action. Clean and dry the
handles.
27. Never attempt to start the motor if the machine
is damaged or not fully assembled.
28. Adjust the shoulder harness and hand grip to
suit the operator's body size.
29. During operation, use the shoulder harness.
►Fig.2
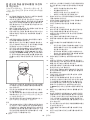
30. Hold the front handle with the left hand and the
rear grip with the right hand, no matter you are
and thumbs around the handles.
31. Never attempt to operate the machine with one
hand. Loss of control may result in an injury.
32. If the machine gets heavy impact or fall, check
the condition before continuing work. Check
the controls and safety devices for malfunc-
tion. If there is any damage or doubt, ask our
authorized service center for the inspection
and repair.
33. Follow the instruction manual of the power
unit for proper use of the power unit.
34. Refer to the instruction manual of the power
unit for how to start and control the machine.
35. During operation, never stand on an unstable
or slippery surface or a steep slope. During
the cold season, beware of ice and snow and
always ensure secure footing.
36. Do not use the machine in bad weather where
visibility is limited.Failuretodosomaycause
fallorincorrectoperationduetolowvisibility.
37. Do not use the machine when there is a risk of
lightning.
Transportation
1. Stop the motor during transportation.
Otherwiseunintentionalstart-upmaycauseinjury.
Vibration
1. Exposing to excessive vibration injures blood
vessels or nervous system of the operator and
hands or wrists: “Falling asleep” (numbness),
tingling, pain, stabbing sensation, alteration of
skin color or of the skin. If any of these symp-
toms occur, see a physician.
keep your hands warm during operation and
well maintain the machine and accessories.
Maintenance and storage
1. Keep all nuts, bolts and screws tight to be sure
the blower is in safe working condition.
2. If the parts are worn or damaged, replace them
with parts provided by Makita.
3. Store the blower in a dry place out of the reach
of children.
4. When you stop the blower for inspection, ser-
vicing, storage, or changing accessory, switch
parts come to a complete stop, and remove the
battery cartridge. Cool down the blower before
making any work on the blower. Maintain the
blower with care and keep it clean.
5. Always cool down the blower before storing.
6. Do not expose the blower to rain. Store the
blower indoors.
7. When you lift the blower, be sure to bend your
knees and be careful not to hurt your back.
8.
Never use gasoline, benzine, thinner, alcohol
or the like for the purpose.Discoloration,defor-
mationorcracksoftheplasticcomponentsmay
result.
9. Do not attempt any maintenance or repair not
described in this instruction manual or the
instruction manual of the power unit. Ask our
authorized service center for such work.
10. Follow instructions for lubricating and chang-
ing accessories.
11. Always use the genuine spare parts and acces-
sories only. Using parts or accessories supplied
byathirdpartymayresultintheequipmentbreak-
down,propertydamageand/orseriousinjury.
12. Request our authorized service center to
inspect and maintain the machine at regular
interval.
13. Before storing the machine, perform full clean-
ing and maintenance. Remove the battery
cartridge.
14. Do not prop the equipment against something,
such as a wall.Otherwiseitmayfallsuddenly
andcauseaninjury.

10 ENGLISH
Battery tool use and care
1.
the manufacturer. A charger that is suitable for
onetypeofbatterypackmaycreateariskofre
whenusedwithanotherbatterypack.
2. -
nated battery packs.Useofanyotherbattery
packsmaycreateariskofinjuryandre.
3. When battery pack is not in use, keep it away
from other metal objects, like paper clips,
coins, keys, nails, screws or other small metal
objects, that can make a connection from one
terminal to another.Shortingthebatterytermi-
nalstogethermaycauseburnsorare.
4. Under abusive conditions, liquid may be
ejected from the battery; avoid contact. If con-
liquid contacts eyes, additionally seek medical
help.Liquidejectedfromthebatterymaycause
irritation or burns.
5. Do not use a battery pack or tool that is dam-
Damagedormodiedbatteries
mayexhibitunpredictablebehaviourresultingin
re,explosionorriskofinjury.
6.
excessive temperature.Exposuretoreortem-
peratureabove130°Cmaycauseexplosion.
7. Follow all charging instructions and do not
charge the battery pack or tool outside the
-
tions.Chargingimproperlyorattemperatures
outsidethespeciedrangemaydamagethe
batteryandincreasetheriskofre.
Electrical and battery safety
1.
Thecellmayexplode.Checkwithlocalcodesfor
possible special disposal instructions.
2. Do not open or mutilate the battery(ies).
Releasedelectrolyteiscorrosiveandmaycause
damagetotheeyesorskin.Itmaybetoxicif
swallowed.
3. Do not charge battery in rain, or in wet
locations.
4. Do not charge the battery outdoors.
5. Do not handle charger, including charger plug,
and charger terminals with wet hands.
Service
1.
repair person using only identical replacement
parts.Thiswillensurethatthesafetyofthepower
tool is maintained.
2. Never service damaged battery packs.Service
ofbatterypacksshouldonlybeperformedbythe
manufacturer or authorized service providers.
SAVE THESE INSTRUCTIONS.
WARNING: DO NOT let comfort or familiarity
with product (gained from repeated use) replace
strict adherence to safety rules for the subject
product.
MISUSE or failure to follow the safety rules stated
in this instruction manual may cause serious
personal injury.
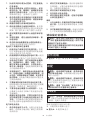
PARTS DESCRIPTION
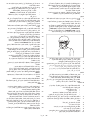
►Fig.3: 1. Cap 2. Pipe 3.Endnozzle
ASSEMBLY
WARNING: Before assembling or adjusting
the battery cartridge.Otherwise,thefansmaymove
andresultinaninjury.
WARNING: When assembling or adjusting
the equipment, always put it down. Assembling or
adjustingtheequipmentinanuprightpositionmay
resultinseriousinjury.
WARNING: Follow the warnings and precau-
tions in the chapter “SAFETY WARNINGS” and
the instruction manual of the power unit.
Mounting the attachment pipe
CAUTION: Always check that the attachment
pipe is secured after installation. Improper instal-
lationmaycausetheattachmentfallingofromthe
powerunitandcausepersonalinjury.
Mount the attachment pipe to the power unit.
1. Remove the cap from the end of the pipe.
►Fig.4: 1. Pipe 2. Cap
NOTICE: Do not dispose of the cap since the cap
is necessary for storing the attachment.
2. Turn the lever toward the attachment.
►Fig.5: 1. Lever
3. Align the pin with the arrow mark on the power
unit. Insert the pipe until the release button pops up.
Make sure that the position line is on the tip of the arrow
markonthepowerunit,andthearrowmarkonthe
power unit and the arrow mark on the pipe are facing
each other.
►Fig.6: 1. Release button 2. Arrow mark on the
power unit 3. Pin 4. Position line 5. Arrow
mark on the pipe
4. Turn the lever toward the power unit.
►Fig.7: 1. Lever
Make sure that the surface of the lever is parallel to the
pipe.
NOTICE: Do not tighten the lever without the
attachment pipe inserted.Otherwisethelevermay
tighten the entrance of the drive shaft too much and
damage it.
Toremovethepipe,turnthelevertowardtheattach-
ment and pull the pipe out while pressing down the
release button.
►Fig.8: 1. Release button 2. Lever 3. Pipe

11 ENGLISH
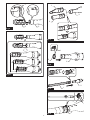
Installing the end nozzle
Align the protrusion on the blower pipe with the groove
ontheendnozzle,thenattachtheendnozzletothe
blowerpipe,andthenturntheendnozzletolockitinto
place.
►Fig.9: 1. Triangle mark 2.Endnozzle3. Blower pipe
Toremovetheendnozzle,performtheinstallation
procedure in reverse.
NOTE:Thelengthofthenozzlecanbechangedby
movingthenozzleasshowninthegure.
►Fig.10
extension nozzle
Optional accessory
1. Remove the end nozzle from the attachment.
2. Attachtheatnozzleorextensionnozzletothe
attachment,andthenturnittolockitintoplace.
►Fig.11: 1. Flat nozzle 2.Extensionnozzle
3. Attachment
Installing the gutter nozzle set
Optional accessory
1. Removetheendnozzle,extensionnozzle,orat
nozzle from the attachment.
2. Loosenthescrewonthesmallhoseclamp,and
pass the hose clamp through the attachment.
►Fig.12: 1.Screw2. Hose clamp (small)
3. Attachment
3. Connect the extension pipe to the attachment.
Align the groove on the extension pipe with the protru-
sionontheattachment,andthenslidetheextension
pipe along its groove so that the triangle markings face
each other.
►Fig.13: 1.Extensionpipe2. Attachment
4. Place the hose clamp onto the groove as illus-
trated and tighten the screw.
►Fig.14: 1.Screw2. Hose clamp
5. Accordingtotheworkingheight,connecttherest
of extension pipes to the extension pipe which has
alreadybeenattached.
CAUTION: When using the gutter nozzle set
in conjunction with a multi function power head
and blower attachment, do not use three or more
extension pipes.Itmaycauseimbalanceandresult
ininjury.
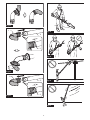
6. Turn the outlet of the end nozzle as shown in the
gure.
►Fig.15
7. Connect the end nozzle to the extension pipe.
Whenconnecting,alignthetrianglemarkingontheend
nozzleandtheextensionpipe,andthenpushtheend
nozzleuntilitclicks.Afterthat,rotatetheendnozzleto
asuitablepositionforyourwork.
►Fig.16: 1.Endnozzle2.Extensionpipe3. Triangle
marking
Whenremovingtheendnozzle,alignthetrianglemark-
ingsontheendnozzleandextensionpipe,andthen
pull out the end nozzle from the extension pipe.
►Fig.17: 1.Endnozzle2.Extensionpipe3. Triangle
marking
OPERATION
WARNING: Follow the warnings and precau-
tions in the chapter “SAFETY WARNINGS” and
the instruction manual of the power unit.
WARNING: Adjust the hanger position and
shoulder harness to your comfortable position
before operating.
Blower operation
CAUTION: Do not place the machine on the
ground while it is switched on.Sandordustmay
enter from suction inlet and cause a malfunction or
personalinjury.
Holdthemachinermlywithbothhandsandperform
theblowingoperationbymovingitaroundslowly.When
blowingaroundbuilding,bigstoneorvehicle,directthe
nozzleawayfromthem.Whenperforminganoperation
inacorner,startfromthecornerandthenmovetowide
area.
Adjust the air speed with the switch trigger of the power
unitaccordingtotheenvironmentorconditionsofyour
usage.
►Fig.18
Using the gutter nozzle set
CAUTION: When using the gutter nozzle set,
do not hold the blower with single hand but with
both hands.
►Fig.19
CAUTION: Do not use the gutter nozzle set
near electric wires.
►Fig.20
CAUTION: Do not use the gutter nozzle set on
windy day.
►Fig.21
CAUTION: When using the gutter nozzle set,
keep other people or animal more than 15 m away
from the blower.
►Fig.22

12 ENGLISH
Holdthebloweruprightbygrabbingthehandleofthe
blower. Place the outlet of the blower on the gutter and
then turn on the blower.
►Fig.23
For UX01G users
NOTICE: When using the gutter nozzle set, if you
use UX01G as the power unit and install BL4080F
to UX01G, do not use the shoulder harness
included in the power unit package, but use the
recommended shoulder harness shown below.
Fortherecommendedshoulderharness,askMakita
AuthorizedServiceCenters.
Attaching the shoulder harness
CAUTION: Always use the shoulder harness
attached to the power unit. Before operation,
adjust the shoulder harness according to the user
size to prevent fatigue.
CAUTION: Before operation, make sure that
the shoulder harness is properly attached to the
hanger on the power unit.
CAUTION: Before operation, make sure that
the buckle of the shoulder harness is fastened
CAUTION: Always use the shoulder har-
ness shown below. Do not use other shoulder
harnesses.
1. Put on the shoulder harness and fasten the
buckle.
►Fig.24: 1. Buckle
NOTE:Whenremovingtheshoulderharness,unlock
the buckle and remove the shoulder harness.
2. Adjust the shoulder harness to a comfortable
working position.
►Fig.25
3. Clasp the hook on the shoulder harness to the
hanger of the power unit.
►Fig.26: 1. Hook 2. Hanger
The shoulder harness features a means of quick
release.Simplysqueezethesidesofthebuckleto
release the shoulder harness.
►Fig.27: 1. Buckle
MAINTENANCE
WARNING: Before inspecting or maintaining
the battery cartridge.Otherwise,thefansmaymove
andresultinseriousinjury.
WARNING: When inspecting or maintaining
the equipment, always put it down. Assembling or
adjustingtheequipmentinanuprightpositionmay
resultinseriousinjury.
WARNING: Follow the warnings and precau-
tions in the chapter “SAFETY WARNINGS” and
the instruction manual of the power unit.
NOTICE: Never use gasoline, benzine, thinner,
alcohol or the like. Discoloration, deformation or
cracks may result.
TomaintainproductSAFETYandRELIABILITY,
repairs,anyothermaintenanceoradjustmentshould
beperformedbyMakitaAuthorizedorFactoryService
Centers,alwaysusingMakitareplacementparts.
Cleaning the machine
Cleanthemachinebywipingodustwithadryclothor
onedippedinsoapywaterandwrungout.
►Fig.28
Remove dust or dirt from the suction inlet at the rear of
the attachment.
►Fig.29: 1.Suctioninlet
Overall inspection
Check for damaged parts. Ask our authorized service
centertoreplacethemifnecessary.
Lubricating moving parts
NOTICE: Follow the instruction of the frequency
and amount of grease supplied.Otherwiseinsu-
cientlubricationmaydamagemovingparts.
Drive axle:
Applygrease(MakitagreaseNNo.2orequivalent)
every30hoursofoperation.
►Fig.30
NOTE:GenuineMakitagreasemaybepurchased
fromyourlocalMakitadealer.
Storage
When storing the attachment separated from the power
unit,putthecapontotheendofthepipe.
►Fig.31

13 ENGLISH
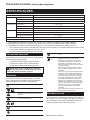
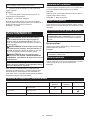
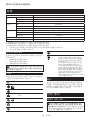
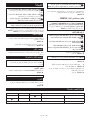
Interval of inspection and maintenance
Operating hour Before
Operation
Daily (10 hours) 30 hours
Whole unit Visuallyinspectfordamagedparts - -
Drive axle Supplygrease - -
Power unit Refer to the instruction manual of the power unit
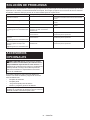
TROUBLESHOOTING
Beforeaskingforrepairs,conductyourowninspectionrst.Ifyoundaproblemthatisnotexplainedinthemanual,
donotattempttodisassemblethemachine.Instead,askMakitaAuthorizedServiceCenters,alwaysusingMakita
replacement parts for repairs.
State of abnormality Probable cause (malfunction) Remedy
Motor does not start. -Refer to the instruction manual of the power unit.
Motor stops soon. -Refer to the instruction manual of the power unit.
Motor speed does not increase. -Refer to the instruction manual of the power unit.
Fans do not rotate.
Stopthemotorimmediately.
The pipes of the power unit and the
attachmentarenotconnectedproperly.
Connectthepipesinthecorrectway.
Abnormaldrivesystem Contact an authorized service center for repairs.
Powerunitvibratesabnormally.
Stopthemotorimmediately.
Abnormaldrivesystem Contact an authorized service center for repairs.
Fans continue to rotate even if the
switch trigger is released.
Stopthemotorimmediately.
Thepowerunitdoesnotworkproperly. Contact an authorized service center for repairs.
OPTIONAL
ACCESSORIES
CAUTION: These accessories or attachments
are recommended for use with your Makita
Theuseofany
other accessories or attachments might present a risk
ofinjurytopersons.Onlyuseaccessoryorattach-
ment for its stated purpose.
Ifyouneedanyassistanceformoredetailsregard-
ingtheseaccessories,askyourlocalMakitaService
Center.
• Extensionnozzle
• Flatnozzle
• Gutternozzleset
• Makitagenuinebatteryandcharger
NOTE:Someitemsinthelistmaybeincludedinthe
productpackageasstandardaccessories.Theymay
dierfromcountrytocountry.

14 ESPAÑOL
ESPAÑOL (Instrucciones originales)
ESPECIFICACIONES
Modelo: UB402MP
Capacidades *1 Volumen de aire 0 m3/min(cu.ft/min)-6,2m3/min ( cu.ft/min)
Velocidad del aire
(promedio)
0m/s-39,1m/s
Velocidad del aire (máx.) 0m/s-47,4m/s
Capacidades *2 Volumen de aire 0 m3/min(cu.ft/min)-6,2m3/min ( cu.ft/min)
Velocidad del aire
(promedio)
0m/s-39,1m/s
Velocidad del aire (máx.) 0m/s-47,4m/s
Capacidades *3 Volumen de aire 0 m3/min(cu.ft/min)-6,2m3/min ( cu.ft/min)
Velocidad del aire
(promedio)
0m/s-39,1m/s
Velocidad del aire (máx.) 0m/s-47,4m/s
Longitud total 760 mm
Peso neto 1,2kg
*1. Capacidades del accesorio de soplador junto con la Herramienta Multifuncional Inalámbrica DUX60
*2. Capacidades del accesorio de soplador junto con la Herramienta Multifuncional Inalámbrica DUX18
*3. Capacidades del accesorio de soplador junto con la Herramienta Multifuncional Inalámbrica UX01G
• Debidoanuestroprogramacontinuodeinvestigaciónydesarrollo,lasespecicacionesaquídadasestán
sujetas a cambios sin previo aviso.
• Lasespecicacionespuedenvariardepaísapaís.
Unidad motorizada aprobada
Esteaccesorioestáaprobadoparausarseúnicamente
con la(s) siguiente(s) unidad(es) motorizada(s):
• HerramientaMultifuncionalInalámbricaDUX60
• HerramientaMultifuncionalInalámbricaDUX18
• HerramientaMultifuncionalInalámbricaUX01G
ADVERTENCIA: Nunca utilice el accesorio
con una unidad motorizada no aprobada. Una
combinación no aprobada podría ocasionar lesio-
nes graves.
Símbolos
Acontinuaciónsemuestranlossímbolosquepue-
denserutilizadosparaelequipo.Asegúresedeque
entiendesusignicadoantesdeutilizar.
Pongaespecialatenciónytengacuidado.
Lea el manual de instrucciones.
Mantenga las manos alejadas de las
piezas giratorias.
Elcabellolargopuedeenredarseprovo-
cando un accidente.
Mantenga alejadas a las personas en los
alrededores.
Lleveprotecciónenojosyoídos.
No se exponga a la humedad.
Mantenga una distancia de 15 m por lo
menos.
Ni-MH
Li-ion
ExclusivamenteparapaísesdelaUnión
Europea
Debido a la presencia de componentes
peligrososenelequipo,losequiposeléc-
tricosyelectrónicosdedesecho,acumula-
doresybateríaspodríantenerunimpacto
negativoenelmedioambienteyenla
salud humana.
¡Nosedeshagadelosaparatoseléctricos
yelectrónicosobateríasconlabasura
doméstica!
DeacuerdoconlaDirectivaEuropea
deResiduosdeAparatosEléctricosy
Electrónicosysobreacumuladoresy
bateríasysobreacumuladoresybaterías
dedesecho,asícomosuadaptaciónala
legislaciónnacional,losaparatoseléc-
tricos,lasbateríasyacumuladoresde
desecho deberán guardarse por separado
yentregarseenunpuntoderecolección
separadopararesiduosmunicipales,que
opere de acuerdo con las normas sobre
protecciónmedioambiental.
Estoseindicamedianteelsímbolodel
contenedor con ruedas tachado colocado
en el equipo.

15 ESPAÑOL
Uso pretendido
Esteaditamentohasidodiseñadoexclusivamentecon
lanalidaddesoplarelpolvojuntoconunaunidad
motorizada aprobada. Nunca use el aditamento para
ningúnotropropósito.Hacerunmalusodeladitamento
puede causar lesiones graves.
ADVERTENCIAS DE
SEGURIDAD
Instrucciones de seguridad para el
soplador
ADVERTENCIA: Antes de usarlo, lea todas
las advertencias de seguridad, instrucciones,
con esta máquina así como el manual de instruc-
ciones de la unidad motorizada.Elnoseguirtodas
lasinstruccionesindicadasabajopodríaocasionar
unadescargaeléctrica,incendioolesionesgraves
tanto al operador como a las personas alrededor.
Guarde todas las advertencias
e instrucciones para su futura
referencia.
Lostérminos“cepillomotorizado/barredormotorizado”
y“máquina”enlasadvertenciasyprecaucioneshacen
referenciaalacombinacióndelaccesorioylaunidad
motorizada.
Capacitación
1. Lea cuidadosamente las instrucciones.
Familiarícese con los controles y el uso
correcto del soplador.
2. Nunca permita que los niños ni las personas
con capacidades físicas, sensoriales o menta-
les reducidas, o que no cuenten con experien-
cia ni conocimientos o no estén familiarizadas
con estas instrucciones utilicen el soplador.
Los reglamentos locales podrían restringir la
edad del operador.
3. Nunca opere el soplador cuando haya perso-
nas, especialmente niños, o mascotas cerca.
4. Tenga presente que el operador o usuario es
responsable de los accidentes o peligros que
les ocurran a otras personas o a su propiedad.
Preparación
1. Siempre use calzado robusto y pantalones
largos al operar el soplador.
2. No use ropa holgada o alhajas que puedan ser
jaladas hacia la entrada de aire. Mantenga el
cabello largo lejos de las entradas de aire.
3. Utilice siempre gafas protectoras para prote-
ger sus ojos de lesiones al usar herramientas
eléctricas. Las gafas deben cumplir con las
normas ANSI Z87.1 en EUA, EN 166 en Europa
o AS/NZS 1336 en Australia/Nueva Zelanda. En
Australia/Nueva Zelanda, la ley requiere el uso
de una máscara protectora para proteger su
cara también.
Es responsabilidad del empleador imponer
el uso de equipos protectores de seguridad
apropiados a los operadores de la herramienta
y demás personas cerca del área de trabajo.
4. Para evitar la irritación por polvo, se reco-
mienda el uso de una mascarilla.
5. Cuando opere la máquina use siempre calzado
de protección con suela antiderrapante. Los
zapatosybotasdeseguridadcerradosconsuela
antideslizante reducen el riesgo de lesiones.
6. Utilice protección para los oídos tal como
orejeras.Laexposiciónalruidopuedeproducir
pérdidaauditiva.
Operación
1. Despeje el área de menores, personas y mas-
cotas alrededor. Como mínimo, mantenga a
todos los menores, personas y mascotas cer-
canas fuera de un radio de 15 m; todavía existe
el riesgo de lesiones por objetos arrojados
fuera de la zona de 15 m. Es preferible que las
personas alrededor usen protección para los
ojos. Si alguien se acerca, detenga la máquina.
►Fig.1
2. Apague el soplador y retire el cartucho de
batería y asegúrese de que todas las partes
móviles se hayan detenido por completo
• cada vez que deje el soplador.
• antes de despejar obstrucciones.
• antes de revisar, limpiar o trabajar en el
soplador.
• Si el soplador empieza a vibrar de manera
anormal.
3. Utilice el soplador solamente a la luz del día
o en buenas condiciones de iluminación
4. No use una postura forzada y mantenga el
5.
en las pendientes.
6. Camine, nunca corra.

16 ESPAÑOL
7. Mantenga todas las entradas de aire despeja-
das de residuos.
8. Nunca sople escombros en dirección de las
personas cercanas.
9. Utilice el soplador en una posición recomen-
10. No opere el soplador en lugares elevados.
11. Cuando utilice el soplador, no apunte nunca la
boquilla a nadie alrededor.
12. Nunca bloquee la entrada de succión o la
salida del soplador.
• Tenga cuidado de no bloquear la entrada
de succión o la salida del soplador con
polvo o suciedad al operar en áreas con
polvo.
• No use boquillas que no sean las boqui-
llas proporcionadas por Makita.
•
botes de caucho o similares.
13. No haga funcionar el soplador cerca de una
ventana abierta, etc.
14. Se recomienda operar el soplador solo a horas
razonables, no temprano en la mañana o tarde
en la noche para no molestar a las personas.
15. Se recomienda usar rastrillos y escobas para
16. Antes de soplar, humedezca ligeramente las
rociador de agua si es necesario.
17. Ajuste la longitud de la boquilla de la sopla-
dora de tal manera que la corriente pueda
trabajar cerca del suelo.
18. Si el soplador golpea algún objeto extraño o
comienza a hacer cualquier ruido o vibración
inusual, apague el soplador inmediatamente
para detenerlo. Retire el cartucho de batería,
e inspeccione el soplador en busca de daños
antes de volver a encenderlo y ponerlo en fun-
cionamiento. Si el soplador se daña, solicite la
reparación a los centros de servicio autorizado
de Makita.
19. No introduzca los dedos u otros objetos en la
entrada de succión o en la salida del soplador.
20. Evite un arranque accidental. Asegúrese de
que el interruptor esté en la posición apagada
antes de insertar el cartucho de batería, levan-
tar el soplador o cargarlo. Cargar el soplador
con su dedo en el interruptor o pasar energía
al soplador con el interruptor encendido puede
propiciar accidentes.
21. Nunca sople sobre materiales peligrosos,
como clavos, fragmentos de vidrio o cuchillas.
22. No opere el soplador cerca de materiales
23. Evite hacer funcionar el soplador durante
mucho tiempo en ambientes de temperatura
baja.
24. Antes de ensamblar o ajustar la máquina,
apague el motor y retire el cartucho de batería.
25. Póngase el equipo de protección personal
antes de arrancar el motor.
26. Antes de arrancar el motor, inspeccione la
máquina para ver que no haya daños, tornillos/
interruptores se accionen fácilmente. Limpie y
seque los mangos.
27. Nunca intente arrancar el motor si la máquina
está dañada o no se encuentra completamente
ensamblada.
28. Ajuste el arnés para hombro y la empuñadura
de mano para adaptarlos al tamaño del cuerpo
del operador.
29. Durante la operación, utilice el arnés para
hombro. Mantenga la máquina de su lado
►Fig.2
30. Sujete el mango delantero con la mano
izquierda y la empuñadura trasera con la mano
derecha, sin importar si es derecho o zurdo.
Rodee los mangos con sus dedos y pulgares.
31. Nunca intente operar la máquina con una
mano. La pérdida de control podría ocasio-
nar lesiones graves o fatales. Para reducir
el riesgo de lesiones, mantenga manos y
pies alejados de los cepillos o los rodillos de
barrido.
32. Si la máquina recibe un golpe fuerte o se cae,
revise su estado antes de continuar el trabajo.
Revise los controles y dispositivos de seguri-
dad para ver que no tengan averías. En caso
de haber daños o dudas, solicite la inspección
y reparación a nuestro centro de servicio
autorizado.
33. Siga el manual de instrucciones de la unidad
motorizada para el uso correcto de la unidad
motorizada.
34. Consulte el manual de instrucciones de la
unidad motorizada para ver cómo arrancar el
motor y controlar la máquina.
35. Durante la operación, nunca se coloque sobre
pendiente inclinada. Durante las estaciones
de frío, tenga cuidado con el hielo y la nieve y
36. No utilice la máquina cuando las condiciones
climáticas no sean buenas y la visibilidad sea
limitada.Encasocontrariosepodríanocasionar
caídasuoperacionesincorrectasdebidoalabaja
visibilidad.
37. No utilice la máquina cuando exista riesgo de
ser alcanzado por un rayo.
Transporte
1. Apague el motor durante el transporte. De lo
contrario,unarranqueaccidentalpodríacausar
algunalesión.

17 ESPAÑOL
Vibración
1. La exposición a una vibración excesiva podría
dañar los vasos sanguíneos o el sistema
nervioso del operador y causar los siguien-
tes síntomas en dedos, manos o muñecas:
“Adormecimiento” (entumecimiento), hor-
migueo, dolor, sensaciones de punzadas,
alteraciones en la piel o en el color de ésta.
Si cualquiera de estos síntomas se presenta,
consulte a un médico.
Para reducir el riesgo de la “enfermedad del
dedo blanco”, conserve sus manos calientes
durante la operación y mantenga el equipo y
accesorios en buenas condiciones.
Mantenimiento y almacenamiento
1. Mantenga apretados todos los tuercas, per-
nos y tornillos para asegurar que el soplador
se encuentre en condiciones seguras de
operación.
2. Si las piezas están desgastadas o dañadas,
reemplácelas con piezas proporcionadas por
Makita.
3. Guarde el soplador en un lugar seco fuera del
alcance de los niños.
4. Cuando detenga el soplador para inspeccio-
narlo, repararlo, almacenarlo o cambiarle un
accesorio, apáguelo y asegúrese de que todas
las partes en movimiento se detengan por
completo y retire el cartucho de batería. Enfríe
el soplador antes de realizar cualquier trabajo
en el mismo. Mantenga el soplador con cui-
dado y manténgalo limpio.
5. Siempre permita que el soplador se enfríe
antes de almacenarlo.
6. No exponga el soplador a la lluvia. Almacene
el soplador en interiores.
7. Cuando levante el soplador, asegúrese de
doblar las rodillas y tenga cuidado de no lasti-
marse la espalda.
8. Limpie siempre el polvo y la suciedad del
equipo. Nunca utilice gasolina, bencina, disol-
vente, alcohol o sustancias similares para ese
propósito.Estopodríaocasionardecoloración,
deformaciónogrietasenloscomponentesde
plástico.
9. No intente realizar ningún tipo de manteni-
miento o reparación que no esté descrito en
este folleto o en el manual de instrucciones de
la unidad motorizada. Solicite este tipo de tra-
bajo a nuestro centro de servicio autorizado.
10. Siga las instrucciones para la lubricación y el
cambio de los accesorios.
11. Siempre utilice únicamente piezas de repuesto
y accesorios originales.Elusodepiezaso
accesoriossuministradosporunterceropodría
provocarfallasenelequipo,dañosmaterialesy/o
lesiones graves.
12. Solicite a nuestro centro de servicio autori-
zado que inspeccione y dé mantenimiento a la
máquina de manera periódica.
13. Antes de almacenar la máquina, límpiela por
completo y dele mantenimiento. Retire el car-
tucho de batería.
14. No apoye el equipo contra algún objeto, tal
como una pared.Delocontrario,podríacaer
repentinamenteycausarunalesión.
Uso y cuidado de la herramienta a batería
1.
por el fabricante. Un cargador que es adecuado
paraunsolotipodebateríapuedegenerarriesgo
deincendioalserutilizadoconotrabatería.
2. Utilice las herramientas eléctricas solamente
para ellas.Lautilizacióndecualquierotrabatería
puede crear un riesgo de lesiones o incendio.
3. Cuando no se esté usando la batería, mantén-
gala alejada de otros objetos metálicos, como
sujetapapeles (clips), monedas, llaves, clavos,
tornillos u otros objetos pequeños de metal
los cuales pueden actuar creando una cone-
xión entre las terminales de la batería. Originar
un cortocircuito en las terminales puede causar
quemaduras o incendios.
4. En condiciones abusivas, podrá escapar
líquido de la batería; evite tocarlo. Si lo toca
accidentalmente, enjuague con agua. Si hay
contacto del líquido con los ojos, busque asis-
tencia médica.Puedequeellíquidoexpulsado
delabateríacauseirritaciónoquemaduras.
5. No utilice una herramienta ni una batería que
Las
bateríasdañadasomodicadaspodríanoca-
sionarunasituacióninesperadaprovocandoun
incendio,explosiónoriesgodelesiones.
6. No exponga la herramienta ni la batería al
fuego ni a una temperatura excesiva. La expo-
siciónalfuegooaunatemperaturasuperioralos
130°Cpodríacausarunaexplosión.
7. Siga todas las instrucciones para la carga y
evite cargar la herramienta o la batería fuera
las instrucciones. Una carga inadecuada o a
unatemperaturafueradelrangoespecicado
podríadañarlabateríaeincrementarelriesgode
incendio.
Seguridad eléctrica y de la batería
1. No deseche la(s) batería(s) donde haya fuego.
Laceldapodríaexplotar.Consulteloscódigos
localesparaversihayinstruccionesespeciales
relativas al desecho.
2. No abra ni dañe la(s) batería(s). Los electrolitos
liberadossoncorrosivosypuedenocasionar
dañosenlosojosolapiel.Éstospuedenser
tóxicossiselleganatragar.
3. No cargue la batería bajo la lluvia ni en lugares
mojados.
4. No cargue la batería en exteriores.
5. No manipule el cargador, incluida la clavija del
cargador, ni los terminales del cargador con
las manos mojadas.
Servicio
1.
herramienta eléctrica utilizando sólo piezas de
repuesto idénticas.Estoaseguraqueseman-
tengalaseguridaddelaherramientaeléctrica.

18 ESPAÑOL
2. Nunca dé servicio a baterías que estén daña-
das.Elservicioalasbateríassolamentedeberá
ser efectuado por el fabricante o un agente de
servicio autorizado.
GUARDE ESTAS
INSTRUCCIONES.
ADVERTENCIA: NO DEJE que la comodidad
o familiaridad con el producto (a base de utilizarlo
repetidamente) evite que siga estrictamente las
normas de seguridad para dicho producto.
El USO INCORRECTO o el no seguir las normas
de seguridad indicadas en este manual de ins-
trucciones puede ocasionar lesiones graves.
DESCRIPCIÓN DE LAS
PIEZAS
►Fig.3: 1. Tapa 2. Tubo 3. Boquilla de extremo
MONTAJE
ADVERTENCIA: Antes de ensamblar o ajus-
tar el equipo, apague el motor y retire el cartucho
de batería.Delocontrario,losventiladorespodrían
moverseyocasionarunalesión.
ADVERTENCIA: Cuando ensamble o ajuste
el equipo, déjelo siempre en el suelo. Elensamble
oajustedelequipoenunaposiciónverticalpodría
ocasionar lesiones graves.
ADVERTENCIA: Siga las advertencias
y precauciones contenidas en el capítulo
“ADVERTENCIAS DE SEGURIDAD” y el manual
de instrucciones de la unidad motorizada.
Ensamble del aditamento del tubo
PRECAUCIÓN: -
tamento del tubo quede asegurado después de la
instalación.Unainstalaciónincorrectapodríacausar
que el aditamento se desprendiera de la unidad
motorizadaocasionandoalgunalesiónpersonal.
Ensambleeladitamentodeltuboenlaunidad
motorizada.
1. Retire la tapa del extremo del tubo.
►Fig.4: 1. Tubo 2. Tapa
AVISO: No deseche la tapa, ya que hace falta
para guardar el aditamento.
2. Gire la palanca hacia el aditamento.
►Fig.5: 1. Palanca
3. Alineeelpasadorconlamarcadeechaenla
unidadmotorizada.Inserteeltubohastaqueelbotón
deliberaciónaparezca.
Asegúresedequelalíneadeposiciónestéenlapunta
delamarcadeechaenlaunidadmotorizada,yquela
marcadeechaenlaunidadmotorizadaylamarcade
echaeneltuboesténorientadasentresí.
►Fig.6: 1.Botóndeliberación2.Marcadeechaen
la unidad motorizada 3. Pasador 4.Líneade
posición5.Marcadeechaeneltubo
4. Gire la palanca hacia la unidad motorizada.
►Fig.7: 1. Palanca
Asegúresedequelasuperciedelapalancase
encuentre paralela al tubo.
AVISO: No apriete la palanca sin que el adita-
mento del tubo esté insertado.Delocontrario,la
palancapodríaapretardemasiadolaentradadeleje
detransmisiónydañarla.
Paraextraereltubo,girelapalancahaciaeladitamento
yjaleeltubohaciaafueramientraspresionahacia
abajoelbotóndeliberación.
►Fig.8: 1.Botóndeliberación2. Palanca 3. Tubo
Instalación de la boquilla de
extremo
Alinee la protuberancia en el tubo de la sopladora con
laranuraenlaboquilladeextremo,luegoconectela
boquilladeextremoaltubodelasopladorayluegogire
la boquilla de extremo para bloquearla en su lugar.
►Fig.9: 1. Marca de triángulo 2. Boquilla de extremo
3. Tubo de la sopladora
Paraextraerlaboquilladeextremo,realiceelprocedi-
mientodeinstalaciónenordeninverso.
NOTA:Lalongituddelaboquillasepuedemodi-
car moviendo la boquilla tal como se muestra en la
ilustración.
►Fig.10
Instalación de la boquilla plana o
boquilla de extensión
Accesorio opcional
1. Retire la boquilla de extremo del aditamento.
2. Coloque la boquilla plana o la boquilla de exten-
siónaladitamento,yluegogírelaparabloquearlaensu
lugar.
►Fig.11: 1. Boquilla plana 2.Boquilladeextensión
3. Aditamento
Instalación del juego de extensión
para boquilla para canaleta
Accesorio opcional
1. Retirelaboquilladeextremo,laboquilladeexten-
siónolaboquillaplanadeladitamento.
2. Aojeeltornillodelaabrazaderapequeñade
sujeciónparamanguera,ypaselaabrazaderade
sujeciónparamangueraatravésdeladitamento.
►Fig.12: 1. Tornillo 2.Abrazaderadesujeciónpara
manguera(pequeña)3. Aditamento

19 ESPAÑOL
3. Conecteeltubodeextensiónaladitamento.
Alineelaranuradeltubodeextensiónconlaprotube-
ranciadeladitamento,yluegodesliceeltubodeexten-
siónalolargodesuranura,demodoquelasmarcas
triangularesquedenorientadasentresí.
►Fig.13: 1.Tubodeextensión2. Aditamento
4. Coloquelaabrazaderadesujeciónparaman-
guerasobrelaranuracomoseilustrayaprieteel
tornillo.
►Fig.14: 1. Tornillo 2. Abrazadera para manguera
5. Deacuerdoconlaalturadetrabajo,conecteel
restodelostubosdeextensiónaltubodeextensión,el
cualyahayasidocolocado.
PRECAUCIÓN: Cuando utilice el juego de
extensión para boquilla para canaleta junto con
una herramienta multifuncional y un accesorio
de soplador, no utilice tres o más tubos de exten-
sión.Podríacausarundesequilibrioyresultaren
lesiones.
6. Girelasalidadelaboquilladeextremo,talcomo
semuestraenlailustración.
►Fig.15
7. Conecte la boquilla de extremo al tubo de exten-
sión.Cuandolosconecte,alineelamarcatriangularde
laboquilladeextremoyeltubodeextensión,yluego
empuje la boquilla de extremo hasta que haga clic.
Despuésdeesto,girelaboquilladeextremoauna
posiciónadecuadaparasutrabajo.
►Fig.16: 1. Boquilla de extremo 2.Tubodeextensión
3. Marca triangular
Cuandoretirelaboquilladeextremo,alineelasmarcas
triangularesdelaboquilladeextremoydeltubode
extensión,yluegojalelaboquilladeextremodeltubo
deextensión.
►Fig.17: 1. Boquilla de extremo 2.Tubodeextensión
3. Marca triangular
OPERACIÓN
ADVERTENCIA: Siga las advertencias
y precauciones contenidas en el capítulo
“ADVERTENCIAS DE SEGURIDAD” y el manual
de instrucciones de la unidad motorizada.
ADVERTENCIA: Ajuste el colgador y el arnés
para hombro en la posición que le resulte cómoda
antes de la operación.
Operación de soplado
PRECAUCIÓN: No coloque la máquina en
el suelo mientras esté encendida. Arena o polvo
puedenentrardesdelaentradadesucciónyocasio-
narunafallaounalesiónpersonal.
Sujetelamáquinarmementeconambasmanosy
realicelaoperacióndesopladomoviéndolalentamente.
Alsoplaralrededordeunedicio,piedrasgrandeso
vehículos,dirijalaboquillalejosdeellos.Cuandorea-
liceunaoperaciónenunaesquina,comiencedesdela
esquinayluegomuévasealáreamásamplia.
Ajuste la velocidad del aire con el gatillo interruptor de
launidadmotorizada,deacuerdoconelentornoolas
condiciones de su uso.
►Fig.18
Uso del juego de extensión para
boquilla para canaleta
PRECAUCIÓN: Cuando utilice el juego de
extensión para boquilla para canaleta, no sujete
la sopladora con una sola mano, sino con las dos.
►Fig.19
PRECAUCIÓN: No utilice el juego de exten-
sión para boquilla para canaleta cerca de cables
eléctricos.
►Fig.20
PRECAUCIÓN: No utilice el juego de exten-
sión para boquilla para canaleta en un día con
viento.
►Fig.21
PRECAUCIÓN: Cuando utilice el juego de
extensión para boquilla para canaleta, mantenga
a las personas o animales alrededor a más de
15 m de distancia del soplador.
►Fig.22
Mantenga la sopladora erguida al sostener el mango de
la sopladora. Coloque la salida de la sopladora sobre la
canaletayluegoenciendalasopladora.
►Fig.23
Para usuarios del UX01G
AVISO: Cuando utilice el juego de extensión para
boquilla para canaleta, si utiliza el UX01G como
unidad motorizada e instala el BL4080F al UX01G,
no use el arnés para hombro incluido en la unidad
motorizada, pero use el arnés para hombro reco-
mendado que se muestra a continuación. Para
elarnésparahombrorecomendado,preguntealos
centros de servicio autorizados de Makita.

20 ESPAÑOL
Instalación del arnés para hombro
PRECAUCIÓN: Siempre lleve puesto el arnés
para hombro colocado en la unidad motorizada.
Antes de la operación, ajuste el arnés para hom-
bro de acuerdo al tamaño del usuario para evitar
la fatiga.
PRECAUCIÓN: Antes de la operación,
asegúrese de que el arnés para hombro esté
colocado correctamente al colgador de la unidad
motorizada.
PRECAUCIÓN: Antes de la operación, asegú-
rese de que la hebilla del arnés para hombro esté
PRECAUCIÓN: Siempre lleve puesto el arnés
para hombro que se muestra a continuación. No
utilice otros arneses para hombro.
1. Colóqueseelarnésparahombroyajustela
hebilla.
►Fig.24: 1. Hebilla
NOTA:Cuandoretireelarnésparahombro,destrabe
lahebillayretireelarnésparahombro.
2. Ajusteelarnésparahombroenunaposición
cómodaparatrabajar.
►Fig.25
3. Abrocheelganchodelarnésparahombroal
colgador de la unidad motorizada.
►Fig.26: 1. Gancho 2. Colgador
Elarnésparahombrocuentaconunmediodelibera-
ciónrápida.Simplementeaprietelosladosdelahebilla
yestoliberaráelarnésparahombro.
►Fig.27: 1. Hebilla
MANTENIMIENTO
ADVERTENCIA: Antes de inspeccionar o dar
mantenimiento al equipo, apague el motor y retire
el cartucho de batería.Delocontrario,losventilado-
respodríanmoverseyocasionarunalesióngrave.
ADVERTENCIA: Cuando inspeccione o dé
mantenimiento al equipo, déjelo siempre en el
suelo.Elensambleoajustedelequipoenunaposi-
ciónverticalpodríaocasionarlesionesgraves.
ADVERTENCIA: Siga las advertencias
y precauciones contenidas en el capítulo
“ADVERTENCIAS DE SEGURIDAD” y el manual
de instrucciones de la unidad motorizada.
AVISO: Nunca use gasolina, bencina, diluyente
(tíner), alcohol o sustancias similares. Puede que
esto ocasione grietas o descoloramiento.
ParamantenerlaSEGURIDADyFIABILIDADdelpro-
ducto,lasreparaciones,ycualquierotratareademan-
tenimiento o ajuste deberán ser realizadas en centros
deservicioautorizadosodefábricaMakita,empleando
siempre repuestos Makita.
Limpieza de la máquina
Quiteelpolvodelamáquinaconunpañosecoo
humedezcaunpañoenaguayjabónyexprímalopara
limpiarla.
►Fig.28
Retireelpolvoolasuciedaddelaentradadesucción
en la parte posterior del aditamento.
►Fig.29: 1.Entradadesucción
Inspección general
Inspeccionelaspiezasdañadas.Solicitesureem-
plazo a nuestro centro de servicio autorizado en caso
necesario.
Lubricación de las piezas móviles
AVISO: Siga la instrucción sobre la frecuencia
y cantidad de grasa suministrada.Delocontrario,
unalubricacióninsucientepodríadañarlaspiezas
móviles.
Eje de transmisión:
Aplique grasa (grasa Makita N No.2 o equivalente) cada
30horasdeoperación.
►Fig.30
NOTA: Usted puede adquirir grasa original de Makita
con el distribuidor Makita de su localidad.
Almacenamiento
Cuando almacene el aditamento separado de la unidad
motorizada,coloquelatapaenelextremodeltubo.
►Fig.31
A página está carregando ...
A página está carregando ...
A página está carregando ...
A página está carregando ...
A página está carregando ...
A página está carregando ...
A página está carregando ...
A página está carregando ...
A página está carregando ...
A página está carregando ...
A página está carregando ...
A página está carregando ...
A página está carregando ...
A página está carregando ...
A página está carregando ...
A página está carregando ...
A página está carregando ...
A página está carregando ...
A página está carregando ...
A página está carregando ...
A página está carregando ...
A página está carregando ...
A página está carregando ...
A página está carregando ...
A página está carregando ...
A página está carregando ...
A página está carregando ...
A página está carregando ...
A página está carregando ...
A página está carregando ...
A página está carregando ...
A página está carregando ...
A página está carregando ...
A página está carregando ...
A página está carregando ...
A página está carregando ...
A página está carregando ...
A página está carregando ...
A página está carregando ...
A página está carregando ...
A página está carregando ...
A página está carregando ...
A página está carregando ...
A página está carregando ...
A página está carregando ...
A página está carregando ...
A página está carregando ...
A página está carregando ...
A página está carregando ...
A página está carregando ...
A página está carregando ...
A página está carregando ...
A página está carregando ...
A página está carregando ...
A página está carregando ...
A página está carregando ...
A página está carregando ...
A página está carregando ...
A página está carregando ...
A página está carregando ...
A página está carregando ...
A página está carregando ...
A página está carregando ...
A página está carregando ...
A página está carregando ...
A página está carregando ...
A página está carregando ...
A página está carregando ...
A página está carregando ...
A página está carregando ...
A página está carregando ...
A página está carregando ...
A página está carregando ...
A página está carregando ...
A página está carregando ...
A página está carregando ...
A página está carregando ...
A página está carregando ...
A página está carregando ...
A página está carregando ...
A página está carregando ...
A página está carregando ...
A página está carregando ...
A página está carregando ...
-
 1
1
-
 2
2
-
 3
3
-
 4
4
-
 5
5
-
 6
6
-
 7
7
-
 8
8
-
 9
9
-
 10
10
-
 11
11
-
 12
12
-
 13
13
-
 14
14
-
 15
15
-
 16
16
-
 17
17
-
 18
18
-
 19
19
-
 20
20
-
 21
21
-
 22
22
-
 23
23
-
 24
24
-
 25
25
-
 26
26
-
 27
27
-
 28
28
-
 29
29
-
 30
30
-
 31
31
-
 32
32
-
 33
33
-
 34
34
-
 35
35
-
 36
36
-
 37
37
-
 38
38
-
 39
39
-
 40
40
-
 41
41
-
 42
42
-
 43
43
-
 44
44
-
 45
45
-
 46
46
-
 47
47
-
 48
48
-
 49
49
-
 50
50
-
 51
51
-
 52
52
-
 53
53
-
 54
54
-
 55
55
-
 56
56
-
 57
57
-
 58
58
-
 59
59
-
 60
60
-
 61
61
-
 62
62
-
 63
63
-
 64
64
-
 65
65
-
 66
66
-
 67
67
-
 68
68
-
 69
69
-
 70
70
-
 71
71
-
 72
72
-
 73
73
-
 74
74
-
 75
75
-
 76
76
-
 77
77
-
 78
78
-
 79
79
-
 80
80
-
 81
81
-
 82
82
-
 83
83
-
 84
84
-
 85
85
-
 86
86
-
 87
87
-
 88
88
-
 89
89
-
 90
90
-
 91
91
-
 92
92
-
 93
93
-
 94
94
-
 95
95
-
 96
96
-
 97
97
-
 98
98
-
 99
99
-
 100
100
-
 101
101
-
 102
102
-
 103
103
-
 104
104


