HP Jetdirect 3100w BLE/NFC/Wireless Accessory Guia de instalação

Tipo
Guia de instalação
A B
ES
Lea esto primero
HP Jetdirect 3100w
BLE/NFC/Wireless Accessory
1
A B
3JN69-90901_IG.indd 1 3/19/2018 6:03:44 PM
*3JN69-90905*
*3JN69-90905*
3JN69-90905
2
2
4
6
98
3
5
7
A
A
A
AA
A
A
A
3JN69-90901_IG.indd 2 3/19/2018 6:03:48 PM
3
2
4
6
3
5
B
B
B
B
B
2
3
2
3JN69-90901_IG.indd 3 3/19/2018 6:03:49 PM
4
NOTE: To ensure printer compatibility and maintain regulatory

1. Ensure the Jetdirect 3100w accessory is disconnected from
the printer.
2. Go to www.hp.com/go/FutureSmart and select .
3. Find your printer and select the   link.
4. 
5. Follow the instructions for installing the Jetdirect 3100w
accessory below.

Steps A1-A9.


Steps B1-B6.

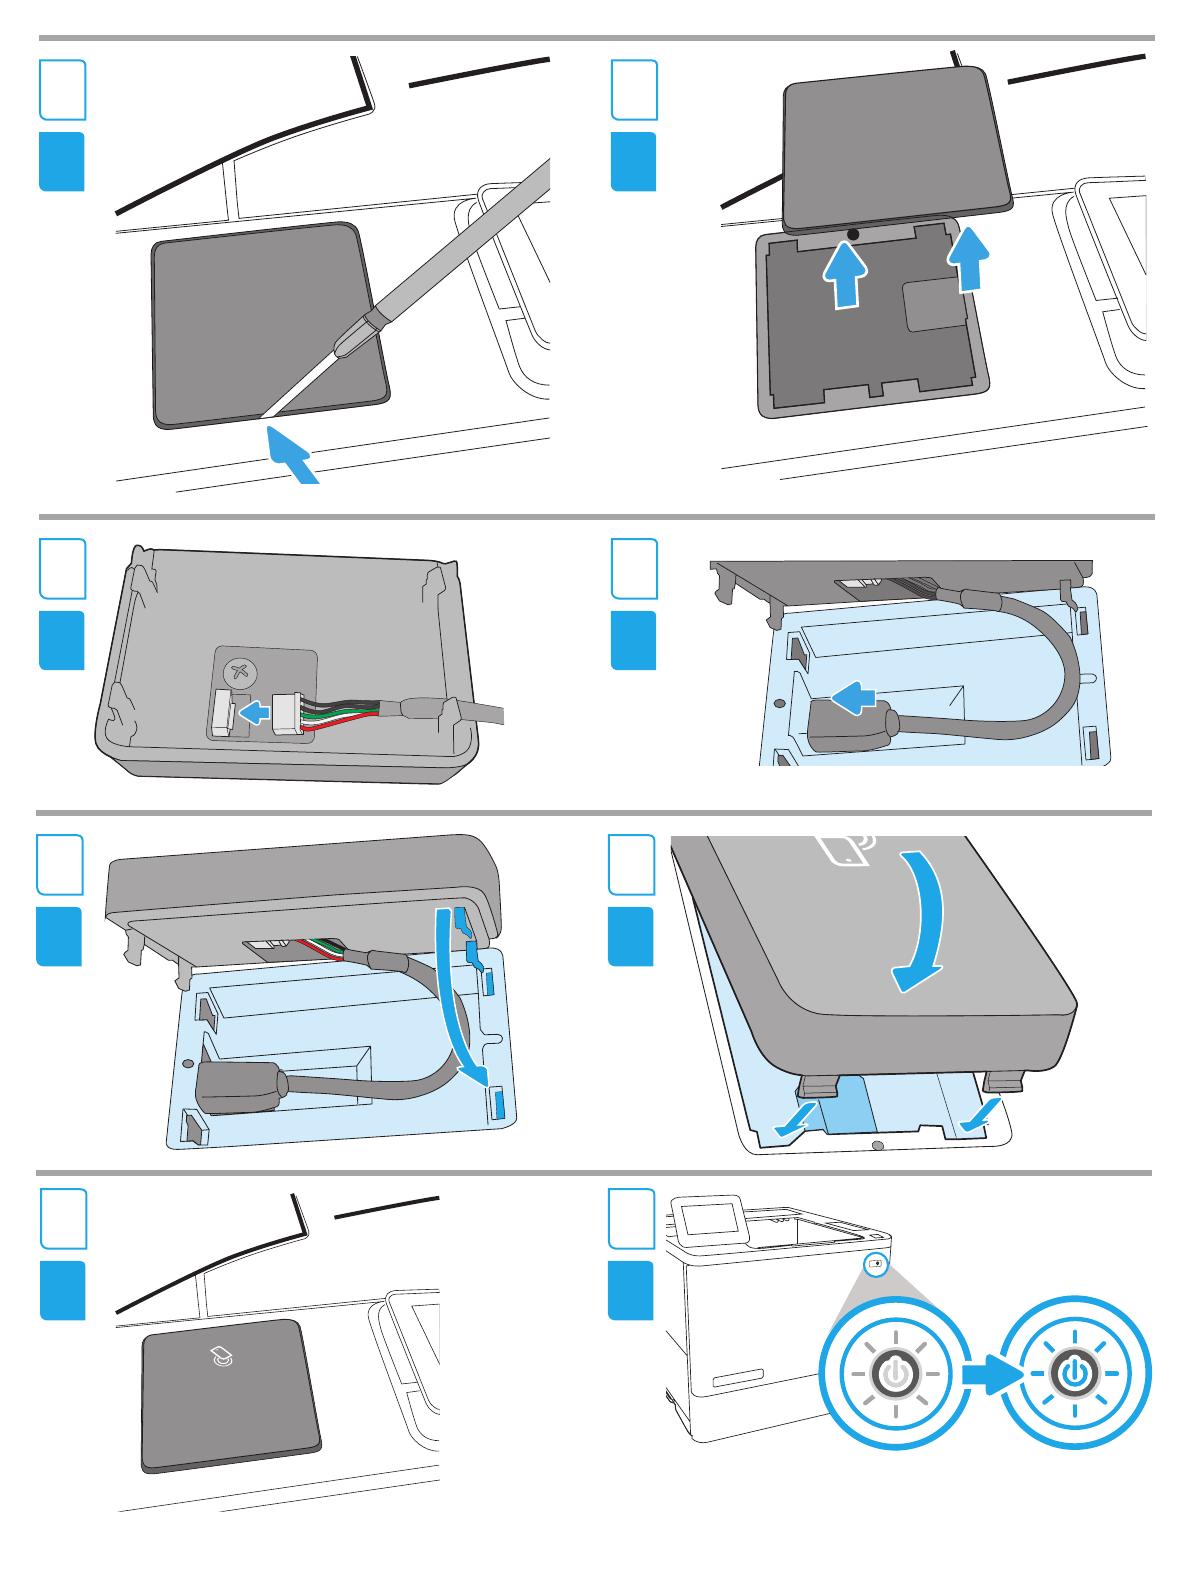
Step A1 and B1: Turn OFF the power to the printer.
Step A2-A3: Locate and open the Hardware Integration Pocket (HIP2)
on the printer. The HIP2 location may vary by printer. Refer to your
printer user guide if needed.
The HIP2 is covered by a rectangular cover that is retained by clips


Step A4: To install in the HIP2, connect the white connector on the
short USB cable to the HP Jetdirect 3100w.
Step A5: Connect the USB connector on the short USB cable to the
socket in the printer’s HIP2.
Step A6, A7: 
into the HIP2 recess. Then gently push the HP Jetdirect 3100w onto
the rounded clips so that it is held securely in place in the HIP2.
Step B2: To install outside the printer, connect the white connector
on the long USB cable to the HP Jetdirect 3100w.
Step B3: Push the long USB cable into the slot on the accessory


3100w to the accessory cover.
Step B4: Attach the fastener strips (optional) to the bottom of the
3100w. Remove the backing paper in order to attach the bottom set
of fastener strips to the top of the printer (Step B5). Place the 3100w
on the printer. Connect the USB connector on the long USB cable to
the USB accessory port, usually located at the back of the printer.
Step A9 and B6:

be shown under the Installed Personalities and Options section of the
printer’s 
icon will also appear on the printer’s control panel.
NOTE:
information at www.hp.com/support/jd3100w.
For more information on mobile printing, go to:
www.hp.com/go/MobilePrinting
www.hp.com/go/WirelessPrinting
www.hp.com/support/jd3100w
REMARQUE: pour garantir la compatibilité de l’imprimante et
la conformité réglementaire, mettez à jour le micrologiciel de

1. 

2. www.hp.com/go/FutureSmart
 (Mettre à niveau maintenant).
3. 
Téléchargement du micrologiciel.
4. 

5. 




ci-dessous.


les 
ci-dessous.
:
:
matériel (HIP2) sur l’imprimante. Lemplacement du module HIP2

l’utilisateur de l’imprimante si nécessaire.



:

:
socket situé dans le module HIP2 de l’imprimante.
:


de le maintenir fermement en place dans le module HIP2.
: pour installer l’accessoire en dehors de l’imprimante,


:



:

).

du câble USB long au port USB de l’accessoire, généralement situé

:


la section Modes d’impression et options installés des pages
 de l’imprimante. Une icône de réseau

REMARQUE:www.hp.com/support/jd3100w pour
obtenir des informations supplémentaires concernant l’installation,


www.hp.com/go/MobilePrinting
www.hp.com/go/WirelessPrinting
www.hp.com/support/jd3100w
EN FR
3JN69-90901_IG.indd 4 3/19/2018 6:03:50 PM
5
 
Erfüllung behördlicher Bestimmungen aktualisieren Sie bitte die

1. 

2. Rufen Sie www.hp.com/go/FutureSmart auf und wählen Sie
Jetzt aktualisieren.
3. 
.
4. 

5. Befolgen Sie folgende Anweisungen für die Installation von



Schritte A1-A9



Zubehörs und befolgen Sie Schritte B1-B6
Anleitung zu B1-B6 unten.
Schritt A1 und B1:
Schritt A2-A3:





Abdeckung vorsichtig, indem Sie einen dünnen Schraubendreher

Schritt A4:

Schritt A5:

Schritt A6, A7:



Schritt B2:


Schritt B3:




Schritt B4: Befestigen Sie die Befestigungsstreifen (optional) an der
Unterseite des 3100w. Entfernen Sie die Papierfolie, um die unteren

(Schritt B5


Schritt A9 and B6:

Installierte
Druckersrprachen und Optionen unter 
Statusseiten


www.hp.com/support/jd3100w.

www.hp.com/go/MobilePrinting
www.hp.com/go/WirelessPrinting
www.hp.com/support/jd3100w
NOTA: 
la conformità alle norme in vigore, aggiornare innanzitutto

1. Assicurarsi che l’accessorio Jetdirect 3100w sia scollegato dalla
stampante.
2. Accedere a www.hp.com/go/FutureSmart
 (Aggiorna ora).
3. 
 .
4. 
5. 
di seguito.


Integration Pocket), utilizzare il cavo USB corto ed eseguire
Passaggi A1-A9
Se l’alloggiamento HIP2 contiene già un altro accessorio, utilizzare


Passaggio A1 e B1: SPEGNERE la stampante.
Passaggio A2-A3: individuare e aprire l’alloggiamento HIP2 sulla



Sullalloggiamento HIP2 è presente un coperchio rettangolare,
mantenuto da fermi presenti sui lati corti. Usare un cacciavite sottile

Passaggio A4:
collegare il connettore bianco del cavo USB corto all’accessorio

Passaggio A5: collegare il connettore USB del cavo USB corto alla
presa all’interno dell’alloggiamento HIP2 della stampante.
Passaggio A6, A7: inserire i fermi a forma di uncino dell’accessorio

l’accessorio HP Jetdirect 3100w sui fermi arrotondati in modo da

Passaggio B2:
stampante, collegare il connettore bianco del cavo USB lungo
allaccessorio HP Jetdirect 3100w.
Passaggio B3: inserire il cavo USB lungo nell’alloggiamento sul coperchio


saldamente laccessorio 3100w al coperchio dell’accessorio.
Passaggio B4:
dellaccessorio 3100w. Rimuovere la pellicola di carta per applicare le
strisce adesive alla parte superiore della stampante ().

connettore USB del cavo USB lungo alla porta dellaccessorio USB,

Passaggio A9 e B6:


 in Rapporti > Pagine di
 della stampante. Sul pannello di controllo

NOTA:

www.hp.com/support/jd3100w.

www.hp.com/go/MobilePrinting
www.hp.com/go/WirelessPrinting
www.hp.com/support/jd3100w
DE IT
3JN69-90901_IG.indd 5 3/19/2018 6:03:50 PM
6
NOTA: 
garantizar su compatibilidad y cumplir las normativas:
1. 
desconectado de la impresora.
2. Visite www.hp.com/go/FutureSmart y seleccione 

3. descarga
.
4. 
5. Siga las instrucciones para instalar el accesorio


inalámbrico en el HIP2, utilice el cable USB corto y siga los


largo y la cubierta de accesorios y siga los pasos B1-B6.

Pasos A1 y B1:
Pasos A2 y A3:


impresora si es necesario.



Paso A4:

Paso A5: Conecte el conector USB del cable USB corto al puerto del
HIP2 de la impresora.
Pasos A6 y A7: Inserte las presillas en forma de gancho del


para ajustarlo correctamente en el HIP2.
Paso B2: Para instalarlo fuera de la impresora, conecte el conector

Paso B3:



Paso B4:

paso B5).

cable USB largo al puerto USB accesorio, normalmente ubicado en
la parte posterior de la impresora.
Pasos A9 y B6: Encienda la impresora. Imprima un informe de


Installed Personalities and Options (Usuarios
Informes de la impresora > Páginas


NOTA:
www.hp.com/support/jd3100w.

www.hp.com/go/MobilePrinting
www.hp.com/go/WirelessPrinting
www.hp.com/support/jd3100w
注:要确保打印机兼容性并维护法规遵从性,
请更新打印机固件:
1. 确保 Jetdirect 3100w 附件已断开与打印机的连
接。
2. 访问 www.hp.com/go/FutureSmart,然后选择
立即升级
3. 查找您的打印机,然后选择固件下载链接。
4. 按照说明升级打印机固件。
5. 按照以下说明安装 Jetdirect 3100w 附件。
要将 HP Jetdirect  无线附件安装到
HIP2 包中,请使用短的 USB 电缆,然后按照
步骤 A1-A9 操作。请参阅下面完整的 A1-A9 说明。
如果 HIP2 包内已安装其它附件,请使用长的 USB
电缆和附件盖板,然后按照步骤 B1-B6 操作。请参
阅下面完整的 B1-B6 说明。
步骤 A1B1关闭打印机的电源。
步骤 A2-A3找到并打开打印机上的硬件集成包
(HIP2)HIP2 的位置因打印机而异。如有需要,
请参阅打印机用户指南。
HIP2 被一块长方形盖板盖住,并用扣夹沿其短边
扣紧。用一把较薄的平口螺丝刀,沿着两个短边
将盖板轻轻撬起。
步骤 A4要安装到 HIP2 中,请将短 USB 电缆上
的白色接头连接至 HP Jetdirect 3100w
步骤 A5将短 USB 电缆上的 USB 接头连接至打印
HIP2 中的插孔。
步骤 A6A7HP  3100w 的钩式扣夹
插入 HIP2 凹槽。然后,将 HP Jetdirect 3100w 轻轻
推入圆形扣夹,使其牢固卡入 HIP2
步骤 B2要安装在打印机外部,请将长 USB 电缆
上的白色接头连接至 HP Jetdirect 3100w
步骤 B3将长 USB 电缆推入附件盖板的插槽中,
然后将 HP  3100w 的钩式扣夹插入附件盖
板。向下按压,以将 3100w 稳固连接到附件挡盖
上。
步骤 B4将扣件条(可选)连接至 3100w 底部。
取下衬纸,以将底部的一组扣件条连接至打印机
顶部(步骤 B53100w 放在打印机上。将长
USB 电缆上的 USB 接头连接至 USB 附件端口——
通常位于打印机背面。
步骤 A9B6打开打印机电源。打印配置报告
以确认安装正确。在打印机报告 > 配置状态页的
安装的个性和选件部分下,将会显示 HP Jetdirect
3100w 条目。打印机控制面板上还将出现一个无
线网络图标。
有关其它安装、配置和故障排除信息,请访
www.hp.com/support/jd3100w
有关移动打印的详细信息,请转至:
www.hp.com/go/MobilePrinting
www.hp.com/go/WirelessPrinting
www.hp.com/support/jd3100w
ES 
3JN69-90901_IG.indd 6 3/19/2018 6:03:50 PM
7
 

1. 

2. www.hp.com/go/FutureSmart
 (Upgradovat).
3.  .
4. 
5. 































krok B5).





Installed Personalities
and Options



www.hp.com/support/jd3100w.

www.hp.com/go/MobilePrinting
www.hp.com/go/WirelessPrinting
www.hp.com/support/jd3100w
 For at sikre printerkompatibilitet og overholdelse

1. 

2. Gå til www.hp.com/go/FutureSmart, og vælg Opgrader nu.
3. Find din printer, og vælg  .
4. 
5. 



. Se alle A1-A9-instrukser nedenfor.


. Se alle B1-B6-instrukser nedenfor.
Trin A1 og B1:
Trin A2-A3: Find og åbn holderen til tilslutning af hardware (HIP2)
på printeren. Placeringen af HIP2 kan variere fra printer til printer.
Se evt. brugervejledningen til din printer.
HIP2 er dækket af et rektangulært dæksel, der holdes fast med


Trin A4: For at installere i HIP2 skal du tilslutte det hvide stik på det

Trin A5:

Trin A6, A7:


Trin B2: For at installere uden for printeren skal du tilslutte det

Trin B3:



Trin B4:

trin B5). Sæt 3100w


Trin A9 og B6:


Installerede printerspr. og -udstyr på siderne Rapporter >

netværk på printerens kontrolpanel.

www.hp.com/support/jd3100w.

www.hp.com/go/MobilePrinting
www.hp.com/go/WirelessPrinting
www.hp.com/support/jd3100w
 DA
3JN69-90901_IG.indd 7 3/19/2018 6:03:50 PM
8
 

regelgeving:
1. 

2. Ga naar www.hp.com/go/FutureSmart en selecteer Upgrade
 (Nu upgraden).
3. 
.
4. 
printer.
5. Volg de instructies voor het installeren van het Jetdirect
3100w accessoire hieronder.

accessoire in de HIP2-pocket gebruikt u de korte USB-kabel en
volgt u de stappen A1-A9. Zie de volledige instructies A1-A9
hieronder.
Als de HIP2-pocket al een ander accessoire bevat, gebruikt u de
lange USB-kabel en de accessoireklep en volgt u de stappen B1-
B6. Zie de volledige instructies B1-B6 hieronder.
Stap A1 en B1: Schakel de voeding naar de printer UIT.
Stap A2-A3:

de gebruikershandleiding van uw printer indien nodig.

randen is vastgeklemd door clips. Gebruik een dunne, platte

randen los te wippen.
Stap A4: Voor installatie in de HIP2 sluit u de witte connector van

Stap A5:
aansluiting in de HIP2 van de printer.
Stap A6, A7:


HIP2.
Stap B2: Voor installatie buiten de printer sluit u de witte connector

Stap B3:


bevestigen aan de accessoireklep.
Stap B4: Breng de bevestigingsstrips (optioneel) aan op de
onderkant van de 3100w. Verwijder het grondpapier om de onderste
set bevestigingsstrips aan te brengen op de bovenkant van de
printer (stap B5


Stap A9 en B6:

wordt een vermelding HP Jetdirect 3100w weergegeven onder
de sectie Geïnstalleerde personality’s en opties bij Rapporten >
 voor de printer. Ook verschijnt er een
pictogram van een draadloos netwerk op het bedieningspaneel van
de printer.
www.hp.com/support/jd3100w voor aanvullende

problemen.
Ga voor meer informatie over mobiel afdrukken naar:
www.hp.com/go/MobilePrinting
www.hp.com/go/WirelessPrinting
www.hp.com/support/jd3100w
HUOMAUTUS: Voit varmistaa tulostimen yhteensopivuuden ja

seuraavasti:
1. 
2. Siirry osoitteeseen www.hp.com/go/FutureSmart ja valitse
 (Päivitä nyt).
3. 

4. Päivitä tulostimen laiteohjelmisto ohjeiden mukaisesti.
5. 
mukaisesti.

 ohjeita.




Vaihe A1 ja B1: katkaise tulostimen virta.




pidikkeillä kiinnitetty suojakansi. Irrota suojakansi ujuttamalla ohut,
litteäpäinen ruuvitaltta varovasti jommankumman lyhyen sivun alle.
Vaihe A4:

Vaihe A5:

Vaihe A6, A7:


Vaihe B2: jos haluat kytkeä laitteen tulostimen ulkopuolelle,


Vaihe B3:

pidikkeet lisälaitteen kanteen. Paina 3100w tukevasti kiinni
lisävarusteen kanteen.
Vaihe B4:
pohjaan. Irrota tarranauhojen taustapaperi ja kiinnitä nauhat
tulostimen kanteen (Vaihe B5). Aseta 3100w tulostimeen. Liitä

yleensä tulostimen taustapuolella.
Vaihe A9 ja B6:

pitäisi näkyä tulostimen 
Asennetut kielet ja asetukset
ohjauspaneeliin ilmestyy langattoman verkon kuvake.
HUOMAUTUS: lisätietoja asentamisesta, määrityksistä ja
vianmäärityksestä on osoitteessa www.hp.com/support/jd3100w.
Lisätietoja mobiilitulostuksesta on osoitteessa:
www.hp.com/go/MobilePrinting
www.hp.com/go/WirelessPrinting
www.hp.com/support/jd3100w
 FI
3JN69-90901_IG.indd 8 3/19/2018 6:03:50 PM
9
MEGJEGYZÉS: A nyomtató kompatibilitásának, valamint az


1. 
2. www.hp.com/go/FutureSmart oldalra,

3. 

4. 
5. 





Ha a HIP2 rekeszben már másik tartozék van, használja a hosszú
USB-kábelt és a tartozékfedelet, és kövesse a 
B6-ig
A1 és B1 lépés:
A2-A3 lépés:






A4 lépés:

A5 lépés:

A6, A7 lépés:



B2 lépés:


B3 lépés:



B4 lépés:

B5 lépés).



A9 és B6 lépés:



és opciók

MEGJEGYZÉS:
www.hp.com/support/jd3100w oldalon



www.hp.com/go/MobilePrinting
www.hp.com/go/WirelessPrinting
www.hp.com/support/jd3100w
 


1. 

2. www.hp.com/go/FutureSmart

3. 

4. 

5. 










A2-A3 







A4 
















(









www.hp.com/support/jd3100w


www.hp.com/go/MobilePrinting
www.hp.com/go/WirelessPrinting
www.hp.com/support/jd3100w
HU 
3JN69-90901_IG.indd 9 3/19/2018 6:03:50 PM
10
참고: 프린터의 호환성이 보장되고 규정 준수를 유지하도록
하려면, 프린터 펌웨어를 업데이트하십시오.
1. 프린터에서 Jetdirect 3100w 부속품이 분리되었는지
확인합니다.
2. www.hp.com/go/FutureSmart로 이동하여 Upgrade now
(지금 업그레이드)를 선택합니다.
3. 해당 프린터를 찾아 Firmware Download (펌웨어 다운로드)
링크를 선택합니다.
4. 프린터의 펌웨어 업그레이드 지침을 따릅니다.
5. 아래의 Jetdirect 3100w 부속품 설치 지침을 따르십시오.
HIP2 포켓에 HP Jetdirect 3100w BLE/NFC/Wireless 부속품을
설치하려면 짧은 USB 케이블을 사용해 A1-A9단계를 따릅니다.
아래의 A1-A9 지침 전체를 참조하십시오.
HIP2 포켓에 이미 다른 부속품이 설치된 경우, 긴 USB 케이블과
부속품 덮개를 사용해 B1-B6단계를 따릅니다. 아래의 B1-B6
지침 전체를 참조하십시오.
A1 및 B1단계: 프린터의 전원을 끕니다.
A2-A3단계: 프린터의 HIP2(Hardware Integration Pocket)를 찾아
엽니다. HIP2의 위치는 프린터에 따라 다를 수 있습니다. 필요한
경우 프린터 사용 설명서를 참조하십시오.
HIP2는 직사각형의 덮개로 덮여 있으며, 짧은 가장자리에 있는
클립으로 고정되어 있습니다. 짧은 가장자리에 얇은 일자형
드라이버를 사용하여 덮개를 가볍게 들어 올립니다.
A4단계: HIP2를 설치하려면, 짧은 USB 케이블에 있는 흰색
커넥터를 HP Jetdirect 3100w에 연결합니다.
A5단계: 짧은 USB 케이블에 있는 USB 커넥터를 프린터의 HIP2
소켓에 연결합니다.
A6, A7단계: HP JetDirect 3100w의 고리 모양 클립을 HIP2의 삽입
위치에 삽입합니다. 그리고 HP Jetdirect 3100w를 둥근 클립에
조심스럽게 밀어 넣어 HIP2에 단단히 고정되도록 합니다.
B2단계: 프린터 겉면을 설치하려면, 긴 USB 케이블의 흰색
커넥터를 HP Jetdirect 3100w에 연결합니다.
B3단계: 긴 USB 케이블을 부속품 덮개에 있는 슬롯에 밀어
넣고, HP JetDirect 3100w의 고리 모양 클립을 부속품 덮개에
삽입합니다. 세게 눌러 3100w가 부속품 덮개에 잘 연결되도록
합니다.
B4단계: 고정 스트립(선택 사항)을 3100w의 하단에 연결합니다.
고정 스트립의 하단 세트를 프린터의 상단(B5단계)에 연결하기
위해 뒷면 용지를 제거합니다. 프린터에 3100w를 배치합니다.
긴 USB 케이블에 있는 USB 커넥터를 일반적으로 프린터의
뒷면에 있는 USB 부속품 포트에 연결합니다.
A9 및 B6단계: 프린터의 전원을 켭니다. 구성 보고서를 인쇄해
올바른 설치를 확인합니다. HP Jetdirect 3100w 항목이 프린터
보고서>구성/상태 페이지의 설치된 특성 및 옵션 섹션 아래
표시됩니다. 또한, 무선 네트워크 아이콘이 프린터의 제어판에
표시됩니다.
참고: 추가 설치, 구성 및 문제 해결 정보는
www.hp.com/support/jd3100w를 참조하십시오.
모바일 인쇄에 대한 자세한 내용은 다음을 참조하십시오.
www.hp.com/go/MobilePrinting
www.hp.com/go/WirelessPrinting
www.hp.com/support/jd3100w
 
skriveren er kompatibel og at den fortsatt overholder gjeldende
forskrifter:
1. 
skriveren.
2. Gå til www.hp.com/go/FutureSmart, og velg Oppgrader nå.
3. Finn skriveren din, og velg koblingen Nedlasting av fastvare.
4. 
5. 


tilleggsutstyret i HIP2-lommen, bruker du den korte USB-kabelen
. Se hele fremgangsmåten
for trinn A1-A9 nedenfor.
Hvis det allerede er koblet til et annet tilleggsutstyr i HIP2-lommen,
bruker du den lange USB-kabelen og tilleggsutstyrsdekselet og
trinn B1-B6. Se hele fremgangsmåten

Trinn A1 og B1:
Trinn A2-A3:
på skriveren. Plasseringen av HIP2 kan variere fra skriver til skriver.

brukerveiledning.

langs kortsidene. Lirk dekselet forsiktig av ved hjelp av en tynn,

Trinn A4:

Trinn A5:
kontakten i skriverens HIP2.
Trinn A6, A7:

forsiktig på de avrundede klemmene, slik at den holdes på plass i HIP2.
Trinn B2:


Trinn B3:
tilleggsutstyrsdekselet. Sett deretter de kroklignende klemmene

for å feste 3100w til tilleggsutstyrsdekselet.
Trinn B4: Fest festeremsene (valgfritt) til bunnen av 3100w. Fjern
papiret på baksiden av det nederste settet med festeremser, og fest
deretter disse på oversiden av skriveren (trinn B5). Plasser 3100w


Trinn A9 og B6:


Installerte språkvalg og alternativer på skriverens Rapporter >

vises også på skriverens kontrollpanel.

www.hp.com/support/jd3100w.
Hvis du vil ha mer informasjon om mobilutskrift, kan du gå til:
www.hp.com/go/MobilePrinting
www.hp.com/go/WirelessPrinting
www.hp.com/support/jd3100w
 NO
3JN69-90901_IG.indd 10 3/19/2018 6:03:51 PM
11
 

1. 
drukarki.
2. www.hp.com/go/FutureSmart
Uaktualnij teraz.
3. Pobieranie
.
4. 

5. 


.














HIP2 drukarki.










krok B5




akcesoria i opcje na stronie 




www.hp.com/support/jd3100w.

na stronach:
www.hp.com/go/MobilePrinting
www.hp.com/go/WirelessPrinting
www.hp.com/support/jd3100w
NOTA: Para garantir a compatibilidade da impressora e manter

da impressora:
1. 
desconectado da impressora.
2. Acesse www.hp.com/go/FutureSmart e selecione Atualizar
agora.
3.  .
4. 
5. 


no pocket HIP2, use o cabo USB curto e siga as Etapas A1-A9.

Se o pocket HIP2 já estiver preenchido por outro acessório, use
Etapas B1-B6.

Etapa A1 e B1:
Etapa A2-A3:


O HIP2 é protegido por uma tampa retangular presa por clipes ao

de uma das bordas curtas para erguer suavemente a tampa.
Etapa A4: Para instalar no HIP2, conecte o conector branco no cabo
USB curto no HP Jetdirect 3100w.
Etapa A5: Conecte o conector USB no cabo USB curto na tomada

Etapa A6, A7:
3100w no recesso do HIP2. Empurre cuidadosamente o HP Jetdirect


Etapa B2: Para instalar fora da impressora, conecte o conector
branco no cabo USB longo no HP Jetdirect 3100w.
Etapa B3: Empurre o cabo USB longo no slot da tampa do



Etapa B4: Conecte as tiras de fecho (opcional) na parte inferior

inferior de tiras de fecho à parte superior da impressora (Etapa B5).



Etapa A9 e B6:





NOTA:
www.hp.com/support/jd3100w.

www.hp.com/go/MobilePrinting
www.hp.com/go/WirelessPrinting
www.hp.com/support/jd3100w
 PT
3JN69-90901_IG.indd 11 3/19/2018 6:03:52 PM
12
 


1. 

2. www.hp.com/go/FutureSmart

3. 

4. 

5. 







.


































Options)



www.hp.com/support/jd3100w.

www.hp.com/go/MobilePrinting
www.hp.com/go/WirelessPrinting
www.hp.com/support/jd3100w
OBS! 
regelefterlevnad ska du uppdatera skrivarens inbyggda programvara:
1. 
skrivaren.
2. Gå till www.hp.com/go/FutureSmart och välj Uppgradera nu.
3. 
programvara.
4. 
programvara.
5. 
nedan.


. Se alla instruktionerna A1-A9 nedan.

du den långa USB-kabeln och luckan till tillbehöret och följer
. Se alla instruktionerna B1-B6 nedan.
Steg A1 och B1:
Steg A2-A3: Leta upp skrivarens maskinvaruintegreringplats HIP2 och

användarhandbok vid behov.
HIP2 täcks av en rektangulär lucka som sitter fast med klämmor


Steg A4:

Steg A5:
på skrivarens HIP2.
Steg A6, A7:


Steg B2:

Steg B3:


Steg B4:
skyddsarket om du vill fästa den undre delen av fästremsorna på
skrivarens ovansida (Steg B5). Placera 3100w på skrivaren. Anslut


Steg A9 och B6:

Installerade
skrivarspråk och tillbehör på skrivarens sidor Rapporter >

skrivarens kontrollpanel.
OBS!
www.hp.com/support/jd3100w.

www.hp.com/go/MobilePrinting
www.hp.com/go/WirelessPrinting
www.hp.com/support/jd3100w
RU SV
3JN69-90901_IG.indd 12 3/19/2018 6:03:52 PM
13
附註:若要確保印表機相容性並維持符合法規要求,請先更新
印表機韌體:
1. 確定 Jetdirect 3100w 配件已從印表機拔除。
2. 前往 www.hp.com/go/FutureSmart,然後選擇 Upgrade 
(立即升級)
3. 找出您的印表機,然後選擇   (韌體下載)
連結。
4. 依照指示升級印表機韌體。
5. 依照下方指示安裝 Jetdirect 3100w 配件。
若要將 HP Jetdirect  無線配件安裝至 HIP2 整合
區中,請使用較短的 USB 纜線,然後按照步驟 A1-A9 操作。
請參閱下面有關 A1-A9 的完整指示。
如果 HIP2 整合區已裝入其他配件,請使用較長的 USB 纜線和
配件蓋,然後按照步驟 B1-B6 操作。請參閱下面有關 B1-B6
完整指示。
步驟 A1B1關閉印表機的電源。
步驟 A2-A3尋找並開啟印表機上的硬體整合區 (HIP2)HIP2
置可能因印表機而異。如有需要,請參閱印表機使用者指南。
HIP2 已由長方形封蓋所蓋住,並以固定夾扣住短邊。使用細扁
的一字型螺絲起子沿著任一短邊,輕輕撬開封蓋。
步驟 A4若要安裝在 HIP2,請將較短 USB 纜線的白色接頭連
接至 HP Jetdirect 3100w
步驟 A5將較短 USB 纜線的 USB 接頭連接至印表機 HIP2 的插
孔中。
步驟 A6A7HP  3100w 的掛鉤固定夾插入 HIP2
槽處。然後將 HP Jetdirect 3100w 輕推至圓形固定夾,使其牢
牢固定在 HIP2 中。
步驟 B2若要安裝在印表機外部,請將較長 USB 纜線的白色
接頭連接至 HP Jetdirect 3100w
步驟 B3將較長的 USB 纜線壓入配件蓋的插槽中,然後
HP  3100w 的掛鉤固定夾插入配件蓋。往下壓,
使 3100w 與配件蓋確實連接。
步驟 B4將固定帶 (選用) 貼至 3100w 底部。移除襯紙,將
固定帶底層黏至印表機頂端 (步驟 B5)。將 3100w 放在印表機
上。將較長 USB 纜線上的 USB 接頭連接至 USB 附件連接埠 –
通常位於印表機背面。
步驟 A9B6開啟印表機電源。列印組態報告,以確認安
裝正確。HP Jetdirect 3100w 項目將會顯示在印表機 Reports
(報告) >  (組態/狀態) 頁的 Installed
Personalities and Options(已安裝的個人化設定和選項) 區段。
無線網路圖示也會出現在印表機的控制面板上。
附註如需更多設定、組態和疑難排解的相關資訊,請前往
www.hp.com/support/jd3100w
如需更多關於行動列印的資訊,請前往:
www.hp.com/go/MobilePrinting
www.hp.com/go/WirelessPrinting
www.hp.com/support/jd3100w
NOT: 

1. 

2. www.hp.com/go/FutureSmart

3. 
4. 
5. 







































NOT:
www.hp.com/support/jd3100w



www.hp.com/support/jd3100w

TR
3JN69-90901_IG.indd 13 3/19/2018 6:03:52 PM
14
 


1. 

2. www.hp.com/go/FutureSmart

3. 

4. 

5. 



.






































 
Installed Personalities and Options
 
 



www.hp.com/support/jd3100w.

www.hp.com/go/MobilePrinting
www.hp.com/go/WirelessPrinting
www.hp.com/support/jd3100w

3JN69-90901_IG.indd 14 3/19/2018 6:03:52 PM
15
3JN69-90901_IG.indd 15 3/19/2018 6:03:52 PM
16
EN
FR
IT
DE
ES
PT
RU


Russia, Kazakhstan, Belarus, and Ukraine only
Russie, Kazakhstan, Biélorussie et Ukraine uniquement
Solo Russia, Kazakistan, Bielorussia e Ucraina
Nur Russland, Kasachstan, Weißrussland und Ukraine
Solo Rusia, Kazajistán, Bielorrusia y Ucrania
Somente Rússia, Cazaquistão, Bielorrússia e Ucrânia
Только для России, Казахстана, Белоруссии и Украины
Тек Ресей, Қазақстан, Беларусь және Украина үшін
Лише для Росії, Казахстану, Білорусі й України
Назначение устройства
Добавляет функцию прямой печати и печати одним касанием для принтера или МФУ HP, а также обеспечивает
беспроводную печать со смартфонов, планшетных ПК и ноутбуков.
Характеристики устройства
При помощи HP Jetdirect 3100w создается гнездо аппаратной интеграции (HIP) на поддерживаемых принтерах
HP, что позволяет использовать функции печати Wireless Direct и мобильной печати одним касанием.
Питание
Внешний источник питания не требуется. При помощи HP Jetdirect 3100w на принтере создается гнездо аппаратной
интеграции (HIP).
Условия окружающей среды
0° - 40° C (32° - 104° F) При эксплуатации: 0° - 45° C (32° - 113° F) При хранении: -40° - 70° C (-40° - 149° F) Влажность
при эксплуатации и хранении: 15% - 95%
Нормативный код модели:
Утилизация оборудования, отслужившего свой срок, силами пользователя
Советы по устранению неполадок и сведения о поддержке можно найти на странице www.hp.com/go/jd3100wSupport.
Месяц и год производства
Серийный номер изделия дополнительного устройства для беспроводной печати определить его месяц и год
производства.
Третья цифра серийного номера обозначает последнюю цифру года в десятилетии. Например, цифра 3 обозначает
2013 год, цифра 4 — 2014 год. Четвертая цифра серийного номера обозначает месяц. Первые девять месяцев
обозначены номерами от 1 до 9 соответственно, а последние три месяца представлены в виде букв. Например,
1 — это январь, 9 — сентябрь, А — октябрь, В — ноябрь, С — декабрь.
Наличие этого символа означает, что данное изделие нельзя утилизировать вместе с другими бытовыми
отходами. Вместо этого изделие необходимо сдать для утилизации в специальный пункт по переработке
электрического и электронного оборудования. Такой подход поможет сохранить здоровье людей
и окружающую среду. Дополнительные сведения можно узнать у вашей службы утилизации отходов
или на странице www.hp.com/recycle.
RU
3JN69-90901_IG.indd 16 3/19/2018 6:03:53 PM
BOISB-1812-00
17
KK
UK
Өнімнің мақсаты
HP принтеріне не MFP құрылғысына сымсыз тікелей басып шығару және басып шығару үшін түрту технологиясын
оңай қосыңыз және смартфондардан, планшеттерден және ноутбуктерден сымсыз басып шығаруды қосыңыз.
Өнім ерекшеліктері
HP Jetdirect 3100w қолдау көрсетілетін HP принтерлерінің жабдықты біріктіру бумасында (HIP) орнатылады, ол мобильді
құрылғылардан сымсыз тікелей басып шығару және басып шығару үшін түрту қызметтерін пайдалануға мүмкіндік береді.
Қуат
Сыртқы қуат көзі талап етілмейді. HP Jetdirect 3100w жүйесі принтердің жабдықты біріктіру бумасында (HIP) орнатылады.
Қоршаған орта ауқымдары
0-40°C (32-104°F) Жұмыс істеу ортасы: 0-45°C (32-113°F) Сақтау ортасы: -40°C және 70°C (-40°F және 149°F) Жұмыс
және сақтау ылғалдылығы: 15-95%
Реттеуші үлгі нөмірі:
Пайдаланушылар тарапынан қалдық жабдықты тастау
Ақауларды жою және қолдау ақпараты www.hp.com/go/jd3100wSupport торабында бар.
Жасалған айы мен жылы
Сымсыз қосалқы құрал өндірілген жылды және айды анықтау үшін қосалқы құралдағы сериялық нөмірді қараңыз.
Сериялық нөмірдің үшінші саны онжылдықтың жылын көрсетеді. Мысалы, 3 = 2013, 4 = 2014. Сериялық нөмірдің
төртінші саны айды көрсетеді. Бірінші тоғыз ай 1 мен 9 аралығындағы санмен дәйекті түрде көрсетіледі және соңғы
үш ай әріптермен көрсетіледі. Мысалы, 1 = қаңтар, 9 = қыркүйек, A = қазан, B = қараша, C = желтоқсан.
Бұл таңба өнімді басқа үй қоқысымен бірге тастауға болмайтындығын білдіреді. Оның орнына, қалдық
жабдықты қалдық электр және электрондық жабдықтарды қайта өңдеу үшін жинайтын арнайы орынға
тапсыру арқылы адам денсаулығы мен қоршаған ортаны қорғаңыз. Қосымша ақпарат алу үшін тұрмыстық
қоқысты тастау қызметіне хабарласыңыз немесе www.hp.com/recycle торабына өтіңіз.
Призначення приладдя
Додає функцію прямого друку та друку одним дотиком для принтера або багатофункціонального пристрою HP, а також
забезпечує безпровідний друк зі смартфонів, планшетів і ноутбуків.
Функції приладдя
Пристрій HP Jetdirect 3100w встановлюється в кишеню для апаратних засобів (HIP) підтримуваних пристроїв HP, роблячи
доступними функції прямого бездротового друку і друку через дотик із мобільних пристроїв.
Живлення
Зовнішнього джерела живлення не потрібно. Пристрій HP Jetdirect 3100w встановлюється в кишеню для апаратних
засобів (HIP) принтера.
Робочі діапазони
Від 0 °C до 40 °C Експлуатація: від 0 °C до 45 °C Зберігання: від -40 °C до 70 °C Вологість експлуатації та зберігання:
від 15% до 95%
Стандартний номер моделі:
Утилізація використаного обладнання користувачами
Усунення несправностей і підтримка: інформацію можна отримати на сторінці www.hp.com/go/jd3100wSupport.
Місяць та рік виробництва
Для визначення року та місяця виробництва бездротового додаткового приладдя знайдіть на ньому серійний номер.
Третя цифра серійного номера відповідає року в десятиріччі. Наприклад, 3 = 2013, 4 = 2014. Четверта цифра
серійного номера відповідає місяцю. Перші дев'ять місяців позначені цифрами від 1 до 9 послідовно, а три останні
місяці представлені літерами алфавіту. Наприклад, 1 = січень, 9 = вересень, A = жовтень, B = листопад, C = грудень.
Цей символ вказує на те, що виріб не можна утилізувати разом з іншими побутовими відходами. Натомість
захистіть довкілля і здоров'я людей – тож доставте обладнання у спеціальний пункт збирання для переробки
використаного електричного та електронного обладнання. Подробиці запитуйте в місцевої служби утилізації
відходів або дивіться на веб-сторінці www.hp.com/recycle.
3JN69-90901_IG.indd 17 3/19/2018 6:03:53 PM
BOISB-1812-00
BOISB-1812-00
18
3JN69-90901_IG.indd 18 3/19/2018 6:03:54 PM
3JN69-90901_IG.indd 19 3/19/2018 6:03:54 PM

www.hp.com
Notice for the U.S.A.
This device complies with Part 15 of the Federal Communication
Commission rules. Operation is subject to the following two conditions:

accept any interference received, including interference that may cause
undesired operation.


designed to provide reasonable protection against harmful interference in


instructions, may cause harmful interference to radio communications.



interference to radio or television reception, which can be determined by

the interference by one or more of the following measures:
Reorient or relocate the receiving antenna.







This device complies with Part 15 of the FCC Rules. Operation is
subject to the following two conditions: (1) this device may not cause
harmful interference, and (2) this device must accept any interference
received,including interference that may cause undesired operation.


should be used in such a manner that the potential for humancontact with




This device complies with the limits for a Class B digital device and conforms

transmitter comply with Industry Canada standard RSS210 and are labeled

Operation is subject to the following two conditions: (1) this device may
not cause interference, and (2) this device must accept any interference,
including interference that may cause undesired operation of the device.


with a minimum distance of 20 cm between the radiator and personnel.




d’approbation IC.


réception d’interférence, y compris les interférences susceptibles de générer
un fonctionnement indésirable de l’appareil.

canadiennes applicables dans un environnement non contrôlé. Cet



Reproduction, adaptation or translation without prior written permis sion

The information contained herein is subject to change without notice.
The only warranties for HP products and services are set forth in the

Nothing herein should be construed as constituting an additional war ranty.
HP shall not be liable for technical or editorial errors or omissions contained
herein.
La reproduction, l'adaptation ou la traduction de ce document sans



préavis.


Les informations contenues dans ce document ne constituent en aucun cas


3JN69-90901_IG.indd 20 3/19/2018 6:03:54 PM
Regulatory Model Identication Number
For regulatory identication purposes, this product has been assigned
aRegulatory Model Number (RMN). The RMN for your product is
BOISB-1812-00. The RMN should not be confused with the marketing name
(HPJetdirect 3100w BLE/NFC/Wireless) or the HP Product Number (3JN69A).
  • Page 1 1
  • Page 2 2
  • Page 3 3
  • Page 4 4
  • Page 5 5
  • Page 6 6
  • Page 7 7
  • Page 8 8
  • Page 9 9
  • Page 10 10
  • Page 11 11
  • Page 12 12
  • Page 13 13
  • Page 14 14
  • Page 15 15
  • Page 16 16
  • Page 17 17
  • Page 18 18
  • Page 19 19
  • Page 20 20

HP Jetdirect 3100w BLE/NFC/Wireless Accessory Guia de instalação

Tipo
Guia de instalação