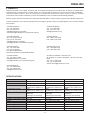
Hoshizaki KM-80C-W Self Contained Crescent Cuber Ice Macker Guia de instalação
- Tipo
- Guia de instalação

L1F158101 (122821)
No. 15 Qingqiu Street, Suzhou Industrial Park, Suzhou 215126 China
KM-40C
KM-60C
KM-80C
KM-40C-W
KM-60C-W
KM-80C-W
KM-80C
SELF-CONTAINED CRESCENT CUBER
CUBO CRESCENTE INDEPENDENTE
INSTRUCTION MANUAL
MANUAL DE INSTRUÇÕES

ENGLISH
PORTUGUÊS
IMPORTANT SAFETY INFORMATION ...................................................................................................1
I. INSTALLATION INSTRUCTIONS .......................................................................................................3
1. CONSTRUCTION .......................................................................................................................... 3
2. ACCESSORIES ............................................................................................................................. 3
3. UNPACKING .................................................................................................................................3
4. LOCATION ....................................................................................................................................4
5. INSTALLATION .............................................................................................................................4
6. ELECTRICAL CONNECTIONS .....................................................................................................4
7. WATER SUPPLY AND DRAIN CONNECTIONS ..........................................................................5
II. OPERATING INSTRUCTIONS ...........................................................................................................6
1. START UP .....................................................................................................................................6
2. USER SETTINGS .......................................................................................................................... 6
3. PREPARING THE ICEMAKER FOR LONG STORAGE ...............................................................7
III. MAINTENANCE ..................................................................................................................................8
1. CLEANING ....................................................................................................................................8
2. BEFORE CALLING FOR SERVICE ............................................................................................10
3. DISPOSAL ................................................................................................................................... 10
4. WARRANTY ................................................................................................................................11
SPECIFICATIONS ..................................................................................................................................11
INFORMAÇÕES DE SEGURANÇA IMPORTANTES ............................................................................ 13
I. INSTRUÇÕES DE INSTALAÇÃO ..................................................................................................... 15
1. ESTRUTURA ............................................................................................................................... 15
2. ACESSÓRIOS .............................................................................................................................15
3. DESEMBALAGEM .......................................................................................................................15
4. POSICIONAMENTO .................................................................................................................... 16
5. INSTALAÇÃO ..............................................................................................................................16
6. CONEXÕES ELÉTRICAS ...........................................................................................................17
7. FORNECIMENTO DE ÁGUA E CONEXÕES DE DRENAGEM ..................................................17
II. INSTRUÇÕES DE OPERAÇÃO .......................................................................................................18
1. INICIALIZAÇÃO ........................................................................................................................... 18
2. CONFIGURAÇÕES DO USUÁRIO .............................................................................................19
3. PREPARAÇÃO DA MÁQUINA DE GELO PARA ARMAZENAMENTO LONGO ........................20
III. MANUTENÇÃO .................................................................................................................................20
1. LIMPEZA .....................................................................................................................................20
2. ANTES DE LIGAR PARA O SERVIÇO TÉCNICO ......................................................................23
3. DESCARTE .................................................................................................................................23
4. GARANTIA ..................................................................................................................................23
ESPECIFICAÇÕES ................................................................................................................................24

1
ENGLISH
IMPORTANT SAFETY INFORMATION
Throughout this manual, notices appear to bring your attention to situations which could result in
death, serious injury, or damage to the unit.
WARNING Indicates a hazardous situation which, if not avoided, could result in death or
serious injury.
CAUTION Indicates a hazardous situation which, if not avoided, could result in minor or
moderate injury.
NOTICE Indicates a hazardous situation which, if not avoided, could result in damage to
the unit.
HYGIENE Indicates important precautions for hygiene and food safety.
IMPORTANT Indicates important information about the use and care of the unit.
IMPORTANT
This booklet is an integral and essential part of the product and should be kept and preserved
by the user.
Please read carefully the guidelines and warnings contained herein as they are intended to
provide the installer/user with essential information for the proper installation and the continued
safe use and maintenance of the product.
Please preserve this booklet for any further consultation that may be necessary.
WARNING
This is a commercial icemaker, and should be destined only to be used for the purpose for
which it has been expressly designed.
Any other use should be considered improper and therefore dangerous. The manufacturer
will not be held liable or responsible for any damage caused by improper, incorrect and
unreasonable use.
The installation, and relocation if necessary, must be carried out by qualied personnel,
in accordance with current regulations, according to the manufacturer’s instructions.
Keep ventilation openings, in the appliance enclosure or in the built-in structure, clear of
obstruction.

2
ENGLISH
The use of any electrical appliance involves the observance of some fundamental rules. In
particular:
* Instances of high humidity and moisture increase the risk of electrical short circuits and
potential electrical shocks. If in doubt, disconnect the icemaker.
* Do not damage the power cord or pull it in order to disconnect the icemaker from the
electrical supply network.
* If the supply cord and/or the plug should need to be replaced, it should only be done by a
qualied service engineer.
* Do not touch the electrical parts or operate the switches with damp hands.
* This appliance is not intended for use by persons (including children) with reduced physical,
sensory or mental capabilities, or lack of experience and knowledge, it can however be used
by children aged from 8 years and above and persons with reduced physical, sensory or
mental capabilities, or lack of experience and knowledge providing they have been given
supervision or instruction concerning use of the appliance by a person responsible for their
safety.
* Children shall not play with the appliance.
* Cleaning and user maintenance shall not be made by children without supervision.
* Do not attempt to modify the icemaker. Only qualied personnel may disassemble or repair
the appliance.
When positioning the appliance, ensure the supply cord is not trapped or damaged.
Do not locate multiple portable socket-outlets or portable power supplies at the rear of the
appliance.

3
ENGLISH
I. INSTALLATION INSTRUCTIONS
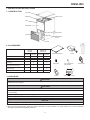
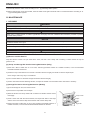
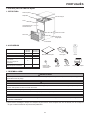
1. CONSTRUCTION
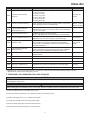
2. ACCESSORIES
KM-40C
KM-60C
KM-80C
KM-40C-W
KM-60C-W
KM-80C-W
Other than
Indonesia Indonesia Other than
Indonesia Indonesia
Instruction Manual 1 1 1 1
Scoop 1 1 1 1
Leg 4 - 4 -
Adjust Bolt (M12 x 35)
(leveling) -4-4
Pan Head Screw with Washer
(M4 x 30) (louver xing) 2 2 - -
Thumbscrew + Spacer (M4)
(louver xing) - - 2 2
Cleaning Pack Assy - - 1 1
3. UNPACKING
WARNING
Children should not be allowed in reach of the packaging elements (plastic bags and expanded polystyrene) as they are
potential sources of danger.
CAUTION
Do not lift or manoeuvre the carton by using the shipping bands.
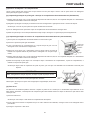
When moving the unit by hand, remove the louver and hold the unit bottom. Do not hold the top panel or door. It may come o
and cause injury.
Always wear protective gloves when carrying the unit.
When handling the carton or the unpacked unit, work in pairs to prevent injury.
NOTICE
Remove shipping carton, tape(s) and packing. If packing material is left in the icemaker, it will not work properly.
1) After removing the packaging, make sure that the icemaker is in good condition. If in doubt, please do not use the icemaker
but apply to professionally qualied personnel.
Top Panel
Separator Water Circuit
Door
Storage Bin
Louver
Control Box
Air Filter
Refrigeration
Circuit
Instruction Manual LegScoop
Pan Head Screw
with Washer
Thumbscrew
Spacer Cleaning Pack Assy
Adjust Bolt

4
ENGLISH
2) Remove the shipping tape holding the door and separator.
3) Remove the protective plastic lm from the exterior. If the icemaker is exposed to the sun or to heat, remove the lm after the
icemaker cools.
4) Remove the package of accessories. Check the contents according to “2. ACCESSORIES”.
4. LOCATION
WARNING
This icemaker is not intended for outdoor use.
The icemaker should not be located next to ovens, grills or other high heat producing equipment.
This appliance is not suitable for installation in an area where a water jet could be used.
CAUTION
The location should provide a rm and level foundation for the icemaker.
NOTICE
Do not place anything on top of the icemaker or in front of the louver.
IMPORTANT
Normal operating ambient temperature should be within 1°C to 40°C. Normal operating water temperature should be within
5°C to 35°C. Operation of the icemaker, for extended periods, outside of these normal temperature ranges may affect
production capacity.
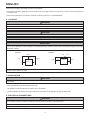
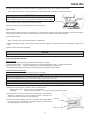
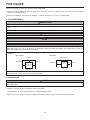
Allow the clearance specied below for proper air circulation and ease of maintenance and/or service should they be required.
Side View
Rear
Front
Top 15 mm
40 cm 15 cm
ICEMAKER
Top View
Rear
ICEMAKER
Front
Left Right
15 cm
15 cm
15 cm
In some high humidity environments, condensation may form inside the machine and drip onto the oor. Do not install where
the oor can be aected by water.
5. INSTALLATION
CAUTION
Incorrect installation can cause harm to people, animals or other items, for which the manufacturer cannot be held
responsible.
* Place the icemaker in the selected permanent site.
* The appliance must be positioned so that the plug is accessible.
* Level the icemaker in both the left-to-right and front-to-rear directions by adjusting the legs or adjust bolts.
6. ELECTRICAL CONNECTIONS
WARNING
THIS APPLIANCE MUST BE EARTHED
This icemaker requires an earth that meets the national and local electrical code requirements.
To prevent possible severe electrical shock to individuals or extensive damage to the unit, install a proper earth wire to the icemaker.
Disconnect the main power supply before any maintenance, repairs or cleaning is undertaken.

5
ENGLISH
* This appliance requires a separate 220 - 240VAC, 10A supply. The electrical supply must be protected by a suitable circuit
breaker.
* The main control box fuse is rated at 5A and should only be replaced by a qualied service engineer.
* Usually an electrical permit and services of a licensed electrician are required.
7. WATER SUPPLY AND DRAIN CONNECTIONS
WARNING
Connect to potable cold water supply only.
* The connections to the mains water supply must be made in accordance with the countries’ current requirements of the Water
Supply or Water Fittings Regulations.
* Icemaking water must be potable water. Where scaling can be caused by water quality, installation of an external lter or
softener is recommended. Contact your local water treatment professional or Hoshizaki service agent.
* Water supply pressure should be minimum 0.07 MPa (0.7 bar) and maximum 0.8 MPa (8 bar). If the pressure exceeds 0.8
MPa (8 bar), use a proper pressure reducing valve. Do NOT throttle back the supply tap.
* A plumbing permit and services of a licensed plumber may be required in some areas.
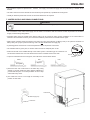
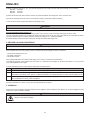
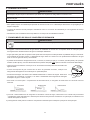
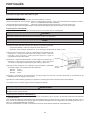
* The icemaker drain is gravity ow, so ensure drain hose has an adequate pitch or fall.
* Drain lines should not be installed directly to the sewer system. A vertical air gap of a minimum of 5
cm should be between the end of the drain hoses from the icemaker and the oor drain.
* To prevent a backow into the storage bin, the outlet hose must be laid as shown.
1) Attach the free end of inlet hose to the water tap, noting
washer is correctly positioned. Hand tighten suciently to
provide leak free joint. It is a wise precaution to have a stop
valve within easy reach.
2) The outlet hose can be cut to length as necessary to suit
position of main drain.
5cm air gap
Drain
Floor
Downgrade
GOOD BAD
Upgrade
BAD
Water Supply Tap
Inlet Hose
Inlet Hose
Outlet Hose

6
ENGLISH
II. OPERATING INSTRUCTIONS
NOTICE
All parts are factory-adjusted. Improper adjustments may result in failure.
If the unit is turned o, wait for at least 3 minutes before restarting the icemaker to prevent damage to the compressor.
HYGIENE
This icemaker is designed to produce edible ice. To keep the icemaker hygienic:
* Wash your hands before removing ice. Use the plastic scoop provided (accessory).
* The storage bin is for ice use only. Do not store anything else in the bin nor use other electrical appliances in the bin.
* Clean the storage bin before use (see “III. 1. CLEANING”).
* Keep the scoop clean. Clean it by using a neutral cleaner and rinse thoroughly.
* Close the door after removing ice to prevent entrance of dirt, dust or insects into the storage bin.
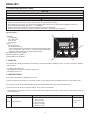
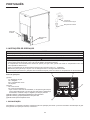
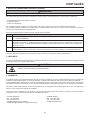
Operation Panel
[1] Display
run: Icemaking
oFF: Shut down
FUL: Bin full
cln: Cleaning
[2] Dot
O: Normal mode
On: Sanitation mode (*)
* After 4 continued hours of inactivity, the icemaker automatically cleans
and refreshes the water circuit to prevent bacterial proliferation,
keeping it clean and sanitary for longer periods of time.
[3] ON/OFF Button / Down Button
[4] Cleaning Button / Up Button
[5] Reset Button / Enter Button
1. START UP
The installer will normally commission the icemaker to start the automatic icemaking process. To ensure continuous operation,
make sure that:
* The water supply tap is on,
* The icemaker is connected to the power supply, and
* The display shows “run”.
2. USER SETTINGS
The settings listed below are adjustable by the user.
1) Press and hold the reset button for 3 seconds to enter the user setting mode. The display shows one of the setting codes.
2) Use the up or down button until the display shows the desired setting code. Then, press the enter button.
3) Use the up or down button to adjust the setting. Then, press the enter button.
4) After nishing the settings, use the up or down button until the display shows “END”. Then, press the enter button to exit the
user setting mode.
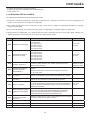
Code Item Description Default
U.04 Drain frequency
0: No drain
1: Every 1 cycle
2: Every 2 cycles
5: Every 5 cycles
10: Every 10 cycles
20: Every 20 cycles
10: Every 10
cycles
[1]
[3] [4]
[2]
[5]

7
ENGLISH
Code Item Description Default
U.44 Automatic water cleaning
frequency
0: No automatic water cleaning
5: Every 5 cycles
10: Every 10 cycles
15: Every 15 cycles
20: Every 20 cycles
40: Every 40 cycles
60: Every 60 cycles
20: Every 20
cycles
U.49 Number of chemical doses (*) When chemical doses reach set number of times, notice code
"n93" appears to show no chemical is left.
KM-40: 15 times
KM-60: 13 times
KM-80: 12 times
U.50 Fully automated chemical
cleaning frequency (*)
Start fully automated chemical cleaning at set frequency.
Adjustable from every 400 to 1000 cycles (in 100-cycle steps)
e.g. 40 = 400 cycles
–
U.51 UV-LED irradiation time (**) Irradiate UV-LED for set period of time.
None or adjustable from 10 to 30 minutes (in 1-minute steps) –
U.52 UV-LED irradiation frequency (**) Irradiate UV-LED in freeze cycle after set period of time.
Adjustable from 30 to 300 minutes (in 10-minute steps) 120 minutes
U.53 Operation mode
nor: Normal mode
cln: Sanitation mode (After 4 continued hours of inactivity,
water circuit is automatically cleaned and refreshed to prevent
bacterial proliferation.)
nor: Normal
mode
U.54 Fully automated chemical
cleaning mode (*)
When "cln" (sanitation mode) is selected, unit runs one cycle
of fully automated chemical cleaning by using fully automated
cleaning kit (option) regardless of frequency set by U.50.
–
U.55 Reset number of chemical doses
(*)
Reset notice code “n93” (no chemical is left) and number of
chemical doses. –
U.56 Reset settings Reset all user settings to default. –
U.58 Forced shut down Shut down unit under any conditions. –
U.59 Forced drain Shut down and drain unit under any conditions. –
U.60 Notice (e.g. maintenance) Notice code “n99” appears after set period of time.
Adjustable from 0 (none) to 6000 hours (in 100-hour steps) 0: None
U.68 Reset notice Reset counting for notice U.60. –
* Applicable only to the fully automated cleaning model (-W) or when the fully automated cleaning kit (option) is used.
** Applicable only when the UV-LED (option) is used.
3. PREPARING THE ICEMAKER FOR LONG STORAGE
NOTICE
This icemaker will not work at subfreezing temperatures. To prevent damage to the water supply line, drain the icemaker when
air temperature is below zero.
HYGIENE
When shutting down the icemaker for two or more days, drain the icemaker to prevent contamination in the water circuit.
1) Press the ON/OFF buton. The display shows “oFF”.
2) Press and hold the reset button for 3 seconds to enter the user setting mode.
3) Set the user setting “U.59” to “1” to drain the icemaker.
4) Unplug the icemaker or disconnect the power supply.
5) Close the water supply tap, and remove the inlet hose.
6) Remove all ice from the storage bin, and clean the bin.

8
ENGLISH
7) Chemically clean the water circuit according to “III. 1. [e] Icemaking Water System”.
8) Before resuming the use of the icemaker, clean the water circuit again with fresh water or a chemical solution according to “III.
1. [e] Icemaking Water System”.
III. MAINTENANCE
1. CLEANING
WARNING
Before carrying out any cleaning or maintenance operations, unplug the icemaker from the electrical supply network.
This appliance must not be cleaned by use of a water jet.
CAUTION
When using a neutral cleaner or sodium hypochlorite, thoroughly read and understand the instructions provided to prevent
potential health problems.
NOTICE
Ask a trained service person to clean and sanitise the icemaker water system at least twice a year and to check and clean the
condenser at least once a year.
To prevent possible damage, do not clean the plastic parts with water above 40°C or in a dishwasher.
Do not use any alcohol for cleaning/sanitisation of the icemaker. It may cause cracks on the plastic parts.
HYGIENE
To ensure their eects and hygienic quality, prepare the cleaning and sanitising solutions just before their use.
[a] Machine and Bin Exterior
Wipe the exterior at least once per week with a clean, soft cloth. Use a damp cloth containing a neutral cleaner to wipe o
grease or dirt.
[b] Scoop and Storage Bin Handle Cleaning/Sanitisation (Daily)
1) Either mix 3 litres of water with 11 ml of 5.25% sodium hypochlorite solution in a suitable container, or the recommended
Hoshizaki sanitiser as directed.
2) Soak the scoop in the solution for more than 3 minutes. Rinse thoroughly, and shake to remove surplus liquid.
Note: Using a cloth to dry may re-contaminate.
3) Use a neutral cleaner to wash the storage bin handle. Rinse thoroughly.
4) Soak a clean cloth with the sanitising solution, and wipe the handle. Use fresh water and a clean cloth to rinse/dry.
[c] Storage Bin Interior Cleaning/Sanitisation (Weekly)
1) Open the storage bin door, and remove all ice.
2) Remove the scoop holder from the slope.
3) Wash the bin liner and scoop holder with a neutral non-abrasive cleaner. Rinse
thoroughly.
4) Soak a clean cloth with the neutral cleaner, and wipe both sides of the slope
and the door inner surface. Wipe o the cleaner with a clean damp cloth.
5) Either mix 3 litres of water with 11 ml of 5.25% sodium hypochlorite solution in a
suitable container, or the recommended Hoshizaki sanitiser as directed.
Scoop Holder
Slope
Handle

9
ENGLISH
6) Soak a clean sponge or cloth with the solution, and wipe the bin liner, bin door, slope and scoop holder.
Note: Clean every surface of the door gasket which gets soiled easily. It is readily removable for cleaning.
IMPORTANT
The door gasket is provided with a magnet at the top and both sides. To
ensure air tightness of the door, ret the gasket properly in its correct position.
7) The remaining solution can be used to sanitise utensils.
Note: Do not wipe dry or rinse after sanitising, but allow to air dry.
[d] Air Filter
Plastic mesh air lters remove dirt or dust from the air, and keep the condenser from getting clogged. If the lters get clogged,
the icemaker’s performance will be reduced. Remove and clean the air lter(s) at least twice per month:
1) Remove the air lter.
Note: Do not put your hand inside the machine compartment.
2) Clean the air lter by using a vacuum cleaner. When severely clogged, use warm water and a neutral cleaner to wash the air
lter.
3) Rinse and dry the air lter thoroughly.
NOTICE
After cleaning, be sure to place the air lter back in position.
[e] Icemaking Water System
Water Cleaning
Clean the water circuit with fresh water either automatically or manually.
Automatic water cleaning: Set the user setting “U.44” to a desired frequency (see “II. 2. USER SETTINGS”).
Manual water cleaning: Press the cleaning button while the display does not show “oFF”.
The icemaker automatically resumes icemaking operation after cleaning the water circuit.
Automated Chemical Cleaning
Eectively clean the water circuit by manually feeding a chemical.
CAUTION
Wear protective equipment (e.g. protective glasses) when using the citric acid or sodium hypochlorite solution. The solution may
spout out and splash into your eyes. In that case, wash your eyes with clean water.
NOTICE
If the citric acid solution is found dripping on the sheet metal parts, wipe it o thoroughly to prevent rust.
1) Make either of the following solutions to t the intended purpose.
Cleaning (descaling): 3 litres of 2% citric acid solution
Sanitising: 3 litres of water mixed with 11 ml of 5.25% sodium hypochlorite solution
2) Open the door, and remove all ice from the storage bin. Check that the
separator is attached in its correct position as shown. Otherwise, the
solution may splash onto the ice in the storage bin.
3) Press and hold the cleaning button for 3 seconds. The display ashes
the current mode. For example, the display showing “run” during the
icemaking operation starts to ash “run”.
Door Gasket
No magnet
at bottom
Water Tank
Separator

10
ENGLISH
4) When the display changes to “cln”, pour the following amount of solution into the water tank carefully not to overow it.
KM-40C: 2.0 litres
KM-60C: 2.5 litres
KM-80C: 3.0 litres
5) Rinse the bin liner with clean water to remove any solution spilled in the storage bin. Then, close the door.
6) Press the cleaning button (or wait for 15 minutes) to start the automated chemical cleaning.
7) The unit resumes the original state when the cleaning is over.
WARNING
If the ice made after the automated chemical cleaning tastes wrong, immediately stop using the icemaker and call for service.
Fully Automated Chemical Cleaning (*)
* Available only for the fully automated cleaning model (-W) or when the fully automated cleaning kit (option) is used.
The fully automated cleaning kit automatically feeds a chemical (1250 ml of 40% citric acid solution) and descales the water
circuit at a desired frequency. Make necessary settings according to “II. 2. USER SETTINGS”.
For further details, see the instruction manual of the fully automated cleaning kit ACK.
2. BEFORE CALLING FOR SERVICE
WARNING
Do not damage the refrigerant circuit.
If the icemaker does not work properly or does not work at all, before calling for service, check that:
* The power is supplied to the unit.
* The water is turned on.
* The air lter is clean.
If the problem still exists, turn o the power supply, turn it back on, and press the reset button.
If the problem persists, check whether the error code “E” is indicated on the display or the dot at the center is on, and contact
your local Hoshizaki service agent.
If one of the following notice codes appears, follow the instructions below.
Code Description
n92 Abnormal high temperature. Clean air lter. Check for proper installation according to "I. 4. LOCATION".
n93 No chemical is left (when fully automated chemical cleaning kit (option) is used). Replace or rell chemical container,
and reset by user setting “U.55” (see “II. 2. USER SETTINGS”). To change frequency of notice, use user setting “U.49”.
n99 Period of time set by user setting “U.60” (see “II. 2. USER SETTINGS”) has passed and maintenance is required.
When maintenance is done, press reset button.
For further assistance or advice, contact your local Hoshizaki service agent.
3. DISPOSAL
Comply with local regulations regarding disposal of this appliance and its refrigerant gas. Before you scrap the appliance, take
o the door to prevent children trapped.
WARNING
The insulation foaming agent used for the unit body contains ammable gas cyclopentane. With this in mind,
dispose of the product properly.
Risk of re

11
ENGLISH
4. WARRANTY
Hoshizaki warrants to the original owner/user that all Hoshizaki branded products shall be free of defects in material and/or
workmanship for the duration of the “warranty period”. The warranty shall be eective for two years from the date of installation.
Hoshizaki’s liability under the terms of the warranty are limited and shall exclude routine servicing, cleaning, essential
maintenance and/or repairs occasioned by misuse and installations not in accordance with Hoshizaki guidelines.
Warranty repairs should be completed by an approved Hoshizaki dealer or service agency using genuine Hoshizaki components.
To obtain full details of your warranty and approved service agency, please contact your dealer/supplier, or the nearest Hoshizaki
Service oce:
Hoshizaki Singapore
TEL: +65 6225 2612
FAX: +65 6225 3219
[email protected] (Sales)
[email protected] (Technical support)
Hoshizaki Philippines
TEL: +63 2 839 2860
FAX: +63 2 851 2784
Hoshizaki Indonesia
TEL: +62 21 2937 5551/2
FAX: +62 21 2937 5553
[email protected] (Sales)
[email protected] (Technical support)
Hoshizaki Taiwan
TEL: +886 2 2706 8818
FAX: +886 2 2708 7999
Hoshizaki Thailand
TEL: +66 2 005 9980
FAX: +66 2 516 2646
Line: @hoshizakithailand
https://www.facebook.com/HoshizakiThailand
Hoshizaki Hong Kong
TEL: +852 2866-2108
FAX: +852 2866-2109
Hoshizaki Vietnam
TEL: +84 28 5417 3853
[email protected] (sales)
[email protected] (technical support)
Aços Macom Indústria e Comércio Ltda.
Av. Jaraguá, 77, Cumbica, Guarulhos - SP CEP 07221-050
Brasil
TEL: +55 11 2085-7000
FAX: +55 11 2085-7000
Hoshizaki Malaysia
TEL: +60 3 8023 5823
FAX: +60 3 8024 1823
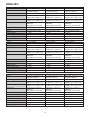
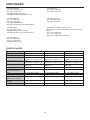
SPECIFICATIONS
Model KM-40C (50Hz) KM-60C (50Hz) KM-80C (50Hz)
Type Air-cooled, crescent ice Air-cooled, crescent ice Air-cooled, crescent ice
Power Supply 1 phase 220 - 240V 50Hz 1 phase 220 - 240V 50Hz 1 phase 220 - 240V 50Hz
Electric Consumption 250W
(ambient 32°C, water 21°C)
305W
(ambient 32°C, water 21°C)
405W
(ambient 32°C, water 21°C)
Ice Production per 24h 43kg
(ambient 10°C, water 10°C)
60kg
(ambient 10°C, water 10°C)
80kg
(ambient 10°C, water 10°C)
Dimensions 452mm(W) x 610mm(D) x
988mm(H)
[838mm(H) for Indonesia]
605mm(W) x 610mm(D) x
988mm(H)
[838mm(H) for Indonesia]
605mm(W) x 712mm(D) x
988mm(H)
[838mm(H) for Indonesia]
Refrigerant R134a, 140g R134a, 220g R134a, 240g
Insulation Foam Blowing Agent HFC-free HFC-free HFC-free
Weight Net: 40kg (Gross: 50kg) Net: 46kg (Gross: 58kg) Net: 51kg (Gross: 64kg)
Ambient Temp 1 - 40°C 1 - 40°C 1 - 40°C
Water Supply Temp 5 - 35°C 5 - 35°C 5 - 35°C
Water Supply Pressure 0.07 - 0.8 MPa (0.7 - 8 bar) 0.07 - 0.8 MPa (0.7 - 8 bar) 0.07 - 0.8 MPa (0.7 - 8 bar)
Voltage Range Rated voltage ± 6% Rated voltage ± 6% Rated voltage ± 6%

12
ENGLISH
Model KM-40C-W (50Hz) KM-60C-W (50Hz) KM-80C-W (50Hz)
Type Air-cooled, crescent ice, fully
automated cleaning
Air-cooled, crescent ice, fully
automated cleaning
Air-cooled, crescent ice, fully
automated cleaning
Power Supply 1 phase 220 - 240V 50Hz 1 phase 220 - 240V 50Hz 1 phase 220 - 240V 50Hz
Electric Consumption 250W
(ambient 32°C, water 21°C)
305W
(ambient 32°C, water 21°C)
405W
(ambient 32°C, water 21°C)
Ice Production per 24h 43kg
(ambient 10°C, water 10°C)
60kg
(ambient 10°C, water 10°C)
80kg
(ambient 10°C, water 10°C)
Dimensions 452mm(W) x 610mm(D) x
988mm(H)
[838mm(H) for Indonesia]
605mm(W) x 610mm(D) x
988mm(H)
[838mm(H) for Indonesia]
605mm(W) x 712mm(D) x
988mm(H)
[838mm(H) for Indonesia]
Refrigerant R134a, 140g R134a, 220g R134a, 240g
Insulation Foam Blowing Agent HFC-free HFC-free HFC-free
Weight Net: 42kg (Gross: 52kg) Net: 48kg (Gross: 60kg) Net: 53kg (Gross: 66kg)
Ambient Temp 1 - 40°C 1 - 40°C 1 - 40°C
Water Supply Temp 5 - 35°C 5 - 35°C 5 - 35°C
Water Supply Pressure 0.07 - 0.8 MPa (0.7 - 8 bar) 0.07 - 0.8 MPa (0.7 - 8 bar) 0.07 - 0.8 MPa (0.7 - 8 bar)
Voltage Range Rated voltage ± 6% Rated voltage ± 6% Rated voltage ± 6%
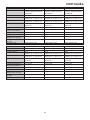
Model KM-40C (60Hz) KM-60C (60Hz) KM-80C (60Hz)
Type Air-cooled, crescent ice Air-cooled, crescent ice Air-cooled, crescent ice
Power Supply 1 phase 220 - 230V 60Hz 1 phase 220 - 230V 60Hz 1 phase 220 - 230V 60Hz
Electric Consumption 222W
(ambient 32°C, water 21°C)
335W
(ambient 32°C, water 21°C)
464W
(ambient 32°C, water 21°C)
Ice Production per 24h 40kg
(ambient 10°C, water 10°C)
65kg
(ambient 10°C, water 10°C)
86kg
(ambient 10°C, water 10°C)
Dimensions 452mm(W) x 610mm(D) x
988mm(H)
[838mm(H) for Indonesia]
605mm(W) x 610mm(D) x
988mm(H)
[838mm(H) for Indonesia]
605mm(W) x 712mm(D) x
988mm(H)
[838mm(H) for Indonesia]
Refrigerant R134a, 200g R134a, 220g R134a, 240g
Insulation Foam Blowing Agent HFC-free HFC-free HFC-free
Weight Net: 40kg (Gross: 50kg) Net: 46kg (Gross: 58kg) Net: 51kg (Gross: 64kg)
Ambient Temp 1 - 40°C 1 - 40°C 1 - 40°C
Water Supply Temp 5 - 35°C 5 - 35°C 5 - 35°C
Water Supply Pressure 0.07 - 0.8 MPa (0.7 - 8 bar) 0.07 - 0.8 MPa (0.7 - 8 bar) 0.07 - 0.8 MPa (0.7 - 8 bar)
Voltage Range Rated voltage ± 6% Rated voltage ± 6% Rated voltage ± 6%
Model KM-40C-W (60Hz) KM-60C-W (60Hz) KM-80C-W (60Hz)
Type Air-cooled, crescent ice, fully
automated cleaning
Air-cooled, crescent ice, fully
automated cleaning
Air-cooled, crescent ice, fully
automated cleaning
Power Supply 1 phase 220 - 230V 60Hz 1 phase 220 - 230V 60Hz 1 phase 220 - 230V 60Hz
Electric Consumption 222W
(ambient 32°C, water 21°C)
335W
(ambient 32°C, water 21°C)
464W
(ambient 32°C, water 21°C)
Ice Production per 24h 40kg
(ambient 10°C, water 10°C)
65kg
(ambient 10°C, water 10°C)
86kg
(ambient 10°C, water 10°C)
Dimensions 452mm(W) x 610mm(D) x
988mm(H)
[838mm(H) for Indonesia]
605mm(W) x 610mm(D) x
988mm(H)
[838mm(H) for Indonesia]
605mm(W) x 712mm(D) x
988mm(H)
[838mm(H) for Indonesia]
Refrigerant R134a, 200g R134a, 220g R134a, 240g
Insulation Foam Blowing Agent HFC-free HFC-free HFC-free
Weight Net: 42kg (Gross: 52kg) Net: 48kg (Gross: 60kg) Net: 53kg (Gross: 66kg)
Ambient Temp 1 - 40°C 1 - 40°C 1 - 40°C
Water Supply Temp 5 - 35°C 5 - 35°C 5 - 35°C
Water Supply Pressure 0.07 - 0.8 MPa (0.7 - 8 bar) 0.07 - 0.8 MPa (0.7 - 8 bar) 0.07 - 0.8 MPa (0.7 - 8 bar)
Voltage Range Rated voltage ± 6% Rated voltage ± 6% Rated voltage ± 6%

13
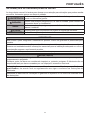
PORTUGUÊS
INFORMAÇÕES DE SEGURANÇA IMPORTANTES
Ao longo deste manual, há avisos para chamar a sua atenção para situações que podem resultar
em morte, ferimentos graves ou danos à unidade.
ADVERTÊNCIA Indica uma situação perigosa que, se não for evitada, pode resultar em
morte ou ferimentos graves.
CUIDADO Indica uma situação perigosa que, se não for evitada, pode resultar em
ferimentos leves ou moderados.
AVISO Indica uma situação perigosa que, se não for evitada, pode resultar em
danos à unidade.
HIGIENE Indica precauções importantes de higiene e segurança alimentar.
IMPORTANTE Indica informações importantes sobre o uso e os cuidados com a unidade.
IMPORTANTE
Este livreto é parte integrante e essencial do produto e deve ser guardado e preservado pelo
usuário.
Leia atentamente as orientações e advertências aqui contidas, pois elas têm como objetivo
fornecer ao instalador/usuário informações essenciais para a instalação adequada e o uso e a
manutenção seguros e contínuos do produto.
Guarde este livreto para fazer as consultas adicionais que possam ser necessárias.
ADVERTÊNCIA
Esta é uma máquina de gelo comercial destinada apenas ao uso para o qual foi
expressamente projetada.
Qualquer outro uso deve ser considerado impróprio e, portanto, perigoso. O fabricante não se
responsabilizará por danos causados por uso impróprio, incorreto e irracional.
A instalação e a realocação, se necessária, devem ser realizadas por profissionais
qualificados, de acordo com os regulamentos em vigor e conforme as instruções do
fabricante.
Mantenha as aberturas de ventilação no gabinete do aparelho ou na estrutura embutida livres
de obstruções.

14
PORTUGUÊS
O uso de aparelhos elétricos envolve a observância de algumas regras fundamentais. Em
particular:
* Ocorrências de alta umidade aumentam o risco de curtos-circuitos e possíveis choques
elétricos. Em caso de dúvida, desconecte a máquina de gelo.
* Não danifique o cabo de alimentação nem o puxe para desconectar a máquina de gelo da
rede elétrica.
* Se o cabo de alimentação e/ou o plugue precisar ser substituído, o serviço deve ser feito
apenas por um engenheiro qualificado.
* Não toque nas partes elétricas nem opere os interruptores com as mãos úmidas.
* Este aparelho não se destina ao uso por pessoas (incluindo crianças) com capacidades
físicas, sensoriais ou mentais reduzidas ou sem experiência e conhecimento, mas pode
ser usado por crianças com idade a partir de 8 anos e pessoas com capacidades físicas,
sensoriais ou mentais reduzidas ou sem experiência e conhecimento, desde que tenham
sido supervisionadas ou instruídas sobre a utilização do aparelho por um responsável pela
segurança dessas pessoas.
* As crianças não devem brincar com o aparelho.
* A limpeza e a manutenção feitas pelo usuário não devem ser executadas por crianças sem
supervisão.
* Não tente modificar a máquina de gelo. Apenas profissionais qualificados podem desmontar
ou reparar o aparelho.
Ao posicionar o aparelho, verifique se o cabo de alimentação não está preso ou danificado.
Não coloque várias extensões elétricas ou fontes de alimentação portáteis na parte traseira
do aparelho.

15
PORTUGUÊS
I. INSTRUÇÕES DE INSTALAÇÃO
1. ESTRUTURA
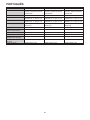
2. ACESSÓRIOS
KM-40C
KM-60C
KM-80C
KM-40C-W
KM-60C-W
KM-80C-W
Manual de instruções 1 1
Pá de gelo 1 1
Perna 4 4
Parafuso de cabeça panela
com arruela
(M4 x 30) (fixação da
veneziana)
2 -
Parafuso manual + espaçador
(M4) (fixação da veneziana) - 2
Conjunto de limpeza - 1
3. DESEMBALAGEM
ADVERTÊNCIA
As crianças não devem ter acesso aos elementos da embalagem (sacos de plástico e poliestireno expandido), pois são
potenciais fontes de perigo.
CUIDADO
Não levante nem movimente a caixa usando as faixas de transporte.
Ao mover a unidade com as mãos, remova a veneziana e segure a parte inferior da unidade. Não segure o painel superior ou
a porta. Eles podem se soltar e causar ferimentos.
Sempre use luvas de proteção ao transportar a unidade.
Ao manusear a caixa ou a unidade desembalada, peça ajuda a outra pessoa para evitar ferimentos.
AVISO
Remova a caixa de transporte, as tas e a embalagem. Se o material da embalagem for deixado na máquina de gelo, ela não
funcionará corretamente.
1) Após retirar a embalagem, verifique se a máquina de gelo está em boas condições. Em caso de dúvida, não use a máquina
de gelo e solicite assistência de profissionais qualificados.
Painel superior
Separador Circuito de água
Porta
Compartimento de
armazenamento
Veneziana
Caixa de controle
Filtro de ar
Circuito de
refrigeração
Manual de instruções PernaPá de gelo
Parafuso de
cabeça panela
com arruela
Parafuso
manual
Espaçador Conjunto de limpeza

16
PORTUGUÊS
2) Remova a fita de transporte que prende a porta e o separador.
3) Remova a película plástica protetora do exterior. Se a máquina de gelo for exposta ao sol ou ao calor, remova a película
depois que a máquina esfriar.
4) Remova a embalagem dos acessórios. Verifique o conteúdo de acordo com o item “2. ACESSÓRIOS”.
4. POSICIONAMENTO
ADVERTÊNCIA
Esta máquina de gelo não se destina ao uso ao ar livre.
A máquina de gelo não deve ser posicionada próxima a fornos, churrasqueiras ou outros equipamentos de alta produção de
calor.
Este aparelho não é adequado para instalação em uma área onde possa ser usado um jato de água.
CUIDADO
O local deve fornecer uma base firme e nivelada para a máquina de gelo.
AVISO
Não coloque nada em cima da máquina de gelo ou na frente da veneziana.
IMPORTANTE
A temperatura ambiente de operação normal deve estar entre 1 °C e 40 °C. A temperatura normal da água de operação
deve estar entre 5 °C e 35 °C. A operação da máquina de gelo por períodos prolongados fora dessas faixas normais de
temperatura pode afetar a capacidade de produção.
Deixe a folga especificada abaixo para a circulação de ar adequada e a realização da manutenção e/ou de serviço, caso seja
necessário.
Em alguns ambientes com alta umidade, pode haver formação de condensação dentro da máquina, e gotas podem pingar no
chão. Não instale onde o piso possa ser afetado pela água.
5. INSTALAÇÃO
CUIDADO
A instalação incorreta pode causar danos a pessoas, animais ou outros itens, pelos quais o fabricante não pode ser
responsabilizado.
* Coloque a máquina de gelo no local permanente selecionado.
* O aparelho deve ser posicionado de forma que o plugue esteja acessível.
* Ajuste as pernas para nivelar a máquina de gelo nas direções da esquerda para a direita e da frente para trás.
Vista lateral
Traseira
Dianteira
Parte superior
15 mm
40 cm 15 cm
MÁQUINA DE
GELO
Vista superior
Traseira
MÁQUINA DE
GELO
Dianteira
Esquerda Direita
15 cm
15 cm
15 cm

17
PORTUGUÊS
6. CONEXÕES ELÉTRICAS
ADVERTÊNCIA
ESTE APARELHO DEVE SER ATERRADO
Esta máquina de gelo requer um aterramento que atenda aos requisitos do código elétrico nacional e local.
Para evitar possíveis choques elétricos graves em pessoas ou danos extensos à unidade, instale um o terra adequado na
máquina de gelo.
Desconecte a fonte de alimentação principal antes de realizar qualquer manutenção, reparo ou limpeza.
* Este aparelho requer uma alimentação separada de 220-240 VCA de 10 A. A alimentação elétrica deve ser protegida por um
disjuntor adequado.
* O fusível da caixa de controle principal é classificado como 5 A e só deve ser substituído por um engenheiro de serviço
qualificado.
* Normalmente, são necessários uma licença elétrica e os serviços de um eletricista licenciado.
7. FORNECIMENTO DE ÁGUA E CONEXÕES DE DRENAGEM
ADVERTÊNCIA
Conecte apenas ao abastecimento de água potável fria.
* As ligações à rede de fornecimento de água devem ser realizadas de acordo com os requisitos atuais de cada país quanto
aos regulamentos de abastecimento de água ou instalações hidráulicas.
* A água para fazer gelo deve ser potável. Onde pode haver formação de incrustação devido à qualidade da água, recomenda-
se a instalação de um filtro externo ou abrandador de água. Entre em contato com seu profissional de tratamento de água
local ou com um agente de serviço da Hoshizaki.
* A pressão de fornecimento da água deve ser de, no mínimo, 0,07 MPa (0,7 bar) e, no máximo, 0,8 MPa (8 bar). Se a pressão
exceder 0,8 MPa (8 bar), use uma válvula redutora de pressão adequada. NÃO aperte novamente a torneira de alimentação.
* Uma licença de encanamento e serviços de um encanador licenciado podem ser necessários em
algumas áreas.
* O dreno da máquina de gelo consiste em um fluxo de gravidade. Portanto, verifique se a
mangueira de drenagem tem uma inclinação ou queda adequada.
* As linhas de drenagem não devem ser instaladas diretamente no sistema de esgoto. Deve haver
um espaço de ar vertical de, no mínimo, 5 cm entre a extremidade das mangueiras de drenagem
da máquina de gelo e o dreno do piso.
* Para evitar um refluxo para o compartimento de armazenamento, a mangueira de saída deve ser colocada conforme
mostrado.
1) Conecte a extremidade livre da mangueira de entrada à torneira de água, observando se a arruela está posicionada
corretamente. Aperte manualmente o suficiente para fornecer uma junta sem vazamentos. Por precaução, é indicado ter uma
válvula de bloqueio ao alcance.
2) A mangueira de saída pode ser cortada no comprimento necessário para se adequar à posição do dreno principal.
Espaço
de ar de
5 cm
Dreno
Piso
ADEQUADO INADEQUADO
Elevação
INADEQUADO
Abaixamento

18
PORTUGUÊS
II. INSTRUÇÕES DE OPERAÇÃO
AVISO
Todas as peças são ajustadas de fábrica. Ajustes inadequados podem resultar em falha.
Se a unidade estiver desligada, espere pelo menos 3 minutos antes de reiniciar a máquina de gelo para evitar danos ao compressor.
HIGIENE
Esta máquina de gelo é projetada para produzir gelo comestível. Para manter a máquina de gelo limpa:
* Lave as mãos antes de remover o gelo. Use a pá de plástico fornecida (acessório).
* O compartimento de armazenamento destina-se apenas para gelo. Não guarde mais nada no compartimento nem use
outros aparelhos elétricos nele.
* Limpe o compartimento de armazenamento antes de usar (consulte o item “III. 1. LIMPEZA”).
* Mantenha a pá de gelo limpa. Limpe-a com um detergente neutro e enxágue abundantemente.
* Feche a porta após remover o gelo para evitar a entrada de sujeira, poeira ou insetos no compartimento de armazenamento.
Painel de operações
[1] Visor
run: fabricação de gelo
oFF: desligado
FUL: compartimento cheio
cln: limpeza
[2] Ponto
Off: modo normal
On: modo de saneamento (*)
* Após 4 horas contínuas de inatividade, a máquina de gelo limpa e
renova automaticamente o circuito de água para evitar a proliferação
de bactérias, mantendo-o limpo e higiênico por longos períodos.
[3] Botão ON/OFF (LIGA/DESLIGA)/Botão de seta para baixo
[4] Botão Cleaning (Limpeza)/Botão de seta para cima
[5] Botão Reset (Reiniciar)/Botão Enter
1. INICIALIZAÇÃO
Normalmente, o instalador colocará a máquina de gelo em operação para iniciar o processo automático de fabricação de gelo.
Para garantir uma operação contínua, confirme se:
Torneira de
fornecimento de água
Mangueira de entrada
Mangueira de
entrada
Mangueira
de saída
[1]
[3] [4]
[2]
[5]
A página está carregando...
A página está carregando...
A página está carregando...
A página está carregando...
A página está carregando...
A página está carregando...
A página está carregando...
A página está carregando...
-
 1
1
-
 2
2
-
 3
3
-
 4
4
-
 5
5
-
 6
6
-
 7
7
-
 8
8
-
 9
9
-
 10
10
-
 11
11
-
 12
12
-
 13
13
-
 14
14
-
 15
15
-
 16
16
-
 17
17
-
 18
18
-
 19
19
-
 20
20
-
 21
21
-
 22
22
-
 23
23
-
 24
24
-
 25
25
-
 26
26
-
 27
27
-
 28
28


Hoshizaki KM-80C-W Self Contained Crescent Cuber Ice Macker Guia de instalação
- Tipo
- Guia de instalação
em outras línguas
Outros documentos
-
LG Electronics Refrigerator LFC21776ST Manual do usuário
-
-
LG GR-P227YLQA Manual do proprietário
-
LG GC-X247CSAV Manual do proprietário
-
LG LFX28968ST/03 Manual do proprietário
-
Jocel JMFG001764 Manual do usuário
-
-
-
 Gastrodomus G-BC3PS Manual do proprietário
