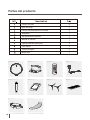
Infiniton CLEANER 1020 Manual do proprietário
- Categoria
- Aspiradores robóticos
- Tipo
- Manual do proprietário

User Manual


Safety lnstruction


High-performance

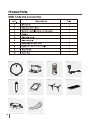
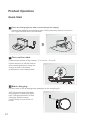
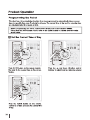
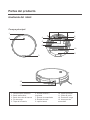
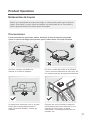
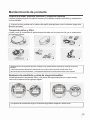
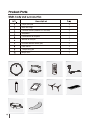
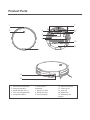
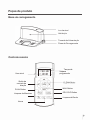
Product Parts
Robot anatomy
1. Front bumper
2. Auto button
3. Dust bin button
4. Charging pin
5. Battery lid
6. Right / left wheel
7. Cliff sensor
8. Nose wheel
9. Side brush
10. Main brush
11. Dust bin
12. Charging port
13. Power switch
1
2
3
4
5
6
7
8
9
10
11
12
13

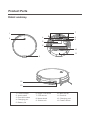
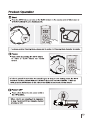
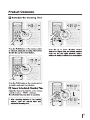
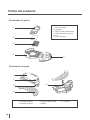
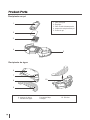
Dust bin
1. Primary filter
2. Sponge
3. High-performance filter
4. Dust bin lid
5. Dust bin
1
2
3
45
6
7
10
8
9
6. Water tank
7. Water inlet
8. Mop holder
9. Mop cloth
10. Sticker
Water tank


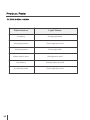
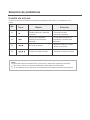
Robot status Light Status
Charging
Charging finished
Selecting mode
When robot in error
Low battery
In cleaning mode Green light turn solid
Orange light turn solid
Red light turn solid
Green light flash
Green light turn solid
Orange light flash

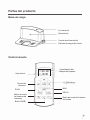
Product Operation
¡ 11
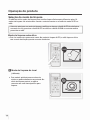
Due to the complexity of home environment, the robot may miss some area not
cleaning. In order to achieve a better cleaning effect, it is recommended that you
use it daily and remove some unfriendly obstacles before cleaning.
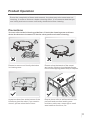
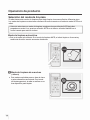
Precautions
You can refer to the following guidelines. Check the cleaning area and learn
about the home environment to let the robot perform a better cleaning.
Please to remove unfriendly obstacles
in cleaning area.
Please roll up the tassels of the carpet
and use the robot on short-haired carpets.
Do not use mopping (water tank) on carpets.
A gap less than 8cm at the bottom of the
home may jam the robot. If you need to
clean it, please raise the furniture.
Please place a fence while machine is to
perform tasks such as landing on a
multistory staircase, step edge or small
area between furniture, etc.

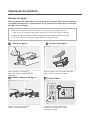
12
Product Operation
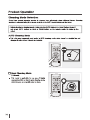
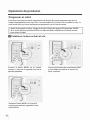
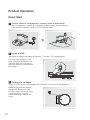
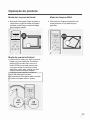
Quick Sta
Turn on the robot
Power switch at side of the cleaner, “I” is turn on, “O” is off.
Please do not turn off the cleaner
after cleaning finished. Keep it in
charge so that it can better
performance next cleaning task.
Start charging
Put the robot on the charging base and align to the charging pin.
AUTO button orange light flash,
charging;AUTO button in green
light, charging finished;For first
charging, please charge
continuously for more than 12
hours.
Place the charging base and connect the power supply
Connect the adapter and charging base. Don't place any objects 1.0m to its
left /right side and 2m to its front side.
1
2
3


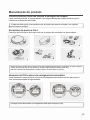
Product Operation
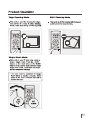
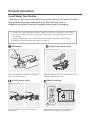
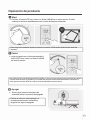
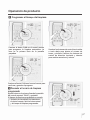
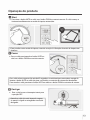
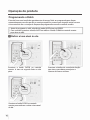
lnstall Water Tank Module
This product is equipped with water tank. After cleaning work is
completed, the dust bin can be changed to water tank for mopping.
Please don't use the water tank on carpet.If you have a carpet in your home,
roll up the edge of the carpet to prevent the robot from climbing and soiling
the carpet.
Please add water in time, and remove the water tank when adding water.
Please remove the water tank while charging.
Add water Install the mop cloth
Install water tank Mop function
Open the injection rubber plug, slowly
pour into clean water.
Seal the lid and stick the mop cloth on the
bottom of the water tank.
Take out the dust bin and install the
water tank.
Choose the cleaning mode based on
demand, robot will start mopping.

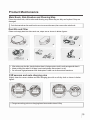
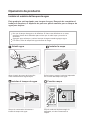
Product Maintenance
O, U g
2 3
º
,
6

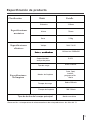
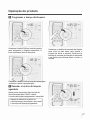
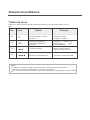
Troubleshooting
Error sheet
When the robot meets with some routine troubles, it will remind by beep sound.
No. Prompt
Tone Reason Method
01
02
03
04
Note
If all above solutions don't work, please take below actions:
Please restart robot by turning on the power switch.
If problem is not solving, please contact our after-sales staff.
Left/right wheel abnormal
Cliff sensor/ front bumper
abnormal
Robot gets stuck
Main brush abnormal
Check left/right wheel
Check cliff sensor/ front
bumper
Move robot to open place,
and restart it
Check main brush
A página está carregando...
A página está carregando...
A página está carregando...
A página está carregando...
A página está carregando...
A página está carregando...
A página está carregando...
A página está carregando...
A página está carregando...
A página está carregando...
A página está carregando...
A página está carregando...
A página está carregando...
A página está carregando...
A página está carregando...
A página está carregando...
A página está carregando...
A página está carregando...
A página está carregando...
A página está carregando...
A página está carregando...
A página está carregando...
A página está carregando...
A página está carregando...
A página está carregando...
A página está carregando...
A página está carregando...
A página está carregando...
A página está carregando...
A página está carregando...
A página está carregando...
A página está carregando...
A página está carregando...
A página está carregando...
A página está carregando...
A página está carregando...
A página está carregando...
A página está carregando...
A página está carregando...
A página está carregando...
A página está carregando...
A página está carregando...
A página está carregando...
A página está carregando...
-
 1
1
-
 2
2
-
 3
3
-
 4
4
-
 5
5
-
 6
6
-
 7
7
-
 8
8
-
 9
9
-
 10
10
-
 11
11
-
 12
12
-
 13
13
-
 14
14
-
 15
15
-
 16
16
-
 17
17
-
 18
18
-
 19
19
-
 20
20
-
 21
21
-
 22
22
-
 23
23
-
 24
24
-
 25
25
-
 26
26
-
 27
27
-
 28
28
-
 29
29
-
 30
30
-
 31
31
-
 32
32
-
 33
33
-
 34
34
-
 35
35
-
 36
36
-
 37
37
-
 38
38
-
 39
39
-
 40
40
-
 41
41
-
 42
42
-
 43
43
-
 44
44
-
 45
45
-
 46
46
-
 47
47
-
 48
48
-
 49
49
-
 50
50
-
 51
51
-
 52
52
-
 53
53
-
 54
54
-
 55
55
-
 56
56
-
 57
57
-
 58
58
-
 59
59
-
 60
60
-
 61
61
-
 62
62
-
 63
63
-
 64
64


Infiniton CLEANER 1020 Manual do proprietário
- Categoria
- Aspiradores robóticos
- Tipo
- Manual do proprietário
em outras línguas
Artigos relacionados
Outros documentos
-
Hoover HGO320H 011 Manual do usuário
-
Samsung VR05R503PWG Manual do usuário
-
Livoo DOH133 Manual do usuário
-
 JBM 54020 Guia de usuario
-
 V-TAC VT-5555 Manual do usuário
-
Blaupunkt Bluebot XPRO Robbot Vacuum Cleaner Manual do usuário
-
Solac AA3400 Manual do proprietário
-
Solac AA3400 ECOGENIC Manual do proprietário
-
Philips FC8792/01 Manual do usuário
-
Mi Mi Robot Vacuum-Mop 2 Pro Manual do usuário

