
www.ghibliwirbel.com
Professional Cleaning Machines Since 1968
8050832
ed. 04/2022
IT
Uso e Manutenzione
EN
Use and Maintenance
FR
Utilisation et Entretien
DE
Gebrauch und Wartung
ES
Uso y Mantenimiento
PT
Uso e manutenção
NL
Gebruik en Onderhoud
CS
Použití a Údržba
RU
Эксплуатация и обслуживание
Copertina M26_8050832_2ed_10-2018.indd 1 22/10/18 12:21

www.ghibliwirbel.com
Professional Cleaning Machines Since 1968
2
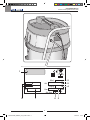
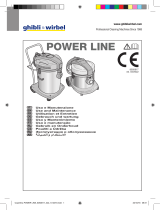
Mod.
Art.
Cap.ty
Vac mba
Air flow l/s
Nr
3
4
56
7
8
1
2
Copertina M26_8050832_1ed_04-2017.indd 2 26/04/17 17:02

www.ghibliwirbel.com
Professional Cleaning Machines Since 1968
3
1234
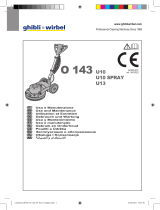
IT
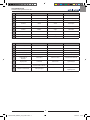
Produttore Modello Articolo Capacità fusto
EN
Manufacturer Model Article Container capacity
FR
Producteur Modèle Article Capacité de la cuve
DE
Hersteller Modell Artikel Fassungsvermögen
des Körpers
ES
Fabricante Modelo Artículo Capacidad del bidón
PT
Produtor Modelo Artigo Capacidade do
reservatório
NL
Producent Model Artikel Inhoud reservoir
CS
Výrobce Model Typ Obsah nádoby
RU
5678
IT
Capacità aspirazione Portata d’aria N° Matricola Caratteristiche elettriche
EN
Vacuum Air flow Serial N° Electrical characteristics
FR
Capacité d’aspiration Débit d’air N° Matricule Caractéristiques électriques
DE
Ansaugleistung Luftdurchsatz Matrikelnr. Elektrische Eigenschaften
ES
Capacidad de aspiración Caudal de aire N° Matrícola Características eléctricas
PT
Capacidade de
aspiração Caudal de ar Número de série Características elétricas
NL
Zuigcapaciteit Luchtdebiet Serienummer Elektrische
eigenschappen
CS
Sací výkon
dopravovaného vzduchu Elektrické údaje
RU
Copertina M26_8050832_1ed_04-2017.indd 3 26/04/17 17:02

www.ghibliwirbel.com
Professional Cleaning Machines Since 1968
4
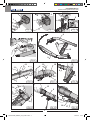
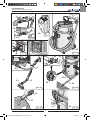
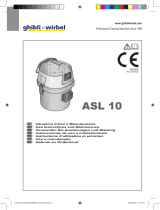
Fig. 1 Fig. 2 Fig. 3
Fig. 4
Fig. 8
Fig. 9 Fig. 10
Fig. 5
Fig. 6 Fig. 7
Fig. 11
5
9
8
10
8
9
11
11
1
3
1
2
4
12
13
10
9
14
10
8
15
16 17
7
6
Copertina M26_8050832_1ed_04-2017.indd 4 26/04/17 17:02

www.ghibliwirbel.com
Professional Cleaning Machines Since 1968
5
0
I
0
I
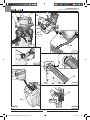
Fig. 15
Fig. 13
Fig. 16
Fig. 17 Fig. 19
Fig. 20
Fig. 14
21
23
Fig. 18
18
27
18
15
16
19 Fig. 12
30
29
22
24 25
9
10
8
26
15
28
31
28
32
36
Copertina M26_8050832_1ed_04-2017.indd 5 26/04/17 17:02

www.ghibliwirbel.com
Professional Cleaning Machines Since 1968
6
CLICK
33
Fig. 21
Fig. 22
Fig. 23
Fig. 26
Fig. 27
Fig. 24
Fig. 25
34
35
31
28
38
39
39
36
40
41
37
36
Copertina M26_8050832_1ed_04-2017.indd 6 26/04/17 17:02

www.ghibliwirbel.com
Professional Cleaning Machines Since 1968
7
IT
Italiano ................................................................................................... ITALIANO -1
(Istruzioni originali)
EN
English ...................................................................................................ENGLISH -1
(Translation of original instructions)
FR
Français .............................................................................................. FRANÇAIS -1
(Traduction des instructions d’origine)
DE
Deutsch ................................................................................................ DEUTSCH -1
(Übersetzung der Originalanleitung)
ES
Español .................................................................................................ESPAÑOL -1
(
Traducción de las instrucciones originales
)
PT
Português ........................................................................................ PORTUGUÊS -1
(Tradução das instruções originais)
NL Nederlands ....................................................................................NEDERLANDS -1
(Vertalinig van de originele instructies)
CS
........................................................................................................ -1
(Překladoriginálníhonávodu)
RU
................................................................................................ -1
Copertina M26_8050832_1ed_04-2017.indd 7 26/04/17 17:02

Copertina M26_8050832_1ed_04-2017.indd 8 26/04/17 17:02

www.ghibliwirbel.com
Professional Cleaning Machines Since 1968
ITALIANO -
1
CARATTERISTICHE
TECNICHE
Tensione .........................Vedi targhetta dati
Potenza motori .................................1900 W
Livello sonoro .................................65 dB(A)
Depressione ..................................190 mbar
Capacità utile serbatoio.......................... 56 l
Capacità serbatoio detergente ............... 11 l
Dimensioni ................610 x 540 x 920H mm
Peso ................................................. 24,5 kg
Accessori....................................... Ø 40 mm
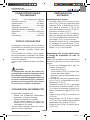
TIPO D’USO
Questo apparecchio è stato concepito per il
lavaggio a spruzzo ed estrazione di qualsiasi
tipo di tessuto, di moquette, poltrone sedili
auto, pavimenti, ecc...
É possibile l’utilizzo come aspirapolvere e
aspiratore solidi e liquidi con i dovuti acces-
sori a richiesta.
Solo per questi utilizzi è stato concepito.
PERICOLO:
Il costruttore non può essere ritenuto re-
sponsabile per eventuali danni dovuti ad
un uso improprio o scorretto.
Qualsiasi altro utilizzo solleva il costrut-
tore da responsabilità per danni a perso-
ne e/o cose e fa decadere qualsiasi condi-
zione di garanzia.
USO SCORRETTO
Non utilizzare l’apparecchio per:
- Aspirare sostanze infiammabili, esplosi-
ve, corrosive, tossiche.
- Aspirare sostanze calde.
- Non utilizzare l’apparecchio in versione
aspiraliquidi per aspirare polveri e vice-
versa.
Non utilizzare l’apparecchio in ambienti con
rischio di esplosione.
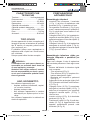
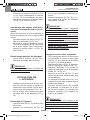
PREPARAZIONE
APPARECCHIO
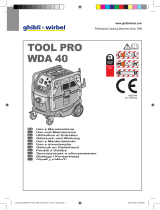
Assemblaggio tubazioni
- Introdurre, fino a finecorsa, il manicotto
(1 Fig. 1) del tubo di aspirazione nella
bocchetta (2 Fig. 1) presente sul fusto.
- Per sganciare il manicotto (1 Fig. 2) pre-
mere e mantenere premuto il pulsante (3
Fig. 2) quindi tirare verso l’esterno il ma-
nicotto (1 Fig. 2).
- Collegare il tubo (4 Fig. 3) di mandata de-
tergente al raccordo rapido (5 Fig. 3); per
sganciarlo spingere il raccordo rapido (5
Fig. 3) verso l’interno.
- Collegare il tubo (6 Fig. 4) di aspirazione
detergente al raccordo rapido (7 Fig. 4);
per sganciarlo spingere il raccordo rapido
(7 Fig. 4) verso l’interno.
Assemblaggio tubazione rigida per
lavaggio moquette o pavimenti (se
presente)
Dopo aver collegato il tubo di aspirazione
alla bocchetta presente sul fusto agire come
segue:
- Estrarre dall’imballo la tubazione rigida
così composta:
- Tubo superiore (8 Fig. 5).
- Tubo inferiore (9 Fig. 5) completo di tu-
bazione detergente e ugello.
- Bocchetta per moquette e pavimenti
(10 Fig. 5).
- Agganciare le due prolunghe rigide (8 e 9
Fig. 6) facendo coincidere i due riferimen-
ti (11 Fig. 6)
- Collegare il tubo (12 Fig. 7) proveniente
dall’ugello al raccordo rapido (13 Fig. 7)
della leva di erogazione; per sganciarlo
spingere il raccordo rapido (13 Fig. 7)
verso la leva.
- Inserire nel tubo (9 Fig. 8) la bocchetta
pavimenti (10 Fig. 8).
- Posizionare l’ugello (14 Fig. 9) sulla boc-
chetta (10 Fig. 9) agganciandolo nelle
apposite protuberanze presenti nella
bocchetta (10 Fig. 9).
Manuale M26_8050832_1ed_04-2017.indd 1 26/04/17 17:05

www.ghibliwirbel.com
Professional Cleaning Machines Since 1968
ITALIANO -
2
- Inserire il tubo (8 Fig. 10) nel tubo flessi-
bile (15 Fig. 10).
- Collegare il raccordo rapido (16 Fig. 11)
del tubo di mandata al raccordo (17 Fig.
11) della leva di erogazione; per sgan-
ciarlo spingere il raccordo rapido (16 Fig.
11) verso l’esterno del tubo.
Assemblaggio tubazione professio-
nale per lavaggio tessuti (se presen-
te)
Dopo aver collegato il tubo di aspirazione
alla bocchetta presente sul fusto agire come
segue:
- Introdurre la bocchetta tessuti (18 Fig.
12) nel tubo flessibile (15 Fig. 12).
- Collegare il tubo del detergente (19
Fig.12) al raccordo rapido (16 Fig.12)
presente nel tubo flessibile; per sganciar-
lo spingere il raccordo rapido (16 Fig.12)
verso il tubo.
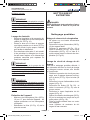
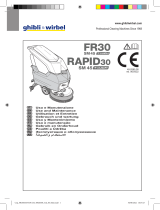
Riempimento serbatoio detergente
- Versare nel serbatoio (36 Fig. 13) il de-
tergente necessario per il lavaggio.
NOTA:
Per il dosaggio del detergente fare riferimen-
to alle istruzioni del produttore.
USO DELL’APPARECCHIO
- L’apparecchio è dotato di ruote e quindi
durante l’utilizzo può essere trascinato
tramite il tubo flessibile, oppure spinto
tramite il maniglione (21 Fig. 14)
- Per il suo sollevamento, in due persone,
inserire le dita della mano nelle apposite
maniglie (22 Fig. 14).
Avviamento dell’apparecchio
- Inserire la spina (23 Fig. 15) nella presa
di corrente.
- Premere l’interruttore (24 Fig. 16) su “I”
per avviare il motore di aspirazione.
- Premere l’interruttore (25 Fig. 16) su “I”
per avviare la pompa detergente, l’inter-
ruttore si illumina.
NOTA:
Il funzionamento del motore di aspirazione e
della pompa detergente sono indipendenti e
quindi è possibile:
- effettuare il lavaggio dei tessuti o dei pa-
vimenti / moquette avviando solo la pom-
pa detergente;
- lavare e contemporaneamente aspirare il
liquido avviando contemporaneamente la
pompa detergente e l’aspirazione;
- aspirare liquidi avviando solo il motore di
aspirazione.
Lavaggio pavimenti o moquette
- Per il lavaggio dei pavimenti o moquette
è necessario montare il tubo rigido (8-9
Fig. 17) e la bocchetta pavimenti (10 Fig.
17), se presenti.
- Posizionarsi con la bocchetta (10 Fig. 17)
perpendicolarmente al pavimento/mo-
quette (vedi Fig. 17).
- Avviare l’aspirazione e la pompa deter-
gente premendo sui relativi interruttori
(24 - 25 Fig. 16).
- Premere la leva (26 Fig. 17) per erogare
il detergente, rilasciare per fermare l’ero-
gazione.
- Il detergente erogato lava il pavimento /
moquette e il liquido sporco viene aspira-
to nel serbatoio dell’apparecchio.
Per sporchi intensi si consiglia di eroga-
re il detergente sulla parte sporca senza
aspirarlo lasciandolo agire per qualche
secondo quindi ripassare lavando e api-
rando.
NOTA:
Per evitare la rottura della pompa detergen-
te, si consiglia di fermare il funzionamento
della stessa, agendo sul relativo interruttore,
quando non viene effettuato il dosaggio per
alcuni minuti.
Manuale M26_8050832_1ed_04-2017.indd 2 26/04/17 17:05

www.ghibliwirbel.com
Professional Cleaning Machines Since 1968
ITALIANO -
3
NOTA:
Quando il serbatoio di recupero è pieno si ha
un aumento di rumore e l’apparecchio non
aspira più, quindi spegnere l’apparecchio e
svuotare il serbatoio come descritto nei rela-
tivi paragrafi.
Lavaggio poltrone
- Avviare l’aspirazione e la pompa deter-
gente premendo sui relativi interruttori
(24 - 25 Fig. 16).
- Appoggiare la bocchetta sul tessuto pre-
mendo leggermente quindi premere la
leva (27 Fig. 18) per erogare il detergen-
te, rilasciare per fermare l’erogazione.
- Per sporchi intensi si consiglia di eroga-
re il detergente sulla parte sporca senza
aspirarlo lasciandolo agire per qualche
secondo quindi ripassare lavando e api-
rando.
NOTA:
Per evitare la rottura della pompa detergen-
te, si consiglia di fermare il funzionamento
della stessa, agendo sul relativo interruttore,
quando non viene effettuato il dosaggio per
alcuni minuti.
NOTA:
Quando il serbatoio di recupero è pieno si ha
un aumento di rumore e l’apparecchio non
aspira più, quindi spegnere l’apparecchio e
svuotare il serbatoio come descritto nei rela-
tivi paragrafi
Spegnimento dell’apparecchio
- Premere gli interruttori (24 e 25 Fig. 16)
su “0” per spegnere l’apparecchio; le lam-
pade presenti sugli interruttori si spengo-
no.
- Staccare la spina (23 Fig. 15) dalla presa
di corrente.
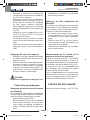
PULIZIA E MANUTENZIONE
PERICOLO:
Prima di effettuare qualsiasi operazione
di manutenzione rimuovere la spina dalla
presa di corrente.
Pulizia gionaliera
Svuotamento serbatoio di recupero
- Posizionarsi su una piletta di scarico con
l’apparecchio.
- Sganciare il tubo di scarico (28 Fig. 19)
da relativo supporto.
- Svitare il pomello (29 Fig. 19) e rimuove-
re il tappo (30 Fig. 19) del tubo di scarico
(28 Fig. 19) e svuotare il liquido contenu-
to nel serbatoio di recupero (31 Fig. 19).
Lavaggio circuito dosaggio detergen-
te
Alla fine della lavorazione giornaliera è ne-
cessario lavare il circuito di dosaggio deter-
gente per evitare che si intasi agendo come
segue:
- Scaricare la pressione dal circuito pre-
mendo, con pompa di dosaggio spenta,
la leva (27 Fig. 18) o la leva (26 Fig. 17)
- Scollegare il tubo di mandata detergente
(4 Fig. 3).
- Sganciare le leve (32 Fig. 20) e rimuo-
vere la testata (33 Fig. 21) completa di
motore.
- Scollegare il tubo di aspirazione deter-
gente (6 Fig. 4).
- Rimuovere il contenitore del detergente
(36 Fig. 22) sollevandolo tramite l’appo-
sita maniglia (40 Fig. 22).
- Svuotare il liquido residuo in un idoneo
contenitore.
- Lavare l’interno del contenitore detergen-
te con acqua corrente.
- Rimontare il contenitore detergente ag-
ganciandolo all’apposita staffa (41 Fig.
22) fissata al serbatoio.
- Collegare il tubo (6 Fig. 4) di aspirazione
detergente al raccordo rapido (7 Fig. 4).
Manuale M26_8050832_1ed_04-2017.indd 3 26/04/17 17:05

www.ghibliwirbel.com
Professional Cleaning Machines Since 1968
ITALIANO -
4
- Versare nel contenitore detergente ac-
qua pulita, collegare elettricamente l’ap-
parecchio e avviare la pompa dosaggio
premendo l’interruttore (25 Fig. 16).
- Pulire il circuito premendo la leva (27 Fig.
18) o (26 Fig. 17), a seconda del tipo di
bocchetta.
- Erogare dalla bocchetta il liquido fino a
che dall’ugello fuoriesce acqua pulita.
- Svuotare l’acqua contenuta nel serbatoio
detergente come descritto in preceden-
za.
Pulizia corpo apparecchio
- Pulire il corpo apparecchio utilizzando un
panno umido d’acqua o detergente neu-
tro.
- Rimuovere la testata come indicato in
precedenza e pulire l’interno del serbato-
io con acqua corrente lasciando aperto il
tubo di scarico (28 Fig. 23) quindi rimon-
tare il tutto procedendo in senso inverso
allo smontaggio.
PERICOLO:
Non lavare l’apparecchio con getti d’ac-
qua.
Controlli periodici
Pulizia ugello erogatore detergente
Se si nota che l’erogazione del detergente
non avviene in modo uniforme è necessario
pulire l’ugello come descritto di seguito:
- Rimuovere la ghiera (34 Fig. 24).
- Rimuovere l’ugello (35 Fig. 24) e pulirlo
in acqua corrente, se si presenta intasato
utilizzare uno spillo facendo attenzione a
non deformare la sagoma dell’ugello.
- Rimontare il tutto procedendo in senso
inverso.
Pulizia filtro aspirazione detergente
Se si nota che il detergente non viene aspi-
rato correttamente è necessario controllare e
pulire il filtro di aspirazione posizionato all’in-
terno del serbatoio detergente.
- Aiutandosi con un cacciavite sganciare
il tappo di aspirazione (36 Fig. 25) ed
estrarlo con il relativo tubetto di aspira-
zione dal serbatoio.
- Rimuovere il filtro (37 Fig. 25) e lavarlo
in acqua corrente se si presenta troppo
intasato è necessario sostituirlo.
- Rimontare il tutto procedendo in senso
inverso.
Sostituzione racla bocchetta pavi-
menti (se presente)
Se durante il lavaggio dei pavimenti si ha
difficoltà ad aspirare il liquido di lavaggio e
il pavimento o la moquette rimane bagnata
è necessario controllare lo stato della racla
(38 Fig. 26).
Se la racla risulta consumata o rovinata è
necessario sostituirla sganciando il supporto
racla (39 Fig. 26) dalla bocchetta.
Nel rimontare la nuova racla con il relativo
supporto fare attenzione a inserirlo corretta-
mente nella bocchetta, quindi premere fino a
sentire il click di aggancio (Fig. 27)
RICAMBI
Slitta corpo bocchetta ...........Cod. 7217519
Manuale M26_8050832_1ed_04-2017.indd 4 26/04/17 17:05

www.ghibliwirbel.com
Professional Cleaning Machines Since 1968
ITALIANO -
5
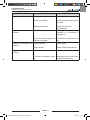
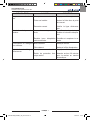
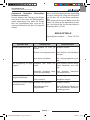
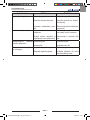
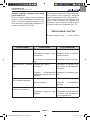
PROBLEMA CAUSA RIMEDIO
Aspiratore non funziona. Interruttore non premuto.
Spina non inserita.
Mancanza corrente.
Premere l’interruttore.
Inserire la spina nella presa di
corrente.
Verificare la linea di
alimentazione.
L’aspirazione non è soddi-
sfacente.
Accessori o tubi otturati.
Racla bocchetta aspirazione
usurata o rovinata.
Controllare e pulire il tubo
flessibile e la bocchetta di
aspirazione.
Controllare e sostituire la ra-
cla.
Erogazione detergente non
uniforme.
Ugello otturato.
Filtro otturato.
Pulire ugello.
Pulire il filtro di aspirazione.
Erogazione detergente non
funziona.
Interruttore non premuto.
Termica di protezione inseri-
ta.
Premere l’interruttore.
Attendere circa 30 minuti per
il ripristino automatico.
Manuale M26_8050832_1ed_04-2017.indd 5 26/04/17 17:05

www.ghibliwirbel.com
Professional Cleaning Machines Since 1968
ITALIANO -
6
Manuale M26_8050832_1ed_04-2017.indd 6 26/04/17 17:05

www.ghibliwirbel.com
Professional Cleaning Machines Since 1968
ENGLISH -
1
TECHNICAL
CHARACTERISTICS
Voltage ..................................See data plate
Motors power ...................................1900 W
Sound level ....................................65 dB(A)
Depression ....................................190 mbar
Useful capacity tank ............................... 56 l
Detergent tank capacity ......................... 11 l
Dimensions ...............610 x 540 x 920H mm
Weight .............................................. 24,5 kg
Accessories ................................... Ø 40 mm
TYPE OF USE
This appliance was designed for spray wash-
ing and extracting any type of fabric, carpet,
car seats, floors etc.
It can be used as a vacuum cleaner and or
solid and liquid suction unit with the appropri-
ate accessories upon request.
It has only been designed for these uses.
DANGER:
The manufacturer can not be held respon-
sible for any damage due to improper or
incorrect use.
Any other use releases the manufacturer
from liability for harm to persons and/or
property and invalidates any warranty
condition.
IMPROPER USE
Do not use the appliance to:
- Aspirate flammable, explosive, corrosive
and toxic substances.
- Aspirate hot substances.
- Do not use the appliance in liquid suction
mode to suction powder and vice versa.
Do not use the appliance in areas at risk of
explosion.
PREPARING THE
APPLIANCE
Assembling the hoses
- Insert, as far as possible, the sleeve (1
Fig. 1) of the suction hose into the nozzle
(2 Fig. 1) on the drum.
- To release the sleeve (1 Fig. 2) press and
hold the button (3 Fig. 2) and then pull out
the sleeve (1 Fig. 2).
- Connect the (4 Fig. 3) detergent delivery
hose to the quick coupling (5 Fig. 3); to
release it push the quick coupling (5 Fig.
3) inwards.
- Connect the (6 Fig. 4) detergent suction
hose to the quick coupling (7 Fig. 4); to
release it push the quick coupling (7 Fig.
4) inwards.
Rigid pipe assembly for washing car-
pets or floors (if present)
After connecting the suction hose to the out-
let the drum, do as follows:
- Remove the hose from its stiff as follows:
- Top Tube (8 Fig. 5).
- Lower Hose (9 Fig. 5) complete with
pipe cleaner and nozzle.
- Nozzle for carpets and floor coverings
(10 Fig 5).
- Hook the two rigid extensions (8 and 9
Fig. 6), matching the two references (11
Fig. 6)
- Connect the hose (12 Fig. 7) coming from
the nozzle quick connector (13 Fig. 7) of
the dispenser lever; push the lever.to re-
lease, the quick connector (13 Fig. 7).
- Insert the floor nozzle (10 Fig. 8) into the
tube (9 Fig. 8).
- Placethe nozzle (14 Fig. 9) on the mouth-
piece (10 Fig. 9) hooking it into the ap-
propriate bumps in the nozzle (10 Fig. 9).
- Insert the tube (8 Fig. 10) in the hose (15
Fig. 10)
- Connect the quick connector (16 Fig. 11)
of the supply pipe to the fitting (17 Fig.
11) of the dispensing; to release the quick
connector (16 Fig.11) push lever to the
outside of the tube.
Manuale M26_8050832_1ed_04-2017.indd 1 26/04/17 17:05

www.ghibliwirbel.com
Professional Cleaning Machines Since 1968
ENGLISH -
2
Professional hose assembly for fab-
ric washing (if present)
After connecting the suction hose to the out-
let the drum, do as follows:
- Insert the fabric nozzle (18 Fig. 12) into
the flexible hose (15 Fig. 12).
- Connect the detergent hose (19 Fig. 12)
to the quick coupling (16 Fig. 12) on the
flexible hose; to release it push the quick
coupling (16 Fig. 12) towards the hose.
Filling the detergent tank
- Pour into the tank (36 Fig. 13) the deter-
gent necessary for cleaning.
NOTE:
For detergent dosing refer to the manufac-
turer’s instructions.
USING THE APPLICANCE
- The appliance is fitted with wheels and
can therefore be pulled along using the
flexible hose, or pushed with the handle
(21 Fig. 14)
- For lifting, two people, put your fingers in
its handles (22 Fig. 14).
Starting up the appliance
- Insert the plug (23 Fig. 15) into the electri-
cal socket.
- Press the switch (24 Fig. 16) to “I” to start
the engine intake.
- Push the switch (25 Fig. 16) on “I” to start
the detergent pump; the switch lights up.
NOTE:
The suction motor and the detergent pump
operate independently; therefore, it is pos-
sible to:
- wash fabrics or floors/ carpets by starting
only the detergent pump;
- wash and suction liquid simultaneously
by starting up the detergent pump and
suction motor at the same time;
- suction liquids by only starting the suction
motor.
Washing floors or carpets
- For washing floors or carpeting is neces-
sary to fit the rigid tube (8-9 Fig. 17) and
the mouth floor (10 Fig. 17), if present.
- Put the nozzle (10 Fig. 17) perpendicular
to the floor / carpet (see Figure 17).
- Start the suction motor and the detergent
pump by pressing the relative switches
(24 - 25 Fig. 16).
- Press the lever (26 Fig. 17) to deliver the
cleaner, release to stop dispensing.
- The detergent released washes the floor/
carpet / and the dirty liquid is suctioned
into the tank of the appliance.
For very dirty areas it is recommended
you apply detergent to the dirty area with-
out suctioning it; leave the detergent al-
lowing it to work for several seconds and
then wash the area and suction the dirt.
NOTE:
To prevent the detergent pump from break-
ing, it is recommended that you stop its op-
eration, pushing the relative switch, when
dosing has not occurred for several minutes.
NOTE:
When the recovery tank is full, noise in-
creases and the appliance does not suction;
therefore, switch it off and empty the tank as
described in the relevant paragraphs.
Cleaning chairs
- Start the suction motor and the detergent
pump by pressing the relative switches
(24 - 25 Fig. 16).
- Place the mouthpiece on the fabric and
press lightly ; than press the lever (27 Fig.
18) to deliver the cleaner, release to stop
dispensing.
Manuale M26_8050832_1ed_04-2017.indd 2 26/04/17 17:05

www.ghibliwirbel.com
Professional Cleaning Machines Since 1968
ENGLISH -
3
- For very dirty areas it is recommended
you apply detergent to the dirty area with-
out suctioning it; leave the detergent al-
lowing it to work for several seconds and
then wash the area and suction the dirt.
NOTE:
To prevent the detergent pump from break-
ing, it is recommended that you stop its op-
eration, pushing the relative switch, when
dosing has not occurred for several minutes.
NOTE:
When the recovery tank is full, noise in-
creases and the appliance does not suction;
therefore, switch it off and empty the tank as
described in the relevant paragraphs
Switching off the appliance
- Press the switches (24 and 25 Fig. 16) to
“0” to switch off the appliance; the lamps
on the switches will go out.
- Remove the plug (23 Fig. 15) from the
electrical socket.
CLEANING AND
MAINTENANCE
DANGER:
Before performing any maintenance op-
erations, unplug the appliance from the
electrical socket.
Daily cleaning
Emptying the recovery tank
- Position yourself over a floor drain with
the appliance.
- Detach the drain hose (28 Fig. 19) from
its relative support.
- Unscrew the knob (29 Fig. 19) and re-
move the cap (30 Fig. 19) of the water
drain hose (28 Fig. 19) and empty the liq-
uid into the recovery tank (31 Fig. 19).
Cleaning the detergent dosing circuit
At the end of each workday, clean the de-
tergent dosing circuit as follows to prevent
clogging:
- Release pressure from the circuit by
pressing, with dosing pump off, the lever
(27 Fig. 18) or lever (26 Fig. 17)
- Disconnect the detergent delivery hose
(4 Fig. 3).
- Lift up the levers (32 Fig. 20) and remove
the cover (33 Fig. 21) complete with mo-
tor.
- Disconnect the detergent suction hose (6
Fig. 4).
- Remove the detergent container (36 Fig.
22) lifting it by the dedicated handle (40
Fig. 22).
- Empty the remaining liquid into a suitable
container.
- Wash the inside of the detergent contain-
er with running water.
- Put the detergent container back in place,
attaching it to the dedicated bracket (41
Fig. 22) fixed to the tank.
- Connect the detergent (6 Fig. 4) suction
hose to the quick coupling (7 Fig. 4).
- Pour clean water into the detergent con-
tainer, electrically connect the appliance
and start the dosing pump by pressing
the switch (25 Fig. 16).
- Clean the circuit by pressing the lever (27
Fig. 18) or (26 Fig. 17), depending on the
type of mouthpiece.
- Dispense the liquid from the nozzle until
clean water comes out.
- Empty the water in the detergent tank as
described above.
Cleaning the appliance body
- Clean the unit body with a cloth damp-
ened with water or a mild detergent.
- Remove the cover as indicated previous-
ly and clean the inside of the tank with
running water, leaving the drain hose
open (28 Fig. 23) then reassemble eve-
Manuale M26_8050832_1ed_04-2017.indd 3 26/04/17 17:05

www.ghibliwirbel.com
Professional Cleaning Machines Since 1968
ENGLISH -
4
rything proceeding in reverse order.
DANGER:
Do not wash the appliance using jets of
water.
Periodic checks
Cleaning the detergent dispensing
nozzle
If you note that the detergent is not dispensed
evenly, clean the nozzle as described below:
- Remove the ring nut (34 Fig. 24).
- Remove the nozzle (35 Fig. 24) and clean
it with running water, if it is clogged use a
pin being careful not to distort the shape
of the nozzle.
- Reassemble all of the parts performing
these operations in the reverse order.
Cleaning the detergent suction filter
If you note that the detergent is not being
suctioned properly, check and clean the suc-
tion filter located inside the detergent tank.
- Using a screw driver, loosen the suction
cap (36 Fig. 25) and remove it from the
tank with the relative suction hose.
- Remove the filter (37 Fig. 25) and wash it
under running water; if it is too clogged it
should be replaced.
- Reassemble all of the parts performing
these operations in the reverse order.
Replacing the floor nozzle squeegee
(if present)
If when washing the floors the washing liquid
is not suctioned properly and the floor or car-
pet remains wet, check the condition of the
squeegee (38 Fig. 26).
If the blade is worn or damaged should be
replaced by releasing the blade support (39
Fig. 26) from the nozzle.
When replacing the new blade pay attention
to insert it properly into the mouthpiece, then
press until you hear the click coupling (Fig.
27).
SPARE PARTS
Slide nozzle body .................Code 7217519
Manuale M26_8050832_1ed_04-2017.indd 4 26/04/17 17:05

www.ghibliwirbel.com
Professional Cleaning Machines Since 1968
ENGLISH -
5
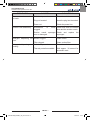
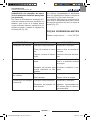
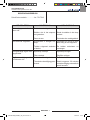
PROBLEM CAUSE SOLUTION
The vacuum cleaner does
not work.
Switch not pressed.
Plug not inserted.
Power cut.
Press the switch.
Insert the plug into the socket.
Check the power line.
Suction is not satisfactory. Accessories or tubes
clogged.
Suction nozzle squeegee
worn or damaged.
Check and clean the flexible
hose and the suction nozzle.
Check and replace the
squeegee.
Detergent dispensing not
even.
Nozzle clogged.
Filter clogged.
Clean nozzle.
Clean suction filter.
Detergent dispensing not
working.
Switch not pressed.
Thermal protection enabled.
Press the switch.
Wait approx. 30 second for
automatic reset.
Manuale M26_8050832_1ed_04-2017.indd 5 26/04/17 17:05

www.ghibliwirbel.com
Professional Cleaning Machines Since 1968
ENGLISH -
6
Manuale M26_8050832_1ed_04-2017.indd 6 26/04/17 17:05
A página está carregando...
A página está carregando...
A página está carregando...
A página está carregando...
A página está carregando...
A página está carregando...
A página está carregando...
A página está carregando...
A página está carregando...
A página está carregando...
A página está carregando...
A página está carregando...
A página está carregando...
A página está carregando...
A página está carregando...
A página está carregando...
A página está carregando...
A página está carregando...
A página está carregando...
A página está carregando...
A página está carregando...
A página está carregando...
A página está carregando...
A página está carregando...
A página está carregando...
A página está carregando...
A página está carregando...
A página está carregando...
A página está carregando...
A página está carregando...
A página está carregando...
A página está carregando...
A página está carregando...
A página está carregando...
A página está carregando...
A página está carregando...
A página está carregando...
A página está carregando...
A página está carregando...
A página está carregando...
A página está carregando...
A página está carregando...
A página está carregando...
A página está carregando...
-
 1
1
-
 2
2
-
 3
3
-
 4
4
-
 5
5
-
 6
6
-
 7
7
-
 8
8
-
 9
9
-
 10
10
-
 11
11
-
 12
12
-
 13
13
-
 14
14
-
 15
15
-
 16
16
-
 17
17
-
 18
18
-
 19
19
-
 20
20
-
 21
21
-
 22
22
-
 23
23
-
 24
24
-
 25
25
-
 26
26
-
 27
27
-
 28
28
-
 29
29
-
 30
30
-
 31
31
-
 32
32
-
 33
33
-
 34
34
-
 35
35
-
 36
36
-
 37
37
-
 38
38
-
 39
39
-
 40
40
-
 41
41
-
 42
42
-
 43
43
-
 44
44
-
 45
45
-
 46
46
-
 47
47
-
 48
48
-
 49
49
-
 50
50
-
 51
51
-
 52
52
-
 53
53
-
 54
54
-
 55
55
-
 56
56
-
 57
57
-
 58
58
-
 59
59
-
 60
60
-
 61
61
-
 62
62
-
 63
63
-
 64
64


Ghibli & Wirbel M 26 I CEME Use And Maintenance
- Tipo
- Use And Maintenance
- Este manual também é adequado para
em outras línguas
- español: Ghibli & Wirbel M 26 I CEME
- français: Ghibli & Wirbel M 26 I CEME
- italiano: Ghibli & Wirbel M 26 I CEME
- Nederlands: Ghibli & Wirbel M 26 I CEME
- Deutsch: Ghibli & Wirbel M 26 I CEME
Artigos relacionados
-
 Ghibli & Wirbel POWER EXTRA 7 P Use And Maintenance
-
 Ghibli & Wirbel POWER D 12 HE Use And Maintenance
-
 Ghibli & Wirbel InPump 90.2 SP CF Use And Maintenance
-
 Ghibli & Wirbel POWER WD 80.2 I Use And Maintenance
-
 Ghibli & Wirbel POWER D 22 P Use And Maintenance
-
 Ghibli & Wirbel S-Team 6 V Use And Maintenance
-
 Ghibli & Wirbel S2 80 D 70 BC Use And Maintenance
-
 Ghibli & Wirbel O 143 U 13 Use And Maintenance
-
 Ghibli & Wirbel TOOL PRO WDA 40 L Use And Maintenance
-
 Ghibli & Wirbel FR 30 SM 45 TOUCH Use And Maintenance


