Yamaha PSR-A5000 Manual do usuário
- Categoria
- Sintetizador
- Tipo
- Manual do usuário

EN
This Reference Manual explains advanced features of the PSR-A5000.
Please read the Owner’s Manual first, before reading this Reference Manual.
Reference Manual
Digital Workstation

2 PSR-A5000 Reference Manual
Contents
Function List 4
1 Styles 6
Style Types (Characteristics) ............................................................................................................................7
Registering Files to the Favorite Tab ................................................................................................................8
Changing the Chord Fingering Type .................................................................................................................9
Chord Types Recognized in the Fingered Mode.............................................................................................10
Using the Chord Tutor Function ......................................................................................................................11
Turning Each Channel of the Style On/Off ......................................................................................................12
Style Playback Related Settings .....................................................................................................................13
Adjusting the Tempo .......................................................................................................................................15
Recording a Chord Sequence when Style Playback is stopped (Chord Looper) ............................................16
Saving and Calling up Your Custom Chord Sequences (Chord Looper) ........................................................17
Creating/Editing Styles (Style Creator)............................................................................................................20
2 Voices 34
Voice Part Setup Display.................................................................................................................................34
Voice Selection Display-related Settings.........................................................................................................36
Voice Types (Characteristics) .........................................................................................................................37
Registering Files to the Favorite Tab ..............................................................................................................38
Metronome Settings ........................................................................................................................................38
Keyboard-related Settings...............................................................................................................................39
Keyboard Part-related Settings (Voice Setting)...............................................................................................40
Transposing the Pitch in Semitones................................................................................................................41
Fine Tuning the Pitch of the Entire Instrument (Master Tune) ........................................................................41
Making Detailed Settings for Harmony/Arpeggio ............................................................................................42
Editing Voices (Voice Edit) ..............................................................................................................................44
Editing Organ Flutes Voices (Voice Edit) ........................................................................................................49
3 Multi Pads 51
Creating a Multi Pad via MIDI (Multi Pad Creator—MIDI Multi Pad Recording)..............................................51
Creating a Multi Pad with Audio files (Multi Pad Creator—Audio Link Multi Pad) ...........................................53
Editing Multi Pads............................................................................................................................................55
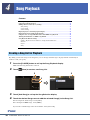
4 Song Playback 56
Creating a Song List for Playback ...................................................................................................................56
Using Repeat Playback Mode .........................................................................................................................57
Editing Music Notation (Score) Settings..........................................................................................................58
Displaying Lyrics and Setting Up the Display..................................................................................................60
Displaying Text and Setting Up the Display ....................................................................................................61
Using the Auto Accompaniment Features with MIDI Song Playback..............................................................62
Turning Each Channel of a MIDI Song On/Off ................................................................................................63
Song Playback Related Settings .....................................................................................................................64
5 MIDI Song Recording/Editing 66
Overview of MIDI Song Recording ..................................................................................................................66
Recording Each Channel Individually (Realtime Recording)...........................................................................68
Re-recording a Specific Section—Punch In/Out (Realtime Recording) ..........................................................70
Recording Panel Setups to a Song .................................................................................................................72
Editing Channel Events of Existing Song Data ...............................................................................................73
Step Recording/Editing Songs (Step Edit) ......................................................................................................76
6 Registration Memory 85
Disabling Recall of Specific Items (Registration Freeze) ................................................................................85
Calling Up Registration Memory Numbers in Order (Registration Sequence) ................................................86
Searching for a Registration Memory Bank File..............................................................................................88
7 Playlist 90
Importing Music Finder Records to the Playlist ...............................................................................................90
8 Microphone 92
Making the Microphone or Guitar Settings (Mic Setting).................................................................................92

Contents
PSR-A5000 Reference Manual 3
9 Mixer 95
Editing Filter Parameters (Filter) .....................................................................................................................95
Editing EQ Parameters (EQ) ...........................................................................................................................96
Editing Effect Parameters (Effect) ...................................................................................................................98
Editing Effect Parameters (Chorus/Reverb) ..................................................................................................100
Editing Pan/Volume Settings (Pan/Volume)..................................................................................................100
Editing Master Compressor Settings (Compressor)......................................................................................101
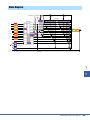
Block Diagram ...............................................................................................................................................103
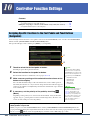
10 Controller Function Settings 104
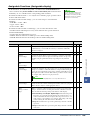
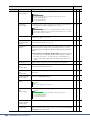
Assigning Specific Functions to the Foot Pedals and Panel Buttons (Assignable) .......................................104
Editing the Assign Types of the Live Control Knobs and Joystick (Live Control) ..........................................111
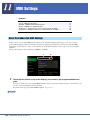
11 MIDI Settings 114
Basic Procedure for MIDI Settings ................................................................................................................114
System—MIDI System Settings ....................................................................................................................116
Transmit—MIDI Transmit Channel Settings..................................................................................................117
Receive—MIDI Receive Channel Settings....................................................................................................118
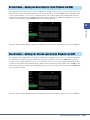
On Bass Note—Setting the Bass Note for Style Playback via MIDI..............................................................119
Chord Detect—Settings for Chords used in Style Playback via MIDI ...........................................................119
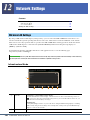
12 Network Settings 120
Wireless LAN Settings...................................................................................................................................120
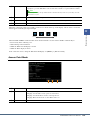
Making the Time Settings..............................................................................................................................122
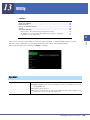
13 Utility 123
Speaker .........................................................................................................................................................123
Touch Screen/Display ...................................................................................................................................124
Parameter Lock .............................................................................................................................................124
Storage—Formatting the Drive......................................................................................................................124
System ..........................................................................................................................................................125
Factory Reset/Backup ...................................................................................................................................126
14 Expansion Pack Related Operations 128
Installing Expansion Pack Data from a USB Flash Drive ..............................................................................128
Saving the Instrument Info File to a USB Flash Drive ...................................................................................129
15 Connections 130
Selecting the Output Destination of Each Sound (Line Out) .........................................................................130
Index 132
• The illustrations and LCD screens as shown in this manual are for instructional purposes only, and may appear somewhat different
from those on your instrument. Note that all display examples shown in this manual are in English.
• The displays are taken from the PSR-A5000, and are in English.
• The “Data List” and “Smart Device Connection Manual” documents can be downloaded from the Yamaha website:
https://download.yamaha.com
• The company names and product names in this manual are the trademarks or registered trademarks of their respective companies.
Using the PDF manual
• To quickly jump to items and topics of interest, click on the desired items in the “Bookmarks” index to the left of
the main display window. (Click the “Bookmarks” tab to open the index if it is not displayed.)
• Click the page numbers that appear in this manual to go directly to the corresponding page.
• Select “Find” or “Search” from the Adobe Reader “Edit” menu and enter a keyword to locate related information in
the document. The names and positions of menu items may vary according to the version of Adobe Reader being
used.

4 PSR-A5000 Reference Manual
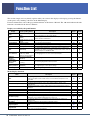
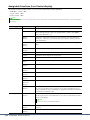
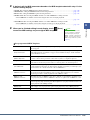
Function List
This section simply and very briefly explains what you can do in the displays called up by pressing the buttons
on the panel, or by touching each icon on the Menu display.
For more information, refer to the page indicated below or the Owner’s Manual. The “” mark indicates that the
function is described in the Owner’s Manual.
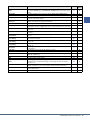
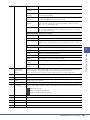
Displays accessible by the panel buttons
Menu display functions
Display Corresponding Button Description Pages
Owner’s
Manual
Home
[DIRECT ACCESS] +
[EXIT]
Portal of the instrument’s display structure, which provides at-a-
glance information on all current settings.
-
Menu [MENU]
By touching each of the icons, you can call up the menus for the
various functions listed below.
-
Style Selection
STYLE category selection
buttons
For selecting Style files. -
Song Playback SONG [PLAYER] For controlling Song playback. 56
Playlist [PLAYLIST] For selecting and editing Playlists, and managing your repertoire. 90
Song Recording SONG [RECORDING] For recording your performance. 67
Mixer [MIXER/EQ]
For adjusting the parameters of each part, such as volume, pan,
and EQ. It also allows you to adjust overall sound controls, such as
Master Compressor and Master EQ.
95
Voice Selection
PART SELECT [LEFT]–
[RIGHT 3], VOICE
category selection buttons
For assigning Voices to each of the keyboard parts. -
Multi Pad
Selection
MULTI PAD CONTROL
[SELECT]
For selecting Multi Pads. 55
Registration
Memory Bank
Selection
REGIST BANK SELECT
[-] and [+]
For selecting Registration Memory Banks. 86
Registration
Memory window
[MEMORY] For registering the current panel settings. -
Mic Setting [MIC SETTING] For making settings for the microphone and guitar sound. 92
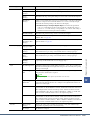
Menu Description Pages
Owner’s
Manual
Mixer
For adjusting the parameters of each part, such as volume, pan, and EQ. It also
allows you to adjust overall sound controls, such as Master Compressor and
Master EQ.
95
Channel On/Off For turning on and off each channel of the Style, and MIDI Song. 12, 63 -
Voice Part Setup
For making detailed settings such as Voice Edit and Effect settings of the
keyboard parts.
34 -
Line Out
Determines which jack is used to output each part and each drum & percussion
instrument.
130 -
Score For displaying the music notation (score) of the current MIDI Song. 58
Lyrics For displaying the lyrics of the current Song. 60
Text Viewer For displaying text files created on your computer. 61 -
Chord Looper For recording a sequence of the chords and playing it back in a loop. 16, 17
Kbd Harmony/Arp
For adding the Harmony/Arpeggio effect to the right-hand section of the keyboard.
Parameters such as Harmony/Arpeggio type can be set.
42
Split & Fingering
For setting the Split Point or changing the Chord Fingering type and Chord
Detection area.
9
Mic Setting For making settings for the microphone and guitar sound. 92
Regist Sequence
Determines the order for calling up Registration Memory settings when using the
pedal.
86 -
Regist Freeze
Determines the item(s) that remain unchanged even when you call up panel
setups from the Registration Memory.
85 -

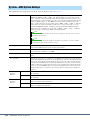
PSR-A5000 Reference Manual 5
* This icon appears only when the optional USB Wireless LAN adaptor is connected.
Tempo
For adjusting the tempo of MIDI Song, Style or Metronome. The same operation
as using the TEMPO [-]/[+] and [RESET/TAP TEMPO] buttons can be done on the
display.
15
Metronome For making settings of the metronome and the [RESET/TAP TEMPO] button. 38
Live Control Determines the functions assigned to the Live Control knobs and joystick. 111
Assignable
Determines the functions assigned to the pedals, assignable buttons, and the
shortcuts on the Home display.
104
Panel Lock
For locking the panel settings. When the panel settings are locked, nothing
happens even when pressing any panel buttons.
-
Demo For calling up the Demo display. -
Voice Edit
For editing the preset Voices to create your own Voices. The display differs
depending on whether an Organ Flutes Voice or another kind of Voice is selected.
44, 49 -
Style Creator
For creating a Style by editing the preset Style, or by recording Style channels
one by one.
20 -
Song Recording
For recording your performance. (This is same as the [RECORDING] button on
the panel.)
66
M.Pad Creator
For creating a Multi Pad by editing an existing preset Multi Pad, or by recording a
new one.
51, 53 -
Voice Setting
Determines detailed settings of the keyboard parts, such as the pitch for each
part, and Voice Set filter.
40 -
Style Setting
For making Style playback related settings such as OTS Link timing, Dynamics
Control, etc.
13 -
Song Setting
For making Song playback related settings such as Guide function, Channel
settings, etc.
64 -
Chord Tutor
For calling up instructions on how to play chords that correspond to the specified
chord symbols.
11 -
Scale Tune For adjusting scales to play the desired type of music. -
Master Tune For fine-tuning the pitch of the entire instrument. 41 -
Transpose
For transposing the pitch of the entire sound in semitones, or just the sound of the
keyboard or MIDI Song.
41
Keyboard Determines the Touch Response of the keyboard. 39 -
MIDI For making MIDI-related settings. 114 -
Utility
For making global settings, managing the USB flash drives, initializing the
instrument to the factory default settings, or backing up the data stored in the
instr
ument, etc.
123
Expansion
F
or installing Expansion Packs for adding extra contents downloaded from the
website or created on your own by using the Yamaha Expansion Manager.
128 -
Wireless LAN*
For making settings for connecting the instrument to a smart device via the
wireless LAN function.
120 -
Time* For making settings of the time shown on the Home display. 122 -
Menu Description Pages
Owner’s
Manual

6 PSR-A5000 Reference Manual
1
1
Styles
Contents
Style Types (Characteristics) ...............................................................................................................................7
Registering Files to the Favorite Tab...................................................................................................................8
• Removing Files from the Favorite Tab............................................................................................................8
Changing the Chord Fingering Type ..................................................................................................................9
Chord Types Recognized in the Fingered Mode ..............................................................................................10
Using the Chord Tutor Function .......................................................................................................................11
Turning Each Channel of the Style On/Off ......................................................................................................12
Style Playback Related Settings.........................................................................................................................13
• Setting............................................................................................................................................................13
• Change Behavior ...........................................................................................................................................14
Adjusting the Tempo...........................................................................................................................................15
Recording a Chord Sequence when Style Playback is stopped (Chord Looper) ..........................................16
Saving and Calling up Your Custom Chord Sequences (Chord Looper) ......................................................17
• Memorizing the Recorded Chord Looper Data .............................................................................................17
• Saving the Recorded Data as a Bank File......................................................................................................18
• Recalling the Chord Looper Bank File and Playing Back a Style with a Chord Sequence ..........................18
• Editing the Chord Looper Bank (Export, Import, Clear) ..............................................................................19
Creating/Editing Styles (Style Creator) ............................................................................................................20
• Style Data Structure—Source Patterns..........................................................................................................20
• Basic Procedure for Creating a Style.............................................................................................................21
• Realtime Recording .......................................................................................................................................22
• Step Recording ..............................................................................................................................................25
• Assembly—Assigning a Source Pattern to Each Channel ............................................................................26
• Channel Edit ..................................................................................................................................................26
• SFF Edit—Making Style File Format Settings..............................................................................................28
• Editing the Rhythm Part of a Style (Drum Setup).........................................................................................32

PSR-A5000 Reference Manual 7
1
Styles
The particular type of Style is indicated at the upper left of the Style name in the
Style Selection display. The defining characteristics of these Styles and their
performance advantages are described below.
Style Types (Characteristics)
Session For information on these types, refer to “Style Characteristics” in the Owner’s Manual.
Free Play
DJ
+Audio The Audio Styles (+Audio) have been specially produced by adding audio recordings of studio
musicians playing in various recording studios worldwide. This adds exceptionally natural feel,
ambience and warmth to the drums and percussion of the Style, giving your performance greater
expressive potential. Specifically, it retains the subtle nuances and grooves that are difficult to
reproduce using the preset drum/percussion kit. Yamaha Time Stretch Technology allows the audio
to follow your tempo changes without changing pitch, so everything stays in perfect sync.
Audio Styles can be played back and controlled by this instrument; however, by default the data is
not included on this instrument. Audio Styles or Expansion Packs that contain Audio Styles may be
available at the Yamaha website.
If the tempo is set to over 160% of the default, the audio part is muted.
NOTE
Keep in mind that the Audio Styles may take more time to load than others, and that they may have certain restrictions and
differ in the specific functions as described below.
• Regardless of the setting of “To Main [A]–[D]” in “Section Change Timing,” section changing works based on “Next Bar”
in the following cases (page 14).
- During playback of an Audio Style.
- When selecting another Style during playback of an Audio Style.
- When selecting an Audio Style during playback of a MIDI Style, which does not contain Audio.
• Half Bar Fill In is not available on Audio Styles (page 107).
• Recording Chord via Step Recording is not available with Audio Styles (page 80).
• The audio part is muted when the tempo exceeds the maximum tempo of each Audio Style displayed on the Tempo pop-up
display.
• Regarding use of Style Creator
- All audio parts are deleted when changing Pattern Length (page 21).
- Audio Part cannot be set for recording (page 22).
• On the Mixer display, the following operations are exceptions for the Audio Part of an Audio Style (from page 95).
- Changing content in the Audio Part.
- Operations of Effect (Insertion/Variation Effect), EQ, Filter displays.
• With the setting for controlling the PSR-A5000 with an external clock, the Audio Part of an Audio Style is muted
(page 116).
• Audio Styles of expansion contents are out of the Backup range (page 126).
NOTE

8 PSR-A5000 Reference Manual
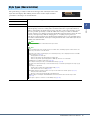
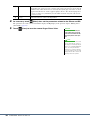
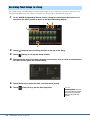
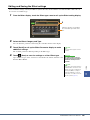
You can call up your favorite or often used preset Styles or Voices quickly by registering them to the Favorite tab on
the File Selection display.
1 In the File Selection display, select the desired category in the Preset tab.
2 Touch (File) to call up the “File Edit” window.
3 Touch [Favorite] to call up the display for selecting the files.
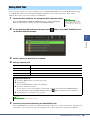
4 Select the desired files for registering to the Favorite tab.
5 Touch [Favorite] to actually register the files to the Favorite tab.
The selected files are shown on the Favorite tab.
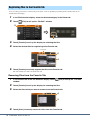
Removing Files from the Favorite Tab
1 In the Favorite tab of the File Selection display, touch (File) to call up the “File Edit”
window.
2 Touch [Favorite] to call up the display for selecting the files.
3 Select the files which you want to remove from the Favorite tab.
4 Touch [Clear] to actually remove the files from the Favorite tab.
Registering Files to the Favorite Tab
2
3
5
4
Favorite tab
4
3

PSR-A5000 Reference Manual 9
1
Styles
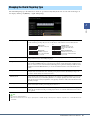
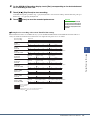
The Chord Fingering type determines how chords are specified for Style Playback. You can select the desired type on
the display called up via [MENU] [Split & Fingering].
Changing the Chord Fingering Type
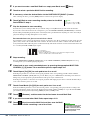
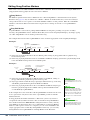
Single Finger Makes it simple to produce orchestrated accompaniment using major, seventh, minor and minor-
seventh chords by pressing only one, two or three keys on the Chord section of the keyboard.
Multi Finger Automatically detects Single Finger or Fingered chord fingerings, so you can use either type of fin-
gering without having to switch fingering types.
Fingered Lets you specify the chord by pressing the notes making up a chord in the left hand section of the
keyboard when ACMP is turned on or the Left part is turned on. For information on which notes to
press for each chord, refer to the Data List (Chord Types Recognized in the Fingered Mode) down-
loadable from Yamaha Manual Library, or use the Chord Tutor function as described in the next
section.
Fingered On Bass Accepts the same fingerings as Fingered; however, the lowest note played in the Chord section of
the keyboard is used as the bass note, allowing you to play inversions. (In the Fingered type, the
root of the chord is always used as the bass note.)
Full Keyboard Detects chords in the entire key range. Chords are detected in a way similar to Fingered, even if you
split the notes between your left and right hands—for example, playing a bass note with your left
hand and chord tones with your right hand, or by playing chord tones with your left hand and a mel-
ody with your right.
AI Fingered Basically the same as Fingered, with the exception that less than three notes can be played to indi-
cate the chords (based on the previously played chord, etc.).
AI Full Keyboard This type is similar to Full Keyboard, with the exception that less than three notes can be played to
indicate the chords (based on the previously played chord, etc.). Chords with tension notes cannot
be recognized.
• “AI” stands for “Artificial Intelligence.”
• When the chord detection area is set to “Upper,” only “Fingered*” is available. This type is basically same as “Fingered,” except that “1+5,” “1+8” and Chord Cancel are
not available.
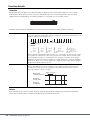
Cm
C
Cm
7
C
7
Major chord
Press the root key only.
Minor chord
Simultaneously press
the root key and a black
key to its left.
Seventh chord
Simultaneously press the
root key and a while key to
its left.
Minor Seventh chord
Simultaneously press the root
key and both a white and black
key to its left.
NOTE

10 PSR-A5000 Reference Manual
• Notes in parentheses can be omitted.
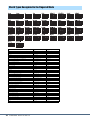
Chord Types Recognized in the Fingered Mode
Chord Name [Abbreviation] Normal Voicing Display for root “C”
1+8 1+8 C1+8
1+5 1+5 C1+5
Major [M] 1+3+5 C
Sixth [6] 1+(3)+5+6 C6
Major seventh [M7] 1+3+(5)+7 CM7
Major seventh flatted fifth [M7b5] 1+3+b5+7 CM7(b5)
Major seventh add sharp eleventh [M7(#11)] 1+(9)+3+#4+5+7 CM7(#11)
Add ninth [(9)] 1+9+3+5 Cadd9
Major seventh ninth [M7_9] 1+9+3+(5)+7 CM7(9)
Sixth ninth [6_9] 1+9+3+(5)+6 C6(9)
Flatted fifth [(b5)] 1+3+b5Cb5
Augmented [aug] 1+3+#5Caug
Seventh augmented [7aug] 1+3+#5+b7 C7aug
Major seventh augmented [M7aug] 1+(3)+#5+7 CM7aug
Minor [m] 1+b3+5 Cm
Minor sixth [m6] 1+b3+5+6 Cm6
Minor seventh [m7] 1+b3+(5)+b7Cm7
Minor seventh flatted fifth [m7b5] 1+b3+b5+b7Cm7(b5)
Minor add ninth [m(9)] 1+9+b3+5 Cm add9
Minor seventh ninth [m7(9)] 1+9+b3+(5)+b7 Cm7(9)
Minor seventh eleventh [m7(11)] 1+(9)+b3+4+5+(b7) Cm7(11)
Minor major seventh flatted fifth [mM7b5] 1+b3+b5+7 CmM7(b5)
Minor major seventh [mM7] 1+b3+(5)+7 CmM7
Minor major seventh ninth [mM7(9)] 1+9+b3+(5)+7 CmM7(9)
Diminished [dim] 1+b3+b5Cdim
Diminished seventh [dim7] 1+b3+b5+bb7Cdim7
Seventh [7] 1+3+(5)+b7C7
Seventh
suspended fourth [7sus4] 1+4+5+b7C7sus4
Seventh ninth [7(9)] 1+9+3+(5)+b7 C7(9)
Seventh add sharp eleventh [7(#11)] 1+(9)+3+#11+5+b7C7(#11)
Seventh add thirteenth [7(13)] 1+3+(5)+13+b7 C7(13)
Seventh flatted fifth [7b5] 1+3+b5+b7C7(b5)
Seventh flatted ninth [7(b9)] 1+b9+3+(5)+b7C7(b9)
Seventh add flatted thirteenth [7(b13)] 1+3+5+b13+b7C7(b13)
Seventh sharp ninth [7(#9)] 1+#9+3+(5)+b7C7(#9)
Suspended fourth [sus4] 1+4+5 Csus4
One plus two plus five [sus2] 1+2+5 Csus2
cancel 1+b2+2 Cancel

PSR-A5000 Reference Manual 11
1
Styles
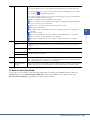
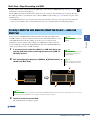
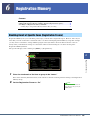
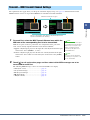
The Chord Tutor function lets you can see which notes to press for specifying the chord. If you know a chord symbol
but don’t know how to play it, use this function.
This function can be used on the display called up via [MENU] [Chord Tutor].
The notes you need to play are shown in the display.
Using the Chord Tutor Function
Root Lets you select the desired chord root.
Type Lets you select the desired chord type.
• Although this function shows how to play a chord only in case of “Fingered,” the indication is useful also when a type other than “Single Finger” is selected.
• Depending on the chord, some notes will be omitted.
NOTE

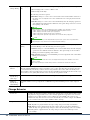
12 PSR-A5000 Reference Manual
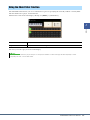
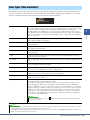
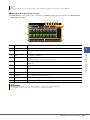
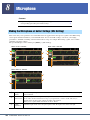
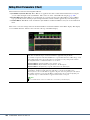
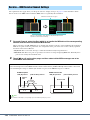
You can add variations and change the feeling of a Style by selectively turning channels on/off as the Style plays.
Style channels can be turned on or off on the display called up via [MENU] [Channel On/Off].
If you want to play back only one particular channel (solo playback), touch and hold the desired channel name until it
turns purple. To cancel solo, simply touch the (purple) channel name again.
Turning Each Channel of the Style On/Off
Style channels
Each Style contains the channels listed below.
• Rhythm 1/2: These are the basic parts of the Style, containing the drum and percussion rhythm patterns.
• Bass: The bass part uses various appropriate instrument sounds to match the Style.
• Chord 1/2: These parts are for rhythmic chord backing, commonly consisting of piano or guitar Voices.
• Pad: This part is used for sustained instruments such as strings, organ, choir, etc.
• Phrase 1/2: These parts are used for punchy brass stabs, arpeggiated chords, and other extras that make the accom-
paniment more interesting.
• Audio: This is the audio part of an Audio Style.
You can also turn the channels on/off on the Mixer display.
To change the Voice for each channel:
Touch the instrument icon below the desired channel to call up the Voice Selection display, then select the desired
Voice.
You can save the settings here to Registration Memory. For details, refer to the Owner’s Manual.
NOTE
The Voice of the Audio part of the Audio Style cannot be changed.
NOTE
NOTE

PSR-A5000 Reference Manual 13
1
Styles
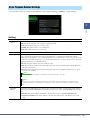
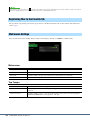
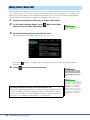
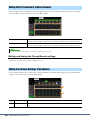
You can make a variety of settings for Style Playback, on the display called up via [MENU] [Style Setting].
Setting
Style Playback Related Settings
Dynamics
Control
This determines how the Style playback volume changes depending on the playing strength.
• Off: The volume is kept the same regardless of playing strength.
• Narrow: The volume changes over a narrow range.
• Medium: The volume changes over a normal range.
• Wide: The volume changes over a wide range.
Display Tempo Turns the tempo indication on or off for each Style on the Style Selection display.
Stop ACMP When the [ACMP] button is turned on and the [SYNC START] button is off, you can play chords in the chord
section of the keyboard with the Style stopped, and still hear the accompaniment chord. In this condition—
called “Stop Accompaniment”—any valid chord fingerings are recognized and the chord root/type are shown in
the Style area of the Home display. Here, you can determine whether the chord played in the chord section will
sound or not in the Stop Accompaniment status.
• Off: The chord played in the chord section will not sound.
• Style: The chord played in the chord section will sound via the Voices for the Pad channel and the Bass chan-
nel of the selected Style.
• Fixed: The chord played in the chord section will sound via the specified Pad/Bass channels’ Voices, regard-
less of the selected Style.
OTS Link
Timing
This applies to the OTS Link function. This parameter determines the timing in which the One Touch Settings
change with the MAIN VARIATION [A]–[D] change and/or the Style change. (The [OTS LINK] button must be
on.)
• Immediate: One Touch Setting is immediately called up when you press a MAIN VARIATION button.
• At Main Section Change: One Touch Setting is called up along with selection of the Main sections of the
Style.
When the selected Style contains MegaVoices, unexpected sounds may result when this is set to “Style.”
NOTE
When you record a Song, the chord detected by playing the Stop Accompaniment can be recorded regardless of the setting here. Please
note that both the sounding Voice and chord data is recorded when set to “Style,” and only the chord data is recorded when set to “Off” or
“Fixed.”
NOTE

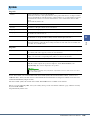
14 PSR-A5000 Reference Manual
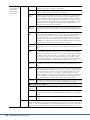
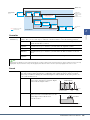
Change Behavior
Section
Change Timing
To Main [A]–
[D]
Determines when Style sections are changed during Style playback for the following cases.
• When changing from a section to a Main section
• When loading another Style
The following are behavior options.
• Immediate: Changes to a new section selected at the next beat. The number of the beat at
the change is received by the new section, and then the new section plays back from the
same beat.
• Next Bar: Changes to a new section selected immediately when the changing operation is
done within the first subsequent beat. Otherwise, this option changes to the new section at
the beginning of the next bar.
Inside Intro/
Ending
Determines when to change Style sections to an Intro/Ending section during Style playback
of an Intro/Ending section. The following are behavior options.
• Next Bar: Changes to a new Intro/Ending section selected immediately when the changing
operation is done within the first beat. Otherwise, this option changes to the new Intro/
Ending section at the beginning of the next bar.
• End of Section: Changes to a new Intro/Ending section after playback of the current Intro/
Ending section is finished.
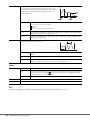
Synchro Stop
Window
This determines how long you can hold a chord before the Synchro Stop function is automatically cancelled.
When the [SYNC STOP] button is turned on and this is set to a value other than “Off,” the Synchro Stop func-
tion is automatically cancelled if you hold a chord for longer than the time set here. This conveniently resets
Style playback control to normal, letting you release the keys and still have the Style play. In other words, if you
release the keys more quickly than the time set here, the Synchro Stop function works.
Multi Pad
Synchro Stop
(Style Stop)
Determines whether or not repeat playback of a Multi Pad stops when Style playback is stopped.
Multi Pad
Synchro Stop
(Style Ending)
Determines whether or not repeat playback of a Multi Pad stops when the Ending section of Style is played
back.
Section Set Determines the default section that is automatically called up when selecting different Styles (when
Style playback is stopped). When set to “Off” and Style playback is stopped, the active section is
maintained even if a different Style is selected. When any of the MAIN A–D sections are not
included in the Style data, the nearest section is automatically selected. For example, when MAIN
D is not contained in the selected Style, MAIN C will be called up.
Tempo This determines whether the tempo changes or not when you change the Style.
• Lock: Regardless of playback status, the tempo setting of the previous Style is maintained.
• Hold: While the Style is playing back, the tempo setting of the previous Style is maintained.
While the Style is stopped, the tempo changes to that of the default tempo of the selected Style.
• Reset: Regardless of playback status, the tempo changes to that of the default tempo for the
selected Style.
Under the following conditions, the changing behavior follows “Next Bar” even if “Immediate” is selected.
• When changing sections while the STYLE CONTROL [AUTO FILL IN] button is turned on.
• When changing sections while an Audio Style is playing back.
• When loading another Style while an Audio Style is playing back.
• When loading an Audio Style while a Style which doesn’t contain audio data is playing back.
NOTE
The option is also set when you load a Registration Memory. However, the option loaded is only activated when
actually changing to a Style, which has been loaded by the Registration Memory.
NOTE
From one Intro section to another Intro section, the changing behavior always follows “Next Bar” even if “End of
Section” is selected.
When changing to Ending I, the behavior always follows the conventional rules instead of the setting here.
NOTE

PSR-A5000 Reference Manual 15
1
Styles
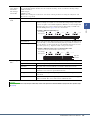
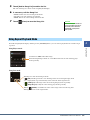
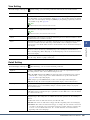
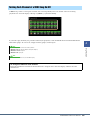
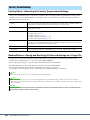
You can adjust the tempo of Style, MIDI Song and metronome on the display called up via [MENU] [Tempo], or by
rotating the Data dial on the Home display.
Part On/Off This determines whether the Style Channel on/off status changes or not when you change the Style.
• Lock: Regardless of playback status, the Channel on/off status of the previous Style is main-
tained.
• Hold: While the Style is playing back, the Channel on/off status of the previous Style is main-
tained. While the Style is stopped, all Channels of the selected Style are set to on.
• Reset: Regardless of playback status, all Channels of the selected Style are set to on.
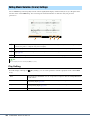
Adjusting the Tempo
q
Indicates the tempo value during playback of the metronome, Style and MIDI Song. The tempo can be changed by using
the Data dial, the [DEC]/[INC] buttons or the TEMPO [-]/[+] buttons.
w
Allows you to change the tempo by tapping this twice at the desired tempo. (Equivalent to the [RESET/TAP TEMPO] but-
ton when the “Style Section Reset” setting (page 38) is off.)
e
Indicates the tempo value of the current MIDI Song. The Song will be started at this tempo.
r
Indicates the tempo value of the current Style. The Style will be started at this tempo.
The tempo value of an Audio Song is set via the Time Stretch function. Refer to the Owner’s Manual.
w
q
e
r
When you select an Audio Style (page 7), the upper limit of the tempo will be shown below the tempo value in this way: Audio: ** max. The Audio part is
muted if the tempo is over the upper limit.
NOTE
NOTE

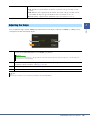
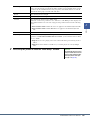
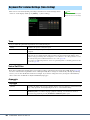
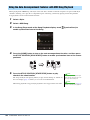
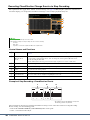
16 PSR-A5000 Reference Manual
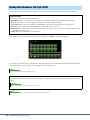
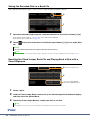
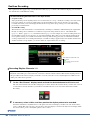
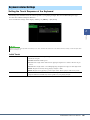
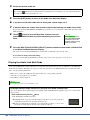
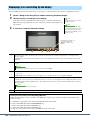
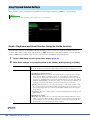
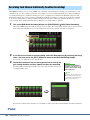
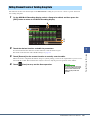
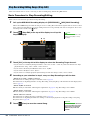
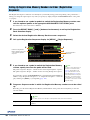
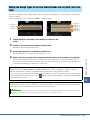
You can start recording and playing back a chord sequence when Style playback is stopped, using SYNC START. By
recording this way, you can ensure that the start timing is exactly on the first beat of the measure.
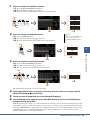
1 While Style playback is stopped, press the CHORD LOOPER [REC/STOP] button.
The [REC/STOP] button flashes to indicate the Chord Looper function is on standby to record, and the STYLE
CONTROL [SYNC START] button is automatically turned on.
2 Enter the chords on the keyboard in real time, along with the playback tempo of the
Style.
Recording and Style playback starts simultaneously with the first chord you play. The chord sequence is recorded
until you stop recording in step 3.
3 Press the STYLE CONTROL [START/STOP] button to stop recording and Style playback.
Recording stops, and the CHORD LOOPER [ON/OFF] button lights in blue to indicate the data is already
recorded.
Recording a Chord Sequence when Style Playback is stopped (Chord
Looper)
When [REC/STOP] is turned on, the [ACMP] button is also turned on automatically.
You can also stop recording by pressing the CHORD LOOPER [REC/STOP] button. In this case, only the recording stops, while Style playback will continue.
The latest chord sequence data you recorded is maintained unless you turn the power off or select a Chord Looper Memory number which contains
data. If you want to save the data, see page 17.
NOTE
NOTE
NOTICE

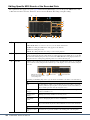
PSR-A5000 Reference Manual 17
1
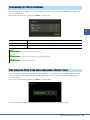
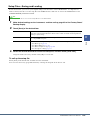
Styles
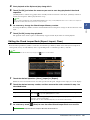
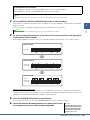
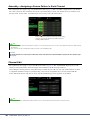
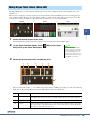
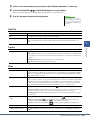
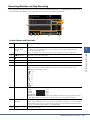
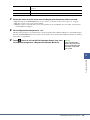
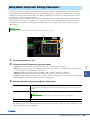
On the Chord Looper display, you can memorize the recorded chord sequence of the Chord Looper function to one of
the eight memories for easy recall. You can save all eight memorized data slots as a single Chord Looper Bank (*.clb)
file or export a single memory as a Chord Looper Data (*.cld) file.
Operation display is called up via: [MENU] [Chord Looper].
This section covers how to memorize, save/recall, and export/import the recorded data.
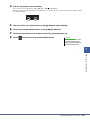
Memorizing the Recorded Chord Looper Data
1 Record the desired chord sequence.
For details on recording the chord sequence, see page 16 or refer to the Owner’s Manual.
2 Touch [Memory] on the Chord Looper display.
A guidance message appears on the display.
3 Touch the desired number to memorize.
The data is memorized, and the content of the memorized data is shown on the corresponding area.
Saving and Calling up Your Custom Chord Sequences (Chord Looper)
If you turn the power off at this point, the Memory will be cleared. To save the memorized data as a file, see pages 18 and 19.
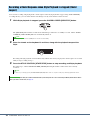
1234
5678
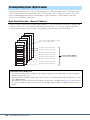
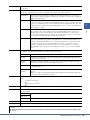
Data Structure on the Chord Looper display
Chord Looper Bank
(*.clb) file
Load[Save]
[Export]
Chord Looper Bank
[Import]
[Clear]
Chord Looper Data
(*.cld) file
Load
(Touch memory number to select)
Memorize
[Memory]
Current Chord Looper
data (not displayed)
Recording
[Rec/Stop]
Loop Playback
[On/Off]
2
3
Same as the CHORD LOOPER
[REC/STOP] and [ON/OFF] buttons.
NOTICE

18 PSR-A5000 Reference Manual
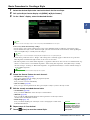
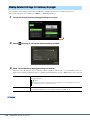
Saving the Recorded Data as a Bank File
The eight memorized chord sequences can be saved as a single Chord Looper Bank (*.clb) file.
1 Record the desired chord sequence, and then memorize to one of the numbers [1]–[8].
To record the chord sequence, see page 16 or refer to the Owner’s Manual.
To memorize the recorded data, see page 17.
2 Touch (Save) to save the data in the Chord Looper Memory [1]–[8] as a single Bank
file.
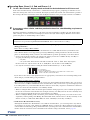
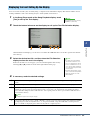
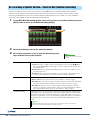
Recalling the Chord Looper Bank File and Playing Back a Style with a
Chord Sequence
1 Select a Style.
2 Load the Chord Looper Bank name to call up the Chord Looper Bank Selection display,
and then select the desired Bank.
3 Touch the Chord Looper Memory number you wish to use first.
If you select a Chord Looper Bank file before saving the edited data, the data will be lost.
Each Chord Looper Memory is named automatically (for example, “CLD_001”), but it can be renamed by exporting the file and then importing it (page 19).
Touch [On/Off] to turn it on in this step, if you want to start automatic Style playback from the beginning of your performance.
1
2
NOTICE
NOTE
2
3
Same as the CHORD LOOPER
[REC/STOP] and [ON/OFF] buttons.
Chord Looper Bank file name
NOTE
NEXT PAGE

PSR-A5000 Reference Manual 19
1
Styles
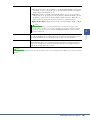
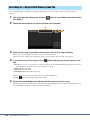
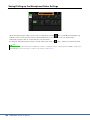
4 Start playback of the Style and play along with it.
5 Touch [On/Off] just before the measure you want to start loop playback of the chord
sequence.
[On/Off] flashes to indicate loop playback is in standby. On the next measure of the Style, [On/Off] is turned on
and the chord sequence will be played back in a loop.
6 As necessary, change the Chord Looper Memory number.
To change the Memory number, touch the desired number. The chord sequence changes on the next measure of the
Style.
7 Touch [On/Off] to stop loop playback.
The playback of the chord sequence is immediately stopped, and the Style returns to normal playback.
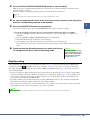
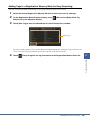
Editing the Chord Looper Bank (Export, Import, Clear)
Each Chord Looper Memory number contained in the Chord Looper Memory Bank can be edited (cleared, imported,
and exported) one by one. The Memory data is exported/imported as a Chord Looper Data (*.cld) file.
1 Touch the desired operation: [Clear], [Import] or [Export].
Follow the onscreen instructions. To cancel the operation at this point, simply touch an empty area of the display.
2 Touch the desired memory number, and then execute the action selected in step 1 as
described below.
3 As necessary, touch (Save) to save the edited Chord Looper Bank as a new file.
During loop playback, [On/Off] lights (and the CHORD LOOPER [ON/OFF] lights in orange), and the [ACMP] button flashes. In this condition, the chord input from
the keyboard is disabled, and the whole keyboard can be used for performance.
If you want to clear all data shown in the Chord Looper display, touch (New) to create the new Bank.
Clear A confirmation message appears. Touch [Yes] to execute clear.
Import The File Selection display for importing is called up. Touch the desired file to import, and
then touch or press the [EXIT] button to return.
Export The File Selection display for exporting is called up. Touch [Export] on the display, enter the
file name, and then touch [OK].
The file name is entered automatically, but you can rename it when saving.
If you select a Chord Looper Bank file before saving the edited data, the data will be lost.
NOTE
NOTE
2
1
NOTICE

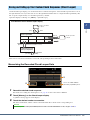
20 PSR-A5000 Reference Manual
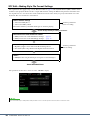
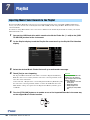
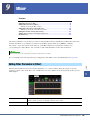
The Style Creator function lets you create your original Style by recording the rhythm pattern via the keyboard and
using already-recorded Style data. Basically, select a preset Style that is closest to the type you want to create, and
then record the rhythm pattern, bass line, chord backing, or phrase (referred to as “Source Pattern” in the Style
Creator) for each channel of each Section.
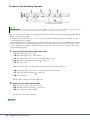
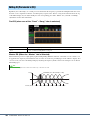
Style Data Structure—Source Patterns
A Style is made up of different Sections (Intro, Main, Ending, etc.) and each Section has eight separate channels, each
of which is referred to as a “Source Pattern.” With the Style Creator feature, you can create a Style by separately
recording the Source Pattern for each channel, or by importing pattern data from other existing Styles.
Creating/Editing Styles (Style Creator)
Limitations on the Audio part:
• If you select an Audio Style as starting data, the Audio part will be used as is. The Audio part cannot be deleted,
edited or created from scratch.
• The created Style containing the Audio part can be used only via an instrument that supports Audio Styles as well
as the SFF GE format.
• The Audio part cannot be copied from another Style or Section in the “Assembly” display (page 26). If you want to
use a specific Audio part, make sure to select the corresponding Audio Style before calling up the Style Creator
display.
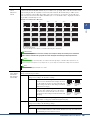
Phrase 2
Phrase 1
Pad
Chord 2
Chord 1
Bass
Rhythm 2
Rhythm 1
Audio Part
Recording or copying from another Style
Recording or copying from another Style
Recording or copying from another Style
Recording or copying from another Style
Recording or copying from another Style
Recording or copying from another Style
Recording or copying from another Style
Recording or copying from another Style
Used as is when selecting an Audio Style as starting
data. This cannot be edited or deleted.
Main A
Main B
Fill In
Intro
Ending 2
Ending 3
Creating a Source Pattern
for each channel separately
A página está carregando ...
A página está carregando ...
A página está carregando ...
A página está carregando ...
A página está carregando ...
A página está carregando ...
A página está carregando ...
A página está carregando ...
A página está carregando ...
A página está carregando ...
A página está carregando ...
A página está carregando ...
A página está carregando ...
A página está carregando ...
A página está carregando ...
A página está carregando ...
A página está carregando ...
A página está carregando ...
A página está carregando ...
A página está carregando ...
A página está carregando ...
A página está carregando ...
A página está carregando ...
A página está carregando ...
A página está carregando ...
A página está carregando ...
A página está carregando ...
A página está carregando ...
A página está carregando ...
A página está carregando ...
A página está carregando ...
A página está carregando ...
A página está carregando ...
A página está carregando ...
A página está carregando ...
A página está carregando ...
A página está carregando ...
A página está carregando ...
A página está carregando ...
A página está carregando ...
A página está carregando ...
A página está carregando ...
A página está carregando ...
A página está carregando ...
A página está carregando ...
A página está carregando ...
A página está carregando ...
A página está carregando ...
A página está carregando ...
A página está carregando ...
A página está carregando ...
A página está carregando ...
A página está carregando ...
A página está carregando ...
A página está carregando ...
A página está carregando ...
A página está carregando ...
A página está carregando ...
A página está carregando ...
A página está carregando ...
A página está carregando ...
A página está carregando ...
A página está carregando ...
A página está carregando ...
A página está carregando ...
A página está carregando ...
A página está carregando ...
A página está carregando ...
A página está carregando ...
A página está carregando ...
A página está carregando ...
A página está carregando ...
A página está carregando ...
A página está carregando ...
A página está carregando ...
A página está carregando ...
A página está carregando ...
A página está carregando ...
A página está carregando ...
A página está carregando ...
A página está carregando ...
A página está carregando ...
A página está carregando ...
A página está carregando ...
A página está carregando ...
A página está carregando ...
A página está carregando ...
A página está carregando ...
A página está carregando ...
A página está carregando ...
A página está carregando ...
A página está carregando ...
A página está carregando ...
A página está carregando ...
A página está carregando ...
A página está carregando ...
A página está carregando ...
A página está carregando ...
A página está carregando ...
A página está carregando ...
A página está carregando ...
A página está carregando ...
A página está carregando ...
A página está carregando ...
A página está carregando ...
A página está carregando ...
A página está carregando ...
A página está carregando ...
A página está carregando ...
A página está carregando ...
A página está carregando ...
A página está carregando ...
A página está carregando ...
-
 1
1
-
 2
2
-
 3
3
-
 4
4
-
 5
5
-
 6
6
-
 7
7
-
 8
8
-
 9
9
-
 10
10
-
 11
11
-
 12
12
-
 13
13
-
 14
14
-
 15
15
-
 16
16
-
 17
17
-
 18
18
-
 19
19
-
 20
20
-
 21
21
-
 22
22
-
 23
23
-
 24
24
-
 25
25
-
 26
26
-
 27
27
-
 28
28
-
 29
29
-
 30
30
-
 31
31
-
 32
32
-
 33
33
-
 34
34
-
 35
35
-
 36
36
-
 37
37
-
 38
38
-
 39
39
-
 40
40
-
 41
41
-
 42
42
-
 43
43
-
 44
44
-
 45
45
-
 46
46
-
 47
47
-
 48
48
-
 49
49
-
 50
50
-
 51
51
-
 52
52
-
 53
53
-
 54
54
-
 55
55
-
 56
56
-
 57
57
-
 58
58
-
 59
59
-
 60
60
-
 61
61
-
 62
62
-
 63
63
-
 64
64
-
 65
65
-
 66
66
-
 67
67
-
 68
68
-
 69
69
-
 70
70
-
 71
71
-
 72
72
-
 73
73
-
 74
74
-
 75
75
-
 76
76
-
 77
77
-
 78
78
-
 79
79
-
 80
80
-
 81
81
-
 82
82
-
 83
83
-
 84
84
-
 85
85
-
 86
86
-
 87
87
-
 88
88
-
 89
89
-
 90
90
-
 91
91
-
 92
92
-
 93
93
-
 94
94
-
 95
95
-
 96
96
-
 97
97
-
 98
98
-
 99
99
-
 100
100
-
 101
101
-
 102
102
-
 103
103
-
 104
104
-
 105
105
-
 106
106
-
 107
107
-
 108
108
-
 109
109
-
 110
110
-
 111
111
-
 112
112
-
 113
113
-
 114
114
-
 115
115
-
 116
116
-
 117
117
-
 118
118
-
 119
119
-
 120
120
-
 121
121
-
 122
122
-
 123
123
-
 124
124
-
 125
125
-
 126
126
-
 127
127
-
 128
128
-
 129
129
-
 130
130
-
 131
131
-
 132
132
-
 133
133


Yamaha PSR-A5000 Manual do usuário
- Categoria
- Sintetizador
- Tipo
- Manual do usuário
em outros idiomas
- español: Yamaha PSR-A5000 Manual de usuario
- français: Yamaha PSR-A5000 Manuel utilisateur
- italiano: Yamaha PSR-A5000 Manuale utente
- English: Yamaha PSR-A5000 User manual
- Nederlands: Yamaha PSR-A5000 Handleiding
- Deutsch: Yamaha PSR-A5000 Benutzerhandbuch
- dansk: Yamaha PSR-A5000 Brugermanual
- čeština: Yamaha PSR-A5000 Uživatelský manuál
- svenska: Yamaha PSR-A5000 Användarmanual
- polski: Yamaha PSR-A5000 Instrukcja obsługi
- Türkçe: Yamaha PSR-A5000 Kullanım kılavuzu
- suomi: Yamaha PSR-A5000 Ohjekirja
- română: Yamaha PSR-A5000 Manual de utilizare
Artigos relacionados
-
Yamaha PSR-A5000 Manual do proprietário
-
Yamaha PSR-SX900 Manual do usuário
-
Yamaha CVP-809 Guia de instalação
-
Yamaha PSR-S670 Manual do usuário
-
Yamaha PSR-SX600 Manual do usuário
-
Yamaha PSR-S970 Manual do usuário
-
-
Yamaha PSR-A3000 Manual do proprietário
-
-