Neomounts DS70-750BL2 Manual do usuário
- Categoria
- Suportes de mesa de tela plana
- Tipo
- Manual do usuário

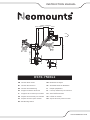
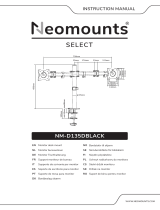
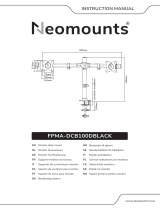
INSTRUCTION MANUAL
WWW.NEOMOUNTS.COM
DS70-750BL2
IT
EN
NL
DE
FR
ES
PT
DK
Monitor desk mount
Monitor bureausteun
Monitor Tischhalterung
Support moniteur de bureau
Supporto da scrivania per monitor
Soporte de escritorio para monitor
Suporte de mesa para monitor
Bordbeslag skærm
NO
SE
FI
PL
CS
SK
RO
Bordstativ til skjerm
Skrivbordsfäste för bildskärm
Näytön pöytäteline
Uchwyt nabiurkowy do monitora
Stolní držák monitoru
Držiak na monitor
Suport de birou pentru monitor
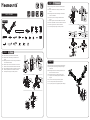
min10-max85mm
min10-max85mm
100mm
Ø35mm
75mm
100mm
117mm
51mm100mm57mm
min167-max197mm
±180°
+45°
-45°
318mm
max496mm
max160mm
115mm
100mm
75mm

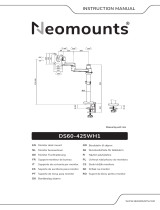
PARTS
DS70-750BL2
Tool
Pencil Drill Tape measure
Tool Pencil
Drill
Tape measure
M-A. M4x12
(x8)
M-B. M5x12
(x8)
M-C. D5
(x8)
L. M6x16
(x3)
Q. 4mm
(x1)
R. 5mm
(x1)
M. M6x12
(x3)
N. M6x10
(x2)
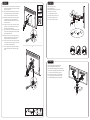
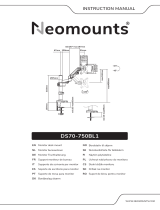
Mount the grommet to the rod and install through the
desk
Monteer de doorvoer aan de stang en installeer in het
bureau
Befestigen Sie die Tülle an der Stange und installieren
Sie sie im Schreibtisch
Montez le passe-fil sur la tige et installez-le dans le
bureau
Montare il gommino sull'asta e installarlo nella scrivania
Monte el pasacables en la varilla e instálelo en el escritorio
Montar a argola na vara e instalar na secretária
Zamontuj przelotkę na pręcie i zainstaluj w biurku
EN
NL
DE
FR
IT
ES
PT
PL
10-55mm
10-85mm
50-85mm
Q
N
Ø10 mm
(Ø3,8")
STEP 1
STEP 2
STEP 1
Mount the clamp to the rod and install to the desk
Monteer de klem aan de stang en installeer aan het
bureau
Befestigen Sie die Klemme an der Stange und installieren
Sie sie auf dem Schreibtisch
Montez la pince sur la barre et installez-la sur le bureau
Montare il morsetto sulla barra e installarlo sulla scrivania
Monte la abrazadera en la barra e instálela en el escritorio
Montar a braçadeira na barra e instalar na secretária
Zamontuj zacisk na pręcie i zainstaluj na biurku
EN
NL
DE
FR
IT
ES
PT
PL
Attach the arm to the rod, adjust the height and tighten
Bevestig de arm aan de stang, stel de juiste hoogte in
en draai vast
Befestigen Sie den Arm an der Stange, stellen Sie die
Höhe ein und ziehen Sie ihn fest
Attachez le bras à la tige, réglez la hauteur et fixer
Collegare il braccio all'asta, regolazione dell'altezza e
stringere
Fije el brazo a la varilla, ajuste la altura y apriete
Fixar o braço à haste, ajustar a altura e apertar
Przymocuj ramię do rurki, regulacja wysokości i dokręcić
EN
NL
DE
FR
IT
ES
PT
PL
A. (x1) B. (x1) C. (x1) D. (x1) E. (x1) F. (x1)
G. (x1) H. (x1) I. (x1)
S. (x1)
J. (x1) K. (x1) O. (x4) P. (x1)
B
D
M
Q
O
C
Q
L
or
or
N
F
Q
H
M
QG
O
10-85mm
I
K
J
S
A
P
1
2
R
75x75 -
100x100 mm
2-7 kg (2x) 7,3-48,1 cm 0-37,8 cm
AClamp
BGrommet

* Not Included
Slide the bolts into the top holes of the VESA plate and
tighten the bolts. Attach the other 2 bolts in the lower
part of the VESA plate
Schuif de bouten in de bovenste gaten van de VESA-
plaat en draai de bouten vast. Bevestig de andere 2
bouten in het onderste deel van de VESA-plaat
Schieben Sie die Schrauben in die oberen Löcher der
VESA-Platte und ziehen Sie die Schrauben fest.
Installieren Sie die anderen 2 Schrauben im unteren
Teil der VESA-Platte
Insérez les vis dans les trous supérieurs de la plaque
VESA et les serrer. Installez les 2 autres vis dans la
partie inférieure de la plaque VESA
Scorra i bulloni nei fori superiori della piastra VESA e
serrare i bulloni. Installare gli altri 2 bulloni nella parte
inferiore della piastra VESA
Deslice los tornillos en los orificios superiores de la
placa VESA y apriete los tornillos. Instale los otros 2
tornillos en la parte inferior de la placa VESA
Deslize os parafusos nos orifícios superiores da placa
VESA e aperte os parafusos. Instale os outros 2 para-
fusos na parte inferior da placa VESA
Wsuń śruby w górne otwory płyty VESA i dokręć je.
Zainstaluj pozostałe 2 śruby w dolnej części płytki
VESA
EN
NL
DE
FR
IT
ES
PT
PL
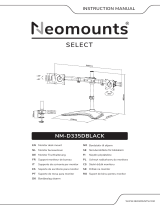
STEP 3
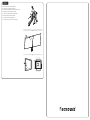
Adjust the gas spring
Stel de gasveer af
Gasfeder-Höhenverstellung einstellen
Ajuster le ressort à gaz
Regolare la forza della molla
Ajustar la fuerza de resorte a gas
Ajuste a força da mola a gás
Ustawić naprężenie sprężyny
EN
NL
DE
FR
IT
ES
PT
PL
STEP 4
STEP 5
Route the cable(s) through the cable clips
Geleid de kabel(s) door de kabelclips
Führen Sie das/die Kabel durch die Kabelklemmen
Faire passer le(s) câble(s) dans les attaches de câble
Far passare il/i cavo/i attraverso i fermacavi
Pase el cable o los cables por las abrazaderas
Guiar o(s) cabo(s) através dos clipes do cabo
Przełóż kabel (kable) przez uchwyty kablowe
EN
NL
DE
FR
IT
ES
PT
PL
3mm
M-A
M-B
M-C
M-A
M-B
M-C
R

Adjust the mount to the desired position
Stel de steun in op de gewenste positie
Positionieren die Halterung in die gewünschte Position
Ajustez le support à la position souhaitée
Regolare il supporto nella posizione desiderata
Ajuste el soporte a la posición deseada
Ajuste o suporte na posição desejada
Dostosuj pozycję uchwytu do twoich wymagań
EN
NL
DE
FR
IT
ES
PT
PL
STEP 6
R

-
 1
1
-
 2
2
-
 3
3
-
 4
4
-
 5
5


Neomounts DS70-750BL2 Manual do usuário
- Categoria
- Suportes de mesa de tela plana
- Tipo
- Manual do usuário
em outras línguas
- español: Neomounts DS70-750BL2 Manual de usuario
- français: Neomounts DS70-750BL2 Manuel utilisateur
Artigos relacionados
-
Neomounts NS-DPOS100BLACK Manual do usuário
-
 Neomounts NM-D135DBLACK Manual do usuário
-
Neomounts FPMA-D550DBLACK Manual do usuário
-
Neomounts FPMA-D650BLACK Manual do usuário
-
Neomounts FPMA-D550DDVBLACK Manual do usuário
-
 Neomounts ds60-425wh1 Manual do usuário
-
Neomounts ds60-425wh2 Manual do usuário
-
 Neomounts DS70-750BL1 Manual do usuário
-
 Neomounts NM-D335DBLACK Manual do usuário
-
 Neomounts FPMA-DCB100DBLACK Manual do usuário


