Black & Decker BXWSH2000E Manual do usuário
- Categoria
- Aquecedores de ambiente
- Tipo
- Manual do usuário

FR ENDEITESPTNLPLELRUROBG
www.blackanddecker.eu
BXWSH2000E

F
A
DAY
OK
SET
+
EDIT
TIME
/ON
TIME
/OFF
P
B
C
F
G
H
I
23
P
°
C
a
b
e
c
f
d
g
I
II
V
V
VI
VII
VIII
X
XI
XII
IV
III
XIII
IX
E
D

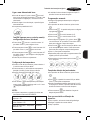
Fig.1
EN: This product is only suitable for well insulated spaces or occasional use.
FR: Ce produit ne peut être utilisé que dans des locaux bien isolés ou de manière occasionnelle.
DE: Dieses Produkt ist nur für gut isolierte Räume oder gelegentlichen Gebrauch geeignet.
IT: Questo prodotto è adatto solo per spazi ben isolati o uso occasionale
ES: Producto indicado para ser usado en espacios correctamente aislados. En caso contrario su utilización deberá ser puntual.
PT: Este produto é adequado apenas para espaços bem isolados espaços ou utilização ocasional.
NL: Dit product is alleen geschikt voor goed geïsoleerde ruimtes of incidenteel gebruik.
PL: Ten produkt jest przeznaczony tylko do dobrze izolowanych pomieszczeń lub okazjonalnych zastosowań.
EL: Αυτό το προϊόν είναι κατάλληλο μόνο για καλά μονωμένους χώρους ή για περιστασιακή χρήση.
RU: Этот продукт подходит только для хорошо изолированных помещений или случайного использования.
RO: Acest produs este potrivit doar pentru spații bine izolate sau ocazional.
BG: Този продукт е подходящ само за добре изолирани помещения или случайна употреба.

ENGLISH
(Original instructions)
4
Wall Mounted Heater
BXWSH2000E
Dear customer,
Many thanks for choosing to purchase a BLACK+DECKER
brand product.
Thanks to its technology, design and operation and the
fact that it exceeds the strictest quality standards, a fully
satisfactory use and long product life can be assured.
♦ Read these instructions carefully before switching on the
appliance and keep them for future reference. Failure to
follow and observe these instructions could lead to an
accident.
SAFETY ADVICE AND
WARNINGS
♦ CAUTION: Some parts of this
product can become very hot and
cause burns. Particular attention
has to be given where children
and vulnerable people are pres-
ent.
♦ The appliance must not be placed
below a power socket.
♦ Children of less than 3 years should
be kept away unless continuously
supervised.
♦ Children aged from 3 years and less
than 8 years shall only switch on/
off the appliance provided that it
has been placed or installed in its
intended normal operating position
and they have been given supervi-
sion or instruction concerning use
of the appliance in a safe way and
understand the hazards involved.
♦ This appliance can be used by chil-
dren aged from 8 years and above
and persons with reduced physical,
sensory or mental capabilities or
lack of experience and knowledge
if they have been given supervision
or instruction concerning use of the
appliance in a safe way and under-
stand the hazards involved.
♦ Cleaning and user maintenance
shall not be made by children unless
they are supervised.
♦ Children aged from 3 years and
less than 8 years shall not plug in,
regulate and clean the appliance or
perform user maintenance.
♦ This appliance is not a toy. Children
should be supervised to ensure that
they do not play with the appliance.
♦ If the connection to the mains has
been damaged, it must be replaced,
take the appliance to an authorised
technical support service. Do not
attempt to disassemble or repair
the appliance by yourself in order to
avoid a hazard.
♦ This appliance is for household use
only, not professional, industrial use.
♦ Ensure that the voltage indicated on the rating label
matches the mains voltage before plugging in the
appliance.
♦ Connect the appliance to a socket that can supply a
minimum of 10 amperes.
♦ The appliance’s plug must t into the mains socket prop-
erly. Do not alter the plug. Do not use plug adaptors.
♦ Use the appliance in a well-ventilated area.
♦ Keep the appliance away from ammable material such
as textiles, cardboard or paper, etc.

ENGLISH
(Original instructions)
5
♦ Ensure that neither the air access nor exit become either
totally or partially covered by drapery, clothing, etc., as
this increases the risk of re.
♦ Do not use the appliance in association with a program-
mer, timer or other device that automatically switches
it on.
♦ Do not use the appliance if the cable or plug is damaged.
♦ If any of the appliance casings breaks, immediately
disconnect the appliance from the mains to prevent the
possibility of an electric shock.
♦ CAUTION: Maintain the appliance dry.
♦ CAUTION: Do not use the appliance near water.
♦ Do not force the power cord. Never use the power cord
to lift up, carry or unplug the appliance.
♦ Do not wrap the power cord around the appliance.
♦ Do not clip or crease the power cord.
♦ Do not allow the power cord to come into contact with
the appliance’s hot surfaces.
♦ Check the state of the power cord. Damaged or tangled
cables increase the risk of electric shock.
♦ The appliance is not suitable for outdoor use.
♦ Supply cord should be regularly examined for signs of
damage, and if the cord is damaged, the appliance must
not be used.
♦ As an additional protection to the electrical supply for the
appliance, it is advisable to have a differential current
device with a maximum sensitivity of 30 mA. Ask for
advice from a competent installer.
♦ Do not use or store the appliance outdoors.
♦ Do not leave the appliance out in the rain or exposed
to moisture. If water gets into the appliance, this will
increase the risk of electric shock.
♦ Do not touch the plug with wet hands.
♦ Do not use the appliance in the case of persons insensi-
tive to heat (the appliance has heated surfaces).
♦ Do not touch the heated parts of the appliance, as it may
cause serious burns.
Use and care:
♦ Fully extend the appliance’s power cable before each
use.
♦ Do not use the appliance if the on/off switch does not
work.
♦ If you use the appliance in a bathroom or similar place,
unplug the appliance from the mains when it is not in
use, even if it is only for a short while, as proximity to wa-
ter involves a risk, even if the appliance is disconnected.
♦ Disconnect the appliance from the mains when not in
use and before undertaking any cleaning task.
♦ Store this appliance out of reach of children and/or
persons with physical, sensory or reduced mental or lack
of experience and knowledge.
♦ Make sure that dust, dirt or other foreign objects do not
block the fan grill on the appliance.
♦ Never leave the appliance connected and unattended if
is not in use. This saves energy and prolongs the life of
the appliance.
♦ Do not use the appliance to dry textiles of any kind.
Service:
♦ Make sure that the appliance is serviced only by special-
ist personnel, and that only original spare parts or acces-
sories are used to replace existing parts/accessories.
♦ CAUTION: There is a risk of re if the appliance’s clean-
ing is not done according to these instructions.
♦ Any misuse or failure to follow the instructions for use
renders the guarantee and the manufacturer’s liability
null and void.
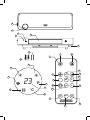
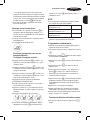
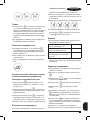
DESCRIPTION
A Louvers
B Power cord
C Screen
D Screws
E Expansion pipe
F Remote control
G On/off switch
H Timer button
I Modes button
SCREEN
a. Heat intensity I
b. Heat intensity II
c. Weekly program
d. Temperature
e. Timer
f. Degrees (ºC)
g. Open-window function
REMOTE CONTROL
I. On/off button
II. Timer button
III. Settings button
IV. Heat intensity button
V. +/- buttons

ENGLISH
(Original instructions)
6
VI. OK
VII. Open-window detection button
VIII. Day setting button
IX. Program button
X. Time ON button
XI. Edit button
XII. Time OFF button
XIII. Oscillation button
If the model of your appliance does not have the accesso-
ries described above, they can also be bought separately
from the Technical Assistance Service.
INSTALLATION
♦ Be sure to remove all packaging material from inside the
appliance.
♦ Install the appliance away from ammable material such
as textiles, cardboard or paper, etc.
♦ Install the appliance a minimum distance of 50cm away
from combustible materials, such as curtains, furniture …
♦ Ensure that neither the air access nor exit become either
totally or partially covered by drapery, clothing, etc., as
this increases the risk of re.
♦ Appliance must be installed at least 1,8 m above the
oor.
♦ In the event that the appliance is mounted on a
bathroom wall, position it in such a way that the socket,
power supply cable, switches or other controls are not
within the reach a person in the bath, shower or at the
wash-hand basin.
♦ The plug must be easily accessible so it can be discon-
nected in an emergency.
♦ Ensure that the appliance is properly and safely xed
in his working position with screws. To avoid damaging
the appliance, on recommend to use only the holes
specically made by the manufacturer.
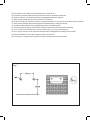
ASSEMBLING THE WALL
BRACKET:
♦ Securing to the wall (Fig.1): Drill two holes in wall keep-
ing a distance of 2,05m from the ground.
♦ Fix the pothook on the expansion pipes with the screws
provided (D).
♦ Make sure the hooks are rm and place the appliance.
INSTRUCTIONS FOR USE
Before use:
♦ Make sure that all products’ packaging has been
removed.
♦ Some parts of the appliance have been lightly greased.
Consequently, the rst time the appliance is used a light
smoke may be detected. After a short time, this smoke
will disappear.
♦ To eliminate the smell given off by the appliance when
used for the rst time, it is recommended to have it on at
full power for 2 hours in a well-ventilated room.
Use:
♦ Unroll the cable completely before plugging it in.
♦ Connect the appliance to the mains.
♦ Turn the appliance on, by using the on/off switch (G).
The appliance enter into standby mode and displays
shows “S”.
FUNCTIONS (MANUAL AND REMOTE CONTROL):
♦ Turn the appliance on, by using the button. It will
enter into fan mode and display will show “- -“.
♦ Press the / button for one time, the appliance
will work with low heating (1000W).
♦ Press again, it will change to high heating (2000W).
Timer:
♦ Press the button to set the timer (1-12 hours).
Pressing the button one time increases one hour. After
setting the time, the display will show the current setting
for 5 seconds, then it will resume to the previous display.
Meanwhile the light of will be on.
TURN ON AT A SPECIFIC TIME:
♦ In standby mode “S”, press button for setting the
appointment turn-on time (1-12 hours). After the setting
is completed, the display will show the appointment
turn-on.
♦ When the appointment power-on time arrives, the
product will automatically turn on.
♦ The default temperature will be 23ºC.

ENGLISH
(Original instructions)
7
Function operation (only remote control)
Set the current time/day:
♦ Press button for one time and the display will show
“12” as default. Press “+/-“ to set the current hour.
♦ Press again, the display will show “30” as default.
Press “+/-“ to set the current minute.
♦ Press again, the display will show “d7” as default.
Press “+/-“ to set the current day (Monday-Sunday:
d1-d7).
♦ Then press OK to conrm the setting.
SET THE TEMPERATURE:
♦ During working status, press +/- buttons. The display will
show 23ºC as default.
♦ Press +/- to set the desired temperature (10-49ºC) and
then press OK to conrm it.
♦ Example: Wednesday, 9:30 AM, 25ºC, II heating.
♦ To cancel the setting temperature just press button
to choose heating I or II. The display will go off and
it will show “- -“.
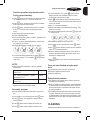
NOTE:
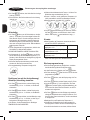
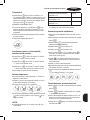
♦ When setting the temperature, it will use a SMART
working way.
Setting temperature – ambient temper-
ature > 2ºC
2000W
0ºC < Setting temperature – ambient
temperature < 2ºC
1000W
Setting temperature – ambient temper-
ature = 0ºC
Fan
♦ The fan will work for 30 seconds and the it will stop. The
appliance will inter into standby mode.
Set weekly program:
♦ Set the weekly program after setting the current time/
day.
♦ If the product is not in working staus, press button.
♦ Press button. The appliance is ready to set the
weekly program.
♦ Press button and the display will show d1-d7.
♦ Press button and the display will show P1-P6.
♦ To set the program 1 (P1), press button and the
display will show “00” as default. Press this button
continuously to set the turn-on time.
♦ Press and the display will show the previous step
turn-on time by default. Press this button continuously to
set the turn-off time.
♦ Press +/- to set the temperature.
♦ Repeat these steps for the whole weekly program. Then
press OK to conrm.
♦ To cancel the weekly function, press the button and
“P” light will go off.
OPEN-WINDOW DETECTION FUNCTION:
♦ If the product is not in working staus, press button.
♦ Press and the appliance will show 23ºC as default.
Press +/- to set the temperature.
♦ When the ambient temperature drops 5-10ºC within 10
minutes, the product will stop working for 30min and it
will enter into standby mode.
♦ Press again to turn off the open-window detection
function.
Once you have nished using the appli-
ance:
♦ Turn the appliance off, using the on/off switch.
♦ Unplug the appliance from the mains.
♦ Clean the appliance.
Safety thermal protector:
♦ The appliance has a safety device, which protects the
appliance from overheating.
♦ When the appliance switches itself on and off repeatedly,
for reasons other than the thermostat control, check to
ensure that there are no obstacles that impede correct
air entry or expulsion.
♦ If the appliance turns itself off and does not switch itself
on again, disconnect it from the mains supply, and wait
for approximately 15 minutes before reconnecting. If the
machine does not start again seek authorised technical
assistance.
CLEANING
♦ Disconnect the appliance from the mains and allow it to

ENGLISH
(Original instructions)
8
cool before undertaking any cleaning task.
♦ Clean the equipment with a damp cloth with a few drops
of washing-up liquid and then dry.
♦ Do not use solvents, or products with an acid or base pH
such as bleach, or abrasive products, for cleaning the
appliance.
♦ Do not let water or any other liquid get into the air vents
to avoid damage to the inner parts of the appliance.
♦ Never submerge the appliance in water or any other
liquid or place it under running water.
♦ If the appliance is not in good condition of cleanliness, its
surface may degrade and inexorably affect the duration
of the appliance’s useful life and could become unsafe
to use.
♦ Remark: When the appliance is used as a heater after
long periods in storage or after having been used solely
as a fan a small amount of smoke may be produced.
This is not important and is due to the heater burning
dust deposits which have accumulated on the heating
element. This phenomenon may be avoided by cleaning
the inside of the appliance beforehand through the grill
with a vacuum cleaner or pressurised air.
ANOMALIES AND REPAIR
♦ Take the appliance to an authorised technical support
service if product is damaged or other problems arise.
Do not attempt to disassemble or repair the appliance
yourself as this may be dangerous.
For EU product versions and/or in case that
it is requested in your country:
Ecology and recyclability of the product
♦ The materials of which the packaging of this appliance
consists are included in a collection, classication and
recycling system. Should you wish to dispose of them,
use the appropriate public recycling bins for each type
of material.
♦ The product does not contain concentrations of
substances that could be considered harmful to the
environment.
This symbol means that in case you wish to
dispose of the product once its working life has
ended; take it to an authorised waste agent for
the selective collection of Waste from Electric
and Electronic Equipment (WEEE).
This appliance complies with Directive 2014/35/EU on
Low Voltage, Directive 2014/30/EU on Electromagnetic
Compatibility, Directive 2011/65/EU on the restrictions of
the use of certain hazardous substances in electrical and
electronic equipment and Directive 2009/125/EC on the
ecodesign requirements for energy-related products.
WARRANTY AND TECHNICAL
ASSISTANCE
♦ This product enjoys the recognition and protection of the
legal guarantee in accordance with current legislation. To
enforce your rights or interests you must go to any of our
ofcial technical assistance services.
♦ You can nd the closest one by accessing the following
web link: http://www.2helpu.com/.
♦ You can also request related information, by contacting
us (see the last page of the manual).
♦ You can download this instruction manual and its
updates at http://www.2helpu.com/.

ENGLISH
(Original instructions)
9
The following information details the features related to
ecodesign.
Model: BXWSH2000E
Heat Output
Nominal heat output Pnom 2,0 kW
Minimum heat output (indicative) Pmin N/A
Maximum continuous heat output Pmax 2,0 kW
Auxiliary electricity consumption
At nominal heat output elmax 0 kW
At minimum heat output elmin 0 kW
In standby mode elSB 0,001 kW
Type of heat input, for electric storage local space heaters only
Manual heat charge control, with integrated thermostat No
Manual heat charge control with room and/or outdoor temperature feedback No
Electronic heat charge control with room and/or outdoor temperature feedback No
Fan assisted heat output
No
Type of heat output/room temperature control
Single stage heat output and no room temperature control No
Two or more manual stages, no room temperature control No
With mechanical thermostat room temperature control No
With electronic room temperature control No
Electronic room temperature control plus day timer No
Electronic room temperature control plus week timer Yes
Other control options
Room temperature control, with presence detection No
Room temperature control, with open window detection Yes
With distance control option No
With adaptive start control No
With working time limitation Yes
With black bulb sensor No
Contact details: Engineering and Technology for Life, S.L., Avda. Barcelona, s/n, Oliana, 25790, Spain

FRANÇAIS
Traduit des instructions originales
10
Chauffage céramique mural
BXWSH2000E
Cher Client,
Nous vous remercions d’avoir acheté un appareil
BLACK&DECKER.
Sa technologie, son design et sa fonctionnalité, outre
sa parfaite conformité aux normes de qualité les plus
strictes, vous permettront d’en tirer une longue et durable
satisfaction.
♦ Lire attentivement cette notice d’instructions avant de
mettre l’appareil en marche, et la conserver pour la
consulter ultérieurement. Le non-respect de ces instruc-
tions peut être source d’accident.
CONSEILS ET MESURES DE
SÉCURITÉ
♦ AVERTISSEMENT : Certaines
pièces du produit peuvent deve-
nir très chaudes et entraîner des
brûlures. Faire particulièrement
attention en présence d’enfants
ou de personnes vulnérables.
♦ L’appareil ne doit pas être placé
sous une prise de courant.
♦ L’appareil doit être mis hors de
portée des enfants de moins de 3
ans, sauf s’ils sont continuellement
surveillés.
♦ Les enfants de 3 ans à 8 ans pour-
ront allumer/éteindre l’appareil à
condition qu’il ait été placé ou installé
dans sa position de fonctionnement
correcte et sous la supervision d’un
adulte ou après avoir reçu les instruc-
tions relatives au fonctionnement sûr
de l’appareil et en connaissant les
risques potentiels de son utilisation.
♦ Cet appareil peut être utilisé par
des enfants de plus de 8 ans et par
des personnes ayant des capacités
physiques, sensorielles ou mentales
réduites ou manquant d’expérience
à condition de le faire sous sur-
veillance ou après avoir reçu les
instructions pour un maniement sûr
de l’appareil et en ayant compris les
risques qu’il comporte.
♦ Les enfants ne doivent pas réaliser
les opérations de nettoyage ou de
maintenance de l’appareil sans la
supervision d’un adulte.
♦ Les enfants de 3 ans à 8 ans ne
doivent pas brancher, régler, net-
toyer ni réaliser les opérations de
maintenance de l’appareil.
♦ Cet appareil n’est pas un jouet. Les
enfants doivent être surveillés an
de s’assurer qu’ils ne jouent pas
avec l’appareil.
♦ Si la prise du secteur est abîmée,
elle devra être remplacée par un
Service d’Assistance Technique
agréé. Ne pas tenter de procéder
aux réparations ou de démonter
l’appareil en raison des risques que
cela implique.
♦ Cet appareil est uniquement desti-
né à un usage domestique et non
professionnel ou industriel.
♦ Avant de raccorder l’appareil au secteur, s’assurer que le
voltage indiqué sur la plaque signalétique correspond à
celui du secteur.

FRANÇAIS
(Instructions initiales)
11
♦ Raccorder l’appareil à une prise pourvue d’une che de
terre et supportant au moins 10 ampères.
♦ La prise de courant de l’appareil doit être compatible
avec la prise de courant de l’installation. Ne jamais
modier la prise de courant de l’appareil. Ne pas utiliser
d’adaptateur de prise de courant.
♦ Utiliser l’appareil dans une zone bien ventilée.
♦ Ne pas utiliser l’appareil associé à un programmateur,
minuteur ou autre dispositif connectant automatiquement
l’appareil.
♦ Ne pas utiliser l’appareil si son câble électrique ou sa
prise sont endommagés.
♦ Si une des enveloppes protectrices de l’appareil se
casse, débrancher immédiatement l’appareil du secteur
pour éviter toute décharge électrique.
♦ AVERTISSEMENT: Maintenir l’appareil au sec.
♦ AVERTISSEMENT: Ne pas utiliser l’appareil à proximité
de points d’eau.
♦ Ne pas forcer le câble électrique de connexion. Ne
jamais utiliser le câble électrique pour lever, transporter
ou débrancher l’appareil.
♦ Ne pas enrouler le câble électrique autour de l’appareil.
♦ Éviter que le câble électrique ne se coince ou ne
s’emmêle.
♦ Ne pas laisser le câble électrique entrer en contact avec
les surfaces chaudes de l’appareil.
♦ Vérier l’état du câble électrique de connexion. Les
câbles endommagés ou emmêlés augmentent le risque
de décharge électrique.
♦ Cet appareil n’est pas adapté à un usage extérieur.
♦ Le câble d’alimentation doit être examiné régulièrement
à la recherche de signes de détérioration ; s’il est
endommagé, l’appareil ne doit pas être utilisé.
♦ Il est recommandé, comme protection additionnelle
de l’installation électrique qui alimente l’appareil, de
disposer d’un dispositif de courant différentiel avec
une sensibilité maximale de 30 mA. En cas de doute,
consultez un installateur agréé.
♦ Ne pas exposer l’appareil aux intempéries.
♦ Ne pas exposer l’appareil à la pluie ou à un environne-
ment humide. L’eau qui entre dans l’appareil augmente
le risque de décharge électrique.
♦ Ne pas toucher la che de l’appareil avec les mains
mouillées.
♦ Les personnes insensibles à la chaleur doivent éviter
d’utiliser cet appareil (puisque celui-ci présente des
surfaces chauffantes).
♦ Éviter de toucher les parties chauffantes de l’appareil,
vous pourriez gravement vous brûler.
Utilisation et entretien :
♦ Avant chaque utilisation, dérouler complètement le câble
électrique de l’appareil.
♦ Ne pas utiliser l’appareil si son dispositif de mise en
marche/arrêt ne fonctionne pas.
♦ Si vous utilisez l’appareil dans une salle de bain ou
endroit similaire, débranchez l’appareil du secteur une
fois que vous aurez terminé, même si ce n’est qu’un
moment, car la proximité de l’eau implique un risque,
même si l’appareil est éteint.
♦ Débrancher l’appareil du secteur quand il n’est pas utili-
sé et avant de procéder à toute opération de nettoyage.
♦ Conserver cet appareil hors de portée des enfants ou
des personnes ayant des capacités physiques, senso-
rielles ou mentales réduites ou présentant un manque
d’expérience et de connaissances.
♦ Vérier que les grilles de ventilation de l’appareil ne sont
pas obstruées par de la poussière, des saletés ou tout
autre objet.
♦ Ne jamais laisser l’appareil branché sans surveillance.
Cela permettra également de réduire la consommation
d’énergie et de prolonger la durée de vie de l’appareil.
♦ Ne pas utiliser l’appareil pour sécher des vêtements,
quels qu’ils soient.
Entretien :
♦ S’assurer que l’entretien de l’appareil est réalisé par du
personnel spécialisé, et que, en cas de besoin de pièces
de rechange, celles-ci soient originales.
♦ AVERTISSEMENT: Si l’appareil ne se nettoie pas
conformément au mode d’emploi, il pourrait exister un
risque d’incendie.
♦ Toute utilisation inappropriée ou non conforme aux
instructions d’utilisation annule la garantie et la respon-
sabilité du fabricant.
DESCRIPTION
A Lames
B Câble
C Écran
D Vis
E Montants
F Télécommande
G Interrupteur marche/arrêt
H Bouton minuterie
I Bouton de sélection de mode

FRANÇAIS
Traduit des instructions originales
12
ÉCRAN
a. Intensité thermique I
b. Intensité thermique II
c. Programmation hebdomadaire
d. Température
e. Horloge
f. Degrés (°C)
g. Fonction fenêtre ouverte
COMMANDE À DISTANCE
I. Interrupteur marche/arrêt
II. Bouton minuterie
III. Touche conguration
IV. Bouton d’intensité de chaleur
V. Boutons–/ +
VI. OK
VII. Bouton fonction fenêtre ouverte
VIII. Bouton réglage jours
IX. Bouton de réglage des programmes
X. Bouton minuteur ON
XI. Bouton éditer
XII. Bouton minuteur OFF
XIII. Bouton d’oscillation
Dans le cas où votre modèle ne disposerait pas des
accessoires décrits antérieurement, ceux-ci peuvent être
achetés séparément auprès des services d’assistance
technique.
INSTALLATION
♦ Veiller à tenir l’appareil éloigné de tout matériel combus-
tible, tels que carton, papier, matières textiles…
♦ Installer l’appareil à 50 cm minimum de tout matériel
combustible, tels que rideaux, meubles…
♦ An d’éviter tout risque d’incendie, ne pas boucher
totalement ou partiellement l’entrée et la sortie d’air de
l’appareil, par des meubles, rideaux, vêtements, etc.
♦ L’appareil doit être installé à au moins 1,8 m au-dessus
du sol.
♦ Dans le cas où l’appareil serait xé au mur d’une salle
de bain, assurez-vous de placer la prise de courant, le
câble d’alimentation, les interrupteurs ou autres com-
mandes hors de portée d’une personne qui se trouverait
dans le bain, la douche ou près d’un lavabo.
♦ La che doit être d’accès facile an de pouvoir la
débrancher en cas d’urgence.
♦ Vérier que l’appareil est correctement xé/vissé dans
sa position de travail et de façon sûre. Pour éviter tout
dommage à l’appareil, nous recommandons d’utiliser
exclusivement les trous prévus par le fabricant.
Montage du support mural:
♦ Fixation murale (Fig.1) : percer deux trous dans le mur
en respectant une distance de 2,05 m du sol.
♦ Fixer les crochets sur les montants en utilisant les vis
fournies en dotation (D).
♦ S’assurer que les crochets soient correctement xés et
installer l’appareil.
MODE D’EMPLOI
Consignes préalables :
♦ S’assurer d’avoir retiré tout le matériel d’emballage du
produit.
♦ Certaines parties de l’appareil ayant été légèrement
graissées, il est possible que l’appareil dégage un
peu de fumée lors de la première utilisation. La fumée
disparaîtra dans un cours laps de temps.
♦ Pour éliminer l’odeur de neuf au premier fonctionnement,
on recommande de le faire marcher à la puissance maxi-
male pendant 2 heures dans une pièce bien ventilée.
Utilisation :
♦ Dérouler complètement le câble avant de le brancher.
♦ Brancher l’appareil au secteur.
♦ Mettre l’appareil en marche en actionnant le bouton
marche/arrêt (G). L’appareil entrera en mode « veille » et
le symbole «S» s’afchera à l’écran.
Fonctions (commande manuelle et à
distance) :
♦ Mettre l’appareil en marche en actionnant le bouton
. L’appareil entrera en mode « ventilateur » et le symbole
«- -» s’afchera à l’écran.
♦ Appuyer sur le bouton / , l’appareil fonctionnera
à basse puissance (1 000 W).
♦ Appuyer à nouveau sur ce bouton, l’appareil passera à
haute puissance (2 000 W).
Minuterie:
♦ Appuyer sur le bouton pour congurer la minuterie

FRANÇAIS
(Instructions initiales)
13
(1-12 heures). Appuyer une fois sur le bouton pour
augmenter d’une heure. Après avoir réglé la minuterie,
la conguration actuelle s’afchera pendant 5 secondes
à l’écran, puis l’écran retournera à la page précédente.
Pendant ce temps, la lumière restera allumée.
♦ Pour régler la minuterie, l’appareil NE doit PAS se
trouver en mode veille.
Allumage à une heure précise :
♦ En mode veille « S », appuyer sur le bouton pour
congurer le délai de démarrage de l’appareil (1-12
heures). Une fois le réglage effectué, l’heure sélection-
née s’afchera à l’écran.
♦ Lorsque l’heure d’activation arrive, l’appareil s’allume
automatiquement.
♦ La température par défaut est 23ºC.
Fonctions (uniquement avec la com-
mande à distance) :
Congurer l’heure/jour actuels :
♦ Appuyer une fois sur le bouton , la valeur « 12 »
s’afchera à l’écran par défaut. Appuyer sur +/- pour
congurer l’heure.
♦ Appuyer à nouveau sur le bouton , la valeur « 30
» s’afchera à l’écran par défaut. Appuyer sur +/- pour
congurer les minutes.
♦ Appuyer à nouveau sur le bouton , la valeur « d7
» s’afchera à l’écran par défaut. Appuyer sur +/- pour
régler le jour (lundi-dimanche : d1-d7).
♦ Appuyer sur OK pour conrmer les paramètres.
CONFIGURER LA TEMPÉRATURE
♦ Durant le fonctionnement, appuyer sur les touches +/-.
L’écran afche 23ºC par défaut.
♦ Appuyer à nouveau sur +/- pour sélectionner la tem-
pérature souhaitée (10-49ºC) et appuyer sur OK pour
conrmer.
♦ Exemple : mercredi, 9h30, 25°C, II chaleur.
♦ Pour annuler les réglages de température, appuyer
simplement sur le bouton pour sélectionner la
chaleur I ou II. L’écran disparaîtra et la valeur «–- »
s’afchera à l’écran.
NOTE :
♦ Lors du réglage de la température, l’appareil utilisera
une méthode de travail INTELLIGENTE.
Réglage de la température–tempéra-
ture ambiante > 2ºC
2000 W
0ºC < Réglage de la température–
température ambiante < 2ºC
1000 W
Réglage de la température–tempéra-
ture ambiante = 0ºC
Ventilateur
♦ Le ventilateur fonctionnera pendant 30 secondes et
s’arrêtera. L’appareil passera en mode veille.
Programmation hebdomadaire:
♦ Procéder à la programmation hebdomadaire après le
réglage de l’heure/ du jour actuels.
♦ Si le produit n’est pas en service, appuyer sur le bouton
.
♦ Appuyez sur la touche . L’appareil est prêt à congu-
rer le programme hebdomadaire.
♦ Appuyer sur le bouton , les valeurs d1-d7 s’afchent
à l’écran.
♦ Appuyer sur le bouton , les valeurs P1-P6 s’af-
chent à l’écran.
♦ Pour congurer le programme 1 (P1), appuyer sur le
bouton , la valeur « 00 » s’afche à l’écran par
défaut. Appuyer continuellement sur ce bouton pour
congurer l’heure d’activation.
♦ Appuyer sur le bouton , l’heure d’allumage de l’étape
précédente s’afchera à l’écran par défaut. Appuyer
continuellement sur ce bouton pour congurer l’heure
d’extinction.
♦ Appuyer sur +/- pour régler la température.
♦ Répéter ces étapes pour l’ensemble du programme
hebdomadaire. Puis appuyer sur OK pour conrmer.
♦ Pour annuler la fonction hebdomadaire, appuyer sur le
bouton, le voyant « P » s’éteindra.
Fonction de détection de fenêtre ouverte :
♦ Si le produit n’est pas en service, appuyer sur le
bouton.

FRANÇAIS
Traduit des instructions originales
14
♦ Appuyer sur , l’appareil afchera 23ºC par défaut.
Appuyer sur +/- pour régler la température.
♦ Lorsque la température ambiante chute de 5 à 10ºC en
10 minutes, l’appareil cesse de fonctionner pendant 30
minutes et passe en mode veille.
♦ Appuyer à nouveau sur pour désactiver la fonction
de détection de fenêtre ouverte.
Après utilisation de l’appareil :
♦ Arrêter l’appareil en appuyant sur l’interrupteur de
marche/arrêt.
♦ Débrancher l’appareil du réseau électrique.
♦ Nettoyer l’appareil.
Sécurité thermique:
♦ L’appareil dispose d’un dispositif de sécurité qui protège
l’appareil de toute surchauffe.
♦ Lorsque l’appareil s’allume et s’éteint alternativement et
que ce n’est pas dû à l’action du thermostat ambiant, vé-
rier qu’aucun obstacle n’empêche ou ne gêne l’entrée
ou la sortie normale de l’air.
♦ Si l’appareil se déconnecte tout seul et que vous ne
parvenez pas à le reconnecter, débranchez-le et atten-
dez environ 15 minutes avant de le rebrancher. S’il ne
fonctionne toujours pas, faites appel à l’un des services
d’assistance technique agréés.
NETTOYAGE
♦ Débrancher l’appareil du secteur et attendre son refroi-
dissement complet avant de le nettoyer.
♦ Nettoyer l’appareil avec un chiffon humide imprégné de
quelques gouttes de détergent et le laisser sécher.
♦ Ne pas utiliser de solvants ni de produits au pH acide ou
basique tels que l’eau de Javel, ni de produits abrasifs
pour nettoyer l’appareil.
♦ Ne pas laisser pénétrer d’eau ni aucun autre liquide par
les ouvertures d’aération an d’éviter d’endommager les
parties intérieures de l’appareil.
♦ Ne pas immerger l’appareil dans l’eau ou dans tout autre
liquide, ni le passer sous un robinet.
♦ Si l’appareil n’est pas maintenu dans un bon état
de propreté, sa surface peut se dégrader et affecter
inexorablement la durée de vie de l’appareil et le rendre
dangereux.
♦ Note : Lors de la mise en marche de l’appareil en
mode chauffage, après une longue période d’arrêt ou
de fonctionnement en mode ventilation seule, il est
possible qu’au début, il se dégage une légère fumée,
sans aucune conséquence, celle-ci étant uniquement
due à la combustion de la poussière et des particules
accumulées dans l’élément chauffant. Ce phénomène
peut être évité en nettoyant au préalable, à travers les
grilles de l’appareil, l’intérieur de ce dernier avec l’aide
d’un aspirateur ou d’un jet d’air comprimé.
ANOMALIES ET RÉPARATION
♦ En cas de panne, remettre l’appareil à un service
d’assistance technique agréé. Il est dangereux de tenter
de procéder aux réparations ou de démonter l’appareil
soi-même.
Pour les versions UE du produit et/ou en
fonction de la législation du pays d’instal-
lation :
Écologie et recyclage du produit
♦ Les matériaux constitutifs de l’emballage de cet appareil
font partie d’un programme de collecte, de tri et de
recyclage. Pour vous débarrasser du produit, merci de
bien vouloir utiliser les conteneurs publics appropriés à
chaque type de matériau.
♦ Le produit ne contient pas de substances concentrées
susceptibles d’être considérées comme nuisibles à
l’environnement.
Ce symbole signie que si vous souhaitez vous
débarrasser de l’appareil, en n de vie utile,
celui-ci devra être déposé, en prenant les
mesures adaptées, à un centre agréé pour la
collecte et le tri des déchets d’équipements
électriques et électroniques (DEEE).
Cet appareil est certié conforme à la Directive 2014/35/
EU de Basse Tension, de même qu’à la Directive 2014/30/
EU en matière de Compatibilité Électromagnétique, à la
Directive 2011/65/EU relative à la limitation de l’utili-
sation de certaines substances dangereuses dans les
équipements électriques et électroniques et à la Directive
2009/125/EC sur les conditions de conception écologique
applicable aux produits en rapport avec l’énergie.

FRANÇAIS
(Instructions initiales)
15
GARANTIE ET ASSISTANCE
TECHNIQUE
♦ Ce produit est reconnu et protégé par la garantie établie
conformément à la législation en vigueur. Pour faire
valoir vos droits ou intérêts, vous devrez vous adresser à
l’un de nos services d’assistance technique agréés.
♦ Pour savoir lequel est le plus proche, vous pouvez
accéder au lien suivant : http://www.2helpu.com/
♦ Vous pouvez aussi nous contacter pour toute information
(veuillez consulter la dernière page du manuel).
♦ Vous pouvez télécharger ce manuel d’instructions et ses
mises à jour sur http://www.2helpu.com/.

FRANÇAIS
Traduit des instructions originales
16
♦ Les informations suivantes fournissent les caractéristiques liées à la conception écologique :
Modèle : BXWSH2000E
Puissance calorique
Puissance calorique nominale Pnom 2,0 kW
Puissance calorique minimum (à titre indicatif) Pmin 0 kW
Puissance calorique maximum continue Pmax 2,0 kW
Consommation auxiliaire d’électricité
À puissance calorique nominale lemax 0 kW
Puissance thermique minimum min 0 kW
En mode attente, leSB 0,001 kW
Type d’entrée de chaleur, uniquement pour les appareils de chauffage local électriques à
accumulation
Contrôle manuel de la charge thermique, avec thermostat intégré Non
Contrôle manuel de la charge thermique en réponse à la température intérieure ou extérieure. Non
Contrôle électronique de la charge thermique en réponse à la température intérieure ou extérieure Non
Puissance thermique assistée par ventilateurs Non
Type de contrôle de puissance calorique/de température intérieure
Puissance calorique à un seul niveau, sans contrôle de la température intérieure Non
Deux niveaux manuels ou plus, sans contrôle de la température intérieure Non
Avec contrôle de la température intérieure par le thermostat mécanique Non
Avec contrôle électronique de la température intérieure Non
Contrôle électronique de la température intérieure et minuterie quotidienne Non
Contrôle électronique de la température intérieure et minuterie hebdomadaire Oui
Autres options de commande
Contrôle de la température intérieure avec détection de présence Non
Contrôle de la température intérieure avec détection des fenêtres ouvertes Oui
Avec option de télécommande Non
Avec contrôle de la mise en marche adaptable Non
Avec limitation de la durée de fonctionnement Oui
Avec capteur à lumière noire Non
Informations de contact: Engineering and Technology for Life, S.L., Avda. Barcelona, s/n, Oliana, 25790, Espagne

DEUTSCH
Übersetzung aus den ursprünglichen anweisungen
17
Wand-Heizstrahler
BXWSH2000E
Sehr geehrte Kunden:
wir danken Ihnen für Ihre Entscheidung, ein BLACK+DE-
CKER.Gerät zu kaufen.
Die Technologie, das Design und die Funktionalität dieses
Produkts, das die anspruchsvollsten Qualitätsnormen er-
füllt, werden Sie über viele Jahre zufriedenstellen.
♦ Lesen Sie die Gebrauchsanweisung sorgfältig, bevor
Sie das Gerät einschalten und bewahren Sie diese zum
Nachschlagen zu einem späteren Zeitpunkt auf. Werden
die Hinweise dieser Bedienungsanleitung nicht beachtet
und eingehalten, kann es zu Unfällen kommen.
RATSCHLÄGE UND SICHER-
HEITSHINWEISE
♦ ACHTUNG Einige Teile dieses
Geräts können sehr heiß werden
und Verbrennungen hervorrufen.
Bitte seien Sie in Anwesenheit
von Kindern oder älteren Perso-
nen besonders vorsichtig.
♦ Das Gerät darf nicht unter einem
Stromanschluss aufgestellt werden.
♦ Das Gerät außerhalb der Reichweite
von Kindern unter 3 Jahren auf-
bewahren, sofern diese nicht unter
Aufsicht stehen.
♦ Kinder zwischen 3 und 8 Jahren
dürfen das Gerät nur ein- oder
ausschalten, sofern dieses in seiner
normalen Betriebsposition wie vor-
geschrieben auf- oder eingebaut
wurde, jedoch nur unter Aufsicht
oder wenn sie eine Anleitung zur
sicheren Nutzung des Geräts erhal-
ten haben und sich über die Risiken
desselben im Klaren sind.
♦ Personen, denen es an Wissen im
Umgang mit dem Gerät mangelt,
geistig behinderte Personen oder
Kinder ab 8 Jahren dürfen das Gerät
nur unter Aufsicht oder Anleitung
über den sicheren Gebrauch des
Gerätes benutzen, sofern sie die
von dem Gerät ausgehenden Ge-
fahren verstehen.
♦ Kinder dürfen keine Reinigungs-
oder Instandhaltungsarbeiten am
Gerät ausführen, sofern sie nicht
von einem Erwachsenen beaufsich-
tigt werden.
♦ Kinder von 3 bis 8 Jahren dürfen
das Gerät nicht anschließen, einstel-
len oder reinigen und dürfen keine
Instandhaltungsarbeiten am Gerät
ausführen.
♦ Dieses Gerät ist kein Spielzeug.
Kinder müssen beaufsichtigt wer-
den, damit sie nicht mit dem Gerät
spielen.
♦ Wenn der Netzstecker beschädigt
ist, muss er ausgetauscht werden.
Bringen Sie das Gerät zu diesem
Zweck zu einem zugelassenen
Kundendienst. Um jegliche Gefahr
auszuschließen, versuchen Sie nicht
selbst, den Stecker abzumontieren
und zu reparieren.
♦ Dieses Gerät ist ausschließlich für
den häuslichen Gebrauch ausge-

DEUTSCH
Übersetzung aus den ursprünglichen anweisungen
18
legt und ist für professionelle oder
gewerbliche Zwecke nicht geeignet.
♦ Vergewissern Sie sich, dass die Spannung auf dem
Typenschild mit der Netzspannung übereinstimmt, bevor
Sie den Apparat an das Stromnetz anschließen.
♦ Das Gerät an ein Stromnetz mit mindestens 10 Ampere
anschließen.
♦ Der Stecker des Geräts muss mit dem Steckdosentyp
des Stromanschlusses übereinstimmen. Der Geräte-
stecker darf unter keinen Umständen modiziert werden.
Keine Adapter für den Stecker verwenden.
♦ Dieses Gerät ist nicht für den Gebrauch im Außenbe-
reich geeignet.
♦ Dieses Gerät nicht über einen Programmschalter, eine
externe Zeitschaltuhr oder eine sonstige Vorrichtung
zum automatischen Einschalten betreiben.
♦ Das Gerät darf nicht mit beschädigtem elektrischem
Kabel oder Stecker verwendet werden.
♦ Sollte ein Teil der Geräteverkleidung beschädigt sein, ist
die Stromzufuhr umgehend zu unterbrechen, um einen
möglichen elektrischen Schlag zu vermeiden.
♦ WARNUNG: Das Gerät trocken halten.
♦ WARNUNG: Das Gerät nicht in Wassernähe benützen.
♦ Nicht mit Gewalt am elektrischen Anschlusskabel ziehen.
Benutzen Sie das elektrische Kabel nicht zum Anheben
oder Transportieren des Geräts. Den Stecker nicht am
Kabel aus der Dose ziehen.
♦ Kabel nicht um das Gerät rollen.
♦ Achten Sie darauf, dass das elektrische Kabel nicht
getreten oder zerknittert wird.
♦ Achten Sie darauf, dass das elektrische Verbindungska-
bel nicht mit heißen Teilen des Geräts in Kontakt kommt.
♦ Überprüfen Sie das elektrische Verbindungskabel.
Beschädigte oder verwickelte Kabel erhöhen das Risiko
von elektrischen Schlägen.
♦ Dieses Gerät ist nicht für den Gebrauch im Außenbe-
reich geeignet.
♦ Das Netzkabel ist regelmäßig auf Schäden zu prüfen.
Bei beschädigtem Kabel darf das Gerät nicht verwendet
werden.
♦ Es empehlt sich, durch den Einbau einer Differenz-
strom-Schutzeinrichtung mit einem Nennauslösestrom
von nicht mehr als 30mA einen zusätzlichen Schutz an der
Elektroinstallation, die das Gerät versorgt, anzubringen.
Lassen Sie sich von Ihrem Elektroinstallateur beraten.
♦ Das Gerät nicht im Freien benutzen oder aufbewahren.
♦ Das Gerät niemals Regen oder Feuchtigkeit aussetzen.
Wasser, das eventuell in das Gerät gelangt, erhöht die
Elektroschockgefahr.
♦ Berühren Sie den Stecker nicht mit feuchten Händen.
♦ Wärmeunempndliche Personen dürfen das Gerät nicht
verwenden (da das Gerät mit erhitzbaren Flächen aus-
gestattet ist).
♦ Die Heizteile des Gerätes nicht berühren, da sie schwere
Verbrennungen verursachen können.
Benutzung und Pege:
♦ Vor jedem Gebrauch des Geräts das Stromkabel voll-
ständig abwickeln.
♦ Benützen Sie das Gerät nicht, wenn der An-/Ausschalter
nicht funktioniert.
♦ Wird das Gerät in einem Badezimmer oder ähnlichem
Raum benutzt, ziehen Sie den Stecker aus der Dose,
wenn Sie es nicht verwenden, selbst wenn es nur kurze
Zeit ist; die Nähe von Wasser stellt immer eine Gefahr
dar, auch wenn das Gerät abgeschaltet ist.
♦ Ziehen Sie den Stecker heraus und lassen Sie das Gerät
abkühlen, bevor Sie mit der Reinigung beginnen.
♦ Das Gerät außerhalb der Reichweite von Kindern und/
oder Personen mit eingeschränkten körperlichen, senso-
rischen oder geistigen Fähigkeiten bzw. Personen ohne
ausreichende Erfahrung und Kenntnisse aufbewahren.
♦ Überprüfen Sie, dass das Ventilationsgitter des Geräts
nicht mit Staub, Schmutz oder anderen Substanzen
verstopft ist.
♦ Das Gerät nie am Stromnetz angeschlossen und ohne
Aufsicht lassen. Sie sparen dadurch Energie und ver-
längern die Gebrauchsdauer des Gerätes.
♦ Das Gerät nicht zum Trocknen von Textilien jeglicher Art
verwenden.
Betrieb:
♦ Achten Sie darauf, dass Reparaturen am Gerät nur
von einem Fachmann ausgeführt werden. Wenn Sie
Betriebsmittel / Ersatzteile benötigen, dürfen diese nur
Originalteile sein.
♦ WARNUNG: Wenn das Gerät nicht gemäß diesen An-
leitungen gereinigt wird, kann ein Brandrisiko entstehen.
♦ Unsachgemäße Verwendung bzw. Nichteinhaltung der
Gebrauchsanweisung kann Gefahren zur Folge haben
und führt zum Erlöschen der Garantieansprüche sowie
der Haftung des Herstellers.
BEZEICHNUNG
A Lamellen
B Kabel
C Display

DEUTSCH
Übersetzung aus den ursprünglichen anweisungen
19
D Schrauben
E Dübel
F Fernbedienung
G An/ Austaste
H Zeituhrtaste
I Modustaste
DISPLAY
a. Wärmeintensität I
b. Wärmeintensität II
c. Wochenprogrammierung
d. Temperatur
e. Uhr
f. Grad (ºC)
g. Funktion „Offenes Fenster“
FERNBEDIENUNG
I. An-/Aus-Taste
II. Zeituhrtaste
III. Kongurationsschalter
IV. Wärmeintensitätstaste
V. Tasten – / +
VI. OK
VII. Funktionstaste „Offenes Fenster“
VIII. Tageseinstellungstaste
IX. Programmeinstellungstaste
X. Taste Uhr AN
XI. Taste „Ändern“
XII. Taste Uhr AUS
XIII. Schwenkknopf
Wenn Sie meinen, dass das Gerät nicht mit dem oben
angeführten Zubehör ausgestattet ist, können Sie die Teile
auch einzeln beim Technischen Dienst erwerben.
AUFSTELLUNG
♦ Stellen Sie bitte das Gerät in ausreichender Entfernung
von brennbaren Stoffen wie zum Beispiel Textilien,
Pappe, Papier und so weiter auf.
♦ Das Gerät mindestens in 50 cm Entfernung von
brennbaren Materialien wie Vorhängen, Möbeln usw.
aufstellen.
♦ Der Lufteintritt und –austritt darf während des Betriebes
weder teilweise noch ganz durch Möbel, Vorhänge, Klei-
dung usw. behindert werden. Es besteht Brandgefahr.
♦ Das Gerät muss mindestens 1,8 m über dem Boden
installiert sein.
♦ Sollte die Wandmontage im Badezimmer erfolgen, brin-
gen Sie das Gerät so an, dass Steckdose, Netzkabel,
die Schalter oder andere Steuerelemente für Personen
unerreichbar sind, die sich in der Badewanne, der
Dusche oder am Waschbecken benden.
♦ Der Stecker muss leicht erreichbar sein, um ihn im Not-
fall aus der Steckdose ziehen zu können.
♦ Stellen Sie sicher, dass das Gerät korrekt und sicher in
seiner Betriebsposition mit Schrauben befestigt ist. Um
Schäden am Gerät zu vermeiden, sollten Sie ausschließ-
lich die vom Hersteller bereits angebrachten Löcher
verwenden.
Montage der Wandhalterung:
♦ Anbringung an der Wand (Fig.1): Bohren Sie zwei
Löcher in die Wand und halten Sie dabei einen Abstand
von 2,05 m vom Boden aus ein.
♦ Die Haken mit den mitgelieferten Schrauben in den
Dübeln befestigen (D).
♦ Stellen Sie sicher, dass die Dübel fest sitzen und bringen
Sie das Gerät an.
BENUTZUNGSHINWEISE
Vor der Benutzung:
♦ Vergewissern Sie sich, dass Sie das gesamte Verpa-
ckungsmaterial des Produkts entfernt haben.
♦ Manche Teile des Bügeleisens wurden leicht eingefettet,
weshalb das Gerät bei der Erstanwendung ein bisschen
dampfen kann. Nach kurzer Zeit wird dies aufhören.
♦ Um der auftretenden Geruchsentwicklung bei der ersten
Inbetriebnahme entgegenzuwirken, wird empfohlen, das
Gerät 2 Stunden lang auf höchster Stufe in einem gut
belüfteten Raum in Betrieb zu lassen.
Benutzung:
♦ Vor Anschluss das Kabel völlig ausrollen.
♦ Schließen Sie das Gerät an das Stromnetz an.
♦ Stellen Sie das Gerät an, indem Sie den An-/Ausschalter
betätigen (G). Das Gerät tritt in den Wartemodus und auf
dem Bildschirm erscheint „S“.
FUNKTIONEN (MANUELL UND FERNBEDIE-
NUNG)
♦ Das Gerät durch Drücken auf die Taste einschalten.
Das Gerät tritt in den Ventilatormodus und auf dem Bild-
schirm erscheint „- -“.

DEUTSCH
Übersetzung aus den ursprünglichen anweisungen
20
♦ Die Taste / drücken, das Gerät läuft mit niedriger
Leistung (1000 W).
♦ Erneut drücken, das Gerät schaltet auf hohe Leistung
(2000 W) um.
Zeitschalter:
♦ Die Taste drücken, um die Zeitschaltuhr zu kongu-
rieren (1-12 Stunden). Durch einmaliges Drücken der
Taste wird die Zeit um 1 Stunde verlängert. Nach der
Konguration der Zeitschaltuhr zeigt das Display die
aktuelle Konguration 5 Sekunden lang an und kehrt
dann zum vorherigen Display zurück. Währenddessen
leuchtet das Lämpchen.
♦ Um die Zeitschaltuhr zu programmieren, darf sich das
Gerät NICHT im Wartemodus benden.
ZU EINER BESTIMMTEN UHRZEIT EINSCHALTEN:
♦ Im Wartemodus „S“ die Taste drücken, um die Uhr-
zeit der Aktivierung des Geräts zu kongurieren (1-12
Stunden). Nach Abschluss der Kongurierung zeigt das
Display die ausgewählte Zeit an.
♦ Wenn der Zeitpunkt der Aktivierung erreicht wurde,
schaltet sich das Gerät automatisch ein.
♦ Die standardmässige Temperatur beträgt 23ºC.
Funktionen (nur mit der fernbedienung):
Aktuelle(n) stunde/tag einstellen:
♦ Die Taste einmal drücken, und das Display zeigt
standardmässig „12“ an. +/- drücken, um die Stunde
einzustellen.
♦ Die Taste erneut drücken, und das Display zeigt
standardmässig „30“ an. +/- drücken, um die Minuten
einzustellen.
♦ Die Taste erneut drücken, und der Bildschirm zeigt
standardmässig „d7“ an. +/- drücken, um den Tag zu
kongurieren (Montag-Sonntag: d1-d7).
♦ OK drücken, um die Einstellungen zu bestätigen.
TEMPERATUR KONFIGURIEREN
♦ Während des Arbeitsmodus die Tasten +/- drücken. Der
Bildschirm zeigt standardmässig 23ºC an.
♦ Erneut +/- drücken, um die gewünschte Temperatur (10-
49ºC) auszuwählen und OK zum Bestätigen drücken.
♦ Beispiel: Mittwoch, 9.30 AM, 25ºC, II Wärme.
♦ Um die Temperatureinstellungen zu stornieren, einfach
die Taste drücken, um die Wärme I oder II auszu-
wählen. Das Display verschwindet und zeigt „—“.
Hinweis:
♦ Beim Einstellen der Temperatur verwendet das Gerät
eine INTELLIGENTE Arbeitsweise.
Temperatureinstellung–Umgebungs-
temperatur > 2ºC
2000 W
0ºC < Temperatureinstellung–Umge-
bungstemperatur < 2ºC
1000 W
Temperatureinstellung–Umgebungs-
temperatur = 0ºC
Ventilator
♦ Der Ventilator funktioniert 30 Sekunden lang und stoppt
dann. Das Gerät geht in den Wartemodus über.
Wochenprogrammierung:
♦ Die Wochenprogrammierung kongurieren, nachdem
der/die aktuelle Tag/Stunde konguriert wurde.
♦ Ist das Produkt nicht in Betrieb, die Taste drücken.
♦ Die Taste betätigen . Das Gerät ist nun zur Wochen-
programmierung bereit.
♦ Die Taste drücken, und das Display zeigt d1-d7 an.
♦ Die Taste drücken und das Display zeigt P1-P6 an.
♦ Um das Programm 1 (P1) zu kongurieren, die Taste
drücken und das Display zeigt standardmässig „00“
an. Drücken Sie diese Taste kontinuierlich, um die Ein-
schaltzeit zu kongurieren.
♦ Die Taste drücken und das Display zeigt standard-
mässig die Betriebszeit des vorherigen Schritts an. Drü-
cken Sie diese Taste kontinuierlich, um die Ausschaltzeit
zu kongurieren.
♦ Betätigten Sie zum Einstellen der Temperatur +/-.
♦ Wiederholen Sie diese Schritte für das gesamte Wo-
chenprogramm. Drücken Sie dann zum Bestätigen OK.
♦ Um die Wochenfuntkion zu stornieren, drücken Sie die
A página está carregando ...
A página está carregando ...
A página está carregando ...
A página está carregando ...
A página está carregando ...
A página está carregando ...
A página está carregando ...
A página está carregando ...
A página está carregando ...
A página está carregando ...
A página está carregando ...
A página está carregando ...
A página está carregando ...
A página está carregando ...
A página está carregando ...
A página está carregando ...
A página está carregando ...
A página está carregando ...
A página está carregando ...
A página está carregando ...
A página está carregando ...
A página está carregando ...
A página está carregando ...
A página está carregando ...
A página está carregando ...
A página está carregando ...
A página está carregando ...
A página está carregando ...
A página está carregando ...
A página está carregando ...
A página está carregando ...
A página está carregando ...
A página está carregando ...
A página está carregando ...
A página está carregando ...
A página está carregando ...
A página está carregando ...
A página está carregando ...
A página está carregando ...
A página está carregando ...
A página está carregando ...
A página está carregando ...
A página está carregando ...
A página está carregando ...
A página está carregando ...
A página está carregando ...
A página está carregando ...
A página está carregando ...
A página está carregando ...
A página está carregando ...
A página está carregando ...
A página está carregando ...
A página está carregando ...
A página está carregando ...
A página está carregando ...
A página está carregando ...
A página está carregando ...
A página está carregando ...
A página está carregando ...
A página está carregando ...
A página está carregando ...
A página está carregando ...
A página está carregando ...
A página está carregando ...
-
 1
1
-
 2
2
-
 3
3
-
 4
4
-
 5
5
-
 6
6
-
 7
7
-
 8
8
-
 9
9
-
 10
10
-
 11
11
-
 12
12
-
 13
13
-
 14
14
-
 15
15
-
 16
16
-
 17
17
-
 18
18
-
 19
19
-
 20
20
-
 21
21
-
 22
22
-
 23
23
-
 24
24
-
 25
25
-
 26
26
-
 27
27
-
 28
28
-
 29
29
-
 30
30
-
 31
31
-
 32
32
-
 33
33
-
 34
34
-
 35
35
-
 36
36
-
 37
37
-
 38
38
-
 39
39
-
 40
40
-
 41
41
-
 42
42
-
 43
43
-
 44
44
-
 45
45
-
 46
46
-
 47
47
-
 48
48
-
 49
49
-
 50
50
-
 51
51
-
 52
52
-
 53
53
-
 54
54
-
 55
55
-
 56
56
-
 57
57
-
 58
58
-
 59
59
-
 60
60
-
 61
61
-
 62
62
-
 63
63
-
 64
64
-
 65
65
-
 66
66
-
 67
67
-
 68
68
-
 69
69
-
 70
70
-
 71
71
-
 72
72
-
 73
73
-
 74
74
-
 75
75
-
 76
76
-
 77
77
-
 78
78
-
 79
79
-
 80
80
-
 81
81
-
 82
82
-
 83
83
-
 84
84


Black & Decker BXWSH2000E Manual do usuário
- Categoria
- Aquecedores de ambiente
- Tipo
- Manual do usuário
em outros idiomas
- español: Black & Decker BXWSH2000E Manual de usuario
- français: Black & Decker BXWSH2000E Manuel utilisateur
- italiano: Black & Decker BXWSH2000E Manuale utente
- English: Black & Decker BXWSH2000E User manual
- русский: Black & Decker BXWSH2000E Руководство пользователя
- Nederlands: Black & Decker BXWSH2000E Handleiding
- Deutsch: Black & Decker BXWSH2000E Benutzerhandbuch
- polski: Black & Decker BXWSH2000E Instrukcja obsługi
- română: Black & Decker BXWSH2000E Manual de utilizare
Artigos relacionados
Outros documentos
-
Taurus 935050000 Manual do proprietário
-
Taurus Alpatec MALBORK 1500 Manual do proprietário
-
Castorama HE20EPC Manual do usuário
-
-
-
-
ALPATEC R750 Manual do usuário
-
-
mundoclima MUEX-H9 “MultiSplit System” Guia de instalação
-
Taurus Alpatec ALPATEC AC 260 KT Manual do proprietário