ELICA LIB0182948 Skydome Ceiling Cooker Hood 100cm Manual do usuário
- Tipo
- Manual do usuário

IT Istruzioni di montaggio e d’uso | EN Instruction on mounting and use |
DE Montage- und Gebrauchsanweisung | FR Prescriptions de montage et mode d’emploi |
NL Montagevoorschriften en gebruiksaanwijzingen | ES Montaje y modo de empleo |
PT Instruções para montagem e utilização | EL Οδηγίες συναρμολόγησης και χρήσης |
SV Monterings- och bruksanvisningar | FI Asennus- ja käyttöohjeet | NO Instrukser for montering og bruk |
DA Bruger- og monteringsvejledning | PL Instrukcja montażu i obsługi | CS Návod na montáž a používání


IT
Il prodotto è concepito per l'aspirazione dei fumi e vapori
della cottura ed è destinato al solo uso domestico.
Attenersi strettamente alle istruzioni riportate in questo
manuale. Si declina ogni responsabilità per eventuali
inconvenienti, danni o incendi provocati al prodotto derivati
dall’inosservanza delle istruzioni riportate in questo
manuale.
L'apparecchio potrebbe avere estetiche differenti
rispetto a quanto illustrato nei disegni di questo
libretto, comunque le istruzioni per l'uso, la
manutenzione e l'installazione rimangono le stesse.
• È importante conservare tutti i manuali che
accompagnano il prodotto per poterli consultare in ogni
momento. In caso di vendita, di cessione o di trasloco,
assicurarsi che restino insieme al prodotto. • Leggere
attentamente le istruzioni: ci sono importanti informazioni
sull’installazione, sull’uso e sulla sicurezza. • Verificare
l’integrità del prodotto prima di procedere con
l’installazione. In caso contrario contattare il rivenditore e
non proseguire con l’installazione.
NOTE
: i particolari contrassegnati con questo simbolo sono
acquistabili separatamente presso rivenditori specializzati.
: i particolari contrassegnati con questo simbolo sono
accessori opzionali forniti solo in alcuni modelli e sono
acquistabili sui siti www.elica.com e
www.shop.elica.com.
SICUREZZA E NORMATIVE
SICUREZZA GENERALE
•Non effettuare variazioni elettriche o meccaniche sul
prodotto o sulle condotte di scarico. •Prima di qualsiasi
operazione di pulizia o manutenzione, disinserire il prodotto
dalla rete elettrica togliendo la spina o staccando
l’interruttore generale dell’abitazione. •Per tutte le
operazioni di installazione e manutenzione utilizzare guanti
da lavoro.• Il prodotto può essere utilizzato da bambini di
età non inferiore a 8 anni e da persone con ridotte capacità
fisiche, sensoriali o mentali, o prive di esperienza o della
necessaria conoscenza, purché sotto sorveglianza oppure
dopo che le stesse abbiano ricevuto istruzioni relative
all’uso sicuro dell’apparecchio e alla comprensione dei
pericoli ad esso inerenti.• I bambini devono essere
controllati affinché non giochino con il prodotto.• La pulizia
e la manutenzione non deve essere effettuata da bambini
senza sorveglianza. •Il locale deve disporre di sufficiente
ventilazione, quando il prodotto viene utilizzato
contemporaneamente ad altri apparecchi a combustione di
gas o altri combustibili. •Il prodotto va frequentemente pulito
sia internamente che esternamente (ALMENO UNA VOLTA
AL MESE), rispettare comunque quanto espressamente
indicato nelle istruzioni di manutenzione. •L’inosservanza
delle norme di pulizia del prodotto e della sostituzione/
pulizia dei filtri comporta rischi di incendi.• E’ severamente
vietato fare cibi alla fiamma sotto il prodotto.•
ATTENZIONE: Quando il piano di cottura è in funzione le
parti accessibili del prodotto possono diventare calde.• Non
collegare il prodotto alla rete elettrica finché l’installazione
non è totalmente completata.• Per quanto riguarda le
misure tecniche e di sicurezza da adottare per lo scarico
dei fumi attenersi strettamente a quanto previsto dai
regolamenti delle autorità locali competenti.• L’aria aspirata
non deve essere convogliata in un condotto usato per lo
scarico dei fumi prodotti da apparecchi a combustione di
gas o di altri combustibili.• Non utilizzare o lasciare il
prodotto privo di lampade correttamente montate per
possibile rischio di scossa elettrica.• Il prodotto non va MAI
utilizzato senza griglia correttamente montata. • Il prodotto
non va MAI utilizzato come piano di appoggio a meno che
non sia espressamente indicato.
• Per la sostituzione della lampada utilizzare solo il tipo
lampada indicato nella sezione manutenzione /sistema di
illuminazione di questo manuale. • L’impiego di fiamma
libera è dannoso ai filtri e può dar luogo ad incendi,
pertanto deve essere evitato in ogni caso. • La frittura deve
essere fatta sotto controllo onde evitare che l’olio
surriscaldato prenda fuoco. • In caso di dubbio, consultare
il centro di assistenza autorizzato o personale qualificato
similare.
SICUREZZA PER L'INSTALLAZIONE
•Utilizzare le viti di fissaggio in dotazione con il prodotto
solo se idonee con la superficie, altrimenti acquistarne del
tipo corretto. Verificare che all'interno del prodotto non vi
sia (per motivi di trasporto) materiale di corredo (ad
esempio buste con viti, garanzie etc.), eventualmente va
tolto e conservato. • AVVERTIMENTO: La mancata
installazione di viti e dispositivi di fissaggio in conformità di
queste istruzioni può comportare rischi di natura elettrica. •
Il tubo di evacuazione non è fornito e va acquistato. • Il
diametro del tubo di scarico deve essere equivalente al
diametro dell'anello di connessione. • Per l'installazione del
prodotto sul piano cottura attenersi all'altezza indicata nei
disegni • La distanza minima fra la superficie di supporto
dei recipienti sul dispositivo di cottura e la parte più bassa
della cappa da cucina deve essere non inferiore a 70 cm in
caso di cucine elettriche e di 100 cm in caso di cucine a
gas o miste. • Se le istruzioni di installazione del dispositivo
di cottura a gas specificano una distanza maggiore,
bisogna tenerne conto.
Verifica soffitto per prima installazione:
• l soffitto deve essere piano, orizzontale e sufficientemente
solido e resistente. • La cappa è progettata per essere
installata in un controsoffitto Il controsoffitto deve essere
solido e avere una capacità di carico adeguata per un
prodotto dal peso max. di 35 kg. • Non installare la cappa
direttamente nei pannelli del controsoffitto, ma avvalersi
3

sempre di un telaio o supporto adeguato.
SICUREZZA PER IL COLLEGAMENTO
ELETTRICO
•La tensione di rete deve corrispondere alla tensione
riportata sull’etichetta caratteristiche situata all’interno del
prodotto.•Se provvisto di spina allacciare il prodotto ad una
presa conforme alle norme vigenti posta in zona accessibile
anche dopo l’installazione. • Se sprovvisto di spina
(collegamento diretto alla rete) o la spina non è posta in
zona accessibile, anche dopo installazione, applicare un
interruttore bipolare a norma che assicuri la disconnessione
completa della rete nelle condizioni della categoria di
sovratensione III, conformemente alle regole di
installazione. • Il prodotto è provvisto di un cavo
alimentazione speciale; in caso di danneggiamento del
cavo, richiederlo al servizio assistenza tecnica.
● Attenzione! Prima di ricollegare il circuito
all’alimentazione di rete e di verificarne il corretto
funzionamento, controllare sempre che il cavo di rete sia
stato montato correttamente.
KIT WINDOWS: Il prodotto è predisposto per essere
utilizzato in abbinamento ad un KIT sensore Window
(non fornito dal produttore). Installando il KIT sensore
Window (soltanto nel caso di utilizzo in modalità
ASPIRANTE), l’aspirazione dell'aria smetterà di funzionare
ogni qual volta la finestra presente nella stanza, su cui il
KIT viene applicato, risulterà chiusa. Il collegamento
elettrico del KIT all’apparecchio deve essere effettuato
da personale tecnico qualificato e specializzato. Il KIT
deve essere separatamente certificato in accordo alle
norme di sicurezza pertinenti al componente ed al suo
impiego con l’apparecchio. L’installazione deve essere
effettuata in accordo alle regolamentazioni per gli
impianti domestici vigenti.
ATTENZIONE: il cablaggio del KIT da collegare al
prodotto deve essere parte di un circuito certificato in
bassissima tensione di sicurezza (SELV). Il produttore
di questo apparecchio declina ogni responsabilità per
eventuali inconvenienti, danni, incendi provocati da
difetti e/o problemi di malfunzionamento e/o errata
installazione del KIT.
Attenzione! Non utilizzare con un programmatore, timer,
telecomando separato o qualsiasi altro dispositivo che si
attiva automaticamente.
SUGGERIMENTI DI UTILIZZO
Suggerimenti per un corretto utilizzo al fine di ridurre
l’impatto ambientale: Quando si inizia a cucinare,
accendere l'apparecchio alla velocità minima, lasciandola
accesa per alcuni minuti anche dopo il termine della
cottura. Aumentare la velocità solo in caso di grandi
quantità di fumo e vapore, utilizzando la funzione booster
solo in casi estremi. Per mantenere ben efficiente il sistema
di riduzione degli odori, sostituire, quando è necessario, il/i
filtro/i carbone. Per mantenere ben efficiente il filtro del
grasso, pulirlo in caso di necessità. Per ottimizzare
l’efficienza e minimizzare i rumori, utilizzare il diametro
massimo del sistema di canalizzazione indicato in questo
manuale.
SMALTIMENTO A FINE VITA
Questo apparecchio è contrassegnato in confor-
mità alla Direttiva Europea 2012/19/EC - UK SI
2013 No.3113, Waste Electrical and Electronic
Equipment (WEEE). Assicurandosi che questo
prodotto sia smaltito in modo corretto. L'utente
contribuisce a prevenire le potenziali conseguen-
ze negative per l'ambiente e la salute.
Il simbolo sul prodotto o sulla documentazione di
accompagnamento indica che questo prodotto non deve
essere trattato come rifiuto domestico ma deve essere
consegnato presso l'idoneo punto di raccolta per il
riciclaggio di apparecchiature elettriche ed elettroniche.
Disfarsene seguendo le normative locali per lo smaltimento
dei rifiuti. Per ulteriori informazioni sul trattamento,
recupero e riciclaggio di questo prodotto, contattare
l'idoneo ufficio locale, il servizio di raccolta dei rifiuti
domestici o il negozio presso il quale il prodotto è stato
acquistato.
NORMATIVE
Apparecchiatura progettata, testata e realizzata nel rispetto
delle norme sulla Sicurezza: EN/IEC 60335-1; EN/IEC
60335-2- 31, EN/IEC 62233. Prestazione: EN/IEC 61591;
ISO 5167-1; ISO 5167-3; ISO 5168; EN/IEC 60704-1; EN/
IEC 60704-2-13;EN/IEC 60704-3; ISO 3741; EN 50564;
IEC 62301. EMC: EN 55014-1; CISPR 14-1; EN 55014-2;
CISPR 14-2; EN/IEC 61000-3-2; EN/IEC 61000-3-3.
UTILIZZO
La cappa è realizzata per essere utilizzata in versione
aspirante ad evacuazione esterna.
ATTENZIONE!: Le tubazioni non sono fornite e vanno
acquistate separatamente.
I vapori vengono evacuati verso l’esterno tramite un tubo di
scarico fissato alla flangia di raccordo.
ATTENZIONE! Se il prodotto è provvisto di filtro/i a
carbone, questo/i deve/devono essere rimosso/i.
Collegare il prodotto a tubi e fori di scarico a parete con
diametro equivalente all’uscita d’aria (flangia di raccordo).
L’utilizzo di tubi e fori di scarico a parete con diametro
inferiore determinerà una diminuzione delle prestazioni di
aspirazione ed un drastico aumento della rumorosità.
Si declina perciò ogni responsabilità in merito.
• Usare un condotto lungo il minimo indispensabile.
• Usare un condotto con minor numero di curve possibile
(angolo massimo della curva: 90°).
• Evitare cambiamenti drastici di sezione del condotto.
4

ELICA CONNECT
La cappa è dotata di funzionalità WiFi per la connessione
remota tramite l’App Elica Connect. Requisiti minimi di
sistema: • Router wireless 2.4GHz WiFi b/g/n • Smartphone
Android o iOs. Verificare sugli store la compatibilità dell'app
con la versione del sistema operativo del proprio
smartphone.
Nota: Il fabbricante ELICA dichiara che questo modello di
elettrodomestico con apparecchiatura radio modulo WiFi è
conforme alla direttiva 2014/53/UE.
L'apparecchiatura radio opera nella banda di frequenza
ISM a 2.4GHz, la massima potenza a radiofrequenza
trasmessa non eccede 20 dBm (e.i.r.p.).
Avvertenze:
• Tutela dei dati: I dati che l’apparecchio connesso rileva
sono raccolti per consentire l’utilizzo di tutti i servizi
dell’elettrodomestico connesso. Ulteriori informazioni sulle
modalità del trattamento dei dati raccolti e sulla informativa
privacy sono disponibili sul sito www.elica.com.
• Disponibilità nei paesi: Il servizio Elica Connect è
disponibile in specifici paesi. Per ulteriori informazioni
visitare la sezione dedicata del sito www.elica.com
oppure verificare la disponibilità sullo store del proprio
smartphone cercando l’App Elica Connect.
• Modifiche future: Elica si riserva di apportare tutte le
modifiche che riterrà utili al miglioramento del servizio Elica
Connect. Di conseguenza le descrizioni contenute in
questo manuale non sono impegnative ed hanno un valore
indicativo.
FUNZIONAMENTO
PANNELLO DI CONTROLLO
DA SAPERE PRIMA DI INIZIARE
Questo prodotto richiede delle operazioni preliminari prima
di essere utilizzato:
● OPERAZIONE NECESSARIA:
Affiliazione del radiocomando.
Questo prodotto è predisposto per funzionare solo con
radiocomando Elica. Per poter utilizzare questo prodotto, è
necessario effettuare l’affiliazione del radiocomando.
In base al prodotto acquistato, troverete a corredo uno dei
due radiocomandi in figura:
Radiocomando 1:
Radiocomando 2:
Le istruzioni di affiliazione sono riportate nel manuale in
dotazione al radiocomando.
L’avvenuta affiliazione del telecomando viene visualizzata
sulla cappa con entrambi i LEDs L1 e L2 lampeggianti
colore Bianco.
Attenzione!: nel manuale dei Radiocomandi vengono
riportate le funzioni principali, in questo manuale trovere
anche altre inidicazioni di utilizzo ed altre funzionalità con
la spiegazione di come attivarle tramite Radiocomando. Nei
casi in cui non si fa riferimento ad uno specifico
radiocomando, le indicazioni sono velide per entrambi.
Nota: I due radiocomandi sono intercambiabili quindi, se si
desidera è sempre possibile acquistare separatamente,
nello store www.elica.com, quello non a corredo con il
prodotto.
● OPERAZIONE FACOLTATIVA:
Selezione del piano cottura.
Il prodotto è progettato per adattare al meglio le sue
performance in funzione al piano cottura su cui lavora. Di
Default il prodotto è settato per lavorare con piani a GAS.
Se si desidera modificare questo settaggio, dopo
l’affiliazione del Radiocomando vedere capitolo “Settaggio
piano cottura”.
● OPERAZIONE AUTOMATICA:
Calibrazione sensore VOC
Se NON si effettua l’operazione facoltativa di Selezione del
piano cottura, la calibrazione del Sensore VOC parte in
automatico trascorsi 2min. dal collegamento del prodotto
alla rete elettrica. La calibrazione ha una durata di 5 min. Il
LED L1 lampeggia di colore Verde e si spegnerà al
termine della procedura di calibrazione.
Attenzione! Durante la calibrazione il motore si
accende a velocità 1. Per maggiori dettagli sul Sensore
VOC consutare i capitoli dedicati a questa funzione che
troverete successivamente.
UTILIZZO DEI COMANDI
● Velocità di aspirazione
Questo prodotto è dotato 5 velocità di aspirazione di cui 2
5

velocità booster temporizzati:
Booster 1 (velocità 4) temporizzata 15 min.
Booster 2 (velocità 5) temporizzata 5 min.
Al termine dei minuti indicati sopra la velocità di
aspirazione si imposterà automaticamente alla velocità 2.
● Delay off
Tramite il telecomando è possibile programmare lo
spegnimento ritardato in base alla velocità (potenza) di
aspirazione attiva in quel momento; Le velocità su cui è
possible abilitare questa funzione sono le seguenti:
Velocita 1 (aspirazione bassa): 20 min.
Velocità 2 (aspirazione media): 15 min.
Velocità 3 (aspirazione alta): 10 min.
Nota (solo per prodotti con funzione WiFi): Il delay off
può essere programmato in modo più avanzato, quando si
è connessi al Cloud Elica, tramite l’App Elica Connect. In
questo caso però non sarà possibile gestire il Delay off da
radiocomando, fino al prossimo reset o spegnimento del
WiFi.
● Attivazione/Disattivazione indicatore saturazione
filtri
Da eseguire a prodotto spento. L'indicatore di
saturazione filtro carbone è normalmente disattivato mentre
l’indicatore di saturazione filtro grassi è normalmente
attivato.
Con Radiocomando 1:
Filtro Odori: Premere contemporaneamente i tasti A+B+D
per 2 sec. ogni pressione passa sequenzialemnte da attivo
a disattivo. (Attivo = LED L1 Rosso fisso e LED L2 Rosso
lampeggiante. Disattivo = LED L1 Rosso fisso e LED L2
Spento)
Filtro Grassi: Premere contemporaneamente i tasti
A+B+C per 2 sec. ogni pressione passa sequenzialmente
da attivo a disattivo. (Attivo = LED L1 Arancio fisso e LED
L2 Arancio lampeggiante. Disattivo = LED L1 Arancio
fisso e LED L2 Spento)
Attendere 10 sec. per salvare l’impostazione scelta.
Con Radiocomando 2:
Questa procedura viene descritta nel manuale del
Radiocomando.
Attendere 10 sec. per salvare l’impostazione scelta.
● Indicatori di Saturazione filtri
I led posti sulla cappa segnalano la necessità di eseguire la
manutenzione dei filtri.
Filtro odori: L1 + L2 lampeggianti colore Rosso.
Filtro grassi: L1 + L2 lampeggianti colore Arancio.
Nota: La segnalazione di saturazione dei filtri è visibile per
10 sec. all'accensione della cappa. Dopo aver eseguito la
manutenzione dei filtri è necessario eseguire il reset
saturazione filtri.
● Reset Saturazione filtri
Questa operazione va eseguita entro i primi 10sec. dopo
l’accenzione del prodotto.
La procedura viene descritta nel manuale del
Radiocomando.
Nota: Se ci sono due segnalazioni attive sia grassi che
odori, l’operazione va fatta due volte.
● Funzione Velocità di aspirazione automatica
(Funzione VOC):
Questo Prodotto, è dotato di un sensore (sensore VOC)
che modula la velocità di aspirazione automaticamente in
funzione della quantità di fumi rilevata.
Questa funzione, va abilitata manualmente tramite
Radiocomando o App Elica connect.
Quando la funzione è attiva, il LED L1 si illuminerà di
colore Bianco.
Una volta attivata, se il sensore rileverà un assensa di fumi
per qualche minuto, il motore si spegnerà.
Nota: La Funzione rimanere comunque attiva e se entro le
successive 2 ore il sensore rileva del vapore il motore
riparte automaticamente. Trascorse 2ore continuative in
assenza di rilevazione fumi la funzione viene disabilitata. E’
sempre possibile disabilitare questa funzione
manualmente, in qualsiasi momento, tramite radiocomando
o App Elica connect.
● Calibrazione sensore VOC:
La calibrazione è necessaria per permettere al sensore del
prodotto, di lavorare correttamente, la calibrazione avviene
in due modi:
Automatica: ogni qualvolta la cappa viene ricollegata alla
rete elettrica (ad es: con la prima installazione o dopo un
blackout).
Manuale: La calibrazione manuale richiede che il motore
del prodotto sia in OFF e che nell’ambiente dove questo è
installato, persistano condizioni ambientali normali. Questa
operazione, va fatta quando si nota un funzionamento
insoddisfacente del funzionamento automatico.
Con Radiocomando 1:
Premere contemporaneamente A+D per 2 sec.
Con Radiocomando 2:
Questa procedura viene descritta nel manuale del
Radiocomando.
Durante la calibrazione, il LED L1 lampeggia di colore
Verde.
Se si vuole annullare la calibrazione in corso ripetere la
procedura utilizzata per l’avvio della calibrazione.
● Settaggio del piano cottura (per sensore VOC)
Per utilizzare al meglio la funzione VOC occorre
selezionare il tipo di piano cottura corretto tra quelli
disponibili: GAS - Induzione o Elettrico. Di Default è
impostato piano GAS.
6

Questo settaggio richiede che il motore del prodotto sia in
OFF che sia disattivato il sensore VOC.
Con Radiocomando 1:
premere contemporaneamente i tasti B+D per 2 sec. un
segnale acustico indicherà che si è entrati nel menu del
seggio del piano cottura. Da qui con i tasti B e C è
possibile scorrere avanti e indietro per selezionare il piano
desiderato. Ad ogni pressione si selezionerà una tipologia
di piano cottura, il LED L1 si illuminera di un colore diverso
in base al piano selezionato: Verde = Gas; Giallo =
Elettrico; Ciano = Induzione.
Con Radiocomando 2:
premere contemporaneamente i tasti A+D per 2 sec. Da
qui con i tasti B e C è possibile scorrere avanti e indietro
per selezionare il piano desiderato. Ad ogni pressione si
selezionerà una tipologia di piano cottura, il LED L1 si
illuminera di un colore diverso in base al piano selezionato:
Verde = Gas; Giallo = Elettrico; Ciano = Induzione.
Nota: dopo aver reimpostato la tipologia di piano, diversa
da quella di Default o da quella pecedente, si avvierà una
calibrazione automatica del sensore VOC. Vedi il capitolo
relativo a questa funzione.
CONTROLLO DEL PRODOTTO CON WIFI
Sono disponibili due modalità di controllo del prodotto
tramite wifi, per farlo è necessario scaricare l’ App Elica
Connect. e seguire le istruzioni indicate.
•Modalità Elica Cluod
Questa funzionalità permette di comandare il prodotto da
un dispositivio cellulare, anche fuori casa.
•Modalità Direct Control
Questa funzionalità permette di comandare il prodotto da
un dispositivio cellulare, come se questo fosse il
radiocomando.
● Configurazione WiFi:
Seguire le istruzioni indicate nell’App Elica Connect per la
configurazione WIFi. Durante la procedura di
configurazione il LED L2 della cappa, si illumina indicando
lo stato della connettività (vedi tabella stato WiFi sotto).
Per interrompere la procedura di configurazione WiFi,
premere per circa 2 sec. il tasto A del radiocomando,
quando il LED L2 della cappa è acceso a luce pulsante
veloce.
● Reset configurazione WiFi:
Questa operazione serve a riportare il prodotto alla
configurazione di fabbrica.
Con Radiocomando 1:
premere per 2 sec. i tasti A+B.
Con Radiocomando 2:
premere per 2 sec. i tasti D+E.
Nota: La password e tutte le altre impostazioni effettuate
nell’App Elica Connect verranno resettate e sarà
necessario impostarle nuovamente.
● Accensione/Spegnimento WiFi:
Dopo aver effettuato la configurazione, è possibile
accendere / spegnere il WiFi.
Con Radiocomando 1:
Premere per 2 sec. il tasto A.
Con Radiocomando 2:
Questa procedura viene descritta nel manuale del
Radiocomando.
Nota: Lo Spegnimento del WiFi con questa procedura non
comporta la perdita dei parametri salvati in precedenza.
TABELLA STATO WiFi
LED L2 Stato WiFi
Luce spenta WiFi non configurato o spento
Luce accesa
fissa bianca WiFi connesso
Luce pulsante
veloce arancio
Tentativo di connessione al router
WiFi
Luce pulsante
lento arancio
Tentativo di connessione al cloud
Elica (in modalità Cloud)
Luce accesa bianca
con breve luce pul-
sante
Ricezione di un comando da re-
moto: accensione motore o luce
ecc..
Luce fissa arancio
Modalità direct con App momen-
taneamente disconnessa. (in mo-
dalità Direct)
AVVERTENZE DI
MANUTENZIONE
• Pulizia: Per la pulizia usare esclusivamente un panno
inumidito con detersivi liquidi neutri. Non utilizzare utensili o
strumenti per la pulizia.
• Evitare l’uso di prodotti contenenti abrasivi. NON
UTILIZZARE ALCOOL!
Per la manutenzione del prodotto vedere le immagini
a fine istallazione contrassegnate con questo simbo-
lo.
• Filtro Antigrasso: Il filtro antigrasso metallico de-
ve essere pulito una volta al mese con detergenti non ag-
gressivi, manualmente oppure in lavastoviglie a basse
temperature ed a ciclo breve. Per smontare il filtro grassi
tirare la maniglia di sgancio a molla.
• Il Filtro antigrasso trattiene le particelle di grasso derivanti
dalla cottura. Con il lavaggio in lavastoviglie il filtro
antigrasso metallico può scolorirsi ma le sue caratteristiche
di filtraggio non cambiano assolutamente.
7

• Pannello aspirazione perimetrale: Il pannello di
aspirazione perimetrale va sempre lasciato chiuso e va
aperto solo in caso di manutenzione (es. Pulizia o sosti-
tuzione dei filtri).
Illuminazione
•Sistema di Illuminazione : Il sistema di illuminazione
non è sostituibile dall’utente, in caso di malfunzionamenti
contattare il servizio assistenza.
• Il sistema di illuminazione è basato sulla tecnologia LED. I
LED garantiscono una illuminazione ottimale, con una
durata fino a 10 volte maggiore delle lampade tradizionali e
consentono di risparmiare il 90% di energia elettrica.
EN
The product is designed for the extraction of cooking fumes
and steam and it is for domestic use only.
Strictly observe the instructions in this manual. No
liability shall be accepted for any inconvenience, damage
or fire caused to the product as a result of not following the
instructions given in this manual.
The device may have different aesthetic features with
respect to the illustrations in this handbook, however
the operating, maintenance and installation
instructions remain the same.
• It is important to keep all the manuals accompanying the
product so that they can be consulted at all times. If sold,
transferred or moved, make sure it remains with the
product. • Read the instructions carefully: they contain
important information on installation, operation and safety. •
Check the integrity of the product prior to its installation.
Otherwise, contact the dealer and do not continue with the
installation.
NOTES
: the parts marked with this symbol can be purchased
separately from specialised dealers.
: the parts marked with this symbol are optional
accessories supplied only with some models and can be
purchased from the websites www.elica.com and
www.shop.elica.com.
SAFETY AND REGULATIONS
GENERAL SAFETY
•Do not make electrical or mechanical changes on the
product or on the exhaust pipes. •Before doing any cleaning
or maintenance work, disconnect the product from the
mains power supply by removing the plug or turning off the
mains switch. •For all installation and maintenance
operations, always wear work gloves. •The product can be
used by children over the age of 8 and by people with
reduced physical, sensory or mental capabilities or without
experience or the necessary knowledge, as long as they
are properly supervised or have been instructed on how to
safely use the device and understand the inherent dangers.
•Children must be supervised to make sure that they do not
play with the product. •Cleaning and maintenance must
never be performed by children unless they are properly
supervised. •The room must have sufficient ventilation
when the product is used at the same time as other
appliances burning gas or other fuels. •The product must be
cleaned frequently both inside and out (AT LEAST ONCE A
MONTH); always follow the instructions given in the
maintenance manual. •Failure to comply with the rules
indicated for cleaning the product and replacing/cleaning
the filters may result in the risk of fire. •It is strictly forbidden
to cook food on the flame under the product.• WARNING:
•When the hob is on, the accessible parts of the product
may become hot. •Do not connect the product to the
electrical power supply until the installation is complete.
•The regulations laid down by local authorities must be
strictly followed with regard to the technical and safety
measures to adopt for fume extraction. •The extracted air
must not be conveyed through the same ducts used to
extract the fumes generated by gas combustion or other
types of combustion products. •Do not use or leave the
product without appropriately installed lamps, as this may
result in the risk of electric shock. •The product must
NEVER be used without the grille correctly fitted. •The
product must NEVER be used as a support surface unless
expressly indicated.
● Range hoods and other cooking fume extractors may
adversely affect the safe operation of appliances burning
gas or other fuels (including those in other rooms) due to
back flow of combustion gases. These gases can
potentially result in carbon monoxide poisoning. After
installation of a range hood or other cooking fume
extractor, the operation of flued gas appliances should be
tested by a competent person to ensure that back flow of
combustion gases does not occur.
• To replace the lamp, only use the lamp indicated in the
maintenance/lighting system section of this manual. • Using
a naked flame may damage the filters and cause a fire
hazard, and must therefore be avoided under all
circumstances. • Extra care must be taken when frying to
prevent the oil from overheating and catching fire. • In case
of doubt, contact the authorised service centre or similar
qualified personnel.
INSTALLATION SAFETY
•Use the fixing screws supplied with the product only if
suitable for the surface; otherwise purchase the correct
type of screws. •Check for accessories (e.g. bags
containing screws, warranty certificates, etc.) inside the
product (placed there for transport reasons). If there are
any, remove them and keep them safe. • WARNING:
Failure to install screws and fasteners in accordance with
these instructions may result in electrical hazards. •The
exhaust pipe is not supplied and must be purchased. •The
8

diameter of the exhaust pipe must be equivalent to the
diameter of the connecting ring. •For installation of the
product on the hob, respect the height indicated in the
drawings •The minimum distance between the surface of
the container supports on the cooker and the lowest part of
the range hood must not be less than 70 cm (not less than
100 cm only for Australia and New Zealand) for electric
cookers and 100 cm for gas or mixed cookers. •If the
installation instructions of the gas cooker specify a greater
distance, take it into account.
Checking the ceiling for first installation:
• The ceiling must be flat, horizontal and sufficiently solid
and strong. • The hood is designed to be installed in a false
ceiling. The false ceiling must be solid and have an
adequate load capacity for a product weighing max. 35 kg.
Do not install the hood directly in the false ceiling panels,
but use a suitable frame or support.
ELECTRICAL CONNECTION SAFETY
•The mains voltage must correspond to the voltage
indicated on the label found inside the product. •If it
features a plug, connect the product to a socket that
complies with current standards, located in an area
accessible even after installation. •If it does not feature a
plug (direct connection to the mains) or the plug is not
located in an accessible area, even after installation, apply
a standard double pole switch that ensures complete
disconnection from the mains in category III overvoltage
conditions, in accordance with the installation rules. •The
product features a special power cable; if the cable is
damaged, contact the Service Centre for a replacement.
● Please note! Before reconnecting the circuit to the
mains power supply, make sure that it is working correctly,
always check that the power cable is correctly installed.
WINDOWS KIT: The product can also be used in
conjunction with a Window sensor KIT (not supplied by
the manufacturer). If the Window sensor KIT is installed
(only if used in DUCT-OUT mode), air extraction will halt
every time the window in the room, on which the KIT is
applied, is closed. The KIT must be electrically
connected to the device by qualified and specialised
technical personnel. The KIT must be certified
separately in accordance with the safety standards for
the component and its use with the device. Installation
must be carried out in accordance with current
regulations for domestic systems.
PLEASE NOTE: the wiring of the KIT to be connected
to the product must be part of a certified safety extra-
low voltage (SELV) circuit. The manufacturer of this
device disclaims all liability for any inconvenience,
damage or fires caused by defects and/or problems
associated with the malfunction and/or incorrect
installation of the KIT.
Please note! Do not use with a programmer, timer,
separate remote control or any other device that activates
automatically.
RECOMMENDATIONS FOR USE
Recommendations for correct use in order to reduce the
impact on the environment: When cooking begins, the
device should be turned on at minimum speed, and left on
for a few minutes even after cooking is complete. Increase
the speed only if there is a large quantity of fumes and
steam, using the Booster function only in extreme cases.
To keep the odour reduction system running efficiently,
replace the carbon filter/s when necessary. To ensure the
high performance of the grease filter, clean it when
necessary. To improve efficiency and minimise noise, use
the maximum duct diameter indicated in this manual.
END-OF-LIFE DISPOSAL
This device is marked in compliance with the Eu-
ropean Directive 2012/19/EC - UK SI 2013
No.3113, Waste Electrical and Electronic Equip-
ment (WEEE). Make sure that this product is di-
sposed of correctly. The user helps prevent po-
tential negative consequences for the environ-
ment and for health.
The symbol on the product or accompanying
documentation indicates that this product should not be
treated as household waste but should be handed over at a
suitable collection point for the recycling of electrical and
electronic equipment. Dispose of it in accordance with local
regulations for waste disposal. For further information
about the treatment, recovery and recycling of this product,
please contact your local authority, the collection service
for household waste or the shop from where the product
was purchased.
REGULATIONS
Equipment designed, tested and manufactured in
compliance with safety regulations: EN/IEC 60335-1; EN/
IEC 60335-2- 31, EN/IEC 62233. Performance: EN/IEC
61591; ISO 5167-1; ISO 5167-3; ISO 5168; EN/IEC
60704-1; EN/IEC 60704-2-13;EN/IEC 60704-3; ISO 3741;
EN 50564; IEC 62301. EMC: EN 55014-1; CISPR 14-1; EN
55014-2; CISPR 14-2; EN/IEC 61000-3-2; EN/IEC
61000-3-3.
USE
The hood is made to be used in the suction version with
external evacuation.
ATTENTION!: The pipes are not supplied and must be
purchased separately.
Vapours are evacuated outside through an exhaust pipe
attached to the connecting flange.
CAUTION! If the product features one or more carbon
filters, they must be removed.
The use of pipes and outlet holes in the wall with a smaller
diameter will reduce the extraction performance and
drastically increase the noise level.
All responsibility in this regard is therefore denied.
• Use a ducting pipe with the shortest length necessary.
9

• Use a ducting pipe with the least number of bends
possible (maximum bend angle: 90°).
• Avoid drastic changes in the ducting pipe diameter.
ELICA CONNECT
The hood features a Wi-Fi function for remote connection
via the Elica Connect App. Minimum system requirements:
• 2.4GHz Wi-Fi b/g/n wireless router • Android or iOs
Smartphone. Via the stores, check that the app is
compatible with the operating system your Smartphone is
running.
Note: The ELICA manufacturer declares that this model of
household appliance with WiFi module radio equipment
complies with Directive 2014/53/EU.
The radio equipment operates within the 2.4GHz ISM
frequency band, the maximum radio frequency power
transmitted does not exceed 20 dBm (e.i.r.p.).
Warnings:
• Data protection: The data that the connected device
detects is collected to allow for all the services of the
connected appliance to be used. Further information on
how the collected data is processed and on the privacy
policy is available at www.elica.com.
• Availability in different countries: The Elica Connect
service is available in specific countries. For further
information, see the dedicated section at
www.elica.com or check for availability from your
Smartphone store by searching for the Elica Connect App.
• Future changes: Elica reserves the right to make any
changes deemed useful to improve the Elica Connect
service. As a result, the descriptions contained in this
manual are not binding and should be treated as purely
indicative.
OPERATION
CONTROL PANEL
THINGS TO KNOW BEFORE STARTING
This product requires some preliminary operations before
being used:
● NECESSARY OPERATION:
Radio Control pairing.
This product is designed to work with the Elica Radio
Control only. In order to be able to use this product, the
Radio Control must be paired.
Depending on the product purchased, you will find one of
the two Radio Controls shown in the figure:
Radio Control 1:
Radio Control 2:
The pairing instructions are given in the manual supplied
with the Radio Control.
When the Radio Control has been paired, both LEDs L1
and L2 on the hood will flash White.
Attention!: the main functions are indicated in the Radio
Control manual; the manual also contains other indications
of use and other functions with an explanation of how to
activate them using the Radio Control. In cases where no
reference is made to a specific Radio Control, the
indications are valid for both.
Note: The two Radio Controls are interchangeable, so it is
always possible to purchase the one not included with the
product from the store at www.elica.com.
● OPTIONAL OPERATION:
Hob selection.
The product is designed to adapt its performance in the
best way possible according to the hob on which it works.
By Default, the product is set to work with GAS hobs.
To change this setting, after pairing the Radio Control, see
the chapter “Hob settings”.
● AUTOMATIC OPERATION:
VOC sensor calibration
If the optional hob selection operation is NOT performed,
the VOC sensor calibration starts automatically 2min.
after the product has been connected to the mains.
Calibration lasts 5 min. LED L1 flashes Green and
switches off at the end of the calibration procedure.
Please note! During calibration, the motor is switched
on at speed 1. For more details on the VOC sensor, refer
to the chapters dedicated to this function below.
10

USING THE CONTROLS
● Suction speed
This product is equipped with 5 suction speeds including 2
timed booster speeds:
Booster 1 (speed 4) timed 15 min.
Booster 2 (speed 5) timed 5 min.
After the minutes indicated above, the suction speed will go
back to speed 2 automatically.
● Delay off
Using the Radio Control, it is possible to program the
delayed switch-off according to the suction speed (power)
active at that time; the speeds at which this function can be
enabled are the following:
Speed 1 (low extraction): 20 min.
Speed 2 (medium extraction): 15 min.
Speed 3 (high extraction): 10 min.
Note (only for products with Wi-Fi function): The Delay
off function can be programmed in a more advanced way,
when connected to the Elica Cloud, via the Elica Connect
App. However, in this case, it will not be possible to
manage the Delay off function from the Radio Control, until
the Wi-Fi is reset or switched off.
● Activating/Deactivating the filter saturation indicator
light
To be performed with the product switched off. The
carbon filter saturation indicator light is usually deactivated,
while the grease filter saturation indicator light is usually
activated.
With Radio Control 1:
Odour Filter: Simultaneously press keys A+B+D for 2 sec.
each press switches sequentially from active to inactive.
(Active = LED L1 steady Red and LED L2 flashing Red.
Inactive = LED L1 steady Red and LED L2 Off)
Grease Filter: Simultaneously press keys A+B+C for 2
sec. each press switches sequentially from active to
inactive. (Active = LED L1 steady Orange and LED L2
flashing Orange. Inactive = LED L1 steady Orange and
LED L2 Off)
Wait 10 sec. to save the chosen setting.
With Radio Control 2:
This procedure is described in the Radio Control manual.
Wait 10 sec. to save the chosen setting.
● Filter saturation indicator lights
The LEDs on the hood indicate the need to perform
maintenance on the filters.
Odour filter: L1 + L2 flashing Red.
Grease filter: L1 + L2 flashing Orange.
Note: The filter saturation indication is visible for 10 sec.
when the hood is switched on. After performing
maintenance on the filters, it is necessary to perform the
filter saturation reset.
● Filter saturation reset
This operation must be performed within the first 10sec.
after switching on the product.
The procedure is described in the Radio Control manual.
Note: If there are two active warnings, for both grease and
odour filters, the operation must be performed twice.
● Automatic suction speed function (VOC function):
This product is equipped with a sensor (VOC sensor) that
modulates the suction speed automatically according to the
amount of smoke detected.
This function must be enabled manually via the Radio
Control or via the Elica Connect App.
When the function is active, LED L1 will light up White.
Once activated, if the sensor detects no smoke for a few
minutes, the motor will be switched off.
Note: The function will still remain active and if within the
next 2 hours the sensor detects some steam, the motor
will be restarted automatically. After 2 continuous hours
without detecting any smoke, the function is disabled. It is
always possible to disable this function manually, at any
time, via the Radio Control or via the Elica Connect App.
● VOC sensor calibration:
Calibration is necessary to allow the product sensor to work
correctly; calibration is performed in two ways:
Automatic: each time the hood is reconnected to the
mains (e.g. the first time it is installed or after a power
failure).
Manual: Manual calibration requires that the product motor
is OFF and that normal environmental conditions persist in
the room where it is installed. This operation must be
performed when automatic operation is unsatisfactory.
With Radio Control 1:
Simultaneously press A+D for 2 sec.
With Radio Control 2:
This procedure is described in the Radio Control manual.
During calibration, LED L1 flashes Green.
To cancel the current calibration, repeat the procedure
used to start the calibration.
● Hob settings (for VOC sensor)
To use the VOC function in the best way possible, it is
necessary to select the correct type of hob from those
available: GAS - Induction or Electric. By Default, the hob
is set to GAS.
This setting requires that the product motor is OFF and that
the VOC sensor is deactivated.
With Radio Control 1:
Simultaneously press keys B+D for 2 sec. an acoustic
signal will indicate that you have entered the hob setting
menu. From here, use the keys B and C to scroll back and
forth to select the desired hob. Each time the key is
pressed, a type of hob will be selected; LED L1 will light up
in a different colour according to the selected hob: Green =
11

Gas; Yellow = Electric; Cyan = Induction.
With Radio Control 2:
Simultaneously press keys A+D for 2 sec. From here, use
the keys B and C to scroll back and forth to select the
desired hob. Each time the key is pressed, a type of hob
will be selected; LED L1 will light up in a different colour
according to the selected hob: Green = Gas; Yellow =
Electric; Cyan = Induction.
Note: after resetting the hob type, to a type other than the
Default one or the previous one, an automatic calibration of
the VOC sensor will start. See the chapter on this function.
CONTROLLING THE PRODUCT VIA WI-FI
The are two product control modes via Wi-Fi; to do this, it is
necessary to download the Elica Connect App and follow
the instructions given.
•Elica Cloud mode
This feature allows the product to be controlled from a
mobile device, even when away from home.
•Direct Control mode
This feature allows the product to be controlled from a
mobile device, as if it were the Radio Control.
● Wi-Fi configuration:
Follow the instructions provided in the Elica Connect App
for the Wi-Fi configuration. During the configuration
procedure, LED L2 will light up indicating the connectivity
status (see the Wi-Fi status table below). To interrupt the
Wi-Fi configuration procedure, press key A on the Radio
Control for about 2 sec. when LED L2 on the hood is lit up
and is flashing fast.
● Wi-Fi configuration reset:
This operation is used to reset the product to the factory
configuration.
With Radio Control 1:
press keys A+B for 2 sec.
With Radio Control 2:
press keys D+E for 2 sec.
Note: The password and all other settings made from the
Elica Connect App will be reset and will need to be set
again.
● Wi-Fi On/Off:
After the configuration, the Wi-Fi can be switched on / off.
With Radio Control 1:
Press key A for 2 sec.
With Radio Control 2:
This procedure is described in the Radio Control manual.
Note: Switching off the Wi-Fi with this procedure does not
result in the loss of the previously saved parameters.
WI-FI STATUS TABLE
LED L2 Wi-Fi Status
Light off WiFi not configured or off
Steady white
light WiFi connected
Fast flashing
orange light
Attempt to connect to the WiFi
router
Slow flashing
orange light
Attempt to connect to the Elica
Cloud (in Cloud mode)
White light on
with brief flashing
Remote command being recei-
ved: motor on or light on, etc.
Steady orange light Direct mode with App temporarily
disconnected. (in Direct mode)
MAINTENANCE WARNINGS
• Cleaning: For cleaning, simply use a cloth moistened
with neutral liquid detergents. Do not use cleaning tools or
instruments.
• Avoid the use of abrasive products. DO NOT USE
ALCOHOL!
For product maintenance, see the images at the end
of the installation marked by this symbol.
• Anti-Grease Filter: The metallic anti-grease filter
must be cleaned once a month with non-aggressive de-
tergents, manually or in a dishwasher on a short wash at
low temperatures. To remove the anti-grease filter, pull
the spring release handle.
• The Anti-Grease Filter traps the grease particles
produced during cooking. When cleaned in the dishwasher,
the metal grease filter may discolour, but its filtering
characteristics remain unchanged.
• Perimeter suction panel: The perimeter suction
panel should always be left closed and should only be
opened in case of maintenance (e.g. cleaning or repla-
cing the filters).
Illumination
•Lighting system : The lighting system cannot be repla-
ced by the user, contact Customer Service in case of
malfunction.
• The lighting system is based on LED technology. LEDs
provide optimal illumination, last up to 10 times longer than
conventional lamps and save 90% of electricity.
DE
Das Produkt ist für die Absaugung von Kochdämpfen
konzipiert und nur für den Hausgebrauch bestimmt.
Die in diesem Handbuch aufgeführten Anleitungen
12

müssen streng eingehalten werden. Es wird keine
Haftung für eventuelle Unannehmlichkeiten, Schäden oder
Brände am Produkt übernommen, die durch die
Nichtbeachtung der in diesem Handbuch angeführten
Anleitungen entstehen.
Das Gerät kann von den Zeichnungen in dieser
Broschüre abweichen, die Gebrauchs-, Wartungs- und
Installationsanweisungen bleiben jedoch unverändert.
• Es ist wichtig, alle dem Produkt beiliegenden Handbücher
aufzubewahren, damit sie zu jedem Zeitpunkt eingesehen
werden können. Im Falle von Verkauf, Weitergabe oder
Umzug ist sicherzustellen, dass sie beim Produkt
verbleiben. • Lesen Sie die Anleitungen aufmerksam durch:
Sie enthalten wichtige Informationen zu Installation,
Gebrauch und Sicherheit. • Prüfen Sie die Unversehrtheit
des Produkts, bevor Sie mit der Installation fortfahren.
Nehmen Sie anderenfalls Kontakt mit dem Händler auf und
fahren Sie nicht mit der Installation fort.
HINWEISE
: die mit diesem Symbol gekennzeichneten Teile
können separat im Fachhandel erworben werden.
: die mit diesem Symbol gekennzeichneten Teile sind
optionales Zubehör, das nur bei einigen Modellen geliefert
wird und auf den Websites www.elica.com und
www.shop.elica.com erworben werden kann.
SICHERHEIT UND
RICHTLINIEN
ALLGEMEINE SICHERHEIT
•Nehmen Sie keine elektrischen oder mechanischen
Änderungen am Produkt oder an den Abluftrohren vor.
•Trennen Sie das Produkt vor jeder Reinigung oder
Wartung von der Stromversorgung, indem Sie den Stecker
ziehen oder den Hauptschalter der Wohnung betätigen.
•Verwenden Sie bei allen Installations- und
Wartungsarbeiten Arbeitshandschuhe.• Das Produkt darf
von Kindern ab dem Alter von 8 Jahren und von Personen
mit eingeschränkten körperlichen, sensorischen oder
geistigen Fähigkeiten oder ohne Erfahrung oder
notwendige Kenntnisse benutzt werden, wenn sie
beaufsichtigt werden oder vorher Anweisungen zur
sicheren Verwendung des Produkts und zum Verständnis
der damit verbundenen Gefahren erhalten haben.• Kinder
müssen beaufsichtigt werden, um sicherzustellen, dass sie
nicht mit dem Produkt spielen.• Die Reinigung und Wartung
darf nicht von Kindern ohne Aufsicht ausgeführt werden.
•Der Raum muss über eine ausreichende Belüftung
verfügen, wenn das Produkt gleichzeitig mit anderen
Geräten, die Gas oder andere Brennstoffe verbrennen,
verwendet wird. •Das Produkt muss regelmäßig
(MINDESTENS EINMAL PRO MONAT) innen und außen
gereinigt werden; beachten Sie in jedem Fall die
Wartungsanweisungen. •Wenn Sie das Produkt nicht
reinigen und die Filter nicht austauschen / reinigen, kann
dies zu Brandgefahr führen.• Es ist strengstens untersagt,
unter dem Produkt zu flambieren.• ACHTUNG: Wenn das
Kochfeld in Betrieb ist, können zugängliche Teile des
Produkts heiß werden.• Schließen Sie das Produkt erst
dann an das Stromnetz an, wenn die Installation vollständig
abgeschlossen ist.• Hinsichtlich der technischen und
sicherheitstechnischen Maßnahmen zur Ableitung der
Dämpfe sind die Vorschriften der zuständigen örtlichen
Behörden strikt einzuhalten.• Die angesaugte Luft darf nicht
in einen Kanal geleitet werden, der für die Abführung der
Rauchgase von Geräten, die mit Gas oder anderen
Brennstoffen betrieben werden, verwendet wird.•
Verwenden Sie das Produkt nicht ohne ordnungsgemäß
montierte Lampen, da Stromschlaggefahr besteht.• Das
Produkt darf NIEMALS ohne korrekt montiertes Gitter
verwendet werden. • Das Produkt darf NIEMALS als
Auflagefläche verwendet werden, es sei denn, dies ist
ausdrücklich angegeben.
• Verwenden Sie für den Austausch der Lampe nur den im
Abschnitt Wartung/Beleuchtungssystem dieses Handbuchs
angegebenen Lampentyp. • Der Einsatz der freien Flamme
ist für die Filter schädlich und kann zu Bränden führen, es
muss daher in jedem Fall vermieden werden. • Das
Frittieren muss unter Kontrolle durchgeführt werden, um zu
verhindern, dass sich überhitztes Öl entzündet. • Wenden
Sie sich im Zweifelsfall an ein autorisiertes
Kundendienstzentrum oder an ähnlich qualifiziertes
Personal.
SICHERHEIT BEI DER INSTALLATION
• Verwenden Sie die mit dem Produkt gelieferten
Befestigungsschrauben nur, wenn sie für die Oberfläche
geeignet sind; andernfalls kaufen Sie den richtigen Typ.
Stellen Sie sicher, dass sich in der Verpackung kein
mitgeliefertes Material (wie z.B. Beutel mit Schrauben,
Garantieblätter usw.) (aus Beförderungsgründen) befindet.
Evtl. ist dieses herauszunehmen und aufzubewahren. •
HINWEIS: Wenn die Schrauben und die
Befestigungsvorrichtungen nicht gemäß diesen Anleitungen
installiert werden, kann es zu elektrischen Risiken kommen.
• Das Abluftrohr wird nicht mitgeliefert und muss gekauft
werden. • Der Durchmesser des Abluftrohrs muss dem
Durchmesser des Anschlussrings entsprechen. • Beachten
Sie bei der Installation des Produkts auf dem Kochfeld die
in den Zeichnungen angegebene Höhe • Der
Mindestabstand zwischen der Auflagefläche der Behälter
auf dem Kochgerät und dem untersten Teil der
Dunstabzugshaube muss bei Elektroherden 70 cm und bei
Gas- oder Mischherden 100 cm sein. • Wenn in der
Installationsanleitung des Gasherdes ein größerer Abstand
angegeben ist, muss dieser berücksichtigt werden.
Prüfung der Decke bei der Erstinstallation:
• Die Decke muss eben, waagerecht und ausreichend
stabil und widerstandsfähig sein. • Die Haube ist für den
Einbau in eine Zwischendecke geplant. Die Zwischendecke
13

muss stabil sein und eine ausreichende Tragfähigkeit für
ein Produkt mit einem Höchstgewicht von 35 kg aufweisen.
• Installieren Sie die Abzugshaube nicht direkt in die
Platten der Zwischendecke, sondern verwenden Sie immer
einen Rahmen oder eine angemessene Halterung.
SICHERHEIT BEIM ELEKTRISCHEN
ANSCHLUSS
•Die Netzspannung muss der auf dem Typenschild im
Inneren des Produkts angegebenen Spannung
entsprechen. •Wenn das Produkt mit einem Stecker
ausgestattet ist, schließen Sie es an eine Steckdose an, die
den geltenden Normen entspricht und sich auch nach der
Installation in einem zugänglichen Bereich befindet. • Wenn
kein Stecker vorhanden ist (direkter Anschluss an das
Stromnetz) oder der Stecker sich auch nach der Installation
nicht in einem zugänglichen Bereich befindet, verwenden
Sie einen zweipoligen Standard-Schalter, der unter den
Bedingungen der Überspannungskategorie III eine
vollständige Trennung vom Stromnetz gewährleistet,
entsprechend den Installationsvorschriften. • Das Produkt
ist mit einem speziellen Stromkabel ausgestattet; wenn das
Kabel beschädigt ist, fordern Sie es beim technischen
Kundendienst an.
● Achtung! Bevor man den Stromkreis wieder an das
Stromnetz anschließt und seinen ordnungsgemäßen
Betrieb überprüft, sich immer vergewissern, dass das
Stromkabel ordnungsgemäß montiert wurde.
KIT WINDOWS: Das Produkt ist für den Gebrauch in
Kombination mit einem KIT Sensor Window (nicht vom
Hersteller mitgeliefert) ausgerüstet. Wenn man das KIT
Sensor Window (nur im ABSAUGMODUS) installiert,
schaltet sich die Luftabsaugung jedes Mal ab, wenn das
Fenster im Raum, an dem das KIT angebracht worden ist,
geschlossen ist. Der elektrische Anschluss des KITs an
das Gerät muss von einem spezialisierten
Fachtechniker ausgeführt werden. Das KIT muss
gemäß .den Sicherheitsvorschriften, die für das Bauteil
und den Einsatz mit dem Gerät gelten getrennt,
zertifiziert werden. Die Installation muss im Einklang
mit den geltenden Regelungen für Hausanlagen
ausgeführt werden.
ACHTUNG: Die Kabel, mit denen das Kit an das Gerät
angeschlossen wird, müssen zu einem zertifizierten
Kreislauf mit Sicherheitskleinspannung (SELV)
gehören. Der Hersteller des Geräts haftet nicht für
eventuell auftretende Probleme, Schäden oder Brände
durch Mängel und/oder Funktionsstörungen und/oder
nicht fachgerechter Installation des KITs.
Achtung! Nicht mit getrenntem Programmierer, Timer,
Fernbedienung oder jeglicher anderer Vorrichtung, die sich
automatisch aktiviert, verwenden.
EMPFEHLUNGEN FÜR DIE
VERWENDUNG
Vorschläge für die korrekte Anwendung zur Verringerung
der Umweltbelastung: Wenn Sie mit dem Kochen
beginnen, schalten Sie das Gerät mit minimaler
Geschwindigkeit ein und lassen Sie sie auch nach dem
Ende des Kochvorgangs noch einige Minuten
eingeschaltet. Erhöhen Sie die Geschwindigkeit nur bei
großen Mengen an Rauch und Dampf, wobei die Booster-
Funktion nur in Extremfällen verwendet wird. Um die
Effizienz des Geruchsminderungssystems
aufrechtzuerhalten, sollten Sie den/die Kohlefilter bei
Bedarf austauschen. Um den Fettfilter effizient zu halten,
reinigen Sie ihn bei Bedarf. Um die Effizienz zu optimieren
und den Lärm zu minimieren, verwenden Sie den in diesem
Handbuch angegebenen maximalen Durchmesser des
Kanalsystems.
ENTSORGUNG AM ENDE DER
LEBENSDAUER
Dieses Gerät ist in Übereinstimmung mit der eu-
ropäischen Richtlinie 2012/19/EU - UK SI 2013
No.3113, Waste Electrical and Electronic Equip-
ment (WEEE) - gekennzeichnet worden. Stellen
Sie sicher, dass dieses Produkt ordnungsgemäß
entsorgt wird. Der Benutzer trägt dazu bei, mögli-
che negative Umwelt- und Gesundheitsfolgen zu
vermeiden.
Das Symbol auf dem Produkt oder auf der
Begleitdokumentation weist darauf hin, dass dieses
Produkt nicht als Hausmüll behandelt werden darf, sondern
bei der entsprechenden Sammelstelle für das Recycling
von Elektro- und Elektronik-Altgeräten abgegeben werden
muss. Das Produkt gemäß den lokalen Vorschriften zur
Abfallentsorgung beseitigen. Weitere Informationen zur
Behandlung, Wiederverwertung und zum Recycling dieses
Produkts erhalten Sie von der zuständigen örtlichen
Behörde, dem Hausmüllentsorgungsdienst oder dem
Geschäft, in dem das Produkt gekauft wurde.
BESTIMMUNGEN
Geräte, die gemäß den folgenden Sicherheitsnormen
entwickelt, getestet und hergestellt wurden: EN/IEC
60335-1; EN/IEC 60335-2- 31, EN/IEC 62233. Leistung:
EN/IEC 61591; ISO 5167-1; ISO 5167-3; ISO 5168; EN/
IEC 60704-1; EN/IEC 60704-2-13;EN/IEC 60704-3; ISO
3741; EN 50564; IEC 62301. EMC: EN 55014-1; CISPR
14-1; EN 55014-2; CISPR 14-2; EN/IEC 61000-3-2; EN/
IEC 61000-3-3.
VERWENDUNG
Die Abzugshaube ist für den Einsatz in einer Version mit
Absaugung mit externer Entlüftung konzipiert.
ACHTUNG!: Die Rohrleitungen sind nicht im Lieferumfang
enthalten und müssen separat erworben werden.
Die Dämpfe werden über ein am Anschlussflansch
befestigtes Abluftrohr nach außen abgeführt.
ACHTUNG! Wenn das Produkt mit Kohlefilter/n
ausgestattet ist, muss/ müssen diese/r entfernt werden.
Das Produkt an Rohre und Austrittsöffnungen anschließen,
14

die über einen Durchmesser verfügen, der dem Luftauslass
(Anschlussflansch) entspricht.
Die Verwendung von Rohren und Austrittsöffnungen an der
Wand mit einem geringerem Durchmesser führt zu einer
Verringerung der Absaugleistungen und einem deutlichen
Anstieg der Geräuschentwicklung.
Aus diesem Grund ist diesbezüglich jede Haftung
ausgeschlossen.
• Verwenden Sie eine möglichst kurze Rohrleitung.
• Verwenden Sie eine Rohrleitung mit möglichst wenigen
Biegungen (maximaler Biegewinkel: 90°).
• Vermeiden Sie drastische Änderungen des
Leitungsquerschnitts.
ELICA CONNECT
Die Abzugshaube verfügt über eine WLAN-Funktion zur
Fernverbindung über die App Elica Connect.
Mindestanforderungen des Systems: • Router wireless
2.4GHz WLAN b/g/n • Smartphone Android oder iOs. Die
Kompatibilität der App mit der Version des Betriebssystems
des eingenen Smartphones im Store überprüfen.
Anmerkung: Der Hersteller ELICA erklärt, dass dieses
Haushaltsgerät mit Funkverbindung mittels WLAN-Modul
der Richtlinie 2014/53/EU entspricht.
Das Funkgerät arbeitet im 2,4-GHz-ISM-Frequenzband, die
maximal übertragene Hochfrequenzleistung überschreitet
20 dBm (e.i.r.p. - äquivalente isotrope Strahlungsleistung)
nicht.
Warnungen:
• Datenschutz: Die vom verbundenen Gerät erfassten
Daten werden gesammelt, um die Verwendung alle Service
des verbundenen Haushaltsgeräts nutzen zu können.
Weitere Informationen über die Verarbeitung der
gesammelten Daten und die Datenschutzbestimmungen
sind auf der Webseite www.elica.com verfügbar.
• Verfügbar in den Ländern: Der Service „Elica Connect“
ist in bestimmten Ländern verfügbar. Für weitere
Informationen besuchen Sie den entsprechenden Bereich
der Webseite www.elica.com oder prüfen Sie die
Verfügbarkeit auf Ihrem Smartphone, indem Sie nach der
App Elica Connect suchen.
• Künftige Änderungen: Elica behält sich das Recht vor,
alle nützlichen Änderungen vorzunehmen, um den Service
Elica Connect zu verbessern. Folglich sind die in diesem
Handbuch enthaltenen Beschreibungen nicht bindend und
dienen nur zur Veranschaulichung.
FUNKTIONSWEISE
BEDIENFELD
WAS VOR DEM BEGINN ZU WISSEN IST
Dieses Produkte erfordert vor der Verwendung einige
vorbereitende Vorgänge:
● NOTWENDIGER VORGANG:
Verknüpfung der Funksteuerung.
Dieses Produkt ist nur für den Betrieb mit Funksteuerung
Elica ausgelegt. Um dieses Produkt verwenden zu können,
ist es notwendig, die Verknüpfung der Funksteuerung
vorzunehmen.
In Abhängigkeit des erworbenen Produkts finden Sie in der
Ausstattung eine der beiden Funksteuerungen in der
Abbildung:
Funksteuerung 1:
Funksteuerung 2:
Die Anleitungen zur Verknüpfung sind im mit der
Funksteuerung gelieferten Handbuch angeführt.
Die erfolgte Verknüpfung der Fernbedienung wird an der
Abzugshaube durch beide LEDs L1 und L2 visualisiert, die
weiß blinken.
Achtung!: im Handbuch der Funksteuerungen werden die
Hauptfunktionen angeführt; in diesem Handbuch finden Sie
auch andere Gebrauchshinweise und andere
Funktionalitäten mit der Erklärung, wie sie über
Funksteuerung aktiviert werden können. In Fällen, in denen
nicht auf eine bestimmte Funksteuerung Bezug genommen
wird, sind die Angaben für beide gültig.
Anmerkung: Die beiden Funksteuerungen sind
austauschbar. Daher ist es, wenn man es wünscht,
möglich, die nicht im Lieferumfang des Produkts enthaltene
15

auch separat im Store www.elica.com zu erwerben.
● OPTIONALER VORGANG:
Wahl des Kochfelds.
Das Produkt ist so konzipiert, dass es seine Leistungen
optimal an das Kochfeld anpasst, an dem es arbeitet.
Standardmäßig ist das Produkt für den Betrieb mit GAS-
Kochfelder eingestellt.
Wenn man wünscht, diese Einstellung zu ändern, nach der
Verknüpfung der Funksteuerung siehe Kapitel
“Einstellung des Kochfelds”.
● AUTOMATISCHER VORGANG:
Kalibrierung des Sensors VOC
Wenn der optionale Vorgang der Wahl des Kochfelds
NICHT ausgeführt wird, startet automatisch die
Kalibrierung des Sensors VOC 2min, nachdem das
Produkt an das Stromnetz angeschlossen wurde. Die
Kalibrierung dauert 5 min. Die LED L1 blinkt grün und
geht nach Abschluss des Kalibrierungsverfahrens aus.
Achtung! Während der Kalibrierung startet der Motor
mit Geschwindigkeit 1. Konsultieren Sie für weitere
Details zum Sensor VOC die folgenden entsprechenden
Kapitel dieser Funktion.
VERWENDUNG DER STEUERUNGEN
● Sauggeschwindigkeit
Dieses Produkt besitzt 5 Sauggeschwindigkeiten, von
denen 2 zeitgesteuerte Booster-Geschwindigkeiten sind:
Booster 1 (Geschwindigkeit 4) zeitgesteuert 15 min.
Booster 2 (Geschwindigkeit 5) zeitgesteuert 5 min.
Am Ende der oben angegebenen Minuten stellt sich die
Sauggeschwindigkeit automatisch auf die Geschwindigkeit
2 ein.
● Delay off
Mit der Fernbedienung kann die verzögerte Abschaltung in
Abhängigkeit von der gerade aktiven Geschwindigkeit
(Leistung) der Absaugung programmiert werden; die
Geschwindigkeiten, bei denen diese Funktion freigegeben
werden kann, sind folgende:
Geschwindigkeit 1 (geringe Absaugung): 20 min.
Geschwindigkeit 2 (mittlere Absaugung): 15 min.
Geschwindigkeit 3 (hohe Absaugung): 10 min.
Anmerkung (nur bei Produkten mit WLAN-Funktion):
Delay off kann auf fortgeschrittenere Weise programmiert
werden, wenn man über die App Elica Connect mit der
Cloud Elica verbunden ist. In diesem Fall ist es jedoch bis
zum nächsten Reset oder Abschalten des WLAN nicht
möglich, Delay off über Funksteuerung zu verwalten.
● Aktivierung/Deaktivierung der Anzeige der
Filtersättigung
Bei abgeschaltetem Produkt auszuführen. Die Anzeige
der Sättigung des Kohlefilters ist normalerweise deaktiviert,
während die Anzeige der Sättigung des Fettfilters
normalerweise aktiviert ist.
Mit Funksteuerung 1:
Geruchsfilter: Gleichzeitig die Tasten A+B+D für 2 s
drücken, jeder Druck wechselt aufeinanderfolgend von
aktiv zu inaktiv. (Aktiv = LED L1 Rot fest und LED L2 Rot
blinkend. Inaktiv = LED L1 Rot fest und LED L2
Ausgeschaltet)
Fettfilter: Gleichzeitig die Tasten A+B+D für 2 s drücken,
jeder Druck wechselt aufeinanderfolgend von aktiv zu
inaktiv. (Aktiv = LED L1 Orangefarben fest und LED L2
Orangefarben blinkend. Inaktiv = LED L1 Orangefarben
fest und LED L2 Ausgeschaltet)
10 s warten, um die gewählte Einstellung zu speichern.
Mit Funksteuerung 2:
Dieses Verfahren wird im Handbuch der Funksteuerung
beschrieben.
10 s warten, um die gewählte Einstellung zu speichern.
● Anzeigen der Filtersättigung
Die LEDs auf der Abzugshaube zeigen die Notwendigkeit
der Ausführung der Wartung der Filter an.
Geruchsfilter: L1 + L2 Rot blinkend.
Fettfilter: L1 + L2 Orangefarben blinkend.
Anmerkung: Die Meldung der Sättigung der Filter ist für 10
s beim Einschalten der Abzugshaube sichtbar. Nachdem
die Wartung der Filter ausgeführt wurde, ist es erforderlich,
das Reset Filtersättigung durchzuführen.
● Reset Filtersättigung
Dieser Vorgang muss innerhalb der ersten 10s nach dem
Einschalten des Produkts ausgeführt werden.
Das Verfahren wird im Handbuch der Funksteuerung
beschrieben.
Anmerkung: Wenn zwei aktive Meldungen, sowohl für
Fett- als auch Geruchsfilter, vorliegen, muss der Vorgang
zweimal durchgeführt werden.
● Funktion automatische Sauggeschwindigkeit
(Funktion VOC):
Dieses Produkt ist mit einem Sensor (Sensor VOC)
ausgestattet, der die Sauggeschwindigkeit automatisch in
Abhängigkeit der erfassten Dämpfe moduliert.
Diese Funktion muss manuell über Funksteuerung oder
App Elica connect freigegeben werden.
Wenn die Funktion aktiv ist, leuchtet die LED L1 weiß.
Nach ihrer Aktivierung schaltet der Motor ab, wenn der
Sensor für einige Minuten keine Dämpfe mehr erfasst.
Anmerkung: Die Funktion bleibt jedenfalls aktiv und wenn
der Sensor innerhalb der nachfolgenden 2 Stunden Dampf
erfasst, startet der Motor wieder automatisch. Nach 2
ununterbrochenen Stunden ohne Raucherfassung wird die
Funktion gesperrt. Es ist immer möglich, diese Funktion zu
jedem Zeitpunkt über Funksteuerung oder App Elica
16

connect manuell zu sperren.
● Kalibrierung des Sensors VOC:
Die Kalibrierung ist erforderlich, um dem Sensor des
Produkts zu erlauben, korrekt zu arbeiten; die Kalibrierung
erfolgt auf zwei Arten:
Automatisch: jedes Mal, wenn die Abzugshaube wieder
mit dem Stromnetz verbunden wird (z.B. bei der
Erstinstallation oder nach einem Stromausfall).
Manuell: Die manuelle Kalibrierung erfordert, dass der
Motor des Produkts sich auf OFF befindet, und dass in der
Umgebung, in der dieses installiert ist, weiterhin normale
Umgebungsbedingungen bestehen. Dieser Vorgang ist
auszuführen, wenn ein unbefriedigender Betrieb des
automatischen Modus festgestellt wird.
Mit Funksteuerung 1:
Gleichzeitig A+D für 2 s drücken.
Mit Funksteuerung 2:
Dieses Verfahren wird im Handbuch der Funksteuerung
beschrieben.
Während der Kalibrierung blinkt die LED L1 grün.
Wenn die laufende Kalibrierung annulliert werden soll, das
für den Start der Kalibrierung verwendete Verfahren
wiederholen.
● Einstellung des Kochfelds (für Sensor VOC)
Um die Funktion VOC optimal nutzen zu können, muss
der korrekte Typ von Kochfeld aus den verfügbaren Typen
ausgewählt werden: GAS - Induktion oder Elektrisch.
Standardmäßig ist GAS-Kochfeld eingestellt.
Diese Einstellung erfordert, dass sowohl der Motor des
Produkts sich auf OFF befindet als auch der Sensor VOC
deaktiviert ist.
Mit Funksteuerung 1:
gleichzeitig die Tasten B+D für 2 s drücken, ein
akustisches Signal gibt den Zugriff auf das Menü der
Einstellung des Kochfelds an. Von hier aus kann man mit
den Tasten B und C vorwärts und zurück scrollen, um das
gewünschte Kochfeld zu wählen. Bei jedem Druck wird ein
Typ von Kochfeld gewählt, die LED L1 leuchtet mit einer
verschiedenen Farbe auf, je nach gewähltem Kochfeld:
Grün = Gas; Gelb = Elektrisch; Zyanenblau = Induktion.
Mit Funksteuerung 2:
gleichzeitig die Tasten A+D für 2 s drücken. Von hier aus
kann man mit den Tasten B und C vorwärts und zurück
scrollen, um das gewünschte Kochfeld zu wählen. Bei
jedem Druck wird ein Typ von Kochfeld gewählt, die LED
L1 leuchtet mit einer verschiedenen Farbe auf, je nach
gewähltem Kochfeld: Grün = Gas; Gelb = Elektrisch;
Zyanenblau = Induktion.
Anmerkung: nachdem der Typ von Kochfeld eingestellt
wurde, verschieden von der standardmäßigen oder vor der
vorherigen, startet eine automatische Kalibrierung des
Sensors VOC. Siehe Kapitel bezüglich dieser Funktion.
STEUERUNG DES PRODUKTS MIT WLAN
Es stehen zwei Modalitäten zur Steuerung des Produkts
über WLAN zur Verfügung, hierzu genügt es, die App Elica
Connect herunterzuladen und die angegebenen
Anleitungen zu befolgen.
•Modalität Elica Cloud
Diese Funktionalität ermöglicht es, das Produkt über ein
Handy auch außer Haus zu steuern.
•Modalität Direct Control
Diese Funktionalität ermöglicht es, das Produkt über ein
Handy wie eine Funksteuerung zu steuern.
● Konfiguration WLAN:
Befolgen Sie die Anweisungen in der App Elica Connect
für die WLAN-Konfiguration. Während des
Konfigurationsverfahrens leuchtet die LED L2 der
Abzugshaube auf und zeigt den Zustand der Konnektivität
an (siehe Tabelle WLAN-Verbindungszustand unten).
Um das WLAN-Konfigurationsverfahren zu unterbrechen,
für ungefähr 2 s die Taste A der Funksteuerung drücken,
wenn die LED L2 der Abzugshaube mit schnell
pulsierendem Licht eingeschaltet ist.
● Reset WLAN-Konfiguration:
Dieser Vorgang dient dazu, das Produkt in seine
Werkskonfiguration zurückzubringen.
Mit Funksteuerung 1:
für 2 s die Tasten A+B drücken.
Mit Funksteuerung 2:
für 2 s die Tasten D+E drücken.
Anmerkung: Das Passwort und alle anderen in der App
Elica Connect ausgeführten Einstellungen werden
zurückgesetzt und es ist notwendig, sie erneut einzustellen.
● Einschalten/Ausschalten des WLAN:
Nachdem die Konfiguration ausgeführt wurde, ist es
möglich, das WLAN ein- oder auszuschalten.
Mit Funksteuerung 1:
Für 2 s die Taste A drücken.
Mit Funksteuerung 2:
Dieses Verfahren wird im Handbuch der Funksteuerung
beschrieben.
Anmerkung: Das Ausschalten des WLAN mit diesem
Verfahren führt nicht zum Verlust der vorher gespeicherten
Parameter.
TABELLE WLAN-ZUSTAND
LED L2 WLAN-Zustand
Licht ausgeschaltet WLAN nicht konfiguriert oder nicht
verbunden
17

Weißes festes
Licht eingeschaltet WLAN verbunden
Orangefarbenes sch-
nell
pulsierendes Licht
Verbindungsversuch mit dem
WLAN-Router
Orangefarbenes lang-
sam
pulsierendes Licht
Verbindungsversuch mit der
Cloud Elica (in Modalität Cloud)
Weißes eingeschalte-
tes Licht
mit kurz pulsieren-
dem Licht
Empfang eines Fernbefehls: Ein-
schalten des Motors oder der Be-
leuchtung usw.
Orangefarbenes fe-
stes Licht
Modalität Direct mit App vorüber-
gehend unterbrochen. (in Modali-
tät Direct)
WARNHINWEISE ZUR
WARTUNG
• Reinigung: Verwenden Sie zur Reinigung nur ein mit
neutralen, flüssigen Reinigungsmitteln angefeuchtetes
Tuch. Verwenden Sie keine Werkzeuge oder Instrumente
zur Reinigung.
• Vermeiden Sie die Verwendung von Produkte mit
Abrasiven. KEINEN ALKOHOL VERWENDEN!
Zur Wartung des Produkts siehe die Bilder am Ende
der Installationsanleitung mit diesem Symbol.
• Fettfilter: Der Metall-Fettfilter muss einmal pro
Monat mit einem nicht aggressiven Reinigungsmittel von
Hand oder in der Spülmaschine bei niedrigen Temperatu-
ren und kurzem Reinigungszyklus gereinigt werden. Um
den Fettfilter zu entfernen, ziehen Sie am federbelasteten
Entriegelungsgriff.
• Der Fettfilter hält Fettpartikel zurück, die beim Kochen
entstehen. Beim Reinigen in der Spülmaschine kann sich
der Metallfettfilter verfärben, wobei seine
Filtereigenschaften in keiner Weise beeinträchtigt werden.
• Perimeter-Saugpaneel: Das Perimeter-Saugpa-
neel muss immer geschlossen gelassen werden und nur
im Falle von Wartung geöffnet werden (z.B. Reinigung
oder Austausch der Filter).
Beleuchtung
•Beleuchtungssystem : Das Beleuchtungssystem kann
nicht vom Anwender ausgetauscht werden, wenden Sie
sich bitte bei Betriebsstörungen an den Kundendienst.
• Das Beleuchtungssystem basiert auf der LED-
Technologie. Die LEDs gewährleisten eine optimale
Beleuchtung, halten bis zu 10 Mal länger als herkömmliche
Lampen und sparen 90 % an elektrischer Energie.
FR
Le produit est conçu pour l’aspiration des fumées et des
vapeurs de cuisson et est destiné au seul usage
domestique.
Suivre de près les instructions reportées dans ce
manuel. Nous déclinons toute responsabilité face à tout
inconvénient, dommage ou incendie causé au produit en
raison du non-respect des instructions de ce manuel.
L'appareil peut avoir un aspect différent par rapport au
dessin de cette notice mais les instructions pour
l'utilisation, l'entretien et l'installation restent les
mêmes.
• Il est important de conserver tous les manuels
accompagnant le produit afin qu'ils puissent être consultés
à tout moment. En cas de vente, de cession ou de
transfert, s’assurer qu'ils restent avec le produit. • Lire
attentivement les instructions : elles contiennent des
informations essentielles sur l'installation, l'utilisation et la
sécurité. • Vérifier l'intégrité du produit avant de procéder à
l’installation. Sinon, contacter le revendeur et ne pas
continuer l'installation.
REMARQUES
: les pièces marquées de ce symbole peuvent être
achetées séparément chez des revendeurs spécialisés.
: les pièces marquées de ce symbole sont des
accessoires en option uniquement fournis sur certains
modèles et peuvent être achetés sur les sites
www.elica.com et www.shop.elica.com.
SÉCURITÉ ET
RÈGLEMENTATIONS
SÉCURITÉ GÉNÉRALE
•Ne pas effectuer de variations électriques ou mécaniques
sur le produit ou sur les conduits d'évacuation. •Avant toute
opération de nettoyage ou d'entretien, débrancher le
produit du secteur électrique en enlevant la fiche ou à
travers le disjoncteur général du logement. •Utiliser des
gants de travail pour toutes les opérations d’installation et
d’entretien.• Le produit peut être utilisé par des enfants
âgés d’au moins 8 ans et par des personnes ayant des
capacités physiques, sensorielles ou mentales réduites ou
sans expérience ou sans les connaissances nécessaires, à
condition qu'ils soient surveillés ou après que ces
personnes aient reçu des instructions relatives à l'usage sûr
de l'appareil et à la compréhension des dangers afférents.•
Les enfants doivent être contrôlés afin qu'ils ne jouent pas
avec le produit.• Le nettoyage et l'entretien ne doivent pas
être effectués par des enfants sans surveillance. •Le local
doit disposer d'une ventilation suffisante lorsque le produit
est utilisé en même temps que d’autres appareils à
combustion de gaz ou autres combustibles. •Le produit doit
18

être fréquemment nettoyé, à l’intérieur comme à l’extérieur
(AU MOINS UNE FOIS PAR MOIS); respecter dans tous
les cas les indications présentes dans les instructions
d’entretien. •Le non-respect des normes de nettoyage du
produit et du remplacement/nettoyage des filtres comporte
des risques d'incendie.• Il est strictement interdit de faire
flamber des aliments sous le produit.• ATTENTION :
Lorsque la plaque de cuisson est en marche, les parties
accessibles du produit peuvent devenir chaudes.• Ne pas
brancher le produit au secteur électrique tant que
l’installation n’est pas totalement terminée.• Concernant les
mesures techniques et de sécurité à prendre pour
l’évacuation des fumées, respecter scrupuleusement les
règlementations établies par les autorités locales
compétentes.• L’air aspiré ne doit pas être conduit vers le
tube destiné à l'évacuation des fumées des appareils à
combustion à gaz ou autres combustibles.• Ne pas utiliser
ni laisser le produit sans que les ampoules ne soient
correctement montées en raison du risque possible de
décharge électrique.• Le produit ne doit JAMAIS être utilisé
sans la grille correctement montée. • Le produit ne doit
JAMAIS être utilisé comme plan à moins que cela ne soit
explicitement indiqué.
• Pour le remplacement de la lampe, utiliser uniquement le
type de lampe indiqué dans la section maintenance/
système d'éclairage de ce manuel. • L’utilisation d'une
flamme nue peut endommager les filtres et provoquer des
incendies et doit donc être évitée. • La friture doit être
surveillée afin d'éviter que l'huile ne prenne feu. • En cas
de doute, consulter le centre de service agréé ou un
personnel qualifié similaire.
SÉCURITÉ POUR L’INSTALLATION
•Utiliser le vis de fixation fournies avec le produit
uniquement si elles sont adaptées à la surface, sinon,
acheter les vis adéquates. Vérifier qu'aucun matériel
accessoire (comme des sachets avec des vis, garanties,
etc.) ne se trouve à l'intérieur de l'emballage (pour des
raisons de transport) : il doit être enlevé et conservé. •
AVERTISSEMENT: La non-installation de vis et fixations
conformément à ces instructions peut comporter des
risques électriques. • Le tube d'évacuation n’est pas fourni
et doit être acheté. • Le diamètre du tube d'évacuation doit
être identique au diamètre de l'anneau de raccordement. •
Pour l’installation du produit sur la plaque de cuisson,
respecter la hauteur indiquée sur les dessins • La distance
minimale entre la surface du support des récipients sur le
dispositif de cuisson et la partie la plus basse de la hotte ne
doit pas être inférieure à 70 cm pour les cuisines
électriques et de 100 cm pour les cuisines à gaz ou mixtes.
• Si les instructions d'installation du dispositif de cuisson à
gaz spécifient une distance plus importante, il faut en tenir
compte.
Vérification du plafond pour la première installation:
• Le plafond doit être plat, horizontal et suffisamment solide
et résistant. • La hotte est conçue pour être installée dans
un faux-plafond. Le faux-plafond doit être solide et avoir
une capacité de charge adaptée au produit, dont le poids
maximal est de 35 kg. • N’installez pas la hotte directement
dans les plaques du faux-plafond, mais utilisez toujours un
châssis ou un support adéquat.
SÉCURITÉ POUR LE RACCORDEMENT
ÉLECTRIQUE
•La tension du réseau doit correspondre à la tension
figurant sur l'étiquette des caractéristiques située à
l'intérieur du produit.•Si une fiche est présente, brancher le
produit à une prise conforme aux normes en vigueur et
placée à un endroit accessible même après l’installation. •
Si l’appareil n’est pas doté de fiche (raccordement direct au
secteur) ou si la fiche n’est pas placée dans un endroit
accessible même après l’installation, appliquer un
interrupteur bipolaire conforme qui assure la déconnexion
complète du secteur dans les conditions de la catégorie de
surtension III, conformément aux règles d'installation. • Le
produit est doté d’un câble d’alimentation spécial; en cas
d’endommagement, le demander au service d'assistance
technique.
● Attention ! Avant de rebrancher le circuit à
l'alimentation du secteur électrique et d'en vérifier le
fonctionnement correct, toujours contrôler que le câble
d'alimentation ait été correctement monté.
KIT WINDOWS: Le produit est préparé pour être utilisé
avec un KIT capteur Window (non fourni par le
fabricant). En installant le KIT capteur Window
(uniquement en cas d’utilisation en mode ASPIRANT),
l’extraction de l’air s’arrêtera chaque fois que la fenêtre
présente dans la pièce, sur laquelle est appliqué le KIT,
sera fermée. Le branchement électrique du KIT à
l’appareil doit être effectué par un personnel technique
qualifié et spécialisé. Le KIT doit être certifié
séparément, conformément aux normes de sécurité
pertinentes au composant et à son utilisation avec
l’appareil. L’installation doit être effectuée
conformément aux règlementations pour les
installations domestiques en vigueur.
ATTENTION: le câblage du KIT à brancher à l’appareil
doit faire partie d’un circuit certifié à très basse tension
de sécurité (TBTS). Le fabricant de cet appareil décline
toute responsabilité en cas de problèmes, de
dommages, ou d'incendies provoqués par des défauts
et/ou des problèmes de dysfonctionnement et/ou une
installation incorrecte du KIT.
Attention! Ne pas utiliser avec un programmateur, une
minuterie, une télécommande séparée ou tout autre
appareil qui s'active automatiquement.
SUGGESTIONS D’UTILISATION
Conseils pour une utilisation correcte et destinée à réduire
l'impact environnemental : Pour commencer à cuisiner,
allumer l’appareil à la vitesse minimale et la laisser allumer
quelques minutes, même après la fin de la cuisson.
19

Augmenter la vitesse seulement en cas de grosses
quantités de fumée et de vapeur en utilisant la fonction
booster uniquement pour les cas extrêmes. Pour préserver
l'efficacité du système de réduction des odeurs, remplacer
le(s) filtre(s) à charbon. Nettoyer le filtre à graisse
régulièrement pour en préserver l'efficacité. Pour optimiser
l'efficacité et minimiser les bruits, utiliser le diamètre
maximal du système de canalisation indiqué dans ce
manuel.
ÉLIMINATION EN FIN DE VIE
Cet appareil est marqué conformément à la Di-
rective Européenne 2012/19/CE - UK SI 2013
No.3113, Déchets d'équipements électriques et
électroniques (DEEE). S’assurer que ce produit
est correctement éliminé. L'utilisateur contribue à
prévenir les possibles conséquences négatives
pour l’environnement et la santé.
Le symbole présent sur le produit ou sur la documentation
qui l’accompagne indique qu’il ne doit pas être traité
comme déchet ménager mais être apporté à un point de
collecte pour le recyclage d’équipements électriques et
électroniques. L'éliminer conformément aux
réglementations locales d'élimination des déchets. Pour
plus d'informations sur le traitement, la récupération et le
recyclage de ce produit, contacter les autorités locales, le
service de collecte des déchets ménagers ou le magasin
où le produit a été acheté.
NORMES
Équipement conçu, testé et réalisé dans le respect des
normes sur la Sécurité : EN/CEI 60335-1 ; EN/CEI
60335-2- 31, EN/CEI 62233. Performance : EN/CEI
61591 ; ISO 5167-1 ; ISO 5167-3 ; ISO 5168 ; EN/CEI
60704-1 ; EN/CEI 60704-2-13 ; EN/CEI 60704-3 ; ISO
3741; EN 50564; CEI 62301. CEM: EN 55014-1; CISPR
14-1; EN 55014-2; CISPR 14-2; EN/CEI 61000-3-2; EN/
CEI 61000-3-3.
UTILISATION
La hotte est réalisée pour être utilisée en version aspirante
et avec une évacuation vers l’extérieur.
ATTENZIONE ! : Les tuyaux ne sont pas fournis et
doivent être achetés séparément.
Les vapeurs sont évacuées vers l'extérieur par un tuyau
d'échappement fixé sur la bride de raccord.
ATTENTION! Si le produit est équipé d'un ou de plusieurs
filtres à charbon, ceux-ci doivent être retirés.
Raccorder le produit aux tuyaux et aux orifices
d'évacuation murale du même diamètre que celui de la
sortie d'air (bride de raccord).
L'utilisation des tuyaux et des orifices d'évacuation d'un
diamètre inférieur diminuera l'efficacité de l'extraction et
augmentera considérablement le bruit.
Nous déclinons, dans ce cas, toute responsabilité.
• La longueur du conduit doit être celle strictement
indispensable.
• Utiliser un conduit avec le moins de coudes possible
(angle maximal du coude : 90°).
• Éviter de changer drastiquement la section du conduit.
ELICA CONNECT
La hotte est dotée d’une fonction WiFi pour la connexion à
distance à travers l’App Elica Connect. Conditions
minimales requises du système: • Routeur sans fil 2.4GHz
WiFi b/g/n • Smartphone Android ou iOs. Vérifiez sur les
stores la compatibilité de l’application avec la version du
système d’exploitation de votre Smartphone.
Remarque : Le fabricant ELICA déclare que ce modèle
d'électroménager doté d'un équipement radio module WiFi
est conforme à la directive 2014/53/UE.
La bande de fréquence de l’équipement radio est ISM à
2.4GHz ; la puissance maximale transmise à
radiofréquence ne dépasse pas les 20 dBm (PIRE).
Mises en garde:
• Protection des données: Les données que l’appareil
connecté récupère sont collectées pour permettre
l’utilisation de tous les services de l'électroménager
connecté. D’autres informations sur les modalités de
traitement des données collectées et sur la politique de
confidentialité sont disponibles sur le site
www.elica.com.
• Disponibilité dans les pays: Le service Elica Connect
est disponible dans certains pays. Pour de plus amples
informations, visitez la section dédiée sur le site
www.elica.com ou vérifiez la disponibilité sur le store de
votre Smartphone en recherchant l’App Elica Connect.
• Futures modifications : Elica se réserve le droit
d’apporter toutes les modifications qu’elle jugera
nécessaire à l’amélioration du service Elica Connect. Les
descriptions contenues dans ce manuel ne sont par
conséquent pas contractuelles et ont une valeur indicative.
20
A página está carregando ...
A página está carregando ...
A página está carregando ...
A página está carregando ...
A página está carregando ...
A página está carregando ...
A página está carregando ...
A página está carregando ...
A página está carregando ...
A página está carregando ...
A página está carregando ...
A página está carregando ...
A página está carregando ...
A página está carregando ...
A página está carregando ...
A página está carregando ...
A página está carregando ...
A página está carregando ...
A página está carregando ...
A página está carregando ...
A página está carregando ...
A página está carregando ...
A página está carregando ...
A página está carregando ...
A página está carregando ...
A página está carregando ...
A página está carregando ...
A página está carregando ...
A página está carregando ...
A página está carregando ...
A página está carregando ...
A página está carregando ...
A página está carregando ...
A página está carregando ...
A página está carregando ...
A página está carregando ...
A página está carregando ...
A página está carregando ...
A página está carregando ...
A página está carregando ...
A página está carregando ...
A página está carregando ...
A página está carregando ...
A página está carregando ...
A página está carregando ...
A página está carregando ...
A página está carregando ...
A página está carregando ...
A página está carregando ...
A página está carregando ...
A página está carregando ...
A página está carregando ...
A página está carregando ...
A página está carregando ...
A página está carregando ...
A página está carregando ...
A página está carregando ...
A página está carregando ...
A página está carregando ...
A página está carregando ...
A página está carregando ...
A página está carregando ...
A página está carregando ...
A página está carregando ...
A página está carregando ...
A página está carregando ...
A página está carregando ...
A página está carregando ...
A página está carregando ...
A página está carregando ...
A página está carregando ...
A página está carregando ...
A página está carregando ...
A página está carregando ...
A página está carregando ...
A página está carregando ...
-
 1
1
-
 2
2
-
 3
3
-
 4
4
-
 5
5
-
 6
6
-
 7
7
-
 8
8
-
 9
9
-
 10
10
-
 11
11
-
 12
12
-
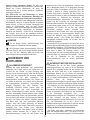 13
13
-
 14
14
-
 15
15
-
 16
16
-
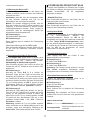 17
17
-
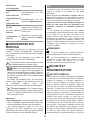 18
18
-
 19
19
-
 20
20
-
 21
21
-
 22
22
-
 23
23
-
 24
24
-
 25
25
-
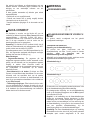 26
26
-
 27
27
-
 28
28
-
 29
29
-
 30
30
-
 31
31
-
 32
32
-
 33
33
-
 34
34
-
 35
35
-
 36
36
-
 37
37
-
 38
38
-
 39
39
-
 40
40
-
 41
41
-
 42
42
-
 43
43
-
 44
44
-
 45
45
-
 46
46
-
 47
47
-
 48
48
-
 49
49
-
 50
50
-
 51
51
-
 52
52
-
 53
53
-
 54
54
-
 55
55
-
 56
56
-
 57
57
-
 58
58
-
 59
59
-
 60
60
-
 61
61
-
 62
62
-
 63
63
-
 64
64
-
 65
65
-
 66
66
-
 67
67
-
 68
68
-
 69
69
-
 70
70
-
 71
71
-
 72
72
-
 73
73
-
 74
74
-
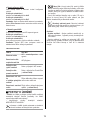 75
75
-
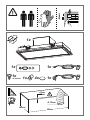 76
76
-
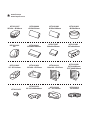 77
77
-
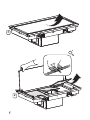 78
78
-
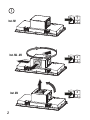 79
79
-
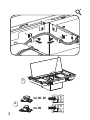 80
80
-
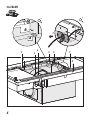 81
81
-
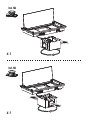 82
82
-
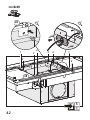 83
83
-
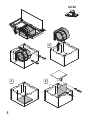 84
84
-
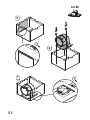 85
85
-
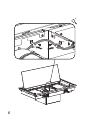 86
86
-
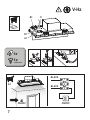 87
87
-
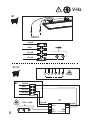 88
88
-
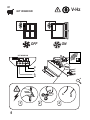 89
89
-
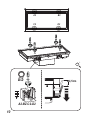 90
90
-
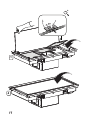 91
91
-
 92
92
-
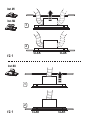 93
93
-
 94
94
-
 95
95
-
 96
96


ELICA LIB0182948 Skydome Ceiling Cooker Hood 100cm Manual do usuário
- Tipo
- Manual do usuário
em outros idiomas
- español: ELICA LIB0182948 Skydome Ceiling Cooker Hood 100cm Manual de usuario
- français: ELICA LIB0182948 Skydome Ceiling Cooker Hood 100cm Manuel utilisateur
- italiano: ELICA LIB0182948 Skydome Ceiling Cooker Hood 100cm Manuale utente
- Nederlands: ELICA LIB0182948 Skydome Ceiling Cooker Hood 100cm Handleiding
- Deutsch: ELICA LIB0182948 Skydome Ceiling Cooker Hood 100cm Benutzerhandbuch
- dansk: ELICA LIB0182948 Skydome Ceiling Cooker Hood 100cm Brugermanual
- svenska: ELICA LIB0182948 Skydome Ceiling Cooker Hood 100cm Användarmanual
- polski: ELICA LIB0182948 Skydome Ceiling Cooker Hood 100cm Instrukcja obsługi
Artigos relacionados
-
ELICA Skydome 100 H30 Manual do usuário
-
-
-
-
-
-