Logitech Type Protective Case for iPad Air Guia de instalação
- Categoria
- Teclados de dispositivos móveis
- Tipo
- Guia de instalação
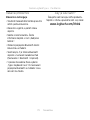
Este manual também é adequado para

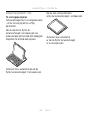
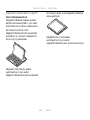
Type +
Protective case with integrated keyboard
For iPad Air
Setup Guide

2
Contents
English. . . . . . . . . . . . . . . . . . 3
Deutsch . . . . . . . . . . . . . . . . 12
Français . . . . . . . . . . . . . . . . 22
Italiano. . . . . . . . . . . . . . . . . 32
Español . . . . . . . . . . . . . . . . 42
Português . . . . . . . . . . . . . . . 52
Nederlands . . . . . . . . . . . . . . 62
Svenska . . . . . . . . . . . . . . . . 72
Dansk . . . . . . . . . . . . . . . . . 82
Norsk . . . . . . . . . . . . . . . . . 92
Suomi . . . . . . . . . . . . . . . . .102
Ελληνικά . . . . . . . . . . . . . . . . . 112
По-русски . . . . . . . . . . . . . . . .122
Magyar . . . . . . . . . . . . . . . .132
Česká verze . . . . . . . . . . . . . .142
Po polsku . . . . . . . . . . . . . . .152
Slovenčina. . . . . . . . . . . . . . .162
Türkçe . . . . . . . . . . . . . . . . .172
182 . . . . . . . . . . . . . . . . . .

English 3
Logitech Type + For iPad Air
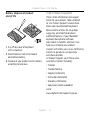
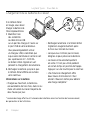
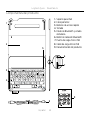
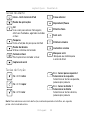
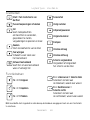
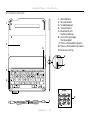
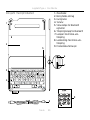
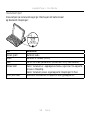
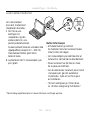
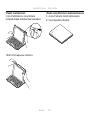
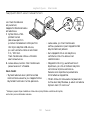
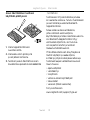
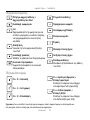
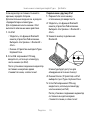
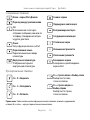
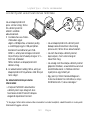
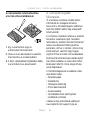
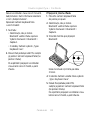
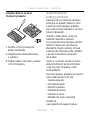
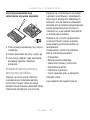
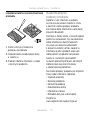
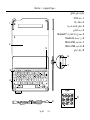
Know your product
1. iPad holder
2. Protective folio
3. Hot keys
4. Keyboard
5. Bluetooth and battery
status light
6. Bluetooth connect button
7. Micro-USB charging port
8. Micro-USB charging cable
9. Product documentation
1
2
6
7
8
9
4
3
5
1.5h
®
®
Type + keyboard case
1 2 3 4
www.logitech.com/support/type-air
PDF
1
1
2
2
3
3
Type +
Protective case with integrated keyboard
For iPad Air

4 English
Logitech Type + For iPad Air
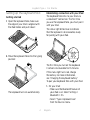
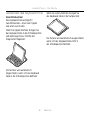
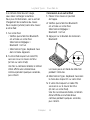
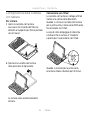
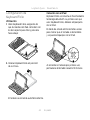
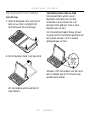
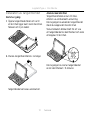
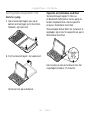
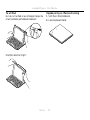
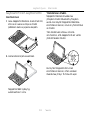
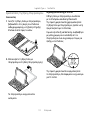
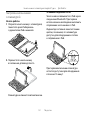
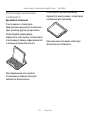
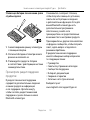
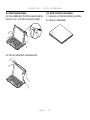
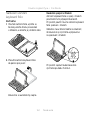
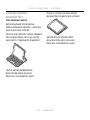
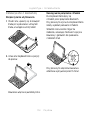
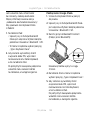
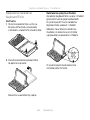
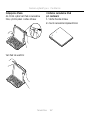
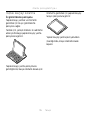
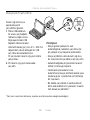
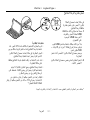
Setting up the keyboard folio
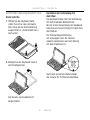
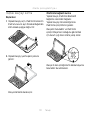
Getting started
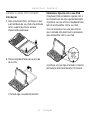
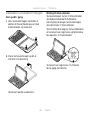
1. Open the keyboard folio, make sure
the edge of your iPad is aligned with
the iPad holder and push down:
2. Move the keyboard folio into the typing
position:
The keyboard turns on automatically.
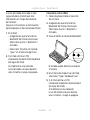
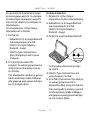
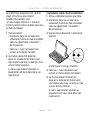
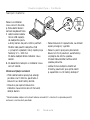
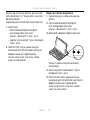
Establishing connection with your iPad
The keyboard folio links to your iPad via
a Bluetooth® connection. The first time
you use the keyboard folio, you must pair it
with your iPad.
The status light blinks blue to indicate
that the keyboard is discoverable, ready
for pairing with your iPad.
The first time you turn on the keyboard
it remains discoverable for 15 minutes.
If the status light turns red, charge
the battery. For more information,
see “Charging the keyboard battery.”
To pair your keyboard folio with your iPad:
1. On your iPad:
• Make sure the Bluetooth feature of
your iPad is on. Select Settings >
Bluetooth > On.
• Select “Type+ Keyboard Case”
from the Devices menu.

English 5
Logitech Type + For iPad Air
2. If your iPad requests a PIN, enter it using
the folio keyboard (not on your iPad).
When successful connection is made,
the status light turns solid blue for
a short time, and then turns o.
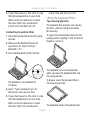
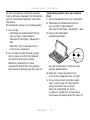
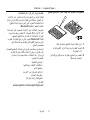
Connecting to another iPad
1. Move the keyboard folio into the typing
position.
2. Make sure the Bluetooth feature of
your iPad is on. Select Settings >
Bluetooth > On.
3. Press the Bluetooth Connect button:
The keyboard is discoverable for
3 minutes.
4. Select “Type+ Keyboard Case” on
the Devices menu of your iPad.
5. If your iPad requests a PIN, enter it using
the folio keyboard (not on your iPad).
When successful connection is made,
the status light turns solid blue for
a short time, and then turns o.
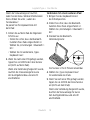
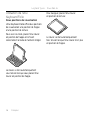
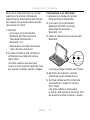
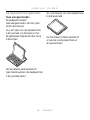
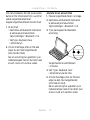
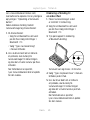
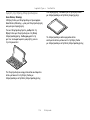
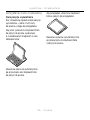
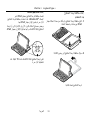
Using the keyboard folio
Two viewing positions
The keyboard folio provides two viewing
positions—one for typing and another
for browsing.
To type, move the keyboard folio into the
typing position, aligning it with the built-in
magnet to secure it:
The keyboard turns on automatically
when you move the keyboard folio into
the typing positon.
To browse, place the keyboard folio in
the browsing position:
The keyboard powers o automatically

6 English
Logitech Type + For iPad Air
when you move the keyboard folio out of
the typing position.
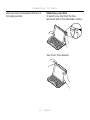
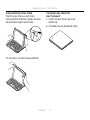
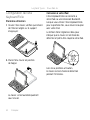
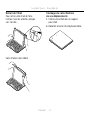
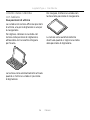
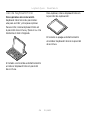
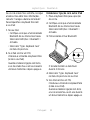
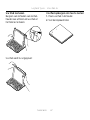
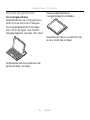
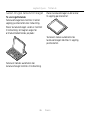
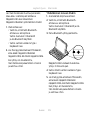
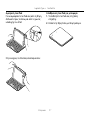
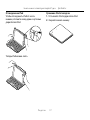
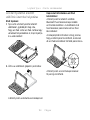
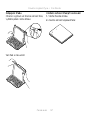
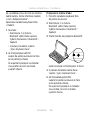
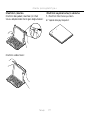
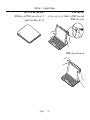
Detaching your iPad
To detach your iPad from the folio,
bend back one of the iPad holder corners:
Your iPad is then released:

English 7
Logitech Type + For iPad Air
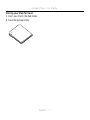
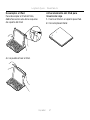
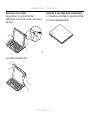
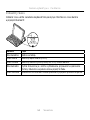
Storing your iPad for travel
1. Insert your iPad in the iPad holder.
2. Close the keyboard folio:

8 English
Logitech Type + For iPad Air
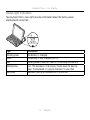
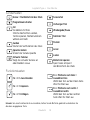
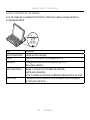
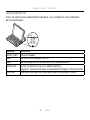
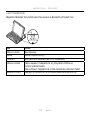
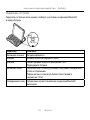
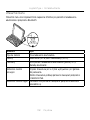
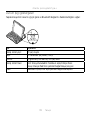
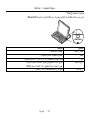
Status light indicators
Your keyboard folio’s status light provides information about the battery power
and Bluetooth connection:
Light Description
Blinking green The battery is charging.
Green The battery is fully charged (100%).
Red Battery power is low (less than 10%). Recharge the battery.
Blinking blue Fast: The keyboard is in discovery mode, ready for pairing.
Slow: The keyboard is trying to reconnect to your iPad.
Solid blue Bluetooth pairing or reconnection is successful.

English 9
Logitech Type + For iPad Air
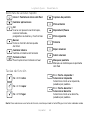
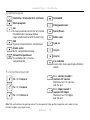
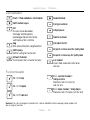
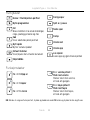
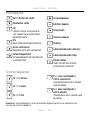
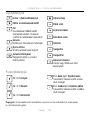
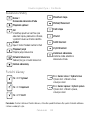
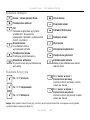
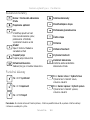
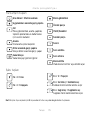
Hot keys
Home = iPad Home screen
Switch applications
Siri
Use your voice to send messages,
make calls, schedule meetings,
and more
Search
Launches the iPad search function
Switch language
Switches the keyboard language
Virtual keyboard
Shows/hides the virtual keyboard
Screenshot
Previous track
Play/Pause
Next track
Mute
Volume down
Volume up
Lock screen
Locks or unlocks the iPad screen
Function keys
Fn + X = Cut
Fn + C = Copy
Fn + V = Paste
Fn + Left cursor = Select left
Selects text on the left,
word by word
Fn + Right cursor = Select right
Selects text on the right,
word by word
Note: To select a function key, press and hold the fn key, and then press the key indicated above.

10 English
Logitech Type + For iPad Air
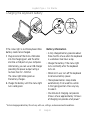
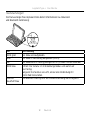
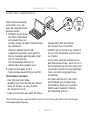
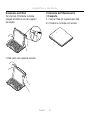
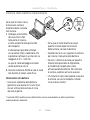
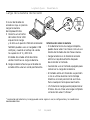
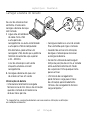
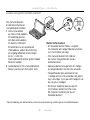
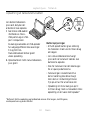
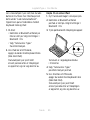
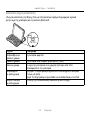
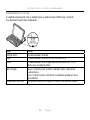
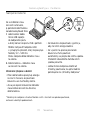
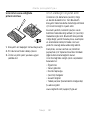
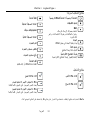
Charging the keyboard battery
If the status light is red the keyboard folio
battery needs to be charged.
1. Plug one end of the micro-USB cable
into the charging port, and the other
end into a USB port on your computer.
Alternatively, you can use a USB charger
providing the power output rating is
no more than 5V - 500mA.
The status light blinks green as
the battery charges.
2. Charge the battery until the status light
turns solid green.
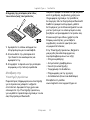
Battery information
• A fully charged battery provides about
three months of use when the keyboard
is used about two hours a day.
• Charge the battery if the status light
turns red briefly after the keyboard
turns on.
• When not in use, turn o the keyboard
to conserve battery power.
• The keyboard enters sleep mode
automatically if not used for a while
in the typing position. Press any key
to wake it.
• One minute of charging can provide
2 hours of use; approximately 1.5 hours
of charging can provide a full power.*
* Actual charging and battery life will vary with use, settings, and environmental conditions.
USB

English 11
Logitech Type + For iPad Air
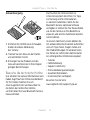
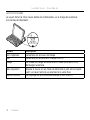
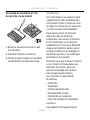
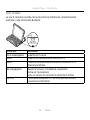
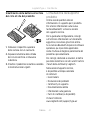
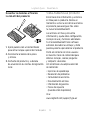
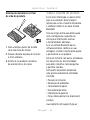
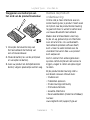
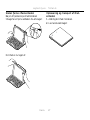
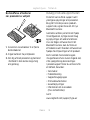
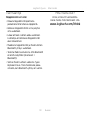
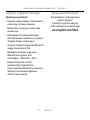
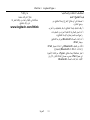
Battery disposal at product
end of life
1. Pry o top cover of keyboard
with screwdriver.
2. Detach battery from circuit board
and remove battery.
3. Dispose of your product and its battery
according to local laws
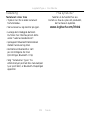
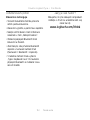
Visit Product Support
There’s more information and support
online for your product. Take a moment
to visit Product Support to learn more
about your new Bluetooth keyboard.
Browse online articles for setup help,
usage tips, and information about
additional features. If your Bluetooth
keyboard has optional software,
learn about its benefits and how it can
help you customize your product.
Connect with other users in our Community
Forums to get advice, ask questions,
and share solutions.
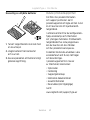
At Product Support, you’ll find a wide
selection of content including:
• Tutorials
• Troubleshooting
• Support community
• Online documentation
• Warranty information
• Spare parts (when available)
Go to:
www.logitech.com/support/type-air
3
2
1

12 English
Logitech Type + For iPad Air
Troubleshooting
The keyboard does not work
• Press any key to wake the keyboard
from sleep mode.
• Turn the keyboard o and then back on.
• Recharge the internal battery.
For more information, see “Charging the
keyboard battery.”
• Re-establish the Bluetooth connection
between the keyboard and your iPad.
• Verify that Bluetooth is turned on
in the settings of iPad (Settings >
Bluetooth > On).
• Choose “Type+ Keyboard Case”
from the Devices menu on your iPad.
The status light turns solid blue when
Bluetooth connection is established.
What do you think?
Thank you for purchasing our product.
Please take a minute to tell us
what you think of it.
www.logitech.com/ithink

Deutsch 13
Logitech
Type + Für iPad Air
Produkt auf einen Blick
1. iPad-Halterung
2. Foliocover
3. Sondertasten
4. Tastatur
5. Bluetooth- und
Akkustandsanzeige
6. Bluetooth-Verbindungstaste
7. Mikro-USB-Ladeanschluss
8. Mikro-USB-Ladekabel
9. Produktdokumentation
1
2
6
7
8
9
4
3
5
1.5h
®
®
Type + keyboard case
1 2 3 4
www.logitech.com/support/type-air
PDF
1
1
2
2
3
3
Type +
Protective case with integrated keyboard
For iPad Air

14 Deutsch
Logitech
Type + Für iPad Air
Einrichten des Keyboard Folio
Erste Schritte
1. Önen Sie das Keyboard Folio,
stellen Sie sicher, dass die Kante
Ihres iPads an der iPad-Halterung
ausgerichtet ist, und drücken Sie es
nach unten:
2. Bringen Sie das Keyboard Folio in
die Schreibposition:
Die Tastatur wird automatisch
eingeschaltet.
Herstellen der Verbindung mit
dem iPad
Das Keyboard Folio stellt die Verbindung
mit dem iPad über Bluetooth her.
Bei der ersten Verwendung des Keyboard
Folio müssen Sie ein Pairing mit dem iPad
durchführen.
Die Statusanzeige blinkt blau,
um anzuzeigen, dass die Tastatur
erkannt werden kann und zum Pairing
mit dem iPad bereit ist.
Nach dem ersten Einschalten bleibt
die Tastatur für 15 Minuten erkennbar.

Deutsch 15
Logitech
Type + Für iPad Air
Wenn die Statusanzeige rot leuchtet,
laden Sie den Akku. Weitere Informationen
hierzu finden Sie unter „Laden des
Tastaturakkus“.
So pairen Sie Ihr Keyboard Folio mit
dem iPad:
1. Führen Sie auf dem iPad die folgenden
Schritte aus:
• Stellen Sie sicher, dass die Bluetooth-
Funktion Ihres iPads eingeschaltet ist.
Wählen Sie „Einstellungen > Bluetooth >
Ein“.
• Wählen Sie im Gerätemenü „Type+
Keyboard Case“.
2. Wenn Sie nach einer PIN gefragt werden,
tippen Sie sie mithilfe der Folio-Tastatur
ein (nicht auf dem iPad).
Wenn eine Verbindung hergestellt wurde,
leuchtet die Statusanzeige für kurze
Zeit durchgehend blau und erlischt
anschließend.
Verbinden mit einem anderen iPad
1. Bringen Sie das Keyboard Folio in
die Schreibposition.
2. Stellen Sie sicher, dass die Bluetooth-
Funktion Ihres iPads eingeschaltet ist.
Wählen Sie „Einstellungen > Bluetooth >
Ein“.
3. Drücken Sie die Bluetooth-
Verbindungstaste:
Die Tastatur ist für 3 Minuten erkennbar.
4. Wählen Sie „Type+ Keyboard Case“
im Gerätemenü des iPads.
5. Wenn Sie nach einer PIN gefragt werden,
tippen Sie sie mithilfe der Folio-Tastatur
ein (nicht auf dem iPad).
Wenn eine Verbindung hergestellt wurde,
leuchtet die Statusanzeige für kurze
Zeit durchgehend blau und erlischt
anschließend.

16 Deutsch
Logitech
Type + Für iPad Air
Verwenden des Keyboard Folio
Zwei Blickwinkel
Das Keyboard Folio ermöglicht
zwei Blickwinkel – einen zum Tippen
und einen zum Surfen.
Wenn Sie tippen möchten, bringen Sie
das Keyboard Folio in die Schreibposition
und befestigen Sie es mithilfe des
integrierten Magneten:
Die Tastatur wird automatisch
eingeschaltet, wenn sich das Keyboard
Folio in der Schreibposition befindet.
Wenn Sie surfen möchten, bringen Sie
das Keyboard Folio in die Surfposition:
Die Tastatur wird automatisch ausgeschaltet,
wenn sich das Keyboard Folio nicht in
der Schreibposition befindet.

Deutsch 17
Logitech
Type + Für iPad Air
Herausnehmen Ihres iPads
Wenn Sie das iPad aus dem Folio
herausnehmen möchten, biegen Sie eine
der Eckhalterungen nach hinten:
Ihr iPad lässt sich dann herausnehmen:
Verstauen des iPads für
den Transport
1. Setzen Sie das iPad in die iPad-
Halterung.
2. Schließen Sie das Keyboard Folio:

18 Deutsch
Logitech
Type + Für iPad Air
Statusanzeigen
Die Statusanzeige Ihres Keyboard Folio bietet Informationen zu Akkustand
und Bluetooth-Verbindung:
LED Beschreibung
Blinkt grün Der Akku wird aufgeladen.
Grün Der Akku ist vollständig aufgeladen (100%).
Rot Der Akkustand ist niedrig (weniger als 10%). Laden Sie den Akku auf.
Blinkt blau Schnell: Die Tastatur ist im Erkennungsmodus und wartet auf
das Pairing.
Langsam: Die Tastatur versucht, erneut eine Verbindung mit
Ihrem iPad herzustellen.
Leuchtet
dauerhaft blau
Das Bluetooth-Pairing bzw. die Wiederverbindung war erfolgreich.

Deutsch 19
Logitech
Type + Für iPad Air
Sondertasten
Home = Startbildschirm des iPads
Programmumschalter
Siri
Sie können mit Ihrer
Stimme Nachrichten senden,
Termine planen, Telefonnummern
wählen und mehr
Suchen
Startet die Suchfunktion des iPads
Sprache ändern
Ändert die Tastatursprache
Virtuelle Tastatur
Zeigt die virtuelle Tastatur an
oder blendet sie aus
Screenshot
Vorheriger Titel
Wiedergabe/Pause
Nächster Titel
Stumm
Leiser
Lauter
Bildschirm sperren
Sperrt oder entsperrt
den Bildschirm des iPads
Funktionstasten
Fn + X = Ausschneiden
Fn + C = Kopieren
Fn + V = Einfügen
Fn + Pfeiltaste nach links =
Auswählen links
Wählt den Text auf der linken Seite
Wort für Wort aus
Fn + Pfeiltaste nach rechts =
Auswählen rechts
Wählt den Text auf der rechten
Seite Wort für Wort aus
Hinweis: Um eine Funktionstaste auszuwählen, halten Sie die Fn-Taste gedrückt und drücken Sie
die oben angegebene Taste.

20 Deutsch
Logitech
Type + Für iPad Air
Laden des Tastaturakkus
USB
Wenn die Statusanzeige
rot leuchtet, muss der
Akku des Keyboard Folio
geladen werden.
1. Schließen Sie ein Ende
des Mikro-USB-Kabels
am Ladeanschluss an
und das andere an einem USB-Anschluss
des Computers.
Alternativ können Sie ein USB-
Ladegerät verwenden, vorausgesetzt,
dessen Ausgangsspannung übersteigt
nicht 5 V bei 500 mA.
Die Statusanzeige blinkt grün,
während der Akku geladen wird.
2. Laden Sie den Akku, bis die
Statusanzeige dauerhaft grün leuchtet.
Informationen zum Akku
• Eine Vollladung des Akkus
gewährleistet etwa drei Monate Laufzeit,
wenn die Tastatur ca. zwei Stunden
am Tag genutzt wird.
• Laden Sie den Akku auf, wenn die Status-
anzeige nach dem Einschalten
der Tastatur kurz rot leuchtet.
• Schalten Sie die Tastatur aus, während
Sie sie nicht verwenden, um den Akku
zu schonen.
• Die Tastatur wechselt automatisch in
den Energiesparmodus, wenn Sie sie in
der Schreibposition eine Zeit lang nicht
verwenden. Drücken Sie eine beliebige
Taste, um den Energiesparmodus
zu beenden.
• Für jede Lademinute ist das Gerät
anschließend zwei Stunden lang
einsatzbereit. Nach nur ca. andert-
halb Stunden Ladezeit ist bereits
die Vollladung erreicht.*
* Die tatsächliche Lade- und Akkulaufzeit variiert je nach Nutzung des Geräts, den Einstellungen
und Umgebungsbedingungen.
A página está carregando ...
A página está carregando ...
A página está carregando ...
A página está carregando ...
A página está carregando ...
A página está carregando ...
A página está carregando ...
A página está carregando ...
A página está carregando ...
A página está carregando ...
A página está carregando ...
A página está carregando ...
A página está carregando ...
A página está carregando ...
A página está carregando ...
A página está carregando ...
A página está carregando ...
A página está carregando ...
A página está carregando ...
A página está carregando ...
A página está carregando ...
A página está carregando ...
A página está carregando ...
A página está carregando ...
A página está carregando ...
A página está carregando ...
A página está carregando ...
A página está carregando ...
A página está carregando ...
A página está carregando ...
A página está carregando ...
A página está carregando ...
A página está carregando ...
A página está carregando ...
A página está carregando ...
A página está carregando ...
A página está carregando ...
A página está carregando ...
A página está carregando ...
A página está carregando ...
A página está carregando ...
A página está carregando ...
A página está carregando ...
A página está carregando ...
A página está carregando ...
A página está carregando ...
A página está carregando ...
A página está carregando ...
A página está carregando ...
A página está carregando ...
A página está carregando ...
A página está carregando ...
A página está carregando ...
A página está carregando ...
A página está carregando ...
A página está carregando ...
A página está carregando ...
A página está carregando ...
A página está carregando ...
A página está carregando ...
A página está carregando ...
A página está carregando ...
A página está carregando ...
A página está carregando ...
A página está carregando ...
A página está carregando ...
A página está carregando ...
A página está carregando ...
A página está carregando ...
A página está carregando ...
A página está carregando ...
A página está carregando ...
A página está carregando ...
A página está carregando ...
A página está carregando ...
A página está carregando ...
A página está carregando ...
A página está carregando ...
A página está carregando ...
A página está carregando ...
A página está carregando ...
A página está carregando ...
A página está carregando ...
A página está carregando ...
A página está carregando ...
A página está carregando ...
A página está carregando ...
A página está carregando ...
A página está carregando ...
A página está carregando ...
A página está carregando ...
A página está carregando ...
A página está carregando ...
A página está carregando ...
A página está carregando ...
A página está carregando ...
A página está carregando ...
A página está carregando ...
A página está carregando ...
A página está carregando ...
A página está carregando ...
A página está carregando ...
A página está carregando ...
A página está carregando ...
A página está carregando ...
A página está carregando ...
A página está carregando ...
A página está carregando ...
A página está carregando ...
A página está carregando ...
A página está carregando ...
A página está carregando ...
A página está carregando ...
A página está carregando ...
A página está carregando ...
A página está carregando ...
A página está carregando ...
A página está carregando ...
A página está carregando ...
A página está carregando ...
A página está carregando ...
A página está carregando ...
A página está carregando ...
A página está carregando ...
A página está carregando ...
A página está carregando ...
A página está carregando ...
A página está carregando ...
A página está carregando ...
A página está carregando ...
A página está carregando ...
A página está carregando ...
A página está carregando ...
A página está carregando ...
A página está carregando ...
A página está carregando ...
A página está carregando ...
A página está carregando ...
A página está carregando ...
A página está carregando ...
A página está carregando ...
A página está carregando ...
A página está carregando ...
A página está carregando ...
A página está carregando ...
A página está carregando ...
A página está carregando ...
A página está carregando ...
A página está carregando ...
A página está carregando ...
A página está carregando ...
A página está carregando ...
A página está carregando ...
A página está carregando ...
A página está carregando ...
A página está carregando ...
A página está carregando ...
A página está carregando ...
A página está carregando ...
A página está carregando ...
A página está carregando ...
A página está carregando ...
A página está carregando ...
A página está carregando ...
A página está carregando ...
A página está carregando ...
A página está carregando ...
A página está carregando ...
A página está carregando ...
A página está carregando ...
A página está carregando ...
A página está carregando ...
A página está carregando ...
-
 1
1
-
 2
2
-
 3
3
-
 4
4
-
 5
5
-
 6
6
-
 7
7
-
 8
8
-
 9
9
-
 10
10
-
 11
11
-
 12
12
-
 13
13
-
 14
14
-
 15
15
-
 16
16
-
 17
17
-
 18
18
-
 19
19
-
 20
20
-
 21
21
-
 22
22
-
 23
23
-
 24
24
-
 25
25
-
 26
26
-
 27
27
-
 28
28
-
 29
29
-
 30
30
-
 31
31
-
 32
32
-
 33
33
-
 34
34
-
 35
35
-
 36
36
-
 37
37
-
 38
38
-
 39
39
-
 40
40
-
 41
41
-
 42
42
-
 43
43
-
 44
44
-
 45
45
-
 46
46
-
 47
47
-
 48
48
-
 49
49
-
 50
50
-
 51
51
-
 52
52
-
 53
53
-
 54
54
-
 55
55
-
 56
56
-
 57
57
-
 58
58
-
 59
59
-
 60
60
-
 61
61
-
 62
62
-
 63
63
-
 64
64
-
 65
65
-
 66
66
-
 67
67
-
 68
68
-
 69
69
-
 70
70
-
 71
71
-
 72
72
-
 73
73
-
 74
74
-
 75
75
-
 76
76
-
 77
77
-
 78
78
-
 79
79
-
 80
80
-
 81
81
-
 82
82
-
 83
83
-
 84
84
-
 85
85
-
 86
86
-
 87
87
-
 88
88
-
 89
89
-
 90
90
-
 91
91
-
 92
92
-
 93
93
-
 94
94
-
 95
95
-
 96
96
-
 97
97
-
 98
98
-
 99
99
-
 100
100
-
 101
101
-
 102
102
-
 103
103
-
 104
104
-
 105
105
-
 106
106
-
 107
107
-
 108
108
-
 109
109
-
 110
110
-
 111
111
-
 112
112
-
 113
113
-
 114
114
-
 115
115
-
 116
116
-
 117
117
-
 118
118
-
 119
119
-
 120
120
-
 121
121
-
 122
122
-
 123
123
-
 124
124
-
 125
125
-
 126
126
-
 127
127
-
 128
128
-
 129
129
-
 130
130
-
 131
131
-
 132
132
-
 133
133
-
 134
134
-
 135
135
-
 136
136
-
 137
137
-
 138
138
-
 139
139
-
 140
140
-
 141
141
-
 142
142
-
 143
143
-
 144
144
-
 145
145
-
 146
146
-
 147
147
-
 148
148
-
 149
149
-
 150
150
-
 151
151
-
 152
152
-
 153
153
-
 154
154
-
 155
155
-
 156
156
-
 157
157
-
 158
158
-
 159
159
-
 160
160
-
 161
161
-
 162
162
-
 163
163
-
 164
164
-
 165
165
-
 166
166
-
 167
167
-
 168
168
-
 169
169
-
 170
170
-
 171
171
-
 172
172
-
 173
173
-
 174
174
-
 175
175
-
 176
176
-
 177
177
-
 178
178
-
 179
179
-
 180
180
-
 181
181
-
 182
182
-
 183
183
-
 184
184
-
 185
185
-
 186
186
-
 187
187
-
 188
188
-
 189
189
-
 190
190
-
 191
191
-
 192
192
-
 193
193


Logitech Type Protective Case for iPad Air Guia de instalação
- Categoria
- Teclados de dispositivos móveis
- Tipo
- Guia de instalação
- Este manual também é adequado para
em outros idiomas
Artigos relacionados
-
Logitech Type+ Protective case Manual do proprietário
-
Logitech FabricSkin Keyboard Folio Guia de instalação
-
Logitech Ultrathin Keyboard Folio Guia de instalação
-
Logitech Folio Guia de instalação
-
-
-
Logitech Ultrathin Keyboard Folio for iPad mini Guia rápido
-
-
-
Outros documentos
-
Trust 18446 Manual do usuário
-
Trust 19386 Guia de instalação
-
Targus THZ500CH Manual do proprietário
-
Sanus VMA302 Guia de instalação
-
Cherry KW 6000 Instruções de operação
-
Trust Folio Manual do usuário
-
PowerTraveller PMEXT001 Ficha de dados
-
Zagg Messenger Folio Manual do proprietário
-
Apple MC184RU/B Manual do usuário
-
Sanus VMA301 Guia rápido