
M7CL firmware V1.10 contains the following changes and additions relative to
V1.05. (Changes in V1.06 are also included here.)
* The Help function in V1.10 and later of this product uses bitmap fonts from the Ricoh Corporation.
• Speed of synchronization with M7CL Editor has been
improved.
• In the ATT/HPF/EQ popup window (1ch) and the
DYNAMICS popup window (1ch), the location of the
ON button has been distanced from the “ × ” (close) but-
ton in order to prevent accidental operation.
• By pressing a GEQ fader in the GEQ popup window,
you can now switch the faders assigned to the Central-
ogic section. The numbers of the assigned faders are
shown on the GEQ faders.
• The position of the window has been improved so that
the channel number and channel name field at the bot-
tom of the display can be seen even when a popup win-
dow or the SCENE LIST window is displayed.
• When you use the SAVE/LOAD screen to save all of the
M7CL’s internal data (except for user authentication key
data) in a single operation, the user level, user-defined
keys, and preference settings of the administrator and
guest will also be saved. On the M7CL console, this
data can be loaded only when the administrator logs in.
In M7CL Editor (V2.1.1 or later), this data can be read
at any time. However on earlier versions of the M7CL
console or M7CL Editor, this data that was saved in
V1.10 or later cannot be read.
•You can now view the M7CL’s Help by pressing the
(Help) button in the function access area. For
details, refer to “Using the Help function.”
• The assigned user-defined key will now blink while
you’re viewing a screen or popup window that’s book-
marked by a user-defined key.
•You can now reset the GAIN to the default value (0.0
dB) for each band by simultaneously pressing the
SELECTED CHANNEL section EQ [Q] encoder and
EQ [GAIN] encoder.
• The following have been added as parameters that can
be assigned to the user-defined keys.
• PRE FADER (immediately before the fader) has been
added as a position for direct output from an INPUT
channel.
• If you’re using the M7CL V1.10, you must use V2.1.1
or later of M7CL Editor. You can download the most
recent version of M7CL Editor from the following web-
site.
http://www.yamahaproaudio.com/
M7CL V1.10 Supplementary Manual
Changes in V1.06
Changes in V1.10
FUNCTION
PARAME-
TER 1
PARAME-
TER 2
Description
SET BY
SEL
SET
[INSERT
ON]
—
By holding down this key
and pressing the [SEL] key
of a channel, that chan-
nel’s INSERT ON can be
switched on/off.
SET BY
SEL
SET
[DIRECT
OUT ON]
—
By holding down this key
and pressing the [SEL] key
of a channel, that chan-
nel’s DIRECT OUT ON
can be switched on/off.
HELP — —
Opens or closes the HELP
popup window. If you hold
down this key and operate
a panel controller (except
for the faders) or an on-
screen controller, the cor-
responding explanation
will appear.
EN

You can view the Help file provided by Yamaha, or you
can view any desired text file created by a user.
*We accept no responsibility for any damages that may occur
as a result of using help files created by a third party other
than Yamaha.
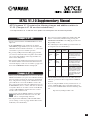
■ Loading a Help file from a USB storage
device
1
Before you proceed, save the Help file
(extension .xml) provided by Yamaha on
your USB storage device. You can down-
load the most recent version of the Help file
from the Yamaha website.
http://www.yamahaproaudio.com/
2
In the function access area, press the
SETUP button to access the SETUP screen.
3
Press the SAVE/LOAD button to access the
SAVE/LOAD popup window.
4
To select the Help file you want to load,
press one of the Help files shown in the file
list, or turn multi-function encoder 1 on the
panel.
5
Press the LOAD button; a confirmation dia-
log box will appear.
6
Press the OK button to load the file.
■ Loading a text file from a USB storage
device
1
Using a commercially available text editor
or the “Notepad” included with the
Microsoft Windows series, create a text file
(extension .txt) and save it on your USB
storage device.
By default, the character code set of the text file will
be detected as UTF-8. However by adding a line con-
sisting of [ISO-8859-1] or [Shift_JIS] at the beginning
of the file, you can force recognition of the file using
that character code set. You can specify the desired
character code set when using your text editor to save
the text file.
The Help function is able to display the following text
files (character code sets / languages).
•Text files written in the ISO-8859-1 character code
set (English, German, French, Spanish, etc.)
•Text files written in the Shift_JIS character code set
(Japanese)
•Text files of the above languages written in the UTF-8
character code set.
2
In the function access area, press the
SETUP button to access the SETUP screen.
3
Press the SAVE/LOAD button to access the
SAVE/LOAD popup window.
4
To select the text file you want to load,
press one of the text files shown in the file
list or turn multi-function encoder 1 on the
panel.
5
Press the LOAD button; a confirmation dia-
log box will appear.
6
Press the OK button to load the file.
Using the Help function
• The help file is not backed up in internal user memory. Each time
you turn on the power, you must reload it from your USB storage
device. It is convenient to save your help file on the USB storage
device that contains your user authentication key.
NOTE
SAVE/LOAD button

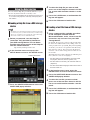
■ Viewing Help
1
Before you proceed, load the help file or
text file from your USB storage device.
2
In the function access area, press the
(Help) button to access the HELP popup
window.
3
By turning multi-function encoders 1 – 2
you can scroll the index area at the left. By
turning multi-function encoders 3 – 8 you
can scroll the main area at the right.
4
By pressing a link (underlined text) in the
text, you can scroll to the linked destina-
tion.
By pressing a window link (a location with an → sym-
bol and underlined text), you can close the HELP win-
dow and open the corresponding window.
5
As necessary, you can also scroll by using
the buttons in the tool bar.
• button......Scrolls to the chapter that precedes
the currently-displayed location.
• button......Returns to the preceding item in the
history of links you pressed.
• button......Proceeds to the subsequent item in
the history of links you pressed.
6
To close the window, press the (Help)
button of the function access area or the
“ × ” button of the HELP popup window.
■ Using user-defined keys to recall Help
directly
1
Before you proceed, load the Help file from
your USB storage device.
2
In the function access area, press the
SETUP button to access the SETUP screen.
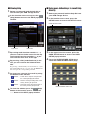
3
In the upper left of the screen, press the
USER SETUP button to access the USER
SETUP popup window.
4
Press the USER DEFINED KEYS tab to
select the USER DEFINED KEYS page.
Index area Main area
USER SETUP button
USER DEFINED KEYS tab

5
Press the button corresponding to the user-
defined key to which you want to assign the
Help function.
6
In the FUNCTION column, choose “HELP”
and press the OK button.
7
When you’ve finished assigning the func-
tion to the user-defined key, press the “ × ”
symbol to close the USER DEFINED KEYS
page.
8
In the function access area, press the
SETUP button to close the SETUP screen.
Recalling the HELP popup window using only a
user-defined key
9
Press the user-defined key to which the
Help function is assigned; the HELP popup
window will appear.
10
To close the window, once again press the
user-defined key to which the Help function
is assigned.
Directly recalling the Help for a specific panel
controller
9
While holding down the user-defined key to
which you’ve assigned the Help function,
press (or turn) the panel controller whose
function you want to read about.
Panel controllers (other than the faders) will not func-
tion as long as you continue holding down the user-
defined key to which the Help function is assigned.
10
If the corresponding controller has an
explanation associated with it, the HELP
popup window will appear, and you will
automatically scroll to the corresponding
item.
If there are multiple explanations for the same control-
ler, you can repeat step 9 to successively display these
explanations.
11
To close the window, once again press the
user-defined key to which the Help function
is assigned.
Directly recalling the Help for a specific
controller in the LCD screen
9
While holding down the user-defined key to
which you’ve assigned the Help function,
press the on-screen controller whose func-
tion you want to read about.
The on-screen buttons and tabs will not function as
long as you continue holding down the user-defined
key to which the Help function is assigned.
10
If there is a corresponding Help item, the
HELP popup window will appear and you
will automatically scroll to the correspond-
ing item.
If there are multiple explanations for the same control-
ler, close the HELP popup window and then repeat
step 9 to successively view these explanations.
11
To close the window, once again press the
user-defined key to which the Help function
is assigned.
U.R.G., Pro Audio & Digital Musical Instrument Division, Yamaha Corporation
© 2006 Yamaha Corporation
-
 1
1
-
 2
2
-
 3
3
-
 4
4


Yamaha M7CL Manual do usuário
- Tipo
- Manual do usuário
- Este manual também é adequado para
em outros idiomas
- español: Yamaha M7CL Manual de usuario
- français: Yamaha M7CL Manuel utilisateur
- italiano: Yamaha M7CL Manuale utente
- English: Yamaha M7CL User manual
- русский: Yamaha M7CL Руководство пользователя
- Nederlands: Yamaha M7CL Handleiding
- Deutsch: Yamaha M7CL Benutzerhandbuch
- dansk: Yamaha M7CL Brugermanual
- čeština: Yamaha M7CL Uživatelský manuál
- svenska: Yamaha M7CL Användarmanual
- polski: Yamaha M7CL Instrukcja obsługi
- Türkçe: Yamaha M7CL Kullanım kılavuzu
- suomi: Yamaha M7CL Ohjekirja
- română: Yamaha M7CL Manual de utilizare
Artigos relacionados
-
Yamaha M7CL Manual do proprietário
-
Yamaha M7CL Manual do proprietário
-
-
-
-
Yamaha V1 Manual do proprietário
-
Yamaha CL5 Manual do proprietário
-
-
Yamaha LS9 Manual do proprietário
-