MaxPro MPBDP16 Manual do usuário
- Categoria
- Ferramentas elétricas
- Tipo
- Manual do usuário

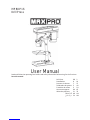
MPBDP16
Drill Press
.
User Manual
Read and follow the operating instructions and safety information before using for the first time.
Save this manual.
Drill Press GB 2
Standbohrer D 14
Perceuse à colonne F 27
Taladradora de prensa E 40
ʻ̨̭̯̣̦̬̖̣̌̽̌́̔̽
RU
65
PL
79
AR
111
ϞϳέΩ
ϲϧϮΘγ
FA
101
Wiertarka pionowa
ΔϴτϐοΔΑΎϘΛ
Furadeira de coluna P54

D
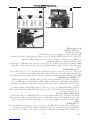
Drill Press MPBDP16 User Manual
2
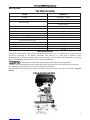
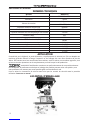
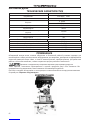
Drill Press TECHNICAL DATA
3UJKR 36(*6
Voltage 220-240Vν 50Hz
Rated power input 500W
No-load speed 9 Speed
280-2350/min
Ø 16mm
Spindle Travel 50mm
Max Distance Axis to Surface of Column 115mm
Cable PVC
Cable Length 2M
APPLICATION
Featured by light weight,
small volume safe performance and so on. It is suitable to be used in general
machinery processing in the
drilling, expansion and reaming of a hole with a diameter more
than16mm,and in machine-building, instrument and meter, farm machine and department of making
repairs and supplying replacements for unit or batchful production.
are devoted to continuously improving and perfecting the existing products.
Therefore, the technical performance and design concept of products may vary without any prior notice;
Our apology for any possible incurrence of inconvenience therefrom.
Read and follow the operating instructions and safety information before using for the first time. Save this
manual
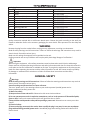
PACKAGING
DETAIL
Chuck Capacity
GB
LpA sound pressure level
LWA sound power level
Uncertainty
Vibration emission value
Uncertainty
Weight according to EPTA-Procedure 01/2003
18.2KG
58dB(A)
71 dB(A)
3dB(A)
1.34m/s²
1.5 m/s²

D
Drill Press MPBDP16 User Manual
3
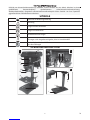
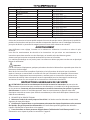
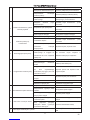
Packaging List
No Description Quantity Article No
1 Guard 1 113-0201-090
2 Chuck 1 113-0201-089
3 Handle sets(3 in 1) 3 113-0201-007~008
4 Wrench 2 113-0201-091~092
5 Chuck Key 1 113-0201-088
6 Under base 1 113-0201-001
7 Column tube 1 113-0201-006
8 Working table sets 1 113-0201-015~020
9 Hexagon bolt 3 113-0201-005
10 Washer 6 113-0201-003~004
11 CE 1 113-0201-101
12 User manual 1 113-0201-102
We recommend that you buy all your accessories from the store where you purchased the tool. Use good
quality accessories marked with a well-known brand name. Choose the grade according to the work you
intend to undertake. Refer to the accessory packaging for more details. Store personnel can also help and
advice. WARNING
Remove the plug from the socket before carrying out any adjustment, servicing or maintenance.
Read all safety warnings and all instructions. Failure to follow the warnings and instructions may result in
electric shock, fire and/or serious injury.
Make sure the voltage corresponds to the type label on the unit.
Packing materials are no toys! Children must not play with plastic bags! Danger of suffocation!
Important
When using the equipment, a few safety precautions must be observed to avoid injuries and damage.
Please read the complete operating instructions and safety information with due care. Keep this manual in
a safe place so that the information is available at all times. If you give the equipment to any other person,
hand over these operating instructions and the safety information as well. We cannot accept any liability
for damage or accidents which arise due to a failure to follow these instructions and the safety
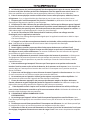
information. GENERAL SAFETY
Warnings
Read all safety warnings and all instructions. Failure to follow the warnings and instructions may result in
electric shock, fire and/or serious injury.
Save all warnings and instructions for future reference.
The term “power tool” in the warnings refers to your mains-operated (corded) power tool or
battery-operated (cordless) power tool.
1) Work area safety
a) Keep work area clean and well lit. Cluttered or dark areas invite accidents.
b) Do not operate power tools in explosive atmospheres, such as in the presence of flammable liquids,
gases or dust. Power tools create sparks which may ignite the dust or fumes.
c) Keep children and bystanders away while operating a power tool. Distractions can cause you to lose
control.
2) Electrical safety
a) Power tool plugs must match the outlet. Never modify the plug in any way. Do not use any adapter
plugs with earthed (grounded) power tools. Unmodified plugs and matching outlets will reduce risk of
electric shock.
GB

D
Drill Press MPBDP16 User Manual
4
b) Avoid body contact with earthed or grounded surfaces, such as pipes, radiators, ranges and
refrigerators. There is an increased risk of electric shock if your body is earthed or grounded.
c) Do not expose power tools to rain or wet conditions. Water entering a power tool will increase the risk
of electric shock.
d) Do not abuse the cord. Never use the cord for carrying, pulling or unplugging the power tool. Keep
cord away from heat, oil, sharp edges and moving parts. Damaged or entangled cords increase the risk of
electric shock.
e) When operating a power tool outdoors, use an extension cord suitable for outdoor use. Use of a cord
suitable for outdoor use reduces the risk of electric shock.
f) If operating a power tool in a damp location is unavoidable, use a residual current device (RCD)
protected supply. Use of an RCD reduces the risk of electric shock.
3) Personal safety
a) Stay alert, watch what you are doing and use common sense when operating a power tool. Do not use
a power tool while you are tired or under the influence of drugs, alcohol or medication. A moment of
inattention while operating power tools may result in serious personal injury.
b) Use personal protective equipment. Always wear eye protection. Protective equipment such as dust
mask, non-skid safety shoes, hard hat, or hearing protection used for appropriate conditions will reduce
personal injuries.
c) Prevent unintentional starting. Ensure the switch is in the off-position before connecting to power
source and/or battery pack, picking up or carrying the tool.
Carrying power tools with your finger on the switch or energising power tools that have the switch on
invites accidents.
d) Remove any adjusting key or wrench before turning the power tool on. A wrench or a key left attached
to a rotating part of the power tool may result in personal injury.
e) Do not overreach. Keep proper footing and balance at all times. This enables better control of the
power tool in unexpected situations.
f) Dress properly. Do not wear loose clothing or jewellery. Keep your hair, clothing and gloves away from
moving parts.
Loose clothes, jewellery or long hair can be caught in moving parts.
g) If devices are provided for the connection of dust extraction and collection facilities, ensure these are
connected and properly used. Use of dust collection can reduce dust-related hazards.
4) Power tool use and care
a) Do not force the power tool. Use the correct power tool for your application. The correct power tool
will do the job better and safer at the rate for which it was designed.
b) Do not use the power tool if the switch does not turn it on and off. Any power tool that cannot be
controlled with the switch is dangerous and must be repaired.
c) Disconnect the plug from the power source and/or the battery pack from the power tool before
making any adjustments, changing accessories, or storing power tools. Such preventive safety measures
reduce the risk of starting the power tool accidentally.
d) Store idle power tools out of the reach of children and do not allow persons unfamiliar with the
power tool or these instructions to operate the power tool.
Power tools are dangerous in the hands of untrained users.
e) Maintain power tools. Check for misalignment or binding of moving parts, breakage of parts and any
other condition that may affect the power tool’s operation. If damaged, have the power tool repaired
before use. Many accidents are caused by poorly maintained power tools.
f) Keep cutting tools sharp and clean. Properly maintained cutting tools with sharp cutting edges are less
likely to bind and are easier to control.
g) Use the power tool, accessories and tool bits etc. in accordance with these instructions, taking into
account the working conditions and the work to be performed.
Use of the power tool for operations different from those intended could result in a hazardous situation.
GB

D
Drill Press MPBDP16 User Manual
5
5) Service
a) Have your power tool serviced by a qualified repair person using only identical replacement parts.
This will ensure that the safety of the power tool is maintained.
SAFETY INSTRUCTION FOR DRILL PRESS
Tool Use
DON’T FORCE TOOL
It will do the job better and safer at the rate for which it was designed.
USE THE RIGHT TOOL
Don’t force a small tool or attachment to do the job of a heavy duty tool. Don’t used tool for purpose not
intended—for example, don’t use a circular saw for cutting tree limbs or logs.
SECURE WORK
Use clamps or a vise to hold work. It’s safer than using your hand and it frees both hands to operate the
tool.
NEVER LEAVE TOOL RUNNING UNATTENDED
Turn power off. Don’t leave tool until it comes to a complete stop.
Tool Care
DO NOT ALTER OR MISUSE TOOL
These tools are precision built. Any alteration or modification not specified is misuse and may result in
dangerous conditions.
AVOID GASEOUS AREAS
Do not operate electric tools in a gaseous or explosive atmosphere. Motors in these tools normally spark,
and may result in a dangerous condition.
MAINTAIN TOOLS WITH CARE
Keep tools sharp and clean for best and safest performance. Follow instructions for lubricating and
changing accessories. Inspect tool cords periodically and if damaged, have repaired by authorized service
facility. Inspect extension cords periodically and replace if damaged. Keep handles dry, clean and free from
oil and grease. Before connecting the tool to a power source (receptacle, outlet, etc.), be sure voltage
supplied is the same as that specified on the nameplate of the tool. A power source with a voltage greater
than that specified for the tool can result in serious injury to the user, as well as damage to the tool. If in
doubt, DO NOT PLUG IN THE TOOL. Using a power source with a voltage less than the nameplate rating is
harmful to the motor.
Warning For your own safety, do not operate your drill press until it is completely assembled and installed
according to the instructions … and until you have read and understood the following:
STABILITY OF THE DRILL PRESS
If there is any tendency of the drill press to tilt or move during any use, bolt it to the bench top or to a
piece of 3/4" exterior plywood large enough to stabilize the drill press. Bolt the plywood to the underside
of the base so it extends beyond the sides of the base. DO NOT USE PRESSED WOODS PANELS. They can
break unexpectedly. If the workpiece is too large to easily support with one hand, provide an auxiliary
support.
LOCATION
Use the drill press in a well lit area and on a level surface, clean and smooth enough to reduce the risk of
trips and falls. Use it where neither the operator nor the casual observer is forced to stand in line with a
potential kickback.
PROTECTION: Eyes, hands, ears and body.
TO AVOID BEING PULLED INTO THE SPINNING TOOL—
DO NOT WEAR: Loose fitting gloves
Necktie
Loose clothing
Jewelry
DO: TIE BACK LONG HAIR
GB

D
Drill Press MPBDP16 User Manual
6
ROLL LONG SLEEVES ABOVE ELBOWS
a. If any part of your drill press is missing, malfunctioning, has been damaged or broken … such as the
motor switch, or other operating control, a safety device or the power cord … cease operating immediately
until the particular part is properly repaired or replaced.
b. Never place your fingers in a position where they could contact the drill bit or other cutting tool if the
workpiece should unexpectedly shift or your hand should slip.
c. To avoid injury from parts thrown by the spring, follow the instructions exactly as given and shown in
“SPINDLE RETURN SPRING” section.
d. To prevent the workpiece from being torn from your hands, spinning on the table, shattering the tool, or
being thrown, always support your work so it won’t shift or bind on the tool.
(1) Always position “backup material” (used beneath the workpiece) to contact the left side of the column.
(2) Whenever possible, position the workpiece to contact the left side of the column — if it is short or the
table is tilted, clamp solidly to the table. Use table slots or clamping ledge around the outside edge of the
table.
(3) When using a drill press vise, always fasten to the table.
(4) Never do any work “free hand” (hand holding a workpiece rather than supporting it on the table),
except when polishing.
(5) Securely lock head and table support to column, and table to table support before operating drill press.
(6) Never move the head or table support while the tool is running.
(7) Before starting the operation, jog the motor switch to make sure the drill bit or other cutting tool does
not wobble or cause vibration.
(8) If a workpiece overhangs the table such that it will fall or tip if not held, clamp it to the table or provide
auxiliary support.
(9) Use fixtures for unusual operations to adequately hold, guide and position the workpiece.
(10) Use the SPINDLE SPEED recommended for the specific operation and workpiece material — check the
panel inside the pulley cover for drilling information; for accessories, refer to the instructions provided
with the accessories.
e. Never climb on the drill press table; it could break or pull the entire drill press down on you.
f. Turn the motor switch “OFF” and unplug from power source when not in operation.
g. To avoid injury from thrown work or tool contact, DO NOT perform layout, assembly, or setup work on
the table while the cutting tool is rotating.
h. Clamp workpiece or brace against column to prevent rotation.
i. Before starting, be certain chuck key is removed from chuck and that motor head and table are locked.
j. Keep pulley cover closed when not making belt adjustments.
k. Do not expose to rain or use in damp locations.
USE ONLY ACCESSORIES DESIGNED FOR THIS DRILL PRESS TO AVOID SERIOUS INJURY FROM THROWN,
BROKEN PARTS OR WORK PIECES.
(1)WHEN CUTTING LARGE DIAMETER HOLES:
Clamp the workpiece firmly to the table. Otherwise the cutter may grab and spin at high speed. Use only
onepiece, cup-type, hole cutters. DO NOT use fly cutters or multi-part hole cutters as they come apart or
become unbalanced in use.
(2)Drum sanders must NEVER be operated on this drill press at a speed greater than the speed rating of
the drum sander.
(3)Do not install or use any drill bit that exceeds 7" in length or extends 6" below the chuck jaws. They
can suddenly bend outward or break.
(4)Do not use wire wheels, router bits, shaper cutters, circle (fly) cutters, or rotary planers on this drill
press.
(5)Use recommended speed for drill accessory and workpiece material.
(6)Accessories must be rated for at least the spindle speed setting of the drill press. This drill press has 5
spindle speeds. Check spindle speed setting of the drill press based on pulley speed chart located inside the
GB

D
Drill Press MPBDP16 User Manual
7
pulley housing. Ensure accessories used has a higher speed rating than the current spindle speed setting of
the drill press. Accessories running over its rated speed can fly apart and cause injury.
DIRECTION OF FEED FOR DRUM SANDING
Feed workpiece into a sanding drum or other approved accessory, against the direction of rotation.
A kickback occurs when workpiece suddenly binds on the cutting edge of the tool and the workpiece is
thrown by the cutter in the direction of the cutter’s rotation. This can cause serious injury.
THINK SAFETY
SAFETY IS A COMBINATION OF OPERATOR COMMON SENSE AND ALERTNESS AT ALL TIMES WHEN THE
DRILL PRESS IS BEING USED.
Do not allow familiarity (gained from frequent use of your drill press) to become commonplace. Always
remember that a careless fraction of a second is sufficient to inflict severe injury.
The operation of any power tool can result in foreign objects being thrown into the eyes, which can result
in severe eye damage. Always wear safety goggles before commencing power tool operation.
Some dust created by power sanding, sawing, grinding, drilling, and other construction activities
contains chemicals known to cause cancer, birth defects or other reproductive harm. Some examples of
these chemicals are:
(1)Lead from lead-based paints,
(2)Crystalline silica from bricks and cement and other masonry products, and
(3)Arsenic and chromium from chemically treated lumber.
Your risk from these exposures varies, depending on how often you do this type of work. To reduce your
exposure to these chemicals: work in a well ventilated area, and work with approved safety equipment,
such as those dust masks that are specially designed to filter out microscopic particles.
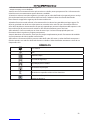
SYMBOLS
Read the manual
Warning
Wear eye protection
Wear ear protection
Wear dust mask
Keep your hands and feet away from all opening
Do not dispose of old appliances in the household garbage
GB


D
Drill Press MPBDP16 User Manual
9
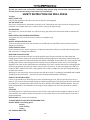
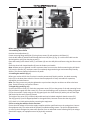
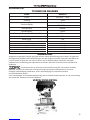
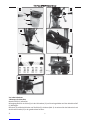
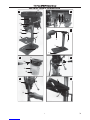
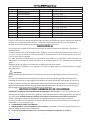
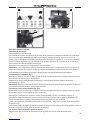
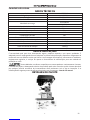
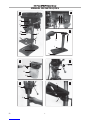
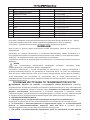
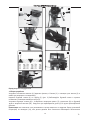
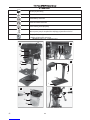
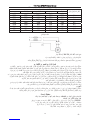
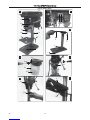
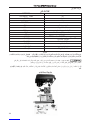
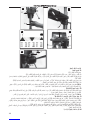
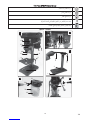
Before starting the equipment
1. Assembling the machine
Position the machine base (1).
Fasten mounting flange with pillar (2) using three screws (3) and washers to drill base (1).
Push the drill table (4) with drill table clamp shaft onto the pillar (2) (Fig. 3). Lock the drill table into the
desired position using the clamping screw (5).
Place drill head (6) with V-belt cover (7) and motor (8) onto the drill pillar and fasten using the Allen screws
(20).
Screw the three ball-shaped handles (9) onto the feeder cross handle.
Note: All bare parts are greased in order to protect them from corrosion. Before mounting the drill chuck
(10) onto the spindle (11), both parts must be completely degreased using an environmentally friendly
solvent. This ensures optimal transmission of power.
2. Installing the machine (Fig. 1)
Before you use the drill for the first time it must be permanently fixed in position. Use both mounting
holes (12) in the base plate to do this. Ensure that the equipment is freely accessible for operation,
adjustment and maintenance.
Note: The fixing screws may only be tightened to a point where they do not distort or deform the base
plate. Excessive tension can lead to fracture.
3. Hinged chip guard (Fig. 4-6)
Unscrew the three screws (21). Push the transparent cover (23) into the groove of the red mounting frame
(24) and fasten it again with the screws (21). Then use the clamping screw to fasten the folding chip guard
(13) to the machine. Finally swing up the chip guard, push the scroll chuck (10) with a jerk onto the taper
and check that the tool is securely seated.
The height of the cover (23) is infinitely adjustable and can be locked using both thumb screws (22).
The chip guard (13) can be flipped upwards to change drill bits, however ensure that the chip guard
(13) is back in its initial position before restarting the equipment.
4. Prior to using the machine for the first time
Ensure that the voltage of the mains supply complies with the specifications on the rating plate. Connect
the equipment only to a socket with the properly installed earthing contact. The drill is equipped with a
no-volt trip that is designed to protect the operator from an undesired restart following a drop in voltage.
Should this happen, the equipment must be physically restarted.
8 9
10
7
16
8
15
9
17
25
GB

D
Drill Press MPBDP16 User Manual
10
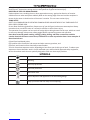
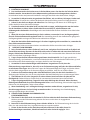
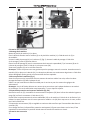
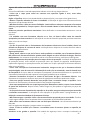
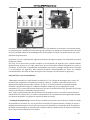
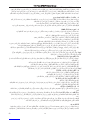
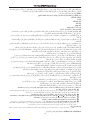
Operation
1. General (Fig. 2)
To switch on the equipment, push in the green On button “I” (18); the drill starts up. To switch off, press
the red Off button “O” (19); the drill shuts down. Ensure that you do not overload the equipment. If the
sound of the motor drops in pitch during operation, it is being overloaded. Do not overload the equipment
to the point where the motor comes to a standstill.
2. Fitting tools to the drill chuck (Fig. 1)
Make sure that the power plug is removed from the socket-outlet before changing tools. Only cylindrical
tools with the stipulated maximum shaft diameter may be clamped in the drill chuck (10). Only use a tool
that is sharp and free of defects. Do not use tools whose shaft is damaged or which are deformed or
flawed in any other way. Use only accessories and attachments that are specified in the operating
instructions or have been approved by the manufacturer.
3. Using the quick-change drill chuck
Your drill is equipped with a gear-toothed drill chuck (10). In order to insert a drill bit, flip up the chip guard
(13), insert the drill bit, then tighten down the drill chuck using the supplied chuck key.
Pull out the chuck key. Ensure that the clamped tool is firmly seated.
Important. Do not leave the chuck key in the clamp hole. Doing so will cause the chuck key to be
catapulted out, which could cause injury.
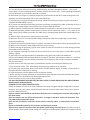
4. Setting the speed (Fig. 1/8/9)
First switch the equipment off, then pull the power plug. The various spindle speeds can be set by moving
the V-belt.
Proceed as follows:
(1) Remove the screw (16) in order to open the V-belt cover (7).
(2) Slacken the tightening screw (15) and push the motor (8) in the direction of the machine head.
(3) Move the V-belt to the desired position.
(4) Refer to table (Fig. 8) for the recommended speeds.
(5) Tighten the V-belt by pushing the motor (8) away from the drill head (6). Screw the tightening screw (16)
back down again. The tension is properly set when the V-belt flexes in the middle by approx. 1cm when
pressed.
(6) Close the V-belt cover and screw down using the screw (16). The V-belt cover (7) must always be locked
tight, as the equipment is equipped with a safety switch that only allows the equipment to be turned when
the V-belt cover (7) is closed.
Important! Never let the pillar drill run when the Vbelt cover is open. Always pull power plug before
opening the cover. Never touch the V-belt when it is rotating.
4.1 Drill depth stop (Fig. 10)
The drilling spindle has a swivelling scale ring (25) for setting the drill depth. Only adjust the setting when
the equipment is at a standstill.
(1)Press the drilling spindle (11) downwards until the tip of the drill bit touches the workpiece.
(2)Slacken the clamping screw (17) and turn the scale ring (25) forwards until it stops.
(3)Turn the scale ring (25) back to the desired drill depth, then lock this setting into place using the
clamping screw (17).
Important! When setting the drill depth of a cylindrical hole you must add the length of the drill tip.
5. Setting the angle of the drill table (Fig. 7)
(1)Slacken the carriage bolt (26) under the drill table (4).
(2)Set the drill table (4) to the desired angle.
(3)Tighten down the carriage bolt (26) in order to lock the drill table (4) into this position.
6. Setting the height of the drill table (Fig. 1)
(1)Slacken the tightening screw (5).
(2)Set the drill table (4) to the desired height by pressing down or lifting up and simultaneously (gently)
pushing to the left or right.
GB

D
Drill Press MPBDP16 User Manual
11
(3)Screw the tightening screw (5) back down again.
7. Clamping the workpiece
As a general rule, use a machine vice or another suitable clamping device to lock a workpiece into position.
Never hold the workpiece in place with your hand! When drilling, the workpiece should be able to travel
on the drill table (4) for self-centering purposes. Ensure that the workpiece cannot rotate.
This is best achieved by placing the workpiece/machine vice on a sturdy block.
Important! Sheetmetal parts must be clamped in to prevent them from being torn up. Properly set the
height and angle of the drill table for each workpiece. There must be enough distance between the upper
edge of the workpiece and tip of the drill bit.
8. Adjustment of speeds
The spindle speeds can be adjusted by changing the position of v-belt on the pulley when adjusting, mover
the v-belt to required position after releasing the shifter bar, then fasten the shifter bar again as soon as
the v-belt has been adjusted in proper working condition.
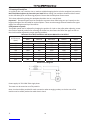
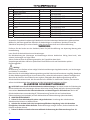
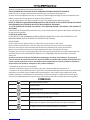
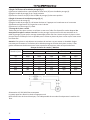
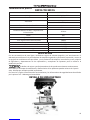
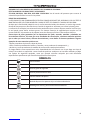
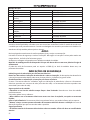
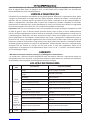
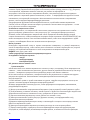
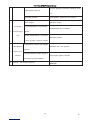
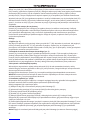
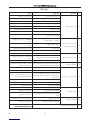
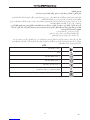
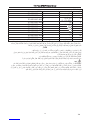
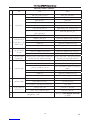
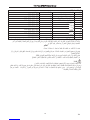
Reference list of Drill, Revolution and Various Materials to be Drilled
Drill Diameter
(mm)
Material
Steel Cast Iron Aluminum Plastics Wood
Rotative speed R. P. M
Ɍϯ 1900 1900 2350 2350 2350
Ɍϰ 1900 1550 1900 2350 2350
Ɍϱ 1550 1000 1550 1900 1900
Ɍϲ 1000 800 1000 1900 1900
Ɍϵ 540 620 800 1550 1550
Ɍϭϯ 450 450 540 1000 1000
Ɍϭϱ 280 450 450 800 800
Ɍϭϲ 280 280 450 620 620
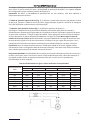
Electric Circuit Diagram
Power supply: AC 220-240V 50Hz single phase
The motor can be turned on or off by switch k.
Note: A socket shall be provided for earth connection when arranging sockets, so tha the case of the
machine can be reliably earthed to avoid electric shock.
GB

D
Drill Press MPBDP16 User Manual
12
CLEANING AND MAINTENANCE
The drill is maintenance-free to a large extent. Keep the equipment clean. Pull the power plug before doing
any cleaning and maintenance work on the appliance. Do not use any harsh, abrasive solvents to clean.
Ensure that no liquid seeps into the equipment. Regrease all bare parts when the work is finished. The drill
pillar, blank parts of the column, and the drill table especially should be regreased at regular intervals. Use
a standard, acid-free lubricating grease to do this.
Important: Do not use your household trash can as a receptacle for oil and grease-soaked cleaning rags or
grease and oil sludge. Dispose of these toxic materials in an environmentally friendly fashion. Regularly
check and clean the ventilation holes. Store the equipment in a dry room. Should the equipment become
damaged, do not try to repair it yourself. Leave this work to the hands of a qualified electrical technician.
We recommend that you clean the equipment immediately after you use it.
Clean the appliance regularly with a damp cloth and some soft soap. Do not use cleaning agents or solvents;
these may be aggressive to the plastic parts in the appliance. Ensure that no water can get into the interior
of the equipment.
Storage
Store the equipment and accessories out of children’s reach in a dark and dry place at above freezing
temperature. The ideal storage temperature is between 5 and 30 °C. Store the electric tool in its original
packaging. ENVIRONMENT
ͻDo not dispose of electric tools, accessories and
packaging together with household waste material
- in observance of European Directive 2002/96/EC onwaste of electric and electronic equipment and its
implementation in accordance with national law,electric tools that have reached the end of their lifemust
be collected separately and returned to anenvironmentally compatible recycling facility
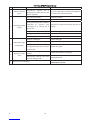
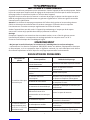
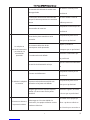
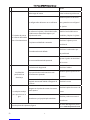
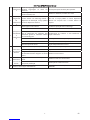
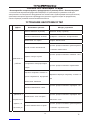
Fault Symptom Possible Cause Troubleshooting
1 Electric motor out of
service
Disconnection between plug and
power socket Put plug in power socket
shortcircuit in power supply Repair and reconnection
At switch-off Switch on
Loose switching contact Replace switchboard by repairer
Burnout of stator coil Replace stator by repairer
Stator wiring disconnection Reconnection by repairer
tripout due to improper closing of
movable guard Shut down movable guard again
Electric circuit disconnection Check electric circuit connection by repairer
2
Sluggish start-up of
electric motor, falling
short of running
speed
Unsmooth running in mechanical
part Check mechanical part by repairer
Burnout of switching contacts Repair or replace switchboard by repairer
Capacitor damage Replace capacitor by repairer
Low supply voltage Regulate supply voltage
3 Excessive running
noise
Electric motor at fault Check motor by repairer
Stopover in mechanical running gear
or damage in bearing Check mechanical part by repairer
Severe wear in bearing or edge Replace bearing, stator or rotor
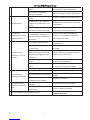
TROUBLE SHOOTING
GB

D
Drill Press MPBDP16 User Manual
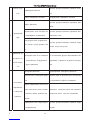
13
friction in stator/rotor
4 Failed to reach full
power
Electrocircuit overload due to
lighting device, public utility or other
electric appliances
No use of public utility or other electric appliances
on machine-connected electrocircuit
5 Superheating during
running
Electromotor overload Overload protection
Insufficient motor cooling Dedust electric motor
Bearing overheating due to deficient
lubricating oil, excessive thick
lubricating oil or bearing full of
grease stain
Supplement or replace lubricating oil and clean up
bearing
Stopover or damage in bearing Replace bearing by repairer
Damage in capacitor Replace capacitor by repairer
Excessive tight in belt Properly regulate belt
6 Substandard auger
boring quality
Wearout of drilling bit Replace drilling bit
Improper adjustment of driving belt Readjust driving belt
Driving blet tensile elongation or
running speed drop due to wearout
in driving belt
Replace driving belt
7 No motion in drill
chuck
Wearout of driving belt or belt
fracture Replace driving wheel or driving belt
Disconnection between drill chuck
and main drilling spindle Refitting drill chuck
8 Spare parts list and drawing Please download files on
www.maxpro-tools.com
GB

D
Drill Press MPBDP16 User Manual
14
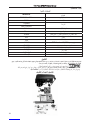
Standbohrer TECHNISCHE ANGABEN
3UJKR 36(*6
Voltzahl<ν .`
2KOYZ[TM =
-KYIN]OTJOMQKOZ 9VKKJ
SOT
(UNXQGVG`OZ¥Z ØSS
9VOTJKR8KOYKT SS
3G^*OYZGT`'INYK`[X5HKXLR¥INKJKX9¥[RK SS
1GHKR 6<)
1GHKR2¥TMK 3
ANWENDUNG
Vorgestellt von geringem Gewicht, geringen Volumen sichere Durchführung und so weiter. Es eignet sich
des allgemeinen Maschinenbaus Verarbeitung in der Bohr eingesetzt werden, Expansion und Reiben ein
Loch mit einem Durchmesser von mehr als 16 mm und im Maschinenbau, Instrument und Meter,
Landmaschine und Abteilung den Reparaturen vornehmen und liefert Ersatz für Einheit oder Batch-ful
Produktion.
sind kontinuierlich zu verbessern und Perfektionierung der vorhandener Produkte
gewidmet. Deshalb, die technische Leistung und Design Konzept der Produkte können sich ohne
vorherige Vorankündigung vorbehalten; unsere Entschuldigung für eventuelle Entstehen
Unannehmlichkeiten daraus.
Lesen und befolgen Sie die Bedienungsanleitung und die Sicherheitsinformationen vor der Verwendung
zum ersten Mal. Bewahren Sie dieses Handbuch
VERPACKUNG DETAIL
D
LpA Schalldruckpegel
LWA Schwingungsemissionswert
Unsicherheit
Schwingungsemissionswert
Unsicherheit
Gewicht entsprechend EPTA-Procedure 01/2003
18.2KG
58dB(A)
71 dB(A)
3dB(A)
1.34m/s²
1.5 m/s²

D
Drill Press MPBDP16 User Manual
15
Verpackenliste
Nr. Beschreibung Menge Artikel Kode
1 Garde Garnituren 1 113-0201-090
2 Bohrfutter 1 113-0201-089
3 Drückergarnituren (3 in 1) 3 113-0201-007~008
4 Schraubenschlüssel 2 113-0201-091~092
5 Bohrfutterschlüssel 1 113-0201-088
6 Unterlage 1 113-0201-001
7 Rohr 1 113-0201-006
8 Tisch 1 113-0201-015~020
9 Bolzen 3 113-0201-005
10 Scheibe 6 113-0201-003~004
11 CE (Kalibrierungsfehler) 1 113-0201-101
12 Benutzerhandbuch 1 113-0201-102
Wir empfehlen Ihnen, dass Sie alle Ihr Zubehör kaufen aus dem Laden, wo Sie das Werkzeug gekauft.
Verwenden Sie qualitativ hochwertige Zubehörteile mit einem bekannten Markennamen gekennzeichnet.
Wählen Sie, die Klasse gemäß der Arbeit die Sie beabsichtigen zu verpflichten. Beziehen sich auf die
Zubehörteil Verpackung für weitere Details. Laden Personal kann Ihnen auch Hilfe und Beratung.
WARNUNG
Entfernen Sie den Stecker aus der Steckdose, bevor Sie jede Durchführung von Anpassung Wartung oder
Instandhaltung.
Lesen Sie alle Sicherheitshinweise und Anweisungen.
Die Nichtbeachtung der Warnungen und Anweisungen können elektrischen Schlag, Brand und / oder
schwere Verletzungen zur Folge haben.
Achten Sie darauf, dass die Spannung entspricht, das Typschild an dem Gerät.
Verpackungsmaterialien sind keine Spielsachen! Kinder dürfen nicht mit Plastiksäcken spielen!
Erstickungsgefahr!
Wichtig!
Bei Benutzung von Geräten müssen einige Sicherheitsvorkehrungen eingehalten werden, um Verletzungen
und Schäden zu vermeiden.
Bitte lesen Sie die vollständige Bedienungsanleitung und die Sicherheitsinformationen sorgfältig. Bewahren
Sie diese Bedienungsanleitung an einem sicheren Platz, sodass die Informationen jederzeit verfügbar sind.
Wenn Sie das Gerät um eine andere Person zu geben, übergeben diese Bedienungsanleitung und die
Sicherheitsinformationen sowie. Wir übernehmen keine Gewähr für Unfälle oder Schäden, was entsteht
auf um ein Nichtbeachten dieser Anleitung und die Sicherheitsinformationen zu folgen.
ALLGEMEINE SICHERHEITSHINWEISE
ACHTUNG! Lesen Sie alle Sicherheitshinweise und Anweisungen. Versäumnisse bei der Einhaltung der
Sicherheitshinweise und Anweisungen können elektrischen Schlag, Brand und/oder schwere Verletzungen
verursachen. Bewahren Sie alle Sicherheitshinweise und Anweisungen für die Zukunft auf. Der in den
Sicherheitshinweisen verwendete Begriff “Elektrowerkzeug” bezieht sich auf netzbetriebene
Elektrowerkzeuge (mit Netzkabel) und auf akkubetriebene Elektrowerkzeuge (ohne Netzkabel).
1) ARBEITSPLATZSICHERHEIT
a) Halten Sie Ihren Arbeitsbereich sauber und gut beleuchtet. Unordnung oder unbeleuchtete
Arbeitsbereiche können zu Unfällen führen.
b) Arbeiten Sie mit dem Gerät nicht in explosionsgefährdeter Umgebung, in der sich brennbare
Flüssigkeiten, Gase oder Stäube befinden. Elektrowerkzeuge erzeugen Funken, die den Staub oder die
Dämpfe entzünden können.
c) Halten Sie Kinder und andere Personen während der Benutzung des Elektrowerkzeugs fern. Bei
D

D
Drill Press MPBDP16 User Manual
16
Ablenkung können Sie die Kontrolle über das Gerät verlieren.
2) ELEKTRISCHE SICHERHEIT
a) Der Anschlussstecker des Gerätes muss in die Steckdose passen. Der Stecker darf in keiner Weise
verändert werden. Verwenden Sie keine Adapterstecker gemeinsam mit schutzgeerdeten Geräten.
Unveränderte Stecker und passende Steckdosen verringern das Risiko eines elektrischen Schlages.
b) Vermeiden Sie Körperkontakt mit geerdeten Oberflächen, wie von Rohren, Heizungen, Herden und
Kühlschränken. Es besteht ein erhöhtes Risiko durch elektrischen Schlag, wenn Ihr Körper geerdet ist.
c) Halten Sie das Gerät von Regen oder Nässe fern. Das Eindringen von Wasser in ein Elektrogerät
erhöht das Risiko eines elektrischen Schlages.
d) Zweckentfremden Sie das Kabel nicht, um das Gerät zu tragen, aufzuhängen oder um den Stecker
aus der Steckdose zu ziehen. Halten Sie das Kabel fern von Hitze, Öl, scharfen Kanten oder
sichbewegenden Geräteteilen. Beschädigte oder verwickelte Kabel erhöhen das Risiko eines elektrischen
Schlages.
e) Wenn Sie mit einem Elektrowerkzeug im Freien arbeiten, verwenden Sie nur Verlängerungskabel,
die auch für den Außenbereich zugelassen sind. Die Anwendung eines für den Außenbereich geeigneten
Verlängerungskabels verringert das Risiko eines elektrischen Schlages.
f) Wenn der Betrieb des Elektrowerkzeuges in feuchter Umgebung nicht vermeidbar ist, verwenden Sie
einen Fehlerstromschutzschalter.
Der Einsatz eines Fehlerstromschutzschalters vermindert das Risiko eines elektrischen Schlages.
3) SICHERHEIT VON PERSONEN
a) Seien Sie aufmerksam, achten Sie darauf, was Sie tun, und gehen Sie mit Vernunft an die Arbeit mit
einem Elektrowerkzeug. Benutzen Sie das Gerät nicht, wenn Sie müde sind oder unter dem Einfluss von
Drogen, Alkohol oder Medikamenten stehen. Ein Moment der Unachtsamkeit beim Gebrauch des Gerätes
kann zu ernsthaften Verletzungen führen.
b) Tragen Sie persönliche Schutzausrüstung und immer eine Schutzbrille. Das Tragen persönlicher
Schutzausrüstung, wie Staubmaske, rutschfeste Sicherheitsschuhe, Schutzhelm oder Gehörschutz, je nach
Art und Einsatz des Elektrowerkzeuges, verringert das Risiko von Verletzungen.
c) Vermeiden Sie eine unbeabsichtigte Inbetriebnahme. Vergewissern Sie sich, dass das
Elektrowerkzeug ausgeschaltet ist, bevor Sie es an die Stromversorgung und/oder den Akku anschließen,
es aufnehmen oder tragen. Wenn Sie beim Tragen des Elektrowerkzeuges den Finger am Schalter haben
oder das Gerät eingeschaltet an die Stromversorgung anschließen, kann dies zu Unfällen führen.
d) Entfernen Sie Einstellwerkzeuge oder Schraubenschlüssel, bevor Sie das Gerät einschalten. Ein
Werkzeug oder Schlüssel, der sich in einem drehenden Geräteteil befindet, kann zu Verletzungen führen.
e) Überschätzen Sie sich nicht. Sorgen Sie für einen sicheren Stand und halten Sie jederzeit das
Gleichgewicht. Dadurch können Sie das Gerät in unerwarteten Situationen besser kontrollieren.
f) Tragen Sie geeignete Kleidung. Tragen Sie keine weite Kleidung oder Schmuck. Halten Sie Haare,
Kleidung und Handschuhe fern von sich bewegenden Teilen. Lockere Kleidung, Schmuck oder lange Haare
können von sich bewegenden Teilen erfasst werden.
g) Wenn Staubabsaug- und –auffangeinrichtungen montiert werden können, vergewissern Sie sich,
dass diese angeschlossen sind und richtig verwendet werden. Verwendung einer Staubabsaugung
verringert Gefährdungen durch Staub.
4) SORGFÄLTIGER UMGANG UND GEBRAUCH VON
ELEKTROWERKZEUGEN
a) Überlasten Sie das Gerät nicht. Verwenden Sie für Ihre Arbeit das dafür bestimmte Elektrowerkzeug.
Mit dem passenden Elektrowerkzeug arbeiten Sie besser und sicherer im angegebenen
Leistungsbereich.
b) Benutzen Sie kein Elektrowerkzeug, dessen Schalter defekt ist. Ein Elektrowerkzeug, das sich nicht
mehr ein- oder ausschalten lässt, ist gefährlich und muss repariert werden.
c) Ziehen Sie den Stecker aus der Steckdose und/oder entfernen Sie den Akku, bevor Sie
Geräteeinstellungen vornehmen, Zubehörteile wechseln oder das Gerät weglegen. Diese
D

D
Drill Press MPBDP16 User Manual
17
Vorsichtsmaßnahme verhindert den unbeabsichtigten Start des Geräts.
d) Bewahren Sie unbenutzte Elektrowerkzeuge außerhalb der Reichweite von Kindern auf. Lassen Sie
Personen das Gerät nicht benutzen, die mit diesem nicht vertraut sind oder diese Anweisungen nicht
gelesen haben. Elektrowerkzeuge sind gefährlich, wenn Sie von unerfahrenen Personen benutzt werden.
E Pflegen Sie das Gerät mit Sorgfalt. Kontrollieren Sie, ob bewegliche Geräteteile einwandfrei
funktionieren und nicht klemmen, ob Teile gebrochen oder so beschädigt sind, dass die Funktion des
Gerätes beeinträchtigt ist. Lassen Sie beschädigte Teile vor dem Einsatz des Geräts reparieren. Viele
Unfälle haben ihre Ursache in schlecht gewarteten Elektrowerkzeugen.
f) Halten Sie Schneidwerkzeuge scharf und sauber.
Sorgfältig gepflegte Schneidwerkzeuge mit scharfen Schneidkanten verklemmen sich weniger und sind
leichter zu führen.
g) Verwenden Sie Elektrowerkzeug, Zubehör, Einsatzwerkzeuge usw. entsprechend diesen
Anweisungen. Berücksichtigen Sie dabei die Arbeitsbedingungen und die auszuführende Tätigkeit. Der
Gebrauch von Elektrowerkzeugen für andere als die vorgesehenen Anwendungen kann zu gefährlichen
Situationen führen.
5) SERVICE
a) Lassen Sie Ihr Gerät nur von qualifiziertem Fachpersonal und nur mit Original-Ersatzteilen
reparieren. Damit wird sichergestellt, dass die Sicherheit des Geräts erhalten bleibt.
SICHERHEITSVORSCHRIFTEN FÜRSTANDBOHRMASCHINE
DAS WERKZEUG VERWENDEN
NICHT MIT GEWALTDAS WERKZEUG BENUTZEN
Es wirddie Arbeit besserundsicherer im angegebenen, für die es konzipiert wurde.
DAS RICHTIGE WERKZEUG VERWENDEN
Nicht mit Gewaltein kleinesWerkzeug oderZubehör die ArbeiteinesschwerenWerkzeugs tun. Benutzen Sie
keine Werkzeugefür den vorgesehenen Zwecknicht beabsichtigt, zum Beispiel, verwenden Sie nicht eine
Kreissägezum schneidenvon Ästen oder Baumstämmen.
SICHERE ARBEIT
Benutzen Sie Spannvorrichtungen odereinen Schraubstock, um Arbeit zu halten.Es ist sicherergehalten als
mit IhrerHand undmacht beide Händefrei zur Bedienung des Werkzeugs.
NIEMALSDAS WERKZEUGUNBEAUFSICHTIGT LAUFEN LASSEN
Schalten Sie das Gerätaus.Lassen Sie dasWerkzeug, bis es zu einem völligen Stillstandkommt.
Werkzeugpflege
NICHT ÄNDERNODER MISSBRAUCHEN DASWERKZEUG
Diese Werkzeuge sindmit Präzision gebaut. Jede Veränderungoder Modifikationdie nicht
angegebensind,können zu gefährlichenSituationen kommen.
VERMEIDENGASFÖRMIGENBEREICHE
Betreiben Sie nichtdie Elektrowerkzeugein einer gasförmigen oderexplosiveAtmosphäre.Die Motors
indieser Werkzeugenin der Regelglitzernund könnenin einem gefährlichen Zustandführen.
WERKZEUGE SORFÄLTIG AUFPASSEN
Halten Sie die Werkzeuge scharf und sauber, für die beste und sicherste Leistung. Befolgen Sie die
Anweisungen für die Schmierung und den Werkzeugwechsel. Überprüfen Sie die Kabel regelmäßig und
wenn sie beschädigt sind, wurden von autorisierten Kundendienst repariert werden. Kontrollieren Sie
Verlängerungskabel regelmäßig und ersetzen Sie beschädigte. Halten Sie Handgriffe trocken, sauber und
frei von Öl und Fett. Bevor Sie das Werkzeug an eine Stromquelle (Steckdose, Behälter, etc.), stellen Sie
sicher versorgt ob die Spannung gleiche wie die auf dem Typenschild des Werkzeugs angegeben ist. Eine
Stromquelle mit einer Spannung größer als die für das Werkzeug festgelegt kann zu schweren
Verletzungen des Benutzers sowie Schäden am Werkzeug führen. Wenn Sie Zweifel haben, NICHT das
Gerät in der Steckdose anschlißen. Mit einer Stromquelle mit einer Spannung von weniger als dem
Typenschild Rating ist schädlich für den Motor.
WarnungZu Ihrer eigenenSicherheit sollten Sienicht mit IhremStandbohrmaschine, bis es vollständig
D

D
Drill Press MPBDP16 User Manual
18
zusammengebaut ist undgemäß den Anweisungeninstalliert ...und bisSie gelesen haben unddas
folgendezu verstehen:
STABILITÄTDER STANDBOHRMASCHINE
Wenn es eineTendenz derBohrmaschinezu kippenoder währendder Nutzungzu bewegen,schrauben Sie
ihnander Tischplatteoder aneinem Stück3/4 "außen Sperrholzgroß genug, umdieBohrmaschinezu
stabilisieren.Boltdas Sperrholzan der UnterseitedesBasissoerstreckt sich über dieSeiten des Sockels.
BENUTZEN SIE KEINEPressholzPANELS. Eskann unerwartetbrechen.Wenn das Werkstückzu groß istleicht
mit einer Handzu unterstützen, stelleneine zusätzlicheUnterstützung.
LOCATION
Verwenden Sie dieStandbohrmaschinein einem gut beleuchtetenBereich undauf einer ebenen Fläche,
sauber und glatt genug, umdas Risiko vonStolpern und Stürzenzu reduzieren.Verwenden Sie es, wenn
weder der Betreibernoch diezufälligen Beobachtergezwungen ist,im Einklang miteiner
möglichenRückschlagstehen.
SCHUTZ: Augen, Hände, Ohrenund Körper.
Um zu vermeiden,in das sich drehendeGEZOGENWERKZEUG-
Tragen Sie keine: Locker sitzendeHandschuhe
Krawatte
lockere Kleidung
Schmuck
MACHEN SIE:Binden Sie lange Haare
ROLLLANGARMOBENELLENBOGENEIN.
a.Wenn ein TeilIhrerBohrmaschinefehlt,funktioniert,beschädigt oderkaputt
ist ...wieMotorschutzschalter,oder andereBedienelement, einerSchutzeinrichtung oderdas
Netzkabel...mehrBetriebssystemsofort bis zumbestimmten Teilordnungsgemäß repariertoder ersetzt wird.
b.Legen Sie niemals IhreFinger in einerPosition, wo sieden Bohreroder
anderenSchneidwerkzeugwendenkönnten, wenndas Werkstückunerwartetverschiebensolltenoder Ihre
Handkannrutschen.
c.Um Verletzungenvon Teilendurch die Federgeworfenzu vermeiden,befolgen Sie die Anweisungengenau
sogegeben undgezeigt,in "SPINDLE RETURNSPRING"Abschnitt.
d. Umdas Werkstückausden Händengerissenzu verhindern, spinnendauf dem Tisch,das Werkzeug würde
zerschmetterteodergeworfen, immer unterstützten SieIhre Arbeit, damit es nicht zu verschieben oderzu
bindenauf das Werkzeug.
(1) Immermahen Sie "Begleitmaterial" (verwendet unterhalb des Werkstücks) an der linkenSeite der
Säulezu kontaktieren.
(2)Wenn es möglich ist,positionierenSie das Werkstück aufder linkenSeite der Säulean -wenn sie kurz
istoder der Tischgekippt wird, fest klemmenSie das an den Tisch.VerwendenSie die TabelleSchlitze
oderSpannleisteum den äußeren Randdes Tisches.
(3)Bei Verwendung einerBohrmaschineSchraubstock,immer die aufdem Tischzu befestigen.
(4)Machen Sie keine Arbeit "freie Hand"(Halten Sie das Werkstückalsdasauf dem Tisch liegen lassen), außer
beim Polieren.
(5)sicher verriegelnSie den Kopf undden Unterstützungstisch,bevor Sie die Bohrmaschine benutzen.
(6)Bewegen Sie niemals den Kopf oder denUnterstützungstisch, während des Werkzeugsläuft.
(7)Vor Sie der Operation beginnen, seien Siesicher dass den Motorschalterum sicherzustellen, dassder
Bohreroder anderenSchneidwerkzeugnicht wackelnoder vibrieren.
(8)Wenn ein Werkstückden Tisch Überhängt, so dass esherunterfällt oder umkippt, wenn nicht gut gehalten,
klemmen Sie es auf den Tischoder bietenSie zusätzlicheUnterstützung.
(9)MitHalterungen fürungewöhnlicheVorgängeangemessenhalten,zu führen undzu positionierendas
Werkstück.
(10)Mit derSpindeldrehzahl für diespezifischenBetriebs-undWerkstoffempfohlen -überprüfen Sie
dieAnzeige im Inneren desRiemenscheibenabdeckungzum BohrenInformationen;für Zubehörfinden Sie in
D

D
Drill Press MPBDP16 User Manual
19
denAnweisungen, die mitden mitgelieferten Zubehörteilen.
E. Nie aufder BohrmaschineTisch zu steigen, es könnte brechen oderziehen Sie
diegesamteBohrmaschineauf dich herab.
f. Schalten Sie den Motorauf "OFF"und ziehen Sievon der Stromquelle, wenn sie nicht mehr in Betrieb ist.
g. Um Verletzungen durchgeworfenArbeit oderToolKontakt zu vermeiden, führen Sie keine Layout-,
Montage-oder Setup-Arbeit auf dem Tisch, während des Schneidwerkzeugsrotiert.
h. Werkstück einspannenoderDoppelpacken gegenSpalte zurDrehung zu verhindern.
i. Bevor Sie beginnen,bestimmteBohrfutterschlüsselseinwirdaus dem Futterentfernt unddass der
MotorKopf undTischgesperrt sind.
j.HaltenSie die RiemenscheibeDeckel verschlossen, wenn sie sie nicht beltAnpassungen machen.
k. Nichtdem Regen aussetzenoder an feuchten Ortenverwenden.
Verwenden Sie nur ZubehörFÜR DIESE BOHRMASCHINEGEMACHTum schwere
Verletzungengeworfen,defekte Teileoder Werkstückezu VERMEIDEN.
(1)BEIM SCHNEIDENLöcher mit großem Durchmesser:
Spannen Sie das Werkstückfest aufden Tisch.Andernfalls wird derFräsergreifen unddrehenmit hoher
Geschwindigkeit.Verwenden Sie nureinteilige, cup-Typ, Lochschneider. Verwenden Sie
KEINESchlagmesseroder mehrteiligeLochschneider, wie sie kommen auseinander oderunausgeglichenim
Einsatz.
(2)Drumsandersdarf NIEMALSauf dieserBohrmaschinemit einer Geschwindigkeitgrößer als die
GeschwindigkeitRatingder Trommelsanderbetrieben werden.
(3)installieren Sie nichtoder verwendenSie kein Bohrer,der7übersteigt,"in der Längeerweitert oder6"
unterhalb der Spannbacken. Siekönnen plötzlichnach außenverbiegen oder brechen.
(4)Verwenden Sie keineSpeichenräder,Fräser, Schneidräder, Kreis (fly) Fräseroder rotierendePlanerauf
dieserBohrmaschine.
(5)Verwenden Sieempfohlene Geschwindigkeitfür BohrerZubehör undWerkstoff.
(6)Zubehör mussmindestens für dieSpindeldrehzahlEinstellungder
Bohrmaschinebewertetwerden.DieseBohrmaschinehat 5Drehzahlen.ÜberprüfenSie die
SpindeldrehzahlEinstellungder Bohrmaschineauf der RiemenscheibeGeschwindigkeitDiagramm inder
RiemenscheibeGehäuseangesiedelt sind.Stellen Sie sicher,dass das Zubehör eine höhere
GeschwindigkeitRatingals die aktuelleDrehzahlEinstellung derBohrmaschineverwendet.Zubehör, dasüber
seineNenndrehzahlauseinander fliegtund Verletzungen verursachen.
LaufrichtungFÜRDRUMSANDING
FütternSie das Werkstück in eineSchleifwalzeoder andere zugelasseneZubehörteil,gegen dieDrehrichtung.
EinRückschlagauftritt, wenndas Werkstückplötzlichan der Schneidkantedes Werkzeugsbindet und das
Werkstück wirddurch die Schneideinrichtungin Richtungdes CuttersDrehunggeworfen.Dies kannschwere
Verletzungen verursachen.
DENKEN SIE SICHER NACH
SICHERHEITist eine Kombination ausOPERATORCOMMONSENSEund Wachsamkeitjederzeit, wenndie
Bohrmaschineverwendet wird.
Lassen Sie keineVertrautheit(gewonnendurch häufigeNutzung IhrerBohrmaschine) zu alltäglich
geworden.Denken Sie immer daran, dass ein unvorsichtigerBruchteil einer Sekundeaus, umschwere
Verletzungenzuzufügen.
DerBetrieb einesElektrowerkzeugsin ausländischenObjekte, diein die Augengeworfen werden, was kann
zu schwerenAugenschäden führen.Tragen Sie immer eineSchutzbrillevor BeginnElektrowerkzeugBetrieb.
EinigeSchäden von Maschinen zum Schleifen, Sägen, Schleifen, Bohrenund
andereBauaktivitätenerstellt wurde, es enthältChemikalien, dieKrebs, Geburtsschädenoder andere
reproduktive Schädenverursachen.Einige Beispiele für dieseChemikalien sind:
(1) vonbleihaltigenLackenBlei,
(2)die Kristalline Kieselsäureaus Ziegeln undZement und anderenBaustoffen und
(3)Arsen undChrom aus chemischbehandeltem Holz.
D

D
Drill Press MPBDP16 User Manual
20
IhrRisiko aus diesenPositionenvariiert,je nachdem, wieoft Siediese Art von Arbeit. Arbeiten in einem
gutbelüfteten Raumundarbeiten mitanerkannten sicherheitstechnischenAusrüstung,
wiedieseStaubmasken, diespeziell aufherauszufilternmikroskopisch kleine Partikel: Um Ihre Exposition
gegenüber diesen Chemikalienzu reduzieren. SYMBOLE
Lesen Sie die Bedienungsanleitung
Warnung
Tragen Sie eine Schutzbrille
Tragen Sie Gehörschutz
Staubschutzmaske tragen
Entsorgen nicht Ausgediente Altgeräte, bitte im Haushaltsabfall
Halten Sie Ihre Hände und Füße
aus allen Öffnungen
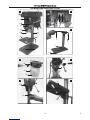
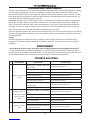
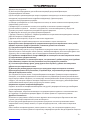
OPERATING INSTRUCTION
1 2
3
7
6
17
10
13
4
16
15 8
5
9
1
15 20
19 18
4
5
3
1
11
D
A página está carregando...
A página está carregando...
A página está carregando...
A página está carregando...
A página está carregando...
A página está carregando...
A página está carregando...
A página está carregando...
A página está carregando...
A página está carregando...
A página está carregando...
A página está carregando...
A página está carregando...
A página está carregando...
A página está carregando...
A página está carregando...
A página está carregando...
A página está carregando...
A página está carregando...
A página está carregando...
A página está carregando...
A página está carregando...
A página está carregando...
A página está carregando...
A página está carregando...
A página está carregando...
A página está carregando...
A página está carregando...
A página está carregando...
A página está carregando...
A página está carregando...
A página está carregando...
A página está carregando...
A página está carregando...
A página está carregando...
A página está carregando...
A página está carregando...
A página está carregando...
A página está carregando...
A página está carregando...
A página está carregando...
A página está carregando...
A página está carregando...
A página está carregando...
A página está carregando...
A página está carregando...
A página está carregando...
A página está carregando...
A página está carregando...
A página está carregando...
A página está carregando...
A página está carregando...
A página está carregando...
A página está carregando...
A página está carregando...
A página está carregando...
A página está carregando...
A página está carregando...
A página está carregando...
A página está carregando...
A página está carregando...
A página está carregando...
A página está carregando...
A página está carregando...
A página está carregando...
A página está carregando...
A página está carregando...
A página está carregando...
A página está carregando...
A página está carregando...
A página está carregando...
A página está carregando...
A página está carregando...
A página está carregando...
A página está carregando...
A página está carregando...
A página está carregando...
A página está carregando...
A página está carregando...
A página está carregando...
A página está carregando...
A página está carregando...
A página está carregando...
A página está carregando...
A página está carregando...
A página está carregando...
A página está carregando...
A página está carregando...
A página está carregando...
A página está carregando...
A página está carregando...
A página está carregando...
-
 1
1
-
 2
2
-
 3
3
-
 4
4
-
 5
5
-
 6
6
-
 7
7
-
 8
8
-
 9
9
-
 10
10
-
 11
11
-
 12
12
-
 13
13
-
 14
14
-
 15
15
-
 16
16
-
 17
17
-
 18
18
-
 19
19
-
 20
20
-
 21
21
-
 22
22
-
 23
23
-
 24
24
-
 25
25
-
 26
26
-
 27
27
-
 28
28
-
 29
29
-
 30
30
-
 31
31
-
 32
32
-
 33
33
-
 34
34
-
 35
35
-
 36
36
-
 37
37
-
 38
38
-
 39
39
-
 40
40
-
 41
41
-
 42
42
-
 43
43
-
 44
44
-
 45
45
-
 46
46
-
 47
47
-
 48
48
-
 49
49
-
 50
50
-
 51
51
-
 52
52
-
 53
53
-
 54
54
-
 55
55
-
 56
56
-
 57
57
-
 58
58
-
 59
59
-
 60
60
-
 61
61
-
 62
62
-
 63
63
-
 64
64
-
 65
65
-
 66
66
-
 67
67
-
 68
68
-
 69
69
-
 70
70
-
 71
71
-
 72
72
-
 73
73
-
 74
74
-
 75
75
-
 76
76
-
 77
77
-
 78
78
-
 79
79
-
 80
80
-
 81
81
-
 82
82
-
 83
83
-
 84
84
-
 85
85
-
 86
86
-
 87
87
-
 88
88
-
 89
89
-
 90
90
-
 91
91
-
 92
92
-
 93
93
-
 94
94
-
 95
95
-
 96
96
-
 97
97
-
 98
98
-
 99
99
-
 100
100
-
 101
101
-
 102
102
-
 103
103
-
 104
104
-
 105
105
-
 106
106
-
 107
107
-
 108
108
-
 109
109
-
 110
110
-
 111
111
-
 112
112


MaxPro MPBDP16 Manual do usuário
- Categoria
- Ferramentas elétricas
- Tipo
- Manual do usuário
em outras línguas
- español: MaxPro MPBDP16 Manual de usuario
- français: MaxPro MPBDP16 Manuel utilisateur
Outros documentos
-
Surtek TB658B Manual do proprietário
-
Delta 638517-00 Manual do usuário
-
EINHELL TC-BD 500 Manual do usuário
-
Hilti DD 150-U Instruções de operação
-
Hilti DD 160 Instruções de operação
-
-
Hilti DD 120 Instruções de operação
-
-
-
Hilti DD 350-CA Instruções de operação