Create THERA RETRO Manual do usuário
- Categoria
- Cafeteiras
- Tipo
- Manual do usuário

ESPRESSO COFFEE MACHINE
CAFETERA ESPRESSO
USER MANUAL
THERA RETRO
80
40
0
ºC


4
INDEX
ENGLISH
Important safeguards 6
Part list 7
Control panel 7
Placing the filter 8
Before first use 8
Preheating 9
Making espresso coffee 9
Preparing a cappuccino 10
How to use the vaporizer arm 10
Automatic power off function 11
Cleaning and maintenance 11
Descaling your coffee maker 11
Troubleshooting 12
ESPAÑOL
Instrucciones de seguridad 13
Listado de partes 14
Panel de control 15
Colocar el filtro 15
Antes del primer uso 15
Precalentar la cafetera 16
Preparar un café expreso 16
Preparar un capuchino 17
Como usar el brazo vaporizador 18
Función de apagado automático 18
Limpieza y mantenimiento 18
Descalcificar la cafetera 18
Resolución de problemas 19
PORTUGÊS
Instruções de segurança 21
Lista de peças 22
Painel de controlo 22
Colocar o filtro 23
Antes da primeira utilização 23
Pré-aquecer a máquina de café 24
Preparar um café espresso 24
Preparar um cappuccino 25
Como usar o braço vaporizador 25
Função para desligar automaticamente 26
Limpeza e manutenção 26
Descalcificar a máquina de café 26
Resolução de problemas 27
FRANÇAIS
Consignes de sécurité 28
Liste des pièces 29
Panneau de contrôle 30
Placer le filtre 30
Avant la première utilisation 30
Préchauffer la cafetière 31
Préparer un café expresso 31
Préparer un cappuccino 32
Comment utiliser le bras vaporisateur 33
Fonction arrêt automatique 33
Nettoyage et entretien 33
Détartrer la cafetière 34
Résolution de problèmes 34
THERA RETRO

5
ITALIANO
Istruzioni di sicurezza 36
Lista dei componenti 37
Pannello di controllo 37
Collegare il filtro 38
Primo utilizzo 38
Preriscaldare la macchina del caffè 39
Preparare un caffè espresso 39
Preparare un cappuccino 40
Come usare il braccio vaporizzatore 40
Funzione spegnimento automatico 41
Pulizia e manutenzione 41
Decalcificare la macchina del caffè 41
Risoluzione dei problemi 42
DEUTSCH
Sicherheitshinweise 43
Teileliste 44
Bedienfeld 45
Siebträger einsetzen 45
Vor der ersten benutzung 45
Die kaffeemaschine vorheizen 46
Einen espresso zubereiten 47
Cappuccino zubereiten 47
Wie man den verdampferarm benutzt 48
Funktion automatische abschaltung 48
Reinigung und pflege 48
Die kaffeemaschine entkalken 49
Problemlösung 49
NEDERLANDS
Beveiligingsinstructies 51
Onderdelenlijst 52
Configuratiescherm 52
Plaats het filter 53
Voor het eerste gebruik 53
Verwarm de koffiezetter 54
Bereid een uitdrukkelijke koffie 54
Bereid een cappuccino 55
Het gebruik van de arm van de verdamper 55
Automatische uitschakelfunctie 56
Reiniging en onderhoud 56
De koffiezeteler ontkalken 56
Problemen oplossen 57
POLSKI
Instrukcje bezpieczeństwa 58
Lista części 59
Panel sterowania 60
Umieść filtr 60
Przed pierwszym użyciem 60
Rozgrzewaj kawę do kawy 61
Przygotuj kawę ekspresową 62
Przygotuj cappuccino 62
Jak korzystać z ramienia parownika 63
Funkcja automatycznego wyłączania 63
Czyszczenie i konserwacja 63
Odwalkuj producenta kawy 64
Rozwiązywanie problemów 64
INDEX
THERA RETRO

6ENGLISH
IMPORTANT SAFEGUARDS
Thank you for choosing our coffee maker. Before using the appliance, and to ensure the best
use, carefully read these instructions.
The safety precautions enclosed herein reduce the risk of death, injury and electrical shock
when correctly adhered to. Keep the manual in a safe place for future reference, along with the
completed warranty card, purchase receipt and package. If applicable, pass these instructions
on to the next owner of the appliance. Always follow basic safety precautions and accident-pre-
vention measures when using an electrical appliance. We assume no liability for customer fail-
ing to comply with these requirements.
Before using this electrical appliance basic precautions should always be
followed:
•
Ensure that the voltage indicated on the Technical Specication matches
the mains voltage before plugging in the appliance.
•
The appliance must be earthed.
•
Never lift up, carry or unplug the appliance by pulling from the power
cord.
•
The steam is extremely hot and can burn. Please, handle with care.
•
Never operate the coffee machine without water.
•
Children should be supervised to ensure that they don’t play with the ap-
pliance.
•
This appliance can be used by children and persons with reduced physi-
cal, sensory or mental capabilities or lack of experience and knowledge if
they have been given supervision or instruction concerning the use of the
appliance in a safe way and understand the hazards involved.
•
Do not place the coffee maker on hot surfaces or next to open re, as it
can cause damage to the appliance.
•
Remove the plug from the power outlet before cleaning or when idle. Al-
low the appliance to cool down completely before removing and/or at-
taching components, and before cleaning.
•
Do not pick up or operate the appliance if the power supply cord or the
plug are damaged, or if the coffee maker is malfunctioning or has been
dropped or damaged in any way. In case of damage, contact the after-
sales service. A damaged cord or plug must be exclusively replaced by
the manufacturer or a qualied person in order to avoid injuries.
•
Do not use any accessories not recommended by the manufacturer, as it
may cause injury to persons or damage to the appliance.
•
Place the appliance on a at surface or table, do not hang the power cord
over the edge of the table or counter.
•
Make sure the power cord does not come into contact with the hot sur-
face of the appliance.
ENGLISH

7
ENGLISH
•
Some parts of the appliance get hot when in use, avoid direct contact.
•
Do not immerse the appliance or the power cord into water or any other
liquids. Should the appliance fall into water, immediately unplug it from
the mains and have the appliance checked by an expert before using it
again. It may cause re, electric shock, injury or death.
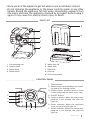
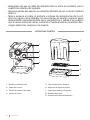
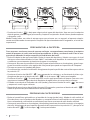
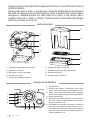
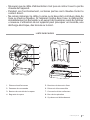
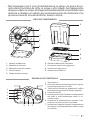
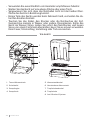
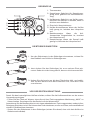
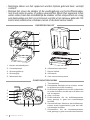
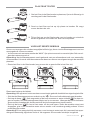
PART LIST
1. Cup warming tray
2. Control panel
3. Steam knob
4. Steam wand
5. Water tank lid
6. Water tank
7. Drip plate
8. Drip tray
9. Anti-ood system
1
2
3
4
00
8080
4040
00
ºCºC
5
6
7
8
9
CONTROL PANEL
1. Thermometer.
2. Steam button: pressed down for steam-
ing and up for making coffee.
3. Coffee button: pressed down to make
coffee and pump hot water, up to stop.
4. ON/OFF button.
5. Coffee indicator. When the water tem-
perature is hot enough, the pilot will
light up.
6. Power indicator. When the appliance
turns on, the pilot will light up.
7. Steam indicator. When the steam tem-
perature is hot enough, the pilot will
light up.
1
5
2
6
3
7
4
00
8080
4040
00
ºCºC

8ENGLISH
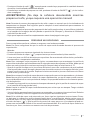
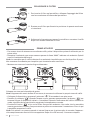
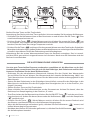
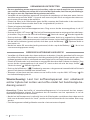
PLACING THE FILTER
BEFORE FIRST USE
• To ensure you get the best coffee possible, please rinse the coffee maker before its rst use.
• Fill up the tank with water without exceeding the “MAX” line marked on the tank. Then cover
the water tank.
Note: The appliance is supplied with a detachable tank to allow for easy cleaning. You can
detach the tank to ll it up and then place it back into the appliance.
• Place the lter in the lter holder (make sure there’s no coffee in the lter).
• Place a mug on the drip tray.
Note: The appliance is not equipped with a mug; please use your own coffee mug.
• Plug the coffee machine in and press the ON/OFF button “ ”. A red indicator light will turn
on. Press the coffee button “ ”. As soon as water starts coming out press the coffee button
“ ” again and the machine will start preheating. When the coffee indicator lights green, it
means the temperature is hot enough.
• Press the coffee button “ ” and allow the entire tank of water to ow out. Once the machine
is no longer dripping, pour out the processed water and clean the container thoroughly. Now
you can start brewing.
Note: There may be a noise when pumping the water out for the rst time, it is normal; the appli-
ance is simply releasing trapped air. After approximately 20 seconds, the noise will disappear.
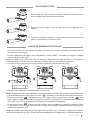
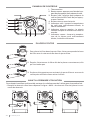
1. To insert the lter in the lter holder, please align the notch on
the lter with the ridge inside the lter holder.
2. Now turn the lter to lock it in place. This will secure the lter in
the lter holder.
80
40
0
ºC
80
40
0
ºC
80
40
0
ºC
3. Lift the tab to hold the lter holder and shake out the coffee
after use without removing the lter.

9
ENGLISH
PREHEATING
To make a good cup of hot espresso, we recommend preheating the appliance before brewing
coffee; this includes the lter holder, lter and your coffee mug. This will ensure you obtain the
best coffee drinking experience.
• Remove the detachable water tank from the appliance. Remove the lid from the tank and ll
it with water, the water level should never exceed the “MAX” line marked on the tank. Then
correctly attach the water tank back to the appliance.
• Place the lter into the lter holder (without any coffee), then insert the lter holder into the
appliance and turn it anticlockwise until it is at the “lock” position.
• Place your cup on the drip tray.
• Then connect the appliance to a power supply source. Make sure the steam control knob is
set to the “0” position.
• Press the ON/OFF button “ ” to turn on the unit, the power indicator (red) will light up. Make
sure that neither the coffee button “ ” nor the steam button “ ” are pressed down.
• Press down the coffee button “ ”. As soon as water starts coming out press the coffee but-
ton “ ” again. The purpose of this step is to pump the water from the tank into the housing.
• When the coffee indicator turns on (green), press the coffee button “ ” down again and hot
water will start owing out.
• After water has own for 20 seconds, press the coffee button “ ”. Now the preheating
process is nished.
MAKING ESPRESSO COFFEE
• Remove the lter holder by turning it clockwise. Place the lter in the lter holder, ll it with
ground coffee using the measuring spoon and compress the ground coffee tightly with the
tamper. A scoop of ground coffee is enough to make a cup of high-quality coffee.
• Place the lter holder in the machine and lock it by turning it in an anticlockwise direction.
• Make sure that the steam knob is at the “0” position and that neither the coffee button “ ”
nor the steam button “ ” are pressed down.
• Press the coffee button “ ” manually when you have brewed the desired amount of coffee
or if it’s coming out too diluted.
• Once you have nished brewing your coffee, press the ON/OFF button “ ” and the power
indicator light will turn off.
WARNING: Do not leave the coffee maker unattended while mak-
ing coffee, as it requires manual operation!
Note: During the brewing or steaming process, it is normal that the temperature light turns
off. This means the machine is heating up to keep the temperature at the standard range.
• Once the coffee making process is complete, you can remove the lter holder by turning it
clockwise from its “Lock” position and discard the coffee residue from the steel lter.
• Allow the appliance to cool down completely before rinsing it under running water.

10 ENGLISH
PREPARING A CAPPUCCINO
HOW TO USE THE VAPORIZER ARM
You can achieve the perfect cappuccino by topping up an espresso with frothed milk.
Note: please make sure the steam wand is assembled during the steaming process.
Method:
• First, prepare your espresso following the instructions.
• Press the steam button “ ” and wait until the yellow indicator light is on.
• Fill a pitcher with 100ml of milk per cappuccino. We recommend you use room temperature
whole fat milk.
Note: In order to get better milk foam, we recommend you keep the steam knob open for ap-
proximately 15 seconds before steaming your milk, since the early steam contains too much
water. Then turn the knob back to the “0” position.
• Insert the steam wand into the pitcher about two centimetres deep. Turn the knob slowly an-
ticlockwise and steam will start coming out from the steam wand. Froth the milk by moving
the pitcher in circular up and down motions.
Note: Never touch the steam wand during operation to avoid burns and other injuries.
Note: Never turn the steam control knob quickly, as steam can accumulate rapidly in a short
period of time, which may result in the potential increase of explosion.
• When you have achieved your desired foam consistency, turn the steam control knob clock-
wise.
Note: Clean the steam outlet immediately after frothing to avoid clotting it. Be careful not to
burn yourself.
• Pour the frothed milk into the prepared espresso and your cappuccino is ready! Sweeten to
your desired taste and top your cappuccino with a sprinkle of cocoa powder.
Note: If the steam outlet is clotted, please follow these instructions.
• First, allow the coffee machine to cool down for about half an hour, then poke the steam
outlet several times with a needle of about 1mm in diameter. Finally, press the coffee/
steam button “ ” and turn on the steam knob to check if the appliance can produce
steam normally when the yellow indicator light is on.
If the steamer still doesn’t work, please, contact our aftersales service.
• Remove the detachable water tank from the appliance. Remove the lid from the tank and ll
it with water, the water level should never exceed the “MAX” line marked on the tank. Then
correctly attach the water tank back to the appliance.
• Plug the appliance to the mains and turn it on by pressing the ON/OFF button “ ”. The red
indicator light will turn on.
• Make sure the steam button “ ” is not pressed, then press the coffee button “ ”. When
there is water owing out, close the pump immediately.
• Press the steam button “ ” and wait until the YELLOW indicator light is on.
• Insert the steam wand two centimetres deep into the pitcher. Turn the steam control knob
slowly anticlockwise and steam will start coming out from the steam wand.
• When you have achieved your desired foam consistency, turn the steam control knob clock-
wise.
Note: Clean the steam outlet immediately after frothing to avoid clotting it. Be careful not to
burn yourself.
• To turn the appliance off just press the ON/OFF button “ ”.
Note: If the steam outlet is clotted, please follow these instructions. First, allow the coffee
machine to cool down for about half an hour, then poke the steam outlet several times with a
needle of about 1mm in diameter.

11
ENGLISH
AUTOMATIC POWER OFF FUNCTION
CLEANING AND MAINTENANCE
DESCALING YOUR COFFEE MAKER
The appliance will turn off automatically 29 minutes after pressing the ON/OFF button “ ”.
• Unplug the coffee maker and allow it to cool down completely before cleaning it.
• Clean the coffee maker housing with a damp cloth regularly and rinse the water tank, drip
tray and removable shelf and dry them right after.
Note: Do not clean the appliance with alcohol or any solvent cleaning products. Never im-
merse the housing in water for cleaning.
• Detach the metal lter holder by turning it clockwise, discard coffee residue inside, then
you can clean the lter holder with a mild cleanser and rinse it with clear water.
• Clean all the attachments and dry thoroughly.
Note: Do not wash the portalter arm or the lter in a dishwasher.
1. To make sure your coffee maker is operating efciently, make sure you are regularly cleaning
the internal piping. You should decalcify your coffee machine every 1-2 months to ensure the
best coffee avour.
2. Fill the water tank with a solution of water and descaler to the MAX level (the ratio of water to
descaler should be 4:1; please refer to the instructions on the label of your descaler).
3. Follow the same instructions as for the preheating process and place the metal and pitcher
or cup of choice in place.
4. Press the ON/OFF button “ ” to turn on the appliance and the power indicator will light up
red. Make sure the steam button “ ” is not pressed, then press the coffee button ” ”.
When there is water owing out, close the pump immediately. Now the appliance is heating.
5. When the green light turns on the appliance will be heated. Now press the coffee button “
” and brew two cups worth of descaler (about 2oz). Then close the pump and wait 5 seconds.
6. Press the steam button “ ” and wait until the yellow indicator light is on. Make steam for 2
min., then turn the steam knob to the “0” position. Press the ON/OFF button “ ” to turn the
unit off immediately and let the descaler sit in the unit for at least 15 minutes.
7. Restart the unit and repeat the steps 4-6 at least 3 times.
8. Make sure that neither the coffee button “ ” nor the steam button “ ” are pressed down.
When the green light comes on, press the coffee button “ ” down and brew until there
isn’t any descaler left.
9. Now repeat steps 4-6 with tap water (without descaler). Then brew until there isn’t any water
left in the tank.
10. Repeat step 9 at least 3 times to make sure the piping is clean.
• Finally, Press the coffee/steam button “ ” and turn on the steam knob to check if the ap-
pliance can produce steam normally when the yellow indicator light is on.
• If the steamer still doesn’t work, please, contact our aftersales service.

12 ENGLISH
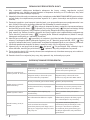
TROUBLESHOOTING
PROBLEM CAUSE SOLUTION
The tank is leaking or
water is seeping out from
the tank
The tank is not positioned properly. Allow the centre of the tank to align
with the opening of the main body.
The volume of water in the tank
exceeds the indicated MAX line.
The water volume in the tank should
be within the MIN and MAX line
indicators.
Water is leaking from
the bottom of the coffee
maker.
There is too much water in the
drip tray. Please empty the drip tray.
There is a malfunction with the
coffee maker
Please contact the authorized ser-
vice facility for repairing.
Water is leaking from the
outer side of the lter.
There is coffee powder residue on
the filter edge. Clean any excess coffee or residue.
Acidic (vinegary) after-
taste in the Espresso
coffee.
You haven’t decalcified the ma-
chine properly.
Decalcify the coffee machine follow-
ing the instructions in this manual.
If ground coffee is stored in a hot,
damp place for a long period of
time, the coffee will turn bad.
Please use fresh coffee grinds, or
store coffee in a cool, dry place.
After opening a package of coffee
grinds, store it in an air tight contain-
er to maintain its freshness.
The coffee maker does
not work.
The power outlet is not connected
correctly.
Plug the power cord into a wall
outlet correctly. If the appliance
still does not work, please contact
the authorized service facility for
repairing.
The steamer does not
froth.
The steam ready indicator is not
lighting up.
Only after the steam ready indicator
is illuminated, can the steamer be
used to froth.
The frothing jug is too big or the
shape is not compatible Use a high cylindrical pitcher.
The steam indicator has a
yellow light. Overheating.
It is necessary to release a little hot
water with the knob. When the light
goes out, it can be used again to boil
the coffee.
Do not attempt to disassemble the appliance by yourself. If you are experiencing any mal-
function, please contact the aftersales service.
In compliance with Directives: 2012/19/EU and 2015/863/EU on the restriction of the use of dangerous sub-
stances in electric and electronic equipment as well as their waste disposal. The symbol with the crossed
dustbin shown on the package indicates that the product at the end of its service life shall be collected as
separate waste. Therefore, any products that have reached the end of their useful life must be given to waste
disposal centres specialising in separate collection of waste electrical and electronic equipment, or given
back to the retailer at the time of purchasing new similar equipment, on a one for one basis. The adequate
separate collection for the subsequent start-up of the equipment sent to be recycled, treated and disposed
of in an environmentally compatible way contributes to preventing possible negative effects on the environ-
ment and health and optimises the recycling and reuse of components making up the apparatus. Abusive
disposal of the product by the user involves application of the administrative sanctions according to the laws.

13
ESPAÑOL
Gracias por elegir nuestra cafetera. Antes de utilizar este electrodoméstico y para asegurar su
mejor uso, por favor, lea detenidamente las instrucciones.
Las medidas de seguridad aquí indicadas reducen el riesgo de incendio, descarga eléctrica y
lesiones cuando se siguen correctamente. Guarde el manual en un lugar seguro para futuras
referencias, así como la garantía, el recibo de compra y la caja. Si procede, entregue estas ins-
trucciones al futuro propietario del electrodoméstico. Siempre siga las instrucciones básicas
de seguridad y las medidas de prevención de riesgos cuando utilice un electrodoméstico eléc-
trico. El fabricante no se responsabilizará de ningún daño derivado del incumplimiento de estas
instrucciones por parte del usuario.
INSTRUCCIONES DE SEGURIDAD
Al utilizar cualquier aparato eléctrico, deben observarse siempre las
siguientes precauciones básicas de seguridad.
•
Asegúrese de que el voltaje y la frecuencia del circuito corresponden a
los indicados en la etiqueta de clasicación del aparato.
•
El aparato debe estar conectado a una toma de tierra.
•
Nunca levante, transporte o desenchufe la cafetera tirando del cable
eléctrico.
•
El vapor sale ardiendo. Por favor, vaya con cuidado para no quemarse.
•
Nunca ponga la cafetera en funcionamiento si no tiene agua.
•
Los niños deben ser supervisados para asegurarse de que no juegan con
el aparato.
•
Este aparato puede ser utilizado tanto por niños como personas con ca-
pacidades físicas, sensoriales o mentales reducidas o con falta de expe-
riencia y conocimientos si han sido supervisados o instruidos en el uso
del aparato de una manera segura y comprenden los peligros que con-
lleva.
•
No deje que el cable cuelgue sobre el borde de una mesa o encimera. No
permita que entre en contacto con supercies calientes, evite la proximi-
dad a fuegos abiertos y todo tipo de calor y fuentes de ignición.
•
Retire el enchufe de la toma de corriente antes de limpiarla o cuando
esté inactiva. Deje que el aparato se enfríe completamente antes de qui-
tar y/o jar los componentes y antes de limpiarlo.
•
No levante ni opere el electrodoméstico si el cable de alimentación o el
enchufe están dañados, o si la cafetera está funcionando mal o se ha caí-
do o dañado de alguna manera. En caso de daños, póngase en contacto
con el servicio postventa. Un cable o enchufe dañado debe ser sustituido
exclusivamente por el fabricante o por una persona cualicada para evi-
tar lesiones.
•
Utilice únicamente accesorios recomendados por el fabricante.
•
Coloque el aparato sobre una supercie plana o mesa.
ESPAÑOL

14 ESPAÑOL
LISTADO DE PARTES
1. Bandeja calientatazas
2. Panel de control
3. Perilla de control del vapor
4. Varilla de vapor
5. Tapa del depósito de agua
6. Depósito de agua extraíble
7. Tapa de la bandeja de goteo
8. Bandeja de goteo
9. Sistema anti-desbordamiento
1
2
3
4
00
8080
4040
00
ºCºC
5
6
7
8
9
•
Asegúrese de que el cable de alimentación no entre en contacto con la
supercie caliente del aparato.
•
Algunas partes del aparato se calientan durante su uso, evite el contacto
directo.
•
Nunca sumerja el cable, el enchufe o la base de alimentación de la caf-
etera en agua u otros líquidos. En caso de que el aparato caiga en agua,
desenchúfelo inmediatamente de la red eléctrica y pídale a un experto
que lo revise antes de volver a utilizarlo. Puede provocar incendios, des-
cargas eléctricas, lesiones o la muerte.

15
ESPAÑOL
PANEL DE CONTROL
1. Termómetro.
2. Botón para vapor: Presionado para hacer
vapor, sin presionar para preparar café.
3. Botón para café: presionado para prepa-
rar café y hervir agua, sin presionar para
detenerla.
4. Botón de encendido/apagado.
5. Indicador de café: Cuando la temper-
atura del café esté lo sucientemente
caliente, el piloto se encenderá.
6. Indicador de encendido: Cuando la caf-
etera se encienda, el piloto se iluminará.
7. Indicador de vapor: Cuando la temper-
atura del vapor esté lo sucientemente
caliente, el piloto se encenderá.
1
5
2
6
3
7
4
00
8080
4040
00
ºCºC
COLOCAR EL FILTRO
1. Para introducir el ltro en el portaltros, por favor, alinee la cuña
del ltro con la ranura del interior del portaltros.
2. Ahora gire el ltro para asegurarlo en su sitio. Esto asegurará
que no se caiga.
ANTES DEL PRIMER USO
• Para asegurarse de que obtiene el mejor café posible, por favor limpie la cafetera antes de
su primer uso.
• Llene el depósito con agua sin sobrepasar la línea “MAX” marcada en el depósito. Luego
cubra el depósito de agua.
Nota: La cafetera viene con un depósito desmontable para facilitar su limpieza. Puede des-
montar el depósito para llenarlo y luego volver a colocarlo en la máquina.
• Coloque el ltro en el portaltros (asegúrese de que no haya café en el ltro).
• Coloque una taza en la bandeja de goteo.
Nota: El aparato no está equipado con una taza; por favor, use su propia taza de café.
• Enchufe la cafetera y pulse el botón “ ”. Se encenderá una luz indicadora roja.
• Presione el botón “ ”. Cuando esté saliendo agua, vuelva a presionar el botón “ ” para
detenerla. Ahora la cafetera empezará a calentarse. Cuando el indicador de café se ilumine
en verde signicará que la máquina ha alcanzado la temperatura adecuada.
3. Levante la pestaña para sujetar el portaltros y vaciar sacudi-
endo el café, después de su uso, sin quitar el ltro.

16 ESPAÑOL
PRECALENTAR LA CAFETERA
Para preparar una buena taza de expreso caliente, recomendamos precalentar la máquina
antes de preparar el café; esto incluye el portaltros, el ltro y su taza de café. Esto le ase-
gurará que obtendrá la mejor experiencia de disfrutar del café.
• Retire el depósito de agua extraíble. Retire la tapa del depósito y llénelo con agua, el nivel
del agua nunca debe exceder la línea “MAX” marcada en el depósito. A continuación, vuelva
a conectar correctamente el depósito de agua a la máquina.
• Coloque el ltro en el portaltros (sin café), monte el portaltros en la máquina y gire el man-
go en el sentido contrario a las agujas del reloj hasta que quede en la posición de “bloqueo”.
• Coloque su taza en la bandeja de goteo.
• A continuación, enchufe la cafetera. Asegúrese de que la perilla de control de vapor esté en
la posición “0”.
• Presione el botón de ON/OFF “ ” para encender la cafetera y se iluminará el piloto rojo.
Asegúrese de que ni el botón de café “ ” ni el de vapor “ ” estén presionados.
• Presione el botón “ ”. Cuando empiece a salir agua presiónelo de nuevo. Con esto con-
seguiremos bombear agua desde el depósito de agua hasta el cuerpo de la cafetera.
• Cuando se encienda el indicador de café (verde), presione el botón de café “ ” de nuevo
y empezará a salir agua caliente.
• Después de que el agua haya uido durante 20 segundos, presione el botón de café “ ”.
Ahora el proceso de precalentamiento ha terminado.
PREPARAR UN CAFÉ EXPRESO
• Retire el portaltros girándolo en el sentido de las agujas del reloj. Añada el café molido al
ltro de acero con la cuchara dosicadora y comprima bien el café molido con el prensador.
Una cucharada de café molido es suciente para hacer una taza de café de alta calidad.
• Coloque el portaltros en la máquina y bloquéelo girando en el sentido contrario a las agujas
del reloj. Asegúrese de que la perilla de control del vapor está en la posición “0” y de que ni el
botón de café “ ” ni el de vapor “ ” estén presionados.
• Presione el botón “ ” y deje que salga toda el agua del depósito. Una vez que la máquina
deje de gotear, vierta el agua procesada y limpie el recipiente a fondo. Ahora puede empezar
a preparar café.
Nota: Puede haber un ruido al extraer agua por primera vez, es normal; el aparato simple-
mente está liberando aire atrapado. Después de aproximadamente 20 segundos, el ruido de-
saparecerá.
80
40
0
ºC
80
40
0
ºC
80
40
0
ºC

17
ESPAÑOL
PREPARAR UN CAPUCHINO
Para un capuchino perfecto, rellene un espresso con leche espumada.
Nota: Por favor, asegúrese de que la varilla de vapor esté montada durante el proceso de
vaporización.
Método:
• Primero, prepare su espresso siguiendo las instrucciones.
• Presione el botón de vapor “ ” y espere hasta que se encienda el piloto amarillo.
• Llene una jarra con 100 ml de leche por capuchino. Se recomienda utilizar leche, preferible-
mente entera, a temperatura ambiente.
Nota: Para conseguir mejor espuma de leche, recomendamos que mantengan la perilla de
vapor abierta durante aproximadamente 15 segundos antes de espumar su leche, dado que el
vapor que sale al principio contiene mucha agua. Después baje el nivel hasta el “0”.
• Inserte la varilla de vapor en la jarra llena de leche a unos dos centímetros de profundidad.
Gire la perilla de control de vapor despacio en el sentido contrario a las agujas del reloj y em-
pezará a salir vapor de la varilla. Espume la leche moviendo la jarra en mociones circulares
hacia arriba y hacia abajo.
Nota: Nunca toque la varilla de vapor durante su operación para evitar quemaduras y lesiones.
Nota: Nunca gire la perilla de control de vapor rápidamente, ya que el vapor puede acumu-
larse rápidamente en un corto periodo de tiempo, lo que puede resultar en un aumento poten-
cial de explosión.
• Cuando haya logrado la consistencia de espuma deseada, gire la perilla de control de vapor
en el sentido de las agujas del reloj.
Nota: Limpie la salida de vapor inmediatamente para evitar que se atasque. Tenga cuidado
para no quemarse.
• Vierta la leche espumada en el espresso ya preparado y ¡su cappuccino estará listo! Endulce
al gusto deseado y cubra su cappuccino con un poco de cacao en polvo.
Nota: Si la salida de vapor está atascada, por favor siga las siguientes instrucciones: Prime-
ro, deje que la cafetera se enfríe durante media hora, a continuación, pinche varias veces la
salida de vapor con una aguja de aproximadamente 1 mm de diámetro. Finalmente, presione
el botón de vapor “ ” y gire la perilla de control de vapor para ver si la máquina puede es-
pumar con normalidad cuando la luz amarilla esté encendida. Si la varilla de vapor todavía no
funciona, por favor, contacte con nuestro servicio de postventa.
• Presione el botón de café “ ” manualmente cuando haya preparado la cantidad deseada
de café o si está saliendo demasiado diluido.
• Cuando haya acabado de preparar su café, presione el botón de ON/OFF “ ” y la luz indica-
dora se apagará.
ADVERTENCIA: ¡No deje la cafetera desatendida mientras
prepara el café, ya que requiere una operación manual!
Nota: Durante el proceso de preparación de café o vapor, es normal que la luz indicadora de
temperatura se apague. Esto signica que la máquina se está calentando para mantener la
temperatura estándar.
• Una vez nalizado el proceso de preparación del café, puede retirar el portaltros girándolo
en el sentido de las agujas del reloj desde su posición de “Bloqueo” y desechar el residuo de
café del ltro de acero.
• Deje que el aparato se enfríe completamente antes de enjuagarlo con agua.

18 ESPAÑOL
COMO USAR EL BRAZO VAPORIZADOR
• Retire el depósito de agua desmontable del aparato. Retire la tapa del depósito y llénelo con
agua, el nivel del agua nunca debe exceder la línea “MAX” marcada en el depósito. A continu-
ación, vuelva a colocar el depósito de agua.
• Conecte el aparato a la red eléctrica y enciéndalo pulsando el botón ON/OFF “ ”. Se encend-
erá el piloto rojo.
• Presione el botón de café “ ” y asegúrese de que el botón de vapor “ ”no está presiona-
do. Cuando empiece a salir agua, deténgalo de inmediato.
• Presione el botón de vapor “ ” y espere hasta que se encienda el piloto amarillo.
• Inserte la varilla de vapor en la jarra a unos dos centímetros de profundidad. Gire la perilla
de control de vapor despacio en el sentido contrario a las agujas del reloj y empezará a salir
vapor de la varilla.
• Cuando haya logrado la consistencia de espuma deseada, gire la perilla de control de vapor en
el sentido de las agujas del reloj.
Nota: Limpie la salida de vapor inmediatamente para evitar que se atasque. Tenga cuidado para
no quemarse.
• Para apagar la cafetera, simplemente presione el botón de ON/OFF “ ”.
Nota: Si la salida de vapor está atascada, por favor siga las siguientes instrucciones: Primero,
deje que la cafetera se enfríe durante media hora, a continuación, pinche varias veces la salida de
vapor con una aguja de aproximadamente 1 mm de diámetro.
• Finalmente, presione el botón de vapor “ ” y gire la perilla de control de vapor para
ver si la máquina puede espumar con normalidad cuando la luz amarilla esté encendida.
Si la varilla de vapor todavía no funciona, por favor, contacte con nuestro servicio de postventa.
FUNCIÓN DE APAGADO AUTOMÁTICO
LIMPIEZA Y MANTENIMIENTO
DESCALCIFICAR LA CAFETERA
La cafetera se apagará automáticamente 29 minutos después de haber presionado el botón de
ON/OFF “ ”.
• Desenchufe la cafetera y deje que se enfríe completamente antes de limpiarla.
• Limpie regularmente la carcasa de la cafetera con un paño húmedo y enjuague el depósito
de agua, la bandeja de goteo y la bandeja extraíble y séquelos inmediatamente después.
Nota: No limpie el aparato con alcohol o disolventes. No sumerja nunca la carcasa en agua
para limpiarla.
• Desconecte el portaltros girándolo en sentido contrario a las agujas del reloj, deseche los
residuos de café de su interior, limpie el embudo con un limpiador suave y enjuáguelo com-
pletamente con agua limpia.
• Limpie todos los accesorios y séquelos bien.
Nota: Nunca lave el brazo portaltros ni el ltro en el lavavajillas.
1. Para asegurarse de que su cafetera funciona ecientemente, asegúrese de limpiar regu-
larmente las tuberías internas. Debe descalcicar su cafetera cada 2-3 meses para ase-
gurar que el café tenga el mejor sabor.
2. Llene el depósito de agua con una solución de agua y descalcicador hasta el nivel MÁXI-
MO (la proporción entre agua y descalcicador debe ser de 4:1; consulte las instrucciones
de la etiqueta de su descalcicador).
3. Siga las mismas instrucciones que para el proceso de precalentamiento y coloque el por-
taltros y la jarra o taza de su elección en su lugar.

19
ESPAÑOL
4. Presione el botón de ON/OFF “ ” para encender la cafetera y se iluminará el piloto rojo. Pre-
sione el botón de café “ ” y asegúrese de que el botón de vapor “ ”no está presionado.
Cuando empiece a salir agua, deténgalo de inmediato. Ahora la cafetera se está calentando.
5. Cuando se encienda el piloto verde la cafetera estará a la temperatura adecuada. Ahora
presione el botón de café “ ” y hierva dos tazas de descalcicador (unas 2oz.). Después
párelo y espere 5 segundos.
6. Presione el botón de vapor “ ” y espere hasta que se encienda el piloto amarillo. Haga vapor
durante 2 minutos y después gire la perilla de control hasta el “0”. Presione el botón de ON/
OFF “ ” para apagar la cafetera y deje que el decalcicador repose por lo menos 15 minutos.
7. Reinicie la cafetera y repita los pasos 4-6 por lo menos tres veces.
8. Asegúrese de que ni el botón de café “ ” ni el de vapor “ ” estén presionados. Cuando
se encienda el piloto verde, presione el botón de café “ ” y permita que salga todo el
descalcicador.
9. Ahora repita los pasos 4-6 con agua del grifo (sin descalcicador). Haga funcionar la
máquina hasta que no quede agua en el depósito.
10. Repita el paso 9 por lo menos tres veces para asegurarse de que los conductos estén limpios.
RESOLUCIÓN DE PROBLEMAS
PROBLEMA CAUSA SOLUCIÓN
El depósito tiene fugas o
el agua se está saliendo
del tanque.
El depósito no está colocado
correctamente.
Alinee el centro del depósito con la
abertura del cuerpo principal.
El volumen de agua en el depósito
excede la línea MAX indicada.
El volumen de agua en el depósito
debe estar dentro de los límites de
MIN y MAX.
El agua se está saliendo
del fondo de la cafetera.
Hay demasiada agua en la bandeja
de goteo. Por favor, vacíe la bandeja de goteo.
Hay una avería en la cafetera.
Póngase en contacto con el servicio
técnico autorizado para la repa-
ración.
El agua se está ltrando
por fuera del ltro.
Hay residuos de café en el borde
del filtro.
Limpie cualquier exceso de café o
residuos.
Gusto ácido (avinagrado)
en el café.
No ha descalcificado bien la
máquina.
Descalcifique la cafetera siguiendo
las instrucciones de este manual.
Si el café molido se guarda en un
lugar caliente y húmedo durante
un largo período de tiempo, el café
se vuelve malo.
Por favor, use café recién molido, o
guarde el café en un lugar fresco y
seco. Después de abrir un paquete
de café molido, guárdelo en un
recipiente hermético para mantener
su frescura.
La cafetera no funciona. La toma de corriente no está
conectada correctamente.
Enchufe el cable de alimentación
a una toma de corriente correcta-
mente. Si el aparato sigue sin
funcionar, póngase en contacto con
el servicio técnico autorizado para
su reparación.

20 ESPAÑOL
No intente desmontar el aparato usted solo. Si detecta algún problema de funcionamiento, póngase
en contacto con el servicio postventa.
En cumplimiento de las directivas: 2012/19 / UE y 2015/863 / UE sobre la restricción del uso de sustancias pe-
ligrosas en equipos eléctricos y electrónicos, así como su eliminación de residuos. El símbolo con el cubo de
basura cruzado que se muestra en el paquete indica que el producto al nal de su vida útil se recogerá como
residuo separado. Por lo tanto, cualquier producto que haya llegado al nal de su vida útil debe entregarse a
centros de eliminación de residuos especializados en la recogida selectiva de equipos eléctricos y electróni-
cos de desecho, o devolverse al minorista al momento de comprar equipos nuevos similares, en uno para Una
base. La recolección separada adecuada para la posterior puesta en marcha de los equipos enviados para
ser reciclados, tratados y eliminados de una manera compatible con el medio ambiente contribuye a prevenir
posibles efectos negativos sobre el medio ambiente y la salud y optimiza el reciclaje y la reutilización de los
componentes que componen el aparato. . La eliminación abusiva del producto por parte del usuario implica
la aplicación de las sanciones administrativas de acuerdo con las leyes.
PROBLEMA CAUSA SOLUCIÓN
El vaporizador no hace
espuma.
El indicador de vapor no se
enciende.
El vaporizador sólo se puede utilizar
para espumar cuando se encienda el
indicador de vapor.
La jarra de espuma es demasiado
grande o su forma no es compatible. Use una jarra cilíndrica alta.
El indicador de vapor
tiene la luz amarilla. Sobrecalentamiento.
Es necesario liberar un poco de agua
caliente con la perilla. Cuando se
apague la luz se puede volver a usar
para hervir el café.
A página está carregando...
A página está carregando...
A página está carregando...
A página está carregando...
A página está carregando...
A página está carregando...
A página está carregando...
A página está carregando...
A página está carregando...
A página está carregando...
A página está carregando...
A página está carregando...
A página está carregando...
A página está carregando...
A página está carregando...
A página está carregando...
A página está carregando...
A página está carregando...
A página está carregando...
A página está carregando...
A página está carregando...
A página está carregando...
A página está carregando...
A página está carregando...
A página está carregando...
A página está carregando...
A página está carregando...
A página está carregando...
A página está carregando...
A página está carregando...
A página está carregando...
A página está carregando...
A página está carregando...
A página está carregando...
A página está carregando...
A página está carregando...
A página está carregando...
A página está carregando...
A página está carregando...
A página está carregando...
A página está carregando...
A página está carregando...
A página está carregando...
A página está carregando...
A página está carregando...
A página está carregando...
A página está carregando...
A página está carregando...
-
 1
1
-
 2
2
-
 3
3
-
 4
4
-
 5
5
-
 6
6
-
 7
7
-
 8
8
-
 9
9
-
 10
10
-
 11
11
-
 12
12
-
 13
13
-
 14
14
-
 15
15
-
 16
16
-
 17
17
-
 18
18
-
 19
19
-
 20
20
-
 21
21
-
 22
22
-
 23
23
-
 24
24
-
 25
25
-
 26
26
-
 27
27
-
 28
28
-
 29
29
-
 30
30
-
 31
31
-
 32
32
-
 33
33
-
 34
34
-
 35
35
-
 36
36
-
 37
37
-
 38
38
-
 39
39
-
 40
40
-
 41
41
-
 42
42
-
 43
43
-
 44
44
-
 45
45
-
 46
46
-
 47
47
-
 48
48
-
 49
49
-
 50
50
-
 51
51
-
 52
52
-
 53
53
-
 54
54
-
 55
55
-
 56
56
-
 57
57
-
 58
58
-
 59
59
-
 60
60
-
 61
61
-
 62
62
-
 63
63
-
 64
64
-
 65
65
-
 66
66
-
 67
67
-
 68
68


Create THERA RETRO Manual do usuário
- Categoria
- Cafeteiras
- Tipo
- Manual do usuário
em outras línguas
- español: Create THERA RETRO Manual de usuario
- français: Create THERA RETRO Manuel utilisateur
- italiano: Create THERA RETRO Manuale utente
- Nederlands: Create THERA RETRO Handleiding
- Deutsch: Create THERA RETRO Benutzerhandbuch
- polski: Create THERA RETRO Instrukcja obsługi
Outros documentos
-
HAEGER CM-145.008A Manual do usuário
-
HAEGER Expresso Italia CM-85B.009A Manual do usuário
-
Tristar KZ-2271 Manual do usuário
-
UFESA CK7360 Operating Instructions Manual
-
UFESA CK7355 Manual do proprietário
-
Palson Arabica Manual do proprietário
-
Gaggia Milano RI9403 Classic Manual do usuário
-
Kenwood ES020 KMIX BLANC Manual do proprietário
-
Becken maquina de cafe expresso BECM2493 Manual do proprietário