Hoover DYN 8163D8P Manual do usuário
- Categoria
- Máquinas de lavar roupas
- Tipo
- Manual do usuário

Instruction
Book
Instructions for installation and use


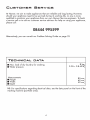
8 kg
0.05 ÷ 0.8 MPa
85 cm
60 cm
52 cm


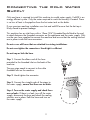
Unpacking the Product
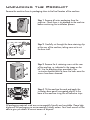
Remove the machine from its packaging close to the final location of the machine.
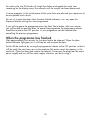
Step 1. Remove all outer packaging from the
machine. Check there is no damage to the machine
before continuing the installation process.
Step 2. Carefully cut through the hose-retaining clip
at the rear of the machine, taking care not to cut
the hose itself.
Step 3. Remove the 4 retaining screws at the rear
of the machine, as indicated in the image on the
left. Use the blanking plugs provided in the
instruction booklet pack to cover the holes once the
screws have been removed.
Step 4. Tilt the machine forward and apply the
insulation base panel (corrugated plastic) to the
base of the machine using the self-adhesive strips.
All packaging materials used are environmentally friendly and recyclable. Please help
dispose of the packaging via environmentally friendly means. Your local council will be
able to give you details of current means of disposal.
Installation
Before installing the machine, ensure that the mains plug and water supply valves are
easily accessible from your chosen machine location.
Make sure there is enough space for the machine. Select a space at least 600mm wide
and 850mm high. Also leave enough space to open the door fully so you can load
and unload it easily.
Keep the area underneath and around the machine free of combustible materials such
as lint, paper, rags, chemicals etc.
All machines are tested with water prior to leaving the factory, so a small amount of
water may be present in the drum and the drain hose.
Flooding may occur if any part of the installation process is not completed correctly.
Electricity Supply
Washing machines are supplied to operate at a voltage of 230-240V, 50 Hz single
phase. Please check that the supply circuit is rated to at least 13A.
The plug is already equipped with a 13A fuse, which is BS 1362 ASTA approved. Any
replacement must be the same rating and specification. If the fuse cover is lost, do not
use the plug until it is replaced.
Electricity can be extremely dangerous. Please take care when connecting your
machine to the electricity supply.
This washing machine must be earthed.
The socket outlet and the plug on the appliance must be of the same type.
Do not use multiple adapters and/or extension leads.
The wires in the mains lead are coloured in accordance with the following codes:
Blue NEUTRAL
Brown LIVE
Green and Yellow EARTH
Appliance complies with European Directive 73/23/EEC, 89/336/EEC
replaced by 2006/95/EC and 2004/108/EC and subsequent amendments.
8
9

Unpacking the Product
Remove the machine from its packaging close to the final location of the machine.
Step 1. Remove all outer packaging from the
machine. Check there is no damage to the machine
before continuing the installation process.
Step 2. Carefully cut through the hose-retaining clip
at the rear of the machine, taking care not to cut
the hose itself.
Step 3. Remove the 4 retaining screws at the rear
of the machine, as indicated in the image on the
left. Use the blanking plugs provided in the
instruction booklet pack to cover the holes once the
screws have been removed.
Step 4. Tilt the machine forward and apply the
insulation base panel (corrugated plastic) to the
base of the machine using the self-adhesive strips.
All packaging materials used are environmentally friendly and recyclable. Please help
dispose of the packaging via environmentally friendly means. Your local council will be
able to give you details of current means of disposal.
Installation
Before installing the machine, ensure that the mains plug and water supply valves are
easily accessible from your chosen machine location.
Make sure there is enough space for the machine. Select a space at least 600mm wide
and 850mm high. Also leave enough space to open the door fully so you can load
and unload it easily.
Keep the area underneath and around the machine free of combustible materials such
as lint, paper, rags, chemicals etc.
All machines are tested with water prior to leaving the factory, so a small amount of
water may be present in the drum and the drain hose.
Flooding may occur if any part of the installation process is not completed correctly.
Electricity Supply
Washing machines are supplied to operate at a voltage of 230-240V, 50 Hz single
phase. Please check that the supply circuit is rated to at least 13A.
The plug is already equipped with a 13A fuse, which is BS 1362 ASTA approved. Any
replacement must be the same rating and specification. If the fuse cover is lost, do not
use the plug until it is replaced.
Electricity can be extremely dangerous. Please take care when connecting your
machine to the electricity supply.
This washing machine must be earthed.
The socket outlet and the plug on the appliance must be of the same type.
Do not use multiple adapters and/or extension leads.
The wires in the mains lead are coloured in accordance with the following codes:
Blue NEUTRAL
Brown LIVE
Green and Yellow EARTH
Appliance complies with European Directive 73/23/EEC, 89/336/EEC
replaced by 2006/95/EC and 2004/108/EC and subsequent amendments.
8
9

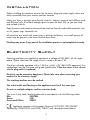
Water Supply
This machine should only be connected to a cold-water supply. The cold-water
pressure should be between 0.5 and 8 bar (0.05-0.8 Mpa).
Do not connect the machine to a single outlet instantaneous water heater.
Before connecting the fill hose, check that the water is running from the water supply
tap to be used. Let the water flow from the tap until the water runs clear before
connecting to the machine. The water supply tap should be accessible when the
machine is installed.
Connecting the Cold Water
Supply
Only one hose is required to install this machine to a cold water supply. Cold fill is an
energy efficient system. Only the water required to wash the laundry is heated. There
is no loss of heat in the pipeline from the hot water tank or the boiler.
If your previous machine installation was hot and cold fill ensure that the hot tap is
firmly closed to prevent leakage.
This machine has an inlet hose with a 19mm (3/4") threaded ferrule fitted to the end,
to attach between the threaded connector on the appliance and the water supply. Only
use the new hose supplied to connect the machine and ensure that the sealing washers
are in place inside the hose connectors.
Do not re-use old hoses that are attached to existing installations.
Do not over-tighten the connections. Hand tight is sufficient.
Do not trap or kink the hose.
Step 1. Connect the elbow end of the hose
provided to the threaded inlet on the back of the
machine.
The grey pipe needs to connect to the white
threaded inlet on the machine.
Step 2. Hand tighten the connector.
Step 3. Connect the straight ends of the pipes to
the water supply; ensure that there are no kinks.
Step 4. Turn on the water supply and check there
are no leaks. If there is a leak, turn off the water
supply, disconnect the hose and check the sealing
washers are in place. Refit the hose and turn on
the water supply.
10
11

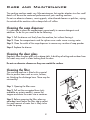
Connecting the drainage pipe
This machine must be connected in accordance with the water supply regulations.
Water bylaws prohibit connection to a surface water drain.
Decide which plumbing option suits you best then follow the instructions below:
Option 1 - Waste pipe connection (waste trap)
Fit the hooked end support to the outlet pipe and position it at least 800mm off the
floor.
After removing the blanking plug, or cutting the membrane from the waste system,
securely fix the outlet pipe to the drainage system, using a hose clip.
Secure the hooked end support up to at least 800mm to avoid water being drawn
back into the machine.
Option 2 - Into a standpipe
Ensure that the standpipe is not located near an electrical socket.
Fit the hooked end support to the outlet pipe. Install the hose into the standpipe
ensuring that the pipe is at least 500mm from the floor.
Insert the outlet pipe approximately 100mm into the standpipe.
Levelling The Machine
Your machine is heavy so care must be taken when moving it.
We recommend that two people move the machine to avoid strain and possible injury.
Take care not to damage flooring when moving the machine and do not drag or lift
the machine by its door.
When moving the machine to its final position, take care not to kink or damage the
hose at the back of the machine.
Once the machine is in place the feet should be adjusted to ensure that the machine is
level. If the machine is not level it may become very noisy or move during the spin
cycle.
Step 1. Turn the locking nut clockwise to release the screw adjuster on the feet.
Step 2. Adjust the feet on the corners of the machine by rotating each foot to raise or
lower its position until it is firm and level on the ground.
Step 3. When the machine is firm and level, tighten the locking nuts on the feet in an
anti-clockwise direction until they reach the base of the machine.
Testing the Installation
Refer to “Selecting the wash programme” for details of how to select programmes.
Step 1. Turn on the water supply and check for leaks from the fill hose.
Step 2. Switch on the electricity supply.
Step 3. Select the spin programme and then press the Start Pause button to start the
machine. Allow the programme to continue for one minute and then cancel the
programme by returning the selector to the OFF position. This will remove any water
remaining in the machine from factory testing.
Step 4. To check for cold water filling to the machine:
Select the rinse programme and press the Start Pause button to start the machine.
Once the rinse has finished, allow the tumble action to continue until the water has
pumped out. Check that the drain outlet is not leaking or overflowing.
12
13

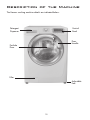
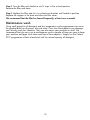
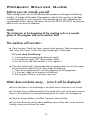
Description of the Machine
The Hoover washing machine details are indicated below:
Step 5. Switch off the machine at the end of the cycle by turning the Programme
Selector to the OFF position.
Step 6. Select the spin programme and press the Start Pause button to start the
machine. If the machine takes longer than one minute to empty check the drain hose
for kinks.
Installation testing is now complete.
Now you have successfully installed the machine we advise that you run the machine
to ensure the drum is thoroughly clean after testing and storage. Select Cottons 90°C
programme and run the machine for a complete cycle using only wash detergent and
water.
This programme will take approximately 2 hours to complete.
Detergent
Dispenser
Control
Panel
Door
Handle
Porthole
Door
Filter
Adjustable
Feet
14
15

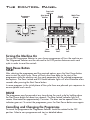
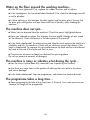
The Control Panel
Turning the Machine On
Turning the Programme Selector to your chosen programme will turn the machine on.
The Programme Selector must be returned to the OFF position between each wash
cycle in order to reset the controls.
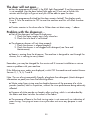
Start Pause Button
START
After selecting the programme and the required options press the Start Pause button
once to start the wash cycle. There will be a short time delay to the start of the
programme while the machine sets the wash parameters for the selected programme
and options. The Door Locked and KG Mode indicator lights will also illuminate a few
seconds after pressing the Start Pause button.
In some programs in the initial phase of the cycle there are planned spin sequences to
ensure optimal wash results.
PAUSE
The programme may be paused at any time during the wash cycle by holding down
the Start Pause button for about two seconds. The door locked indicator light will
remain illuminated for approximately 2 minutes. The door can be opened when this
indicator goes out. To restart the programme, press the Start Pause button once again.
Cancelling and Changing the Programme
To cancel the programme the Programme Selector should be rotated to the OFF
position. Select a new programme and start as detailed above.
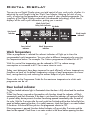
Digital Display
The easy-to-use Digital Display gives you total control of your wash cycle, whether it is
adjusting the wash length using our Wash Time Selector, delaying the start of your
wash, or adjusting the temperature and spin speed of your selected programme. The
simplicity of the Digital Display understates the advanced technology, which clearly
displays all the wash cycle information, putting you in control.
Wash Temperature
When a programme is selected the relevant indicator will light up to show the
recommended wash temperature. You can select a different temperature by pressing
the Temperature button. For example: The Cottons programme will default to 40°C.
With this control the temperature can be reduced to 30°C to reduce energy
consumption or increased to 60°C for a more intensive wash.
Today, most detergents have been improved to wash efficiently at lower temperatures,
therefore we have set the default temperature settings of each programme to a lower
level, saving electricity and reducing the carbon footprint of your machine.
Please refer to the Programme Guide for the maximum temperature to which each
programme can be set.
Door Locked indicator
The Door Locked indicator light is illuminated when the door is fully closed and the machine
is ON.
When Start Pause is pressed on the machine with the door closed the indicator will flash
momentarily and then illuminate. If the door is not closed the indicator will continue to flash.
A special safety device prevents the door from being opened immediately after the end of
the cycle. Wait for 2 minutes after the wash cycle has finished and the door locked light has
gone out before opening the door. As a safety measure, check that there is no water evident
in the drum. At the end of the cycle turn the programme selector to OFF.
If the programme is paused, the door locked indicator will go out after 2 minutes and the
door can be opened. Check there is no water evident in the drum before opening the door.
Programme
Selector
Start/Pause
Button
Spin Speed
Selector
Digital
Display
Wash Time
Selector
Door Lock
Indicator
Stain
Blaster
Sensitive
Care
Delay
Start
Temperature
Selector
Easy
Iron
Wash Cycle Time/
Delay Start Indicator
Kg Mode
Wash Temperature
Indicator
Spin Speed
Indicator
Wash Length
Indicator
16
17
Door Locked
Indicator

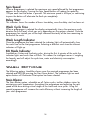
The Control Panel
Turning the Machine On
Turning the Programme Selector to your chosen programme will turn the machine on.
The Programme Selector must be returned to the OFF position between each wash
cycle in order to reset the controls.
Start Pause Button
START
After selecting the programme and the required options press the Start Pause button
once to start the wash cycle. There will be a short time delay to the start of the
programme while the machine sets the wash parameters for the selected programme
and options. The Door Locked and KG Mode indicator lights will also illuminate a few
seconds after pressing the Start Pause button.
In some programs in the initial phase of the cycle there are planned spin sequences to
ensure optimal wash results.
PAUSE
The programme may be paused at any time during the wash cycle by holding down
the Start Pause button for about two seconds. The door locked indicator light will
remain illuminated for approximately 2 minutes. The door can be opened when this
indicator goes out. To restart the programme, press the Start Pause button once again.
Cancelling and Changing the Programme
To cancel the programme the Programme Selector should be rotated to the OFF
position. Select a new programme and start as detailed above.
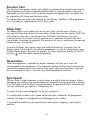
Digital Display
The easy-to-use Digital Display gives you total control of your wash cycle, whether it is
adjusting the wash length using our Wash Time Selector, delaying the start of your
wash, or adjusting the temperature and spin speed of your selected programme. The
simplicity of the Digital Display understates the advanced technology, which clearly
displays all the wash cycle information, putting you in control.
Wash Temperature
When a programme is selected the relevant indicator will light up to show the
recommended wash temperature. You can select a different temperature by pressing
the Temperature button. For example: The Cottons programme will default to 40°C.
With this control the temperature can be reduced to 30°C to reduce energy
consumption or increased to 60°C for a more intensive wash.
Today, most detergents have been improved to wash efficiently at lower temperatures,
therefore we have set the default temperature settings of each programme to a lower
level, saving electricity and reducing the carbon footprint of your machine.
Please refer to the Programme Guide for the maximum temperature to which each
programme can be set.
Door Locked indicator
The Door Locked indicator light is illuminated when the door is fully closed and the machine
is ON.
When Start Pause is pressed on the machine with the door closed the indicator will flash
momentarily and then illuminate. If the door is not closed the indicator will continue to flash.
A special safety device prevents the door from being opened immediately after the end of
the cycle. Wait for 2 minutes after the wash cycle has finished and the door locked light has
gone out before opening the door. As a safety measure, check that there is no water evident
in the drum. At the end of the cycle turn the programme selector to OFF.
If the programme is paused, the door locked indicator will go out after 2 minutes and the
door can be opened. Check there is no water evident in the drum before opening the door.
Programme
Selector
Start/Pause
Button
Spin Speed
Selector
Digital
Display
Wash Time
Selector
Door Lock
Indicator
Stain
Blaster
Sensitive
Care
Delay
Start
Temperature
Selector
Easy
Iron
Wash Cycle Time/
Delay Start Indicator
Kg Mode
Wash Temperature
Indicator
Spin Speed
Indicator
Wash Length
Indicator
16
17
Door Locked
Indicator

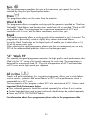
Spin Speed
When a programme is selected the maximum spin speed allowed for that programme
appears on the display. Pressing the Spin Speed button will reduce the speed by
100rpm each time the button is pressed. The minimum speed is 400rpm, or continuing
to press the button will eliminate the final spin completely.
Delay Start
This indicator shows the number of hours time delay, once the delay start has been set.
Wash Cycle Time
When a programme is selected the display automatically shows the maximum cycle
duration for a full load, which can vary, depending on the options selected. Once the
programme has started you will be kept informed constantly of the time remaining to
the end of the wash.
Wash Length Indicator
Once the programme has been selected the indicator light will automatically show
the wash time set for that programme. Selecting a different wash time the relevant
indicator will light up.
KG Mode Indicator
Available on Cotton and Synthetic cycles, during the first 4 minutes of the cycle the
indicator lights and wash time will flash. This means the intelligent sensor is weighing
the laundry and will adjust the cycle time, water and electricity consumption
accordingly.
Wash Options
The following options should be chosen once the required programme has been
selected and BEFORE pressing the Start Pause button. The indicator light on each
option button will illuminate if that option has been selected.
Stain Blaster
The Stain Blaster option, selectable on all Cotton cycles, tackles stubborn stains by
maintaining wash temperatures throughout the programme and adjusting the spin
speed of the drum during critical stages of the wash and rinse cycles. Using this
special programme will increase the wash efficiency without increasing the length of
your wash programme.
Sensitive Care
The Sensitive Care option washes your clothes in a deeper than normal water level to
provide gentler washing for especially delicate fabrics, while detergent is removed
thoroughly with five extra rinses. Perfect for people with delicate skin, this option can
be selected on all Cotton and Synthetic cycles.
This option does not need to be selected on the Delicate, Woollen or Silk programmes,
as it is already an integrated part of the wash cycles.
Delay Start
This option allows you to delay the start of your wash cycle by up to 24 hours. By
pressing the Delay Start button, the time delay will be shown on the display (h00). This
will increase in one-hour intervals each time the Delay Start button is pressed.
Continue to press the button until the required time is reached, then press the Start
Pause button to activate the machine. The machine will start its cycle once the required
number of hours has passed.
To cancel the Delay Start option, press and hold the button for 5 seconds until the
display shows the settings for the selected programme. To start this programme, press
the Start Pause button. To cancel the process, turn the Programme Selector to the OFF
position and then select another programme.
Temperature
When a programme is selected the relevant indicator will light up to show the
recommended wash temperature. The Temperature button can be used to decrease or
increase the temperature of your chosen wash cycle. Each time the button is pressed,
the new temperature level is shown on the Wash Temperature Indicator.
Spin Speed
The spin cycle is used to remove as much water as possible from the laundry without
damaging your clothes. The recommended spin speed for each programme is already
set to the highest level for that chosen programme. By pressing the Spin Speed button
you can reduce the spin speed in 100rpm intervals.
To cancel the spin cycle altogether, set the spin speed to 0.
It is not possible to select a spin speed higher than that suitable for the programme
selected. This feature is designed to avoid damage to your clothes.
It is possible to modify the spin speed at any time without stopping or pausing the
machine.
18
19

Spin Speed
When a programme is selected the maximum spin speed allowed for that programme
appears on the display. Pressing the Spin Speed button will reduce the speed by
100rpm each time the button is pressed. The minimum speed is 400rpm, or continuing
to press the button will eliminate the final spin completely.
Delay Start
This indicator shows the number of hours time delay, once the delay start has been set.
Wash Cycle Time
When a programme is selected the display automatically shows the maximum cycle
duration for a full load, which can vary, depending on the options selected. Once the
programme has started you will be kept informed constantly of the time remaining to
the end of the wash.
Wash Length Indicator
Once the programme has been selected the indicator light will automatically show
the wash time set for that programme. Selecting a different wash time the relevant
indicator will light up.
KG Mode Indicator
Available on Cotton and Synthetic cycles, during the first 4 minutes of the cycle the
indicator lights and wash time will flash. This means the intelligent sensor is weighing
the laundry and will adjust the cycle time, water and electricity consumption
accordingly.
Wash Options
The following options should be chosen once the required programme has been
selected and BEFORE pressing the Start Pause button. The indicator light on each
option button will illuminate if that option has been selected.
Stain Blaster
The Stain Blaster option, selectable on all Cotton cycles, tackles stubborn stains by
maintaining wash temperatures throughout the programme and adjusting the spin
speed of the drum during critical stages of the wash and rinse cycles. Using this
special programme will increase the wash efficiency without increasing the length of
your wash programme.
Sensitive Care
The Sensitive Care option washes your clothes in a deeper than normal water level to
provide gentler washing for especially delicate fabrics, while detergent is removed
thoroughly with five extra rinses. Perfect for people with delicate skin, this option can
be selected on all Cotton and Synthetic cycles.
This option does not need to be selected on the Delicate, Woollen or Silk programmes,
as it is already an integrated part of the wash cycles.
Delay Start
This option allows you to delay the start of your wash cycle by up to 24 hours. By
pressing the Delay Start button, the time delay will be shown on the display (h00). This
will increase in one-hour intervals each time the Delay Start button is pressed.
Continue to press the button until the required time is reached, then press the Start
Pause button to activate the machine. The machine will start its cycle once the required
number of hours has passed.
To cancel the Delay Start option, press and hold the button for 5 seconds until the
display shows the settings for the selected programme. To start this programme, press
the Start Pause button. To cancel the process, turn the Programme Selector to the OFF
position and then select another programme.
Temperature
When a programme is selected the relevant indicator will light up to show the
recommended wash temperature. The Temperature button can be used to decrease or
increase the temperature of your chosen wash cycle. Each time the button is pressed,
the new temperature level is shown on the Wash Temperature Indicator.
Spin Speed
The spin cycle is used to remove as much water as possible from the laundry without
damaging your clothes. The recommended spin speed for each programme is already
set to the highest level for that chosen programme. By pressing the Spin Speed button
you can reduce the spin speed in 100rpm intervals.
To cancel the spin cycle altogether, set the spin speed to 0.
It is not possible to select a spin speed higher than that suitable for the programme
selected. This feature is designed to avoid damage to your clothes.
It is possible to modify the spin speed at any time without stopping or pausing the
machine.
18
19

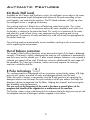
Automatic Features
KG Mode (Half Load)
Available on the Cottons and Synthetics cycles, the intelligent sensor adjusts the water
level and programme length throughout each phase of the cycle according to how
much laundry you load into the machine. The KG Mode indicator will light up when
the intelligent sensor is weighing the laundry.
The washing machine is fitted with a self-adjusting water level system. This system
enables the machine to use the optimum amount of water needed to wash and rinse
the laundry in relation to the particular load. This results in a reduction of the water
and electricity used without in any way compromising the washing and rinsing
performance. The amount of water and electricity used will always be appropriate for
the clothes load size.
The washing machine automatically ensures excellent washing results at minimum cost
whilst respecting the environment.
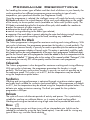
Out of Balance protection
This model is fitted with an electronic sensor device that checks if the load is balanced
correctly. If the load is slightly unbalanced the machine will re-balance it automatically
and then carry out the normal spin. If, after several attempts, balance is not restored a
reduced spin speed will be used. If loads are seriously unbalanced the spin stage will
be cancelled. This helps limit vibration, reduce noise and improve the washing
machine's reliability and life.
8 Pulse technology
This washing machine is equipped with an innovative system that by means of 8 high
pressure jets, sprays a mixture of water and detergent directly into the load.
When the cycle is started, in conjunction with the 8 high pressure jets spraying the
detergent mixture into the load, the cycle includes a set of spin actions that helps the
detergent solution to penetrate into the fibers, helping dirt removal and ensuring the
best available wash performance.
The spin cycle at the beginning of the wash is therefore a normal phase of the
program and should not be regarded as a malfunction of the machine.
The 8 pulse system is also used during the rinse phase where the high pressure jets aid
the complete removal of detergent residues trapped in the clothes.
20
21
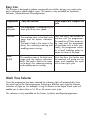
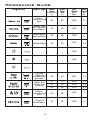
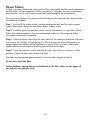
Easy Iron
This function is designed to reduce creasing of your clothes during your wash cycle,
and is tailored to specific fabric types. This option is only available on Synthetics,
Delicates, Woolmark and Silk programmes.
Wash Time Selector
Once the programme has been selected the indicator light will automatically show
the wash time set for that programme. Selecting a different wash time the relevant
indicator will light up. For example: Using this button on the Rapid Wash cycle will
enable you to select either a 14, 30 or 44 minute wash cycle.
This selection is only available on the Cotton, Synthetic and Rapid programmes.
Programme
Easy Iron Function
Action Required to Complete the
Cycle
Mixed
& Synth’s
The programme is completed by a
short spin of very low speed.
_
Delicate
The machine stops in the final rinse
stage and the option indicators
blink.
The load is held in the water in the
drum, thus reducing creasing and
enabling easier ironing.
Press the Easy Iron button to
continue with the programme.
The machine will then pump out
the water and the programme
will conclude with a short spin.
Finally, the programme carries
out a brief tumbling action to
loosen the items in the load.
Wool
& Silk
The machine stops in the final rinse
stage and the option indicators
blink. The load is held in the water
in the drum, thus reducing creasing
and enabling easier ironing.
Press the Easy Iron button and
the machine will pump out the
water and complete the cycle
with a short spin cycle.
A página está carregando ...
A página está carregando ...
A página está carregando ...
A página está carregando ...
A página está carregando ...
A página está carregando ...
A página está carregando ...
A página está carregando ...
A página está carregando ...
A página está carregando ...
A página está carregando ...
A página está carregando ...
A página está carregando ...
A página está carregando ...
A página está carregando ...
A página está carregando ...
A página está carregando ...
A página está carregando ...
A página está carregando ...
A página está carregando ...
-
 1
1
-
 2
2
-
 3
3
-
 4
4
-
 5
5
-
 6
6
-
 7
7
-
 8
8
-
 9
9
-
 10
10
-
 11
11
-
 12
12
-
 13
13
-
 14
14
-
 15
15
-
 16
16
-
 17
17
-
 18
18
-
 19
19
-
 20
20
-
 21
21
-
 22
22
-
 23
23
-
 24
24
-
 25
25
-
 26
26
-
 27
27
-
 28
28
-
 29
29
-
 30
30
-
 31
31
-
 32
32
-
 33
33
-
 34
34
-
 35
35
-
 36
36
-
 37
37
-
 38
38
-
 39
39
-
 40
40


Hoover DYN 8163D8P Manual do usuário
- Categoria
- Máquinas de lavar roupas
- Tipo
- Manual do usuário
em outros idiomas
- español: Hoover DYN 8163D8P Manual de usuario
- français: Hoover DYN 8163D8P Manuel utilisateur
- italiano: Hoover DYN 8163D8P Manuale utente
- English: Hoover DYN 8163D8P User manual
- русский: Hoover DYN 8163D8P Руководство пользователя
- Nederlands: Hoover DYN 8163D8P Handleiding
- slovenčina: Hoover DYN 8163D8P Používateľská príručka
- Deutsch: Hoover DYN 8163D8P Benutzerhandbuch
- dansk: Hoover DYN 8163D8P Brugermanual
- čeština: Hoover DYN 8163D8P Uživatelský manuál
- svenska: Hoover DYN 8163D8P Användarmanual
- polski: Hoover DYN 8163D8P Instrukcja obsługi
- Türkçe: Hoover DYN 8163D8P Kullanım kılavuzu
- suomi: Hoover DYN 8163D8P Ohjekirja
- română: Hoover DYN 8163D8P Manual de utilizare
Artigos relacionados
Outros documentos
-
Whirlpool AVXXL 105 (EX) Guia de usuario
-
-
Whirlpool XWE 91282X S Guia de usuario
-
Zanussi ZWI1125 Manual do usuário
-
Aeg-Electrolux LAV50610 Manual do usuário
-
Brandt BFV1508 Manual do proprietário
-
Franke FWM12005EI Manual do usuário
-
-
-