
imagine as possibilidades
Obrigado por comprar este produto Samsung.
Para receber um serviço mais completo, registre
seu produto no site
www.samsung.com/register
Model ___________ Serial No. ____________
E-MANUAL
LCD TV
Manual do Usuário
© 2011 Samsung Electronics Co., Ltd. All rights reserved.
Contate a SAMSUNG EM TODO O MUNDO
Caso tenha dúvidas ou comentários sobre os produtos da Samsung, entre em contato com o centro de atendimento ao cliente da SAMSUNG.
País
Assistência Técnica
Web Site
ARGENTINA 0800-333-3733 www.samsung.com
BRAZIL
0800-124-421
4004-0000
www.samsung.com
CHILE 800-SAMSUNG(726-7864) www.samsung.com
COLOMBIA 01-8000112112 www.samsung.com
COSTA RICA 0-800-507-7267 www.samsung.com
DOMINICA 1-800-751-2676 www.samsung.com
ECUADOR 1-800-10-7267 www.samsung.com
EL SALVADOR 800-6225 www.samsung.com
GUATEMALA 1-800-299-0013 www.samsung.com
HONDURAS 800-27919267 www.samsung.com
JAMAICA 1-800-234-7267 www.samsung.com
NICARAGUA 00-1800-5077267 www.samsung.com
PANAMA 800-7267 www.samsung.com
PERU 0-800-777-08 www.samsung.com
PORTO RICO 1-800-682-3180 www.samsung.com
TRINIDAD & TOBAGO 1-800-SAMSUNG(726-7864) www.samsung.com
VENEZUELA 0-800-100-5303 www.samsung.com
BN68-03460A
BN68-03460A-00
[LD400-ZD]BN68-03460A-Eng.indb 1 2011-02-24 �� 7:50:39

English - 2
For more information on how to use e-Manual (P. 10)
Figures and illustrations in this User Manual are provided for reference only and may differ from actual product appearance.
Product design and specifications may be changed without notice.
Important Warranty Information Regarding Television Format Viewing
✎
See the warranty card for more information on warranty terms.
Wide screen format LCD Displays (16:9, the aspect ratio of the screen width to height) are primarily designed to view wide screen format full-
motion video. The images displayed on them should primarily be in the wide screen 16:9 ratio format, or expanded to fill the screen if your model
offers this feature and the images are constantly moving. Displaying stationary graphics and images on screen, such as the dark sidebars on
nonexpanded standard format television video and programming, should be limited to no more than 5% of the total television viewing per week.
Additionally, viewing other stationary images and text such as stock market reports, video game displays, station logos, web sites or computer
graphics and patterns, should be limited as described above for all televisions. Displaying stationary images that exceed the above guidelines
can cause uneven aging of LCD Displays that leave subtle, but permanent burned-in ghost images in the LCD picture. To avoid this, vary the
programming and images, and primarily display full screen moving images, not stationary patterns or dark bars. On LCD models that offer picture
sizing features, use these controls to view different formats as a full screen picture.
Be careful in the selection and duration of television formats used for viewing. Uneven LCD aging as a result of format selection and use, as well as
burned-in images, are not covered by your Samsung limited warranty.
Still image warning
Avoid displaying still images (such as jpeg picture files) or still image elements (such as TV channel logos, panorama or 4:3 image format, stock
or news bars at screen bottom etc.) on the screen. Constant displaying of still pictures can cause ghosting of LCD screen, which will affect image
quality. To reduce risk of this effect, please follow below recommendations:
• Avoid displaying the same TV channel for long periods.
• Always try to display any image on full screen, use TV set picture format menu for best possible match.
• Reduce brightness and contrast values to minimum required to achieve desired picture quality, exceeded values may speed up the burnout
process.
• Use all TV features designed to reduce image retention and screen burn, refer to e-Manual for details.
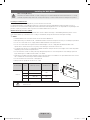
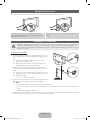
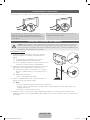
Securing the Installation Space
Keep the required distances between the product and other objects (e.g. walls) to ensure proper ventilation.
Failing to do so may result in fire or a problem with the product due to an increase in the internal temperature of the product.
✎
When using a stand or wall-mount, use parts provided by Samsung Electronics only.
x
If you use parts provided by another manufacturer, it may result in a problem with the product or an injury due to the product falling.
✎
The appearance may differ depending on the product.
✎
Be careful when you contact the TV because some parts can be somewhat hot.
Installation with a stand. Installation with a wall-mount.
4inches
4inches
4inches
4inches
4inches
4inches
4inches
[LD400-ZD]BN68-03460A-Eng.indb 2 2011-02-24 �� 7:50:39

English - 3
Accessories
✎
Please make sure the following items are included with your TV. If any items are missing, contact your dealer.
✎
The items’ colors and shapes may vary depending on the models.
y Remote Control & Batteries (AAA x 2) (Not available in some locations)
y Owner’s Instructions
y Warranty Card / Safety Guide (Not available in some locations)
y Power Cord
y Cleaning Cloth
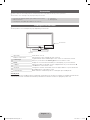
Viewing the Control Panel
✎
The product color and shape may vary depending on the model.
P
(Power)
Turns the TV on or off.
Remote control sensor Aim the remote control towards this spot on the TV.
SOURCE
E
Toggles between all the available input sources. In the on-screen menu, use this
button as you would use the ENTER
E
button on the remote control.
MENU Displays an on-screen menu, the OSD (on screen display), of your TV’s features.
y
Adjusts the volume. In the OSD, use the
y
buttons as you would use the ◄
and ► buttons on the remote control.
z
Changes the channels. In the OSD, use the
z
buttons as you would use the
▼ and ▲ buttons on the remote control.
Power Indicator Blinks and turns off when the power is on and lights up in standby mode.
Standby mode
Do not leave your TV in standby mode for long periods of time (when you are away on a holiday, for example). A small amount
of electric power is still consumed even when the power button is turned off. It is best to unplug the power cord.
Speakers
Control Panel
[LD400-ZD]BN68-03460A-Eng.indb 3 2011-02-24 �� 7:50:40

English - 4
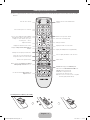
Installing batteries (Battery size: AAA)
Viewing the Remote Control
✎
This is a special remote control for the visually impaired persons and has Braille points on the Power, Channel, Volume
buttons.
Press to display information on the TV screen.
Changes channels.
Returns to the previous channel.
Cut off the sound temporarily.
Displays the main on-screen menu.
Exit the menu.
E-MANUAL: Displays the e-Manual guide.
SRS: Selects the SRS TruSurround HD mode.
P.MODE: Selects picture mode.
P.SIZE: Choose the picture size.
CC: Controls the caption decoder.
MTS: Press to choose stereo, mono or Separate
Audio Program (SAP broadcast).
Display the EPG (Electronic Program Guide).
Returns to the previous menu.
Quickly select frequently used functions.
Selects the on-screen menu items and
changes the values seen on the menu.
Displays the channel list on the screen.
Press to select additional channels (digital)
being broadcast by the same station. For
example, to select channel ‘54.3’, press
‘54’, then press ‘-’ and ‘3’.
Adjusts the volume.
Displays and selects the available video
sources.
Turns the TV on and off.
Use these buttons in My Contents and
Anynet+ modes.
Press to directly access to channels.
A B C D
P.SIZE
CONTENT
E-MANUAL
CC
SRS
GUIDE
MTS
P.MODE
Buttons used in the Channel List, Channel
Manager, My Contents menu, etc.
Displays the My Contents, Watch TV and
Source.
[LD400-ZD]BN68-03460A-Eng.indb 4 2011-02-24 �� 7:50:41

English - 5
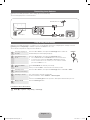
Connecting to an Antenna
When the TV is initially powered on, basic settings proceed automatically.
✎
Connecting the power cord and antenna.
Cable
R-AUDIO-L
P
R PB Y
ANT OUT
VHF/UHF Antenna
Power Input
or
Plug & Play (Initial Setup)
When the TV is initially powered on, a sequence of on-screen prompts will assist in configuring basic settings. Press the
POWER
P
button. Plug & Play is available only when the Source is set to TV.
✎
To return to the previous step, press the red button.
1
Selecting Language of
the OSD
Press the ▲ or ▼ button, then press the ENTER
E
button. Select the
desired OSD (On Screen Display) language.
P
POWER
FAV.CH
CHLIST
MEDIA.P
P.MODE
S.MODE
P.SIZE
CC
MTS
INFO
SLEEP
2
Selecting the usage
mode
Press the ◄ or ► button, then press the ENTER
E
button.
y Select the Home Use mode. Store Demo Mode is for retail environments.
y To return the unit’s settings from Store Demo to Home Use (standard):
Press the volume button on the TV. When you see the volume in the OSD,
press and hold MENU for 5 sec.
3
Setting the Clock
Mode
Set the Clock Mode automatically or manually.
✎
If you select the Auto, select the time zone where you live.
4
Selecting search
options for auto tuning
Press the ▲ or ▼ button, then press the ENTER
E
button. Select Air or Cable.
5
Selecting a channel The channel search will start automatically.
For more information, refer to Channel → Auto Program.
✎
Press the ENTER
E
button at any time to interrupt the memorization process.
6
Enjoy your TV.
Press the ENTER
E
button.
If You Want to Reset This Feature...
O
MENU
m
→ System → Plug & Play → ENTER
E
[LD400-ZD]BN68-03460A-Eng.indb 5 2011-02-24 �� 7:50:42

English - 6
Connecting to an AV devices
¦ Available devices: DVD, Blu-ray player, HD cable box, HD STB (Set-Top-Box) satellite
receiver, VCR, Digital Audio System, Amplifier, Home Theater, PC
Using an HDMI cable or HDMI to DVI Cable (up to 1080p)
✎
HDMI/DVI IN / PC/DVI AUDIO IN
x
For better picture and audio quality, connect to a digital device using an HDMI cable.
x
An HDMI cable supports digital video and audio signals, and does not require an audio cable.
– To connect the TV to a digital device that does not support HDMI output, use an HDMI/DVI and audio cables.
x
The picture may not display normally (if at all) or the audio may not work if an external device that uses an older
version of HDMI mode is connected to the TV. If such a problem occurs, ask the manufacturer of the external
device about the HDMI version and, if out of date, request an upgrade.
x
Be sure to purchase a certified HDMI cable. Otherwise, the picture may not display or a connection error may
occur.
x
A basic high-speed HDMI cable or one with ethernet is recommended. This product does not support the
ethernet function via HDMI.
Device
R-AUDIO-L
P
R PB Y
DVI OUT
BD/DVD player/
HD cable/Sat. box
R-AUDIO-L
P
R PB Y
HDMI OUT
R-AUDIO-L
P
R PB Y
AUDIO OUT
Red White
W W
B
G
R
R
W
Y
[LD400-ZD]BN68-03460A-Eng.indb 6 2011-02-24 �� 7:50:44

English - 7
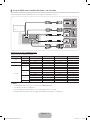
Connecting to a PC and Audio device
¦ Available devices: Digital Audio System, Amplifier, Home Theater
Using a Component (up to 1080p), Using an Audio/Video Cable (480i only)
✎
When connecting to AV IN, the color of the AV IN [Y/VIDEO] jack (Green) does not match the color of the video cable
(Yellow).
✎
For better picture quality, the Component connection is recommended over the A/V connection.
W W
B
G
RR
W
Y
Yellow Red White Red Blue Green
R-AUDIO-L
P
R PB Y
COMPONENT OUT
R-AUDIO-L
P
R PB Y
AUDIO OUT
Blu-ray player
R-AUDIO-L
P
R PB Y
VIDEO OUT
VCR
R-AUDIO-L
P
R PB Y
AUDIO OUT
W
W
Y
Y
R
R
B
G
R
R
W
B
G
R
R
W
DVD
Home Theater
R-AUDIO-L
P
R PB Y
OPTICAL
R-AUDIO-L
P
R PB Y
AUDIO IN
Red White
W W
B
G
R
R
W
Y
Digital audio system
Using an Optical (Digital) or Audio (Analog) Cable Connection
✎
DIGITAL AUDIO OUT (OPTICAL)
x
When a digital audio system is connected to the DIGITAL AUDIO OUT (OPTICAL) jack, decrease the volume of
both the TV and the system.
x
5.1 CH (channel) audio is available when the TV is connected to an external device supporting 5.1 CH.
x
When the receiver (home theater) is set to on, you can hear sound output from the TV’s optical jack. When the TV
is receiving a DTV signal, the TV will send 5.1 CH sound to the home theater receiver. When the source is a digital
component such as a DVD / Blu-ray player / cable box / STB (Set-Top-Box) satellite receiver and is connected to
the TV via HDMI, only 2 CH audio will be heard from the home theater receiver. If you want to hear 5.1 CH audio,
connect the digital audio out jack from your DVD / Blu-ray player / cable box / STB satellite receiver directly to an
amplifier or home theater.
✎
AUDIO OUT: Connects to the audio input jacks on your amplifier/home theater.
x
When connecting, use the appropriate connector (sold separately).
x
When an audio amplifier is connected to the AUDIO OUT jacks: Decrease the volume of the TV and adjust the
volume level with the amplifier’s volume control.
[LD400-ZD]BN68-03460A-Eng.indb 7 2011-02-24 �� 7:50:48

English - 8
¦ Using an HDMI cable or HDMI to DVI Cable / a D-sub Cable
✎
Connecting through the HDMI cable may not be supported depending on the PC.
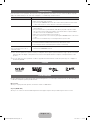
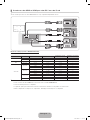
Display Modes (D-Sub and HDMI/DVI Input)
Optimal resolution is 1360 x 768 @ 60 Hz.
Mode Resolution
Horizontal Frequency (KHz) Vertical Frequency (Hz) Pixel Clock Frequency (MHz) Sync Polarity (H / V)
IBM
640 x 350 31.469 70.086 25.175 + / -
720 x 400 31.469 70.087 28.322 - / +
MAC
640 x 480 35.000 66.667 30.240 - / -
832 x 624 49.726 74.551 57.284 - / -
VESA DMT
640 x 480
31.469 59.940 25.175 - / -
37.861 72.809 31.500 - / -
37.500 75.000 31.500 - / -
800 x 600
37.879 60.317 40.000 + / +
48.077 72.188 50.000 + / +
46.875 75.000 49.500 + / +
1024 x 768
48.363 60.004 65.000 - / -
56.476 70.069 75.000 - / -
60.023 75.029 78.750 + / +
1360 x 768 47.712 60.015 85.500 + / +
✎✎
NOTE
x
For HDMI/DVI cable connection, you must use the HDMI/DVI IN jack.
x
The interlace mode is not supported.
x
The set might operate abnormally if a non-standard video format is selected.
x
Separate and Composite modes are supported. SOG(Sync On Green) is not supported.
R-AUDIO-L
P
R PB Y
AUDIO OUT
R-AUDIO-L
P
R PB Y
AUDIO OUT
R-AUDIO-L
P
R PB Y
DVI OUT
R-AUDIO-L
P
R PB Y
PC OUT
R-AUDIO-L
P
R PB Y
HDMI OUT
[LD400-ZD]BN68-03460A-Eng.indb 8 2011-02-24 �� 7:50:50

English - 9
Changing the Input Source
¦ Source List
Use to select TV or other external input sources such as DVD / Blu-ray players / cable box / STB
satellite receiver connected to the TV.
■ TV / PC / AV / Component / HDMI/DVI / USB
✎
In the Source List, connected inputs will be highlighted.
✎
If you want to see connected devices only, move to Connected using ◄ or ► button.
✎
PC always stay activated.
✎
If the connected external devices are not highlighted, press the red button. The TV will
search for connected devices.
How to use Edit Name
In the Source, press the TOOLS button, and then you can set an external input sources name you want.
■ VCR / DVD / Cable STB / Satellite STB / PVR STB / AV Receiver / Game / Camcorder / PC / DVI PC / DVI Devices /
TV / IPTV / Blu-ray / HD DVD / DMA: Name the device connected to the input jacks to make your input source selection
easier.
✎
When connecting a PC to the HDMI / DVI IN port with HDMI cable, you should set the TV to PC mode under Edit
Name.
✎
When connecting a PC to the HDMI / DVI IN port with HDMI to DVI cable, you should set the TV to DVI PC mode
under Edit Name.
✎
When connecting an AV devices to the HDMI / DVI IN port with HDMI to DVI cable, you should set the TV to DVI
Devices mode under Edit Name.
Information
You can see detailed information about the selected external device.
[LD400-ZD]BN68-03460A-Eng.indb 9 2011-02-24 �� 7:50:51

English - 10
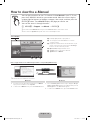
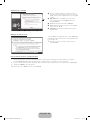
How to view the e-Manual
Screen Display
1
4 5 6
2
3
Preference Features
Network (for LCD 550 series)
System Menu
Support Menu
}
Index
E
Enter
e
Exit
1 Currently displayed video, TV program, etc.
2 The category list. Press ◄ or ► button to select the
category you want.
3 Displays the sub-menu list. Use the arrow buttons on your
remote control to move the cursor. Press the ENTER
E
button to select the sub-menu you want.
4 } Blue (Index): Displays the index screen.
5 E Enter: Selects a category or sub-menu.
6 e Exit: Exit the e-Manual.
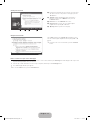
How to toggle between an e-Manual topic and the corresponding OSD menu(s).
E-MANUAL
Picture
Picture Mode : Standard ►
Backlight : 7
Contrast : 95
Brightness : 45
Sharpness : 50
Color : 50
Tint (G/R) : G50/R50
Screen Adjustment
a
Try Now
Basic Features > Picture Menu (2/16)
a
Try Now
b
Home
{
Zoom
}
Index
L
Page
e
Exit
✎
This function is not enabled in some menus.
Method 1 Method 2
1. If you want to use the menu that corresponds to an e-Manual
topic, press the red button to select Try Now.
2. To return to the e-Manual screen, press the E-MANUAL button.
1. Press the ENTER
E
button when a topic is displayed. “Do you
want to execute this?” appears. Select Yes, and then press the
ENTER
E
button. The OSD window appears.
2. To return to the e-Manual screen, press the E-MANUAL button.
E-MANUAL
You can find instructions for your TV’s features in the e-Manual in your TV. To use,
press the E-MANUAL button on your remote control. Move the cursor using the
up/down/right/left buttons to highlight a category, then a topic, and then press the
ENTER
E
button. The e-Manual displays the page you want to see.
You can also access it through the menu:
O
MENU
m
→ Support → e-Manual → ENTER
E
✎
To return to the e-Manual main menu, press the E-MANUAL button on the remote control.
✎
You cannot use Try Now directly if the TV is set to an external input source.
[LD400-ZD]BN68-03460A-Eng.indb 10 2011-02-24 �� 7:50:54

English - 11
Viewing the Contents
Basic Features > Picture Menu (2/16)
2 3 4 5
a
Try Now
b
Home
{
Zoom
}
Index
L
Page
e
Exit
1
1 Contents Area: Contains the topic contents, if you selected a
sub-menu. To move to the previous or next page, press the
◄ / ► button.
2 Try Now: Displays the OSD menu that corresponds to
the topic. To return to the e-Manual screen, press the
E-MANUAL button.
3 Home: Moves to the e-Manual home screen.
4 Zoom: Magnifies a screen. You can scroll through the
magnified screen by using ▲ / ▼ buttons.
5 L (Page): Moves to previous or next page.
Using the Zoom mode
U
Move
R
Return
Select Zoom, and then press ENTER
E
to magnify the screen.
You can scroll through the magnified screen by using the ▲ or ▼
buttons.
✎
To return to the screen to normal size, press the RETURN
button.
How to search for a topic on the index page
1. To search for a topic, press the left or right arrow button to select a letter, and then press ENTER
E
. The Index displays a list of topics and
keywords that begin with the letter you selected.
2. Press the up or down arrow button to select a topic or keyword, and then press the ENTER
E
button.
3. The e-Manual page with the topic appears.
✎
To close the Index screen, press the RETURN button.
[LD400-ZD]BN68-03460A-Eng.indb 11 2011-02-24 �� 7:50:57

English - 12
Installing the Wall Mount
Wall or Ceiling Mounting
The product should be mounted on a wall or ceiling only as recommended by the manufacturer. Unless it is correctly
mounted, the product may slide or fall, causing serious injury to a child or adult, and serious damage to the product.
Installing the Wall Mount Kit
The wall mount kit (sold separately) allows you to mount the TV on the wall.
For detailed information on installing the wall mount, see the instructions provided with the wall mount items. Contact a
technician for assistance when installing the wall mount bracket. Samsung Electronics is not responsible for any damage to the
product or injury to yourself or others if you elect to install the wall mount on your own.
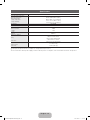
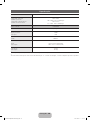
Wall Mount Kit Specifications (VESA)
Install your wall mount on a solid wall perpendicular to the floor. When attaching to other building materials, please contact
your nearest dealer. If you install the TV on a ceiling or slanted wall, it may fall and result in severe personal injury.
✎
NOTE
x
Standard dimensions for wall mount kits are shown in the table below.
x
When purchasing our wall mount kit, a detailed installation manual and all parts necessary for assembly are provided.
x
Do not use screws that do not comply with the VESA standard screw specifications.
x
Do not use screws that are longer than the standard length or do not comply with the VESA standard screw
specifications. Screws that are too long may cause damage to the inside of the TV set.
x
For wall mounts that do not comply with the VESA standard screw specifications, the length of the screws may differ
depending on the wall mount specifications.
x
Do not fasten the screws too firmly. This may damage the product or cause the product to fall, leading to personal
injury. Samsung is not liable for these kinds of accidents.
x
Samsung is not liable for product damage or personal injury when a non-VESA or non-specified wall mount is used or
the consumer fails to follow the product installation instructions.
x
Do not mount the TV at more than a 15 degree tilt.
x
Always have two people mount the TV on a wall.
Product Family inches VESA Spec. (A X B) Standard Screw Quantity
LCD-TV
19~22 75 X 75
M4
4
26 200 X 100
32~40 200 X 200 M6
46 400 X 400 M8
Do not install your Wall Mount Kit while your TV is turned on. It may result in personal injury due to
electric shock.
[LD400-ZD]BN68-03460A-Eng.indb 12 2011-02-24 �� 7:50:57

English - 13
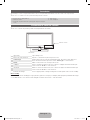
Troubleshooting
If the TV seems to have a problem, first try this list of possible problems and solutions. If none of these troubleshooting tips
apply, visit “www.samsung.com,” then click on Support, or call Samsung customer service.
Issues Solutions and Explanations
The TV will not turn on. • Make sure the AC power cord is securely plugged in to the wall outlet and the TV.
• Make sure the wall outlet is working.
• Try pressing the POWER button on the TV to make sure the problem is not the remote
control. If the TV turns on, refer to “Remote control does not work” below.
There is no picture/video. • Check cable connections (remove and reconnect all cables connected to the TV and
external devices).
• Set your external device’s (Cable/Sat Box, DVD, Blu-ray etc) video outputs to match
the connections to the TV input. For example, if an external device’s output is HDMI, it
should be connected to an HDMI input on the TV.
• Make sure your connected devices are powered on.
• Be sure to select the TV’s correct source by pressing the SOURCE button on the remote
control.
• Reboot the connected device by reconnecting the device’s power cable.
The remote control does not work. • Replace the remote control batteries with correct polarity (+/–).
• Clean the transmission window located on the top of the remote control.
• Try pointing the remote control directly at the TV from 5~6 feet away.
The cable/set top box remote control
does not turn the TV on or off, or
adjust the volume.
• Program the Cable/Set remote control to operate the TV. Refer to the Cable/Set user
manual for the SAMSUNG TV ctode.
✎
This TFT LCD panel uses a panel consisting of sub pixels which require sophisticated technology to produce. However,
there may be a few bright or dark pixels on the screen. These pixels will have no impact on the performance of the
product.
✎
You can keep your TV as optimum condition to upgrade the latest firmware on web site (samsung.com -> Support ->
Downloads) by USB.
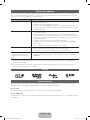
License
List of Features
Excellent Digital Interface & Networking: With a built-in HD digital tuner, nonsubscription HD broadcasts can be viewed without
a cable box / STB (Set-Top-Box) satellite receiver.
My Contents
Allows you to play music files, pictures, and movies saved on a USB device.
Anynet+(HDMI-CEC)
Allows you to control all connected Samsung devices that support anynet+ with your Samsung TV’s remote control.
[LD400-ZD]BN68-03460A-Eng.indb 13 2011-02-24 �� 7:50:58

English - 14
Storage and Maintenance
✎
If you remove the attached sticker on the TV screen, clean the residues and then watch TV.
Do not spray water or a cleaning agent directly onto the
product. Any liquid that goes into the product may cause a
failure, fire, or electric shock.
Clean the product with a soft cloth dapped in a small amount
of water.
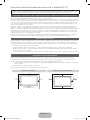
Securing the TV to the Wall
Caution: Pulling, pushing, or climbing on the TV may cause the TV to fall. In particular, ensure your children do not
hang over or destabilize the TV; doing so may cause the TV to tip over, causing serious injuries or death. Follow
all safety precautions provided on the included Safety Flyer. For added stability, install the anti-fall device for safety
purposes, as follows.
To avoid the TV from falling
1. Put the screws into the clamps and firmly fasten them onto the
wall. Confirm that the screws have been firmly installed onto the
wall.
✎
You may need additional material such as an anchor
depending on the type of wall.
✎
Since the necessary clamps, screws, and string are not
supplied, please purchase these additionally.
2. Remove the screws from the center back of the TV, put the
screws into the clamps, and then fasten the screws onto the TV
again.
✎
Screws may not be supplied with the product. In this case,
please purchase the screws of the following specifications.
✎
Screw Specifications
x
For a 32 ~ 40 Inch LCD TV : M6
3. Connect the clamps fixed onto the TV and the clamps fixed onto
the wall with a strong string and then tie the string tightly.
✎
NOTE
x
Install the TV near to the wall so that it does not fall backwards.
x
It is safe to connect the string so that the clamps fixed on the wall are equal to or lower than the clamps fixed on
the TV.
x
Untie the string before moving the TV.
4. Verify all connections are properly secured. Periodically check connections for any sign of fatigue for failure. If you have any
doubt about the security of your connections, contact a professional installer.
Wall
[LD400-ZD]BN68-03460A-Eng.indb 14 2011-02-24 �� 7:50:59

English - 15
Specifications
Display Resolution
1360 x 768
Environmental Considerations
Operating Temperature
Operating Humidity
Storage Temperature
Storage Humidity
50°F to 104°F (10°C to 40°C)
10% to 80%, non-condensing
-4°F to 113°F (-20°C to 45°C)
5% to 95%, non-condensing
Model Name
LN32D400
Screen Size
32 inches
Power Consumption
Normal operation
Standby
110W
<1W
Sound
(Output) 10W X 2
Dimensions (WxDxH)
Body
With stand
30.8 x 3.1 x 19.7 inches
(784.4 x 78.8 x 502.8 (mm))
30.8 x 9.9 x 22.2 inches
(784.4 x 251.7 x 565.6 (mm))
Weight
Without Stand
With Stand
12.1 lbs (5.5 kg)
23.5 lbs (10.7 kg)
✎
Design and specifications are subject to change without prior notice.
✎
For information about power supply, and more about power consumption, refer to the label attached to the product.
[LD400-ZD]BN68-03460A-Eng.indb 15 2011-02-24 �� 7:51:00

Português - 2
Para obter mais informações sobre como usar o e-Manual (P. 10)
As figuras e ilustrações deste Manual de usuário são fornecidas apenas para fins de referência e podem ser diferentes da
aparência real dos produtos. O design e as especificações do produto podem ser alterados sem aviso prévio.
Informações importantes sobre a garantia em relação ao formato de visualização de televisão
✎
Veja o cartão de garantia para obter mais informações sobre os termos da garantia.
Os monitores LCD no formato wide screen (16:9, relação de largura x altura da tela) são projetados essencialmente para exibir vídeo full motion no
formato wide screen. As imagens exibidas nelas devem estar, principalmente, no formato widescreen 16:9, ou serem expandidas para preencher
a tela caso o seu modelo ofereça tal função e as imagens estejam em constante movimento. A exibição de gráficos e imagens parados na tela,
como as barras escuras laterais nas programações e vídeos da TV em formato padrão não expandido, deve ser limitada a não mais de 5% do
tempo total de visualizações na TV por semana.
Além disso, a exibição de outras imagens e textos parados, como notícias sobre o valor de ações, exibições de videogames, logotipos, sites
ou gráficos e padrões de computador, deve ser limitada para todas as TVs, conforme descrição acima. A exibição de imagens paradas que
ultrapasse as orientações acima pode causar um desgaste irregular dos monitores LCD e, consequentemente, problemas de imagens duplicadas
permanentes na tela. Para evitar que isso ocorra, varie a programação e as imagens, exibindo imagens em movimento, em tela cheia, em vez
de imagens paradas ou barras escuras. Nos modelos LCD que oferecem recursos de enquadramento de imagem, utilize esses controles para
visualizar formatos diferentes como uma imagem em tela cheia.
Esteja atento à seleção e à duração dos formatos de TV utilizados para visualização. O desgaste irregular do monitor LCD como resultado da
seleção e do uso de formatos, bem como imagens fantasmas permanentes, não são cobertos pela garantia limitada Samsung.
Alerta de imagens estáticas
Evite exibir imagens estáticas (como arquivos de fotos jpeg) ou elementos de imagens estáticas (como logotipos de programs de TV, panorama
ou formato de imagem 4:3, barras de notícias ou de bolsa de valores na parte inferior da tela, etc.) na tela. A exibição constante de imagens
estáticas pode causar desgaste na tela LCD, afetando a qualidade da imagem. Para reduzir o risco de tal efeito, siga as recomendações abaixo:
• Evite exibir o mesmo canal de TV por longos períodos.
• Sempre tente exibir as imagens em tela cheia, use o menu de formato de imagem da TV para encontrar a melhor configuração.
• Reduza os valores de brilho e contraste até o mínimo requerido para obter a qualidade de imagem desejada, já que valores altos demais
podem acelerar o processo de queima.
• Use todas as funções da TV designadas para reduzir a retenção de imagem e queima de tela. Consulte o e-Manual para obter mais detalhes.
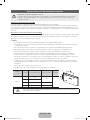
Segurança do espaço de instalação
Respeite as distâncias requeridas entre o produto e outros objetos (por exemplo, paredes) para garantir que haja ventilação adequada.
A não observação de tais distâncias pode causar incêndios ou problemas com o produto devido a elevações de sua temperatura interna.
✎
Ao usar um suporte ou suporte de parede, utilize somente as peças fornecidas pela Samsung Electronics.
x
Se você usar peças fornecidas por outro fabricante, isto pode resultar em algum problema com o produto ou ferimento ocasionado pela
queda do produto.
✎
A aparência pode ser diferente dependendo do produto.
✎
Tenha cuidado ao ligar a TV porque algumas peças podem estar quentes.
Instalação com um suporte. Instalação com um suporte de parede.
10 cm
10 cm
10 cm
10 cm
10 cm
10 cm
10 cm
[LD400-ZD]BN68-03460A-Eng.indb 2 2011-02-24 �� 7:51:00

Português - 3
Acessórios
✎
Verifique se os itens a seguir foram incluídos com a TV. Se algum item estiver faltando, entre em contato com o representante.
✎
As cores e os formatos dos itens podem variar dependendo do modelo.
y Controle remoto e pilhas (AAA x 2)
y Manual do Usuário
y Certificado de garantia / Guia de segurança (Não disponível em alguns
locais)
y Cabo de força
y Pano de limpeza
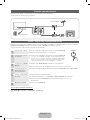
Visualizando o Painel de controle
✎
A cor e o formato do produto podem variar, dependendo do modelo.
P
(Power)
Liga e desliga a TV.
Sensor do controle remoto Aponte o controle remoto para este ponto na TV.
SOURCE
E
Alterna entre todas as fontes de entrada disponíveis. No menu na tela, utilize esse
botão da mesma maneira que usaria o botão ENTER
E
no controle remoto.
MENU Exibe o menu na tela com as funções da sua TV.
y
Ajusta o volume. No menu na tela, use os botões
y
da mesma maneira que
usaria os botões ◄ e ► no controle remoto.
z
Muda os canais. No menu na tela, use os botões
z
da mesma maneira que
usaria os botões ▼ e ▲ no controle remoto.
Indicador de energia Pisca e apaga quando a energia está ligada e acende quando está no modo standby.
Modo standby
Não deixe a sua TV em standby por longos períodos (quando você viajar, por exemplo). Uma pequena quantidade de energia
é consumida mesmo com o botão Power desligado. É melhor desconectar o cabo da tomada.
Alto-falantes
Painel de controle
[LD400-ZD]BN68-03460A-Eng.indb 3 2011-02-24 �� 7:51:01

Português - 4
Instalação das pilhas (Tamanho das pilhas: AAA)
Visualizando o controle remoto
✎
Este é um controle remoto especial para deficientes visuais e possui pontos em braile nos botões Power, Channel e
Volume.
Pressione para exibir informações na tela da TV.
Muda os canais.
Volta ao canal anterior.
Elimina o som temporariamente.
Exibe o menu de tela principal.
Sai do menu.
E-MANUAL: Exibe o guia do e-Manual.
SRS: Seleciona o modo SRS TruSurround HD.
P.MODE: Selecione o modo de imagem.
P.SIZE: Escolha o tamanho da imagem.
CC: Controla o decodificador de legendas.
MTS: Pressione para selecionar estéreo,
mono ou Segundo Programa de Áudio
(transmissão SAP)
Exibe o EPG (Guia eletrônico de programas).
Volta ao menu anterior.
Seleciona rapidamente funções utilizadas
com frequência.
Seleciona os itens do menu de tela e troca
os valores vistos no menu.
Exibe a Lista de Canais na tela.
Pressione para selecionar mais canais
(digitais) transmitidos pela mesma estação.
Por exemplo, para selecionar o canal
“54.3”, pressione “54”, depois “-” e “3”.
Ajusta o volume.
Exibe e seleciona as fontes de vídeo
disponíveis.
Liga e desliga a TV.
Utilize esses botões nos modos Meu
conteúdo e Anynet+.
(�:controla a gravação nos gravadores
Samsung que dispõem da função
Anynet+)
Pressione para acessar canais
diretamente.
A B C D
P.SIZE
CONTENT
E-MANUAL
CC
SRS
GUIDE
MTS
P.MODE
Botões utilizados nos menus Lista de
Canais, Gerenc. de Canais , Meu
conteúdo, etc.
Exibe Meu conteúdo, Ver TV e Entrada.
[LD400-ZD]BN68-03460A-Eng.indb 4 2011-02-24 �� 7:51:02

Português - 5
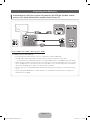
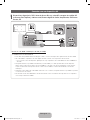
Conexão com uma antena
Quando a TV for ligada, os ajustes básicos serão realizados automaticamente.
✎
Conexão do cabo de força e da antena.
Cabo
R-AUDIO-L
P
R PB Y
ANT OUT
Antena VHF/UHF
Entrada de energia
ou
Ajuste - Plug & Play (Configuração inicial)
Quando a TV for ligada, uma sequência de avisos na tela irá auxiliá-lo a realizar as configurações básicas. Pressione o botão
POWER
P
. Plug & Play está disponível apenas quando a Entrada está definida como TV.
✎
Para retornar à etapa anterior, pressione o botão vermelho.
1
Selecionando o idioma
Pressione o botão ▲ ou ▼, e então pressione o botão ENTER
E
.
Selecione o idioma desejado para o menu da tela.
P
POWER
FAV.CH
CHLIST
MEDIA.P
P.MODE
S.MODE
P.SIZE
CC
MTS
INFO
SLEEP
2
Selecionando o modo
de utilização
Pressione o botão ◄ ou ►, e então pressione o botão ENTER
E
.
y Selecione o modo Casa. O modo Loja é o modo utilizado pelas lojas.
y Para retornar as configurações da unidade de Loja para Casa (padrão):
Pressione o botão de volume da TV. Ao ver o menu de volume na tela,
aperte e mantenha o botão pressionado MENU por 5 segundos.
3
Configuração do Modo
Relógio.
Configure a opção Modo Relógio automática ou manualmente.
✎
Se você selecionar o modo Auto, selecione o fuso horário do seu local.
4
Selecionando opções
de pesquisa para a
sintonia automática
Pressione o botão ▲ ou ▼, e então pressione o botão ENTER
E
. Selecione Ar ou Cabo.
5
Seleção e memorização
de canais.
A pesquisa terminará automaticamente.
Para obter mais informações, consulte Canal → Prog. Automática no e-Manual.
✎
Pressione o botão ENTER
E
quando desejar interromper o processo de
memorização.
6
Aproveite a sua TV!
Pressione o botão ENTER
E
Se você quiser restaurar essa função...
O
MENU
m
→ Sistema → Plug & Play → ENTER
E
[LD400-ZD]BN68-03460A-Eng.indb 5 2011-02-24 �� 7:51:03

Português - 6
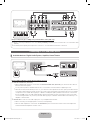
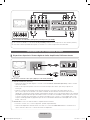
Conexão com um dispositivo AV
¦ Dispositivos disponíveis: DVD, leitor de discos Blu-ray, cabo HD, receptor de satélite HD
(conversor Set-Top Box), videocassete,Sistema digital de áudio, Amplificador, DVD home
theater, PC
Usando um cabo HDMI ou HDMI para cabo DVI (até 1080p)
✎
HDMI/DVI IN / PC/DVI AUDIO IN
x
Para obter uma qualidade melhor de imagem e áudio, conecte a um dispositivo digital usando um cabo HDMI.
x
Um cabo HDMI é compatível com sinais digitais de vídeo e áudio, e não requer um cabo de áudio.
– Para conectar a TV a um dispositivo digital que não seja compatível com a saída HDMI, use cabos HDMI/DVI e
de áudio.
x
A imagem talvez não seja exibida normalmente (ou nem exibida) ou o áudio poderá falhar se um dispositivo
externo que usa uma versão anterior do modo HDMI for conectado à TV. Se esse problema ocorrer, informe-
se junto ao fabricante do dispositivo externo sobre a versão HDMI e, se estiver desatualizada, solicite uma
atualização.
x
Certifique-se de comprar um cabo HDMI certificado. Caso contrário, a imagem talvez não seja exibida ou poderá
ocorrer um erro de conexão.
x
Recomenda-se um cabo HDMI básico de alta velocidade ou um com ethernet. Esse produto não é compatível
com a função ethernet via HDMI.
Dispositivo
R-AUDIO-L
P
R PB Y
DVI OUT
BD/DVD player/
Cabo HD/receptor de
satélite HD
R-AUDIO-L
P
R PB Y
HDMI OUT
R-AUDIO-L
P
R PB Y
AUDIO OUT
Vermelho Branco
W W
B
G
R
R
W
Y
[LD400-ZD]BN68-03460A-Eng.indb 6 2011-02-24 �� 7:51:05
A página está carregando...
A página está carregando...
A página está carregando...
A página está carregando...
A página está carregando...
A página está carregando...
A página está carregando...
A página está carregando...
A página está carregando...
-
 1
1
-
 2
2
-
 3
3
-
 4
4
-
 5
5
-
 6
6
-
 7
7
-
 8
8
-
 9
9
-
 10
10
-
 11
11
-
 12
12
-
 13
13
-
 14
14
-
 15
15
-
 16
16
-
 17
17
-
 18
18
-
 19
19
-
 20
20
-
 21
21
-
 22
22
-
 23
23
-
 24
24
-
 25
25
-
 26
26
-
 27
27
-
 28
28
-
 29
29


em outras línguas
Artigos relacionados
-
Samsung UE32N4005AW Manual do usuário
-
Samsung LN32C530F1M Manual do usuário
-
-
-
-
-
-
-
-
Samsung LN46D550K1G Guia rápido