JATA MC822 Manual do usuário
- Categoria
- Máquinas de costura
- Tipo
- Manual do usuário
A página está carregando ...

MANUAL DE INSTRUCCIONES • INSTRUCTIONS MANUAL • MANUAL DE INSTRUÇÕES
222
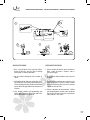
PROTECCION DEL MEDIO AMBIENTE
• En su calidad de consumidor, cuando desee desprenderse del aparato deposítelo para su posterior tratamiento en
un centro de recogida de residuos o contenedor destinado a tal fi n.
• Proceda de igual forma cuando tenga que eliminar las pilas usadas.
• Nunca tire el aparato ni las pilas a la basura. De esta manera estará contribuyendo al cuidado y mejora del medio
ambiente.
ENVIRONMENT PROTECTION
• Dispose the appliance according to the local garbage regulations.
• Dispose the batteries according to the local garbage regulation.
• Never throw it away to the rubbish. So you will help to the improvement of the environment.
PROTECÇÃO DO MEIO AMBIENTE
• Na sua qualidade de consumidor, quando desejar desfazer-se do aparelho deposite-o, para o seu posterior trata-
mento, num centro de recolha de resíduos ou contentor destinado para tal efeito.
• Proceda de igual forma quando tiver que eliminar as pilhas usadas.
• Nunca deite o aparelho, nem as pilhas, para o lixo. Desta forma estará contribuindo para o cuidado e a melhoria
do meio ambiente.

3
MANUAL DE INSTRUCCIONES • INSTRUCTIONS MANUAL • MANUAL DE INSTRUÇÕES
33
1. IDENTIFICACIÓN DE SU
MÁQUINA
Identifi cación de su máquina
Accesorios
Conexión de la máquina a la red
Colocación de los porta carretes
Palanca de alzado del
prensatelas
Ajuste de los dientes de arrastre
Brazo libre
Devanado de la canilla
Posición de la canilla en su
alojamiento
Enhebrado del hilo superior
Enhebrado de hilo automático
Extracción del hilo de la canilla
Tabla de tejidos, agujas e hilos
Cambio de aguja
Ajuste de la tensión del hilo
superior
Cambio del prensatelas
Regulador de tensión
Panel de control
Funciones del panel de control
Botones de funcionamiento
Control de velocidad del cosido
Mensajes en la pantalla
2. COMENZAR A COSER
Puntada recta
Colocación de cremalleras y
cordoncillo
Acolchados y apariencia
manual
Puntada Zig-zag
Puntada invisible
Zig-zag triple
Puntada de concha (hueca)
Coser un botón
Puntadas elásticas y
decorativas
Ojal automático
Posición de la aguja de
puntada recta
3. CUIDADO DE SU MÁQUINA
Limpieza de los dientes de
arrastre y lanzadera
6
8
11
13
13
13
15
17
19
21
23
25
25
33
35
35
39
41
43
45
47
49
51
51
56
59
61
61
73
79
81
6
8
11
13
13
13
15
17
19
21
23
25
26
31
33
35
35
36
41
43
45
47
49
51
51
57
59
59
61
61
73
79
81
6
8
10
12
12
12
14
16
18
20
22
24
26
30
32
34
34
36
38
40
42
44
46
48
50
50
56
58
58
60
60
72
78
80
1. KNOWING YOUR SEWING
MACHINE
Machine identifi cation
Accessories
Setting up your machine
Spool pins
Presser foot lifter
Feed dogs control
Converting to free-arm sewing
Winding the bobbin
Threading the bobbin thread
Threading the top thread
Using automatic needle
threader
Picking up bobbin thread
Needle, thread and fabric chart
Adjusting top thread tension
Changing presser foot
Presser regulator
Functions of control panel
Operation buttons
Sewing speed control
Helpful messages
2. STARTING TO SEW
Straight stitching
Inserting zippers and piping
Hand-look quilt stitch
Zigzag stitching
Blindhem stitch
Multi-stitch zigzag, Shell stitch
Sewing on a button
Decorative and stretch stitches
Automatic buttonhole
Straight stitch needle position
3. CARING FOR YOUR MACHINE
Cleaning hook area and feed
dogs
1. PEÇAS
PRINCIPAIS
Identifi cação da sua máquina
Acessórios
Ligação da máquina à rede
Colocação dos suportes para
carrinhos de linhas
Elevação da alavanca do pé-calcador
Ajuste dos dentes impelentes
Braço livre
Enrolamento da bobina
Posição da bobina no local a ela
destinado
Enfi ar a linha superior
Enfi ar o fi o, automaticamente
Retirar a linha da bobina
Tabela de tecido, agulhas e linha
Mudar de agulha
Ajustamento da tensão da linha
superior
Substituição do pé-calcador
Regulador de tensão
Painel de controlo
Botões de funcionamento
Controlo da velocidade de costura
Mensagens no visor
2. COMEÇAR A COSER
Ponto a direito
Coser fechos Cordão
Acolchoados e costura com
aparência manual
Pontos em zig-zag
Ponto invisível
Zig-zag triplo
Ponto de concha (vazio)
Pregar um botão
Pontos elásticos e decorativos
Casa automática
Posição da agulha para o ponto a
direito
3. O CUIDADO DE SUA MÁQUINA
Limpeza dos dentes de arraste y
lançadeira
Índice · Index · Índice
A página está carregando ...

5
MANUAL DE INSTRUCCIONES • INSTRUCTIONS MANUAL • MANUAL DE INSTRUÇÕES
55
Esta máquina de costura foi concebida e fabricada exclusiva-
mente para uso doméstico. Por favor leia todas as instruções
antes da sua utilização e siga os cuidados de segurança bási-
cos que seguem em pormenor.
ATENÇÃO
Para evitar o risco de choque eléctrico:
• A máquina nunca deve ser deixada sozinha e desligue-a
da corrente eléctrica sempre que a não for utilizar ou a
vá limpar.
Instruções importantes
de segurança
ADVERTÊNCIA
Para reduzir o risco de queimaduras, incêndio ou lesões:
• Faça funcionar a máquina de costura somente quando
estiver montada sobre a sua mesa de trabalho.
• Este aparelho não é destinado para ser usado por
pessoas (incluindo crianças) com capacidades físicas,
sensoriais ou mentais reduzidas; falta de experiência e
conhecimento, a não ser que sejam supervisionadas ou
recebam instruções concretas sobre a utilização do apa-
relho por uma pessoa responsável pela sua segurança.
• Use este aparelho somente para o fi m para o qual foi
concebido, utilizando exclusivamente os acessórios
recomendados pelo fabricante, como se indica neste
manual.
• Nunca faça funcionar este aparelho se o cabo ou a fi -
cha estiverem danifi cados. Se não funcionar adequa-
damente, se tiver caído, estiver danifi cado ou se tiver
apanhado água, contacte o distribuidor ou o centro
de serviço técnico autorizado mais próximo para que o
verifi quem, reparem ou façam os ajustes eléctricos ou
mecânicos necessários.
• Nunca use este aparelho com alguma das saídas de ven-
tilação bloqueadas. Mantenha as grelhas de ventilação e
o pedal limpos, sem acumulações de pelos, pó ou fi os de
tecido soltos.
• Nunca deixe cair, ou insira objectos nas aberturas.
• Não a use ao ar livre.
• Não a use onde estiverem a ser usados produtos em
aerossol (sprays) ou onde esteja a ser libertado oxigénio.
• Para a desligar, coloque todos os controlos na posição “Apa-
gado” (“0”) e desligue a ficha da tomada da corrente.
• Desligue-a sempre puxando pela fi cha e nunca pelo cabo.
• Mantenha os dedos das mãos afastados das peças em
movimento. Necessitam-se cuidados especiais perto da
agulha.
• Use sempre a chapa adequada à agulha. Usar uma chapa
errada poderá provocar a quebra da agulha.
• Não use agulhas tortas.
• Evite puxar, ou empurrar, o tecido com a mão enquanto
cose, já que o seu movimento é efectuado pela própria
máquina. Forçar o processo só provocará a quebra da
agulha.
• Desligue a máquina de costura ao fazer qualquer ajuste
perto da agulha como enfi ar, ou mudar, a agulha, encher
a bobina, trocar o pé-calcador, etc.
• Desligue sempre a máquina de costura da tomada de
corrente para retirar a tampa, ao lubrifi car, ou ao fazer
qualquer outro ajuste de serviço mencionado neste ma-
nual de instruções.
GUARDE ESTAS INSTRUÇÕES
dropped or damaged, or dropped into water. Return
the appliance to the nearest authorized dealer or
service center for examination, repair, electrical or
mechanical adjustment.
• Never operate the appliance with any air openings
blocked. Keep ventilation openings of the sewing ma-
chine and foot controller free from the accumulation
of lint, dust, and loose cloth.
• Never drop or insert any object into any opening.
• Do not use outdoors.
• Do not operate where aerosol (spray) products are
being used or where oxygen is being administered.
• To disconnect, turn all controls to the off (“0”) posi-
tion, then remove plug from outlet.
• Do not unplug by pulling on cord. To unplug, grasp the
plug, not the cord.
• Keep fi ngers away from all moving parts. Special care
is required around the sewing machine needle.
• Always use the proper needle plate. The wrong plate
can cause the needle to break.
• Do not use bent needles.
• Do not pull or push fabric while stitching. It may de-
fl ect the needle causing it to break.
• Unplug the sewing machine when making any ad-
justments in the needle area, such as threading nee-
dle, changing needle, threading bobbin, or changing
presser foot, etc.
• Always unplug sewing machine from the electrical
outlet when removing covers, lubricating, or when
making any other user servicing adjustments mentio-
ned in the instruction manual.
SAVE THESE INSTRUCTIONS
A página está carregando ...

7
MANUAL DE INSTRUCCIONES • INSTRUCTIONS MANUAL • MANUAL DE INSTRUÇÕES
7
Ajuste de tensión del hilo superior
Regulador de presión
Elevador del hilo
Control de la tensión del hilo
Cubierta frontal
Cortahilos
Control de dientes de arrastre
Compartimento accesorios
(Ampliación de la superfi cie de
costura)
Porta carretes vertical
Eje del devanador de la canilla
Tope del devanador de canillas
Panel de control
Control de velocidad de cosido
Botones de funcionamiento
Asa
Volante
Interruptor de encendido
Enchufe del pedal
Enchufe de la máquina
Guía del hilo
Palanca para ojales
Elevador del prensatelas
Enhebrador de hilo
Enhebrador de aguja
Guía del hilo
Tornillo prensatelas
Aguja
Cubierta de la canilla
Barra de la aguja
Cortador de hilo
Botón para soltar el prensatelas
Tornillo sujeción aguja
Prensatelas
Dientes de arrastre
Placa de la aguja
Apertura de la cubierta de canilla
Cable conexión
Pedal de control
Manual de instrucciones
1.
2.
3.
4.
5.
6.
7.
8.
9.
10.
11.
12.
13.
14.
15.
16.
17.
18.
19.
20.
21.
22.
23.
24.
25.
26.
27.
28.
29.
30.
31.
32.
33.
34.
35.
36.
37.
38.
39.
Ajustamento da tensão da linha
Regulador de pressão
Elevador da linha
Controlo da tensão da linha
Cabeçote
Cortador de linhas
Controlo dos dentes impelentes
Compartimento acessórios
(Ampliação da superfície de
costura)
Porta-carrinhos de linha vertical
Eixo do enrolador da bobina
Limite do enrolador de bobinas
Painel de controlo
Controlo da velocidade de costura
Botões de funcionamento
Pega
Volante
Interruptor para ligar
Ficha do pedal
Ficha da máquina
Guia da linha
Alavanca para casas
Elevador do pé-calcador
Enfi ador da linha
Enfi ador da linha
Guia da linha
Parafuso do pé-calcador
Agulha
Tampa da bobina
Barra da agulha
Cortador do fi o
Botão para libertar o pé-calcador
Parafuso de fi xação da agulha
Pé-calcador
Dentes impelentes
Placa da agulha
Abertura da cobertura da bobina
Cabo de ligação
Pedal de controlo
Manual de Instruções
1.
2.
3.
4.
5.
6.
7.
8.
9.
10.
11.
12.
13.
14.
15.
16.
17.
18.
19.
20.
21.
22.
23.
24.
25.
26.
27.
28.
29.
30.
31.
32.
33.
34.
35.
36.
37.
38.
39.
Bobbin winding tension disk
Pressure regulator
Thread take-up
Thread tension control
Face cover
Thread cutter
Feed dog control
Accessory box (Extension table)
Vertical spool pin
Bobbin winder shaft
Bobbin winder stop
Control Panel
Sewing speed control
Operation buttons
Handle
Hand wheel
Power/light switch
Foot control socket
19. Cord socket
Thread guide
Buttonhole lever
Presser foot lifter
Automatic needle threader
Needle threader Thread Guide
Thread guide
Presser foot screw
Needle
Bobbin cover plate
Needle bar
Alternate Thread Cutter
Foot release button
Needle clamp screw
Presser foot
Feed dogs
Needle plate
Bobbin cover release button
Power line cord
Foot control
Instruction manual
1.
2.
3.
4.
5.
6.
7.
8.
9.
10.
11.
12.
13.
14.
15.
16.
17.
18.
19.
20.
21.
22.
23.
24.
25.
26.
27.
28.
29.
30.
31.
32.
33.
34.
35.
36.
37.
38.
39.
7
A página está carregando ...

9
MANUAL DE INSTRUCCIONES • INSTRUCTIONS MANUAL • MANUAL DE INSTRUÇÕES
9
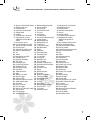
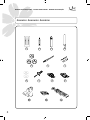
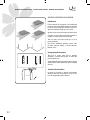
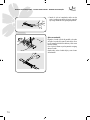
1) Agujas
2) Aguja doble
3) Lubricante
4) Porta carretes auxiliar
5) Canillas
6) Cepillo
7) Abridor de ojales
8) Discos de felpa.
9) Destornillador
10) Prensatelas para cremalleras
11) Prensatelas para puntada satin
12) Prensatelas para puntada ciega
13) Prensatelas para el cosido de
botones
14) Prensatelas deslizante para
ojales
1) Needle set
2) Twin Needle
3) Oiler
4) Auxiliary spool pin
5) Bobbins
6) Brush
7) Buttonhole opener
8) Spool pin felt discs
9) Screw driver
10) Zipper foot
11) Satin stitch foot
12) Blind stitch foot
13) Button fi tting foot
14) Buttonhole foot
1) Agulhas
2) Agulha dupla
3) Lubrifi cante
4) Porta-carrinhos de linha
auxiliar
5) Bobinas
6) Escova
7) Abridor de casas
8) Discos de feltro
9) Chave de parafusos
10) Pé-calcador para fechos
11) Pé-calcador para ponto de cetim
12) Pé-calcador para ponto cego
13) Pé-calcador para coser botões
14) Pé-calcador deslizante para
casas
A página está carregando ...

11
MANUAL DE INSTRUCCIONES • INSTRUCTIONS MANUAL • MANUAL DE INSTRUÇÕES
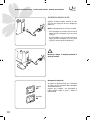
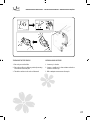
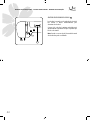
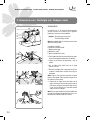
SETTING UP YOUR MACHINE
Be sure to wipe off any surplus oil from needle plate
area before using your machine the fi rst time.
Note: This machine can be used either with or without
foot control.
• When using power line cord only: Connect the plug
of the power line cord into the cord socket (1) and
your wall outlet (2) as illustrated (A).
• When using power line cord and foot control:
Connect the plug of the power line cord into the
cord socket (1) and your wall outlet (2) as illustrated
(B). Connect the foot control plug into the machine
socket (3).
Power/ light switch
Your machine will not operate until the power/light
switch is turned on. The same switch controls both the
power and the light.
When servicing the machine, or changing needles, etc.,
machine must be disconnected from the power supply.
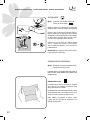
LIGAÇÃO DA MÁQUINA À REDE
Certifi que-se de que limpa qualquer excesso de óleo da
placa da agulha antes de usar a máquina pela primeira
vez.
Aviso: Esta máquina pode ser usada com ou sem pedal.
• Uso da máquina com ligação à rede: Ligue uma das
extremidades do cabo à máquina (1) e o outro à rede
(2) (Fig. A).
• Uso da máquina à rede e com pedal: Ligar uma das
extremidades do cabo à máquina (1) e o outro à rede
(2) (Fig. B). Ligue o pedal à máquina (3)
Interruptor de alimentação / luz
A máquina não funcionará enquanto o interruptor
de alimentação / luz não estiver ligado. O mesmo
interruptor controla as duas funções.
Certifi que-se que a máquina está desligada para
fazer qualquer alteração de peças ou trabalhos de
manutenção.
11
Always disconnect the machine from power
supply by removing the plug from the wall-
outlet.
Desligue sempre a máquina retirando a fi cha da
tomada.
A página está carregando ...

13
MANUAL DE INSTRUCCIONES • INSTRUCTIONS MANUAL • MANUAL DE INSTRUÇÕES
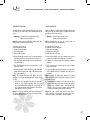
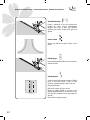
COLOCAÇÃO DOS SUPORTES PARA CARRINHOS DE LINHAS
• Porta-carrinhos de linha vertical (1): Levante o
suporte para carrinhos e coloque um disco de feltro
(2). Introduza o carrinho de linhas (3).
• Porta-carrinhos auxiliar (4): Ajuste o suporte
auxiliar para carrinhos e coloque um disco de feltro
(5). Coloque o carrinho de linhas (6).
ELEVAÇÃO DA ALAVANCA DO PÉCALCADOR
O pé-calcador tem três posições.
1. Baixe o pé-calcador para coser.
2. Levante a alavanca até à posição média para inserir
ou mover o tecido.
3. Levante para a posição mais elevada para trocar o
pé-calcador ou para ou para mover tecidos pesados.
AJUSTE DOS DENTES IMPELENTES
Os dentes impelentes controlam o movimento do
tecido que está a ser costurado. Os dentes impelentes
devem ser posicionados em cima para coser e em baixo
para cerzir, bordar, etc.
SPOOL PINS
• Vertical spool pin (1): Pull up the vertical spool
pin and place a felt disc over it (2). Place a spool of
thread on the spool pin (3).
• Auxiliary spool pin (4): Attach the auxiliary spool
pin and place a felt disc over it (5). Place a spool of
thread on the spool pin (6).
PRESSER FOOT LIFTER
There are three positions for your presser foot.
1. Lower the presser foot to sew .
2. Raise the lifter to the middle position to insert or
remove fabric.
3. Lift it to its highest position to change the presser
foot or to remove thick fabric.
FEED DOG CONTROL
The feed dogs control the movement of the fabric that
is being sewn. They should be raised for all general
sewing purposes and lowered for darning, freehand
embroidery and monogramming so that you, not the
feed dogs, are guiding the fabric.
13
A página está carregando ...

15
MANUAL DE INSTRUCCIONES • INSTRUCTIONS MANUAL • MANUAL DE INSTRUÇÕES
15
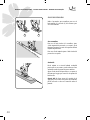
CONVERTING TO FREE ARM SEWING
Your machine can be used either as a fl at- bed or as a
freearm model. With the extension table in position, it
provides a large working surface.
With the extension table removed the machine
converts into a free-arm model for sewing children’s
clothes, cuff s, trouser legs, and other hard-to-reach
places.
• To remove the extension table, hold it fi rmly with
both hands and pull it off to the left as shown.
• To replace, slide the extension table back into place
until it clicks.
BRAÇO LIVRE
A extensão fornece uma superfície de costura adicional
e pode ser removida facilmente para a costura com
movimento livre.
A costura com movimento livre é usada para roupas
tubulares de difícil acesso como, por exemplo, bainhas
de calças ou mangas.
• Para a remover, segure o extremo da extensão e
desprenda-a da máquina de costura.
• Para voltar a colocá-la, empurre a extensão até que
encaixe na máquina.
A página está carregando ...

17
MANUAL DE INSTRUCCIONES • INSTRUCTIONS MANUAL • MANUAL DE INSTRUÇÕES
17
1
3
4
2
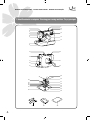
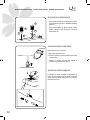
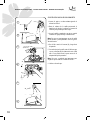
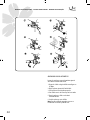
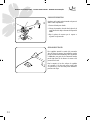
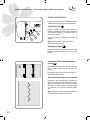
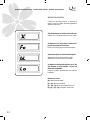
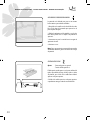
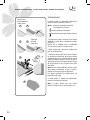
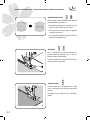
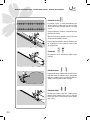
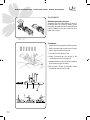
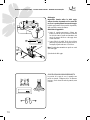
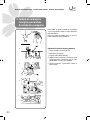
WINDING THE BOBBIN
1. Place a spool of thread on the spool pin. Pull the
thread out from the spool and place it through
thread guides as shown in illustration.
2. Put end of thread through the hole in bobbin as
shown.
3. Push bobbin winder shaft to far left position, if it is
not already there. Place bobbin onto shaft with end
of thread coming from top of bobbin. Push bobbin
winder shaft to the right until it clicks. Hold onto end
of thread.
4. Start machine. Bobbin will automatically stop
turning when completely fi lled. Push shaft to the
left to remove bobbin and cut thread.
ENROLAMENTO DA BOBINA
1. Coloque a bobina de linha no suporte das bobinas.
Retire a linha da bobina e coloque-a como se
apresenta na fi gura.
2. Insira a linha no orifício da bobina, como se pode ver
na fi gura.
3. Empurre o eixo do enrolador para a esquerda, se não
estiver já colocado nessa posição. Coloque a bobina
no eixo com a linha para cima e pressione o eixo para
a direita até ouvir um “click”.
4. Coloque a máquina em funcionamento. A bobina
pára automaticamente quando estiver totalmente
cheia de linha. Pressione o eixo para a esquerda para
retirar a bobina e corte a linha.
A página está carregando ...

19
MANUAL DE INSTRUCCIONES • INSTRUCTIONS MANUAL • MANUAL DE INSTRUÇÕES
19
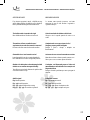
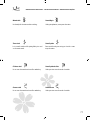
THREADING THE BOBBIN THREAD
1. Raise the needle to its highest position by rotating
the hand wheel toward you.
2. Remove the bobbin cover plate by pushing the
release button to the right Bobbin cover will pop up
suffi ciently to allow you to remove the cover.
3. Insert the bobbin making sure the bobbin rotates
counter -clockwise when you pull the thread.
Note: This is a very important step as the bobbin can
become unthreaded and cause sewing problems if it
rotates clockwise.
4. Pull thread through the slot (A) and then to the left.
5. With a fi nger held gently on top of the bobbin pull
the thread , until it stops in slot (B) Then pull about
6” (15 cm) of thread and lead it towards back of the
machine under the presser foot.
Note: This is also a very important step to assure the
bobbin thread does not slip out of position.
6. Replace the bobbin cover plate onto the needle
plate.
POSIÇÃO DA BOBINA NO LOCAL A ELA DESTINADO
1. Levante a agulha até à sua altura máxima rodando o
volante na sua direcção.
2. Retire a tampa da bobina pressionando o botão para
a direita. Deverá levantar a tampa o sufi ciente para
permitir que a mesma seja removida.
3. Insira a bobina certifi cando-se que, ao esticar
a linha, a faz rodar no sentido contrário ao dos
ponteiros do relógio.
Nota: Este passo é muito importante, pois a bobina
pode fi car emaranhada e causar problemas ao coser se
rodar na direcção dos ponteiros do relógio.
4. Passe a linha através da ranhura (A) e depois para
a esquerda.
5. Com um dedo segure a bobina, estique a linha
até que esta pare na ranhura (B). Seguidamente,
estique a linha cerca de 15 cm e leve-a para a parte
traseira da máquina, sob o pé-calcador.
Nota: Este passo é, também, muito importante para se
assegurar que a bobina não se move do seu sítio.
6. Volte a colocar a tampa.
A página está carregando ...
21
MANUAL DE INSTRUCCIONES • INSTRUCTIONS MANUAL • MANUAL DE INSTRUÇÕES
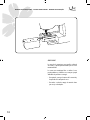
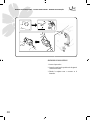
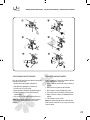
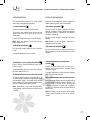
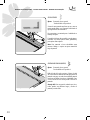
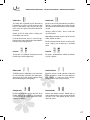
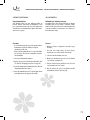
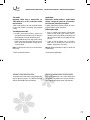
THREADING THE TOP THREAD
1. Raise the presser foot lifter.
2. Raise the needle to its highest position by rotating
the hand wheel towards you.
3. Thread the machine in the order as illustrated.
ENFIAR A LINHA SUPERIOR
1. Levante o pé-calcador.
2. Levante a agulha até à altura máxima rodando o
volante na sua direcção.
3. Enfi e a máquina como mostra a ilustração.
21
1
2
3
4
6
5
A página está carregando ...

23
MANUAL DE INSTRUCCIONES • INSTRUCTIONS MANUAL • MANUAL DE INSTRUÇÕES
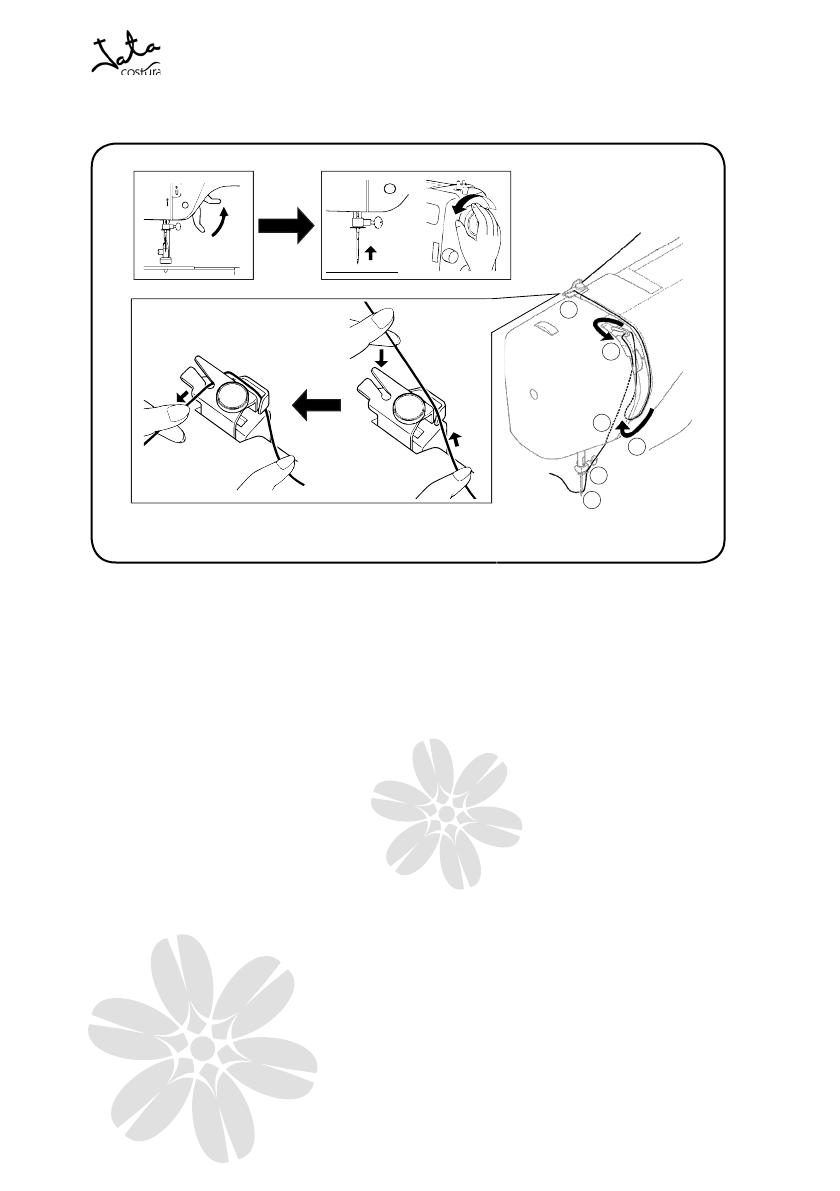
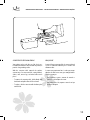
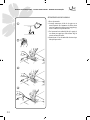
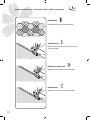
USING AUTOMATIC NEEDLE THREADER
Raise the needle to its highest position by rotating the
hand wheel towards you.
1. Hook thread to thread guide as illustrated.
2. Pull down lever holding the end of thread.
3. Turn the lever as far as it will go.
4. Guide thread into hooked end and pull it upward.
5. Return the lever and needle will be threaded
automatically.
6. Release the lever and pull thread away from you.
Note: For smooth threading it is recommended you
select straight stitching when using the needle
threader.
ENFIAR O FIO, AUTOMATICAMENTE
Levante a agulha até à sua posição máxima rodando o
volante com a mão na sua direcção.
1. Engate a linha na guia da linha como se mostra no
desenho.
2. Baixe a alavanca segurando o fi nal da linha.
3. Rode a alavanca o mais rapidamente possível.
4. Passe a linha através da ranhura e puxe para cima.
5. Retire a alavanca e a linha será automaticamente
enfi ada.
6. Solte a alavanca e puxe a linha.
Nota: Para enfi ar automaticamente a linha de uma
forma correcta recomenda-se que esteja seleccionado
o ponto a direito.
23
A página está carregando ...

25
MANUAL DE INSTRUCCIONES • INSTRUCTIONS MANUAL • MANUAL DE INSTRUÇÕES
PICKING UP BOBBIN THREAD
1. Raise the presser foot lifter.
2. Holding needle thread loosely with your left hand
turn hand, wheel toward you with your right hand
fi rst lowering the needle and continuing until the
needle comes to its highest position.
3. Lightly pull up the top thread and pick up bobbin
thread , which will appear through the needle plate
slot.
4. Pull both top and bobbin threads together toward
the back of the machine under the presser foot
leaving about 6” (15 cm) clear.
RETIRAR A LINHA DA BOBINA
1. Levante o pé-calcador.
2. Pressione cuidadosamente a linha da agulha com a
mão esquerda. Rode lentamente o volante na sua
direcção com a mão direita até que a agulha baixe e
volte a subir até ao seu ponto mais elevado.
3. Puxe levemente para cima a linha da agulha; assim,
a linha interior sairá para fora em forma de laçada.
4. Puxe uns 15cm das duas linhas para trás por baixo
do pé-calcador.

MANUAL DE INSTRUCCIONES • INSTRUCTIONS MANUAL • MANUAL DE INSTRUÇÕES
26
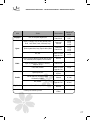
TABLA DE TEJIDO, AGUJAS E HILO
La tela determinará la elección del
hilo y de la aguja. La siguiente tabla
le ayudará a seleccionar la aguja y
el hilo correspondientes.
Asegúrese de usar siempre el
mismo tamaño y tipo de hilo en la
canilla y en el hilo de arriba.
NEEDLE THREAD AND FABRIC CHART
Your fabric will determine the
choice of a needle and thread. The
following table is a practical guide
to needle and thread selection.
Always refer to it before a new
sewing project. And be sure to use
the same size and type of thread
in the bobbin as in the top thread
supply.
TABELA DE TECIDO, AGULHAS E LINHA
O tecido vai determinar a escolha
da linha e da agulha. A tabela
seguinte ajudará a seleccionar a
agulha e a linha apropriadas.
Certifi que-se que usa sempre a
mesma espessura e tipo de linha na
bobina e em cima.
A página está carregando ...
A página está carregando ...

29
MANUAL DE INSTRUCCIONES • INSTRUCTIONS MANUAL • MANUAL DE INSTRUÇÕES
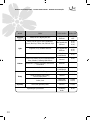
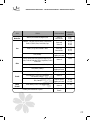
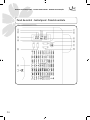
PESO TECIDO TIPO DE AGULHA
MEDIDA DA
AGULHA
Muito Fino
Alinhado, de bordado fi no, Organdi, Tule
Universal
Ponta de bola
9 (65)
9 (65)
Leve
Cambraia, Seda pura, Crepe da China, Tecido de linho,
Percal, Lã, Tafetá, Cetim, Seda Surah, Crepe
Ponta azul
Universal
11 (75)
11 (75)
12 (80)
Malha , Jersey, Fatos de banho e Tricot Ponta azul
Ponta de bola
11 (75)
11 (75)
11 (75)
Pele, Camurça
Ponta de espada
Agulha para couro
11 (75)
Meio
Flanela, Veludo, Musselina, Popelina, Roupa de casa,
Linho, Tecido de Gabardina, Feltro, Serapilheira, Tecidos
acolchoados
Universal
14(90)
Jersey duplo, (sintéticos e naturais), Veludo, Jerseys Ponta de bola
14 (90)
Couro, Vinilo, Camurça
Ponta de espada
Agulha para couro
14 (90)
Pesado
Ganga, Lona
Agulha para ganga 16 (100)
Lã de dupla face, Casacos de tecido pesado,
Pele sintética, Cortinas
Universal
16 (100)
Pele, Camurça
Ponta de espada
Agulha para couro
16 (100)
18 (110)
Muito
Pesados
Tecidos muito pesados, Tecido de tapeçarias
Universal
16 (100)
Costuras para acabamentos especiais
Agulha para
costuras
14 (90)
A página está carregando ...

31
MANUAL DE INSTRUCCIONES • INSTRUCTIONS MANUAL • MANUAL DE INSTRUÇÕES
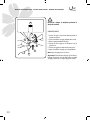
CHANGING THE NEEDLE
1. Raise the needle bar to its highest position by
turning the hand wheel toward you.
2. Loosen the needle clamp screw by turning it toward
you.
3. Remove the needle by pulling it downward.
4. Insert the new needle into the needle clamp with
the fl at side toward the back.
5. Push the needle up as far as it can go.
6. Tighten the needle clamp screw with the screw
driver.
Note: Tighten snugly but do not over tighten.
Helpful Hint: Placing a scrap of fabric under the
presser foot and lowering the presser foot makes it
easier to change the needle and will preclude dropping
the needle into the needle plate slot.
MUDAR DE AGULHA
1. Levante a agulha até à sua posição máxima rodando
o volante na sua direcção.
2. Alivie o parafuso da agulha rodando-o na sua
direcção.
3. Remova a agulha puxando-a para baixo.
4. Coloque novamente a agulha com o lado plano para
a parte traseira.
5. Pressione a agulha para cima tanto quanto possível.
6. Ajuste o parafuso da agulha com a chave de
parafusos.
Nota: Ajuste a agulha mas não em excesso.
Sugestão: Colocando um pano sob o pé-calcador e
baixando-o será mais fácil trocar a agulha evitando
que esta caia pela ranhura.
Always disconnect the machine from power
supply by removing the plug from the wall-
outlet.
Desligue sempre a máquina retirando a fi cha da
tomada.
A página está carregando ...

33
MANUAL DE INSTRUCCIONES • INSTRUCTIONS MANUAL • MANUAL DE INSTRUÇÕES
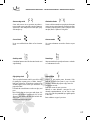
ADJUSTING TOP THREAD TENSION
Straight stitching
The good looking appearance of your stitching is
largely determined by the balanced tension of both top
and bobbin threads. The tension is well balanced when
these two threads ‘lock’ in the middle of layers of fabric
you are sewing.
Set the tension control at “4” position for ordinary
sewing.
If, when you start to sew, you fi nd that the stitching is
irregular, you will need to adjust the tension control.
Make any adjustments with presser foot ‘down’.
A balanced tension (identical stitches both top and
bottom) is usually only desireable for straight stitch
sewing.
Zig zag and decorative sewing
For zigzag sewing and decorative stitch functions,
thread tension should be less than for straight stitch
sewing.
You will always obtain a nicer stitch and less puckering
when the upper thread appears on the bottom side of
your fabric.
Bobbin tension
The bobbin tension has been correctly set at the
factory, so you do not need to adjust it.
AJUSTAMENTO DA TENSÃO DA LINHA SUPERIOR
Ponto a direito
O bom resultado dos pontos está condicionado pelas
tensões correctas da linha superior e da bobina. A
tensão está bem calibrada quando as duas linhas se
encontram no meio do tecido que está a ser costurado.
Ajuste a tensão na posição 4 para uma costura normal.
Se, quando estiver a costurar, verifi car que o ponto está
irregular terá que ajustar a tensão da linha.
Todos os ajustes devem ser feitos com o pé-calcador
para baixo.
Uma tensão equilibrada (pontos exactos tanto por cima
como por baixo), só é desejável para pontos a direito.
Zig-zag e pontos decorativos
Tanto para o ponto zig-zag, como para os pontos
decorativos, a tensão da linha deve ser menor do que
para os pontos a direito.
Obterá sempre um ponto mais perfeito e com menos
rugas quando a linha superior aparece na parte inferior
do tecido.
Tensão da linha da bobina
A tensão da bobina é correctamente ajustada durante
a fabricação da máquina, pelo que não necessitará de
qualquer tipo de ajuste adicional.
A página está carregando ...

35
MANUAL DE INSTRUCCIONES • INSTRUCTIONS MANUAL • MANUAL DE INSTRUÇÕES
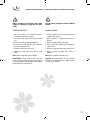
CHANGING PRESSER FOOT
Be sure needle is in the up position. Raise presser foot
lifter.
1. Push presser foot release button to remove the foot.
2. Place the desired foot on the needle plate aligning
the presser foot pin with the foot holder.
3. Lower the presser foot lifter so that the foot holder
snaps on the foot.
SUBSTITUIÇÃO DO PÉCALCADOR
Certifi que-se que a agulha está posicionada na parte
de cima. Levante o pé-calcador.
1. Pressione o botão para o libertar.
2. Coloque o pé-calcador desejado na chapa da agulha
alinhando a patilha à ranhura do suporte do mesmo.
3. Baixe a alavanca para que o suporte engate no pé-
calcador.
PRESSER REGULATOR
This control regulates the pressure of the presser foot
on to the feed-dogs. Insuffi cient pressure may cause
poor feeding of the fabric, skipped stitches, or diffi culty
in guiding the fabric. Too much pressure may result in
feeddogs or presser foot marks appearing on the fabric.
For most fabrics set the control at 3. For thicker ones
increase it to 4 and for fi ner ones decrease to a lower
number.
REGULADOR DE TENSÃO
Este regulador controla a tensão do pé-calcador sobre
os dentes impelentes. Uma tensão insufi ciente pode
causar um deslizamento incorrecto, pontos em falso
ou difi culdades para guiar o tecido. Demasiada tensão
pode deixar marcas dos dentes impelentes ou do pé-
calcador no tecido.
Para a maioria dos tecidos coloque o regulador na
posição 3. Em tecidos mais grossos pode colocar
na posição 4 e em tecidos fi nos pode diminuir para
posições mais baixas.
A página está carregando ...

37
MANUAL DE INSTRUCCIONES • INSTRUCTIONS MANUAL • MANUAL DE INSTRUÇÕES
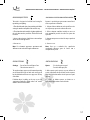
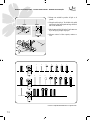
1) Indicador de la posición de la aguja
2) Número del diseño de puntada
3) Visor LCD
4) Indicador del prensatelas
5) Botones para seleccionar el número
de puntada
6) Guía de números y diseños de
puntada
7) Indicador de modo doble aguja
8) Largo de puntada
9) Ancho de puntada / posición de la
aguja en puntada recta
10) Botones de ajuste manual para
largo de puntada
11) Interruptor doble aguja
12) Botones de ajuste manual para
ancho de puntada / posición de
aguja
1) Needle position indicator
2) Stitch pattern number
3) LCD display
4) Presser foot indicator
5) Buttons for pattern number
selection
6) Pattern number reference guide
7) Twin needle mode indicator
8) Stitch length
9) Stitch width/needle position of
straight stitch
10) Manual adjustment buttons for
stitch length
11) Twin needle mode switch
12) Manual adjustment buttons for
stitch width/needle position
1) Indicador da posição da agulha
2) Número do desenho do ponto
3) Visor LCD
4) Indicador do pé-calcador
5) Botões para seleccionar o número
de pontos
6) Guia de números e desenhos de
pontos
7) Indicador de modo de agulha dupla
8) Comprimento do ponto
9) Largura do ponto / posição da
agulha em ponto a direito
10) Botões de ajuste manual para
comprimento do ponto
11) Interruptor agulha dupla
12) Botões de ajuste manual para
largura do ponto / posição da
agulha
Modo doble aguja
Para usar la doble aguja, presione
el interruptor doble aguja
independientemente de la puntada
seleccionada. Haciendo ésto,
reducirá automáticamente el ancho
de puntada y evitará agujas rotas y
posibles daños en la máquina.
Mientras este interruptor esté
presionado, el símbolo
aparecerá
en el display no siendo posible
utilizar los diseños de puntada
marcados con un círculo.
Twin needle mode
When using twin needles, push
the twin needle mode switch
regardless of the stitch you
selected. Doing so will reduce the
stitch width automatically and
save broken needles and possible
damage to your machine.
While the switch is pushed, will
be appeared on the LCD, patterns
with circled numbers in the pattern
reference guide cannot be selected
and a beep will sound.
Modo agulha dupla
Para usar a agulha dupla,
pressione o interruptor agulha
dupla independentemente do
ponto seleccionado. Ao fazer isto
reduzirá, automaticamente, a
largura do ponto e evitará que se
partam agulhas e que ocorram
possíveis danos na máquina.
Enquanto este interruptor estiver
pressionado, o símbolo, aparecerá
no visor não sendo possível a
utilização de desenhos de pontos
marcados com um círculo.
A página está carregando ...

39
MANUAL DE INSTRUCCIONES • INSTRUCTIONS MANUAL • MANUAL DE INSTRUÇÕES
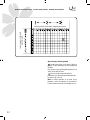
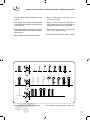
FUNÇÕES DO PAINEL DE CONTROLO
Botões para seleccionar o número do ponto
(1) Quando se liga a máquina, o ponto a direito
é seleccionado e o visor LCD mostra o número do
desenho do ponto.
(2) Nota: O tipo de pé-calcador a utilizar (B,Z,H,O)
aparecerá sob o símbolo
à direita do
número do desenho do ponto.
(3) Pressione “+” ou “-” para aumentar, ou diminuir,
o número. Pressionando o botão da direita, altera os
dígitos de um em um e no da esquerda, a selecção do
ponto poderá ser alterado de 10 em 10.
CONTROL PANEL FUNCTIONS
Pattern number selection buttons
(1) When the machine is turned on, straight stitch is
selected and pop-up screen for individual preference
settings appears on the LCD display.
(2) Note: The presser foot to be used is indicated by the
letter (B,Z, H,O) below
to the right of the
stitch number.
(3) Press the “+” or “–” side of to increase or reduce the
number by one. Pressing button on the right changes
the digit on the right and pressing button on the left
changes the digit on the left.
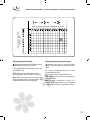
Comprimento e largura do ponto /
botões de ajuste da posição da agulha
A máquina, por defeito, irá costurar sempre,
automaticamente, com o mesmo comprimento e
largura do ponto.
Dependendo das suas necessidades, pressionando os
botões de ajuste poderá ser alterado o comprimento
e a largura do ponto, assim como a posição da agulha
para o ponto a direito.
Quando se altera o comprimento ou a largura do
ponto programado de fábrica
à volta de ou
desaparece do visor.
O
reaparece ao voltar à programação de fábrica.
Stitch length and stitch width/
needle position adjustment buttons
Your sewing machine will produce your stitching
requirements at an Auto/Default stitch Length and
Width.
You can manually change the length, width or needle
position for straight stitch according to your preference
pushing manual adjustment buttons.
When the stitch length or stitch width is changed from
the default setting,
around or disappears
from the LCD.
When the stitch length or stitch width is reset back to
the default setting
reappears.
A página está carregando ...
A página está carregando ...
A página está carregando ...
A página está carregando ...
A página está carregando ...
A página está carregando ...
A página está carregando ...
A página está carregando ...
A página está carregando ...
A página está carregando ...
A página está carregando ...
A página está carregando ...
A página está carregando ...
A página está carregando ...
A página está carregando ...
A página está carregando ...
A página está carregando ...
A página está carregando ...
A página está carregando ...
A página está carregando ...
A página está carregando ...
A página está carregando ...
A página está carregando ...
A página está carregando ...
A página está carregando ...
A página está carregando ...
A página está carregando ...
A página está carregando ...
A página está carregando ...
A página está carregando ...
A página está carregando ...
A página está carregando ...
A página está carregando ...
A página está carregando ...
A página está carregando ...
A página está carregando ...
A página está carregando ...
A página está carregando ...
A página está carregando ...
A página está carregando ...
A página está carregando ...
A página está carregando ...
A página está carregando ...
A página está carregando ...
A página está carregando ...
-
 1
1
-
 2
2
-
 3
3
-
 4
4
-
 5
5
-
 6
6
-
 7
7
-
 8
8
-
 9
9
-
 10
10
-
 11
11
-
 12
12
-
 13
13
-
 14
14
-
 15
15
-
 16
16
-
 17
17
-
 18
18
-
 19
19
-
 20
20
-
 21
21
-
 22
22
-
 23
23
-
 24
24
-
 25
25
-
 26
26
-
 27
27
-
 28
28
-
 29
29
-
 30
30
-
 31
31
-
 32
32
-
 33
33
-
 34
34
-
 35
35
-
 36
36
-
 37
37
-
 38
38
-
 39
39
-
 40
40
-
 41
41
-
 42
42
-
 43
43
-
 44
44
-
 45
45
-
 46
46
-
 47
47
-
 48
48
-
 49
49
-
 50
50
-
 51
51
-
 52
52
-
 53
53
-
 54
54
-
 55
55
-
 56
56
-
 57
57
-
 58
58
-
 59
59
-
 60
60
-
 61
61
-
 62
62
-
 63
63
-
 64
64
-
 65
65
-
 66
66
-
 67
67
-
 68
68
-
 69
69
-
 70
70
-
 71
71
-
 72
72
-
 73
73
-
 74
74
-
 75
75
-
 76
76
-
 77
77
-
 78
78
-
 79
79
-
 80
80
-
 81
81
-
 82
82
-
 83
83
-
 84
84


JATA MC822 Manual do usuário
- Categoria
- Máquinas de costura
- Tipo
- Manual do usuário
em outros idiomas
- español: JATA MC822 Manual de usuario
- English: JATA MC822 User manual
Artigos relacionados
Outros documentos
-
Alfa Network 2622 Instruction book
-
Brother LS-1717P Manual do usuário
-
-
-
-
-
-
-
SINGER 3150 Manual do proprietário
-
Silvercrest SNMD 33 A1 Instruções de operação