Makita EM408MP Manual do usuário
- Categoria
- Ferramentas elétricas
- Tipo
- Manual do usuário

EM408MP
EM409MP
EN Grass Trimmer Attachment ORIGINAL INSTRUCTION
MANUAL 7
PTBR Acessório para Aparador de
Grama MANUAL DE INSTRUÇÕES
ORIGINAL 17
ES Accesorio de Desbrozadora MANUAL DE
INSTRUCCIONES ORIGINAL 28
ZHCN 割草头组件 原版使用说明书 39
ZHTW 割草機頭組件 原始操作手冊 49
ID Alat Tambahan Pemotong
Rumput PETUNJUK PENGGUNAAN
ASLI 59
MS Pemasangan Pemangkas
Rumput MANUAL ARAHAN ASAL 70
VI 81
TH 91
FA 111
AR 119

Fig.1
12 1
2
3
4
5
11
10
9
8
Fig.2
1
4
3
5
2
Fig.3
1
4
2
3
Fig.4
1
2
Fig.5
1
32
4
2
5
6
Fig.6
2
3
1
Fig.7
2

1
7
2
3
4
5
6
Fig.8
1
2
3
Fig.9
1
1
Fig.10
1
4
23
5
Fig.11
1
4
23
5
Fig.12
1
Fig.13
1
2
3
Fig.14
1
Fig.15
3

Fig.12
3
1
2
Fig.16
1
750 mm 750 mm
100-300 mm
Fig.17
1
750 mm 750 mm
100-300 mm
Fig.18
1
Fig.19
Fig.20
4

1
2
4
3
5
6
4 m
100 mm
Fig.21
5

6
Fig.22
Fig.23

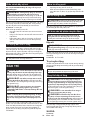
7ENGLISH
ENGLISH (Original instructions)
TABLE OF CONTENTS
SPECIFICATIONS....................................................... 7
SAFETY WARNINGS .................................................. 8
PARTS DESCRIPTION...............................................11
ASSEMBLY.................................................................11
OPERATION.............................................................. 14
MAINTENANCE......................................................... 14
TROUBLESHOOTING............................................... 16
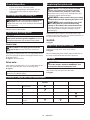
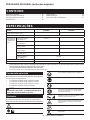
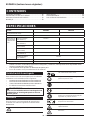
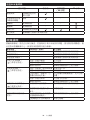
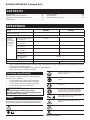
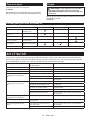
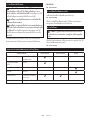
SPECIFICATIONS
Model: EM408MP EM409MP
Dimensions: length x width x height
(without cutting tool) 880 mm x 320 mm x 196 mm 880 mm x 185 mm x 203 mm
Nylon cord diameter 2.0 mm
Applicable
cutting tool
and cutting
diameter
2-tooth blade
(P/N 197997-3) 230 mm -
3-tooth blade
(P/N 195298-3) 230 mm -
4-tooth blade
(P/N B-14118) 230 mm -
8-tooth blade
(P/N B-14130) 230 mm -
Nylon cutting head
(P/N 191D89-4) 300 mm 330 mm
Plastic blade
(P/N 198383-1) 255 mm
Gear ratio 14:19
Net weight 1.4 kg 1.2 kg
• Due to our continuing program of research and development, the specications herein are subject to change
without notice.
• Specications may dier from country to country.
•Weight according to EPTA-Procedure 01/2014
Approved power unit
This attachment is approved to use only with the follow-
ing power unit(s):
•DUX60 Cordless multi function power head
•DUX18 Cordless multi function power head
•UX01G Cordless multi function power head
•EX2650LH Multi function power head
WARNING: Never use the attachment with
non-approved power unit. Non-approved combi-
nation may cause serious injury.
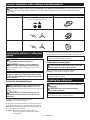
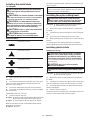
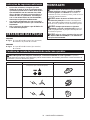
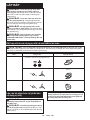
Symbols
The following symbols are used on the attachment and
this instruction manual. Understand these denitions.
Take Particular care and attention!
Read instruction manual.
Wear protective helmet, eye and ear
protection!
Wear eye and ear protection.
Protective gloves must be worn!
Wear sturdy boots with nonslip soles.
Steeltoed safety boots are recommended!
15m(50FT)Keep bystanders at least 15 m (50 ft) away.
Danger; be aware of thrown objects.
Kickback!
Top permissible tool speed

8ENGLISH
Never use metal blade.
Intended use
For EM408MP
This attachment is designed only for the purpose of
cutting grass, weed, bushes and undergrowth in con-
junction with an approved power unit. Never use the
attachment for the other purpose. Abusing the attach-
ment may cause serious injury.
For EM409MP
This attachment is designed only for the purpose of
trimming grass and light weed in conjunction with an
approved power unit. Never use the attachment for
the other purpose. Abusing the attachment may cause
serious injury.
WARNING: Read the instruction manual of
the attachment as well as this instruction manual
before using. Failure to follow the warnings and
instructions may result serious injury.
SAFETY WARNINGS
Grass trimmer safety warnings
WARNING: Read all safety warnings,
-
vided with this machine. Failure to follow all instruc-
tions listed below may result in re and/or serious
injury to the operator and/or bystanders.
Save all warnings and instruc-
tions for future reference.
The term “grass trimmer” and “machine” in the warnings
and precautions refer to the combination of the attach-
ment and the power unit.
The term “motor” in the warnings and precautions refers
to the engine or electric motor of the power unit.
General safety
1. First-time or inexperienced operator should
ask the dealer for training in all operation of
the machine. Never allow children, persons
with reduced physical, sensory or mental
capabilities or lack of experience and knowl-
edge or people unfamiliar with the instructions
to use the machine.
2. It is recommended only to lend the machine
to people who have proven to be experienced.
Always hand over the instruction manual.
3. Stay alert, watch what you are doing and use
common sense when operating the machine.
Do not use the machine while you are tired,
medication. A moment of inattention while oper-
ating the machine may result in serious personal
injury.
4. Avoid using the machine in bad weather
conditions especially when there is a risk of
lightning.
5. Follow your national and local regulation for
use of outdoor power machines.
Intended use of machine
This machine is only intended for cutting grass,
weeds, bushes and undergrowth. Never use the
machine for any other purpose such as edging or
hedge cutting. Use for unintended purpose may result
in serious injury.
Personal protective equipment
1. Always wear heavy, long pants, sturdy boots,
gloves, and a long-sleeve shirt. Do not wear
loose clothing, jewelry, short pants, sandals,
or go barefoot. Secure hair so it is above
shoulder level.
2. Always wear a helmet where there is a risk of
falling objects.
3. Always wear protective goggles to protect
your eyes from injury when using the machine.
The goggles must comply with ANSI Z87.1 in
the USA, EN 166 in Europe, or AS/NZS 1336
in Australia/New Zealand. In Australia/New
Zealand, it is legally required to wear a face
shield to protect your face, too.
It is an employer's responsibility to enforce
the use of appropriate safety protective equip-
ments by the tool operators and by other per-
sons in the immediate working area.
4.
Exposure to noise can cause hearing loss.
5. Always wear sturdy shoes with a non-slip
sole. This protects your feet against injuries and
ensures a good footing.
6. Wear a dust mask as necessary.
7. Use personal protective equipment. Always
wear eye protection. Protective equipment such
as a dust mask, non-skid safety shoes, hard hat or
hearing protection used for appropriate conditions
will reduce personal injuries.

9ENGLISH
Preparation before use
1. Before use, always check the machine is safe
for operation:
—Check for fuel leaks.
—Make sure all fasteners are in place and
secure.
—Replace damaged parts.
—Make sure the cutting tool is properly
installed and securely fastened.
—Make sure the cutting tool guard is prop-
erly attached in the position as described
in this manual.
—
and other control switch for smooth
action and proper function.
—Clean the handles for proper control of
the machine.
—Make sure the handles are installed as
described in this manual.
Failure to follow those instructions may cause
serious injury.
2. Use a sharp blade. Discard blades that are
bent, warped, cracked, broken, chipped or
damaged in any way. A dull blade is more likely
to snag and kickback.
3.
blade properly. Improper xing parts can cause
the blade to y o and seriously injure the operator
and/or bystanders.
Electrical and battery safety
1. Do not expose the machine, battery, or charger
to rain or wet conditions. Water entering the tool
will increase the risk of electric shock.
2. Do not charge battery in rain, or in wet
locations.
3. Do not replace the battery in the rain.
Refueling
1. Stop the engine before refueling. Keep away
during refueling. Otherwise re and/or explosion
may result.
2. Refuel outdoors. Refueling in a closed room can
cause explosion of fuel vapor.
3. Avoid contact with fuel or engine oil. Do not
from the machine and/or ground immediately.
If fuel spills on your clothes, change it immedi-
4. After refueling, carefully tighten the fuel tank
cap and check for fuel leak. Move at least 3 m
(10 feet) away from the fueling source and site
before starting engine.
5. Only transport and store fuel in approved con-
tainers. Keep children away from the stored
fuel.
Starting up the machine
1. Keep children, bystanders and pets at least
15 m (50 feet) away, when starting up or
using the machine. Additionally, bystanders
should wear eye protection, as there is still a
risk of injury from thrown objects. Otherwise
bystanders' unexpected action or blade kickback
may cause serious injury to the operator and/or
bystanders.
2. Start and operate the machine only outdoors
in a well ventilated area. Operation in aconned
or poorly ventilated area can result in death due to
suocation or carbon monoxide poisoning.
3. Before starting, make sure that the cutting
tool has no contact with hard objects such as
branches, stones etc. as the cutting tool will
revolve when starting.
4. If the cutting tool rotates at idle, adjust the idle
speed so that it stops at idle. Otherwise uninten-
tional contact with moving cutting tool may result
in serious injury.
5. Stop the motor immediately if you notice any
trouble.
6. Make sure there are no electrical cables, water
pipes, gas pipes etc. that could cause a hazard
if damaged by use of the machine.
Transportation
1. Stop the motor during transport. Otherwise
unintentional start-up may cause injury.
2. When transporting the machine, always attach
the cover to the cutting blade. Contact with bare
blades results in injury.
3. Ensure safe position of the machine during car
transportation to avoid fuel leakage.
4. Lift the entire machine from the ground when
carrying the machine. Dragging the machine
causes fuel tank damage and fuel leakage, result-
ing in re.
Operation
1. Only use the machine in good light and visi-
bility. Use in the dark or poor visibility area may
cause unexpected accident.
2. Avoid using the machine when it is hard to
keep your balance, for example, working on a
steep surface or windy day.
3. During operation, never stand on an unstable
or slippery surface or a steep slope. During
the cold season, beware of ice and snow and
always ensure secure footing.
4. If you are approached, stop the motor.
Otherwise the rotating cutting tool may hit the
bystander and result in serious injury.
5. Clear the working area before operation.
Remove all objects such as rocks, broken
glass, nails, wire, or string, which can be
thrown or become entangled in the cutting
attachment. Foreign particles may damage the
cutting tool and can cause dangerous kickback.

10 ENGLISH
6. To control the machine steadily, do the follow-
ing during operation:
—
on your right side.
—Hang the machine on your shoulder(s)
with the shoulder harness.
—Ensure a safe footing. Never work on a
ladder or in a tree.
—Avoid over-reach.
—Keep cutting tool below waist level.
—Keep all parts of your body away from the
rotating cutting tool and hot surface.
Those action reduces the risk of injury.
7. If weeds or branches get caught between the
cutting tool and guard, always stop the motor
before clearing. Otherwise unintentional blade
rotation may cause serious injury.
8. Never drop or throw the machine, unless an
emergency. If the machine drops or hits some-
thing, immediately check for fuel leakage,
safety devices and other damages. Operating
an malfunctioned machine may cause injury and/
or re.
9. Inspect the cutting tool frequently, or immedi-
ately after it hits a stone or other hard objects.
If the cutting tool breaks during operation, the
broken piece may y and cause injury.
10. Stop the motor when inspecting, cleaning or
replacing the cutting tool. Otherwise the cutting
tool may rotate unexpectedly and result in serious
injury.
11. Maintain proper control until the cutting tool
stops completely, when stopping the motor or
releasing the throttle trigger. A coasting blade
can cause injury.
12. Before starting the cutting operation, wait until
the cutting tool attains enough speed for cut-
ting. It reduces the risk of kickback and entangling
weeds.
13. Take a rest to prevent loss of control caused
by fatigue. We recommend to take a 10 to
20-minute rest every hour.
14. Stop the motor and place it in safe location,
when resting or leaving the machine. It pre-
vents unexpected accident.
15.
not put them onto combustible materials, while
the engine runs or just after stopping it, as
they are hot. Burn and/or re may result.
16. Do not operate the tool in bad weather or if
there is a risk of lightning.
Cutting Tools
1. Use a suitable cutting tool for your work.
—Nylon cutting heads (string trimmer heads)
are suitable for trimming lawn grass.
—Metal blades are suitable for cutting weeds,
high grasses, bushes, shrubs, underwood,
thicket, and the like.
Always use the cutting tool guard properly
suited for the cutting tool used.
2. When using a nylon cutting head, use only
manual. Never use wire or wirerope. They can
break o and become adangerous projectile.
3. Never use metal multi-piece pivoting chains,
manual. Otherwise serious injury may result.
4. When handling the metal blade, always wear
gloves and put the blade cover on the blade.
The blade can cut bare hands.
5. When using metal blades, avoid “kickback”
and always prepare for an accidental kickback.
See the section Kickback.
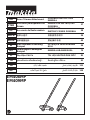
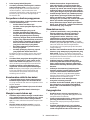
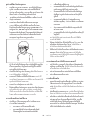
Kickback (blade thrust)
Kickback (blade thrust) may occur when the spin-
ning blade contacts an object that it does not imme-
diately cut. It can be violent enough to cause the
unit and/or operator to be propelled in any direc-
tion, and possibly lose control of the unit, resulting
in serious injury. Kickback can occur without warn-
ing if the blade snags, stalls or binds and is more
material being cut.
Kickback occurs particularly when applying the
blade segment between 12 and 2 o’clock to solids,
bushes and trees with 3 cm or larger diameter.
►Fig.1
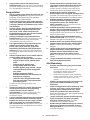
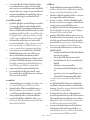
To avoid kickback:
1. Apply the segment between 8 and 11 o’clock.
2. Swing the tool evenly in half-circle from right
to left, like using a scythe. This allows the
proper segment of blade to contact plants to be
cut.
3. Never apply the segment between 12 and 2
o’clock.
4. Never apply the segment between 11 and 12
o’clock and between 2 and 5 o’clock, unless
the operator is well trained and experienced
and does it at his/her own risk.
►Fig.2
5. Never use cutting blades close to solids, such
as fences, walls, tree trunks and stones.
6. Never use cutting blades vertically, for such
operations as edging and trimming hedges.
7. -
cult to see the object being cut.
Vibration
Exposing to excessive vibration injures blood ves-
sels or nervous system of the operator and causes
wrists: “Falling asleep” (numbness), tingling, pain,
stabbing sensation, or alteration of skin color or
of the skin. If any of these symptoms occur, see a
physician.
your hands warm during operation and well main-
tain the machine and accessories.

11 ENGLISH
Maintenance
1. Have your machine serviced by our authorized
service center using only identical replace-
ment parts. Use only identical spare parts and
accessories supplied by MAKITA. Incorrect
repair and poor maintenance can shorten the life
of the machine and increase the risk of accidents.
2. Never alter or remove any components of the
machine. It may cause re and/or serious injury.
3. After use, clean the machine and check all
screws and nuts for tightness.
4. Check the condition of the cutting tool, cutting
tool guard and shoulder harness. The cutting
blade must be sharp. Never straighten or weld
damaged cutting tools.
Storage
1. Before storing the machine, perform full clean-
ing and maintenance. Remove the battery
cartridge. Empty the fuel tank. Attach the cover
to the cutting blade.
2. Store the machine in a dry and high or locked
location out of reach of children.
3. Do not prop the machine against something,
such as a wall. Otherwise it may fall suddenly
and cause an injury.
Other instructions
1. Pay attention to the environment. Avoid unnec-
essary throttle operation for less pollution
and noise emissions. Adjust the carburetor
correctly.
2. Do not operate the engine with faulty exhaust
First Aid
1.
box is available in the vicinity of the cutting
operations. Immediately replace any item
2. When asking for help, give the following
information:
—Place of accident
—What happened
—Number of injured persons
—Kind of injuries
—Your name
Additional safety instructions
1. To avoid accident, leave more than 15m (50 ft)
distance between operators when two or more
operators work in one area. Also, arrange a
person to observe the distance between oper-
ators. If someone or an animal enter the work-
ing area, immediately stop the operation.
2. Only use the cutting tools that are marked with
a speed equal or higher than the speed marked
on the tool.
3. Be sure to remove the cover on the cutting
blade before operation.
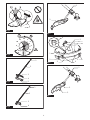
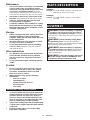
PARTS DESCRIPTION
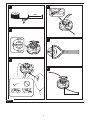
EM408MP
►Fig.3: 1. Cap 2. Pipe 3. Protector (universal type)
4. Protector extension 5. Cutter
EM409MP
►Fig.4: 1. Cap 2. Pipe 3. Protector (narrow type)
4. Cutter
ASSEMBLY
WARNING: Before assembling or adjusting
the spark plug cap or battery cartridge. Otherwise
the cutting tool or other parts may move and result in
serious injury.
WARNING: Before handling cutting blade,
wear protective gloves. During the assembly or
adjustment, your ngers may contact with the cutting
blade and it may cause serious injury.
WARNING: When assembling or adjusting
the equipment, always put it down. Assembling or
adjusting the equipment in an upright position may
result in serious injury.
WARNING: Follow the warnings and precau-
tions in the chapter “SAFETY WARNINGS” and
the instruction manual of the power unit.

12 ENGLISH
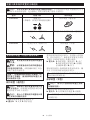
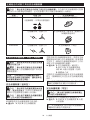
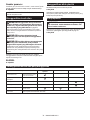
Correct combination of the cutting tool and the protector
CAUTION:Always use the correct combination of cutting tool and protector. The wrong protector may
not protect you from ying debris and stones. It can also aect the balance of the tool and result in serious per-
sonal injury.
Model Cutting tool Protector
EM408MP Metal blade
(with nut, cup, and clamp washer) Protector (universal type)
Nylon cutting head / Plastic blade Protector (universal type) with protector extension
EM409MP Nylon cutting head / Plastic blade Protector (narrow type)
Installing the protector (cutting tool
guard)
WARNING: Do not use a cutting tool without
an appropriate protector at any time.
WARNING: Always use the cutting tool
with the correct combination of the protector.
Otherwise contact with a cutting tool may cause
serious injury.
NOTICE:Periodically tighten the bolts on the
protector. Tighten the right and left bolts evenly
so that the gap between the clamp and the protec-
tor is constant.
Protector (universal type)
CAUTION:Make sure to push in the protec-
tor extension until it is fully inserted. Otherwise
the protector extension may fall and result in personal
injury.
CAUTION:Be careful not to injure your-
self with the cutter mounted on the protector
extension.
Fix the protector to the clamp with bolts.
►Fig.5: 1. Clamp 2. Protector
To install the protector extension, insert the protector
extension to the protector and then snap the clips on.
Make sure that the tabs on the protector extension t
into the slots on the protector.
►Fig.6: 1. Protector (universal type) 2. Clip
3. Protector extension 4. Cutter (inside)
5. Slot 6. Tab
To remove the protector extension from the protector,
unclasp the clips and pull the protector extension out.
NOTE: The cutter on the protector extension keeps
the nylon cord best length for cutting.
Protector (narrow type)
CAUTION:Be careful not to injure yourself
with the cutter mounted on the protector.
Attach the protector to the clamp using bolts.
►Fig.7: 1. Clamp 2. Protector 3. Cutter
NOTE: The cutter on the protector keeps the nylon
cord best length for cutting.
Installing the cutting tool
CAUTION:Be sure to use genuine MAKITA
cutting tools.
CAUTION:Be sure to remove the hex
wrench after installation.
NOTE: When installing the cutting tool, turn the tool
upside down for ease of the procedure.

13 ENGLISH
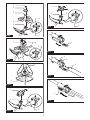
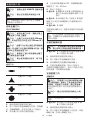
Installing the metal blade
For EM408MP
CAUTION:When handling the metal blade,
always wear gloves and put the blade cover on
the blade.
CAUTION:The outside diameter of the metal
CAUTION:The metal blade must be well
polished, free of cracks or breakage. If the metal
blade hits against a stone during operation, stop
the motor and check the blade immediately.
CAUTION:Polish or replace the metal blade
every three hours of operation.
CAUTION:Always use the supplied
wrench(es) to remove or to install the blade.
Applicable blade
Metal blade (2-tooth)
Metal blade (3-tooth)
Metal blade (4-tooth)
Metal blade (8-tooth)
1. Make sure that the receive washer is attached to
the shaft.
2. Insert the hex wrench through the hole in the gear
case to lock the shaft. Rotate the shaft until the hex
wrench is fully inserted.
3. Mount the metal blade onto the receive washer.
4. Install the clamp washer and cup, and then tighten
the nut securely.
Tightening torque: 16 - 23 N• m
5. Remove the hex wrench.
►Fig.8: 1. Nut 2. Cup 3. Clamp washer 4. Metal blade
5. Receive washer 6. Shaft 7. Hex wrench
►Fig.9: 1. Socket wrench 2. Hex wrench 3. Tighten
Make sure that the arrows on the blade and protector
indicate the same way.
►Fig.10: 1. Arrow
To remove the metal blade, follow the installation proce-
dure in reverse.
NOTE: The resin part on the blade fastening nut
wears out in course of time. Replace the nut if there
appears any wear or deformation.
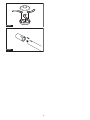
Installing the nylon cutting head
CAUTION:If the nylon cutting head hits
against a stone during operation, stop the motor
and check the nylon cutting head immediately.
►Fig.11: 1. Nylon cutting head 2. Receive washer
3. Shaft 4. Hex wrench 5. Tighten
1. Make sure that the receive washer is attached to
the shaft.
2. Insert the hex wrench through the hole in the gear
case.
3. Screw the nylon cutting head onto the shaft.
4. After installing nylon cutting head, remove the hex
wrench.
To remove the nylon cutting head, turn it clockwise
while holding the receive washer with the hex wrench.
Installing plastic blade
Optional accessory
CAUTION:If the plastic blade accidentally
impacts a rock or hard object during operation,
stop the tool and inspect for any damage. If the
plastic blade is damaged, replace it immediately.
Use of a damaged cutting tool could result in serious
personal injury.
CAUTION:Be sure to remove the hex
wrench after installation.
NOTICE:Be sure to use genuine Makita plastic
blade.
►Fig.12: 1. Plastic blade 2. Receive washer 3. Shaft
4. Hex wrench 5. Tighten
1. Make sure that the receive washer is attached to
the shaft.
2. Insert the hex wrench through the hole on the gear
case and rotate the spindle until the spindle is locked.
3. Place the plastic blade onto the threaded spindle
directly and tighten.
4. Remove the hex wrench.
To remove the plastic blade, turn it clockwise while hold-
ing the receive washer with the hex wrench.

14 ENGLISH
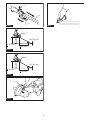
Mounting the attachment pipe
CAUTION:Always check that the attach-
ment pipe is secured after installation. Improper
installation may cause the attachment falling o from
the power unit and cause personal injury.
Mount the attachment pipe to the power unit.
1. Turn the lever of the power unit toward the attach-
ment side.
►Fig.13: 1. Lever
2. Remove the cap of the attachment. Align the pin
with the arrow mark and insert the attachment pipe until
the release button pops up.
►Fig.14: 1. Release button 2.Arrow mark 3. Pin
3. Turn the lever toward the power unit side.
►Fig.15: 1. Lever
Make sure that the surface of the lever is parallel to the
pipe.
To remove the pipe, turn the lever toward the attach-
ment side and pull the pipe out while pressing down the
release button.
►Fig.16: 1. Release button 2. Lever 3. Pipe
OPERATION
WARNING: Follow the warnings and precau-
tions in the chapter “SAFETY WARNINGS” and
the instruction manual of the power unit.
WARNING: If the cutting tool moves at
idle, adjust the idle speed of the engine down.
Otherwise you cannot stop the cutting tool by throttle
o and it may cause serious injury.
Adjusting the hanger position and
shoulder harness
For DUX60 Cordless multi function power head,
EX2650LH Multi function power head
WARNING: Do not use the tool if you cannot
adjust the hanger position and shoulder harness
length within the range as illustrated. Using the
tool with improper weight balance may bring the
cutting tool upward and result in personal injury.
When replacing an accessory with another, the weight
balance of the equipment may change. In such case,
adjust the hanger position and shoulder harness length
as follows.
►Fig.17: 1. Hanger
To change the hanger position, loosen the xing screw
on the hanger and then move the hanger.
Adjust the hanger position and shoulder harness length
so that:
•the hanger positions 750 mm or higher from the
ground,
•the cutting tool positions 100 mm to 300 mm high
from the ground and,
•the unguarded part of cutting tool is horizontally
750 mm or further away from the hanger.
After adjusting the hanger position, tighten the screw
with a wrench or screwdriver (depending on the power
unit) securely.
Adjusting the shoulder harness
For DUX18/UX01G Cordless multi function power
head
WARNING: Do not use the tool if you cannot
adjust the shoulder harness length within the
range as illustrated. Using the tool with improper
weight balance may bring the cutting tool upward and
result in personal injury.
When replacing an accessory with another, the weight
balance of the equipment may change. In such case,
adjust the shoulder harness length as follows.
►Fig.18: 1. Hanger
Adjust the shoulder harness length so that:
•the hanger positions 750 mm or higher from the
ground,
•the cutting tool positions 100 mm to 300 mm high
from the ground and,
•the unguarded part of cutting tool is horizontally
750 mm or further away from the hanger.
Using a nylon cutting head
During operation, use the tip of the nylon cutting cord
for cut. As the nylon cutting cord is worn and shortened
with the cutting operation, the operator needs to feed it
manually. To feed the nylon cutting cord, tap the nylon
cutting head against the ground while rotating.
NOTE: If the nylon cutting cord does not feed out,
rewind it. Refer to the chapter “MAINTENANCE.”
MAINTENANCE
WARNING:Before inspecting or maintaining
the spark plug cap or battery cartridge. Otherwise
the cutting tool or other parts may move and result in
serious injury.
WARNING: When inspecting or maintaining
the equipment, always put it down. Assembling or
adjusting the equipment in an upright position may
result in serious injury.
WARNING: Follow the warnings and precau-
tions in the chapter “SAFETY WARNINGS” and
the instruction manual of the power unit.
NOTICE:Never use gasoline, benzine, thinner,
alcohol or the like. Discoloration, deformation or
cracks may result.
To maintain product SAFETY and RELIABILITY,
repairs, any other maintenance or adjustment should
be performed by Makita Authorized or Factory Service
Centers, always using Makita replacement parts.

15 ENGLISH
Overall inspection
•Tighten loose bolts, nuts and screws.
•Check for damaged parts and blades. Ask our
authorized service center to replace them if
necessary.
Resharpening the cutting tool
WARNING: Do not resharpen cutting blades
by yourself. Manual resharpening unbalances a
cutting blade and it can cause vibrations and damage
to the equipment.
Ask Makita authorized service center to resharpen and
rebalance blunt cutter blades.
Lubricating moving parts
NOTICE:Follow the instruction of the fre-
quency and amount of grease supplied. Otherwise
insucient lubrication may damage moving parts.
Gear case:
CAUTION:Do not apply grease when the
gear case is hot. Hot gear case can cause burn
injury.
Apply grease (Shell Alvania 1 or 2, or equivalent) to the
gear case through the grease hole approximately every
30 working hours.
►Fig.19: 1. Grease hole
Drive axle:
Apply grease (Shell Alvania 1 or 2, or equivalent) to the
drive axle approximately every 30 working hours.
►Fig.20
NOTE: Genuine Makita grease may be purchased
from your local Makita dealer.
Replacing the nylon cord
WARNING: Use only the nylon cord with
Never use heavier line, metal wire, rope or the
like. Failure to do so may cause damage to the tool
and result in serious personal injury.
WARNING: Always remove the nylon cutting
head from the tool when replacing the nylon cord.
WARNING: Make sure that the cover of the
nylon cutting head is secured to the housing
properly as described in this instruction manual.
Failure to properly secure the cover may cause the
nylon cutting head to y apart resulting in serious
personal injury.
Replace the nylon cord if it is not fed any more. The
method of replacing the nylon cord varies depending on
the type of the nylon cutting head.
96-M10L
►Fig.21
Replacing the plastic blade
Replace the blade if it is worn out or broken.
►Fig.22
When installing the plastic blade, align the direction of
the arrow on the blade with that of the protector.
Storage
WARNING: Follow the warnings and precau-
tions in the chapter “SAFETY WARNINGS” and
the instruction manual of the power unit.
When storing the attachment separated from the power
unit, put the cap onto the end of the shaft.
►Fig.23
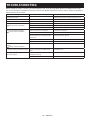
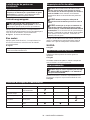
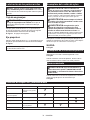
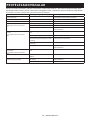
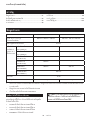
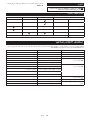
Interval of inspection and maintenance
Operating hour Before
Operation Daily (10h) 30h
Whole unit Visually inspect for
damaged parts - -
All xing screws and
nuts Tighten - -
Gear case Supply grease - -
Drive axle Supply grease - -
Cutter blade Visually inspect for
damage -
Power unit Refer to the instruction manual of the power unit

16 ENGLISH
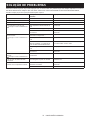
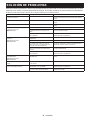
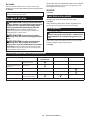
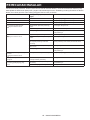
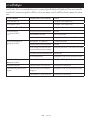
TROUBLESHOOTING
Before asking for repairs, conduct your own inspection rst. If you nd aproblem that is not explained in the man-
ual, do not attempt to dismantle the machine. Instead, ask Makita Authorized Service Centers, always using Makita
replacement parts for repairs.
State of abnormality Probable cause (malfunction) Remedy
Motor does not start. -Refer to the instruction manual of the power unit.
Motor stops soon. -Refer to the instruction manual of the power unit.
Motor speed does not increase. -Refer to the instruction manual of the power unit.
Cutting tool does not rotate.
Stop the motor immediately. Loose attachment of the cutting tool Tighten securely.
Cutting tool caught a twig. Remove foreign matter
Abnormal drive system Contact an authorized service center for repairs.
Main unit vibrates abnormally.
Stop the motor immediately. Broken, bent or worn cutting tool Replace the cutting tool.
Loose attachment of the cutting tool Tighten securely.
One end of nylon cutting cord has been
broken and the nylon cutting head got
unbalanced.
Feed the nylon cutting cord with tapping the nylon
cutting head on the ground.
Irregular attachment of cutting tool Attach properly.
Abnormal drive system Contact an authorized service center for repairs.
Cutter blade does not stop imme-
diately.
Stop the motor immediately.
The power unit does not work properly. Refer to the instruction manual of the power unit.
The nylon cutting cord does not feed. The cord is used up or tangled in the
spool. Rewind the cord.
The nylon cutting cord is not cut o at
the correct length. The cord cutter on the protector is
damaged or missing. Contact an authorized service center for repairs.
The cord extends past the protector. Rewind the cord.

17 PORTUGUÊS DO BRASIL
PORTUGUÊS DO BRASIL (Instruções originais)
CONTEÚDO
ESPECIFICAÇÕES ................................................... 17
AVISOS DE SEGURANÇA........................................ 18
DESCRIÇÃO DAS PEÇAS........................................ 22
MONTAGEM.............................................................. 22
OPERAÇÃO .............................................................. 24
MANUTENÇÃO......................................................... 25
SOLUÇÃO DE PROBLEMAS.................................... 27
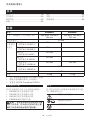
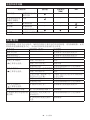
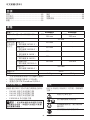
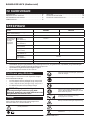
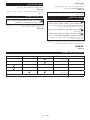
ESPECIFICAÇÕES
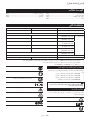
Modelo: EM408MP EM409MP
Dimensões: comprimento x largura x altura
(sem a ferramenta de corte) 880 mm x 320 mm x 196 mm 880 mm x 185 mm x 203 mm
Diâmetro do o de náilon 2,0 mm
Ferramenta de
corte aplicável
e diâmetro de
corte
Lâmina de 2 dentes
(P/N 197997-3) 230 mm -
Lâmina de 3 dentes
(P/N 195298-3) 230 mm -
Lâmina de 4 dentes
(P/N B-14118) 230 mm -
Lâmina de 8 dentes
(P/N B-14130) 230 mm -
Cabeçote de corte de náilon
(P/N 191D89-4) 300 mm 330 mm
Lâmina de plástico
(P/N 198383-1) 255 mm
Relação de transmissão 14:19
Peso líquido 1,4 kg 1,2 kg
• Em função do nosso contínuo programa de pesquisa edesenvolvimento, as especicações que constam neste
manual estão sujeitas amudanças sem aviso prévio.
• As especicações podem diferir de país para país.
•Peso de acordo com o Procedimento 01/2014 da EPTA
Ferramenta aprovada
Este implemento está aprovado para ser usado apenas
com as seguintes ferramentas:
•Ferramenta multifuncional a bateria DUX60
•Ferramenta multifuncional a bateria DUX18
•Ferramenta multifuncional a bateria UX01G
•Ferramenta multifuncional EX2650LH
AVISO: Nunca use o implemento com ferra-
mentas não aprovadas. A combinação não apro-
vada pode causar ferimentos graves.
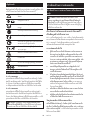
Símbolos
Os seguintes símbolos são usados no implemento e
neste manual de instruções. Entenda essas denições.
Tenha especial cuidado e atenção!
Leia o manual de instruções.
Use capacete, proteção visual e auditiva!
Use proteção ocular e auditiva.
Use luvas de proteção!
Use botas resistentes com solado antider-
rapante. Recomenda-se o uso de botas
com biqueira de aço!
15m(50FT)Mantenha outras pessoas afastadas a uma
distância de pelo menos 15 m.
Perigo! Tome cuidado, pois objetos podem
ser lançados na sua direção e de outras
pessoas.
Recuo!
Velocidade máxima permitida da
ferramenta

18 PORTUGUÊS DO BRASIL
Nunca use lâminas de metal.
Indicação de uso
Para o modelo EM408MP
Este implemento se destina somente ao corte de
grama, erva daninha, mato e vegetação rasteira em
conjunto com aferramenta aprovada. Nunca use o
implemento para outra nalidade. Abusar do imple-
mento pode causar ferimentos graves.
Para o modelo EM409MP
Este implemento se destina somente a aparar grama
eervas daninhas pequenas em conjunto com aferra-
menta aprovada. Nunca use o implemento para outra
nalidade. Abusar do implemento pode causar ferimen-
tos graves.
AVISO: Leia o manual de instruções do
implemento e também este manual de instruções
antes de usá-los. O descumprimento destos avisos
einstruções pode provocar ferimentos sérios.
AVISOS DE SEGURANÇA
Avisos de segurança para o
aparador de grama
AVISO: Leia todos os avisos de segurança,
-
cidos com esta máquina. O descumprimento das
instruções descritas abaixo pode resultar em incêndio
e/ou ferimentos graves no operador e/ou em pessoas
próximas.
Guarde todos os avisos e instru-
ções para consultas futuras.
Os termos “aparador de grama” e“máquina” nos avisos
e precauções referem-se à combinação do acessório
com a ferramenta.
O termo “motor” nos avisos e precauções refere-se ao
motor acombustão ou elétrico da ferramenta.
Segurança geral
1. Operadores iniciantes ou inexperientes
devem solicitar treinamento nas operações
da máquina ao revendedor. Nunca permita
que crianças, pessoas com capacidade física,
sensorial ou mental reduzida ou falta de expe-
riência e conhecimento, tampouco pessoas
não familiarizadas com as instruções, usem a
máquina.
2. Recomenda-se emprestar a máquina somente
a pessoas com experiência comprovada.
Empreste sempre acompanhada do manual de
instruções.
3. Mantenha-se alerta, preste atenção ao que
estiver fazendo e utilize bom senso quando
operar a máquina. Não use a máquina se
estiver cansado, indisposto, ou ainda sob
Um instante de desatenção durante a operação
da máquina pode resultar em ferimentos pessoais
graves.
4. Evite usar a máquina em condições climáti-
cas hostis, especialmente se houver risco de
raios.
5. Siga suas regulamentações federais e locais
sobre o uso de máquinas motorizadas ao ar
livre.
Uso pretendido da máquina
Esta máquina se destina somente ao corte de
grama, ervas daninhas, mato e vegetação rasteira.
-
dade, tal como o corte de bordaduras ou de cercas
vivas. Ouso para nalidades não indicadas pode
resultar em ferimentos sérios.
Equipamentos de proteção pessoal
1. Use sempre calças compridas grossas, botas
resistentes, luvas e camisa de manga com-
prida. Não use roupas folgadas, acessórios,
Prenda o cabelo acima da altura do ombro.
2. Use sempre um capacete em locais onde
houver risco de objetos caírem de locais altos.
3. Quando usar a máquina, use sempre os óculos
de segurança para proteger os olhos contra
ferimentos. Os óculos de segurança devem
atender aos requisitos das normas ANSI Z87.1
nos EUA, EN 166 na Europa, ou AS/NZS 1336
na Austrália/Nova Zelândia. Na Austrália/Nova
Zelândia, também é exigido por lei o uso de
um protetor facial para proteger o rosto.
É responsabilidade do empregador garantir
que os operadores da ferramenta e as outras
pessoas nas imediações da área de trabalho
usem os equipamentos protetores de segu-
rança apropriados.
4. Use proteção auditiva, tal como protetores
auriculares tipo concha. A exposição a ruídos
pode causar perda auditiva.
5. Use sempre sapatos resistentes, com solado
antiderrapante. Eles protegem os pés contra
lesões egarantem que estejam rmes no chão.

19 PORTUGUÊS DO BRASIL
6. Quando necessário, use uma máscara contra
poeiras.
7. Use equipamentos de proteção individual. Use
sempre óculos de proteção. Equipamentos de
proteção, como máscara contra pó, sapatos de
segurança antiderrapantes, capacete de segu-
rança e protetores auditivos, reduzem lesões
pessoais quando usados conforme exigido pelas
condições.
Preparação antes de utilizar
1.
em condições seguras para operação:
—
combustível.
—
estão instalados e seguros.
—
—
corte está corretamente instalada e presa
com segurança.
—-
menta de corte está corretamente insta-
lada na posição descrita neste manual.
—-
vanca de travamento e outras chaves de
controle estão operando sem problemas
e funcionando corretamente.
—Limpe as empunhaduras para poder
controlar a máquina adequadamente.
—
estão instaladas conforme descrito neste
manual.
O descumprimento destas instruções pode provo-
car ferimentos sérios.
2.
estiverem deformadas, empenadas, quebra-
Uma lâmina cega tem mais chances de car presa
e causar um recuo.
3. Use sempre todas as peças requeridas para
montar a lâmina corretamente. Peças mal ins-
taladas podem fazer com que alâmina seja arre-
messada ecause ferimentos sérios no operador
e/ou em pessoas próximas.
Segurança elétrica e da bateria
1. Não exponha a máquina, a bateria ou o carre-
gador à chuva ou umidade.Aentrada de água
na ferramenta aumenta orisco de choque elétrico.
2. Não carregue a bateria na chuva ou em locais
úmidos.
3. Não substitua a bateria na chuva.
Reabastecimento
1. Desligue o motor antes de reabastecer.
Mantenha-se afastado de chamas abertas e
faíscas. Nunca fume durante o reabasteci-
mento. Pois isso pode resultar em incêndio e/ou
explosões.
2. Reabasteça ao ar livre. O reabastecimento em
ambientes fechados pode causar explosão dos
vapores de combustível.
3. Evite o contato com o combustível ou o óleo
de motor. Não inale vapores de combustível.
Em caso de derramamento de combustível
ou óleo, limpe imediatamente o material der-
ramado para removê-lo da máquina e/ou do
chão. Se algum combustível derramado atingir
suas roupas, troque-as imediatamente para
impedir que se incendeiem.
4. Depois de reabastecer, aperte cuidadosamente
se há vazamentos. Afaste-se a uma distância
de pelo menos 3 m da fonte e do local do rea-
bastecimento antes de ligar o motor.
5. Transporte e armazene combustível somente
em recipientes aprovados. Mantenha o com-
bustível armazenado afastado de crianças.
Para ligar a ferramenta
1. Mantenha crianças, outras pessoas e animais
de estimação afastados a uma distância de
pelo menos 15 m ao ligar ou usar a máquina.
Além disso, pessoas próximas devem usar
proteção para os olhos, uma vez que existe
risco de ferimentos causados por objetos
arremessados. Do contrário, as ações inespera-
das de pessoas próximas ou um recuo da lâmina
podem causar ferimentos graves no operador e/
ou em pessoas próximas.
2. Ligue e opere a máquina somente ao ar livre,
em áreas bem ventiladas. A operação em locais
connados ou mal ventilados pode resultar em
morte por asxia ou envenenamento por monó-
xido de carbono.
3.
que a ferramenta de corte não está em contato
com objetos duros, como galhos de árvore,
pedras, etc., pois ela irá girar quando for
ligada.
4. Se a ferramenta de corte girar em marcha
lenta, ajuste a velocidade de marcha lenta para
que ela pare na marcha lenta. Do contrário, o
contato acidental com a ferramenta de corte em
movimento pode resultar em ferimentos graves.
5. Desligue o motor imediatamente se perceber
algo anormal.
6.
tubulações de água, tubulações de gás, etc.
uso da máquina.
Transporte
1. Desligue o motor durante o transporte. Do
contrário, oacionamento acidental pode provocar
ferimentos.
2. Ao transportar a máquina, coloque sempre a
capa na lâmina de corte. O contato com a lâmina
descoberta resulta em ferimentos.
3. -
ção segura ao transportá-la em um veículo
para evitar vazamentos de combustível.
4. Levante a máquina do chão totalmente ao
transportá-la manualmente.Arrastar amáquina
pode causar danos ao tanque de combustível e
vazamentos de combustível, resultando em um
incêndio.

20 PORTUGUÊS DO BRASIL
Operação
1. Somente utilize a máquina em boas condições
de iluminação e visibilidade. O uso no escuro
ou em áreas de pouca visibilidade pode causar
acidentes inesperados.
2. Evite usar a máquina quando for difícil manter
o equilíbrio, como por exemplo, trabalhando
em uma superfície íngreme ou em dias com
muito vento.
3.
uma superfície instável ou escorregadia, nem
em um declive acentuado. Durante os meses
mais frios, tome cuidado com gelo e neve e
assentados no chão.
4. Se alguém se aproximar de você, desligue o
motor. Do contrário, aferramenta de corte em
rotação poderá atingir essa pessoa eprovocar
ferimentos sérios.
5. Limpe a área de trabalho antes da operação.
Remova todos os objetos que puderem ser
-
rio de corte, tais como pedras, cacos de vidro,
Partículas estranhas
podem danicar aferramenta de corte eprovocar
um recuo perigoso.
6.
seguinte durante a operação:
—
ambas as mãos, mantendo-a à sua
direita.
—Pendure a máquina em seu(s) ombro(s)
usando a correia de ombro.
—
chão. Nunca trabalhe em uma escada ou
em cima de uma árvore.
—Evite se esticar além do ponto de equilí-
brio para alcançar pontos distantes.
—Mantenha a ferramenta de corte abaixo
do nível da cintura.
—Mantenha todas as partes do corpo afas-
tadas da ferramenta de corte em rotação
e de superfícies quentes.
Essas ações reduzem o risco de ferimentos.
7.
entre a ferramenta de corte e a proteção, desli-
gue o motor antes de retirá-los. Do contrário, a
rotação acidental da lâmina pode causar ferimen-
tos graves.
8. Nunca derrube ou jogue a máquina, exceto
durante uma emergência. Se a máquina cair ou
-
sitivos de segurança e se existem vazamentos
de combustível ou outros danos. A operação de
uma máquina defeituosa pode provocar ferimen-
tos e/ou incêndios.
9. Inspecione a ferramenta de corte com fre-
quência, ou imediatamente após ela atingir
uma pedra ou outros objetos rígidos. Se a
ferramenta de corte quebrar durante a operação,
opedaço quebrado poderá ser arremessado e
provocar ferimentos.
10. Desligue o motor ao inspecionar, limpar ou
trocar a ferramenta de corte. Do contrário, a
ferramenta de corte pode girar inesperadamente e
provocar ferimentos sérios.
11. Mantenha o controle apropriado até a ferra-
menta de corte parar completamente depois
de desligar o motor ou soltar o gatilho do
acelerador. Uma lâmina girando inercialmente
pode provocar ferimentos.
12. Antes de iniciar a operação de corte, aguarde
até que a ferramenta de corte atinja uma velo-
Isso reduzirá o
risco de recuos ou do enroscamento de ervas
daninhas.
13. Descanse para evitar perda de controle cau-
sada por cansaço. Recomendamos tirar de 10 a
20 minutos de descanso a cada hora de trabalho.
14. Desligue o motor e coloque a máquina em
um local seguro ao descansar ou parar de
usar a máquina. Fazer isso previne acidentes
inesperados.
15. Não toque no motor nem no silenciador, nem
os coloque sobre materiais combustíveis
enquanto o motor estiver funcionando ou logo
após desligá-lo, pois estarão quentes. Poderá
ocorrer queimaduras e/ou um incêndio.
16. Não use a ferramenta durante intempéries ou
quando houver risco de relâmpagos.
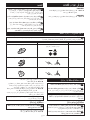
Ferramentas de corte
1. Use uma ferramenta de corte adequada ao seu
trabalho.
— Os cabeçotes de corte de náilon (cabeçotes
de aparador de grama) são adequados para
aparar gramados.
— As lâminas metálicas são adequadas para
o corte de ervas daninhas, gramados altos,
mato, arbustos, vegetação rasteira, moitas e
similares.
Use sempre a proteção adequada à ferramenta
de corte utilizada.
2. Quando utilizar um cabeçote de corte de
metálicos recomendados neste manual. Nunca
use arames ou cabos de aço. Esses materiais
podem quebrar ese tornar projéteis perigosos.
3. Nunca use correntes articuladas de elos múl-
tiplos, facas articuladas ou lâminas não reco-
mendadas neste manual. Do contrário, podem
ocorrer ferimentos sérios.
4. Quando manusear a lâmina metálica, use sem-
pre luvas e coloque a capa da lâmina nesta. A
lâmina pode cortar as mãos desprotegidas.
5. Quando usar lâminas metálicas, evite
“recuos”, e esteja sempre preparado para um
recuo acidental. Consulte a seção Recuo.
A página está carregando...
A página está carregando...
A página está carregando...
A página está carregando...
A página está carregando...
A página está carregando...
A página está carregando...
A página está carregando...
A página está carregando...
A página está carregando...
A página está carregando...
A página está carregando...
A página está carregando...
A página está carregando...
A página está carregando...
A página está carregando...
A página está carregando...
A página está carregando...
A página está carregando...
A página está carregando...
A página está carregando...
A página está carregando...
A página está carregando...
A página está carregando...
A página está carregando...
A página está carregando...
A página está carregando...
A página está carregando...
A página está carregando...
A página está carregando...
A página está carregando...
A página está carregando...
A página está carregando...
A página está carregando...
A página está carregando...
A página está carregando...
A página está carregando...
A página está carregando...
A página está carregando...
A página está carregando...
A página está carregando...
A página está carregando...
A página está carregando...
A página está carregando...
A página está carregando...
A página está carregando...
A página está carregando...
A página está carregando...
A página está carregando...
A página está carregando...
A página está carregando...
A página está carregando...
A página está carregando...
A página está carregando...
A página está carregando...
A página está carregando...
A página está carregando...
A página está carregando...
A página está carregando...
A página está carregando...
A página está carregando...
A página está carregando...
A página está carregando...
A página está carregando...
A página está carregando...
A página está carregando...
A página está carregando...
A página está carregando...
A página está carregando...
A página está carregando...
A página está carregando...
A página está carregando...
A página está carregando...
A página está carregando...
A página está carregando...
A página está carregando...
A página está carregando...
A página está carregando...
A página está carregando...
A página está carregando...
A página está carregando...
A página está carregando...
A página está carregando...
A página está carregando...
A página está carregando...
A página está carregando...
A página está carregando...
A página está carregando...
A página está carregando...
A página está carregando...
A página está carregando...
A página está carregando...
A página está carregando...
A página está carregando...
A página está carregando...
A página está carregando...
A página está carregando...
A página está carregando...
A página está carregando...
A página está carregando...
-
 1
1
-
 2
2
-
 3
3
-
 4
4
-
 5
5
-
 6
6
-
 7
7
-
 8
8
-
 9
9
-
 10
10
-
 11
11
-
 12
12
-
 13
13
-
 14
14
-
 15
15
-
 16
16
-
 17
17
-
 18
18
-
 19
19
-
 20
20
-
 21
21
-
 22
22
-
 23
23
-
 24
24
-
 25
25
-
 26
26
-
 27
27
-
 28
28
-
 29
29
-
 30
30
-
 31
31
-
 32
32
-
 33
33
-
 34
34
-
 35
35
-
 36
36
-
 37
37
-
 38
38
-
 39
39
-
 40
40
-
 41
41
-
 42
42
-
 43
43
-
 44
44
-
 45
45
-
 46
46
-
 47
47
-
 48
48
-
 49
49
-
 50
50
-
 51
51
-
 52
52
-
 53
53
-
 54
54
-
 55
55
-
 56
56
-
 57
57
-
 58
58
-
 59
59
-
 60
60
-
 61
61
-
 62
62
-
 63
63
-
 64
64
-
 65
65
-
 66
66
-
 67
67
-
 68
68
-
 69
69
-
 70
70
-
 71
71
-
 72
72
-
 73
73
-
 74
74
-
 75
75
-
 76
76
-
 77
77
-
 78
78
-
 79
79
-
 80
80
-
 81
81
-
 82
82
-
 83
83
-
 84
84
-
 85
85
-
 86
86
-
 87
87
-
 88
88
-
 89
89
-
 90
90
-
 91
91
-
 92
92
-
 93
93
-
 94
94
-
 95
95
-
 96
96
-
 97
97
-
 98
98
-
 99
99
-
 100
100
-
 101
101
-
 102
102
-
 103
103
-
 104
104
-
 105
105
-
 106
106
-
 107
107
-
 108
108
-
 109
109
-
 110
110
-
 111
111
-
 112
112
-
 113
113
-
 114
114
-
 115
115
-
 116
116
-
 117
117
-
 118
118
-
 119
119
-
 120
120


Makita EM408MP Manual do usuário
- Categoria
- Ferramentas elétricas
- Tipo
- Manual do usuário