Hilti TE 30-AVR Instruções de operação
- Categoria
- Martelos rotativos
- Tipo
- Instruções de operação


1
Printed: 03.03.2017 | Doc-Nr: PUB / 5324643 / 000 / 01

2
3
4
5
Printed: 03.03.2017 | Doc-Nr: PUB / 5324643 / 000 / 01

6
7
Printed: 03.03.2017 | Doc-Nr: PUB / 5324643 / 000 / 01

TE 30
TE 30-AVR
en Original operating instructions . . . . . . . . . . . . . . . . . . . . . . . . . . 1
fr Mode d'emploi original . . . . . . . . . . . . . . . . . . . . . . . . . . . . . . . 14
es Manual de instrucciones original . . . . . . . . . . . . . . . . . . . . . . . 28
pt Manual de instruções original . . . . . . . . . . . . . . . . . . . . . . . . . . 42
Printed: 03.03.2017 | Doc-Nr: PUB / 5324643 / 000 / 01

Printed: 03.03.2017 | Doc-Nr: PUB / 5324643 / 000 / 01

English 1
1 Information about the documentation
1.1 About this documentation
• Read this documentation before initial operation or use. This is a
prerequisite for safe, trouble-free handling and use of the product.
• Observe the safety instructions and warnings in this documentation and
on the product.
• Always keep the operating instructions with the product and make sure
that the operating instructions are with the product when it is given to
other persons.
1.2 Explanation of symbols used
1.2.1 Warnings
Warnings alert persons to hazards that may occur when handling or using the
product. The following signal words are used in combination with a symbol:
DANGER! Draws attention to an imminent hazard that will lead to
serious personal injury or fatality.
WARNING! Draws attention to a potential hazard that could lead to
serious personal injury or fatality.
CAUTION! Draws attention to a potentially dangerous situation that
could lead to minor personal injury or material damage.
1.2.2 Symbols in the documentation
The following symbols are used in this document:
Read the operating instructions before use
Instructions for use and other useful information
1.2.3 Symbols in the illustrations
The following symbols are used in illustrations:
These numbers refer to the corresponding illustrations found at the
beginning of these operating instructions.
The numbering reflects the sequence of operations shown in the
illustrations and may deviate from the steps described in the text.
Item reference numbers are used in the overview illustration and
refer to the numbers used in the key in the product overview sec-
tion.
This symbol is intended to draw special attention to certain points
when handling the product.
Printed: 03.03.2017 | Doc-Nr: PUB / 5324643 / 000 / 01

2 English
1.3 Product-dependent symbols
1.3.1 Symbols on the product
The following symbols are used on the product:
Drilling without hammering
Drilling with hammering action (hammer drilling)
Chiseling
Chisel positioning
Forward / reverse
Protection class II – double-insulated (only TE 30)
Protective earth / ground (only TE 30-AVR)
Diameter
Rated speed under no load
Revolutions per minute
1.4 Product information
Hilti products are designed for professional use and may be operated, ser-
viced and maintained only by trained, authorized personnel. This personnel
must be informed of any particular hazards that may be encountered. The
product and its ancillary equipment can present hazards if used incorrectly
by untrained personnel or if used not in accordance with the intended use.
The type designation and serial number are stated on the rating plate.
▶ Write down the serial number in the table below. You will be required to
state the product details when contacting Hilti Service or your local Hilti
organization to inquire about the product.
Product information
Combihammer TE 30 / TE 30AVR
Generation 02
Serial no.
1.5 Declaration of conformity
We declare, on our sole responsibility, that the product described here
complies with the applicable directives and standards. A copy of the
declaration issued by the certification department can be found at the end
of this documentation.
The technical documentation is filed and stored here:
Hilti Entwicklungsgesellschaft mbH | Tool Certification | Hiltistrasse 6 | 86916
Kaufering, Germany
Printed: 03.03.2017 | Doc-Nr: PUB / 5324643 / 000 / 01

English 3
2 Safety
2.1 General power tool safety warnings
WARNING
Read all safety warnings and all instructions. Failure to follow the warnings
and instructions may result in electric shock, fire and/or serious injury.
Save all warnings and instructions for future reference.
Work area safety
▶ Keep work area clean and well lit. Cluttered or dark areas invite
accidents.
▶ Do not operate power tools in explosive atmospheres, such as in
the presence of flammable liquids, gases or dust. Power tools create
sparks which may ignite the dust or fumes.
▶ Keep children and bystanders away while operating a power tool.
Distractions can cause you to lose control.
Electrical safety
▶ Power tool plugs must match the outlet. Never modify the plug in any
way. Do not use any adapter plugs with earthed (grounded) power
tools. Unmodified plugs and matching outlets will reduce risk of electric
shock.
▶ Avoid body contact with earthed or grounded surfaces, such as
pipes, radiators, ranges and refrigerators. There is an increased risk of
electric shock if your body is earthed or grounded.
▶ Do not expose power tools to rain or wet conditions. Water entering a
power tool will increase the risk of electric shock.
▶ Do not abuse the cord. Never use the cord for carrying, pulling or
unplugging the power tool. Keep cord away from heat, oil, sharp
edges or moving parts. Damaged or entangled cords increase the risk
of electric shock.
▶ When operating a power tool outdoors, use an extension cord suitable
for outdoor use. Use of a cord suitable for outdoor use reduces the risk
of electric shock.
▶ If operating a power tool in a damp location is unavoidable, use
a residual current device (RCD) protected supply. Use of an RCD
reduces the risk of electric shock.
Personal safety
▶ Stay alert, watch what you are doing and use common sense when
operating a power tool. Do not use a power tool while you are tired
or under the influence of drugs, alcohol or medication. A moment
of inattention while operating power tools may result in serious personal
injury.
▶ Use personal protective equipment. Always wear eye protection.
Protective equipment such as dust mask, non-skid safety shoes, hard
Printed: 03.03.2017 | Doc-Nr: PUB / 5324643 / 000 / 01

4 English
hat, or hearing protection used for appropriate conditions will reduce
personal injuries.
▶ Prevent unintentional starting. Ensure the switch is in the off‐position
before connecting to power source, picking up or carrying the tool.
Carrying power tools with your finger on the switch or energising power
tools that have the switch on invites accidents.
▶ Remove any adjusting key or wrench before turning the power tool
on. A wrench or a key left attached to a rotating part of the power tool
may result in personal injury.
▶ Do not overreach. Keep proper footing and balance at all times. This
enables better control of the power tool in unexpected situations.
▶ Dress properly. Do not wear loose clothing or jewellery. Keep your
hair, clothing and gloves away from moving parts. Loose clothes,
jewellery or long hair can be caught in moving parts.
▶ If devices are provided for the connection of dust extraction and
collection facilities, ensure these are connected and properly used.
Use of dust collection can reduce dust-related hazards.
Power tool use and care
▶ Do not force the power tool. Use the correct power tool for your
application. The correct power tool will do the job better and safer at the
rate for which it was designed.
▶ Do not use the power tool if the switch does not turn it on and off.
Any power tool that cannot be controlled with the switch is dangerous
and must be repaired.
▶ Disconnect the plug from the power source from the power tool
before making any adjustments, changing accessories, or storing
power tools. Such preventive safety measures reduce the risk of starting
the power tool accidentally.
▶ Store idle power tools out of the reach of children and do not
allow persons unfamiliar with the power tool or these instructions
to operate the power tool. Power tools are dangerous in the hands of
untrained users.
▶ Maintain power tools. Check for misalignment or binding of moving
parts, breakage of parts and any other condition that may affect the
power tool’s operation. If damaged, have the power tool repaired
before use. Many accidents are caused by poorly maintained power
tools.
▶ Keep cutting tools sharp and clean. Properly maintained cutting tools
with sharp cutting edges are less likely to bind and are easier to control.
▶ Use the power tool, accessories and tool bits etc. in accordance with
these instructions, taking into account the working conditions and
the work to be performed. Use of the power tool for operations different
from those intended could result in a hazardous situation.
Printed: 03.03.2017 | Doc-Nr: PUB / 5324643 / 000 / 01

English 5
Service
▶ Have your power tool serviced by a qualified repair person using only
identical replacement parts. This will ensure that the safety of the power
tool is maintained.
2.2 Hammer safety warnings
▶ Wear ear protectors. Exposure to noise can cause hearing loss.
▶ Use auxiliary handles, if supplied with the tool. Loss of control can
cause personal injury.
▶ Hold power tool by insulated gripping surfaces, when performing an
operation where the cutting accessory may contact hidden wiring
or its own cord. Cutting accessory contacting a "live" wire may make
exposed metal parts of the power tool "live" and could give the operator
an electric shock.
2.3 Additional safety instructions for breakers
Personal safety
▶ Use the product only when it is in technically faultless condition.
▶ Never tamper with or modify the power tool in any way.
▶ Use the auxiliary grips supplied with the power tool. Loss of control can
cause personal injury.
▶ Apply appropriate safety measures at the opposite side of the workpiece
in work that involves breaking through. Parts breaking away could fall out
and / or fall down causing injury to other persons.
▶ Always hold the tool securely with both hands on the insulated grips. Keep
the grips clean and dry. If the accessory tool comes into contact with live
cables, metal parts of the power tool can also become live, resulting in an
electric shock.
▶ You and any other persons in the vicinity must wear suitable eye pro-
tection, a hard hat, ear protection, protective gloves and respiratory
protection while the tool is in use.
▶ Wear protective gloves also when changing the accessory tool. Touching
the accessory tool can result in cuts and burns.
▶ Wear eye protection. Flying fragments can injure the body and eyes.
▶ Before starting work, check the hazard class of the dust that will be pro-
duced when working. Use an industrial vacuum cleaner with an officially
approved protection class in compliance with the locally applicable dust
protection regulations. Dust from materials such as lead-based paint,
certain types of wood and concrete/masonry/stone containing quartz,
minerals or metal can be harmful to health.
▶ Make sure that the workplace is well ventilated and, where necessary,
wear a respirator appropriate for the type of dust generated. Contact with
or inhalation of the dust may cause allergic reactions and/or respiratory
or other diseases among operators or bystanders. Certain kinds of dust
Printed: 03.03.2017 | Doc-Nr: PUB / 5324643 / 000 / 01

6 English
are classified as carcinogenic such as oak and beech dust, especially
in conjunction with additives for wood conditioning (chromate, wood
preservative). Material containing asbestos may be handled only by
specialists.
▶ Take breaks and do physical exercises to improve the blood circulation
in your fingers. Exposure to vibration during long periods of work can
lead to disorders of the blood vessels and nervous system in the fingers,
hands and wrists.
Electrical safety
▶ Before beginning work, check the working area for concealed electric
cables or gas and water pipes. External metal parts of the power tool
can become live, presenting a risk of electric shock, if you accidentally
damage an electric cable.
Careful handling and use of electric tools
▶ Wait until the power tool stops completely before you lay it down.
3 Description
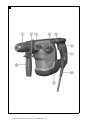
3.1 Overview of the product 1
@
Chuck
;
Depth gauge release button
=
Depth gauge
%
Function selector switch
&
Active Vibration Reduction
(AVR)
(
Control switch
)
Grip
+
Supply cord
§
Forward / reverse switch
/
Side handle
3.2 Intended use
The product described is an electrically powered combihammer. It is
designed for drilling in concrete, masonry, wood and metal.
The version with AVR can also be used for light to medium-duty chiseling
on masonry and for finishing work on concrete.
▶ The tool may be operated only when connected to a power source
providing a voltage and frequency in compliance with the information
given on the type identification plate.
3.3 Possible misuse
• This product is not suitable for working on hazardous materials.
• This product is not suitable for working in a damp environment.
3.4 AVR option
The product may be optionally equipped with an Active Vibration Reduction
(AVR) system, which reduces vibration noticeably.
Printed: 03.03.2017 | Doc-Nr: PUB / 5324643 / 000 / 01

English 7
3.5 Motor protection system
The tool is equipped with a motor protection system. The system monitors
current input and motor temperature and thus prevents the tool from
overheating.
If the motor is overloaded through application of excessive working pressure,
the power tool’s performance drops noticeably or it may stall completely.
If the power tool stalls or slows significantly due to overloading, release the
pressure applied to the tool and then allow it to run under no load for approx.
30 seconds.
3.6 Items supplied
Rotary hammer, side handle, depth gauge, operating instructions.
Note
For safe, reliable operation, use only genuine Hilti spare parts and
accessories. Spare parts, accessories and consumables approved by
Hilti for use with this product can be found at your Hilti Center or at
www.hilti.com.
4 Technical data
Note
For details of the rated voltage, current, frequency and/or input power,
please refer to the power tool’s country-specific type identification plate.
When powered by a generator or transformer, the generator or transformer’s
power output must be at least twice the rated input power shown on the rating
plate of the power tool. The operating voltage of the transformer or generator
must always be within +5% and -15% of the rated voltage of the power tool.
Model
TE 30 TE 30AVR
Weight
9.0 lb
(4.1 kg)
9.3 lb
(4.2 kg)
Ø hammer drill bits
1/4 in … 1 1/8 in 1/4 in … 1 1/8 in
Ø hammer drill bits
6 mm … 28 mm 6 mm … 28 mm
Ø drill bits for wood
3/16 in … 1 in 3/16 in … 1 in
Ø drill bits for wood
3 mm … 25 mm 3 mm … 25 mm
Ø drill bits for metal
3/16 in … 1/2 in 3/16 in … 1/2 in
Ø drill bits for metal
3 mm … 13 mm 3 mm … 13 mm
Printed: 03.03.2017 | Doc-Nr: PUB / 5324643 / 000 / 01

8 English
5 Using extension cords
WARNING
A damaged supply cord presents a hazard! Do not touch the supply
cord or extension cord if damaged while working. Disconnect the supply
cord plug from the power outlet.
▶ Check the appliance’s supply cord at regular intervals and have it
replaced by a qualified specialist if found to be damaged.
• Use only extension cords of a type approved for the application and
with conductors of adequate gauge (cross section). The power tool
may otherwise suffer a drop in performance and the extension cord may
overheat.
• Check the extension cord for damage at regular intervals.
• Replace damaged extension cords.
• When working outdoors, use only extension cords that are approved and
correspondingly marked for this application.
Recommended minimum conductor gauge (cross section) and maxi-
mum cord length with 120V supply voltage
Extension cords AWG 16 AWG 14 AWG 12 AWG 10
Extension cord conductor
gauge
1,31
mm²
2,08
mm²
3,31
mm²
5,26
mm²
Extension cord conductor
gauge
2,58
kcmil
4,11
kcmil
6,53
kcmil
10,4
kcmil
Extension cord length 25 m 30 m 50 m 100 m
Extension cord length 75 ft 100 ft 150 ft 250 ft
6 Operation
6.1 Preparations at the workplace
CAUTION
Risk of injury! Inadvertent starting of the product.
▶ Unplug the supply cord before making adjustments to the power tool
or before changing accessories.
Observe the safety instructions and warnings in this documentation and on
the product.
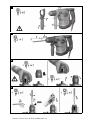
6.1.1 Fitting the side handle 2
1. Release the side handle clamping band by turning the handle grip.
2. Slide the side handle clamping band over the chuck from the front and
into the recess provided.
3. Bring the side handle into the desired position.
Printed: 03.03.2017 | Doc-Nr: PUB / 5324643 / 000 / 01

English 9
4. Tighten the side handle clamping band by turning the handle grip.
6.1.2 Adjusting the depth gauge (optional) 3
1. Press the release button on the side handle.
2. Adjust the depth gauge to the desired drilling depth.
3. Release the release button.
4. Check that the side handle is securely attached.
6.1.3 Removing the chuck 4
CAUTION
Risk of injury! The depth gauge, if fitted but not used, may hinder the
user.
▶ Remove the depth gauge from the tool.
Note
Set the function selector switch to the “Chiseling” position for
changing the chuck.
1. Disconnect the supply cord plug from the power outlet.
2. Grip the chuck as shown in the illustration and pull the three chuck release
rings upwards.
3. Lift the chuck upwards away from the tool.
6.1.4 Fitting the chuck 4
CAUTION
Risk of injury! The depth gauge, if fitted but not used, may hinder the
user.
▶ Remove the depth gauge from the tool.
Note
When changing the chuck, set the function selector switch to this
position: .
1. Disconnect the supply cord plug from the power outlet.
2. Grip the chuck as shown in the illustration and pull the three chuck release
rings upwards.
3. Fit the chuck onto the chuck mount.
4. Rotate the chuck until it engages in position.
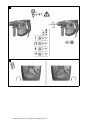
6.1.5 Fitting the accessory tool 5
1. Apply a little grease to the connection end of the accessory tool.
◁ Use only genuine Hilti grease. Use of the wrong grease can result in
damage to the tool.
Printed: 03.03.2017 | Doc-Nr: PUB / 5324643 / 000 / 01

10 English
2. Push the accessory tool into the chuck as far as it will go, turning it and
applying light pressure until it engages with an audible click.
3. After fitting the accessory tool, grip it and pull it firmly in order to check
that it is securely engaged.
◁ The product is ready for use.
6.1.6 Removing the accessory tool 5
CAUTION
Risk of injury! The accessory tool gets hot during use.
▶ Wear protective gloves when changing the accessory tool.
▶ Do not place the hot accessory tool on readily flammable materials.
▶ Pull the chuck ring back as far as it will go and remove the accessory tool.
6.2 Types of work
WARNING
A damaged supply cord presents a hazard! Do not touch the supply
cord or extension cord if damaged while working. Disconnect the supply
cord plug from the power outlet.
▶ Check the appliance’s supply cord at regular intervals and have it
replaced by a qualified specialist if found to be damaged.
Check extension cords at regular intervals and replace them if found to be
damaged.
6.2.1 Function selector switch 6
▶ Set the function selector switch to the desired working position.
◁ Do not operate the function selector switch while the motor is running.
Risk of damage!
6.2.2 Drilling without hammering 6
▶ Set the function selector switch to this symbol: .
6.2.3 Drilling with hammering action (hammer drilling) 6
▶ Set the function selector switch to this symbol: .
6.2.4 Positioning the chisel (only TE 30-AVR) 6
CAUTION
Risk of injury! Loss of control over the chisel direction.
▶ Do not operate the tool when the selector switch is set to “Chisel
positioning”. Turn the function selector switch until it engages in the
“Chiseling” position.
Printed: 03.03.2017 | Doc-Nr: PUB / 5324643 / 000 / 01

English 11
▶ Set the function selector switch to this symbol: .
◁ The chisel can be adjusted to 12 different positions (in 30° increments).
This ensures that flat chisels and shaped chisels can always be set to
the optimum working position.
6.2.5 Chiseling (only TE 30-AVR) 6
▶ Set the function selector switch to this symbol: .
6.2.6 Forward / reverse 7
▶ Set the forward/reverse switch to the desired direction of rotation.
◁ Do not operate the function selector switch while the motor is running.
Risk of damage!
7 Care and maintenance
WARNING
Danger of electric shock! Carrying out care and maintenance while the
supply cord is connected to the power outlet presents a risk of serious
injuries including burns.
▶ Always unplug the supply cord before carrying out all care and
maintenance tasks.
Care
• Carefully remove stubborn dirt from the tool.
• Clean the air vents carefully with a dry brush.
• Use only a slightly damp cloth to clean the casing. Do not use cleaning
agents containing silicone as they can attack the plastic parts.
Maintenance
WARNING
Danger of electric shock! Improper repairs to electrical components
may lead to serious injuries including burns.
▶ Repairs to the electrical section of the tool or appliance may be
carried out only by trained electrical specialists.
• At regular intervals, check all visible parts and the controls for signs of
damage and make sure that they all function correctly.
• Do not operate the power tool if signs of damage are found or if parts
malfunction. Have damage repaired immediately by Hilti Service.
• After cleaning and maintenance, refit all guards or protective devices and
check that they function correctly.
Printed: 03.03.2017 | Doc-Nr: PUB / 5324643 / 000 / 01

12 English
Note
To help ensure safe and reliable operation, use only genuine Hilti spare
parts and consumables. Spare parts, consumables and accessories
approved by Hilti for use with the product can be found at your local
Hilti Center or online at: www.hilti.com
8 Transport and storage
• Do not transport electric tools with accessory tools fitted.
• Always unplug the supply cord before storing an electric tool or appliance.
• Store tools and appliances in a dry place where they cannot be accessed
by children or unauthorized persons.
• Check electric tools or appliances for damage after long periods of
transport or storage.
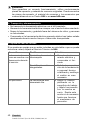
9 Troubleshooting
If the trouble you are experiencing is not listed in this table or you are unable
to remedy the problem by yourself, please contact Hilti Service.
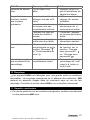
Trouble or fault Possible cause Action to be taken
The tool doesn’t
start or switches it-
self off during opera-
tion.
Interruption in the elec-
tric supply.
▶ Plug in another electric
tool or appliance
and check whether it
works.
The carbon brushes are
worn out.
▶ Have the power tool
checked by a trained
electrical special-
ist and the carbon
brushes replaced if
necessary.
No hammering ac-
tion.
The power tool is too
cold.
▶ Bring the tip of the drill
bit into contact with
the working surface,
switch the rotary
hammer on and allow
it to run. If necessary,
repeat the procedure
until the hammering
mechanism begins to
operate.
Printed: 03.03.2017 | Doc-Nr: PUB / 5324643 / 000 / 01

English 13
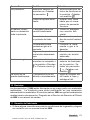
Trouble or fault Possible cause Action to be taken
No hammering ac-
tion.
The function selector
switch is set to “Rotary
drilling only” .
▶ Set the function
selector switch to
the “Hammer drilling”
position .
Contact pressure too
low.
▶ Press harder to in-
crease contact pres-
sure so that hammer
mechanism cuts in.
The combihammer
doesn’t achieve full
power.
The gauge (cross sec-
tion) of the extension
cord conductors is inad-
equate.
▶ Use an extension cord
with an adequate con-
ductor cross section.
The control switch is not
fully pressed.
▶ Press the control
switch as far as it will
go.
The tool has been set to
reverse rotation.
▶ Set the tool to forward
rotation.
Voltage from generator
is too low.
▶ Make sure that voltage
rating of electricity
supply is correct.
The drill bit doesn’t
rotate.
The function selector
switch is not engaged or
is in the “Chiseling” or
“Chisel adjustment”
position.
▶ Set the function selec-
tor switch to “Drilling
without hammering”
or “Hammer drilling”
.
The drill bit can’t be
released.
The chuck is not pulled
back fully.
▶ Pull the chuck back
as far as it will go and
remove the accessory
tool.
10 Disposal
Most of the materials from which Hilti tools and appliances are manu-
factured can be recycled. The materials must be correctly separated before
they can be recycled. In many countries, your old tools, machines or appli-
ances can be returned to Hilti for recycling. Ask Hilti Service or your Hilti
representative for further information.
11 Manufacturer’s warranty
▶ Please contact your local Hilti representative if you have questions about
the warranty conditions.
Printed: 03.03.2017 | Doc-Nr: PUB / 5324643 / 000 / 01

14 Français
1 Indications relatives à la documentation
1.1 À propos de cette documentation
• Lire intégralement la présente documentation avant la mise en service.
C'est la condition préalablement requise pour assurer la sécurité du travail
et un maniement sans perturbations.
• Bien respecter les consignes de sécurité et les avertissements de la
présente documentation ainsi que celles figurant sur le produit.
• Toujours conserver le mode d'emploi à proximité du produit et uniquement
le transmettre à des tiers avec ce mode d'emploi.
1.2 Explication des symboles
1.2.1 Avertissements
Les avertissements attirent l'attention sur des dangers liés à l'utilisation du
produit. Les termes de signalisation suivants sont utilisés en combinaison
avec un symbole :
DANGER ! Pour un danger imminent qui peut entraîner de graves
blessures corporelles ou la mort.
AVERTISSEMENT ! Pour un danger imminent potentiel qui peut
entraîner de graves blessures corporelles ou la mort.
ATTENTION ! Pour attirer l'attention sur une situation pouvant pré-
senter des dangers entraînant des blessures corporelles légères ou
des dégâts matériels.
1.2.2 Symboles dans la documentation
Les symboles suivants sont utilisés dans la présente documentation :
Lire le mode d'emploi avant d'utiliser l'appareil
Pour des conseils d'utilisation et autres informations utiles
1.2.3 Symboles dans les illustrations
Les symboles suivants sont utilisés dans les illustrations :
Ces chiffres renvoient à l'illustration correspondante au début du
présent mode d'emploi.
La numérotation détermine la séquence des étapes de travail dans
l'image et peut se différencier de celles des étapes de travail dans le
texte.
Les numéros de position sont utilisés dans l'illustration Vue d’en-
semble et renvoient aux numéros des légendes dans la section Vue
d'ensemble du produit.
Ce signe doit inviter à manier le produit en faisant particulièrement
attention.
Printed: 03.03.2017 | Doc-Nr: PUB / 5324643 / 000 / 01
A página está carregando...
A página está carregando...
A página está carregando...
A página está carregando...
A página está carregando...
A página está carregando...
A página está carregando...
A página está carregando...
A página está carregando...
A página está carregando...
A página está carregando...
A página está carregando...
A página está carregando...
A página está carregando...
A página está carregando...
A página está carregando...
A página está carregando...
A página está carregando...
A página está carregando...
A página está carregando...
A página está carregando...
A página está carregando...
A página está carregando...
A página está carregando...
A página está carregando...
A página está carregando...
A página está carregando...
A página está carregando...
A página está carregando...
A página está carregando...
A página está carregando...
A página está carregando...
A página está carregando...
A página está carregando...
A página está carregando...
A página está carregando...
A página está carregando...
A página está carregando...
A página está carregando...
A página está carregando...
A página está carregando...
A página está carregando...
A página está carregando...
A página está carregando...
-
 1
1
-
 2
2
-
 3
3
-
 4
4
-
 5
5
-
 6
6
-
 7
7
-
 8
8
-
 9
9
-
 10
10
-
 11
11
-
 12
12
-
 13
13
-
 14
14
-
 15
15
-
 16
16
-
 17
17
-
 18
18
-
 19
19
-
 20
20
-
 21
21
-
 22
22
-
 23
23
-
 24
24
-
 25
25
-
 26
26
-
 27
27
-
 28
28
-
 29
29
-
 30
30
-
 31
31
-
 32
32
-
 33
33
-
 34
34
-
 35
35
-
 36
36
-
 37
37
-
 38
38
-
 39
39
-
 40
40
-
 41
41
-
 42
42
-
 43
43
-
 44
44
-
 45
45
-
 46
46
-
 47
47
-
 48
48
-
 49
49
-
 50
50
-
 51
51
-
 52
52
-
 53
53
-
 54
54
-
 55
55
-
 56
56
-
 57
57
-
 58
58
-
 59
59
-
 60
60
-
 61
61
-
 62
62
-
 63
63
-
 64
64


Hilti TE 30-AVR Instruções de operação
- Categoria
- Martelos rotativos
- Tipo
- Instruções de operação
em outras línguas
- español: Hilti TE 30-AVR Instrucciones de operación
- français: Hilti TE 30-AVR Mode d'emploi
Artigos relacionados
-
Hilti TE 6-CL Instruções de operação
-
Hilti TE 30-AVR Instruções de operação
-
-
-
Hilti 3578531 Manual do usuário
-
-
Hilti TE 1 Instruções de operação
-
-
-
Hilti TE 7 Instruções de operação