Electrolux END42395X Manual do usuário
- Categoria
- Geladeira-freezers
- Tipo
- Manual do usuário

user manual
Οδηγίες Χρήσης
manual de instruções
Fridge-Freezer
Ψυγειοκαταψύκτης
Combinado
END42395X

Electrolux. Thinking of you.
Share more of our thinking at www.electrolux.com
Contents
Safety information 2
Control panel 4
First use 5
Daily use 5
Helpful hints and tips 6
How to use the water dispenser with BRITA
MAXTRA filter cartridge 7
Care and cleaning 13
What to do if… 14
Technical data 16
Installation 16
Environmental concerns 19
Subject to change without notice
Safety information
In the interest of your safety and to ensure
the correct use, before installing and first us-
ing the appliance, read this user manual
carefully, including its hints and warnings. To
avoid unnecessary mistakes and accidents,
it is important to ensure that all people using
the appliance are thoroughly familiar with its
operation and safety features. Save these in-
structions and make sure that they remain
with the appliance if it is moved or sold, so
that everyone using it through its life will be
properly informed on appliance use and safe-
ty.
For the safety of life and property keep the
precautions of these user's instructions as
the manufacturer is not responsible for dam-
ages caused by omission.
Children and vulnerable people safety
• This appliance is not intended for use by
persons (including children) with reduced
physical, sensory or mental capabilities, or
lack of experience and knowledge, unless
they have been given supervision or in-
struction concerning use of the appliance
by a person responsible for their safety.
Children should be supervised to ensure
that they do not play with the appliance.
• Keep all packaging well away from chil-
dren. There is risk of suffocation.
• If you are discarding the appliance pull the
plug out of the socket, cut the connection
cable (as close to the appliance as you
can) and remove the door to prevent play-
ing children to suffer electric shock or to
close themselves into it.
• If this appliance featuring magnetic door
seals is to replace an older appliance hav-
ing a spring lock (latch) on the door or lid,
be sure to make that spring lock unusable
before you discard the old appliance. This
will prevent it from becoming a death trap
for a child.
General safety
Caution! Keep ventilation openings
clear of obstruction.
• The appliance is intended for keeping
foodstuff and/or beverages in a normal
household as explained in this instruction
booklet.
• Do not use a mechanical device or any ar-
tificial means to speed up the thawing
process.
• Do not use other electrical appliances
(such as ice cream makers) inside of re-
frigerating appliances, unless they are ap-
proved for this purpose by the manufac-
turer.
• Do not damage the refrigerant circuit.
2 electrolux

• The refrigerant isobutane (R600a) is con-
tained within the refrigerant circuit of the
appliance, a natural gas with a high level of
environmental compatibility, which is nev-
ertheless flammable.
During transportation and installation of
the appliance, be certain that none of the
components of the refrigerant circuit be-
come damaged.
If the refrigerant circuit should become
damaged:
– avoid open flames and sources of igni-
tion
– thoroughly ventilate the room in which
the appliance is situated
• It is dangerous to alter the specifications or
modify this product in any way. Any dam-
age to the cord may cause a short-circuit,
fire and/or electric shock.
Warning! Any electrical component
(power cord, plug, compressor) must be
replaced by a certified service agent or
qualified service personnel.
1. Power cord must not be lengthened.
2. Make sure that the power plug is not
squashed or damaged by the back of
the appliance. A squashed or dam-
aged power plug may overheat and
cause a fire.
3. Make sure that you can come to the
mains plug of the appliance.
4. Do not pull the mains cable.
5. If the power plug socket is loose, do
not insert the power plug. There is a
risk of electric shock or fire.
6. You must not operate the appliance
without the lamp cover
1)
of interior
lighting.
• This appliance is heavy. Care should be
taken when moving it.
• Do not remove nor touch items from the
freezer compartment if your hands are
damp/wet, as this could cause skin abra-
sions or frost/freezer burns.
• Avoid prolonged exposure of the appli-
ance to direct sunlight.
Daily Use
• Do not put hot pot on the plastic parts in
the appliance.
• Do not store flammable gas and liquid in
the appliance, because they may explode.
• Do not place food products directly
against the air outlet on the rear wall.
2)
• Frozen food must not be re-frozen once it
has been thawed out.
• Store pre-packed frozen food in accord-
ance with the frozen food manufacturer's
instructions.
• Appliance's manufacturers storage rec-
ommendations should be strictly adhered
to. Refer to relevant instructions.
• Do not place carbonated or fizzy drinks in
the freezer compartment as it creates
pressure on the container, which may
cause it to explode, resulting in damage to
the appliance.
• Ice lollies can cause frost burns if con-
sumed straight from the appliance.
Care and cleaning
• Before maintenance, switch off the appli-
ance and disconnect the mains plug from
the mains socket.
• Do not clean the appliance with metal ob-
jects.
• Do not use sharp objects to remove frost
from the appliance. Use a plastic scraper.
• Regularly examine the drain in the refriger-
ator for defrosted water. If necessary,
clean the drain. If the drain is blocked, wa-
ter will collect in the bottom of the appli-
ance.
Installation
Important! For electrical connection
carefully follow the instructions given in
specific paragraphs.
• Unpack the appliance and check if there
are damages on it. Do not connect the ap-
pliance if it is damaged. Report possible
damages immediately to the place you
bought it. In that case retain packing.
• It is advisable to wait at least four hours
before connecting the appliance to allow
the oil to flow back in the compressor.
1) If the lamp cover is foreseen
2) If the appliance is Frost Free
electrolux 3

• Adequate air circulation should be around
the appliance, lacking this leads to over-
heating. To achieve sufficient ventilation
follow the instructions relevant to installa-
tion.
• Wherever possible the back of the product
should be against a wall to avoid touching
or catching warm parts (compressor, con-
denser) to prevent possible burn.
• The appliance must not be located close
to radiators or cookers.
• Make sure that the mains plug is accessi-
ble after the installation of the appliance.
•
Connect to potable water supply only.
3)
Service
• Any electrical work required to do the serv-
icing of the appliance should be carried out
by a qualified electrician or competent per-
son.
• This product must be serviced by an au-
thorized Service Centre, and only genuine
spare parts must be used.
Environment Protection
This appliance does not contain gasses
which could damage the ozone layer, in
either its refrigerant circuit or insulation
materials. The appliance shall not be dis-
carded together with the urban refuse
and rubbish. The insulation foam con-
tains flammable gases: the appliance
shall be disposed according to the ap-
plicable regulations to obtain from your
local authorities. Avoid damaging the
cooling unit, especially at the rear near
the heat exchanger. The materials used
on this appliance marked by the symbol
are recyclable.
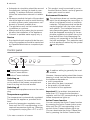
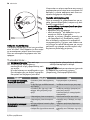
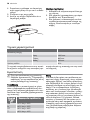
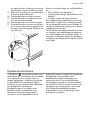
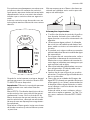
Control panel
+2 +4 +5 +6 +8
1 2
1 Temperature regulator
Action Freeze button
2 Action Freeze indicator
Switching on
Remove, if present, the remove label stuck
on the inside of the freezer compartment.
Insert the plug into the wall socket.
Switching off
To switch off the appliance remove the mains
plug.
Temperature regulation
The temperature is automatically regulated.
To operate the appliance, proceed as fol-
lows:
• press the temperature regulator more
times until the LED corresponding to the
required temperature lights up. Selection
is progressive, varying from +2°C to +8°C.
A medium setting is generally the most
suitable.
However, the exact setting should be chosen
keeping in mind that the temperature inside
the appliance depends on:
• room temperature
• how often the door is opened
• the quantity of food stored
• the location of the appliance.
Important! If the ambient temperature is
lower than 16°C press the temperature
regulator until the LED corresponding to the
lowest temperature lights up.
Action Freeze function
You can activate the Action Freeze function
by pressing the Action Freeze button more
times until the LED corresponding to the
symbol Action Freeze indicator lights up.
You can deactivate the Action Freeze func-
tion by pressing the Action Freeze button
3) If a water connection is foreseen
4 electrolux

more times until the required temperature is
selected.
First use
Cleaning the interior
Before using the appliance for the first time,
wash the interior and all internal accessories
with lukewarm water and some neutral soap
so as to remove the typical smell of a brand-
new product, then dry thoroughly.
Important! Do not use detergents or abra-
sive powders, as these will damage the fin-
ish.
Daily use
Movable shelves
The walls of the refrigerator are equipped
with a series of runners so that the shelves
can be positioned as desired.
Bottle rack
Place the bottles (with the opening facing
front) in the pre-positioned shelf.
Important! If the shelf is positioned
horizontally, place only closed bottles.
This bottle holder shelf can be tilted in order
to store previously opened bottles. To obtain
this result, pull the shelf up so it can rotate
upwards and be placed on the next higher
level.
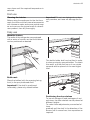
Positioning the door shelves
To permit storage of food packages of vari-
ous sizes, the door shelves can be placed at
different heights.
To make these adjustments proceed as fol-
lows:
gradually pull the shelf in the direction of the
arrows until it comes free, then reposition as
required.
electrolux 5

Air cooling
The Dynamic Air Cooling (DAC) fan let food
cool quickly and a more uniform temperature
in the compartment.
You can switch on the fan by pressing the
switch shown in the picture. The green light
comes on.
B
Important! Switch on the fan when the
ambient temperature exceeds 25°C.
Ice-cube production
This appliance is equipped with one or more
trays for the production of ice-cubes. Fill
these trays with water, then put them in the
freezer compartment.
Important! Do not use metallic instruments
to remove the trays from the freezer.
Freezing Calendar
The symbols show different types of frozen
goods.
The numbers indicate storage times in
months for the appropriate types of frozen
goods. Whether the upper or lower value of
the indicated storage time is valid depends
on the quality of the foods and treating before
freezing.
Freezing fresh food
The freezer compartment is suitable for
freezing fresh food and storing frozen and
deep-frozen food for a long time.
To freeze fresh food activate the Action
Freeze function at least 24 hours before plac-
ing the food to be frozen in the freezer com-
partment.
Move the shelf present in the freezer com-
partment to the middle seat, keeping it hori-
zontal.
Place the fresh food to be frozen on that
shelf.
The maximum amount of food that can be
frozen in 24 hours is specified on the rating
plate, a label located on the inside of the ap-
pliance.
The freezing process lasts 24 hours: during
this period do not add other food to be fro-
zen.
After 24 hours, when the freezing process is
completed, return to the required tempera-
ture (refer to "Temperature regulation").
Storage of frozen food
When first starting-up or after a period out of
use, before putting the products in the com-
partment let the appliance run at least 2
hours on the higher settings.
Important! In the event of accidental
defrosting, for example due to a power
failure, if the power has been off for longer
than the value shown in the technical
characteristics chart under "rising time", the
defrosted food must be consumed quickly or
cooked immediately and then re-frozen (after
cooling).
Thawing
Deep-frozen or frozen food, prior to being
used, can be thawed in the refrigerator com-
partment or at room temperature, depending
on the time available for this operation.
Small pieces may even be cooked still frozen,
directly from the freezer: in this case, cooking
will take longer.
Helpful hints and tips
Hints for energy saving
• Do not open the door frequently or leave it
open longer than absolutely necessary.
• If the ambient temperature is high and the
Temperature Regulator is set to low tem-
perature and the appliance is fully loaded,
the compressor may run continuously,
causing frost or ice on the evaporator. If
this happens, set the Temperature Regu-
lator toward warmer settings to allow au-
tomatic defrosting and so a saving in elec-
tricity consumption.
6 electrolux

Hints for fresh food refrigeration
To obtain the best performance:
• do not store warm food or evaporating liq-
uids in the refrigerator
• do cover or wrap the food, particularly if it
has a strong flavour
• position food so that air can circulate freely
around it
Hints for refrigeration
Useful hints:
Meat (all types) : wrap in polythene bags and
place on the glass shelf above the vegetable
drawer.
For safety, store in this way only one or two
days at the most.
Cooked foods, cold dishes, etc..: these
should be covered and may be placed on any
shelf.
Fruit and vegetables: these should be thor-
oughly cleaned and placed in the special
drawer(s) provided.
Butter and cheese: these should be placed
in special airtight containers or wrapped in
aluminium foil or polythene bags to exclude
as much air as possible.
Milk bottles: these should have a cap and
should be stored in the bottle rack on the
door.
Bananas, potatoes, onions and garlic, if not
packed, must not be kept in the refrigerator.
Hints for freezing
To help you make the most of the freezing
process, here are some important hints:
• the maximum quantity of food which can
be frozen in 24 hrs. is shown on the rating
plate;
• the freezing process takes 24 hours. No
further food to be frozen should be added
during this period;
• only freeze top quality, fresh and thorough-
ly cleaned, foodstuffs;
• prepare food in small portions to enable it
to be rapidly and completely frozen and to
make it possible subsequently to thaw only
the quantity required;
• wrap up the food in aluminium foil or pol-
ythene and make sure that the packages
are airtight;
• do not allow fresh, unfrozen food to touch
food which is already frozen, thus avoiding
a rise in temperature of the latter;
• lean foods store better and longer than
fatty ones; salt reduces the storage life of
food;
• water ices, if consumed immediately after
removal from the freezer compartment,
can possibly cause the skin to be freeze
burnt;
• it is advisable to show the freezing in date
on each individual pack to enable you to
keep tab of the storage time.
Hints for storage of frozen food
To obtain the best performance from this ap-
pliance, you should:
• make sure that the commercially frozen
foodstuffs were adequately stored by the
retailer;
• be sure that frozen foodstuffs are transfer-
red from the foodstore to the freezer in the
shortest possible time;
• not open the door frequently or leave it
open longer than absolutely necessary.
• Once defrosted, food deteriorates rapidly
and cannot be refrozen.
• Do not exceed the storage period indica-
ted by the food manufacturer.
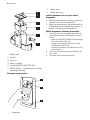
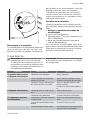
How to use the water dispenser with BRITA MAXTRA filter cartridge
BRITA water filter unit
Internal components:
electrolux 7

6
3
5
2
1
4
1 Water tank
2 Funnel
3 Tank lid
4Valve + gasket
5 Including BRITA MAXTRA filter
6 BRITA Memo - the electronic cartridge
exchange indicator
External components:
1
2
3
1Dispenser
2 Water lever
3 Water drop tray
Initial operations to use your water
dispenser
1. Remove every tape and other protection
system from the tank assembly
2. clean the components, as described into
"Water dispenser cleaning procedure", in
order to remove eventual residue.
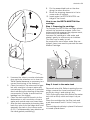
Water dispenser cleaning procedure
1. Unblock the two stopping elements on
the sides of the tank as shown in the pic-
tures:
– take out the BRITA MAXTRA cartridge
from the water filter unit
– press the stopping elements in the
middle and move it up
– move the stopper into direction of the
central tank.
2. Push up the tank along the direction of
the valve.
3. Remove the lid and the funnel.
8 electrolux

A
4. Unscrew the valve in counter clockwise
(pay particular attention not to lose the
Valve Gasket because is necessary to a
correct functioning of the features ).
5. Clean the tank lid, the valve and the gas-
ket with a solution of warm water and
neutral soap. Rinse it and put it inside the
door hole during the cleaning of the other
components (in order to avoid cold air
leakage from the fridge).
6. Clean the tank and the funnel into the
dishwasher or with a solution of warm
water and neutral soap and rinse them.
7. After the tank components cleaning take
back the valve from the fridge door and
assembly the tank in the inverse order
(4;3;2;1) of disassembly (pay attention at
the valve gasket positioning ).
8. Put the assembled tank on the door
along the valve direction.
9. Block the stopping elements in the in-
verse order of unblock.
10. Insert again the BRITA MAXTRA car-
tridge in the funnel .
How to use the BRITA MAXTRA filter
cartridge
Step 1: Preparing the cartridge
To prepare your BRITA filter cartridge, please
remove the protective wrapper (note: car-
tridge and inside wrapper may appear moist,
this is simply condensation).
Immerse the cartridge in cold water and
shake it gently to remove any air bubbles.
The filter now is ready to use.
As required for some other water filter car-
tridges, there is no need to pre-soak the new
Maxtra Cartridge.
Step 2: Insert in the water tank
Remove the tank lid. Before inserting the car-
tridge, remove the funnel and clean it thor-
oughly by rising it and wiping it dry.
Then, thoroughly clean the inside of the water
tank with a dump cloth and wipe it dry as
well.
Place the cartridge into the filter tank and
push downwards until it 'clicks' firmly into
place.
The cartridge should stay in place if the funnel
is turned upside down.
electrolux 9

Step 3: Rinse the cartridge
2x 3x=ok
Take the funnel out of the BRITA water filter
unit, fill it under the tap with cold tap water
and allow it to filter through.
Discard the first two fillings into the sink.
These first two fillings are used to flush the
filter cartridge.
Then, place the funnel back into BRITA water
filter unit.
Place the cover back onto the jug and press
it carefully downwards to ensure it fits cor-
rectly into place.
Step 4: Refill the water tank
To fill the tank with cold water, simply open
the flip top lid, take a jug of tap water and
pour it inside the tank through the cover as
shown into the picture (use the lid every time
that you want to fill your water).
Important! In order to avoid risk of spillage
of water during closing and opening of the
refrigerator door, we recommend to not fill
completely the water tank but leave a head
space of air (max. refilling limit till the frontal
marks).
If you have not used all filtered water in the
water tank within 1-2 days, please discard
any water left inside the BRITA water filter unit
before refilling it.
Allow the water to filter through and repeat
"Step 4" as many times as you want until the
BRITA water filter unit is filled up.
Remove cartridge with ring pull handle
To exchange the cartridge after four weeks,
simply use the ring pull handle on the top of
the cartridge to remove it from the funnel,
and repeat steps 1 - 3 above.
The BRITA Memo
For maximum filter performance and opti-
mum taste, it is important to change your
BRITA cartridge regularly. BRITA recom-
10 electrolux

mends that you replace the cartridge in the
BRITA unit of your fridge every four weeks.
BRITA Memo automatically reminds you
when to change the cartridge.
START
%
100
75
50
25
The unique BRITA Memo measures the rec-
ommended time of use of your cartridge.
Memo is easy to use and automatically re-
minds your when to change your cartridge.
The BRITA Memo is located on the lid of the
water tank. Operation is really simple.
Start the Memo display
To start Memo please press and hold down
the start button on the lid until all four bars
appear in the display and flash twice. The
Memo is now set.
START
%
100
75
50
25
Functional control
The flashing dot in the bottom right corner of
the Memo indicates that the Memo is work-
ing.
electrolux 11

START
%
100
75
50
25
Change display
START
%
100
75
50
25
Every week one bar will disappear to show
the remaining cartridge life. After four weeks
all four bars will disappear. This, and a flash-
ing arrow, indicate that the cartridge should
now be changed.
Insert a new cartridge according to the in-
structions and reactivate the Memo as de-
scribed above.
START
%
100
75
50
25
When only one bar is showing, you should
just check whether you have a new BRITA
MAXTRA filter cartridge to hand.
Important! The Memo is only designed to be
used with BRITA filter cartridges.
BRITA Memo: the electronic cartridge ex-
change indicator has a life of approximately
5 years. At the end of the Memo's life, please
remember that it is an electronic device and
to dispose on the Memo according to all ap-
plicable provisions and regulations.
To remove the exhausted Memo place a
screwdriver in the notch next to the Memo
and push it out.
Please note that Memo should not be re-
moved for any other reason than to dispose
of it.
12 electrolux

Important information
• The fridge door valve hole must be closed
with the Water Valve during the regular
functioning of the appliance.
• Use only drinking water. The use of any
other drink type can leave residues, taste
or odor in the reservoir and in the tap.
• It is possible to hear some noises caused
by air entering when the water left the res-
ervoir.
• In case the water does not flow well, press
the driving lever once again. Keep the
glass below the tap for some instants, in
order to assure that all the water is collec-
ted by the glass.
• Do not use gasified drinks, such as soft
drinks. The drink can leak due to the gas
pressure.
• Remember that water is a foodstuff.
Please consume filtered water within one
to two days.
• Should your BRITA water filter unit not be
in use for a prolonged period (e.g. vaca-
tion), we recommend that you discard any
water left inside the system and leave the
cartridge inside the filter tank.
Before using the system again take out the
cartridge and repeat steps 1 to 4 of "How
to use the BRITA MAXTRA filter cartridge".
• The BRITA water filter unit is designed for
use only with municipally treated tap water
(note: this water is constantly controlled
and according to legal regulations safe to
drink) or with water from private supplies
which has been tested safe to drink.
If an instruction is received from the au-
thorities that mains water must be boiled,
the BRITA filtered water has also to be
boiled. When the instruction to boil water
is no longer in force, the entire filter system
must be cleaned and a new cartridge in-
serted.
More information on the use of BRITA filter
cartridges and the Memo can be found in the
BRITA information guide.
You can purchase new BRITA filter car-
tridges and Memo through consumer
service network of Electrolux or BRITA.
Care and cleaning
Caution! Unplug the appliance before
carrying out any maintenance operation.
This appliance contains hydrocarbons in
its cooling unit; maintenance and re-
charging must therefore only be carried
out by authorized technicians.
Periodic cleaning
The equipment has to be cleaned regularly:
• clean the inside and accessories with luke-
warm water and some neutral soap.
• regularly check the door seals and wipe
clean to ensure they are clean and free
from debris.
• rinse and dry thoroughly.
Important! Do not pull, move or damage any
pipes and/or cables inside the cabinet.
Never use detergents, abrasive powders,
highly perfumed cleaning products or wax
polishes to clean the interior as this will dam-
age the surface and leave a strong odour.
Clean the condenser (black grill) and the
compressor at the back of the appliance with
a brush or a vacuum cleaner. This operation
will improve the performance of the appli-
ance and save electricity consumption.
Important! Take care of not to damage the
cooling system.
Many proprietary kitchen surface cleaners
contain chemicals that can attack/damage
the plastics used in this appliance. For this
reason it is recommended that the outer cas-
ing of this appliance is only cleaned with
warm water with a little washing-up liquid
added.
After cleaning, reconnect the equipment to
the mains supply.
electrolux 13

Defrosting of the refrigerator
Frost is automatically eliminated from the
evaporator of the refrigerator compartment
every time the motor compressor stops, dur-
ing normal use. The defrost water drains out
through a trough into a special container at
the back of the appliance, over the motor
compressor, where it evaporates.
It is important to periodically clean the defrost
water drain hole in the middle of the refriger-
ator compartment channel to prevent the
water overflowing and dripping onto the food
inside. Use the special cleaner provided,
which you will find already inserted into the
drain hole.
Defrosting of the freezer
The freezer compartment of this model, on
the other hand, is a "no frost" type. This
means that there is no buildup of frost when
it is in operation, neither on the internal walls
nor on the foods.
The absence of frost is due to the continuous
circulation of cold air inside the compart-
ment, driven by an automatically controlled
fan.
Periods of non-operation
When the appliance is not in use for long pe-
riods, take the following precautions:
• disconnect the appliance from elec-
tricity supply
• remove all food
•
defrost
4)
and clean the appliance and all
accessories
• leave the door/doors ajar to prevent un-
pleasant smells.
If the cabinet will be kept on, ask somebody
to check it once in a while to prevent the food
inside from spoiling in case of a power failure.
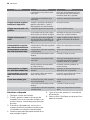
What to do if…
Warning! Before troubleshooting,
disconnect the mains plug from the
mains socket.
Only a qualified electrician or competent
person must do the troubleshooting that
is not in this manual.
Important! There are some sounds during
normal use (compressor, refrigerant
circulation).
Problem Possible cause Solution
The appliance does not
operate. The lamp does
not operate.
The appliance is switched off. Switch on the appliance.
The mains plug is not connected
to the mains socket correctly.
Connect the mains plug to the
mains socket correctly.
The appliance has no power.
There is no voltage in the mains
socket.
Connect a different electrical appli-
ance to the mains socket.
Contact a qualified electrician.
4) If foreseen.
14 electrolux

Problem Possible cause Solution
The lamp does not work.
The lamp is in stand-by. Close and open the door.
The lamp is defective. Refer to "Replacing the lamp".
The compressor operates
continually.
The temperature is not set cor-
rectly.
Set a higher temperature.
The door is not closed correctly. Refer to "Closing the door".
The door has been opened too
frequently.
Do not keep the door open longer
than necessary.
The product temperature is too
high.
Let the product temperature de-
crease to room temperature before
storage.
The room temperature is too
high.
Decrease the room temperature.
Water flows on the rear
plate of the refrigerator.
During the automatic defrosting
process, frost defrosts on the rear
plate.
This is correct.
Water flows into the re-
frigerator.
The water outlet is clogged. Clean the water outlet.
Products prevent that water flows
into the water collector.
Make sure that products do not
touch the rear plate.
Water flows on the
ground.
The melting water outlet does not
flow in the evaporative tray above
the compressor.
Attach the melting water outlet to
the evaporative tray.
The temperature in the
appliance is too low.
The temperature regulator is not
set correctly.
Set a higher temperature.
The temperature in the
appliance is too high.
The temperature regulator is not
set correctly.
Set a lower temperature.
The door is not closed correctly. Refer to "Closing the door".
The product temperature is too
high.
Let the product temperature de-
crease to room temperature before
storage.
Many products are stored at the
same time.
Store less products at the same
time.
The temperature in the re-
frigerator is too high.
There is no cold air circulation in
the appliance.
Make sure that there is cold air cir-
culation in the appliance.
The temperature in the
freezer is too high.
Products are too near to each
other.
Store products so that there is cold
air circulation.
There is too much frost.
Food is not wrapped correctly. Wrap the food correctly.
The door is not closed correctly. Refer to "Closing the door".
The temperature regulator is not
set correctly.
Set a higher temperature.
Replacing the lamp
1. Disconnect the plug from the mains
socket.
2. Press on the rear hook of the lamp cover
by a screwdriver and at the same time pull
and rotate the cover in the direction of the
arrow.
3. Replace the lamp with one of the same
power (the maximum power is shown on
the lamp cover).
4. Install the lamp cover by fixing it into its
original position.
5. Connect the plug to the mains socket.
electrolux 15

6. Open the door. Make sure that the light
comes on.
A
B
max 25 W
Closing the door
1. Clean the door gaskets.
2. If necessary, adjust the door. Refer to "In-
stallation".
3. If necessary, replace the defective door
gaskets. Contact the Service Center.
Technical data
Dimension of the recess
Height 1800 mm
Width 695 mm
Depth 669 mm
Rising Time 20 h
The technical information are situated in the
rating plate on the internal left side of the ap-
pliance and in the energy label.
Installation
Read the "Safety Information" carefully
for your safety and correct operation of
the appliance before installing the
appliance.
Positioning
Install this appliance at a location where the
ambient temperature corresponds to the cli-
mate class indicated on the rating plate of the
appliance:
Climate
class
Ambient temperature
SN +10°C to + 32°C
N +16°C to + 32°C
ST +16°C to + 38°C
T +16°C to + 43°C
Location
The appliance should be installed well away
from sources of heat such as radiators, boil-
ers, direct sunlight etc. Ensure that air can
circulate freely around the back of the cabi-
net. To ensure best performance, if the ap-
pliance is positioned below an overhanging
wall unit, the minimum distance between the
top of the cabinet and the wall unit must be
at least 100 mm . Ideally, however, the ap-
pliance should not be positioned below over-
hanging wall units. Accurate levelling is en-
sured by one or more adjustable feet at the
base of the cabinet.
Warning! It must be possible to
disconnect the appliance from the mains
power supply; the plug must therefore
be easily accessible after installation.
16 electrolux

10 mm
10 mm
100 mm
AB
Electrical connection
Before plugging in, ensure that the voltage
and frequency shown on the rating plate cor-
respond to your domestic power supply.
The appliance must be earthed. The power
supply cable plug is provided with a contact
for this purpose. If the domestic power sup-
ply socket is not earthed, connect the appli-
ance to a separate earth in compliance with
current regulations, consulting a qualified
electrician.
The manufacturer declines all responsibility if
the above safety precautions are not ob-
served.
This appliance complies with the E.E.C. Di-
rectives.
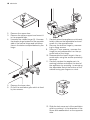
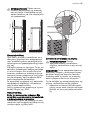
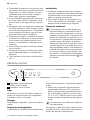
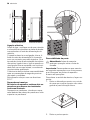
Rear spacers
Inside the appliance you find two
spacers which must be fitted as shown
in the figure.
Slacken the screws and insert the spacer
under the screw head, then retighten the
screws.
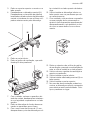
Door reversibility
Warning! Before carrying out any
operations, remove the plug from the
power socket.
Important! To carry out the following
operations, we suggest that this be made
with another person that will keep a firm hold
on the doors of the appliance during the
operations.
To change the opening direction of the door,
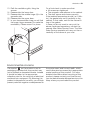
do these steps:
1. Remove the upper hinge taking care for
the upper door not to fall off and keep it
for future actions.
electrolux 17

2. Remove the upper door.
3. Remove the upper support and mount it
in the opposite side.
4. Unscrew the middle hinge (H). Unscrew
the plastic plugs located on the opposite
side of the central hinge and introduce
them in the holes occupied before by the
hinge.
H
5. Remove the lower door.
6. Pull off the ventilation grille which is fixed
by two screws.
7. Carefully place the appliance on its back,
totally unscrew the adjustable foot and
screw it in the opposite side.
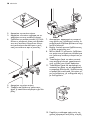
8. Remove the bottom hinge by unscrew-
ing its fixing screws.
9. Using a 12 mm spanner, unscrew the
hinge pin and reassemble it on the op-
posite side of the hinge.
10. Reassemble the lower hinge in the op-
posite side, using the screws previously
removed.
11. Carefully replace the appliance in its
working position and adjust the level of
the appliance by screwing / unscrewing
the adjustable feet at the bottom of the
cabinet using your fingers or a tool.
12. Slide the hole cover out of the ventilation
grille by pushing it in the direction of the
arrow and reassemble it on the opposite
side.
18 electrolux

13. Refit the ventilation grille, fixing the
screws.
14. Reassemble the lower door.
15. Reassemble the middle hinge (H) in the
opposite side.
16. Reassemble the upper door.
17. In your documentation bag you will find
the upper hinge necessary to make the
reversibility. Please screw it in place.
Do a final check to make sure that:
• All screws are tightened.
• The magnetic seal adheres to the cabinet.
• The door opens and closes correctly.
If the ambient temperature is cold (i.e. in Win-
ter), the gasket may not fit perfectly to the
cabinet. In that case, wait for the natural fit-
ting of the gasket.
In case you do not want to carry out the
above mentioned operations, contact the
nearest After Sales Service Force. The After
Sales Service specialist will carry out the re-
versibility of the doors at your cost.
Environmental concerns
The symbol on the product or on its
packaging indicates that this product may
not be treated as household waste. Instead
it should be taken to the appropriate
collection point for the recycling of electrical
and electronic equipment. By ensuring this
product is disposed of correctly, you will help
prevent potential negative consequences for
the environment and human health, which
could otherwise be caused by inappropriate
waste handling of this product. For more
detailed information about recycling of this
product, please contact your local council,
your household waste disposal service or the
shop where you purchased the product.
electrolux 19

Electrolux. Thinking of you.
Μοιραστείτε τη φιλοσοφία μας στο www.electrolux.com
Περιεχόμενα
Πληροφορίες ασφαλείας 20
Πίνακας χειριστηρίων 22
Πρώτη χρήση 23
Καθημερινή χρήση 23
Χρήσιμες συμβουλές 25
Τρόπος χρήσης του διανομέα νερού με
φύσιγγα φίλτρου BRITA MAXTRA 26
Φροντίδα και καθάρισμα 33
Τι να κάνετε αν... 34
Τεχνικά χαρακτηριστικά 36
Εγκατάσταση 36
Περιβαλλοντικά θέματα 39
Υπόκειται αε αλλαγές χωρίς προειδποίηση
Πληροφορίες ασφαλείας
Χάρη της ασφάλειάς σας και για να εξασφα‐
λιστεί η σωστή χρήση, πριν την εγκατάστα‐
ση και την πρώτη χρήση της συσκευής, δια‐
βάστε προσεκτικά αυτό το εγχειρίδιο χρή‐
στη, συμπεριλαμβανομένων των συμβου‐
λών και των προειδοποιήσεών του. Για την
αποφυγή περιττών λαθών και ατυχημάτων,
είναι σημαντικό να εξασφαλίσετε ότι όλα τα
άτομα που χρησιμοποιούν τη συσκευή γνω‐
ρίζουν καλά τη λειτουργία της και τα χαρα‐
κτηριστικά ασφαλείας της. Φυλάξτε τις οδη‐
γίες αυτές και βεβαιωθείτε ότι παραμένουν
με τη συσκευή εάν μετακινηθεί ή πωληθεί,
έτσι ώστε οποιοσδήποτε τη χρησιμοποιήσει
κατά τη διάρκεια της ζωής της να είναι σω‐
στά ενημερωμένος για τη συσκευή και την
ασφάλεια.
Για την ασφάλεια της ζωής και της περιου‐
σίας, φυλάξτε τις προφυλάξεις αυτών των
οδηγιών χρήσης επειδή ο κατασκευαστής
δεν φέρει ευθύνη για ζημιές που θα προ‐
κληθούν από παραλείψεις.
Ασφάλεια παιδιών και ευπαθών ατόμων
• Η συσκευή αυτή δεν προορίζεται για χρή‐
ση από άτομα (συμπεριλαμβανομένων
των παιδιών) με μειωμένη σωματική ή
πνευματική ικανότητα ή έλλειψη εμπει‐
ρίας και γνώσης, εκτός και εάν επιβλέπο‐
νται ή έχουν λάβει οδηγίες σχετικά με τη
χρήση της συσκευής από άτομο υπεύθυ‐
νο για την ασφάλειά τους.
Τα παιδιά πρέπει να εποπτεύονται ώστε
να εξασφαλίζεται ότι δεν παίζουν με τη
συσκευή.
• Κρατήστε όλα τα υλικά της συσκευασίας
μακριά από τα παιδιά. Υπάρχει κίνδυνος
ασφυξίας.
• Εάν απορρίψετε τη συσκευή, βγάλτε το
φις του ηλεκτρικού καλωδίου από την
πρίζα, κόψτε το καλώδιο σύνδεσης (όσο
μπορείτε πιο κοντά στη συσκευή) και
αφαιρέστε την πόρτα για να την αποφυγή
ηλεκτροπληξίας ή παγίδευσης μέσα στη
συσκευή παιδιών που παίζουν.
• Εάν η συσκευή, η οποία διαθέτει μαγνη‐
τικά λάστιχα πόρτας, θα αντικαταστήσει
μια παλαιότερη συσκευή με μάνδαλο
στην πόρτα ή το καπάκι, μην παραλείψετε
να καταστρέψετε το μάνδαλο προτού
απορρίψετε την παλαιά συσκευή. Με αυ‐
τό τον τρόπο θα αποτρέψετε τη μετατρο‐
πή του ψυγείου σε θανάσιμη παγίδα για
παιδιά.
Γενική ασφάλεια
ΠΡΟΣΟΧΗ Μη φράζετε τα ανοίγματα
εξαερισμού.
• Η συσκευή προορίζεται για τη φύλαξη
τροφίμων ή/και αναψυκτικών σε ένα συν‐
ηθισμένο νοικοκυριό όπως εξηγείται σε
αυτό το εγχειρίδιο οδηγιών.
• Μη χρησιμοποιείτε μηχανικές συσκευές ή
άλλα τεχνητά μέσα για την επιτάχυνση
της διαδικασίας ξεπαγώματος.
• Μη χρησιμοποιείτε άλλες ηλεκτρικές συ‐
σκευές (όπως παγωτομηχανές) στο εσω‐
τερικό ψυκτικών συσκευών, εκτός αν είναι
εγκεκριμένες για το σκοπό αυτό από τον
κατασκευαστή.
20 electrolux
A página está carregando ...
A página está carregando ...
A página está carregando ...
A página está carregando ...
A página está carregando ...
A página está carregando ...
A página está carregando ...
A página está carregando ...
A página está carregando ...
A página está carregando ...
A página está carregando ...
A página está carregando ...
A página está carregando ...
A página está carregando ...
A página está carregando ...
A página está carregando ...
A página está carregando ...
A página está carregando ...
A página está carregando ...
A página está carregando ...
A página está carregando ...
A página está carregando ...
A página está carregando ...
A página está carregando ...
A página está carregando ...
A página está carregando ...
A página está carregando ...
A página está carregando ...
A página está carregando ...
A página está carregando ...
A página está carregando ...
A página está carregando ...
A página está carregando ...
A página está carregando ...
A página está carregando ...
A página está carregando ...
A página está carregando ...
A página está carregando ...
A página está carregando ...
A página está carregando ...
-
 1
1
-
 2
2
-
 3
3
-
 4
4
-
 5
5
-
 6
6
-
 7
7
-
 8
8
-
 9
9
-
 10
10
-
 11
11
-
 12
12
-
 13
13
-
 14
14
-
 15
15
-
 16
16
-
 17
17
-
 18
18
-
 19
19
-
 20
20
-
 21
21
-
 22
22
-
 23
23
-
 24
24
-
 25
25
-
 26
26
-
 27
27
-
 28
28
-
 29
29
-
 30
30
-
 31
31
-
 32
32
-
 33
33
-
 34
34
-
 35
35
-
 36
36
-
 37
37
-
 38
38
-
 39
39
-
 40
40
-
 41
41
-
 42
42
-
 43
43
-
 44
44
-
 45
45
-
 46
46
-
 47
47
-
 48
48
-
 49
49
-
 50
50
-
 51
51
-
 52
52
-
 53
53
-
 54
54
-
 55
55
-
 56
56
-
 57
57
-
 58
58
-
 59
59
-
 60
60


Electrolux END42395X Manual do usuário
- Categoria
- Geladeira-freezers
- Tipo
- Manual do usuário
em outros idiomas
- English: Electrolux END42395X User manual
Artigos relacionados
-
Electrolux ENB43495W Manual do usuário
-
-
-
-
-
-
Electrolux EN3450COW Manual do usuário
-
-
-