
Cave à vins de vieillissement
Wine cellar
Weinklimaschrank
Cave para envelhecimento
de vinhos
Cava para envejecimiento
del vino
Cantina per l’invecchiamento
dei vini
Vinlagringsskåp
Notice d’instructions ................. FR
Instruction manual ................. GB
Bedienungsanleitung ................. DE
Manual de instruções ................. PT
Manual de instrucciones ................. ES
Manuale di istruzioni ................. IT
Bruksanvisning ................. SE
CS
110
160
200
825 12 39-01
C...
®

7
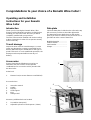
Operating and Installation
Instructions for your Dometic
Wine Cellar
Introduction
Thank you for choosing the Dometic Wine Cellar.
Please read the following instructions carefully before
installing your new wine cellar. We trust you will be
completely satisfied with your purchase.
The wine cellar must be installed and used according
to these instructions in order for it to operate correctly
and economically.
Transit damage
Inspect the wine cellar for transit damage. You must
report any damage the company responsible for the
delivery within the legal or stated time for this type of
product. If there is no such established report time, the
damage must be reported within seven days of
delivery.
Data plate
Check the data plate, inside the wine cellar at the top
left, to ensure you have received the right model.
The data plate shows details that you will need to
quote if you have to contact service personnel. It is a
good idea to make a note of them here.
Model designation ……………
Product number ………………
Serial number …………………
Voltage …………………………
Congratulations to your choice of a Dometic Wine Cellar !
Accessories
Please check that the following accessories are
attached to the wine Cellar or in the separate
cardboard box for accessories wich is placed inside
the wine Cellar.
At the back:
1. Distance bar (to ensure distance to wall behind)
Accessories box:
1. Instruction manual
2. Handle
3. Drip tray
4. Shelf support
5. Keys
6. Storage shelf
Necessary additional tools not incuded
1. Screwdriver (star quad )
2. Adjustable spanner or fixed spanner ( 21mm )
1
4
3
2
1
6
5

8
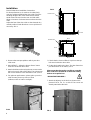
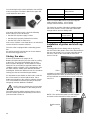
1. Remove the transport pallet on which your wine
cellar rests.
Installation
Please follow these installation instructions:
For best performance, air needs to circulate freely
over the cooling unit behind the wine cellar. The free-
standing design of the cellar means that it should
stand at least 25 mm from the rear and side walls.
Allow a clearance of at least 100 mm above the wine
cellar.
Adjust the feet of the wine cellar so that it stands in a
vertical position in both directions. Use a spirit level if
necessary. FIG.1
2. IMPORTANT ! Adjust the feet to allow a 30mm
clearance under the wine cellar
3. Attach the distance bar using the two screws at the
top back on each side of the cellar. The rod ensures
the correct distance to the wall behind. FIG 2,FIG4.
4. For optimum performance, please place your wine
cellar far away from any source of heat
(radiator,cooker or intence sunlight) .
5.Check that the charcoal filter is in place at the top
left corner inside the wine cellar.
Please note that it must be possible to open the
wine cellar door at least 90° to allow the sliding
shelves to be pulled out.
6. Fit the door handle to the door. The door frame has
pre-drilled holes on its side(s). FIG 3
* IMPORTANT WARNING !
7. Attach the driptray on the back as shown on the
pictures FIG 5a , 5b , 5c. on side 5. The screws are
already attached at the back.
FIG 2
FIG 3
Wall
30 mm
FIG. 1
25
25
Wall
Rear
Distance bar
Distance bar

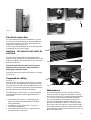
9
FIG 5a FIG 5b
FIG 5c
FIG 4
WARNING – THE WINE CELLAR MUST BE
EARTHED.
The wine cellar is fitted with a plug intended for an
earthed socket. Dometic and its subsidiaries will not be
held responsible for any incident due to non-existent or
defective earth wires.
Electrical leads must be routed and secured so
that they cannot come into contact with hot or
sharp parts of the wine cellar.
Plug in the wine cellar and turn it on with the S1 switch
(see FIG. 6).
Electrical connection.
It is essential that the electrical installation is carried
out correctly, and according to all relevant regulations
and codes of practice. Your wine cellar operates on a
single phase alternating current.
Please check that the voltage shown on the data plate
corresponds to your power supply.
Temperature setting
(see FIG. 7)
The wine cellar is equipped with an electronic control.
This allows you to programme the temperature inside
the wine cellar. Your wine will be stored between 10°C
and 15°C according to expert advice. The temperature
pre-set in the factory is shown on the display.
The temperature, [pre-set at 12°C], can be changed
on demand between 8° and 18° depending on the
wine stored.
1. Press button [1] (see FIG. 7). Message L1 will
appear and the pre-set temperature is blinking
shortly afterwards.
2. Use buttons [2] and [3] (see FIG 7) to lower or
increase the temperature.
3. Please allow 6 seconds for the control system to
record the new pre-set value.
Maintenance
We recommend that you keep your wine cellar as
clean as possible. Unplug the cellar before cleaning.
Do not use any abrasive or strong scented substances
Use a smoth cloth or sponge and light detergent.
It is very important to check regularly that the air
circulation underneath and behind the cellar is not
blocked. Condensation collects in a small cup at the
back of the cellar.The cup has a sponge which helps
the condensation to evaporate. Check that the plastic
pipe routing the water from the inside to the cup is not
blocked by dust or dirt.
S1
FIG 6
FIG 7
1
2
3

10
You should replace the inside ventilation charcoal filter
every second year. The filter is fitted in the upper left
corner inside the wine cellar.
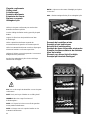
Model Max. no. of
sliding shelves
CS 110 8 woodendoor / 9 glassdoor
CS 160 12
CS 200 16
Each kit contains two shelves and shelf supports.
Sliding shelf kit number: 921 17 81-99
Storage shelf kit number: 921 17 81-98
The maximum number of Bordeaux tradition bottles
that can be stored in a wine cellar that is fitted with
storage shelves and one sliding shelf:
Model No. of No. of bottles
storage shelves
CS 110 1+1 116
CS 160 1+2 170
CS 200 1+3 206
Installation of guides and shelf sup-
ports
Installing guides for the sliding shelves by placing
the rear hook of the guide in front of the desired hole in
the rear row ( Arrow 1 FIG 8 ) push in the direction of
the arrow. Then do the same with the front hook
(Arrow 2 FIG 8) .
Installation of shelf support for storage shelf. Place the
support hooks in the holes at desired level, press in as
arrow 1 indicates and push down as arrow 2 indicates
see FIG 9
FIG 8
1
2
NOTE ! The reinforcement bar is a shelf support
and must not be removed for safety reasons.
Reinforcement
bar
FIG 9
If the wine cellar fails to work, check the following
before calling a service technician:
• that the fuse of power supply is intact
• that the plug is properly inserted in its socket
• that the wine cellar is switched on
If the cause of failure is not listed above, an authorised
service technician must be called for.
The wine cellar is equipped with overheating protec-
tion.
An authorised service technician can check whether
this has been triggered or not.
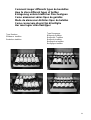
Storing the wine .
Please see illustrations on pages 31-32.
Bottles should be stored in your wine cellar according
to their size. The most known bottles are the “Bor-
deaux” and the “Burgundy”. These bottles are not all
identical. The most widely recognised bottles are the
“Tradition” and the “Légère”. The “Champenoise” and
the “flûte d’Alsace” bottles have different diameters
and heights. Take these differences into account when
storing your wine and avoid mixing the bottles.
It is important to store bottles on their side in order for
the cork to remain in contact with the wine. Place
bottles top to bottom in the cellar for optimum volume
use. Our illustrations show the best way to stack the
“Burgundy” and the “Bordeaux Tradition”.
NOTE that you should store no more than
one layer of bottles on the sliding shelves.
The sliding shelves and the storage shelves can be
placed in several positions depending on the size of
your wine cellar. FIG 8 & 9
1
2

31
Comment ranger différents types de bouteilles
How to store different types of bottles
Einlagerung unterschiedlicher Flaschentypen
Como armazenar vários tipos de garrafas
Modo de almacenar distintos tipos de botellas
Come conservare diversi tipi di bottiglie
Hur man lagrar olika flasktyper
Type Bourgogne
Burgundy tradition
Burgunder Tradition
Type Bordaux
Bordeaux tradition
Bordolese tradition
Burgundy tradition
Borgognona tradition
Bourgogne tradition

32
Clayette coulissante
Sliding shelf
Schieberregal
Prateleira deslizante
Estantería deslizante
Ripiano scorrevole
Utdragbar hylla
Utilisez la clayette coulissante pour stocker des
bouteilles de forme spéciale.
Use the sliding shelf when storing specially shaped
bottles.
Lagern Sie Flaschen mit Spezialform auf dem
Schieberegal.
Utilize a prateleira deslizante aquando do
armazenamento de garrafas de formato especial.
Utilice la estantería deslizante cuando se disponga a
almacenar botellas con formas especiales.
Utilizzare il ripiano scorrevole quando si conservano
bottiglie di forma particolare.
Använd den utdragbara hyllan när du skall lagra
olikformade flasktyper.
Exemple de bouteilles mixtes
Example of mix bottle types
Beispiel für Kombilagerung
Exemplo de tipos de garrafas misturados
Ejemplo de almacenamiento de distintos
tipos de botellas
Esempio con diversi tipi di bottiglie
Exempel på blandade flasktyper
N.B. Une seule rangée de bouteilles sur une clayette
coulissante !
NOTE ! only one layer of bottles on a sliding shelf !
HINWEIS ! Nur eine Lage Flaschen auf
Schieberegalen!
NOTA ! Só é possível colocar uma fila de garrafas
numa prateleira deslizante!
NOTA ! Coloque una sola capa de botellas en las
estanterías deslizantes
NOTA ! Riporre un solo strato di bottiglie per ripiano
scorrevole!
OBS ! Endast ett lager flaskor på en utdragbar hylla

33
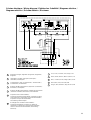
Schéma électrique / Wiring diagram / Elektrisches Schaltbild / Diagrama eléctrico /
Diagrama eléctrico / Schema elettrico / Elschema
Régulateur / Regler / Regulador / Regulador / Regolatore /
Regulator
Interrupteur / Schalter / Interruptor / Interruptor /
Interruttore / Strömbrytare
Transformateur / Trafo / Transformador / Transformador /
Trasformatore / Transformator
Elément chauffant / Heizpatrone / Aquecedor / Calentador /
Resistenza / Värmepatron
Elément chauffant / Heizelement / Unidade de aquecimento
/ Elemento calentador / Resistenza / Värmeelement
Séparateur d’eau à thermofusible /
Thermosicherung Wasserabscheider / Separador de água
do termofusível / Condensador de agua del termofusible /
Separatore d’acqua del termofusibile /
Termosäkring vattenavskiljare
Enveloppe de la chaudière à thermofusible /
Thermosicherung Boiler / Invólucro da caldeira do
termofusível / Cubierta de la caldera del termofusible /
Involucro del boiler del termofusibile / Termosäkring
kokarsvep
Gris / Grau / Cinzento / Gris / Grigio / Grå
Blanc / Weiß / Branco / Blanco / Bianco / Vit
Noir / Schwarz / Preto / Negro / Nero / Svart
Bleu / Blau / Azul / Azul / Blu / Blå
Rouge / Rot / Vermelho / Rojo / Rosso / Röd
A
B
C
D
E
F
2
4
3
5
1
G
-
 1
1
-
 2
2
-
 3
3
-
 4
4
-
 5
5
-
 6
6
-
 7
7
-
 8
8


Dometic CS160DV Manual do usuário
- Categoria
- Refrigeradores de vinho
- Tipo
- Manual do usuário
em outras línguas
- English: Dometic CS160DV User manual
Artigos relacionados
-
Dometic CS 200 Manual do usuário
-
-
-
-
-
-
-
-