ESS EDCLEANCOMTAF-1300 Guia de instalação
- Tipo
- Guia de instalação

Modulo / Compact Clean TAF
Installation advice
Einbauempfehlung
Inbouwadvies
Montagevejledning
Innbyggingsråd
Consejo para la instalación
Conselho de instalação
Consigli di montaggio
Conseils de montage
Zalecenia dotyczące wbudowania
UK
DE
NL
DK
NO
ES
PT
IT
FR
PL
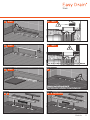
INSTALLATION ADVICE
BASIC, TAF, DESIGN

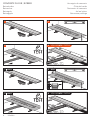
2 Modulo
Installation options 3
Height adjustable support 4
Height adjustable support - Wall 5
Concrete loor | Screed 6
Joisted wooden loor | Floor plate 7
Sealing WPS 8
Finishing - TAF 10
Finishing - BASIC 12
DRYPHON® TECHNOLOGY 13
Sealing advice - TAF (primary drainage) 14
Sealing advice - TAF (secondary drainage) 15
Sealing advice - BASIC 16
Maintenance instructions 17
Siphon cleaning 18
Important assembling advice 19
Modulo / Compact TAF
Modulo / Compact TAF WALL
Modulo DESIGN (Z2)
Modulo DESIGN (Z3)
Modulo DESIGN (Z4)
Modulo BASIC
CONTENTS Contenido
Inhalt Conteúdo
Inhoud Contenuto
Indhold Table des matières
Innhold Zawartość

3 Modulo
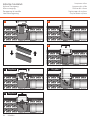
INSTALLATION OPTIONS Opciones de instalación
Einbauemmöglichkeiten Variantes de instalação
Inbouwvarianten Varianti di montaggio
Installeringvarianter Variantes de montage
Innbyggingsvarianter Warianty wmontowania
Modulo / CompactTAFModulo / CompactTAF Modulo Modulo / Compact/ Compact TAF Wall TAF Wall
Modulo Design Z2Modulo Design Z2 Modulo Design Z3Modulo Design Z3
Modulo Design Z4Modulo Design Z4 Modulo Modulo / Compact / Compact TAF - SHOWER ENTRANCETAF - SHOWER ENTRANCE

4 Modulo
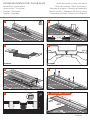
HEIGHT ADJUSTABLE SUPPORT Montaje del pie de ajuste
Stellfuß Montage Montagem do pé nivelador
Stelvoet montage Montaggio del piede di regolazione
Justering fod montering Socle de montage ajustable
Justeringsfot montering Montaż na regulowanej stopce
110 mm
165 mm
65 mm
110 mm
11
23
4 5
A B

5 Modulo
1 2
3
5
4
7 8
6
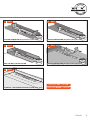
HEIGHT ADJUSTABLE SUPPORT WALL Montaje del pie de ajuste - Pared
Stellfuß Montage - Wand Montagem do pé nivelador - Parede
Stelvoet montage - Wand Montaggio del piede di regolazione - Parete
Justering fod montering - Væg Socle de montage ajustable - Mur
Justeringsfot montering - Vegg Montaż na regulowanej stopce - Ściana

6 Modulo
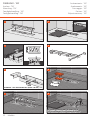
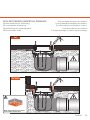
CONCRETE FLOOR SCREED Hormigón de cemento
Betonboden Chão de betão
Betonvloer Pavimento di cemento
Betongulv Sol en béton
Betonggulv Betonowa podłoga
1 2
43
21
3 4
SEALING WPS - PAGE 8
SEALING WPS - PAGE 8
WALL WALL
WALL

7 Modulo
JOISTED WOODEN FLOOR FLOOR PLATE Suelo de madera | Platos de ducha
Holzaubau | Bodenplatte Chão de madeira | Placa de chuveiro
Houten vloer | Vloerplaat Pavimento in legno | Elementi a pavimento
Trægulv | Gulvplade Les sols en bois | Panneaux de construction
Tregulv | Gulvplate Drewniana podłoga | Elementy podłogowe
72 mm
113 mm
1 2
43
65
87
OPTIONAL OPTIONALOPTIONAL
EASY SILICON EDSIL 1, EASY COMPOUND ED2CEASY SILICON EDSIL 1, EASY COMPOUND ED2C
SEALING WPS - PAGE 8

8 Modulo
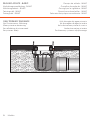
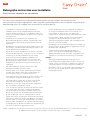
SEALING ADVICE Consejo de sellado
Abdichtungsempfehlung Conselho de vedação
Afdichtingsadvies Consigli per la sigillatura
Tætningsråd Conseil pour étanchéiier
Tetningsråd Zalecenia dotyczące uszczelniania
1 2
3 4
4
OPTIONAL - WET ROOM SEALING SYSTEM (WPSSET)OPTIONAL - WET ROOM SEALING SYSTEM (WPSSET)
SEALING COMPOUND (Easy2Seal, Easy2Seal 2K)SEALING COMPOUND (Easy2Seal, Easy2Seal 2K)
SEALING COMPOUND (Easy2Seal, Easy2Seal 2K)SEALING COMPOUND (Easy2Seal, Easy2Seal 2K)
A
B
FINISHING TAF - PAGE 10
FINISHING BASIC - PAGE 12

9 Modulo
1 2
3 4
4
WALL
SEALING COMPOUND (Easy2Seal, Easy2Seal 2K)SEALING COMPOUND (Easy2Seal, Easy2Seal 2K) SEALING COMPOUND (Easy2Seal, Easy2Seal 2K)SEALING COMPOUND (Easy2Seal, Easy2Seal 2K)
WALLTOWALL INSTALLATIONWALLTOWALL INSTALLATION SEALING COMPOUND (Easy2Seal, Easy2Seal 2K)SEALING COMPOUND (Easy2Seal, Easy2Seal 2K)
OPTIONAL - WET ROOM SEALING SYSTEM (WPSSET)OPTIONAL - WET ROOM SEALING SYSTEM (WPSSET)
WALL
WALL
WALLWALL
FINISHING TAF - PAGE 10
FINISHING BASIC - PAGE 12

10 Modulo
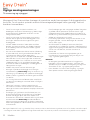
FINISHING TAF Acabamiento - TAF
Ausbau - TAF Acabamento - TAF
Afwerking - TAF Finissaggio - TAF
Færdigbehandling - TAF Finition - TAF
Ferdigbehandling - TAF Wykończeniowy - TAF
1 2
43
65
87
OPTIONAL - SEALING ADVICE PAGE 14 & 15OPTIONAL - SEALING ADVICE PAGE 14 & 15
Easy Silicon (EDSIL 1), Easy Compound (ED2C)Easy Silicon (EDSIL 1), Easy Compound (ED2C)
OPTIONAL - TAF EXTENSION SET (MAX. +10 CM)OPTIONAL - TAF EXTENSION SET (MAX. +10 CM)

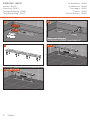
11 Modulo
9 10
11 12
13 14
15 15
SEALING ADVICE PAGE 14& 15SEALING ADVICE PAGE 14& 15
Easy Silicon (EDSIL 1), Easy Compound (ED2C)Easy Silicon (EDSIL 1), Easy Compound (ED2C)
FILL UP ALL HOLLOW SPACES BENEATH THE DRAINFILL UP ALL HOLLOW SPACES BENEATH THE DRAIN
WALL WALL
WALL WALL
WALL
BA DRYPHON

12 Modulo
FINISHING BASIC Acabamiento - BASIC
Ausbau - BASIC Acabamento - BASIC
Afwerking - BASIC Finissaggio - BASIC
Færdigbehandling - BASIC Finition - BASIC
Ferdigbehandling - BASIC Wykończeniowy - BASIC
1 2
3 4
SEALING ADVICE PAGE 16SEALING ADVICE PAGE 16
Easy Silicon (EDSIL 1), Easy Compound (ED2C)Easy Silicon (EDSIL 1), Easy Compound (ED2C)
B DRYPHON4
A

13 Modulo
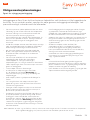
MODULO CLEAN WITH DRYPHON® TECHNOLOGY
EN
DE
FR
ES
IT
• The Dryphon® has a high-tech silicone valve that blocks any odour from the waste piping,
without the use of water. This provides higher drainage capacity and requires less mainte-
nance.
• Der Dryphon® verfügt über ein Hightech-Silikonventil, das den Geruch aus der Abwasser-
leitung ohne Sperrwasseraufnahme blockiert. Dies führt zu einer höheren Entwässerung-
skapazität und einem geringeren Wartungsaufwand.
• Le Dryphon® est doté d’une vanne en silicone de haute technologie qui bloque toute
odeur émanant de la tuyauterie d’évacuation, sans utiliser d’eau. Ceci permet une capacité
d’évacuation plus élevée et nécessite moins d’entretien.
• El Dryphon® tiene una válvula de silicona avanzada que bloquea cualquier olor de la
tubería sin necesidad de agua. Eso proporciona una mayor capacidad de drenaje y menor
mantenimiento.
• Il Dryphon® ha una valvola avanzata in silicone che blocca qualsiasi odore proveniente dal
tubo di scarico senza l’uso dell’acqua. Questo comporta una maggiore capacità di scarico
e richiede meno manutenzione.

14 Modulo
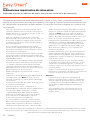
SEALING ADVICE TAF Consejo de sellado - TAF
Abdichtungsempfehlung - TAF Conselho de vedação - TAF
Afdichtingsadvies - TAF Consigli per la sigillatura - TAF
Tætningsråd - TAF Conseil pour étanchéiier - TAF
Tetningsråd - TAF Zalecenia dotyczące uszczelniania - TAF
ONLY PRIMARY DRAINAGE Sólo desagüe de agua primario
Nur Primärwasser Ableitung Só drenagem da água primária
Alleen primaire afwatering Solo derivazione primario scarico
Kun aledning af primærvand Seule évacuation primaire
Kun primær avløp Podstawowy systemu odpływowego
TAF
TAF WALL

15 Modulo
WITH SECONDARY UNDERTILE DRAINAGE Con desagüe de agua secundario
Mit Sekundärwasser Ableitung Com drenagem da água secundário
Met secundaire afwatering Con derivazione secondario scarico
Med aledning af sekundærvand Avec évacuation secondaire
Med sekundær avløp Z drugorzędnego systemu odpływowego
Only apply with waterprooing
of the entire shower loor
TAF
TAF WALL

16 Modulo
SEALING ADVICE BASIC Consejo de sellado - BASIC
Abdichtungsempfehlung - BASIC Conselho de vedação - BASIC
Afdichtingsadvies - BASIC Consigli per la sigillatura - BASIC
Tætningsråd - BASIC Conseil pour étanchéiier - BASIC
Tetningsråd - BASIC Zalecenia dotyczące uszczelniania - BASIC
ONLY PRIMARY DRAINAGE Sólo desagüe de agua primario
Nur Primärwasser Ableitung Só drenagem da água primária
Alleen primaire afwatering Solo derivazione primario scarico
Kun aledning af primærvand Seule évacuation primaire
Kun primær avløp Podstawowy systemu odpływowego

UK
DE
NL
DK
NO
• Do not use abrasives and/or sharp/scraping objects to clean the Easy drain®.
• The siphon trap should be cleaned periodically to remove any dirt that may have collected.
• We recommend the use of EasyClean Set (EDSC) for daily maintenance and cleaning of your Easy drain®.
• Reinigen Sie den Easy drain® ohne Scheuermittel und/oder spitze oder scheuernde Gegenstände.
• Befreien Sie den Geruchsverschluss in regelmäßigen Abständen von eventuellen Verschmutzungen.
• Wir empfehlen die Verwendung von EasyClean Set (EDSC) für die tägliche Reinigung und Plege Ihrer Easy drain®.
• De Easy drain® reinigen zonder schuurmiddelen en/of scherpe of schurende voorwerpen.
• Periodiek het waterslot vrij maken van eventuele vervuilingen.
• Wij raden het gebruik van EasyClean Set (EDSC) aan voor dagelijks onderhoud en intensieve reiniging van uw Easy
drain®.
• Rengøring af Easy drain® skal ske med rengøringsmidler uden slibemiddel, såvel som brugen af spidse eller slibende
rengøringsremedier frarådes.
• Vandlåsen rengøres med jævne mellemrum efter behov.
• Vi anbefaler anvendelsen af EasyClean Set (EDSC) til den daglige rengøring og pleje af Deres Easy drain®.
• Rengjør Easy drain® uten skuremidler og/eller skarpe eller skurende gjenstander.
• Rengjør med jevne mellomrom vannlåsen for eventuelle forurensninger.
• Vi anbefaler bruken av EasyClean Set (EDSC) for daglig vedlikehold og intensiv rengjøring av din Easy drain®.
ES
PT
IT
FR
PL
• Limpiar el Easy drain® sin utilizar productos corrosivos y/o materiales abrasivos.
• Limpiar periódicamente los posibles residuos del cierre hidráulico.
• Se recomienda el uso de EasyClean Set (EDSC) para el mantenimiento diario y limpieza intensiva de su Easy drain®.
• A Easy drain® não deve ser limpa com produtos abrasivos e/ou objectos aiados ou abrasivos.
• Periodicamente libertar o sifão de retenção de odores de eventuais sujidades .
• Recomendamos a utilização do kit de limpeza EasyClean Set (EDSC) para a manutenção diária e a limpeza intensiva
da sua Easy drain®.
• Pulire la Easy drain® senza utilizzare sostanze abrasive e/o oggetti taglienti o abrasivi.
• Eliminare periodicamente le eventuali contaminazioni dal sifone antiodore.
• Consigliamo di utilizzare EasyClean Set (EDSC) per la manutenzione giornaliera e la pulizia approfondita della
Easy drain®.
• N’utilisez pas de produit abrasifs ni d’objets coupants ou abrasifs pour le nettoyage du Easy drain®.
• Éliminez périodiquement les dépôts éventuels au niveau du coupe-odeur.
• Nous conseillons d’utiliser EasyClean Set (EDSC) pour la maintenance quotidienne et le nettoyage intensif du Easy
drain®.
• Easy drain® czyścić bez użycia materiałów ściernych i/lub ostrych albo szorstkich przedmiotów.
• Okresowo należy usuwać ewentualne zanieczyszczenia z syfonu kanalizacyjnego.
• Zalecamy korzystanie z EasyClean Set (EDSC) do codziennych zabiegów pielęgnacyjnych oraz intensywnego
czyszczenia Easy drain®.
MAINTENANCE INSTRUCTIONS Instrucciones de mantenimiento
Plegehinweise Instruções de manutenção
Onderhoudsadviezen Istruzioni di manutenzione
Vedligeholdelsesinstruktioner Instructions d’entretien
Vedlikeholdsinstruks Instrukcja konserwacji
17 Modulo

18 Modulo
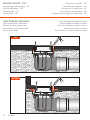
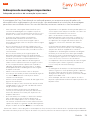
SIPHON CLEANING Limpieza sifon
Siphon Reinigung Limpeza do sifão
Sifon reiniging Pulizia del sifone
Rengøring af vandlås Nettoyage du siphon
Vannlåsrengjøring Czyszczenie syfonu
1 2
43
1 2
3
Dryphon Dryphon
Dryphon

19 Modulo
Typing and printing errors reserved. Easy Sanitary Solutions BV excludes all liability for any damages whatsoever associated
with the use and/or the installation of the drain. Easy Sanitary Solutions BV a priori excludes any liability whatsoever.
UK
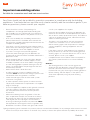
Important assembling advice
Suitable for renovation work and new construction
• Please check the content of the package for
completeness and integrity before proceeding with
the assembly. Do not install the drain if any deviations
are noted. Should this be the case, please consult your
supplier.
• Prior to the assembly, the assembling advice and its
special characteristics should be discussed with the
tiler. After the assembly, please provide the tiler with the
complete assembling advice.
• If the drain is used for several showers, please check to
make sure that the drainage capacity is suicient. If you
are unsure, please consult the supplier for advice.
• If you are not using the second drainage level
(secondary water drainage), the joint between the
shower drain and the tile frame should be sealed with a
permanent sealer.
• We recommend taping or closing the drain opening
of the shower drain with a cement cap prior to the
assembly to prevent construction debris from getting
into the drainage pipe. To prevent damage to the tile
frame, it should be kept in the package until the inal
installation by the tiler.
• Make sure the drain is level all around.
• Install the sewage system in compliance with the
standards. Note: ensure that the sewage system is well
ventilated and that the gradient is suicient.
• Check the drainage system and the sewer system
connection for tightness.
• In order to prevent hollow spaces, the drain must be
fully lined and sealed with loor pavement to the upper
edge of the lange.
• The seal is applied in compliance with general standards
for indoor sealing of wet areas. If alternative seals
are used, please read the manufacturer’s product
information.
• When tiles are being itted, the gradient of the tiles
(min. 2% per linear metre) in the shower must always
be towards the drain. The tiles should be laid level or
1 mm higher than the top edge of the tile frame to
ensure good drainage toward the shower drain. Note:
the requirements with regard to the loor gradient may
be dierent for walk-in showers with glass walls. Please
consult your supplier in this respect.
• Once the tiles have been itted, the joint between the
tiled loor and the drain should be permanently sealed
with an elastic sealant (maintenance joint). The adhesion
surfaces should be free of mortar, adhesive and other
adhesion-reducing materials.
• The drain is only intended for use with waste water
common in households. Do not use other luids as
well as cleaning agents with the potential to damage
sanitary equipment, drainage equipment and raw
materials.
• If the drain is used for other purposes (e.g. swimming
pools), where it may come in contact with aggressive
cleaning agents or corrosive substances such as salt or
chlorine, please consult your supplier.
• Compliance with this installation advice is required for
any warranty claims based on our sale and delivery
terms.
Caution !
• Tile cleaning products often contain aggressive
chemicals that are abrasive in nature and may damage
the drain. Please ensure that the drain is thoroughly
lushed after using any tile and grout cleaning products.
• Before cleaning, remove all parts of the siphon and
clean them separately using only mild cleaning
products.
Easy Drain should only be installed by specialist companies in compliance with the building
regulations. To achieve the best possible result, please carefully read the installation guide. If you
have any questions, please consult your supplier.

20 Modulo
Druck- und Satzfehler vorbehalten. Easy Sanitary Solutions BV schließt jegliche Haftung für Schäden aus, die durch die
Verwendung und/oder den Einbau der Duschrinne, entstehen. Easy Sanitary Solutions BV schließt a priori jegliche Haftung
aus.
Wichtige Montagehinweise
Geeignet für Renovierung und Neubau
Der Einbau der Easy Drain sollte unter Berücksichtigung der bautechnischen Vorschriften
nur von Fachirmen durchgeführt werden. Für ein optimales Ergebnis, lesen Sie bitte die
Einbauanleitung sorgfältig durch. Bei Rückfragen setzen Sie sich bitte mit Ihrem Lieferanten in
Verbindung.
• Vor Beginn der Montage sollte der Packungsinhalt auf
Vollständigkeit und Unversehrtheit überprüft werden.
Bei Abweichungen sollte der Ablauf nicht verbaut
werden. Bitte kontaktieren Sie dann ihren Lieferanten.
• Vor Montagebeginn sollten die Montagehinweise mit
ihren Besonderheiten zusammen mit dem Fliesenleger
durchgesprochen werden. Nach der Montage
übergeben Sie bitte alle Montagehinweise an den
Fliesenleger.
• Bei Verwendung des Ablaufes in Verbindung
mit mehreren Duschen, prüfen Sie bitte ob die
Ablaukapazität des Ablaufes ausreichend ist. Lassen Sie
sich bitte ggf. von Ihrem Lieferanten beraten.
• Bei nicht Inanspruchnahme der zweiten Ablaufebene
(Sekundärwasser Ableitung) sollte die Fuge zwischen
Duschrinnenkörper und Fliesenrahmen mit einer
dauerhaften Dichtmasse verschlossen werden.
• Wir empfehlen Ihnen, die Ablaufönung der
Duschrinne vor der Montage abzukleben, oder mit
der Zementkappe zu schließen, um Verunreinigungen
in der Ablauleitung zu vermeiden. Zur Vermeidung
von Beschädigungen sollte der Fliesenrahmen bis zur
Endmontage durch den Fliesenleger in der Verpackung
bleiben.
• Den Ablauf in allen Richtungen waagerecht ausrichten.
• Die Installation der Abwasseranlage muss normgerecht
ausgeführt werden. Hinweis: Beachten Sie die Be-
und Entlüftung, und ausreichendes Gefälle in der
Abwasseranlage.
• Das Ablaufsystem und die Abwasseranschlüsse auf
Dichtigkeit kontrollieren.
• Um Hohlräume zu vermeiden muß der Ablaukörper
volllächig bis zur Oberkante Flansch mit Estrich
unterfüttert und verdichtet werden.
• Die Abdichtung erfolgt nach DIN 18534. Bei der
Verwendung alternativer Abdichtungen sind die
Produktinformationen vom Hersteller zu beachten.
• Beim Verlegen der Bodenliesen muss das Fliesengefälle
(min. 2% je m1) im Duschbereich immer zum Ablauf
hin verlaufen. Die Fliesen müssen höhengleich oder
1 mm höher zur Oberkante des Fliesenrahmens
verlegt werden. Hiermit wird eine gute Entwässerung
zur Duschrinne gewährleistet. Hinweis: Bei
bodenebenen Duschen mit Glaswänden können andere
Anforderungen bezüglich des Gefälles gelten. Wenden
Sie sich diesbezüglich an Ihren Lieferanten.
• Nach dem Fliesen muss der Übergang zwischen
dem Fliesenboden und Ablauf mit einer elastischen
Fuge (Wartungsfuge) dauerhaft abgedichtet werden.
Die Klebelächen müssen frei von Mörtel, Kleber und
sonstigen haftunsveringernden Materialien sein.
• Der Ablauf ist nur für haushaltsübliche Abwässer
geeignet. Vermeiden Sie andere Flüssigkeiten, sowie
Reinigungsmittel die sanitäre Einrichtungsgegenstände,
Entwässerungsgegenstände und Rohrwerkstoe
beschädigen können.
• Bei Verwendung des Ablaufes in anderen
Bereichen (z.B. Schwimmbad), bei denen der
Ablauf mit aggressiven Reinigungsmitteln oder
korrosionsfördernden Substanzen wie Salz oder Chlor
in Verbindung kommen kann, setzen Sie sich bitte mit
ihrem Lieferanten in Verbindung.
• Die Einhaltung dieser Einbauempfehlung ist die
Voraussetzung für einen Gewährleistungsanspruch
auf der Grundlage unserer Verkaufs- und
Lieferbedingungen.
Achtung !
• Fliesenreiniger enthalten oft aggressive Chemikalien.
Diese können die Oberläche der Rinne angreifen. Bitte
achten Sie darauf, dass bei Verwendung von Fliesen-
und Fugenreiniger der Ablauf nachträglich ausreichend
gereinigt werden muss.
• Entfernen Sie vor der Reinigung alle Teile des Siphons
und reinigen Sie diese separat und nur mit milden
Reinigungsmitteln.
DE
A página está carregando...
A página está carregando...
A página está carregando...
A página está carregando...
A página está carregando...
A página está carregando...
A página está carregando...
A página está carregando...
A página está carregando...
A página está carregando...
A página está carregando...
A página está carregando...
-
 1
1
-
 2
2
-
 3
3
-
 4
4
-
 5
5
-
 6
6
-
 7
7
-
 8
8
-
 9
9
-
 10
10
-
 11
11
-
 12
12
-
 13
13
-
 14
14
-
 15
15
-
 16
16
-
 17
17
-
 18
18
-
 19
19
-
 20
20
-
 21
21
-
 22
22
-
 23
23
-
 24
24
-
 25
25
-
 26
26
-
 27
27
-
 28
28
-
 29
29
-
 30
30
-
 31
31
-
 32
32


ESS EDCLEANCOMTAF-1300 Guia de instalação
- Tipo
- Guia de instalação
em outras línguas
- español: ESS EDCLEANCOMTAF-1300 Guía de instalación
- français: ESS EDCLEANCOMTAF-1300 Guide d'installation
- italiano: ESS EDCLEANCOMTAF-1300 Guida d'installazione
- English: ESS EDCLEANCOMTAF-1300 Installation guide
- Nederlands: ESS EDCLEANCOMTAF-1300 Installatie gids
- Deutsch: ESS EDCLEANCOMTAF-1300 Installationsanleitung
- dansk: ESS EDCLEANCOMTAF-1300 Installationsvejledning
- polski: ESS EDCLEANCOMTAF-1300 Instrukcja instalacji
Artigos relacionados
-
ESS MB-NAT-1000 Guia de instalação
-
-
 ESS XS-Z4P-M-1100 Guia de instalação
-
 ESS SBITAL-LINE-1 Guia de instalação
-
 ESS EDMTAF800 Guia de instalação
-
 ESS BD-50-STEPS Guia de instalação
-
 ESS SBBASIC-LINE-1 Guia de instalação
-
 ESS SBCOM-LINE-1 Guia de instalação
-
 ESS SBAquaB Guia de instalação
-
 ESS R-LINE-1000 Guia de instalação


