
Panda Wireless
LCD Keypad Instructions
IT FR
Models: RW332KP, RW332K
PR

2
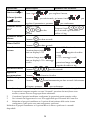
Language Page
3
10
ES
18
26
34
PR

3
EN
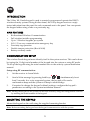
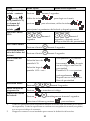
INTRODUCTION
The 2-Way WL Panda keypad is used to remotely program and operate the RISCO
wireless security systems. Being bi-directional, the 2-Way keypad receives a reply
status indication from the panel for each command sent to the panel. You can operate
the keypad either using a code or a proximity tag.
MAIN FEATURES
Bi-directional Wireless Communication
Full wireless installer programming
Up to 3 Wireless keypads per system
S.O.S / Two way communication emergency key
Proximity tag operation
Double tamper protection (Box & Wall)
Battery economy mode
COMMUNICATION SETUP
The wireless Panda keypad must identify itself to the system receiver. This can be done
by typing the 11 digit serial number of the keypad into the system or using RF mode.
To set up the keypad using the serial number refer to the security system installation
manual.
Setup using RF communication:
1. Set the receiver to Learn Mode.
2. Send a Write message by pressing both keys
simultaneously for at
least 2 seconds. In a voice supported system, the keypad will sound a
confirmation beep and the system will beep to acknowledge.
3. If required to change the keypad's default settings, configure the keypad's
parameters according to the system installation manual.
Note: Adding the keypad to the system can be done remotely using the configuration software
by entering the serial number of the keypad.
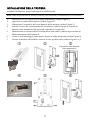
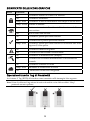
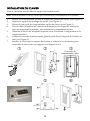
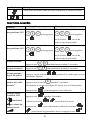
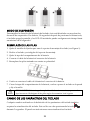
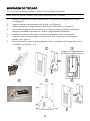
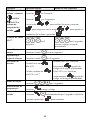
MOUNTING THE KEYPAD
Mount the keypad on the wall using the supplied mounting bracket.
Note: Before mounting the keypad test the keypad communication with the system.

4
1. Remove the fastening screw that secures the mounting bracket to the keypad (see
Figure 1).
2. Separate the mounting bracket from the keypad (see Figure 2).
3. Release battery cover from the keypad’s battery compartment (see Figure 3).
4. Attach the battery cable to the battery connector (see Figure 4), insert the batteries (while
paying attention to the polarity of the batteries) and close the battery compartment.
5. Allocate the Keypad to the Receiver (see Communication Setup).
6. Using the mounting holes as a template secure the mounting bracket to the wall
(see Figure 5).
7. Mount the keypad to the mounting bracket and insert the fastening screw to lock
the keypad (see Figures 6 and 1).
MAIN USER OPERATIONS
The following list details the user operations from the wireless Panda keypad.
User operation can be defined to be activated by a quick mode or high security mode
that requires the use of a code or proximity tag.
In the high security mode, the proximity tag can be used as a substitute for entering a
user code when the display prompts to "Insert a code".
Battery Compartment
Cover
(
back side
)

5
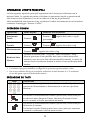
COMMON OPERATIONS
Operation
1
Quick Operation
High Security Mode
2
Full Set
(Away)
Press
Press
followed by code or proximity tag
3
Part Set
(Stay)
Press Press followed by code or proximity tag
Full Unset
(Disarm)
Press
followed by code or proximity tag
Get System
Status
When the
keypad is woken up (not in Sleep Mode) by short press of any
button (no beep sound), the keypad receives system status from the panel. A
corresponding icon indication appears on the keypad display.
1. Operations are performed by Normal press
2. Consult your installer for the operations defined with a code.
3. For optimal use of the proximity tag, use it from a distance of 1-2 cm from the top-right
corner of the keypad.
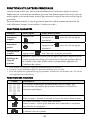
KEY OPERATION
Key Description
Numerical keys are used to input the numeric codes that may be
required for setting, unsetting, or used to activate specific functions
In Normal Operation mode: Used to enter the User Functions menu
In User Functions menu: Used to move back one step in the menu
In Normal Operation mode: Used for Disarming (Unsetting).
In User Functions menu: Used to terminate commands and confirm
data to be stored.
Used to scroll up a list or to move the cursor to the left;
Provides the system status
Long press on provides system status with voice (in a voice
supported system)
Used to scroll down a list or to move the cursor to the right.
Changes data

6
ADVANCED OPERATIONS
Operation
1
Quick Operation High Security Mode
Full Setting
(Away) partition
1/2/3
Select partition
/ / and press
Select partition
/ /
and press
followed by code
or proximity tag
Part Setting (Stay)
partition 1/2/3
Select partition
/ /
and press
Select partition
/ /
and press
followed by code
or proximity tag
Fire Alarm
Pressing
keys simultaneously for at least two seconds
activates a Fire alarm
Emergency /
Medical Alarm
Pressing
keys simultaneously for at least two seconds
activates an Emergency alarm
Panic alarm /
Service call
Pressing
+ keys simultaneously for at least two seconds
activates a Panic alarm
2
Main unit Speaker
Volume
3
Press the button
for 2 seconds
Select the volume level (0=No sound, 4=Full volume)
Press
to save your selection
Keypad setup -
LCD contrast
, brightness
and keypad
buzzer volume
Press
for 2 seconds.
Use the
keys to choose from menu,
press to select, then use keys to adjust the
keypad's parameters and press
Output control
1/2/3
4
Press button
/ / for 2 seconds
Press button
/ / for
2 seconds and then enter the code
or proximity tag

7
Operation
1
Quick Operation High Security Mode
View Last Alarm
Press button
for two seconds
System Chime
On/Off
Press the button
for 2 seconds
View system
status
Short press on : LCD
display
Long press on
: LCD
display + voice
3
Only LCD Dispaly: Short press
on folllowed by code
or proximity tag.
LCD display + voice: Long
press on
followed by
code or proximity tag
Macro Activation
5
Press
/ / for 2 seconds
Enter programming
mode
Press
and enter the code
Changing Keypad
Language
Press
simultaneously for 2 seconds. Select the
language and press
to confirm.
1 All operations are available while keypad is turned on (Not in Sleep Mode). All operations
are performed by Normal press (with beep), unless otherwise mentioned.
2 Ask your installer for the keys definition
3 In voice supported systems. Not applicable for WiComm Pro
4 Ask your installer whether outputs control is applicable or not and which output is
assigned to which key
5 Ask your installer for the macro defined for each key.
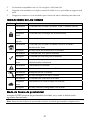
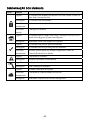
ICONS INDICATION
Key Function
On System is armed in Full Arm or Stay Arm mode
Off System is disarmed
Slow Flash System is in Exit/Entry Delay
Rapid Flash Alarm condition
On System is in Stay Arm mode (Part Set) or Zone Bypass mode
Off No bypass zones in the system
On System is ready to be armed

8
Key Function
Off System is not ready to be armed
Slow Flash System ready to be armed while Exit/Entry zone is open
On System Trouble
Off System is operating normally
On Tamper in the system
Off No tamper in the system
On System connected to cloud
Slow Flash Cloud connectivity trouble
Off No cloud connection configured
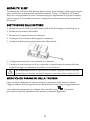
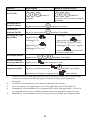
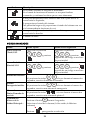
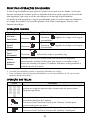
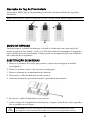
Proximity Tag Operation
Present the RFID (Proximity Tag) to the keypad as shown in the following illustrations:
Note: Before using the Proximity Tag, wake up the keypad by pressing any button on the keypad.
SLEEP MODE
For extending the battery life of the keypad, the keypad is designed with a Sleep mode
function. By default, 10 seconds after the last key has been pressed, the keypad will
turn off its display and LEDs. The time can be configured by your installer to a
maximum of 60 seconds.
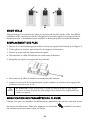
REPLACING BATTERIES
1. Remove the fastening screw that secures the mounting bracket to the keypad
(see Figure 1).
2. Slide the keypad and remove it from the mounting bracket.
3. Remove the battery compartment cover.
4. Disconnect the battery cable from the battery connector.
5. Replace the batteries while paying attention to the polarity of the batteries.

9
6. Reconnect the battery cable to the battery connector.
7. Close the battery compartment cover, place the keypad back on the wall and secure
the screw to its place.
CAUTION: Risk of explosion if battery is replaced by an incorrect type. Dispose
of used batteries according to local regulations.
CHANGING KEYPAD PARAMETERS
Any change performed in the definition of the keypad parameters also requires
updating the keypad. This is performed by pressing the
key for 2 seconds. The
panel will then send an update to the keypad.
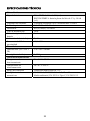
TECHNICAL SPECIFICATION
Electrical
Battery Type CR123, 3V Lithium battery (x 4)
RW332KPP8BTA: 3V, 10 Ah flat Lithium battery (x 1)
Current Consumption Standby current 9µA, Max current 150 mA
Power Output 868.65MHz: 10 mW
Frequency 433.92, 868.65, 915 MHz
Modulation Type OOK
Typical Battery Life 3 years
Low battery indication 2.6 V
Proximity RF frequency 13.56 MHz
Physical
Dimension (HxWxD) 178 x 103 x 38 mm (7 x 4.1 x 1.5“)
Weight (Including batteries) 0.435 kg
Environmental
Operating temperature -10°C to 55°C (14°F to 131°F)
Storage temperature -20°C to 60°C (-4°F to 140°F)
Humidity Range Average relative humidity: 75%
Standard Compliance EN 50131-1, EN 50131-3 Grade 2, Environmental Class
II, EN 50131-6 Type C, EN 50131-5-3

10
IT
INTRODUZIONE
La tastiera Panda Radio bidirezionale è usata per programmare e utilizzare i sistemi di
sicurezza radio di RISCO Group. Essendo bidirezionale la tastiera riceve le
informazioni di stato della centrale e le risposte ad ogni comando trasmesso. La tastiera
può essere usata sia tramite codice che tramite tag di prossimità.
Verificare che la versione del sistema radio utilizzata sia compatibile con la tastiera
radio Panda.
CARATTERISTICHE PRINCIPALI
Comunicazione Radio Bidirezionale
Compatibile con la programmazione tecnica completa
Fino a 4 tastiere per sistema
Tasti di emergenza
Lettore di prossimità integrato
Doppia protezione tamper (Apertura e rimozione)
Funzione di risparmio batteria
MEMORIZZAZIONE DELLA TASTIERA
La tastiera deve essere identificata dalla ricevente del sistema tramite l’inserimento del
numero di serie di 11 cifre o tramite procedura di auto-apprendimento via radio. Per
memorizzare la tastiera usando il numero di serie fare riferimento al manuale tecnico
del sistema radio utilizzato.
Memorizzazione tramite apprendimento radio:
4. Predisporre l’unità ricevente on modalità Memorizzazione Radio.
5. Trasmettere un messaggio WRITE premendo sulla tastiera simultaneamente i
tasti
per almeno 2 secondi, sia la tastiera che la centrale emetteranno
un tono acustico di conferma.
Nota: Se il sistema supporta i messaggi vocali, la memorizzazione della tastiera verrà
confermata anche con un messaggio vocale.
6. Per modificare i parametri di default della tastiera, se necessario, fare riferimento
al manuale tecnico del sistema radio utilizzato.
Nota: La tastiera può essere memorizzata nel sistema anche usando il software di
Configurazione CS, inserendo il numero seriale della tastiera. Verificare di avere una
versione aggiornata di CS compatibile con la tastiera radio Panda.

11
INSTALLAZIONE DELLA TASTIERA
Installare la tastiera a parete utilizzando la staffa fornita.
Nota: Prima di posizionare la tastiera verificare che comunichi correttamente con la ricevente.
1. Rimuovere la vite che blocca la staffa alla tastiera (vedere Figura 1).
2. Sganciare la staffa dalla tastiera (vedere Figura 2).
3. Rimuovere il coperchio del vano batterie della tastiera (vedere Figura 3).
4. Inserire il cavo del vano batterie nel connettore (vedere Figura 4), inserire le
batterie (fare attenzione alla polarità) e chiudere il coperchio.
5. Memorizzare la tastiera nella Centrale/Ricevitore radio (vedere la procedura di
Memorizzazione della tastiera).
6. Usare i fori di montaggio come dima e fissare la staffa alla parete (vedere Figura 5).
7. Fissare la tastiera sulla staffa e inserire la vite per bloccarla (vedere Figure 6 e 1).
Coperchio vano batterie
(
lato
p
osteriore
)

12
OPERAZIONI UTENTE PRINCIPALI
La lista seguente riporta le principali operazioni che l’utente può effettuare con la
tastiera Panda. Le operazioni utente si dividono in operazioni rapide e operazioni ad
alta sicurezza che richiedono l’uso di un codice o di un tag di prossimità.
Nella modalità ad alta sicurezza il tag sostituisce il codice nel momento in cui la tastiera
evidenzia il messaggio “Inserire Codice”.
OPERAZIONI COMUNI
Operazione
1
Modo Rapido
Modalità Alta Sicurezza
2
Inserimento
Totale
Premere
Premere
seguito dal codice o tag di
prossimità
3
Inserimento
Parziale
Premere Premere seguito dal codice o tag
Disinserimento
Premere
seguito dal codice o tag
Richiesta Stato
Sistema
Quando la tastiera viene “svegliata” dalla condizione “sleep”,
tramite pressione di un qualsiasi tasto (non si udirà alcun tono
acustico), essa riceve lo stato del sistema dalla centrale. Lo stato del
sistema verrà visualizzato tramite la relativa icona sul display della
tastiera.
1. Le operazioni in tastiera vengono eseguite premendo i tasti normalmente
2. Consultare il proprio installatore configurare le operazioni gestite tramite codice.
3. Per un uso ottimale del tag di prossimità, utilizzarlo ad una distanza di 1 / 2 centimetri
vicino alla parte superiore destra della tastiera.
SPIEGAZIONE DEI TASTI
Tasto Descrizione
Tasti numerici usati per inserire codici numeri richiesti per le
operazioni di inserimento e disinserimento o attivare specifiche
funzioni
Nel modo di funzionamento normale questo tasto viene usato per
accedere al menu Funzioni Utente. Nel menu Funzioni Utente
serve a tornare al livello precedente del menu
Nel modo di funzionamento normale questo tasto viene usato per
disinserire il sistema.
Nel menu Funzioni Utente questo tasto viene usato per terminare
comandi e confermare i dati da memorizzare

13
Tasto Descrizione
Usato per scorrere in su una lista o spostare il cursore a sinistra;
Se premuto effettua la richiesta di stato del sistema mentre una
pressione continuata di questo tasto effettua la richiesta stato del
sistema tramite riscontro vocale (se i messaggi vocali sono supportati
dal sistema utilizzato)
Usato per scorrere in giù una lista o spostare il cursore a destra
Questi tasti servono per modificare i dati visualizzati sul display
OPERAZIONI AVANZATE
Operazione
1
Modo Rapido
Modalità Alta Sicurezza
2
Inserimento
Totale partizioni
1/2/3
Selezionare la partizione
/ / e premere
Selezionare la partizione
/ / e premere
seguito dal codice o dal tag
Inserimento
Parziale partizioni
1/2/3
Selezionare la partizione
/ / e premere
Selezionare la partizione
/ / e premere
seguito dal codice o dal tag
Allarme incendio
Premere i tasti
simultaneamente per almeno due
secondi per attivare un allarme incendio
Emergenza /
Soccorso medico
Premere i tasti
simultaneamente per almeno due
secondi per attivare un allarme di emergenza
Allarme
Panico/Rapina /
Chiamata di
servizio
Premere i tasti
+ simultaneamente per almeno due secondi
per attivare un allarme Panico/Rapina
2
Volume Speaker
Integrato in
Centrale
3
Premere il tasto
per due secondi per impostare il volume
(0=Spento, 4=Massimo)
Premere
per registrare il valore selezionato
Impostazione
Contrasto
,
Premere
per due secondi.

14
Operazione
1
Modo Rapido
Modalità Alta Sicurezza
2
Luminosità e
Volume Speaker
tastiera
Usare i tasti
per scegliere il menu,
premere
per selezionarlo, poi usare i tasti per
regolare il parametro e premere
per confermare
Controllo Uscite
1/2/3
4
Premere il tasto
/ / per due
secondi
Premere il tasto
/ /
per 2 secondi e poi inserire il
codice o il tag
Visualizza ultimo
allarme
Premere
per due secondi
Chime On/Off
Premere
per due secondi
Visualizza stato
sistema
Pressione breve tasto :
stato su display LCD
Pressione lunga tasto
:
stato su display LCD + messaggi
vocali
3
Solo LCD: Pressione breve
tasto
seguito da codice
o tag.
LCD + messaggi vocali:
pressione lunga tasto
seguito da codice o tag
Esecuzione Macro
5
Premere
/ / per due secondi
Ingresso in
programmazione
Premere
ed inserire ilcodice
Modifica lingua
tastiera
Premere
simultaneamente per due secondi. Selezionare
la lingua e premere
per confermare.
1 Tutte le operazioni sono disponibili a tastiera attiva (fuori dalla modalità “sleep”). Tutte
le operazioni vengono eseguite con una “Normale” pressione dei tasti (breve tono
acustico) a meno che non venga specificato altrimenti.
2 Consultare il proprio installatore configurare le operazioni gestite tramite codice.
3 Per i sistemi che supportano la voce. Non applicabile per la centrale WiComm Pro
4 Richiedere al proprio installatore se l’opzione di attivazione delle uscite è stata
configurata e quali uscite sono state assegnate a quali tasti
Richiedere al proprio installatore se l’opzione Macro è attiva e quali sono i comandi
disponibili.

15
SIGNIFICATO DELLE ICONE GRAFICHE
Icona Funzione
On Il sistema è inserito in Totale o in Parziale.
Off Il sistema è disinserito.
Lamp. lento Il sistema è in fase di inserimento con tempo di uscita attivo.
Lamp. veloce Sistema in allarme
On Il sistema è inserito in Parziale o in Totale e ci sono delle
zone escluse
Off Non ci sono zone escluse
On Il sistema è pronto per essere inserito
Off Il sistema non è pronto per essere inserito
Lamp. lento Il sistema è pronto per essere inserito ed evidenzia una zona
Ingresso/Uscita aperta.
On Il sistema evidenzia un guasto
Off Il sistema sta funzionando normalmente.
On Il sistema è in manomissione (tamper)
Off Il sistema non evidenzia manomissioni. Funzionamento
normale
On Il sistema è connesso al cloud
Lamp. lento Anomalia di connessione al cloud
Off Connessione cloud non configurata
Operazioni tramite Tag di Prossimità
Avvicinare il Tag (RFID) alla tastiera come mostrato nelle immagini che seguono:
Nota: Prima di utilizzare il tag attivare la tastiera facendola uscire dalla modalità “Sleep”
premendo un tasto qualsiasi.

16
MODALITA’ SLEEP
Per aumentare la durata delle batterie della tastiera, quest’ultima è stata progettata per
poter funzionare in una speciale modalità chiamata “Sleep”. Di fabbrica, 10 secondi
dopo che viene premuto un tasto, la tastiera spegne completamente il proprio display.
Questo tempo di 10 secondi può essere configurato dal tecnico fino ad un massimo di
60 secondi.
SOSTITUZIONE DELLE BATTERIE
1. Rimuovere la vite di blocco della tastiera alla staffa di fissaggio (vedere Figura 1).
2. Rimuovere la tastiera dalla staffa.
3. Rimuovere il coperchio del vano batterie.
4. Scollegare il cavo batteria dall’apposito connettore.
5. Sostituire le batterie prestando attenzione alla polarità.
6. Collegare nuovamente il cavo batteria al connettore.
7. Chiudere il vano batterie con il suo coperchio e riposizionare la tastiera nella sua
staffa di fissaggio ricordandosi di inserire la vite di blocco.
ATTENZIONE: Rischio di esplosione se le batterie vengono sostituite con altre
di tipologia non corretta. Smaltire le batterie usate in base alle normative locali.
MODIFICA DEI PARAMETRI DELLA TASTIERA
Ogni modifica effettuata nel sistema relativa ai parametri della tastiera richiede
l’aggiornamento della programmazione della tastiera stessa. Questo aggiornamento
viene effettuato premendo per almeno due secondi il tasto
. Con questa
procedura la centrale trasmetterà alla tastiera i parametri aggiornati.

17
SPECIFICHE TECNICHE
Elettriche
Tipologia batterie 4 Batterie al litio CR123, oppure, in alternativa,
1 batteria al litio piatta 3V, 10 Ah (RW332KPP8BTA)
Assorbimento in corrente Assorbimento a riposo 9µA, Max. 150 mA
Potenza RF 868.65MHz: 10 mW
Frequenza RF 433.92, 868.65, 915 MHz
Tipo Modulazione OOK
Durata media della batteria 3 anni
Soglia batteria scarica 2.6 V
Frequenza lettore di prox. 13.56 MHz
Fisiche
Dimensioni (HxLxP) 178 x 103 x 38 mm (7 x 4.1 x 1.5“)
Peso (Batterie incluse) 0.435 kg
Ambientali
Temp. di funzionamento -10°C to 55°C (14°F to 131°F)
Temperatura di stoccaggio -20°C to 60°C (-4°F to 140°F)
Umidità Umidità relativa media: 75%
Certificazioni EN 50131-1, EN 50131-3 Grado 2, Ambientale Classe II,
EN 50131-6 Tipo C, EN 50131-5-3

18
FR
INTRODUCTION
Le clavier Panda sans fil bidirectionnel permet de programmer et d'utiliser les systèmes
de sécurité sans fil de RISCO. Grâce à sa technologie bidirectionnelle, le clavier reçoit
une indication d'état en réponse à chacune des commandes envoyées à la centrale. Pour
vous servir des fonctions du clavier vous avez la possibilité d'utiliser soit un code, soit
un tag de proximité.
CARACTÉRISTIQUES PRINCIPALES
Communication sans fil bidirectionnelle
Programmation installateur complète sans fil
Jusqu'à 3 claviers sans fil par système
ouches S.O.S / de communication d'urgence bidirectionnelle
Fonctionne avec tag de proximité
Autoprotection à l’arrachement et à l’ouverture
Mode d'économie de la batterie
CONFIGURATION DE LA COMMUNICATION
Le clavier Panda sans fil doit s’identifier au récepteur du système. Vous pouvez pour
cela saisir le numéro de série à 11 chiffres du clavier dans le système ou utiliser le mode
d’adressage RF. Pour configurer le clavier à l'aide du numéro de série, reportez-vous au
guide d'installation du système de sécurité.
Configuration via la communication RF
7. Configurez le récepteur en mode Adressage.
8. Envoyez un message d’adressage en appuyant simultanément sur les touches
et pendant au moins 2 secondes. Le clavier émettra un bip de
confirmation et le système émettra un bip de confirmation.
9. Si vous devez modifier les paramètres par défaut du clavier, suivez les
instructions du manuel d'installation du système.
Note : vous pouvez ajouter le clavier au système à distance depuis le logiciel de configuration
en saisissant le numéro de série du clavier.

19
INSTALLATION DU CLAVIER
Fixez le clavier au mur à l'aide du support de fixation fourni.
Note : avant d'installer le clavier, vérifiez qu'il communique correctement avec le système.
1. Retirez la vis de maintien qui fixe le support de fixation au clavier (voir Figure 1).
2. Séparez le support de montage du clavier (voir Figure 2).
3. Ouvrez le couvercle du compartiment à piles du clavier (voir Figure 3).
4. Fixez le câble de batterie au connecteur de batterie (voir Figure 4), insérez les
piles (en respectant la polarité), puis refermez le compartiment à piles.
5. Adressez le clavier au récepteur (reportez-vous à la section Configuration de la
communication).
6. Utilisez les trous de fixation comme gabarits pour fixer le support de fixation au
mur (voir Figure 5).
7. Installez le clavier sur le support de fixation et insérez la vis de fixation pour
verrouiller le clavier sur son support (voir Figures 6 et 1).
Couvercle du
com
p
artiment à
p
iles

20
FONCTIONS UTILISATEURS PRINCIPALES
La liste suivante décrit les fonctions disponibles pour l'utilisateur depuis le clavier
Panda sans fil. Les fonctions utilisateur peuvent être définies pour être activées par un
mode rapide ou un mode haute sécurité qui nécessite l’usage d'un code ou d'un tag de
proximité.
En mode haute sécurité, le tag de proximité peut être utilisé comme un substitut du
code utilisateur lorsque l'écran affiche « Insérer un code ».
FONCTIONS COURANTES
Fonction
1
Mode rapide
Mode haute sécurité
2
Armement
complet
Appuyez sur
.
Appuyez sur
, suivi du code ou tag de
proximité
3
Armement
partiel
Appuyez sur
.
Appuyez sur
, suivi du code ou tag de
proximité
Désarmement
complet
Appuyez sur
, suivi du code ou tag de proximité
Affichage de
l'état du
système
Quand le clavier est réveillé par un appui court sur n’importe quelle
touche (pas de son de bip), le clavier reçoit l’état du système depuis
la centrale. Une icône d’indication correspondante apparaît sur
l’afficheur du clavier.
1. Pour activer ces fonctions, appuyez normalement sur les touches.
2. Contactez votre installateur pour les fonctions définies avec un code.
3. Pour une utilisation optimale du tag de proximité, utilisez-la à une distance de 1 à 2 cm du
coin supérieur droit du clavier.
FONCTION DES TOUCHES
Touche Description
Les touches numériques permettent de saisir des codes, qui
peuvent être nécessaires pour armer, désarmer ou activer des
fonctions spécifiques.
En fonction normal : Utilisé pour entrer dans le menu Utilisateur
Dans le menu : Permet de revenir d’un pas en arrière dans le menu
En fonction normal : Utilisé pour désarmer
Dans le menu : Utilisé pour terminer une commande et confirmer
les données à enregistrer
Utilisé pour monter dans une liste ou déplacer le curseur à gauche ;
Donne l’état du système
A página está carregando...
A página está carregando...
A página está carregando...
A página está carregando...
A página está carregando...
A página está carregando...
A página está carregando...
A página está carregando...
A página está carregando...
A página está carregando...
A página está carregando...
A página está carregando...
A página está carregando...
A página está carregando...
A página está carregando...
A página está carregando...
A página está carregando...
A página está carregando...
A página está carregando...
A página está carregando...
A página está carregando...
A página está carregando...
A página está carregando...
A página está carregando...
A página está carregando...
A página está carregando...
A página está carregando...
A página está carregando...
-
 1
1
-
 2
2
-
 3
3
-
 4
4
-
 5
5
-
 6
6
-
 7
7
-
 8
8
-
 9
9
-
 10
10
-
 11
11
-
 12
12
-
 13
13
-
 14
14
-
 15
15
-
 16
16
-
 17
17
-
 18
18
-
 19
19
-
 20
20
-
 21
21
-
 22
22
-
 23
23
-
 24
24
-
 25
25
-
 26
26
-
 27
27
-
 28
28
-
 29
29
-
 30
30
-
 31
31
-
 32
32
-
 33
33
-
 34
34
-
 35
35
-
 36
36
-
 37
37
-
 38
38
-
 39
39
-
 40
40
-
 41
41
-
 42
42
-
 43
43
-
 44
44
-
 45
45
-
 46
46
-
 47
47
-
 48
48


Risco Panda RW332K Instructions Manual
- Tipo
- Instructions Manual
- Este manual também é adequado para
em outras línguas
- español: Risco Panda RW332K
- français: Risco Panda RW332K
- italiano: Risco Panda RW332K
- English: Risco Panda RW332K
Artigos relacionados
Outros documentos
-
Visonic KP-241 - PG2 Manual do proprietário
-
Bentel Security Absoluta Quick User Manual
-
Chacon 34958 Manual do usuário
-
RISC GROUP RW332KF1 Guia de usuario
-
Alan HP 408 Manual do proprietário
-
Chamberlain LiftMaster 747EV Manual do proprietário
-
DSC HS2TCHP Manual do usuário
-
Johnson Controls Tyco HC2TCHPRO Manual do usuário
-
-