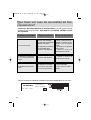
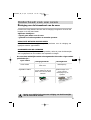
Brandt FE200BS1 Manual do proprietário
- Categoria
- Microondas
- Tipo
- Manual do proprietário
Este manual também é adequado para

Using your oven
Le guide d’utilisation de votre four
O guia de utilização do seu forno
Ï ïäçãüò ÷ñÞóçòôïõ öïýñíïõ óáò
Gebruiksaanwijzing van uw oven
FE 200
GB
FR
PT
NL
GR
99625662_ML_A.qxd 21/05/03 16:47 Page 1

Throughout this manual,
indicates safety recommendations,
indicates advice to help you make the
best use of your oven
2
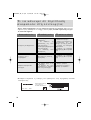
Contents
Introduction P.3
Your oven
How it works P.4
Accessories P.5
Safety recommendations P.6
How to install your oven
Electrical connections P.7-8
Dimensions for installation use P.9
How to use your oven
How to cook straightaway P.10
Changing a bulb
P.10
Looking after your oven P.11
Cooking methods P.12-13
Troubleshooting
P.14
99625662_ML_A.qxd 21/05/03 16:47 Page 2

Introduction
Dear Customer,
Thank you for buying a BRANDT oven.
Our design staff have produced a new generation of kitchen equipment,
to make everyday cooking a pleasure.
You will find that the clean lines and modern look of your Brandt oven
blends in perfectly with your kitchen décor. It is easy to use and per-
forms to a high standard.
Brandt also makes a range of products that will enhance your kitchen
such as hobs, extractor hoods, built-in dishwashers and refrigerators.
There are models to complement your new Brandt oven.
Of course, we make every effort to ensure that our products meet all
your requirements, and our Customer Relations department is at your
disposal, to answer all your questions and to listen to all your sugges-
tions (see back cover of manual).
Brandt has always been a leader in the development of new products,
thus enhancing the quality of everyday life by providing increasingly
efficient products, that are easy to use, respect the environment, and are
attractive and reliable.
The BRANDT name.
3
GB
99625662_ML_A.qxd 21/05/03 16:47 Page 3

4
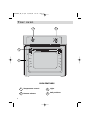
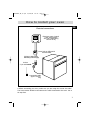
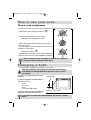
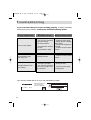
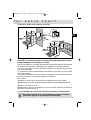
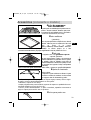
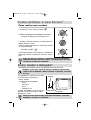
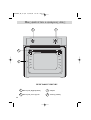
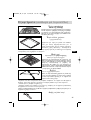
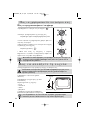
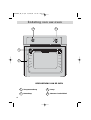
Your oven
1
4
2
3
5
3
1
55
75
100
125
150
180
210
240
270
3
4
2
1
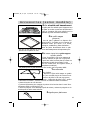
Temperature control
Feature selector
Light
Rail positions
OVEN FEATURES
99625662_ML_A.qxd 21/05/03 16:47 Page 4

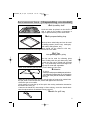
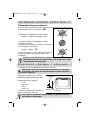
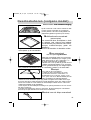
Anti-tip safety shelf
Food can either be placed on the shelf in a
dish or cake tin for cooking or browning, or
may be placed directly on the shelf itself.
Accessories (Depending on model)
5
Multi-purpose baking tray
This tray has a raised edge and can be used
for baking pastries (choux buns, meringues,
small cakes, flaky pasties, etc).
Joints should not be cooked in this tray
uncovered because fat could spit all over the oven sides.
Grill Tray
With special grid for grilling
The tray can be used for collecting juices
when cooking with the grill element by itself
or with the oven set to pulsed grill (grill and
fan). It is particularly useful as a large roas-
ting tray for meat and vegetables.
Never cook with the grill tray sitting on the bottom of the oven.
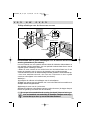
• Slide one of the forks onto the spit; put the piece of meat to be roasted onto
the spit; slide on the second fork; centre and tighten the two forks.
• Place the spit on its cradle.
• Push gently to locate the tip of the spit in the turning mechanism situated at
the back of the oven (6).
• Remove the handle by unscrewing it. After cooking, screw the handle back
onto the spit to take it out without burning yourself.
Rotisserie
To use it:
• Place the multi-purpose baking tray at level no.
1 to collect the cooking juices or on the bottom
of the oven if the piece of meat to be roasted is
too big.
Handle for grill tray
GB
99625662_ML_A.qxd 21/05/03 16:47 Page 5

6
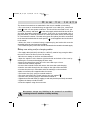
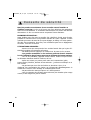
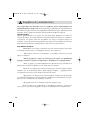
Safety recommendations
Please read these instructions before installing and using your oven.
The oven has been designed for domestic use only for cooking food. No asbestos
has been used in its construction.
USING FOR THE FIRST TIME:
Before you use your oven for the first time, leave it empty and, with the door
closed, turn it on to maximum temperature and let it heat up for 15 minutes. This
"runs the oven in". During this time there may be some smell from the mineral
wool that insulates the oven and there could be some smoke. This is perfectly
normal.
NORMAL USE:
- Always close the door properly. The oven is fitted with a seal designed to
work with a closed door.
- Never lean or let anyone sit on the oven door when it is open.
- The oven parts and accessories can become hot when the door is
left partially open and the grill on. Always keep children at a safe distance.
- When the oven is on it will get hot. Take care not to touch the heating
elements inside the oven.
- Always protect your hands with oven gloves or something similar when
removing food, accessories or containers from the oven.
- Do not line your oven with kitchen foil. The metal will increase the heat pro-
duced and could ruin the food and damage the enamel.
- Never use a spray or a high-pressure washer to clean the oven.
- During self-cleaning, surfaces can become hotter than in normal use.
Children must be kept at a distance.
99625662_ML_A.qxd 21/05/03 16:47 Page 6

7
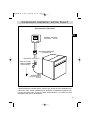
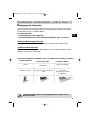
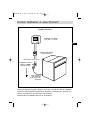
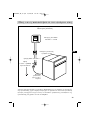
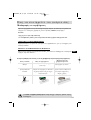
How to install your oven
Electricity meter (mains)
(20A, single-phase
220-240 V alternating
current 50 Hz)
Socket
2 -pin with earth
220-240 V single phase
alternating current supply
Electrical connections
• Before connecting your oven, make sure you are using the correct size cable.
The cross-section should be the same as the cable connected to the oven. Use a
16-amp fuse.
Connecting cable
approx 1.50 m.
long
Fused 16A or differential
circuit breaker
GB
99625662_ML_A.qxd 21/05/03 16:47 Page 7

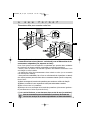
How to insta
8
We cannot accept any liability in the event of an accident
resulting from non-existent or faulty earthing.
• The supply cable (H05 RR-F, H05 RN-F or H05 W-F) must be long enough to allow
the oven to rest on the floor in front of its housing.
With the oven sitting on the floor and disconnected:
• Open the trapdoor at the bottom right hand side at the back of the oven by
removing the 2 screws and swinging the door away.
• Remove the sheath from each wire in the new cable up to 12 mm.
• Twist the ends carefully together.
• Unscrew the terminal screws and remove the wires that need changing.
• Pass the new cable through the wire clamp to the right of the terminals.
• Connect the wires up in accordance with the markings on the terminals.
• Make sure all wires are trapped under the screws.
• The brown wire (live) going to terminal marked L.
• The green and yellow wire (earth) going to the one marked .
• The blue wire (neutral) going to the terminal marked N.
• Tighten the screws and check, by tugging on each wire, that they are firmly connected.
• Tighten the clamp to hold the cable.
• Close the trapdoor using the two screws.
Fitting new wiring and/or changing cables.
The electrical connections are made before the oven is installed in its housing.
• The oven must be connected using an approved 3-core cable (live, neutral and
earth
) with 1.5 mm square conductors. This should be connected via a 3- pin-
socket (live, neutral, and earth to the main supply which should be should be a
220-240V, alternating single-phase current. If the oven is not connected using a
plug and socket, it must be connected to a multi-pole switch with a minimum gap
of 3 mm between contacts. The earth wire (green and yellow) should be connected
to the terminal marked with the earth symbol on the appliance and to the earth
in the switch.
• Where the oven is connected using a separate plug and socket this must be
accessible after the oven has been installed.
• The neutral wire (blue) of the oven must be connected to the neutral in the main supply.
99625662_ML_A.qxd 21/05/03 16:47 Page 8

9
all your oven
If you are unsure about fitting this oven yourself please use a
qualified electrician.
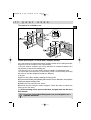
Dimensions for installation use
The oven may be housed either under a work surface or built into a
column that is open* or closed with a suitable opening.
Your oven works at its best and produces excellent results when cooking and clea-
ning itself, if its air circulation is not compromised:
• The oven must be centred in the unit so that there is a minimum distance of 5
mm between it and the surrounding unit.
• The housing unit or its outer surface must be capable of withstanding heat.
• To ensure the oven rests firmly in the housing, screw it to the housing unit using
the holes on the side uprights provided (see diagram).
To do this:
1) Remove the rubber stoppers masking the fixing holes.
2) To prevent the housing unit splintering, drill two holes 3 mm in diameter in the wall of the
housing unit opposite the fixing holes.
3) Attach the oven using the two screws.
4) Conceal the hole using the rubber stoppers. (These also help to cushion the
closing of the oven door).
(*) If the housing unit is open at the back, the gap must not be more
than 70 mm.
GB
99625662_ML_A.qxd 21/05/03 16:47 Page 9

10
• The light bulb is housed in the ceiling of your oven.
a) Unscrew the protective shade (see
diagram).
b) Unscrew the bulb in the same direction.
The bulb used is a:
- 15 W
- 220-240 V
- 300°C
- E 14 screw-fitting bulb
c) Change the bulb, replace the shade and
switch your oven back on at the mains.
C hanging a bulb
bulb fitting
unscrew
cover
It is easier to unscrew the shade and bulb if you wear a rubber
glove.
Warning! Switch off the power at the main switch before
attempting to change the bulb. Leave the oven to cool if
necessary.
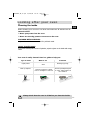
H
ow to use your oven
• Preheat the oven using the function " "
• Select the temperature for your recipe
Example: 210° temperature mark
• When the temperature light goes out, put your
dish in the oven.
• Do not forget to turn the function selector to the
position of your choice.
Exemple : position " ".
• After this, the oven heats up, the thermostat light
glows on and off as the oven temperature adjusts.
How to cook straightaway
55
75
100
125
150
180
210
240
270
After cooking, the fan continues to operate for a while in
order to cool the elements right down.
99625662_ML_A.qxd 21/05/03 16:47 Page 10

Looking after your oven
Cleaning the inside
Before cleaning your oven let it cool down and make sure all switches are off.
General advice:
* Never spray water into the oven.
* Never use scouring pastes or scourers on the oven.
POLISHED METAL SURFACES
Only used materials recommended for polished metal.
GLASS IN OVEN DOOR
If the food cooked produces lots of splashes, wipe the glass on the inside with soapy
water.
Type of marks
Lightly soiled
Built up deposits
Soak the area well with warm
water
Washing-up sponge
Leave for 30 mins in a warm
oven or overnight in a cold one
Aerosol specially designed
for ovens. Follow advice on
the container
What to use
Treatment
Your oven is easily cleaned. Here is a guide to help you:
Powder
Abrasive sponge
Special sponge for delicate
items
Always check that the oven is off before you clean the inside.
11
GB
99625662_ML_A.qxd 21/05/03 16:47 Page 11

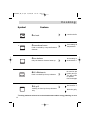
12
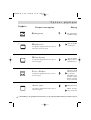
Cooking
Grill +Rotisserie
Food is cooked by the top element.
C
onventional oven
Food is cooked by a top and bottom
element.
Pre-heating ne
temperature.
Symbol
Feature
Oven bottom
Only the bottom element heats up.
Pre-heating re
underneath. U
Pre-heat
Use this befor
Full grill
Cooking is done by the top element
only
Pre-heat for 5
Slide the grill p
No need to pre
Poultry and jui
The spit contin
is opened.
Put the drippin
*
*
Cooking methods referred to in the advertisement about energy labelling in acco
99625662_ML_A.qxd 21/05/03 16:47 Page 12

13
methods
eeded to reach the required
Recommended for food requiring
slow, careful cooking such as game
and braising joints. Ideal for sealing red
meat joints and simmering lidded cas-
seroles whose contents have been par-
tially cooked on the hob first.
Description
Recommendations
equired. Food is cooked from
Use a shelf near the bottom.
Recommended for dishes with a lot of
liquid (quiches and fruit pies) as the
pastry base is cooked through. Use also
for food that rises (bread and cakes)
and uncovered soufflés.
re cooking some foods.
Set the temperature to the one you wish
to cook at. At the end of the pre-heat
cycle make sure you turn the selector to
the method of your choice.
5 minutes.
pan onto the rail beneath the grill.
For grilling large amounts that can
be spread out across the grid.
reheating.
uicy roasts crispy on all sides.
nues to operate until the oven door
ng pan on the lowest level.
Recommended for all poultry or spit
roasts.
thoroughly cooking gigot lamb
chops, and sides of beef. Also good for
cooking fish in breadcrumbs.
ordance with European Standard EN50304 and the European Directive 2002/40/EC
GB
99625662_ML_A.qxd 21/05/03 16:47 Page 13

14
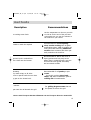
Troubleshooting
If you're not sure that your oven is working properly, it doesn't necessarily
mean that there's a problem.
In all cases, check the following points:
If you realize that..
Possible causes what should you do?
The oven isn't heating.
• The oven isn't connected
to the power supply.
• The fuse has blown.
• The temperature selected
is too low.
• The thermostat is faulty.
- Connect to power supply.
- Change the fuse, checking
that it is 16A.
- Increase the temperature
selected.
- Contact the After-Sales
Service.
The temperature light
does not go out.
• Faulty thermostat.
- Contact the After-Sales
Service.
The light inside the oven
isn't working.
• The lamp is unusable.
• The oven isn't connected
to the power supply or the
fuse has blown.
- Change the bulb.
- Connect to power supply
or change fuse.
Copy here the details that are on your oven manufacturer's plate:
MADE IN FRANCE
220 - 240V ~ 50 Hz
BRANDT APPLIANCES SAS
7 rue Henri Becquerel
92500 RUEIL MALMAISON
99625662_ML_A.qxd 21/05/03 16:47 Page 14

FR
15
99625662_ML_A.qxd 21/05/03 16:47 Page 15

Tout au long de la notice,
vous signale les consignes de sécurité,
vous signale les conseils et les astuces
16
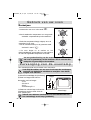
Sommaire
Edito P.17
Comment se présente votre four ?
Descriptif de l’appareil P.18
Accessoires P.19
Conseils de sécurité P.20
Comment installer votre four ?
Raccordement électrique P.21-22
Dimensions utiles pour encastrer votre four P.23
Comment utiliser votre four ?
Comment faire une cuisson immédiate ? P.24
Comment changer l’ampoule ?
P24
Comment entretenir votre four ? P.10
Modes de cuisson du four P.26-27
Que faire en cas d’anomalies de fonctionnement ? P.28
99625662_ML_A.qxd 21/05/03 16:47 Page 16

Edito
Chère Cliente, Cher Client,
Vous venez d'acquérir un four BRANDT et nous vous en remercions.
Nos équipes de recherche ont conçu pour vous une nouvelle génération
d'appareils pour cuisiner chaque jour avec plaisir.
Avec des lignes pures et une esthétique moderne, votre nouveau four
Brandt s'intègre harmonieusement dans votre cuisine et allie parfaite-
ment facilité d'utilisation et performances de cuisson.
Vous trouverez également dans la gamme des produits Brandt, un vaste
choix de tables de cuisson, de hottes aspirantes, de lave-vaisselle et de
réfrigérateurs intégrables, que vous pourrez coordonner à votre nouveau
four Brandt.
Bien entendu, dans un souci permanent de satisfaire au mieux vos exi-
gences vis à vis de nos produits, notre service consommateurs est à
votre disposition et à votre écoute pour répondre à toutes vos questions
ou suggestions (coordonnées à la fin de ce livret).
A la pointe de l'innovation, Brandt contribue ainsi à l'amélioration de la
qualité de la vie quotidienne en vous apportant des produits toujours plus
performants, simples d'utilisation, respectueux de l'environnement, esthé-
tiques et fiables.
La Marque BRANDT.
17
FR
99625662_ML_A.qxd 21/05/03 16:47 Page 17

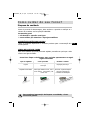
18
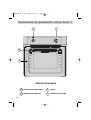
Comment se présente votre four ?
1
4
2
3
5
3
1
55
75
100
125
150
180
210
240
270
3
4
2
1
Sélecteur de température
Sélecteur de fonctions
Lampe
Indicateur de gradin
DESCRIPTIF APPAREIL
99625662_ML_A.qxd 21/05/03 16:47 Page 18

Grille sécurité anti basculement
La grille peut être utilisée pour supporter tous
les plats et moules contenant des aliments à
cuire ou à gratiner. Elle sera utilisée pour les
grillades (à poser directement dessus).
Accessoires (selon modèle)
19
Plat multi usages
(pâtisserie)
Il sert de plat à gâteaux et dispose d'un
rebord incliné. Il s'utilise pour la cuisson de
pâtisseries telles que choux à la crème,
meringues, madeleines, pâtes feuilletées...
Evitez de poser directement dans ce plat
des rôtis ou des viandes car vous aurez automatiquement d'importantes pro-
jections sur les parois du four.
Plat creux équipé d'une grille support
spéciale grillades
Il sert à recueillir le jus et les graisses de
cuisson réalisées en gril fort ou gril pulsé.
Il peut être utilisé comme plat de cuisson en
appropriant la taille du morceau à cuire
(ex: une volaille avec les légumes autour, à
température modérée).
Ne jamais poser ce plat directement sur la sole, sauf en position GRIL.
• enfilez une des fourchettes sur la broche ; embrochez la pièce à rôtir ; enfilez
la deuxième fourchette ; centrez et serrez en vissant les deux fourchettes.
• placez la broche sur son berceau.
• poussez légèrement pour engager la pointe de la broche dans le carré d'en-
traînement situé au fond du four (6).
• retirez la poignée en la dévissant. Après la cuisson, revissez la poignée sur la
broche pour la retirer sans se brûler.
Tournebroche
Pour l'utiliser :
• disposez le plat multi-usages au gradin
N°1 pour recueillir les jus de cuisson ou sur
la sole si la pièce à rôtir est trop grosse.
Poignée pour plat creux
FR
99625662_ML_A.qxd 21/05/03 16:47 Page 19

20
Conseils de sécurité
Merci de prendre connaissance de ces conseils avant d’installer et
d’utiliser votre four. Ce four a été conçu pour être utlilisé par des particuliers
dans leur lieu d’habitation. Il est destiné exclusivement à la cuisson des denrées
alimentaires. Ce four ne contient aucun composant à base d’amiante.
PREMIERE UTILISATION :
Avant d’utiliser votre four pour la première fois, chauffer le à vide, porte fermée,
pendant 15 minutes environ sur la position maxi afin de “roder” l’appareil. La laine
minérale qui entoure la cavité du four peut dégager, au début, une odeur particu-
lière due à sa composition. De même, vous constaterez peut être un dégagement
de fumée. Tout ceci est normal.
UTILISATIONS SUIVANTES :
- Assurez vous que votre porte de four est bien fermée afin que le joint d’é-
tanchéité remplisse correctement sa fonction.
- Ne laissez personne s’appuyer ou s’asseoir sur la porte du four ouverte.
- Les parties accessibles ou les surfaces peuvent devenir chaudes
lors de l’utilisation du gril porte entrouverte. Eloignez les jeunes enfants.
- Lors de son utilisation, l’appareil devient chaud . Veillez à ne pas toucher
les éléments chauffants situés à l’intérieur du four.
- Après une cuisson, ne prenez pas à main nue la casserolerie (grille,
tourne broche, léchefrite, berceau de tournebroche...), utilisez une manique ou un
tissu isolant.
- Ne garnissez pas votre four de feuilles en aluminium. Sinon, il en
résulterait une accumulation de chaleur qui influencerait désavantagement le
résultat de la cuisson et du rôtissage et endommagerait l’émail.
- Ne pas utiliser de nettoyeur vapeur ou à haute pression.
- Lors du nettoyage les surfaces peuvent devenir plus chaudes qu'en usage
normal, il faut éloigner les jeunes enfants.
99625662_ML_A.qxd 21/05/03 16:47 Page 20
A página está carregando...
A página está carregando...
A página está carregando...
A página está carregando...
A página está carregando...
A página está carregando...
A página está carregando...
A página está carregando...
A página está carregando...
A página está carregando...
A página está carregando...
A página está carregando...
A página está carregando...
A página está carregando...
A página está carregando...
A página está carregando...
A página está carregando...
A página está carregando...
A página está carregando...
A página está carregando...
A página está carregando...
A página está carregando...
A página está carregando...
A página está carregando...
A página está carregando...
A página está carregando...
A página está carregando...
A página está carregando...
A página está carregando...
A página está carregando...
A página está carregando...
A página está carregando...
A página está carregando...
A página está carregando...
A página está carregando...
A página está carregando...
A página está carregando...
A página está carregando...
A página está carregando...
A página está carregando...
A página está carregando...
A página está carregando...
A página está carregando...
A página está carregando...
A página está carregando...
A página está carregando...
A página está carregando...
A página está carregando...
A página está carregando...
A página está carregando...
A página está carregando...
A página está carregando...
-
 1
1
-
 2
2
-
 3
3
-
 4
4
-
 5
5
-
 6
6
-
 7
7
-
 8
8
-
 9
9
-
 10
10
-
 11
11
-
 12
12
-
 13
13
-
 14
14
-
 15
15
-
 16
16
-
 17
17
-
 18
18
-
 19
19
-
 20
20
-
 21
21
-
 22
22
-
 23
23
-
 24
24
-
 25
25
-
 26
26
-
 27
27
-
 28
28
-
 29
29
-
 30
30
-
 31
31
-
 32
32
-
 33
33
-
 34
34
-
 35
35
-
 36
36
-
 37
37
-
 38
38
-
 39
39
-
 40
40
-
 41
41
-
 42
42
-
 43
43
-
 44
44
-
 45
45
-
 46
46
-
 47
47
-
 48
48
-
 49
49
-
 50
50
-
 51
51
-
 52
52
-
 53
53
-
 54
54
-
 55
55
-
 56
56
-
 57
57
-
 58
58
-
 59
59
-
 60
60
-
 61
61
-
 62
62
-
 63
63
-
 64
64
-
 65
65
-
 66
66
-
 67
67
-
 68
68
-
 69
69
-
 70
70
-
 71
71
-
 72
72


Brandt FE200BS1 Manual do proprietário
- Categoria
- Microondas
- Tipo
- Manual do proprietário
- Este manual também é adequado para
em outras línguas
- français: Brandt FE200BS1 Le manuel du propriétaire
- English: Brandt FE200BS1 Owner's manual
- Nederlands: Brandt FE200BS1 de handleiding