Hamilton Beach 35325 Guia de usuario
- Categoria
- Fritadeiras
- Tipo
- Guia de usuario
Este manual também é adequado para

READ BEFORE USE
LIRE AVANT UTILISATION
LEA ANTES DE USAR
Visit www.hamiltonbeach.com for our
complete line of products and Use and
Care Guides – as well as delicious recipes,
tips, and to register your product online
Rendez-vous sur www.hamiltonbeach.ca
pour notre liste complète de produits et de
nos manuels utilisateur – ainsi que nos
délicieuses recettes et nos conseils
Visite www.hamiltonbeach.com (
EE. UU.)
o
www.hamiltonbeach.com.mx (México)
para ver otros productos de Hamilton Beach
o para contactarnos
Questions
Please call us – our friendly
associates are ready to help.
USA: 1.800.851.8900
Preguntas
Por favor llámenos – nuestros
amables representantes están
listos para ayudar.
EE. UU.: 1.800.851.8900
MEX: 01 800 71 16 100
Le invitamos a leer cuidadosamente este
instructivo antes de usar su aparato.
Questions
N’hésitez pas à nous appeler –
nos associés s’empresseront
de vous aider.
CAN : 1.800.267.2826
Deep Fryer
Friteuse
Freidora Eléctrica
English ...................... 2
Français ................... 14
Español ................... 26

2
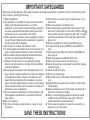
IMPORTANT SAFEGUARDS
1. Read all instructions.
2. This appliance is not intended for use by persons (including
children) with reduced physical, sensory, or mental
capabilities, or lack of experience and knowledge, unless they
are closely supervised and instructed concerning use of the
appliance by a person responsible for their safety.
3. Close supervision is necessary when any appliance is used by
or near children. Children should be supervised to ensure that
they do not play with the appliance.
4. Do not touch hot surfaces. Use handles or knobs.
5. To protect against risk of electric shock, do not immerse cord,
plugs, or heating element assembly in water or other liquid.
6. Be sure handle is properly assembled to basket and locked
into place. See detailed assembly instructions.
7. Unplug from outlet when not in use and before cleaning.
Allow to cool before putting on or taking off parts and before
cleaning the appliance.
8. Do not operate any appliance with a damaged supply cord or
plug, or after the appliance malfunctions or has been dropped
or damaged in any manner. Supply cord replacement and
repairs must be conducted by the manufacturer, its service
agent, or similarly qualified persons in order to avoid a hazard.
Call the provided customer service number for information on
examination, repair, or adjustment.
9. The use of accessory attachments not recommended or sold
by the appliance manufacturer for use with this model may
cause injuries.
10. Do not use outdoors.
11. Do not let cord hang over edge of table or counter or touch
hot surfaces.
12. Do not place on or near a hot gas or electric burner, or in a
heated oven.
13. Never move deep fryer containing hot oil.
14. Always attach plug to appliance first; then plug cord in the
wall outlet. To disconnect, turn any control to MIN, or OFF ( )
when provided, and remove plug from wall outlet. To unplug,
grasp the plug and pull from the outlet. Never pull from the
power cord.
15. Do not use appliance for other than intended purpose.
16. To reduce the risk of injury, NEVER fill oil above MAX fill
mark.
17. Always ensure removable pot is filled to at least MIN level
when using oil.
18. Never leave appliance unattended while in use.
19. Always dry foods and remove ice before frying.
20. Always dry deep fryer components thoroughly after cleaning
and before frying.
21. Always fry with lid in place.
22. Do not use refrigerated oil.
23. Never block vent on lid. Be aware of steam emitting from
vent.
24. Escaping steam may cause burns to hands or fingers. Open
the lid carefully.
25. Always raise basket, rest on drain bracket, and allow food to
drain before removing food basket.
26. Warm or loose-fitting plugs/outlets can indicate an unsafe
condition in the outlet that may cause a fire. Have such
outlets replaced by a licensed electrician.
27. Do not operate the appliance by means of an external timer or
separate remote-control system.
When using electrical appliances, basic safety precautions should always be followed to reduce the risk of fire, electric shock, and/or
injury to persons, including the following:
SAVE THESE INSTRUCTIONS

3
Other Consumer Safety Information
This product is intended for household use only.
This product is only intended for the preparation, cooking, and
serving of foods. This product is not intended for use with any
nonfood materials or products.
w WARNING
Electrical Shock Hazard: This product is provided with
a polarized plug (one wide blade) to reduce the risk of electric shock.
The plug fits only one way into a polarized outlet. Do not defeat the
safety purpose of the plug by modifying the plug in any way or by
using an adapter. If the plug does not fit fully into the outlet, reverse
the plug. If it still does not fit, have an electrician replace the outlet.
w WARNING
Burn Hazards:
• Hot liquid will splash if you miss the drain bracket and accidentally
drop the frying basket into the hot liquid. Do not lean over the
deep fryer when the lid is off.
• Serious hot-oil burns may result from a deep-fat fryer being pulled
off a countertop. Do not allow the cord to hang over the edge of the
counter where it may be grabbed by children or become entangled
with the user. Do not use with an extension cord.

4
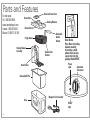
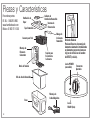
Frying Basket
Parts and Features
Magnetic Cord Assembly
Removable Vent Cover
Removable
Basket
Handle
Removable Lid
Heating Element
Assembly
Removable Oil Pot
Base
RESET
Reset Button
Press Reset on heating
element assembly
by inserting a small
pointed item (such as
a paper clip) into the
opening labeled RESET.
Reset Button
Steam Vent
Basket Drain
Bracket
READY
Light
Adjustable
Thermostat
Power
Light
Viewing Window
To order parts:
US: 1.800.851.8900
www.hamiltonbeach.com
Canada: 1.800.267.2826
Mexico:
01 800 71 16 100

5
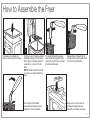
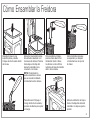
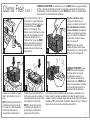
How to Assemble the Fryer
3
RESET
2
1
5 6
4
Place base on a stable, flat
surface. Insert oil pot into base.
Align vent cover and vent of
lid toward heating element
assembly. Lid snaps into place.
Align grooves of heating element
assembly with grooves on base.
Push down on heating element
assembly to connect it to the
base.
NOTE: Heater cannot be turned
on unless correctly installed on
base.
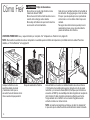
To assemble handle, squeeze
tines of handle together. Align
tines with round holes on metal
bracket inside basket.
Release tines to allow them to
spread and then pull handle back
to lock into metal bracket.
For storage: Push handle
into basket and squeeze tines
together to remove handle.

6
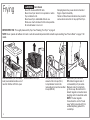
Frying
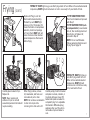
1 2 3 4
Place assembled fryer on a stable,
level, heat-resistant surface out of
reach of children. Lift lid to open.
Remove basket from fryer. Fill fryer with oil. Maximum
amount of oil is 8 cups (1.9 L)
to top indicator mark on the
removable oil pot and no less than
4 cups (946 ml).
Make sure fryer is turned to
MIN. Attach magnetic end of
cord assembly to fryer socket.
Magnetic end of cord will only
go in one way. Be careful not to
disturb magnetic connection when
plugging cord into electrical outlet.
NOTE: The low magnetic
force allows the cord to “break
away” which prevents unit from
accidentally being pulled off a
countertop.
BEFORE FIRST USE: Thoroughly clean and dry fryer. See “Cleaning Your Fryer” on page 9.
NOTE: Never operate unit without oil in tank or unit will exceed temperature limit and will require resetting. See “How to Reset” on page 11 for
details.
w WARNING
Burn Hazard.
• Never fill oil above MAX fill mark.
• Never move fryer when it is in operation or when
fryer contains hot oil.
• Never leave fryer unattended while in use.
• Remove as much moisture from food as possible.
Do not add water or ice to oil.
• Escaping steam may cause burns to hands or
fingers. Open lid carefully.
• Failure to follow these instructions may result in
serious burns since hot oil may spill from fryer.

7
Frying (cont.)
5
7 8
Replace lid. Plug in unit. Set
thermostat to desired setting.
Preheat fryer until READY light
comes on (6 to 10 minutes). For
more information on temperature
selection, check food package
or Frying Chart. READY light will
come on when oil has reached
preset temperature. Remove lid
before frying.
Carefully place basket in fryer.
Replace lid.
NOTE: Never operate unit
without oil in pot or unit will
exceed temperature limit and will
require resetting.
When frying is done, remove
lid, raise basket, and hook over
removable oil pot to drain.
NOTE: Do not allow condensation
to drain into oil pot while
removing lid or while unit is off.
Carefully empty food from basket
and place in a bowl, colander, or
tray lined with paper towel. Fill
basket and repeat as needed to
complete frying. Turn adjustable
thermostat to MIN and unplug
appliance after use. Place lid on
removable oil pot and allow to
cool.
FRYING TIP: READY light may go out after frying a batch of food. When oil has reached selected
temperature, READY light will come back on. Unit is now ready to fry next batch of food.
TO FRY UNBATTERED FOOD:
Place food in basket and proceed
with Step 7.
TO FRY BATTERED FOOD (such
as tempura batter): Lower basket
into oil; then carefully place food
directly into oil. Replace lid;
proceed to Step 8.
NOTE: Do not overfill basket.
Follow packaging directions and
Frying Tips on page 10.
9
6
FRYING TIP: READY light may go
out after frying a batch of food.
When oil has reached selected
temperature, READY light will
come back on. Unit is now ready
to fry next batch of food.

8
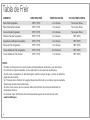
Frying Chart
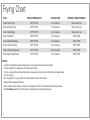
FOOD FRYING TEMPERATURE COOKING TIME INTERNAL TEMP/DONENESS
Frozen French Fries 375ºF (191ºC) 2 to 3 minutes Brown and crisp
Fresh-Cut French Fries 375ºF (191ºC) 7 to 8 minutes Brown and crisp
Frozen Onion Rings 375ºF (191ºC) 2 to 3 minutes Brown and crisp
Frozen Fish Sticks 350ºF (177ºC) 2 to 3 minutes 145ºF (63ºC)
Frozen Butterflied Shrimp 350ºF (177ºC) 3 to 4 minutes 145ºF (63ºC)
Frozen Chicken Tenders 375ºF (191ºC) 3 to 5 minutes 165ºF (74ºC)
Frozen Chicken Wing Pieces 375ºF (191ºC) 8 to 10 minutes 165ºF (74ºC)
Fresh Chicken Wing Pieces 375ºF (191ºC) 7 to 9 minutes 165ºF (74ºC)
NOTES:
• Length of cooking time and temperature may vary based on batch size and weight.
• For best results, fry a single layer of food for each batch.
• Frozen, uncooked chicken should be thawed, excess water removed, and patted dry with paper towel
prior to cooking.
• See “Frying Tips” on page 10 for more information to obtain best results.
• Always follow package directions.
• When cooking meat, poultry, or fish, use cooking thermometer to determine internal temperatures.
• Visit foodsafety.gov for more information on safe internal cooking temperatures.

9
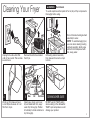
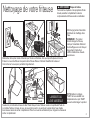
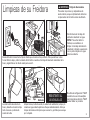
Cleaning Your Fryer
w WARNING
Burn Hazard.
To avoid eruptions and/or spatter of hot oil, dry all fryer components
thoroughly before using.
2
RESET
3
4 DISHWASHER-SAFE
1
Unplug from wall outlet. Wait
until oil has cooled. This can take
several hours.
Remove lid and remove basket
from fryer.
Lift heating element assembly
from base and hook onto oil pot
to drain.
Lift oil pot from base and pour
out oil. Wipe all excess oil or oil
film from oil pot.
Clean base, oil pot, vent cover,
lid, and basket with hot, soapy
water. Dry thoroughly. Position
lid vertically to drain and allow to
dry thoroughly.
DO NOT use the “SANI” setting
when washing in the dishwasher.
“SANI” cycle temperatures could
damage your product.
Do not immerse heating element
assembly in water.
NOTE: To avoid damaging fryer,
use care when cleaning heating
element assembly. Gently wipe
with soft cloth dampened with
hot, soapy water.
5
Base
Vent Cover
Lid
Basket
Oil Pot

10
Frying Tips
SELECTING AND CHANGING THE FRYING OIL:
• Use a good quality vegetable or peanut oil.
• Frying foods in butter, margarine, olive oil, or animal fat is NOT
recommended because of low-temperature smoke point.
• DO NOT mix two types of oil.
• Change oil regularly to maintain optimum frying and flavor quality.
• Oil used for french fries can be used 10 to 12 times before
changing if oil is filtered after each use. Oil used for food that is
high in protein (such as meat or fish) should be changed more
often.
• To filter oil, allow oil to completely cool. Cheesecloth or paper
towel may be used as a filter to strain oil.
• Always follow food package directions.
• DO NOT add fresh oil to used oil.
• Always change the oil if it starts to foam when heated, when it has
a strong smell or taste, or when it turns dark and/or syrupy.
BEFORE FRYING:
• Excess water or ice particles can cause hot oil to splatter or
foam. Remove any excess water from fresh food by blotting with
a paper towel. Remove any ice chunks or buildup from frozen
foods.
GENERAL TIPS:
• DO NOT use plastic utensils in hot oil.
• Season food AFTER frying.
• If food is not as crisp as desired, reduce batch size.
DISPOSING OF OIL:
• Pour cool oil into its original (resealable) empty plastic bottle.
BASKET USAGE WITH FRESHLY BATTERED FOODS:
• Freshly battered foods should be carefully placed directly into oil.
First, lower basket completely and then carefully place each piece
of battered food into hot oil. Use basket to remove fried battered
foods.
STORAGE:
• Basket handle can be disengaged and rotated into basket. Place
oil pot in base and then place basket and power cord in oil pot.
• It is best to store all oils in a cool, dark, dry place for up to six
months.
IF YOU LIVE IN A HIGH-ALTITUDE AREA:
The Extension service will have detailed information about cooking
for your area. To locate the Cooperative Extension service in your
county, please visit: http://www.csrees.usda.gov/Extension/.
Visit www.hamiltonbeach.com for our complete
line of products and Use and Care Guides –
as well as delicious recipes, tips, and
to register your product online!

11
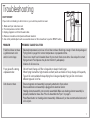
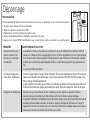
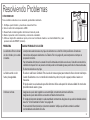
Troubleshooting
PROBLEM PROBABLE CAUSE/SOLUTION
Fried food does not have
a golden-brown color
and/or is not crispy.
• Selected temperature is too low or food has not been fried long enough. Check food package or
Frying Chart on page 8 for correct temperature or preparation time.
• There is too much food in basket. Never fry too much food at one time. See recipe for correct
frying amount. Food pieces may be too thick to fry adequately.
• Volume of oil is too low.
Fryer gives off a strong,
unpleasant odor.
• Oil isn’t fresh. Change oil. Filter oil regularly to keep it fresh longer.
• When frying food with a high moisture content (such as chicken or fries), change oil frequently.
• Type of oil is not suitable for deep-frying food. Use good quality frying oil. Do not mix two
different types of oil or fat.
Unit does not heat. • Ensure magnetic cord assembly is properly attached to fryer socket.
• Ensure electrical cord assembly is plugged into electrical outlet.
• Heating element assembly not correctly assembled. Make sure heating element assembly is
properly installed on base. See “How to Assemble the Fryer” on page 5.
• Press Reset button on heating element assembly. Make sure fryer has recommended amount of
oil in oil pot.
HOW TO RESET:
If your unit is not heating or will not turn on, your unit may need to be reset.
1. Make sure fryer and oil are cool.
2. Turn temperature control to MIN.
3. Unplug magnetic cord from the wall outlet.
4. Remove removable control panel and heater element.
5. Use a thin pointed object such as a wooden skewer or thin screwdriver to push in RESET button.

12
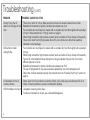
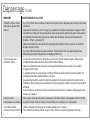
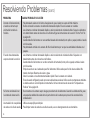
Troubleshooting (cont.)
PROBLEM PROBABLE CAUSE/SOLUTION
During frying, the oil
spills over the edge of the
fryer.
• There is too much oil in fryer. Make sure that oil does not exceed maximum level mark.
• Basket/food immersed too quickly. Carefully raise basket out of oil.
• Food contains too much liquid or coated with ice crystals. Dry food thoroughly before placing it
in fryer. Follow instructions in “Frying” section on page 6.
• When frying food with a high moisture content (such as chicken or fries), change oil frequently.
• There is too much food in frying basket. Do not fry more food at one time than quantities
indicated on food package.
Oil foams too much
during frying.
• Food contains too much liquid or coated with ice crystals. Dry food thoroughly before placing it
in fryer.
• When frying food with a high moisture content (such as chicken or fries), change oil frequently.
• Type of oil is not suitable for deep-frying food. Use good quality frying oil. Do not mix two
different types of oil or fat.
• Basket/food immersed too quickly. Carefully raise basket out of oil.
• The use of refrigerated oil may cause excessive splattering. Use room-temperature oil.
• Oil pot has not been cleaned properly. See instructions in the “Cleaning Your Fryer” section on
page 9.
Condensation forms on
viewing window.
• Water vapor from food collects on window. When unit is cold, wipe a small amount of oil on
inside of viewing window to prevent condensation buildup.
Oil film buildup on oil pot. • Use plastic scouring pad to clean.
• To clean oil residue from oil pot, use a household degreaser.

13
This warranty applies to products purchased and used in the U.S. and Canada. This is the only express warranty for this product and
is in lieu of any other warranty or condition.
This product is warranted to be free from defects in material and workmanship for a period of five (5) years from the date of original
purchase in Canada and one (1) year from the date of original purchase in the U.S. During this period, your exclusive remedy is repair
or replacement of this product or any component found to be defective, at our option; however, you are responsible for all costs
associated with returning the product to us and our returning a product or component under this warranty to you. If the product or
component is no longer available, we will replace with a similar one of equal or greater value.
This warranty does not cover glass, filters, wear from normal use, use not in conformity with the printed directions, or damage to
the product resulting from accident, alteration, abuse, or misuse. This warranty extends only to the original consumer purchaser or
gift recipient. Keep the original sales receipt, as proof of purchase is required to make a warranty claim. This warranty is void if the
product is used for other than single-family household use or subjected to any voltage and waveform other than as specified on the
rating label (e.g., 120V ~ 60 Hz).
We exclude all claims for special, incidental, and consequential damages caused by breach of express or implied warranty. All
liability is limited to the amount of the purchase price. Every implied warranty, including any statutory warranty or condition
of merchantability or fitness for a particular purpose, is disclaimed except to the extent prohibited by law, in which case such
warranty or condition is limited to the duration of this written warranty. This warranty gives you specific legal rights. You may have
other legal rights that vary depending on where you live. Some states or provinces do not allow limitations on implied warranties or
special, incidental, or consequential damages, so the foregoing limitations may not apply to you.
To make a warranty claim, do not return this appliance to the store. Please call 1.800.851.8900 in the U.S. or 1.800.267.2826 in Canada
or visit hamiltonbeach.com in the U.S. or hamiltonbeach.ca in Canada. For faster service, locate the model, type, and series numbers
on your appliance.
Limited Warranty

14
PRÉCAUTIONS IMPORTANTES
1. Lire toutes les instructions.
2. Cet appareil n’est pas destiné à être utilisé par des personnes (y
compris les enfants) dont les capacités physiques, sensorielles ou
mentales sont réduites, ou manquant d’expérience et de connaissance,
sauf si elles sont étroitement surveillées et instruites sur l’utilisation de
l’appareil par une personne responsable de leur sécurité.
3. Une surveillance étroite est requise pour tout appareil utilisé par
ou près des enfants. Surveiller que les enfants ne jouent pas avec
l’appareil.
4. Ne pas toucher aux surfaces chaudes. Utiliser les poignées ou
les boutons.
5. Pour éviter le risques de décharge électrique, ne pas immerger le
cordon, la fiche ou l’ensemble d’élément de chauffage dans l’eau ou
autre liquide.
6. Assurer que le manche soit bien assemblé au panier et fixé en place.
Consulter les instructions détaillées de montage.
7. Débrancher la friteuse de la prise de murale lorsqu’elle n’est pas
utilisée et avant le nettoyage. La laisser refroidir avant d’y ajouter ou d’y
enlever des pièces ou de la nettoyer.
8. Ne pas faire fonctionner un appareil électroménager avec un cordon
ou une fiche endommagée, ou lorsque l’appareil ne fonctionne pas
bien ou a été échappé ou endommagé d’une manière quelconque.
Le remplacement et la réparation du cordon d’alimentation doivent
être faits par le fabricant, son agent de service ou toute personne
qualifiée de façon à éviter tout danger. Appeler le numéro de service
à la clientèle fourni pour des renseignements concernant l’examen, la
réparation ou l’ajustement.
9. L’utilisation d’accessoires non recommandés ou non vendus par le
fabricant d’appareil pour ce modèle peut causer des blessures.
10. Ne pas utiliser à l’extérieur.
11. Ne pas laisser le cordon pendre du bord d’une table ou d’un comptoir,
ni toucher des surfaces chaudes.
12. Ne pas placer l’appareil sur ou près d’un brûleur à gaz ou électrique
chaud ou dans un four chauffé.
13. Ne déplacer jamais la friteuse contenant de l’huile chaude.
14. Toujours brancher le cordon sur l’appareil d’abord, puis sur une prise
de courant murale. Pour débrancher, mettre tous les contacts en
position MIN, ou éteinte ( ) si équipé, et retirer la fiche de la prise de
murale. Pour débrancher, saisir la fiche et la retirer de la prise. Ne pas
tirer sur le cordon d’alimentation.
15. Ne pas utiliser la friteuse à une fin autre que celle pour laquelle elle a
été conçue.
16. Pour réduire le risque de blessure, NE PAS remplir d’huile au-dessus
du repère de niveau maximal.
17. Toujours assurer que le pot à huile amovible soit rempli au moins au
niveau minimum.
18. Ne jamais laisser la friteuse sans surveillance durant son utilisation.
19. Toujours sécher les aliments et enlever la glace avant de faire frire.
20. Toujours sécher complètement les éléments de la friteuse après les
avoir lavés et avant de faire frire.
21. Toujours frire avec le couvercle en place.
22. Ne jamais utiliser d’huile réfrigérée.
23. Ne jamais bloquer l’évent sur le couvercle. Ayez conscience de la
vapeur qui sort de l’évent.
24. Des émissions de vapeur peuvent entraîner des brûlures aux mains ou
aux doigts. Faites bien attention quand vous ouvrez le couvercle.
25. Toujours relever le panier à friture et le faire reposer sur le support
d’égouttage puis laisser égoutter les aliments avant de retirer le panier
de la cuve amovible.
26. Des prises de courant ou fiches chaudes ou mal adaptées représentent
une condition dangereuse parce que la prise de courant risque de
prendre feu. Faire remplacer les prises de courant par un électricien
qualifié.
27. Ne pas faire fonctionner cet appareil avec une minuterie externe ou un
système de télécommande distinct.
Pour utiliser un appareil électroménager, vous devez toujours prendre des mesures élémentaires de sécurité pour réduire le risqued’incendie,
d’électrocution et/ou de blessure corporelle, en particulier les mesures suivantes :
CONSERVER CES INSTRUCTIONS

15
Autres renseignements de sécurité aux consommateurs
Cet appareil est destiné à un usage domestique uniquement.
Ce produit est conçu uniquement pour préparer, faire cuire et servir
des aliments. Ce produit n’est pas conçu pour une utilisation avec
toute autre matière ou produit non alimentaire.
w AVERTISSEMENT
Risque de choc électrique : Ce produit est
fourni avec une fiche polarisée (une broche large) pour réduire le
risque d’électrocution. Cette fiche n’entre que dans un seul sens dans
une prise polarisée. Ne contrecarrez pas l’objectif sécuritaire de cette
fiche en la modifiant de quelque manière que ce soit ou en utilisant
un adaptateur. Si vous ne pouvez pas insérer complètement la fiche
dans la prise, inversez la fiche. Si elle refuse toujours de s’insérer, faire
remplacer la prise par un électricien.
w AVERTISSEMENT
Danger de brûlure:
• Vous serez éclaboussé par du liquide chaud si vous manquez le
support d’égouttage et laissez tomber accidentellement le panier
à frire dans le liquide chaud. Ne vous penchez jamais sur la friteuse
sans couvercle.
• De l’huile chaude renversée d’une bassine à friture tirée par
mégarde du comptoir peut causer des brûlures sévères. Ne
jamais laisser le cordon d’alimentation pendre par l’extrémité d’un
comptoir. Il peut être saisi par un enfant et il peut se mêler pendant
l’usage. Ne jamais utiliser avec une rallonge.

16
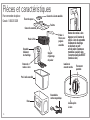
Panier à frire
Pièces et caractéristiques
Ensemble de
cordon magnétique
Couvercle à évent amovible
Panier à
friture avec
poignée
amovible
Couvercle amovible
Ensemble
d’élément
de chauffage
Pot à huile amovible
Base
Pour commander des pièces :
Canada : 1.800.267.2826
RESET
Bouton de remise à zéro
Appuyez sur le bouton de
remise à zéro du ensemble
d’élément de chauffage
en insérant un petit
article pointu (comme un
trombone à papier) dans
l’ouverture marquée RESET
(remise à zéro).
Bouton de
remise à zéro
Évent de vapeur
Support
d’égouttage
de panier
Lumière prête
à cuire
Thermostat
ajustable
Lumière de
courant marche
Fenêtre

17
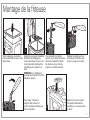
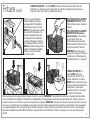
Montage de la friteuse
3
RESET
2
1
5 6
4
Placer la base sur une surface
plate, stable. Mettre le pot à huile
dans la base.
Aligner l’évent du couvercle
à l’ensemble d’élément de
chauffage. Le couvercle se fixe
en place.
Aligner les rayures de l’ensemble
d’élément de chauffage aux
rayures de la base. Pousser vers
le bas l’ensemble d’élément de
chauffage pour le joindre à la
base.
REMARQUE : Le chauffage ne
peut pas être branché s’il est mal
installé sur la base.
Pour assembler le manche,
presser sur les dents du manche
afin de les rassembler. Aligner
les dents aux trous ronds du
support en métal des paniers.
Relâcher les dents pour leur
permettre de s’étendre et de
se fixer au support en métal.
Pour ranger : Pousser la
poignée dans le panier et
presser les tiges ensemble pour
retirer la poignée.

18
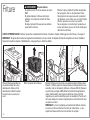
Friture
1 2 3 4
Placer la friteuse assemblée sur
une surface stable, de niveau,
résistante à la chaleur et hors
de portée des enfants. Soulever
l’ouverture du couvercle pour
ouvrir.
Retirer les panier de la friteuse. Remplir la friteuse avec de l’huile. La quantité maximum d’huile est de
8 tasses (1,9 litres), jusqu’à la marque supérieure indiquée dans la cuve
amovible, mais ne doit pas être inférieure à 4 tasses (946 ml).
S’assurer
que le friteuse est réglée à MIN. Brancher l’extrémité magnétique du
cordon d’alimentation dans la prise de la friteuse. Cette extrémité
magnétique ne peut être branchée que d’une seulefaçon. Prendre soin
de ne pas déloger la connexion magnétique lors du branchement dans
une prise de courant.
REMARQUE : La force magnétique est relativement faible de manière
à ce que le cordon se détache s’il est tiré par inadvertance ; ce qui
empêche la friteuse d’être tirée et de tomber du comptoir.
AVANT LE PREMIER USAGE : Nettoyer et assécher complètement la friteuse. Consulter le chapitre « Nettoyage de votre friteuse » à la page 21.
REMARQUE : Ne jamais faire fonctionner l’appareil sans huile dans le pot pour éviter de dépasser la limite de température et devoir réinitialiser
l’appareil. Consulter le chapitre « Réinitialisation » à la page 23 pour obtenir les détails.
w AVERTISSEMENT
Risque de brûlure.
• Ne jamais remplir d’huile au-dessus du repère
MAX.
• Ne jamais déplacer la friteuse durant son
utilisation ou lorsqu’elle contient de l’huile
chaude.
• Ne laisser jamais la friteuse sans surveillance
quand elle fonctionne.
• Éliminer le plus possible l’humidité des aliments.
Ne pas ajouter d’eau ou de glace dans l’huile.
• Des projections de vapeur peuvent occasionner
des blessures à vos mains ou à vos doigts. Faites
attention quand vous ouvrez le couvercle.
• Ne pas respecter ces instructions représente un
risque de brûlures graves, car l’huile chaude peut
déborder de la friteuse.

19
Friture (suite)
5
7 8
Fermer le couvercle. Brancher
l’appareil. Régler le thermostat
au réglage désiré. Préchauffer la
friteuse jusqu’à ce que le témoin
READY (prêt) pour la cuisson s’allume
(au bout de 6 à 10 minutes). Pour
plus de renseignements au sujet
de la sélection de la température,
consulter l’emballage de l’aliment
ou le Tableau de friture. Le témoin
READY (prêt) s’allume dès que l’huile
a attient la température préréglée.
Enlever le couvercle avant de
commencer à frire.
Mettre soigneusement les panier dans la friteuse. Fermer le couvercle. REMARQUE : Ne jamais faire fonctionner cet appareil sans huile dans
le pot, car l’appareil surchauffera et nécessitera une réinitialisation de la température.
Quand vous avez terminé de frire, enlever le couvercle,
soulever les panier et accrocher sur le pot à huile amovible pour égoutter. REMARQUE : Quand vous enlever le couvercle et quand le couvercle
est enlevé, ne permettre pas de condensation couler dans le pot à huile.
Vider soigneusement les paniers en versant dans un bol, une passoire
ou une plaque tapissée d’une serviette de papier. Remplir les paniers et répéter au besoin pour terminer la friture. Tourner la commande de
température réglable à la position MIN et débrancher l’appareil dès la fin de l’utilisation. Fermer le couvercle sur la cuve amovible et laisser
refroidir.
CONSEIL DE FRITURE : Le témoin READY (prêt) peut s’éteindre après la friture d’un lot
d’aliments. Il se rallumera une fois que l’huile aura atteint la température sélectionnée. La
friteuse est alors prête à frire le lot d’aliments suivant.
POUR FAIRE FRIRE UN ALIMENT
NON ENROBÉ DE PÂTE : Mettre
l’aliment dans le panier et passer à
l’étape 7.
POUR FAIRE FRIRE UN ALIMENT
ENROBÉ DE PÂTE (comme la
pâte de tempura) : Pour abaisser
le panier dans l’huile, puis
mettre l’aliment avec précaution
directement dans l’huile. Fermer le
couvercle et passer à l’étape 8.
REMARQUE : Éviter de remplir
excessivement le panier. Suivre les
instructions sur l’emballage et les
« Conseils de friture » à la page 22.
9
6
CONSEIL DE FRITURE : Le
témoin READY (prêt) peut
s’éteindre à la fin d’un lot de
cuisson d’aliments. Le témoin
READY (prêt) se rallumera dès que
l’huile aura atteint la température
sélectionnée. L’appareil est
maintenant prêt pour la cuisson
d’un autre lot d’aliments.

20
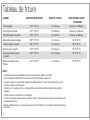
Tableau de friture
ALIMENT TEMPÉRATURE DE FRITURE DURÉE DE CUISSON TEMP. INTERNE/CUISSON
SÉCURITAIRE
Frites surgelées 375 ºF (191 ºC) 2 à 3 minutes Brunes et croustillantes
Frites régulières fraîches 375 ºF (191 ºC) 7 à 8 minutes Brunes et croustillantes
Rondelles d’oignon surgelées 375 ºF (191 ºC) 2 à 3 minutes Brunes et croustillantes
Bâtonnets de poisson surgelés 350 ºF (177 ºC) 2 à 3 minutes 145 ºF (63 ºC)
Crevettes papillon surgelées 350 ºF (177 ºC) 3 à 4 minutes 145 ºF (63 ºC)
Filets de poulets surgelés 375 ºF (191 ºC) 3 à 5 minutes 165 ºF (74 ºC)
Morceaux d’ailes de poulet
surgelées
375 ºF (191 ºC) 8 à 10 minutes 165 ºF (74 ºC)
Morceaux d’ailes de poulet
fraîches
375 ºF (191 ºC) 7 à 9 minutes 165 ºF (74 ºC)
NOTES:
• La durée de cuisson et la température peuvent varier selon la quantité et le poids.
• Pour de meilleurs résultats, faire frire une seule couche d’aliments à chaque lot.
• Le poulet congelé non cuit doit être dégelé puis débarrassé de son excès d’eau et épongé avec une
serviette de papier avant la cuisson.
• Consulter les « Conseils de friture » à la page 22 pour connaître les détails et obtenir des résultats
optimaux.
• Toujours suivre les instructions sur l’emballage.
• Lors de la cuisson de viande, poulet ou poisson, utiliser un thermomètre de cuisson pour déterminer les
températures internes.
• Visitez les différents sites gouvernementaux pour plus d’information à propos des températures internes
de cuisson.
A página está carregando...
A página está carregando...
A página está carregando...
A página está carregando...
A página está carregando...
A página está carregando...
A página está carregando...
A página está carregando...
A página está carregando...
A página está carregando...
A página está carregando...
A página está carregando...
A página está carregando...
A página está carregando...
A página está carregando...
A página está carregando...
A página está carregando...
A página está carregando...
A página está carregando...
A página está carregando...
-
 1
1
-
 2
2
-
 3
3
-
 4
4
-
 5
5
-
 6
6
-
 7
7
-
 8
8
-
 9
9
-
 10
10
-
 11
11
-
 12
12
-
 13
13
-
 14
14
-
 15
15
-
 16
16
-
 17
17
-
 18
18
-
 19
19
-
 20
20
-
 21
21
-
 22
22
-
 23
23
-
 24
24
-
 25
25
-
 26
26
-
 27
27
-
 28
28
-
 29
29
-
 30
30
-
 31
31
-
 32
32
-
 33
33
-
 34
34
-
 35
35
-
 36
36
-
 37
37
-
 38
38
-
 39
39
-
 40
40


Hamilton Beach 35325 Guia de usuario
- Categoria
- Fritadeiras
- Tipo
- Guia de usuario
- Este manual também é adequado para
em outras línguas
- español: Hamilton Beach 35325 Guía del usuario
- français: Hamilton Beach 35325 Mode d'emploi
- English: Hamilton Beach 35325 User guide
Artigos relacionados
Outros documentos
-
Proctor Silex 35000 Guia de usuario
-
cosy Life 973023 Manual do usuário
-
BLACK DECKER BXAFO1200E Manual do usuário
-
Philips HD6143/80 Manual do usuário
-
Tefal FR701330+ Manual do proprietário
-
-
Oster FRYRIGHT 3246 Manual do usuário
-
-
Proctor Silex 35055 Guia de usuario
-
GYS Magnetic earth Ficha de dados