NightStick XPR-5542 Manual do usuário
- Categoria
- Lanternas
- Tipo
- Manual do usuário
Este manual também é adequado para

Bayco Products, Inc. • 640 South Sanden Blvd. • Wylie, TX 75098 • USA • 1-800-233-2155 • 1-469-326-9400 • www.nightstick.com
INS-XPR-5542-LG-22 09-09-2022
Instruction Manual
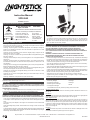
XPR-5542
US PATENT 9,713,217
THE XPR-5542 IS APPROVED FOR USE
CLASS I DIV 1 GRPS A-D T4
CLASS II & III DIV 1 GRPS E-G
CLASS I ZONE 0 GRP IIC T4
CLASS II ZONE 20 IIIC T135ºC
Ex ia IIC T4 Gb
DEMKO 16 ATEX 1815
IECEx UL 16.0168
-20ºC ≤ Tamb ≤ +40ºC
3.7V/Cell 5500-BATT
Um = 4.75V
2575
E 467756
INTRINSICALLY SAFE
SÉCURITÉ INTRINSÉQUÉ
II 2 G Ex ia IIC T4 Gb
Bayco Products, Inc. XPR-5542
Ex ia FLASHLIGHT FOR USE IN HAZARDOUS LOCATIONS
UL listed for use with Bayco Li-ion Battery Pack 5500-BATT
Wylie, TX 75098
ID 5012927
22-AV4BO-0249X
WARNINGS - INTRINSICALLY SAFE
yWarning: To prevent ignition of a hazardous atmosphere, do not locate the charger for
this product in the hazardous environment. The charger for this product must be located in
an area known to be non-hazardous ONLY.
yWarning: To prevent ignition of a hazardous atmosphere, do not attempt to charge this
product in the hazardous environment. This task must ONLY be performed in an area
known to be non-hazardous.
yWarning: Lithium-ion batteries must be used and charged properly. Improper use can
result in serious injury, re, or death.
yWarning: Use only the included and approved 5500-BATT rechargeable battery pack
from Bayco Products.
yWarning: Do NOT attempt to use any other rechargeable or non-rechargeable batteries
with this light.
yWarning: To prevent ignition of a hazardous atmosphere, do not open the lens bezel in
the hazardous environment. This task must ONLY be performed in an area known to be
non-hazardous.
yWarning: When exchanging the rechargeable battery pack, use only the approved 5500-
BATT rechargeable battery pack from Bayco Products.
yWarning: To prevent ignition of a hazardous atmosphere, the rechargeable battery pack
must only be exchanged in an area known to be non-hazardous.
yWarning: Do not expose the rechargeable battery pack to water or salt water, or allow
the battery pack to get wet.
yWarning: Do not store the rechargeable battery pack with metallic objects that may
cause a short circuit.
yWarning: Substitution of components may impair intrinsic safety.
SPECIAL INSTRUCTIONS FOR INTRINSIC SAFETY
For personal safety, always conrm the rating of any known hazardous or potentially
hazardous location where the light is to be used.
INITIAL USE
Warning: To prevent ignition of a hazardous atmosphere, do not attempt to charge
this product in the hazardous environment. This task must ONLY be performed in an
area known to be non-hazardous.
CHARGER INPUT: 12 VDC Max
Fully charge the XPR-5542 before the rst use, or if the battery is new or has been unused
for several months. The maximum charge time required is approximately 6 hours.
DAILY USE
WARNING: TO PREVENT IGNITION OF A HAZARDOUS ATMOSPHERE, DO NOT
ATTEMPT TO CHARGE THIS PRODUCT IN THE HAZARDOUS ENVIRONMENT. THIS
TASK MUST ONLY BE PERFORMED IN AN AREA KNOWN TO BE NON-HAZARDOUS.
yUse only the supplied Nightstick charger, 5500-BATT rechargeable battery pack and AC
or DC adapter. For best performance, charge the 5542 when the ashlight beam starts
to dim.
yConnect the AC power adapter to the charger. The LED indicator will not be illuminated
at this point.
yWith the ashlight facing forward, slide the 5542 into the charger until the contacts snap
into place.
yThe LED indicator changes to constant red indicating the 5542 is properly inserted into the
charger and is in fact charging. The LED indicator remains red until the battery is fully charged.
At full charge, the LED indicator turns green.
yThe total time to full charge the 5542 varies depending on the remaining charge in the
battery pack.
yTo conrm a full charge, keep the 5542 in the charger and turn it on. The LED indicator
will change to red. Turn off the 5542. If the 5542 is fully charged, the LED indicator will
turn green. If not, it remains red until the charge is completed and the LED indicator turns
green. The 5542 will now be fully charged.
REPLACING LITHIUM-ION RECHARGEABLE BATTERY
WARNING: TO PREVENT IGNITION OF A HAZARDOUS ATMOSPHERE, DO NOT
OPEN THE LENS BEZEL IN THE HAZARDOUS ENVIRONMENT. THIS TASK MUST
ONLY BE PERFORMED IN AN AREA KNOWN TO BE NON-HAZARDOUS.
WARNING: WHEN EXCHANGING THE RECHARGEABLE BATTERY PACK, USE
ONLY THE APPROVED 5500-BATT RECHARGEABLE BATTERY PACK FROM BAYCO
PRODUCTS.
WARNING: TO PREVENT IGNITION OF A HAZARDOUS ATMOSPHERE, THE
RECHARGEABLE BATTERY PACK MUST ONLY BE EXCHANGED IN AN AREA
KNOWN TO BE NON-HAZARDOUS.
yLoosen the locking screw located on the side of the tail cap. CAUTION: Do NOT attempt
to completely remove the locking screw. Doing so is not necessary and may damage the
threads. The screw simply needs to be loosened enough to allow the tail-cap to unscrew.
yUnscrew the tail-cap from the housing in a counter-clockwise direction.
yTurn the light upside down and carefully shake the light in order to remove the battery.
Allow the battery to slide into your hand.
yNext, allow the 5500-BATT rechargeable battery pack to slide out of the light paying close
attention to the battery pack’s orientation within the handle.
yUsing only the approved replacement 5500-BATT rechargeable battery pack from Bayco
Products, slide the new battery pack into the handle of the light using the directional arrow
marked on the side of the pack to be a guide to proper battery orientation.
yReplace the tail-cap by screwing it onto the housing in a clockwise direction.
yTighten locking screw. CAUTION: Do NOT over-tighten. Doing so may damage the
threads and impact the light’s Intrinsic Safety.
OPERATION
THE XPR-5542 HAS SEVEN LIGHT MODES:
yMomentary ashlight
yFull brightness ashlight
yMedium brightness ashlight
yLow brightness ashlight
yFloodlight
yDual-light
yStrobe
The XPR-5542 has two body switches providing access to all modes.
Momentary Flashlight Mode
Lightly press the top body switch for momentary operation. Release the switch to turn
the light off.
Constant-on
Press the top body switch until it clicks and then release for constant-on in high-brightness
mode. Press and release the top body switch again to turn the light off.
Select Brightness Level
Press and hold down the top body switch. The light will cycle from high to medium to
low and then back up again at a rate of approximately one mode per second. The light will
continue to cycle up and down through the various modes as long as the top body switch
is held down. When the desired brightness level is reached, simply release the top body
switch, and the light will remain in that brightness mode. Press and release the top body
switch to turn the light off.
Floodlight
Press the bottom body switch until it clicks and then release for oodlight mode. Press
and release the bottom body switch again to turn the light off.

Bayco Products, Inc. • 640 South Sanden Blvd. • Wylie, TX 75098 • USA • 1-800-233-2155 • 1-469-326-9400 • www.nightstick.com
INS-XPR-5542-LG-22 09-09-2022
Dual-Light
Dual-Light allows the user to turn on both the Flashlight (at any brightness level) and the
Floodlight, at the same time. First select the appropriate brightness level of the ashlight
using the directions above. Next press and release the bottom switch to activate the
oodlight. Both the Flashlight and the Floodlight are now running. Press and release both
the top and bottom body switches to turn the light off.
Strobe Function
From off or any mode, rapidly double click the switch to activate the strobe function
running at full brightness. Press and release the body switch to turn the light off.
STROBE WARNING
Exposure to strobing lights may cause dizziness, disorientation, and nausea. A very
small percentage of people suffer from photosensitive epilepsy and may experience
seizures or blackouts triggered by strobing lights. For more information from the EPILEPSY
FOUNDATION about photosensitivity and seizures, please visit www.epilepsy.com.
Anyone who has had symptoms linked to this condition should consult a doctor before using
this product.
WARRANTY
LIMITED LIFETIME WARRANTY
Bayco Products, Inc. warrants this product to be free from defects in workmanship and
materials for the original purchaser’s lifetime. The Limited Lifetime Warranty includes the
LEDs, housing and lenses. Rechargeable batteries, chargers, switches, electronics and
included accessories are warranted for a period of two years with proof of purchase. Normal
wear and failures which are caused by accidents, misuse, abuse, faulty installation and
lightning damage are excluded.
We will repair or replace this product should we determine it to be defective. This is the
only warranty, expressed or implied, including any warranty of merchantability or tness for
a particular purpose.
For a complete copy of the warranty, go to www.nightstick.com/nightstick-product-
support/warranties. Retain your receipt for proof of purchase.
Mode d’emploi
XPR-5542
LA LAMPE XPR-5500GM EST APPROUVÉE POUR UTILISATION
AVERTISSEMENTS – SÉCURITÉ INTRINSÈQUE
yAvertissement : Pour éviter l’inammation d’atmosphère dangereuse, ne pas placer le
chargeur pour ce produit dans une zone dangereuse. Le chargeur pour ce produit doit être
placé UNIQUEMENT dans une zone non dangereuse.
yAvertissement : Pour éviter l’inammation d’atmosphère dangereuse, ne pas essayer
de recharger ce produit dans une zone dangereuse. Cette tâche doit être effectuée
UNIQUEMENT dans une zone non dangereuse.
yAvertissement : Les batteries au lithium-ion doivent être utilisées et chargées
correctement. Une mauvaise utilisation peut causer des blessures graves, un incendie
ou la mort.
yAvertissement : Veuillez utiliser uniquement le bloc-piles rechargeable 5500-BATT
approuvé et inclut de Bayco Products.
yAvertissement : Ne PAS essayer d’utiliser d’autres piles rechargeables ou non
rechargeables avec cette lampe.
yAvertissement : Pour éviter l’inammation d’atmosphère dangereuse, ne pas ouvrir
la collerette de la lentille dans une zone dangereuse. Cette tâche doit être effectuée
UNIQUEMENT dans une zone non dangereuse.
yAvertissement : Lorsque vous remplacez le bloc-piles rechargeable, veuillez utiliser
uniquement le bloc-piles rechargeable approuvé 5580-BATT de Bayco Products.
yAvertissement : Pour éviter l’inammation d’atmosphère dangereuse, le bloc-piles
rechargeable doit être remplacer uniquement dans une zone non dangereuse.
yAvertissement : Ne pas mettre le bloc-piles rechargeable dans l’eau ou l’eau salée, ou
laisser le bloc-piles être mouillé.
yAvertissement : Ne pas entreposer le bloc-piles rechargeable avec des objets
métalliques cela pourrait causer un court-circuit.
yAvertissement : la substitution de composants peut compromettre la sécurité intrinsèque.
DIRECTIVES PARTICULIÈRES POUR UNE SÉCURITÉ INTRINSÈQUE
yPour votre propre sécurité, toujours conrmer la charge d’une zone dangereuse ou
potentiellement dangereuse quand la lampe de poche est utilisée.
UTILISATION INITIALE
Avertissement : Pour éviter l’inammation d’atmosphère dangereuse, ne pas essayer
de recharger ce produit dans une zone dangereuse. Cette tâche doit être effectuée
UNIQUEMENT dans une zone non dangereuse.
ENTRÉE CHARGEUR: 12 VDC Max
Charger complètement la lampe XPR-5542 avant la première utilisation ou si la pile est
neuve ou n’a pas été utilisée pendant plusieurs mois. Le temps maximum de charge requis
est d’une durée approximative de 6 heures.
UTILISATION QUOTIDIENNE
AVERTISSEMENT : POUR ÉVITER L’INFLAMMATION D’ATMOSPHÈRE
DANGEREUSE, NE PAS ESSAYER DE RECHARGER CE PRODUIT DANS UNE ZONE
DANGEREUSE. CETTE TÂCHE DOIT ÊTRE EFFECTUÉE UNIQUEMENT DANS UNE
ZONE NON DANGEREUSE.
yUtiliser uniquement le chargeur Nightstick, le bloc-piles rechargeable 5500-BATT et
l’adaptateur c.a. ou c.c. fournis. Pour de meilleurs résultats, charger la lampe 5542 lorsque
le faisceau de lumière commence à faiblir.
yBrancher l’adaptateur d’alimentation c.a. au chargeur. Le voyant DEL ne sera pas
allumé à ce stade.
yAvec la lampe de poche faisant face vers l’avant, glisser la lampe 5542 dans le chargeur
jusqu’à ce qu’elle s’enclenche correctement.
yLe voyant DEL passe au rouge continu indiquant ainsi que la lampe 5542 est correctement
insérée dans le chargeur et est en mode chargement. Le voyant DEL demeure rouge jusqu’à
ce que la pile soit complètement chargée. Lorsque le chargement est complété, le voyant
DEL passe au vert.
yLa durée totale d’une charge complète de la lampe 5542 varie selon la charge restante
dans le bloc-piles.
yPour vous assurer d’une charge complète, garder la lampe 5542 dans le chargeur et la
mettre en marche. Le voyant DEL passera au rouge. Éteindre la lampe 5542. Si la lampe 5542
est complètement chargée, le voyant DEL passera au vert. Si ce n’est pas le cas, le voyant
reste rouge jusqu’à la charge complète pour, par la suite, passer au vert. La lampe 5542 est
maintenant complètement chargée.
REMPLACEMENT DU BLOC-PILES RECHARGEABLE AU LITHIUM-ION
AVERTISSEMENT : POUR ÉVITER L’INFLAMMATION D’ATMOSPHÈRE
DANGEREUSE, NE PAS OUVRIR LA COLLERETTE DE LA LENTILLE DANS UNE
ZONE DANGEREUSE. CETTE TÂCHE DOIT ÊTRE EFFECTUÉE UNIQUEMENT DANS
UNE ZONE NON DANGEREUSE.
AVERTISSEMENT : LORSQUE VOUS REMPLACEZ LE BLOC-PILES
RECHARGEABLE, UTILISER UNIQUEMENT LE BLOC-PILES RECHARGEABLE
APPROUVÉ 5500-BATT DE BAYCO PRODUCTS.
AVERTISSEMENT : POUR ÉVITER L’INFLAMMATION D’ATMOSPHÈRE
DANGEREUSE, LE BLOC-PILES RECHARGEABLE DOIT ÊTRE REMPLACÉ
UNIQUEMENT DANS UNE ZONE NON DANGEREUSE.
yDesserrer la vis de blocage située sur le côté du capuchon à l’embout de la lampe. MISE
EN GARDE : Ne PAS enlever complètement la vis de blocage. Cette opération n’est pas
nécessaire et risquerait d’endommager les lets de la vis. La vis doit être simplement
desserrée pour permettre au capuchon de se dévisser.
yDévisser le capuchon à l’embout de la lampe dans le sens contraire des aiguilles d’une
montre.
yRetourner la lampe à l’envers et agiter avec précaution la lampe pour enlever la batterie.
Permettre à la batterie de glisser dans votre main.
yEnsuite, permettre au bloc-piles rechargeable 5500-BATT de glisser hors de la lampe en
portant une attention particulière à l’orientation du bloc-piles dans le manche.
yEn utilisant le bloc-piles rechargeable approuvé 5500-BATT de Bayco Products, glisser
le nouveau bloc-piles dans le boîtier de la lampe en vous servant de la èche directionnelle
indiquée sur le côté du bloc comme guide pour placer correctement l’orientation du bloc-
piles.
yReplacer le capuchon en le vissant dans le boîtier dans le sens des aiguilles d’une
montre.
ySerrer la vis de blocage. MISE EN GARDE : Ne PAS trop serrer. Si vous serrez trop vous
risquez d’endommager les lets et compromettre la sécurité intrinsèque de la lampe.
FONCTIONNEMENT
La lampe XPR-5542 dispose de sept modes d’éclairage :
yÉclairage lampe de poche momentané
yÉclairage lampe de poche à haute
luminosité
yÉclairage lampe de poche à moyenne
luminosité
yÉclairage lampe de poche à basse
luminosité
yÉclairage à faisceau large (projecteur)
yMode d’éclairage double et éclairage
stroboscopique.
La lampe XPR-5542 dispose de deux interrupteurs sur le manche qui permettent l’accès
à tous les modes.
Mode lampe de poche à éclairage momentané
Appuyer légèrement sur l’interrupteur du haut pour une fonction momentanée. Relâcher
l’interrupteur pour éteindre la lumière.
Mode continu
Appuyer sur l’interrupteur du haut jusqu’à ce qu’il s’enclenche et puis relâcher pour un
mode d’éclairage continu à haute luminosité.. Appuyer de nouveau sur l’interrupteur du haut
pour éteindre la lumière.
Choisir le niveau de luminosité
Appuyer et maintenir l’interrupteur du haut. L’éclairage passera d’un cycle de luminosité
de haute à basse et à moyenne à un taux d’environ un mode par seconde. La lampe
continuera son cycle de haute à basse luminosité à travers les différents modes aussi
longtemps que l’interrupteur est maintenu enfoncé. Lorsque le niveau de luminosité désiré
est atteint, veuillez simplement relâcher l’interrupteur du haut et l’éclairage restera dans ce
mode de luminosité. Appuyer de nouveau sur l’interrupteur du haut pour éteindre la lumière.

Bayco Products, Inc. • 640 South Sanden Blvd. • Wylie, TX 75098 • USA • 1-800-233-2155 • 1-469-326-9400 • www.nightstick.com
INS-XPR-5542-LG-22 09-09-2022
Éclairage à faisceau large ( projecteur)
Appuyer sur l’interrupteur du bas jusqu’à ce qu’il s’enclenche et puis relâcher pour
un mode d’éclairage à faisceau large. Appuyer de nouveau sur l’interrupteur du bas pour
éteindre la lumière.
Éclairage double
Le mode d’éclairage double permet à l’utilisateur d’allumer en même temps l’éclairage lampe
de poche (à tous les niveaux de luminosité) et l’éclairage à faisceau large. Premièrement, choisir
le niveau de luminosité approprié de la lampe de poche en utilisant les directives ci-dessus.
Ensuite, appuyer et relâcher l’interrupteur du bas pour activer l’éclairage à faisceau large. Les
deux types d’éclairage (lampe de poche – projecteur) sont maintenant en fonction. Appuyer et
relâcher les deux interrupteurs, celui du haut et celui du bas, pour éteindre les lumières.
Mode stroboscopique
À partir de n’imporqte quel mode ou lorsque la lampe est éteinte, cliquer deux fois
rapidement pour activer la fonction stroboscopique à haute luminosité. Appuyer et relâcher
l’interrupteur pour éteindre la lumière.
AVERTISSEMENT STROBOSCOPIQUE
L’exposition à des lumières stroboscopiques peut causer des étourdissements, une
désorientation et des nausées. Un très faible pourcentage de personnes souffrent d’épilepsie
photosensible et peuvent avoir des convulsions ou des évanouissements déclenchés par des
lumières stroboscopiques. Pour plus d’informations sur la photosensibilité et les saisies de
la FONDATION EPILEPSY, rendez-vous sur www.epilepsy.com. Toute personne qui a eu
des symptômes liés à cette condition devrait consulter un médecin avant d’utiliser ce produit.
GARANTIE
GARANTIE À VIE LIMITÉE
Bayco Products, Inc. garantit que ce produit est exempt de défauts de matériaux et de
fabrication à l’acheteur original durant toute sa vie. La garantie à vie limitée inclut les DEL,
les boîtiers et les lentilles. Les batteries rechargeables, les chargeurs, les interrupteurs, les
électroniques et les accessoires compris sont garantis pour une période de deux ans avec
une preuve d’achat. L’usure normal et les défaillances qui sont causés par des accidents,
une mauvaise utilisation, un abus, une installation défectueuse et un système d’éclairage
endommagé sont exclus.
Ce produit sera réparé ou remplacé si nous déterminons qu’il est défectueux. Ceci est
la seule garantie explicite ou implicite, y compris toute garantie de qualité marchande ou
d’adéquation à un usage particulier.
Pour une copie détaillée de la garantie, vous rendre sur le site www.nightstick.com/
nightstick-product-support/warranties. Gardez ce reçu comme preuve d’achat.
Manual de Instrucciones
XPR-5542
LA XPR-5542 ESTÁ APROBADA PARA SU USO
ADVERTENCIAS - INTRÍNSECAMENTE SEGURA
yAdvertencia: Para evitar la ignición de una atmósfera peligrosa, no coloque el cargador de
este producto en un ambiente peligroso. El cargador de este producto debe estar situado en
una zona SOLAMENTE conocida como no peligrosa.
yAdvertencia: Para evitar la ignición de una atmósfera peligrosa, no intente cargar este
producto en un ambiente peligroso. Esta tarea debe realizarse SOLAMENTE en una zona
que se sabe no peligrosa.
yAdvertencia: Las pilas de litio-ion se deben utilizar y ser cargadas correctamente. El uso
incorrecto puede provocar lesiones graves, incendio o muerte.
yAdvertencia: Utilice solo la pila recargable 5500-BATT ya incluida y aprobada por Bayco
Products.
yAdvertencia: NO intente utilizar otras pilas recargables o no recargables con esta linterna.
yAdvertencia: Para evitar la ignición de una atmósfera peligrosa, no abra el bisel del lente
en un ambiente peligroso. Esta tarea SOLAMENTE debe realizarse en una zona que se
sabe no peligrosa.
yAdvertencia: Al cambiar el paquete de pila recargable, utilice únicamente el paquete de
pilas recargables 5500-BATT aprobadas por Bayco Products.
yAdvertencia: Para evitar la ignición de una atmósfera peligrosa, el paquete de pilas
recargables solo debe ser intercambiado en una zona que se sabe no peligrosa.
yAdvertencia: No exponga la pila recargable al agua o agua salada, ni permita que la
pila se moje.
yAdvertencia: No almacene la pila recargable con objetos metálicos que puedan causar
un cortocircuito.
yAdvertencia: La sustitución de componentes puede afectar la seguridad intrínseca.
INSTRUCCIONES ESPECIALES PARA LA SEGURIDAD INTRÍNSECA
yPor su seguridad personal, siempre conrme la clasicación conocida de cualquier
ubicación peligrosa o potencialmente peligrosa donde la linterna se va a utilizar.
USO INICIAL
Advertencia: Para evitar la ignición de una atmósfera peligrosa, no intente cargar este
producto en un ambiente peligroso. Esta tarea SOLAMENTE debe realizarse en una
zona que se sabe no peligrosa.
ENTRADA DE CARGADOR: 12 VDC Máx
Cargue completamente la XPR-5542 antes del primer uso, o si la pila es nueva
o no se ha utilizado durante varios meses. El tiempo máximo de carga requerida es de
aproximadamente 6 horas.
USO DIARIO
ADVERTENCIA: PARA EVITAR LA IGNICIÓN DE UNA ATMÓSFERA PELIGROSA, NO
INTENTE CARGAR ESTE PRODUCTO EN UN AMBIENTE PELIGROSO. ESTA TAREA
SOLAMENTE DEBE REALIZARSE EN UNA ZONA QUE SE SABE NO PELIGROSA.
yUtilice únicamente el cargador suministrado 5542 BATT del paquete de pila recargable
y adaptador de AC o DC. Para un mejor rendimiento, cargue la 5542 cuando el rayo de
luz comienza a disminuir.
yConecte el adaptador de alimentación AC en el cargador. El indicador LED no se
iluminará en este momento.
yCon la linterna hacia adelante, deslice la 5542 en el cargador hasta que los contactos
encajen en su lugar.
yEl indicador LED cambia a color rojo constante indicando que la 5542 esta insertada
correctamente en el cargador y esta cargando. El indicador LED se mantiene rojo hasta
que la pila esta completamente cargada. En plena carga, el indicador LED se ilumina verde.
yEl tiempo total para cargar completamente la 5542 varía en función de la carga restante
en la pila.
yPara conrmar una carga completa, mantenga la 5542 en el cargador y enciéndala. El indicador
LED cambiará a rojo. Apague la 5542. Si la 5542 está completamente cargada, el indicador LED
se iluminará verde. Si no es así, seguirá siendo de color rojo hasta que se complete la carga y el
indicador LED se ilumine verde. La 5542 ya se habrá cargado por completo.
REEMPLAZAR LA BATERIA LITIO-IÓN RECARGABLE
ADVERTENCIA: PARA EVITAR LA IGNICIÓN DE UNA ATMÓSFERA PELIGROSA,
NO ABRA EL BISEL DEL LENTE EN UN AMBIENTE PELIGROSO. ESTA TAREA
SOLAMENTE DEBE REALIZARSE EN UNA ZONA QUE SE SABE NO PELIGROSA.
ADVERTENCIA: AL CAMBIAR EL PAQUETE DE PILAS RECARGABLE, UTILICE
ÚNICAMENTE EL PAQUETE DE PILAS RECARGABLE 5500-BATT APROBADO POR
BAYCO PRODUCTS.
ADVERTENCIA: PARA EVITAR LA IGNICIÓN DE UNA ATMÓSFERA PELIGROSA, EL
PAQUETE DE PILAS RECARGABLES SOLO DEBE SER INTERCAMBIADO EN UNA
ZONA QUE SE SABE NO PELIGROSA.
yAoje el tornillo de jación situado al lado de la tapa de la cola. PRECAUCIÓN: NO
intente retirar por completo el tornillo de jación. Si lo hace, no es necesario y puede dañar
las roscas. El tornillo simplemente necesita ser aojado lo suciente como para permitir
que la tapa de la cola desenrosque.
yDesatornille la tapa de la cola de la carcasa en sentido contrario a las agujas del reloj.
yVoltee la linterna al revés y agítela con cuidado con el n de extraer la pila. Deje que la
pila se deslice en su mano.
yA continuación, permita que la pila recargable 5500-BATT se deslice fuera de la linterna
prestando especial atención a la orientación de la pila dentro del mango.
yUsando solo el reemplazo aprobado por Bayco Productos del paquete de pilas
recargables 5500-BATT, deslice el nuevo paquete de pilas en el mango de la linterna
usando la echa en la dirección marcada en el lado lateral del paquete para ser una guía
en la orientación correcta de la pila.
yReemplace la tapa de la cola enroscándola en la carcasa hacia la derecha.
yApriete el tornillo de jación. PRECAUCIÓN: No apriete demasiado. Si lo hace, puede dañar
las roscas y afectar la seguridad intrínseca de la linterna.
OPERACIÓN
La XPR-5542 tiene siete modos de luz:
ylinterna momentánea
ylinterna de brillo completo
ylinterna de luminosidad media
ylinterna de bajo brillo, reector
yde doble luz y luz estroboscópica
La XPR-5542 tiene dos interruptores en la carcasa que permiten el acceso a todos los
modos.Linterna de Modo Momentáneo
Modo de linterna con iluminación momentánea
Presione ligeramente el interruptor de la parte superior de la carcasa para el funcionamiento
momentáneo. Suelte el interruptor para apagar la luz.
Luz Constante
Presione el interruptor de la parte superior de la carcasa hasta que haga clic y suéltelo
para el modo constante de alto brillo. Presione y suelte el interruptor de la parte superior de
la carcasa de nuevo para apagar la luz.
Seleccionar Nivel de Brillo
Presione y mantenga presionado el interruptor de la parte superior de la carcasa.
La linterna tendrá un ciclo de alto a mediano a bajo y luego volverá a subir a un ritmo de
aproximadamente un modo por segundo. La linterna continuará el ciclo de arriba abajo a
través de los distintos modos, siempre y cuando el interruptor de la parte superior de la
carcasa se mantenga presionado. Cuando se alcanza el nivel de brillo deseado, basta con
soltar el interruptor de la parte superior de la carcasa, y la linterna permanecerá en ese modo
de brillo. Presione y suelte el interruptor superior de la carcasa para apagar la luz.
Reector
Presione el interruptor inferior de la carcasa hasta que haga clic y luego suéltelo para
el modo de reector. Presione y suelte el interruptor inferior de la carcasa de nuevo para
apagar la luz.

Bayco Products, Inc. • 640 South Sanden Blvd. • Wylie, TX 75098 • USA • 1-800-233-2155 • 1-469-326-9400 • www.nightstick.com
INS-XPR-5542-LG-22 09-09-2022
Doble Luz
La Doble Luz permite al usuario activar tanto la linterna (en cualquier nivel de brillo) y el
reector, al mismo tiempo. En primer lugar seleccione el nivel de brillo apropiado de la linterna
usando las instrucciones anteriores. A continuación, presione y suelte el interruptor inferior
para activar el proyector. Tanto la linterna y el reector se encuentran encendidos. Presione y
suelte los dos interruptores, el superior e inferior de la carcasa para apagar la luz.
Función Estroboscópica
Desde apagado o cualquier otro modo, haga doble clic rápidamente en el interruptor
para activar la función estroboscópica y que funcione a máxima intensidad. Presione y
suelte el interruptor de la carcasa para apagar la luz.
ADVERTENCIA DE LUZ ESTROBOSCÓPICA
La exposición a luces estroboscópicas puede causar mareos, desorientación y
náuseas. Un porcentaje muy pequeño de personas sufre de epilepsia fotosensible y pueden
experimentar convulsiones o desmayos provocados por luces estroboscópicas. Para
obtener más información de la FUNDACIÓN EPILEPSY sobre fotosensibilidad y ataques,
visite www.epilepsy.com. Cualquier persona que haya tenido síntomas relacionados con
esta afección debe consultar a un médico antes de usar este producto.
GARANTÍA
GARANTIA LIMITADA DE POR VIDA
Bayco Products, Inc. garantiza que este producto está libre de defectos de mano de obra
y materiales durante la vida del comprador original. La garantía de por vida limitada incluye
los LED, la carcasa y los lentes. Las pilas recargables, los cargadores, los interruptores, la
electrónica y los accesorios incluidos están garantizados por un período de dos años con un
comprobante de compra. Se excluyen el desgaste y los fallos normales, que son causados por
accidentes, mal uso, abuso, instalación defectuosa y daños por rayos.
Repararemos o reemplazaremos este producto si lo determinamos como defectuoso. Esta
es la única garantía, expresa o implícita, incluyendo cualquier garantía de comerciabilidad o
idoneidad para un propósito particular.
Para obtener una copia completa de la garantía, visite www.nightstick.com/nightstick-
product-support/warranties. Conserve su recibo para comprobar la compra.
Manual de Instruções
XPR-5542
A XPR-5542 ESTÁ APROVADA PARA USO
ADVERTÊNCIAS - INTRINSECAMENTE SEGURO
yAviso: para evitar a ignição de uma atmosfera perigosa, não localize o carregador deste
produto no ambiente perigoso. O carregador para este produto deve ser localizado em
uma área que é conhecida somente como NÃO-PERIGOSA.
yAviso: para evitar a ignição de uma atmosfera perigosa, não tente carregar este produto
em ambiente perigoso. Esta tarefa só deve ser realizada em uma área conhecida como
NÃO-PERIGOSA.
yAviso: as baterias de íon de lítio devem ser usadas e carregadas corretamente. O uso
inadequado pode resultar em ferimentos graves, fogo ou morte.
yAviso: use apenas o carregador de bateria recarregável 5500-BATT incluído e aprovado
pela Bayco Products.
yAviso: NÃO tente usar outras baterias recarregáveis ou não recarregáveis com esta
lanterna.
yAviso: para evitar a ignição de uma atmosfera perigosa, não abra a moldura da lente
em ambiente perigoso. Esta tarefa só deve ser realizada em uma área conhecida como
NÃO-PERIGOSA.
yAviso: ao trocar a bateria recarregável, use apenas a bateria recarregável 5500-BATT
aprovada pela Bayco Products.
yAviso: para evitar a ignição de uma atmosfera perigosa, a bateria recarregável só deve
ser trocada em uma área conhecida como NÃO-PERIGOSA.
yAviso: Não exponha a bateria recarregável à água ou água salgada, nem permita que
a bateria se molhe.
yAviso: Não armazene a bateria recarregável com objetos metálicos que possam causar
um curto-circuito.
yAviso: a substituição de componentes pode prejudicar a segurança intrínseca.
INSTRUÇÕES ESPECIAIS PARA A SEGURANÇA INTRÍNSECA
yPara segurança pessoal, sempre conrmar a classicação de qualquer localização perigosa
ou potencialmente perigosa conhecida onde a lanterna será usada.
USO INICIAL
Aviso: para evitar a ignição de uma atmosfera perigosa, não tente carregar este
produto em ambiente perigoso. Esta tarefa só deve ser realizada em uma área
conhecida como NÃO-PERIGOSA.
ENTRADA DO CARREGADOR: 12 VDC Max
Carregue completamente a XPR-5542 antes do primeiro uso, ou se a bateria for nova
ou não tiver sido utilizada por vários meses. O tempo máximo de carga requerido é de
aproximadamente 6 horas.
USO DIÁRIO
AVISO: PARA PREVENIR A IGNIÇÃO DE UMA ATMOSFERA PERIGOSA, NÃO TENTE
USAR ESTE PRODUTO EM AMBIENTE PERIGOSO. ESTA TAREFA DEVE SER
SOMENTE REALIZADA EM UMA ÁREA CONHECIDA COMO NÃO-PERIGOSA.
yUse apenas o carregador fornecido, a bateria recarregável 5542-BATT e o adaptador
AC ou DC. Para obter o melhor desempenho, carregue a bateria 5542 quando a luz da
lanterna começa a enfraquecer.
yConecte o adaptador de alimentação AC ao carregador. O indicador LED não será
iluminado neste momento.
yCom a lanterna voltada para a frente, deslize a bateria 5542 para dentro do carregador
até que os contatos se encaixem no lugar.
yO indicador LED muda para uma luz vermelha constante, indicando que a bateria 5542
está inserida corretamente no carregador e, de fato, que está sendo carregada. O indicador
LED permanecerá vermelho até que a bateria esteja totalmente carregada. Ao carregar
totalmente, o indicador LED cará verde.
yO tempo total para carga total da bateria 5542 varia dependendo da carga restante.
Para conrmar uma carga total, mantenha a bateria 5542 no carregador e ligue-o. O indicador
LED mudará para vermelho. Desligue a bateria 5542. Se a bateria 5542 estiver totalmente
carregada, o indicador LED cará verde. Caso contrário, permanecerá vermelho até a carga
ser completada e o indicador LED car verde. A bateria 5542 estará totalmente carregada.
SUBSTITUIÇÃO DA BATERIA RECARREGÁVEL DE ÍON DE LÍTIO
AVISO: PARA EVITAR A IGNIÇÃO DE UMA ATMOSFERA PERIGOSA, NÃO ABRA
A MOLDURA DA LENTE EM AMBIENTE PERIGOSO. ESTA TAREFA SÓ DEVE SER
REALIZADA EM UMA ÁREA CONHECIDA COMO NÃO-PERIGOSA.
AVISO: AO TROCAR A BATERIA RECARREGÁVEL, USE APENAS A BATERIA
RECARREGÁVEL 5500-BATT APROVADA PELA BAYCO PRODUCTS.
AVISO: PARA EVITAR A IGNIÇÃO DE UMA ATMOSFERA PERIGOSA, A BATERIA
RECARREGÁVEL SÓ DEVE SER TROCADA EM UMA ÁREA CONHECIDA COMO
NÃO-PERIGOSA.
ySolte o parafuso localizado no lado da tampa da lente. CUIDADO: NÃO tente remover
completamente o parafuso; não é necessário e pode danicar a rosca. O parafuso simplesmente
precisa ser afrouxado o suciente para permitir que a moldura da lente se desencaixe.
yDesencaixe a moldura da lente no sentido anti-horário.
yVire a lanterna de cabeça para baixo e chacoalhe-a cuidadosamente para remover o
bateria. Permita que bateria deslize para a sua mão.
yEm seguida, permita que a bateria recarregável 5500-BATT seja deslizada para fora da
lanterna, prestando muita atenção à orientação da bateria dentro da lanterna.
yUsando apenas a bateria recarregável 5500-BATT aprovada pela Bayco Products,
deslize a nova bateria usando a seta direcional marcada no lado da embalagem que
serve como um guia para a orientação adequada da bateria.
yEncaixe a tampa da cauda, aparafusando-a na lanterna no sentido horário.
yAperte o parafuso. CUIDADO: NÃO aperte demais. Isso pode danicar a rosca e afetar
a segurança intrínseca da luz.
UTILIZAÇÃO
A XPR-5542 POSSUI SETE MODOS DE ILUMINAÇÃO:
yLanterna momentânea
yLanterna de brilho total
yLanterna de brilho médio
yLanterna de brilho baixo
yHolofote
yLuz-Dupla
yEstroboscópio
A XPR-5542 possui dois botões que oferecem acesso a todos os modos.
Modo de lanterna momentânea
Pressione levemente o botão superior para uma operação momentânea. Solte o botão
para desligar a luz.
Luz Constante
Pressione o botão superior até ouvir um clique e, em seguida, solte-o para ter o modo
de luz constante em alto brilho. Pressione e solte o botão novamente para desligar a luz.
Selecione o Nível de brilho
Pressione e mantenha pressionado o botão superior. A luz irá alternar entre os modos
alto, médio e baixo, e em seguida, voltará novamente em uma média de um modo por
segundo. A luz continuará a alternar para cima e para baixo entre os vários modos, desde
que o botão esteja pressionado. Quando o nível de brilho desejado for alcançado, basta
soltar o botão e a luz permanecerá nesse modo de brilho. Pressione e solte o botão
novamente para desligar a luz.
Floodlight
Press the bottom body switch until it clicks and then release for oodlight mode. Press
and release the bottom body switch again to turn the light off.
Holofote
Pressione o botão inferior até ouvir um clique e, em seguida, solte para o modo holofote.
Pressione e solte o botão novamente para desligar a luz.
Dual-Light
Dual-Light allows the user to turn on both the Flashlight (at any brightness level) and
the Floodlight, at the same time. First select the appropriate brightness level of the ashlight
using the directions above. Next press and release the bottom switch to activate the
oodlight. Both the Flashlight and the Floodlight are now running. Press and release both
the top and bottom body switches to turn the light off.

Bayco Products, Inc. • 640 South Sanden Blvd. • Wylie, TX 75098 • USA • 1-800-233-2155 • 1-469-326-9400 • www.nightstick.com
INS-XPR-5542-LG-22 09-09-2022
Luz-Dupla
Luz-Dupla permite que o usuário ligue a lanterna (em qualquer nível de brilho) e o
Holofote ao mesmo tempo. Primeiro selecione o nível de brilho da lanterna desejado
usando as instruções acima. Em seguida, pressione e solte o botão inferior para ligar o
holofote. Tanto a lanterna como o Holofote estarão ligados. Pressione e solte ambos os
botões para desligar a luz.
Função estroboscópica
Tanto quanto com a lanterna desligada ou em qualquer modo de brilho, aperte duas
vezes rapidamente o botão para ativar a função estroboscópica em pleno brilho. Pressione
e solte o botão novamente para desligar a luz.
AVISO ESTROBOSCÓPICO
A exposição a luzes estroboscópicas pode causar tontura, desorientação e náusea.
Uma porcentagem muito pequena de pessoas sofre de epilepsia fotossensível e pode
sofrer convulsões ou desmaios provocados por luzes estroboscópicas. Para obter mais
informações da FUNDAÇÃO EPILEPSIA sobre fotossensibilidade e convulsões, visite
www.epilepsy.com. Qualquer pessoa que tenha sintomas relacionados a essa condição
deve consultar um médico antes de usar este produto.
GARANTIA
GARANTIA VITALÍCIA LIMITADA
Bayco Products, Inc. garante que este produto está livre de defeitos de fabricação e
materiais por tempo indeterminado ao comprador original. A Garantia Vitalícia Limitada
inclui os LEDs, a caixa e as lentes. As baterias recarregáveis, carregadores, interruptores,
componentes eletrônicos e acessórios incluídos são garantidos por um período de dois
anos com comprovante de compra. O desgaste e falhas normais causados por acidentes,
maus-tratos, abuso, instalação defeituosa e danos por raio são excluídos.
Repararemos ou substituiremos este produto se o determinarmos ser defeituoso. Esta
é a única garantia, expressa ou implícita, incluindo qualquer garantia de comercialização ou
adaptação para um propósito especíco.
Para obter uma cópia completa da garantia, acesse www.nightstick.com/nightstick-
product-support/warranties. Retenha o seu recibo como comprovante de compra.
Gebrauchsanleitung
XPR-5542
DIE XPR-5542 STIRNLAMPE IST ZUM GEBRAUCH ZUGELASSEN
WARNHINWEISE - EIGENSICHERHEIT GEWÄHRLEISTET
yWarnhinweis: Um eine Entammung in einer explosions-gefährdeten Atmosphäre zu
vermeiden, versuchen Sie nicht das Ladegerät für dieses Produkt in einem explosions-
gefährdeten Umfeld ausndig zu machen. Das Ladegerät für dieses Produkt muss in
einem Umfeld ausndig gemacht werden, das bekannterweise ungefährlich ist.
yWarnhinweis: Um eine Entammung zu verhindern, vermeiden Sie es das Produkt in
einer explosions-gefährdeten Atmosphäre aufzuladen. Diese Maßnahme sollte lediglich in
einem Umfeld vorgenommen werden, das bekannterweise ungefährlich ist.
yWarnhinweis: Lithiumionbatterien müssen sachgemäß aufgeladen und verwendet werden.
Unsachgemäße Anwendung kann zu ernsthaften Verletzungen, Feuer, oder Tot führen.
yWarnhinweis: Verwenden Sie lediglich die inklusiven und bewährten wiederauadbaren
5500-BATT Batterien von Bayco Products.
yWarnhinweis: Verwenden Sie keine anderen wiederauadbaren oder nicht
wiederauadbaren Batterien mit dieser Lampe.
yWarnhinweis: Vermeiden Sie das Öffnen des Lampenglases innerhalb eines explosions-
gefährdeten Umfeldes, um eine Entammung in der gefährlichen Atmosphäre zu
vermeiden. Diese Maßnahme darf nur in einem Umfeld vorgenommen werden, das
bekannterweise ungefährlich ist.
yWarnhinweis: Beim Austauschen der wiederauadbaren Batterien verwenden Sie
ausschließlich die bewährten wiederauadbaren 5500-BATT Batterien von Bayco Products.
yWarnhinweis: Um eine Entammung in einer explosions-gefährdeten Atmosphäre zu
verhindern, tauschen Sie die wiederauadbaren Batterien nur in einem Umfeld aus, das
bekannterweise ungefährlich ist.
yWarnhinweis: Vermeiden Sie es die wiederauadbaren Batterien mit Wasser oder
Salzwasser in Kontakt zu bringen, oder es zuzulassen, daß die Batterien naß werden.
yWarnhinweis: Bewahren Sie die wiederauadbaren Batterien nicht mit metallischen
Objekten auf, die einen Kurzschluss verursachen könnten.
yWarnhinweis: Das Austauschen von Bestandteilen kann die Eigensicherheit
beeinträchtigen.
SPEZIELLE ANLEITUNG ZUR EIGENSICHERHEIT
Für Ihre persönliche Sicherheit überprüfen Sie stets die Einstufung jedes
bekanntlicherweise gefährlichen oder möglicherweise gefährlichen Standortes, an dem die
Taschenlampe verwended werden soll.
ERSTMALIGER GEBRAUCH
Warnhinweis: Um eine Entammung zu verhindern, vermeiden Sie es das Produkt in
einer explosions-gefährdeten Atmosphäre aufzuladen. Diese Maßnahme sollte lediglich
in einem Umfeld vorgenommen warden, das bekannterweise ungefährlich ist.
LADEGERÄTEINGANG: 12 VDC Max
Laden Sie die XPR-5542 Lampe vor dem erstmaligen Gebrauch komplett auf, oder
falls die Batterie neu ist oder für mehrere Monate nicht verwendet worden ist. Die maximal
benötigte Auadezeit ist ungefähr 6 Stunden.
TÄGLICHER GEBRAUCH
WARNHINWEIS: UM EINE ENTFLAMMUNG EINER EXPLOSIONS-GEFÄHRDETEN
ATMOSPHÄRE ZU VERHINDERN, VERMEIDEN SIE ES DIESES PRODUKT IN
EINEM GEFÄHRDETEN UMFELD AUFZULADEN. DIESE MASSNAHME SOLLTE
LEDIGLICH IN EINEM UMFELD VORGENOMMEN WERDEN, DAS BEKANNTERWEISE
UNGEFÄHRLICH IST.
yVerwenden Sie lediglich das hinzugefügte Nightstick-Auadegerät, wiederauadbare
5542-BATT Batterien und einen AC oder DC Adapter. Für die beste Leistungsfähigkeit
laden Sie die 5542 Batterien auf wenn sich der Taschenlampenstrahl verdunkelt.
ySchließen Sie den AC Strom-Adapter an das Auadegerät an. Die LED-Anzeige leuchtet
zu diesem Zeitpunkt nicht auf.
yMit der Taschenlampe nach vorne gerichtet schieben Sie die 5542 Lampe in das
Auadegerät bis die Kontaktstellen einrasten.
yDie LED-Anzeige wechselt jetzt auf Rot und zeigt damit an, dass die 5542 Lampe richtig
in das Auadegerät eingeführt worden ist und tatsächlich auäd. Die LED-Anzeige bleibt
rot bis die Taschenlampe komplett aufgeladen ist. Bei voller Auadung wechselt die LED-
Anzeige auf Grün.
yDie Gesamtdauer zur Auadug der 5542 Taschenlampe hängt davon ab, wieviel Strom
noch in den Batterien vorhanden ist.
yUm eine komplette Auadung zu bestätigen lassen Sie die 5542 Taschenlampe im
Auadegerät und schalten Sie es ein. Die LED-Anzeige wird auf Rot wechseln. Schalten
Sie die 5542 Lampe aus. Falls die 5542 Lampe komplett aufgeladen ist wechselt die
LED-Anzeige auf Grün. Falls nicht bleibt die Anzeige rot bis das Auaden vollständig
abgeschlossen ist und die LED-Anzeige auf Grün wechselt. Die 5542 Taschenlampe ist
jetzt komplett aufgeladen.
ERSETZEN VON WIEDERAUFLADBAREN LITHIUMION BATTERIEN
WARNHINWEIS: VERMEIDEN SIE DAS ÖFFNEN DES LAMPENGLASES INNERHALB
EINES EXPLOSIONS-GEFÄHRDETEN UMFELDES, UM EINE ENTFLAMMUNG IN
DER GEFÄHRLICHEN ATMOSPHÄRE ZU VERMEIDEN. DIESE MASSNAHME DARF
NUR IN EINEM UMFELD VORGENOMMEN WERDEN, DAS BEKANNTERWEISE
UNGEFÄHRLICH IST.
WARNHINWEIS: BEIM AUSTAUSCHEN DER WIEDERAUFLADBAREN BATTERIEN
VERWENDEN SIE AUSSCHLIESSLICH DIE BEWÄHRTEN WIEDERAUFLADBAREN
5500-BATT BATTERIEN VON BAYCO PRODUCTS.
WARNHINWEIS: UM EINE ENTFLAMMUNG IN EINER EXPLOSIONS-GEFÄHRDETEN
ATMOSPHÄRE ZU VERHINDERN, TAUSCHEN SIE DIE WIEDERAUFLADBAREN
BATTERIEN NUR IN EINEM UMFELD AUS, DAS BEKANNTERWEISE
UNGEFÄHRLICH IST.
yLockern Sie die Schraubensicherung an der Seite des Objektivdeckels. VORSICHT:
Vermeiden Sie es die Schraubensicherung völlig zu beseitigen. Das vollständige Entfernen
ist nicht notwendig und kann das Gewinde beschädigen. Die Schraube muss lediglich
soweit gelockert werden, um das Öffnen des Lampenglases zu ermöglichen.
ySchrauben Sie das Lampenglas vom Gehäuse entgegen dem Uhrzeigersinn ab.
yStellen Sie die Lampe auf den Kopf und schütteln Sie sie vorsichtig, um die batterie zu
entfernen. Lassen Sie die batterie in Ihre Hand gleiten.
yAls nächstes lassen Sie die wiederauadbaren 5500-BATT Batterien aus der Lampe gleiten
und achten Sie dabei sorgfältig auf die Ausrichtung der Batterien innerhalb des Lampengriffs.
yVerwenden Sie nur die bewährten wiederauadbaren 5500-BATT Ersatzbatterien von
Byco Products und lassen Sie die neuen Batterien in den Griff der Taschenlampe gleiten.
Verwenden Sie den Richtungspfeil an der Seite der Packung zur Orientierung für die
richtige Batterieausrichtung.
ySetzen Sie das Endkappe ein, indem Sie es entgegen dem Uhrzeigersinn auf das
Gehäuse aufschrauben.
yZiehen sie die Schraubensicherung fest an. VORSICHT: Ziehen Sie sie nicht zu fest
an. Auf diese Weise kann das Gewinde beschädigt und die Eigensicherheit der Lampe
beeinträchtigt werden.
INBETRIEBSETZUNG
DIE XPR-5542 HAT SIEBEN BELEUCHTUNGSARTEN:
yAugenblickliches Blinklicht
yMaximales Helligkeits-Blinklicht
yMittleres Helligkeits-Blinklicht
yNiedriges Helligkeits-Blinklicht
yFlutlicht
yDuales Licht
yStroboskop-Blinklicht
Die XPR-5542 hat zwei Gehäuseschalter, die Zugang zu allen Beleuchtungsmodi geben.
Blinklicht Modus
Drücken Sie leicht auf den oberen Gehäuseschalter, um das Blinklicht zu betätigen.
Lassen Sie den Schalter wieder los, um das Licht auszuschalten.
Dauerlicht Modus
Drücken Sie den oberen Gehäuseschalter bis es klickt und lassen Sie ihn los, um das
Dauerlicht mit maximaler Helligkeit zu betätigen. Drücken Sie den oberen Gehäuseschalter
erneut kurz, um das Licht auszuschalten.
Auswahl der Helligkeitsstufe
Drücken und halten Sie den oberen Gehäuseschalter. Das Licht rotiert mit einer Geschwindigkeit
von etwa einer Stufe pro Sekunde von hoch zu mittel auf niedrig und dann wieder zurück. Solange
der obere Gehäuseschalter gedrückt wird rotiert das Licht fortwährend hoch und runter durch die

Bayco Products, Inc. • 640 South Sanden Blvd. • Wylie, TX 75098 • USA • 1-800-233-2155 • 1-469-326-9400 • www.nightstick.com
INS-XPR-5542-LG-22 09-09-2022
verschiedenen Modi. Wenn der gewünschte Helligkeitsgrad erreicht worden ist lassen sie den
oberen Gehäuseschalter einfach los, und das Licht verbleibt auf dieser Helligkeitsstufe. Um das
Licht auszuschalten drücken Sie den oberen Gehäuseschalter ein weiteres Mal.
Flutlicht Modus
Drücken Sie den unteren Gehäuseschalter bis es klickt und lassen Sie ihn los, um das Flutlicht
zu betätigen. Drücken Sie den unteren Gehäuseschalter erneut kurz, um das Licht auszuschalten.
Dualer Beleuchtungs-Modus
Der duale Beleuchtungs-Modus ermöglicht es dem Benutzer das Blinklicht (auf jeglicher
Helligkeitsstufe) und Flutlicht gleichzeitig einzuschalten. Zunächst wählen Sie die geeignete
Helligkeiststufe der Taschenlampe gemäß den Anweisungen weiter oben. Dann drücken Sie
den unteren Gehäuseschalter kurz, um das Flutlicht zu betätigen. Nun sind das Blinklicht
und Flutlicht beide eingeschaltet. Um das Licht auszuschalten, drücken Sie kurz den oberen
und unteren Gehäuseschalter.
Stroboskop
Von der Ausposition oder von jedem Modus aus drücken Sie den Schalter zweimal
schnell, um die Stroboskopfunktion auf voller Helligkeitsstufe zu betätigen. Um das Licht
auszuschalten drücken Sie den Gehäuseschalter ein weiteres Mal.
BLITZWARNUNG
Exposition gegenüber Stroboskopen kann Schwindel, Orientierungslosigkeit und
Übelkeit verursachen. Ein sehr kleiner Prozentsatz von Menschen leidet an lichtemp ndlicher
Epilepsie und kann Anfälle oder Stromausfälle haben, die durch Stroboskoplicht ausgelöst
werden. Für weitere Informationen von der EPILEPSY FOUNDATION über Photosensibilität
und Anfälle, besuchen Sie bitte www.epilepsy.com. Jeder, der Symptome im
Zusammenhang mit dieser Erkrankung hatte, sollte vor der Verwendung dieses Produkts
einen Arzt konsultieren.
GARANTIE
BEFRISTETE LEBENSLÄNGLICHE GARANTIE
Bayco Products, Inc. gewährleistet dem Erstkäufer eine lebenslängliche Garantie
dafür, dass dieses Product keinerlei Bearbeitungs- oder Materialienschäden aufweist.
Die befristete lebenslängliche Garantie beinhaltet LEDs (Leuchtdioden), Gehäuse und
Lichtscheiben. Wiederau adbare Batterien, Ladegeräte, Schalter, Elektronik und enthaltene
Zubehör haben eine Garantie von 2 Jahren mit Kaufbeleg.
Normaler Verschleiß und Fehlfunktionen, die durch Unfälle, Zweckentfremdung, Missbrauch,
fehlerhafte Installation und Blitzschäden verursacht wurden sind hiervon ausgeschlossen. Wir
reparieren oder ersetzen das Produkt sofern ein Defekt festgestellt wird. Dies ist die einzige
Gewährleistung, inklusive jeglicher Gewährleistung der allgemeinen Gebrauchstauglichkeit und
Eignung für den bestimmten Zweck dieses Produktes.
Eine vollständige Kopie der Garantie ist auf www.nightstick.com/nightstick-product-
support/warranties ersichtbar. Bewahren Sie den Kassenzettel zum Kaufnachweis auf.
P:
\
\
Quality
\
EU Declaration of
Conformity
EU Declaration of Conformity
Model(s): XPR-5542GMX Declaration Number: 20170220-G
Product Type: Flashlight
Company Name: Bayco Products Inc.
Address: 640 S. Sanden Blvd.
City, State, Postcode: Wylie, Texas 75098 USA
Phone / Website: 001-469-326-9400 / www.nightstick.com
We hereby declare that the product identified above meets the requirements of the following EU
Directives and therefore qualifies for free movement within markets comprising the European Union (EU)
and the European Economic Area (EEA). This declaration is issued under the sole responsibility of the
manufacturer.
The following harmonized standards and technical specifications have been applied and evaluated by:
Directives: ATEX Directive 2014/34/EU Article 34 of the Industrial Safety and
Health Act and Article 58-4,
Paragraph 4 of the Enforcement Rule of
the same Act.
Notified Body: UL International Demko A/S Korea Occupational Safety and
Health Agency
Notified Body Number: 0359 N/A
Certificate Number: DEMKO16ATEX1815 22-AV4BO-0249X
Standards: EN 60079-0:2012+A11:2013
EN 60079-11:2012 (ia)
Type Approval:
These Products are fully compliant and do not contain the restricted substances above levels noted in EU
RoHS.
Name: Mark Situ
Title: Quality Director
Date: 2022/08/08
2
575
22
-
AV
4BO
-
0249
X
-
 1
1
-
 2
2
-
 3
3
-
 4
4
-
 5
5
-
 6
6


NightStick XPR-5542 Manual do usuário
- Categoria
- Lanternas
- Tipo
- Manual do usuário
- Este manual também é adequado para
em outras línguas
- español: NightStick XPR-5542 Manual de usuario
- français: NightStick XPR-5542 Manuel utilisateur
- Deutsch: NightStick XPR-5542 Benutzerhandbuch
Artigos relacionados
-
NightStick XPR-5568 Manual do usuário
-
NightStick 5584-BATT Manual do usuário
-
-
-
-
-
-
NightStick XPP-5422GM Manual do usuário
-
NightStick XPP-5420B Manual do usuário