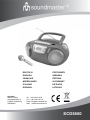
Soundmaster SCD5800 Manual do usuário
- Categoria
- Tocadores de CD
- Tipo
- Manual do usuário

SCD5800
DEUTSCH
PORTUGUÊS
ENGLISH
SVENSKA
FRANÇAIS
ČEŠTINA
NEDERLANDS
SLOVENSKÝ
ITALIANO
LIETUVOS
ESPANOL
LATVIJAS
Hersteller
Wörlein GmbH Tel.: +49 9103/71670
Gewerbestrasse 12 Fax.: +49 9103/716712
D 90556 Cadolzburg Email. info@soundmaster.de
GERMANY Web: www.soundmaster.de

Sicherheits- / Umwelt- / Aufstellhinweise
DE
HINWEIS ZUM UMWELTSCHUTZ
Dieses Produkt darf am Ende seiner Lebensdauer nicht über den
normalen Haushaltsabfall entsorgt werden, sondern muss an
einem Sammelpunkt für das Recycling von elektrischen und
elektronischen Geräten abgegeben werden. Das Symbol auf
dem Produkt in der Gebrauchsanleitung oder auf der
Verpackung weist darauf hin
Die Werkstoffe sind gemäß Ihrer Kennzeichnung wiederverwertbar. Mit
der Wiederverwendung der stofflichen Verwertung oder anderen Formen
der Verwertung von Altgeräten, leisten Sie einen wichtigen Beitrag zum
Schutze unserer Umwelt
Bitte fragen Sie Ihre Gemeindeverwaltung nach der zuständigen
Entsorgungsstelle.
WARNUNG
Gefahr elektrischer Schläge
Gerät nicht öffnen!
Zur Vermeidung von Stromschlägen darf dieses Gerät nicht geöffnet
werden. Es enthält keine Bauteile, die vom Benutzer gewartet oder
repariert werden können, Wartungs- und Reparaturarbeiten dürfen nur
von Fachpersonal ausgeführt werden.
Dieses Symbol zeigt an, dass im Inneren des
Gerätes gefährliche Spannungen vorhanden sind,
und einen Stromschlag verursachen können.
Dieses Symbol weist auf wichtige Bedienungs- und
Wartungsanweisungen bezüglich des Geräts hin.
Verbrauchte Batterien sind Sonderabfall und gehören
NICHT in den Hausmüll! Als Verbraucher sind Sie
gesetzlich verpflichtet alle Batterien und Akkus egal
ob Schadstoffe *) enthalten oder nicht zur
umweltschonenden Entsorgung zurückzugeben.
Sie können alle Batterien und Akkus bei den öffentlichen
Sammelstellen in Ihrer Gemeinde oder dort unentgeltlich ab-
geben wo Batterien und Akkus der betreffenden Art verkauf
werden.
Batterien und Akkus bitte nur in entladenem Zustand abgeben.
*) gekennzeichnet mit Cd = Cadmium, Hg =Quecksilber, Pb = Blei
Verwenden Sie nur Batterien, die frei von Quecksilber &
Cadmium sind.
Batterien dürfen nicht in die Hände von Kindern gelangen.
Kinder können Batterien verschlucken. Wurde eine Batterie
verschluckt, muss sofort medizinische Hilfe in Anspruch
genommen werden.
Überprüfen Sie regelmäßig die Batterien um ein Auslaufen
der Batterie zu vermeiden.
Batterien dürfen keiner Hitze (z. B. Sonnenbestrahlung),
Feuer ausgesetzt werden.
ACHTUNG: Explosionsgefahr bei falscher
Batteriehandhabung. Nur durch denselben oder baugleichen
Batterietyp ersetzen.
VORSICHT – UNSICHTBARE LASERSTRAHLUNG
TRITT AUS, WENN DER DECKEL GEÖFFNET, UND
DIE SICHERHEITSVERRIEGELUNG
NIEDERGEDRÜCKT WIRD. SETZEN SIE SICH
NICHT DEM STRAHL AUS.
Ständige Benutzung des Kopfhörers bei hoher
Lautstärke kann zu Gehörschädigungen führen.
Das Gerät ausnahmslos nur in trockenen
Innenräumen betreiben.
Niemals mit Feuchtigkeit in Verbindung bringen.
Schützen Sie das Gerät vor tropfenden oder
spritzenden Flüssigkeiten, und stellen Sie keine mit
Flüssigkeit gefüllten Gefäße (z. B. Vasen) auf das
Gerät.
Betreiben Sie das Gerät nur in einem gemäßigten
Klima.
Schließen Sie das Gerät nur an eine
vorschriftsmäßig installierte und geerdete
Netzsteckdose an. Die Netzspannung muss mit
den Angaben auf dem Typenschild des Gerätes
übereinstimmen.
Achten Sie darauf, dass im Betrieb das Netzkabel
niemals nass oder feucht wird. Das Netzkabel darf
nicht eingeklemmt oder anderweitig beschädigt
werden.
Der Netzstecker dient als Trennvorrichtung und
muss ohne Schwierigkeiten benutzbar sein.
Achten Sie beim Verlegen des Netzkabels darauf,
dass es beim Betrieb des Gerätes nicht zu einer
Stolperfalle werden kann.
Lassen Sie beschädigte Netzstecker oder
Netzkabel sofort von dem Kundenservice
austauschen.
Prüfen Sie das Gerät, das Netzkabel sowie den
Netzstecker regelmäßig auf sichtbare
Beschädigungen. Verwenden Sie das Gerät auf
keinen Fall, wenn Sie Beschädigungen festgestellt
haben.
Benutzen Sie das Gerät nicht, wenn es
Beschädigungen aufweist, wenn es
heruntergefallen ist oder nicht einwandfrei
funktioniert.
Sie dürfen das Gehäuse nicht öffnen oder
reparieren. In diesem Falle ist die Sicherheit nicht
gegeben und die Garantie erlischt. Reparaturen
sind ausschließlich durch einen Service-
Center/Kundencenter auszuführen.
Ziehen Sie bei Gewitter oder einer längerer
Abwesenheit (z.B. Urlaub) den Netzstecker und
entnehmen Sie ggf. die Batterien.
Kinder sollten das Gerät nur unter Aufsicht
Erwachsener betreiben.
Lassen Sie das Gerät während des Gebrauchs
nicht unbeaufsichtigt.
Das Gerät ausnahmslos nur mit einem trockenen
Abstaubtuch reinigen.
KEINE REINIGUNGSMITTEL oder TÜCHER mit
GROBEN Material verwenden!!!
Das Gerät keiner Sonnenbestrahlung oder
anderen Hitzequellen aussetzen.
Stellen Sie das Gerät so auf, dass kein Hitzestau
entstehen kann, also frei und gut belüftet.
Achten Sie darauf, dass an den Seiten ein
Mindestabstand von 10 cm besteht, um eine
ausreichende Luftzirkulation zu gewährleisten.
Decken Sie niemals die Belüftungsöffnungen zu!!!
Offene Brandquellen, wie z.B. brennende Kerzen,
dürfen nicht auf das Gerät gestellt werden.
Das Gerät an einem sicheren,
erschütterungsfreien Platz aufstellen.
Benutzen Sie das Gerät nicht, wenn es
Beschädigungen aufweist, wenn es
heruntergefallen ist oder nicht einwandfrei
funktioniert.
Gerät möglichst weit entfernt von Computern und
Mikrowellengeräten platzieren, da es sonst evtl. zu
Empfangsstörungen im Radiobetrieb kommen
kann.
Treten wegen einer elektrostatischen Entladung
oder kurzeitigen Netzüberspannung
Fehlfunktionen auf, setzen Sie das Gerät zurück.
Ziehen Sie hierfür den Netzstecker bzw.
Netzadapter und schließen ihn nach einigen
Sekunden wieder an.

SCD5800 / Deutsche Bedienungsanleitung
1
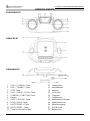
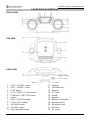
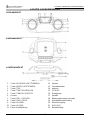
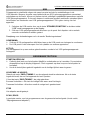
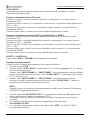
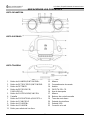
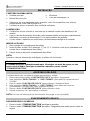
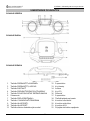
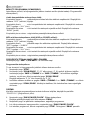
BEDIENELEMENTE
FRONTANSICHT
DRAUFSICHT
RÜCKANSICHT
1
SKIP+ / TUNING+ Taste
12
Lautsprecher
2
SKIP- / TUNING - Taste
13
Kassettenfach
3
STOP Taste
14
Antenne
4
PLAY / PAUSE / CLOCK Taste
15
CD-Deckel
5
STANDBY / FUNCTION Taste
16
Tragegriff
6
Display
17
Lautsprecher
7
PRE+ / FOLDER+ Taste
18
Bedientasten Kassette
8
SCAN / PROG Taste
19
Kopfhörerbuchse
9
LAUTSTÄRKE + Taste
20
Mikrofoneingang
10
LAUTSTÄRKE - Taste
21
USB Buchse
11
Taste für Discolicht-Effekt
22
Netzbuchse

SCD5800 / Deutsche Bedienungsanleitung
2
INSTALLATION
LIEFERUMFANG
➢ Hauptgerät
➢ Mikrofon
➢ Bedienungsanleitung
➢ Netzkabel
➢ Suchen Sie einen geeigneten Ort für das Gerät und die Lautsprecher aus. Eine ebene,
rutschfeste Oberfläche, an der Sie das Gerät leicht bedienen können, wäre geeignet.
➢ Stellen Sie sicher dass das Gerät ausreichend belüftet ist.
SPANNUNGSVERSORGUNG
➢ Vergewissern Sie sich daß Ihre Netzspannung mit denen des Gerätes übereinstimmt. Die
Angabe finden Sie auf dem Typenschild des Gerätes.
➢ Stecken Sie den Netzstecker in eine haushaltübliche Netzsteckdose.
➢ Wenn Sie das Gerät für eine längere Zeit nicht verwenden empfehlen wir Ihnen das Gerät
vom Netz zu trennen.
BATTERIEBETRIEB
1. Öffnen Sie das Batteriefach
2. Legen Sie 6 Batterien des Typs LR14, UM-2 (“C”-Größe) 1.5V ein. Achten Sie dabei auf die
richtige Polarität (siehe im Batteriefach).
3. Schliessen Sie das Batteriefach
HINWEIS:
Ist das Netzkabel angeschlossen sind die Batterien außer Funktion.
Automatische Standby-Schaltung (ERP)
Das Gerät schaltet sich nach 10 Minuten automatisch in Standby wenn kein Audio-Signal
vorhanden ist. Um das Gerät wieder einzuschalten drücken Sie erneut die „STANDBY /
FUNCTION“ Taste.
EINSTELLEN DER UHRZEIT
Das Gerät muss sich zum Einstellen der Uhrzeit und Datum in Standby befinden.
1. Drücken und halten Sie die “PLAY / PAUSE / CLOCK” für ca. 2 Sekunden.
2. Drücken Sie die “SKIP+ / TUNING+” oder “SKIP- / TUNING-” Taste um das Zeitformat
“12 / 24hr” einzustellen.
3. Drücken Sie “PLAY / PAUSE / CLOCK” Taste um die Einstellung zu bestätigen.
4. Drücken Sie die “SKIP+ / TUNING+” oder “SKIP- / TUNING-” Taste um bei der Uhrzeit die
Stunden einzustellen. Die Stundenanzeige blinkt dabei.
5. Drücken Sie die “PLAY / PAUSE / CLOCK” Taste um die Einstellung zu bestätigen.
6. Wiederholen Sie die Schritte 4 und 5 um die Minuten einzustellen.
HINWEIS:
Bei Unterbrechung der Spannung geht die Uhrzeit verloren
GRUNDBEDIENUNG
GERÄT EIN-/AUSSCHALTEN
➢ Drücken Sie die “STANDBY / FUNCTION” Taste um das Gerät einzuschalten.
➢ Drücken und halten Sie die “STANDBY / FUNCTION” Taste für 3 Sekunden um das Gerät
wieder in Standby zu schalten.

SCD5800 / Deutsche Bedienungsanleitung
3
EINSTELLEN DER LAUTSTÄRKE
Drücken Sie die “LAUTSTÄRKE –“ oder “LAUTSTÄRKE +” Taste um die Lautstärke zu
verringern oder zu erhöhen.
RADIO
1. Wählen Sie mit der „STANDBY / FUNCTION“ Taste den Radio-Modus aus.
2. Für bestmöglichen Empfang ziehen Sie die Antenne komplett aus und richten Sie die
Antenne aus.
3. Das Gerät besitzt zwei Suchlaufoptionen des Sendersuchlaufes.
➢ Automatischer Sendersuchlauf:
Wichtig! Alles gespeicherten Sender werden überschrieben!
Drücken und halten Sie die Taste "SCAN / PROG" für 3 Sekunden. Das Gerät sucht alle
verfügbaren Sender und speichert diese von der niedrigsten bis zur höchsten
Empfangsfrequenz.
➢ Manueller Sendersuchlauf:
Drücken Sie die Taste “SKIP+ / TUNING+” oder “SKIP- / TUNING-” bis der gewünschte
Sender gefunden wurde. Halten Sie die Taste gedrückt, so sucht das Gerät automatisch bis
zum nächsten empfangbaren Sender.
Sender speichern (Festsenderspeicher):
1. Wählen Sie den gewünschten Sender den Sie abspeichern möchten.
2. Drücken Sie die Taste "SCAN / PROG". Im Display erscheint „P …“ und es blinkt der
nächste freie Speicherplatz. Durch wiederholtes Drücken der Taste „PRE+ / FOLDER+“
können Sie auch einen gewünschten Speicherplatz selbst auswählen. Sollte auf diesem
Programmplatz bereits ein Sender abgespeichert sein, wird dieser automatisch
überschrieben.
3. Drücken Sie erneut die Taste „SCAN / PROG“ um den Sender auf dem Programmplatz
abzuspeichern.
CD
1. Drücken Sie die Taste “STANDBY / FUNCTION” bis “CD” im Display angezeigt wird.
2. Öffnen Sie das CD-Fach durch Anheben des CD-Deckels.
3. Legen Sie eine CD mit der beschrifteten Seite nach oben ein und schließen Sie wieder das
CD-Fach.
4. Die CD wird eingelesen und mit der Wiedergabe des ersten Titels gestartet.
5. Um die CD zu wechseln drücken Sie die “STOP” Taste, öffnen Sie das CD-Fach und
entnehmen Sie vorsichtig die CD.
Achten Sie darauf dass das CD-Fach immer geschlossen ist.
Die Bedienung finden Sie im Bereich “STEUERELEMENTE”.
HINWEIS:
➢ Ist eine CD nicht korrekt eingelegt oder wenn keine CD eingelegt ist, zeigt das Display “NO”
an.
➢ Eine Wiedergabe von selbst aufgenommenen CDs kann auf Grund der großen Auswahl an
verfügbaren Software- und CD-Medien nicht garantiert werden.

SCD5800 / Deutsche Bedienungsanleitung
4
USB
Dieses Gerät wurde nach den neuesten technischen Errungenschaften im USB-Bereich
entwickelt. Die große Auswahl an verschiedenen USB-Speichergeräten aller Typen, die derzeit
auf dem Markt sind, erlauben leider keine vollständige Kompatibilität mit allen USB-Speicher-
geräten. Aus diesem Grund können in seltenen Fällen Probleme bei der Wiedergabe von
Dateien von USB-Speichergeräten auftreten. Dies ist keine Fehlfunktion des Geräts.
1. Drücken Sie die Taste “STANDBY / FUNCTION” bis “USB” im Display angezeigt wird.
2. Verbinden Sie das USB-Speichermedium mit der USB-Buchse des Gerätes. Die
Wiedergabe startet nach einigen Sekunden automatisch.
Die Bedienung finden Sie im Bereich “STEUERELEMNTE”.
HINWEIS:
➢ Verbinden Sie immer direkt das USB-Speichermedium mit dem Gerät um Fehlfunktionen
auszuschließen.
➢ Der USB-Anschluss ist nicht zum Aufladen externer Geräte geeignet.
WICHTIG:
Bevor das USB-Speichermedium entfernen wechseln Sie immer in einen anderen
Funktionsmodus.
STEUERELEMENTE
HINWEIS:
Abhängig vom Wiedergabegerät werden möglicherweise nicht alle Funktionen unterstützt.
PLAY / PAUSE / CLOCK
➢ Sie können die Wiedergabe unterbrechen und fortsetzen. Im Display blinkt bei Pause die
abgespielte Zeit. Drücken Sie die Taste um die Wiedergabe fortzusetzen.
➢ Drücken und halten Sie die Taste um die aktuelle Zeit anzuzeigen.
SKIP+ oder SKIP-
Mit der Taste “SKIP+ / TUNING+” können Sie den nächsten Titel auswählen. Drücken und
halten Sie die Taste gedrückt so sucht das Gerät innerhalb des Titels.
Mit der Taste “SKIP- / TUNING-” können Sie folgendes steuern:
Einmal gedrückt = Der gegenwärtige Titel wird erneut abgespielt.
Zweimal gedrückt = Das Gerät springt zum vorherigen Titel.
STOP
Die Wiedergabe wird beendet.
SCAN / PROG
Im Stopp-Modus kann der programmierte Wiedergabe-Modus ausgewählt werden (siehe
„Programmierte Wiedergabe“).
Während der Wiedergabe einer Audio-CD:
Einmal gedrückt = Der aktuelle Titel wird wiederholt (Im Display “REP” Logo).
Dreimal gedrückt = Alle Titel der CD werden wiederholt (Im Display “REP“ Logo + „ALL”).
Viermal gedrückt = Die Titel werden in zufällig wiedergegeben (Im Display “RAND”).
Fünfmal gedrückt = Die CD wird normal wiedergegeben.

SCD5800 / Deutsche Bedienungsanleitung
5
Während der Wiedergabe von MP3-Musik (Im USB- oder CD-MP3 Modus):
Einmal gedrückt = Der aktuelle Titel wird wiederholt (Im Display “REP“ Logo).
Zweimal gedrückt = Der ausgewählte Ordner wird wiederholt abgespielt (Im Display
„REP“ Logo + „ALBUM“).
Dreimal gedrückt = Alle Titel der CD werden wiederholt (Im Display “REP“ Logo + „ALL”).
Viermal gedrückt = Die Titel werden in zufällig wiedergegeben (Im Display “RAND”).
Fünfmal gedrückt = Die CD wird normal wiedergegeben
PRE. /FOLDER
Verwenden Sie die Taste um den Ordner zu wählen.
Programmierte Wiedergabe
Mit dieser Funktion können Sie eine bestimmte Reihenfolge der Titel programmieren.
1. Drücken Sie die „STOP“-Taste.
2. Drücken Sie die Taste "SCAN / PROG". “P_01” beginnt zu blinken im Display. P_01 zeigt
den Speicherplatz an.
Drücken Sie die Taste “SKIP+ / TUNING+” oder “SKIP- / TUNING-” um den gewünschten
Titel zu wählen und drücken Sie danach die "SCAN / PROG" Taste erneut. Im Display
wechselt die Anzeige von “P_01” auf “P_02”.
3. Wählen Sie den nächsten Titel mit der Taste “SKIP+ / TUNING+” oder “SKIP- / TUNING-”
und drücken Sie die Taste "SCAN / PROG" erneut. Wiederholen Sie die Schritte erneut bis
alle gewünschten Titel gespeichert sind.
HINWEIS: Ist die Speicherkapazität der Titel voll erscheint im Display “PROGFULL”.
4. Drücken Sie die “PLAY / PAUSE / CLOCK” Taste um die Wiedergabe zu starten. Links
unten im Display wird dabei „PROG“ angezeigt.
5. Drücken Sie die Taste erneut um die Wiedergabe zu unterbrechen.
6. Um die Wiedergabe fortzusetzen drücken Sie die Taste “PLAY / PAUSE / CLOCK” erneut.
7. Um die programmierten Titel zu löschen drücken Sie zweimal die Taste “STOP”. Die
Anzeige „MEM“ im Display erlischt.
Musikwiedergabe im MP3-Format
Mit diesem Gerät ist es möglich, Musikstücke im MP3-Format abzuspielen. Das Gerät
unterstützt auch alle gängigen CD-Typen: CD, CD-RW, CD-R. Das Gerät kann MP3-CDs
abspielen. Bis zu 99 Tracks können komprimiert und auf diesen CDs gespeichert werden. Ihr
Gerät erkennt automatisch eine MP3-CD (die Gesamtzahl der Titel und MP3s wird im Display
angezeigt). Tracks können wie unter "Programmierte Wiedergabe" beschrieben programmiert
werden.
KASSETTE
Kassette Abspielen
1. Drücken Sie die Taste “STANDBY / FUNCTION” bis “Tape” im Display angezeigt wird.
2. Drücken Sie die STOP/EJECT Taste um das Kassettenfach zu öffnen.
3. Legen Sie eine bespielte Audio-Kassette in das Kassettenfach mit der Bandöffnung nach
oben.
4. Drücken Sie die „PLAY“ Taste, um die Wiedergabe zu starten.
5. Drücken Sie die „STOP/EJECT“ Taste, um die Wiedergabe zu Stoppen.
6. Spulen Sie wenn nötig, das Kassettenband in Richtung der Pfeiltaste auf (Siehe
Pfeilrichtung der Kassettenbedienung).
7. Drücken Sie immer die „STOP/EJECT“ Taste wenn Sie das Band aufwickeln, oder das
Band Stoppen möchten. Dies verhindert Schäden am Gerät und an ihrem Tonband.

SCD5800 / Deutsche Bedienungsanleitung
6
8. Drücken Sie die „STOP/EJECT“ Taste um das Kassettenfach zu öffnen.
9. Um die Wiedergabe anzuhalten, drücken Sie die „PAUSE“ Taste. Drücken Sie die
„PAUSE“ Taste erneut, um die Wiedergabe fortzusetzen.
Aufnahme
1. Legen Sie eine Audio-Kassette in das Kassettenfach ein. Vergewissern Sie sich dass der
Schreibschutz der Kassette nicht entfernt wurde.
2. Wählen Sie den Funktionsmodus von dem Sie aufnehmen möchten und starten Sie
gegebenenfalls die Wiedergabe.
3. Drücken Sie die „RECORD“ Taste beim Kassettenteil um die Aufnahme zu starten.
4. Wenn Sie die Aufnahme unterbrechen wollen drücken Sie die „PAUSE“ Taste am beim
Kassettenteil. Um die Aufnahme fortzusetzen drücken Sie die Taste erneut.
5. Um die Aufnahme zu beenden drücken Sie die „STOP/EJECT“ Taste beim Kassettenteil.
MIKROFON / MITSING-FUNKTION
1. Stecken Sie das Mikrofon in die Anschlußbuchse „MIC“ auf der Rückseite des Gerätes.
2. Schalten das Mikrofon ein.
3. Durch Drücken der Tasten „LAUTSTÄRKE-“ und „LAUTSTÄRKE+“ ändert sich die
Lautstärke der gewählten Quelle ebenso wie die Mikrofonlautstärke.
4. Wenn Sie die „RECORD“ Taste beim Kassettenteil drücken startet die Aufnahme.
Hinweis: Im Kassetten-Modus ist das Mikrofon nicht verwendbar.
KOPFHÖRER
Um Musik über Kopfhörer zu hören, schließen Sie ein 3.5mm Klinken-Kopfhörer an die
Kopfhörerbuchse ihres Geräts an. Der Ton über die Lautsprecher wird unterbrochen, und
automatisch auf die Kopfhörer umgeleitet.
DISCOLICHT-EFFEKT
Durch Drücken der Taste „LIGHT“ können Sie den Discolicht-Effekt ein- oder ausschalten.
TECHNISCHE DATEN
Spannungsversorgung
:
AC 230V~ 50Hz
Batteriebetrieb
:
6x LR14, UM-2 (“C” size) 1.5 V
Frequenzbereich UKW
:
87.5 – 108MHz
Festsenderspeicher
:
30 UKW
Audio-Ausgangsleistung
:
2x 1.5W RMS
Technische Änderungen und Druckfehler vorbehalten
Copyright by Woerlein GmbH, 90556 Cadolzburg, www.soundmaster.de
Vervielfältigung nur mit ausdrücklicher Genehmigung der Woerlein GmbH

Safety, Environmental and Setup Instructions
EN
ENVIRONMENTAL PROTECTION
Do not dispose of this product with the normal household
waste at the end of its life cycle. Return it to a collection
point for the recycling of electrical and electronic devices.
This is indicated by the symbol on the product, user
manual or packaging
The materials are reusable according to their markings. By
reusing, recycling or other forms of utilization of old devices you
make an important contribution to the protection of our
environment.
Please contact your local authorities for details about collection
points.
WARNING
Risk of electric shock
Do not open!
Caution: To reduce the risk of electric shock, do not remove the
cover (or back). There are no user serviceable parts inside.
Refer servicing to qualified service personnel.
This symbol indicates the presence of dangerous
voltage inside the enclosure, sufficient enough to
cause electric shock.
This symbol indicates the presence of important
operating and maintenance instructions for the device
Used batteries are hazardous waste and NOT to be
disposed of with the household waste! As a
consumer you are legally obligated to return all
batteries for environmentally responsible recycling –
no matter whether or not the batteries contain harmful
substances*)
Return batteries free of charge to public collection points in your
community or shops selling batteries of the respective kind.
Only return fully discharged batteries
*) marked Cd = cadmium, Hg = mercury, Pb = lead
Only use mercury and cadmium-free batteries.
Used batteries are hazardous waste and NOT to be
disposed of with the household waste!!!
Keep batteries away from children. Children might swallow
batteries.
Contact a physician immediately if a battery was swallowed.
Check your batteries regularly to avoid battery leakage.
Batteries shall not be exposed to excessive heat such as
sunshine, fire or the like.
CAUTION: Danger of explosion if battery is incorrectly
replaced
Replace only with the same or equivalent type
CAUTION - INVISIBLE LASER
RADIATION WHEN OPENING THE
COVER OR PRESSING THE SAFETY
INTERLOCK. AVOID EXPOSURE TO
THE LASER BEAM.
To prevent possible hearing damage, do not
listen at high volume levels for long periods
Use the device in dry indoor environments only.
Protect the device from humidity.
This apparatus is for moderate climates areas use,
not suitable for use in tropical climates countries.
No objects filled with liquids, such as vases,
shall be placed on the apparatus.
The mains plug or an appliance coupler is used
as the disconnect device, the disconnect devices
shall remain readily operable.
Connect this device to a properly installed and
earthed wall outlet only. Make sure the mains
voltage corresponds with the specifications on
the rating plate.
Make sure the mains cable stays dry during
operation. Do not pinch or damage the mains
cable in any way.
A damaged mains cable or plug must
immediately be replaced by an authorized service
center.
In case of lightning, immediately disconnect the
device from the mains supply.
Children should be supervised by parents when
using the device.
Clean the device with a dry cloth only.
Do NOT use CLEANING AGENTS or ABRASIVE
CLOTHS!
Do not expose the device to direct sunlight or
other heat sources.
Install the device at a location with sufficient
ventilation in order to prevent heat accumulation.
Do not cover the ventilation openings!
Install the device at a safe and vibration-free
location.
Install the device as far away as possible from
computers and microwave units; otherwise radio
reception may be disturbed.
Do not open or repair the enclosure. It is not safe
to do so and will void your warranty. Repairs only
by authorized service/ customer center.
No naked flame sources, such as lighted
candles, should be placed on the unit.
When you are necessary to ship the unit store it
in its original package. Save the package for this
purpose.
In case of malfunction due to electrostatic
discharge or fast transient (burst), remove and
reconnect the power supply.
If the unit is not using for a long period of time,
disconnect it from the power supply by
unplugging the power plug. This is to avoid the
risk of fire.

SCD5800 / English Instruction Manual
1
LOCATION OF CONTROLS
FRONT VIEW
TOP VIEW
BACK VIEW
1
SKIP+ / TUNING+ button
12
Speaker
2
SKIP- / TUNING - button
13
Cassette cover
3
STOP button
14
Antenna
4
PLAY / PAUSE / CLOCK button
15
CD cover
5
STANDBY / FUNCTION button
16
Handle
6
Display
17
Speaker
7
PRE+ / FOLDER+ button
18
Buttons for Cassette
8
SCAN / PROG button
19
Headphone jack
9
VOLUME+ button
20
Microphone jack
10
VOLUME- button
21
USB jack
11
Disco light effect button
22
AC socket

SCD5800 / English Instruction Manual
2
INSTALLATION
CONTENT OF DELIVERY
➢ Main unit
➢ Microphone
➢ Instruction manual
➢ AC power cable
➢ Select a suitable location for the device, such as a dry, flat, non-slip surface on which it is
easy to operate the machine.
➢ Ensure that the device is sufficiently ventilated.
POWER SUPPLY
➢ Ensure that the voltage is the same as that indicated on the model identification plate.
➢ Connect the power cable supplied to a properly installed safety power socket and the mains
connector AC on the back of the machine.
➢ If you do not use the device for a long time, we recommend disconnecting the device from
the mains.
INSERTING THE BATTERIES
1. Open the lid of the battery compartment.
2. Insert 6 batteries of type UM-2 (“C” size) 1.5 V. Please ensure that the polarity is correct (see
the floor of the battery compartment)!
3. Then close the battery lid.
NOTE:
When the power cord is plugged in, the batteries will not work.
ERP power management
The unit will turn off automatically after 10 minutes in standby mode if there is no audio
signal. To turn on the unit again press the “STANDBY / FUNCTION” button.
SETTING CLOCK
The system must be in standby mode in order to set the clock.
1. Press and hold the “PLAY / PAUSE / CLOCK” button for approx.2 seconds.
2. Use the “SKIP+ / TUNING+” & “SKIP- / TUNING-” buttons to set the time format “12 / 24hr”.
3. Press the “PLAY / PAUSE / CLOCK” button to confirm time format.
4. Use the “SKIP+ / TUNING+” & “SKIP- / TUNING-” buttons to set the hours accordingly. The
hour digits start flashing.
5. Press the “PLAY / PAUSE / CLOCK” button to confirm the hour.
6. Repeat step 4 and 5 to set the minute.
NOTE: If the voltage is interrupted, the time is lost
BASIC OPERATION
SWITCH DEVICE ON/OFF
➢ Press the “STANDBY / FUNCTION” button to turn on the device.
➢ Press the “STANDBY / FUNCTION” button for approx. 3 seconds to switch into the standby
mode.
ADJUSTING VOLUME
Press the “VOLUME –“ or “VOLUME +“ button to decrease or increase the volume.

SCD5800 / English Instruction Manual
3
RADIO
1. Select the radio mode with the “STANDBY / FUNCTION” button, until “RAD” is shown in the
display and after that the radio frequency.
2. For FM reception: Completely extend the telescopic antenna. Change its position to improve
the reception.
3. There are two options to search for and preset radio stations.
➢ Automatic scan:
Important! All preset radio stations will be overridden.
Press and hold the "SCAN / PROG" button for approx.3 seconds. The system scans the
entire frequency band for radio stations. Any stations found will be preset from lowest to
highest frequency.
➢ Manual scan for audio stations:
Briefly press the “SKIP+ / TUNING+” & “SKIP- / TUNING-” buttons, until you have found the
radio station which you are looking for. If you keep one of the buttons pressed down, the
device will search to the previous, respectively next radio station.
Preset station
1. Select the desired station.
2. Press the "SCAN / PROG" button. The display shows "P ..." and the next free memory
flashes. By repeatedly pressing the "PRE + / FOLDER +" button, you can also select a
desired memory location yourself. If a station has already been stored on this program
station, it will automatically be overwritten.
3. Press the "SCAN / PROG" button again to confirm the station to the program station.
CD
1. Select the CD mode with the “STANDBY / FUNCTION” button, until “CD” is shown in the
display.
2. Open the CD compartment by pulling the lid upwards by the tab.
3. Insert an audio CD with the printed side facing upwards on to the central cone so that the
CD clicks into place and then close the lid of the CD compartment.
4. The CD will play from the first title.
5. In order to remove a CD, please press the “STOP” button, open the CD compartment and
lift the CD out carefully.
Always keep the CD deck closed.
For operation, please refer to the section “CONTROL BUTTONS”.
NOTE:
➢ If a disc is inserted the wrong way around, respectively if no disc is inserted, then the
message “NO “ appears in the display.
➢ Playback of self-recorded CDs can not be guaranteed due to the wide variety of available
software and CD media.

SCD5800 / English Instruction Manual
4
USB
This device has been developed in line with the latest technical advances in the USB field. The
wide range of different USB storage devices of all types which are currently on the market,
unfortunately do not allow us to guarantee full compatibility with all USB storage devices. For
this reason, in rare cases there may be problems in playing back files from USB storage
devices. This is not a malfunction of the device.
1. Select the USB mode with the “STANDBY / FUNCTION” button, until “USB” is shown in the
display.
2. Connect a USB storage device directly into the port. The playback will automatically start
after a few seconds.
For operation, please refer to the section “CONTROL BUTTONS”.
NOTE:
➢ Always directly connect a USB storage medium to the USB port to prevent any
malfunctions.
➢ The USB port is not designed for charging external devices.
CAUTION:
Switch the device to a different operating mode before you remove the USB storage device.
CONTROL BUTTONS
NOTE:
Depending on the player, not all features may be supported.
PLAY / PAUSE / CLOCK
➢ You can briefly interrupt and resume playback using this button. The display shows the
elapsed playback time flashing. Pressing again continues playback.
➢ Press and hold this button during operation to briefly display the current time.
SKIP+ & SKIP-
With “SKIP+ / TUNING+” button you can jump to the next or previous track etc.
If the button is kept pressed down, the machine starts to search through the tracks.
The “SKIP- / TUNING-” button can be used as follows:
Press once = This starts the current track again from the beginning.
Press twice = This jumps back to the previous track.
STOP
The playback is stopped.
SCAN / PROG
In stop mode for programming any order of tracks (see the section on “Programmed Play”).

SCD5800 / English Instruction Manual
5
During the playback of an audio CD:
Press once = the current track is repeated continuously. The display will show the “REP” logo.
Press twice = the whole CD is played continuously. The display will show the “REP” logo +
“ALL”.
Press three times = all tracks will be played in random order. The display will show “RAND”.
Press four times = back to the normal play mode.
During playback of MP3 music (Under USB and CD-MP3 mode):
Press once = the current track is repeated continuously. The display will show the “REP” logo.
Press twice = the selected folder is repeated continuously. The display will show the “REP” logo
+ “ALBUM”.
Press three times = the whole CD is played continuously. The display will show the “REP” logo
+ “ALL”.
Press four times = all tracks will be played in random order. The display will show “RAND”.
Press five times = back to the normal play mode.
PRE. /FOLDER
Use the “PRE.+ / FOLDER+” button to chose the folder.
Programmed Play
This can be used to program any desired sequence of tracks.
1. Press the “STOP” button.
2. Press the "SCAN / PROG" button. “P_01” will start to flash.. P_01 means the storage space
Use the “SKIP+ / TUNING+” & “SKIP- / TUNING-” buttons to select the desired track and
then press the "SCAN /PROG" button again.
The display “P_01” will be changed to “P_02”.
3. Select the next track with the “SKIP+ / TUNING+” & “SKIP- / TUNING-” buttons and press
the "SCAN /PROG" button again. Repeat the procedure until all the desired tracks are
selected.
NOTE: Once the storage capacity of the tracks to be programmed has been reached
“PROGFULL” will show in the display.
4. Press the “PLAY / PAUSE / CLOCK” button. The playback starts.
The lower-left of the display will show “PROG”.
5. Press the button to interrupt the playback while retaining the program.
6. To play the programmed back again, press the “PLAY / PAUSE / CLOCK” button.
7. To delete the program, press the “STOP” button twice. The notification “PROG” will
disappear.
Playing back Music in MP3 Format
With this device it is possible to play back pieces of music in MP3 format. The device also
supports all standard CD types: CD, CD-RW, CD-R.
This machine of is able to play MP3 CDs. Up to 99 track scan be compressed and stored on
these CDs. Your machine detects an MP3 CD automatically (the total number of tracks and
MP3s appears in the display). If you would like to play one of these CDs, proceed as described
under “Playing CDs/MP3”. Tracks can be programmed as described under “Playing Back
Programmed Tracks”.

SCD5800 / English Instruction Manual
6
CASSETTE
Playing Cassettes
1. Select the Tape mode with the “STANDBY / FUNCTION” button, until “TAPE” is shown.
2. Press the “STOP/EJECT” button to open the cassette compartment.
3. Insert a recorded audiocassette into the compartment with the tape opening facing upwards
and the side you wish to listen to facing the front (full spool to the right). Then close the
cassette compartment again.
4. Press the “PLAY” button to listen to the tape.
5. With the “STOP/EJECT” button you can stop play-back.
6. Wind the tape forwards or backwards if necessary in the direction of the arrow keys.
7. Always press the “STOP/EJECT” key when changing the direction or stopping the tape.
This prevents damage to the machine and the tape.
8. If the “STOP/EJECT” button is pressed again the flap of the cassette compartment opens.
9. In order to interrupt playback briefly, press the “PAUSE” button. Pressing again continues
playback.
Cassette Record
1. Insert an audio cassette into the cassette compartment. Make sure the cassette write-
protect has not been removed.
2. Select the function mode you want to record from and start playback if necessary.
3. Press the "RECORD" button on the cassette section to start recording.
4. If you want to stop recording, press the "PAUSE" button on the cassette part. To resume
recording, press the button again.
5. To stop recording, press the "STOP / EJECT" button on the cassette section.
MICROPHONE
1. Plug the microphone into the "MIC" socket on the back of the device.
2. Turn on the microphone.
3. Pressing the "VOLUME-" and "VOLUME +" buttons will change the volume of the selected
source as well as the microphone volume.
4. If you press the "RECORD" button on the cassette part, the recording starts.
Note: In cassette mode, the microphone is not useable.
HEADPHONE
To listen to music privately, use headphones with a 3.5 stereo jack plug and connect to the
headphones socket on the back of the system. The speakers will then be muted.
DISCO LIGHT EFFECT
Press the "LIGHT" button to turn the disco light effect on or off.
TECHNICAL SPECIFICATION
Power supply
:
AC 230V ~ 50Hz
Battery supply
:
6x LR14, UM-2 (“C” size) 1.5 V
Frequency range FM
:
87.5 – 108MHz
Preset station
:
30 FM
Audio output power
:
2x 1.5W RMS
Technical changes and misprints reserved.
Copyright by Woerlein GmbH, 90556 Cadolzburg, www.soundmaster.de
Duplication only with the permission of Woerlein GmbH

Consignes de sécurité, d’environnement et d’installation
FR
PROTECTION DE L’ENVIRONNEMENT
Ne jetez pas ce produit avec les ordures ménagères
lorsqu’il est usagé. Retournez-le à un point de collecte
pour le recyclage des appareils électriques et
électroniques. Cette recommandation est indiquée par le
symbole sur le produit, le mode d’emploi ou l’emballage.
Les composants sont réutilisables en fonction de leur marquage.
En réutilisant, recyclant ou employant autrement les vieux
appareils, vous contribuerez de façon signifiante à la protection
de notre environnement.
Veuillez contacter vos collectivités locales pour vous
renseigner sur les points de collecte
ATTENTION
Risque d’électrocution
Ne pas ouvrir!
Attention!: Pour réduire le risque d’électrocution, ne retirez
pas le couvercle (ou l’arrière). L’usager ne peut entretenir
aucune pièce à l’intérieur. Confiez l’entretien à un
personnel qualifié.ntretenir aucune pièce à l’intérieur.
Confiez l’entretien à un personnel qualifié.
Ce symbole indique la présence d’une tension
dangereuse à l’intérieur de l'appareil, qui est
suffisante pour provoquer un choc électrique.
Ce symbole indique la présence de consignes
importantes de fonctionnement et d’entretien de pour
l’appareil
Les piles usages sont des déchets dangereux et
ne doivent PAS être jetées avec les ordures
ménagères ! La loi impose aux consommateurs de
disposer de toutes les piles pour un recyclage
écologique – et ce que les piles soient de contenance
dangereuse ou pas*).
Disposer gratuitement des piles dans les points de collecte
de votre communauté ou auprès des magasins détaillant
les piles de même catégories.
Ne disposez que de piles entièrement vides.
*) marquée Cd = cadmium, Hg = mercure, Pb = plomb
CLASS 1 LASER PRODUCT
KLASSE 1 LASER PRODUKT
LUOKAN 1 LASER LAITE
KLASS 1 LASER APPARAT
PRODUCTO LASER CLASE 1
ATTENTION – RADIATION
LASER INVISIBLE LORSQUE
VOUS OUVREZ LE COUVERCLE
OU APPUYEZ SUR
L’ENCLENCHEMENT DE
SECURITE. EVITEZ TOUTE
EXPOSITION AU RAYON LASER
Pour éviter des lésions auditives, n’écoutez pas à
des niveaux sonores élevés pendant de longues
périodes.
N'utilisez l'appareil qu’à l’intérieur dans un lieu sec
Protégez l’appareil contre l’humidité
N’ouvrez pas l’appareil RISQUE
D’ELECTROCUTION ! Faites effectuer l’ouverture
et l’entretien par un personnel qualifié
Ne connectez cet appareil qu'à une prise murale
correctement installée et reliée à la terre Assurez-
vous que la tension principale corresponde aux
recommandations de la plaque d’indice.
Assurez-vous que le câble d’alimentation reste
au sec pendant le fonctionnement. Ne pincez
pas le câble et ne l’endommagez d’aucune
façon.
Un câble de réseau ou une prise abimés doivent
être immédiatement remplacés par un centre
agréé.
En cas de tonnerre, débranchez immédiatement
l’appareil de l’alimentation.
Les enfants doivent être surveillés par leurs
parents lorsqu’ils utilisent l’appareil.
Ne nettoyez l’appareil qu’avec un tissu sec.
N’utilisez PAS de PRODUITS DETERGENTS
ou de CHIFFONS ABRASIFS !
N’exposez pas l’appareil à la lumière directe du
soleil ou toute autre source de chaleur
Installez l’appareil dans un emplacement
suffisamment ventilé pour éviter une
accumulation de chaleur.
Ne recouvrez pas les grilles d’aération !
Installez l’appareil dans un emplacement
sécurisé et sans vibrations.
Ne pas installer l’appareil à proximité
d’ordinateurs et fours à micro-ondes; sinon la
réception de radio pourrait être perturbée.
Ne pas ouvrir ou réparer l’appareil. Cela est
dangereux et annulerait la garantie. La
réparation doit être uniquement effectuée que
par un centre de réparations / service agréé.
L’appareil est équipé d’un « Laser Classe 1 ».
Evitez toute exposition au rayon laser car cela
pourrait blesser les yeux.
N’utilisez que des piles au mercure et sans
cadmium.
Les piles usagées sont des déchets dangereux
et ne doivent PAS être jetées avec les ordures
ménagères !!! Ramenez les piles à votre point
de vente ou aux points de collecte de votre ville.
Eloignez les piles des enfants. Les enfants
pourraient avaler les piles. En cas d’ingestion
d’une pile, contactez immédiatement un
médecin.
Vérifiez régulièrement vos piles pour éviter les
fuites.
La prise de courant ou un coupleur d’appareil
est utilisé comme dispositif de déconnexion, les
dispositifs de déconnexion doivent rester
facilement utilisables.
Aucune source de flamme nue, telle que des
bougies allumées, ne doit être placée sur
l’appareil.
Aucun objet rempli de liquide, tel que des vases,
ne doit être placé sur l’appareil.
Cet appareil, conçu pour les climats modérés,
ne convient pas pour une utilisation dans les
pays au climat tropical.

SCD5800 / Français Manuel d’instructions
1
EMPLACEMENT DES BOUTONS
VUE DE FACE
VUE DE DESSUS
VUE ARRIÈRE
1
Bouton SAUT+/SYNTONISATION+
12
Haut-parleur
2
Bouton SAUT-/SYNTONISATION-
13
Compartiment cassette
3
Bouton ARRÊT
14
Antenne
4
Bouton LECTURE/PAUSE/
HORLOGE
15
Compartiment CD
16
Poignée
5
Bouton VEILLE/FONCTION
17
Haut-parleur
6
Écran
18
Cassette des boutons de commande
7
Bouton PRÉCÉDENT/DOSSIER
19
Prise casque
8
Bouton SCAN / PROG
20
Entrée microphone
9
Bouton VOLUME+
21
Prise USB
10
Bouton VOLUME-
22
Prise de courant
11
Bouton d'effet de lumière disco

SCD5800 / Français Manuel d’instructions
2
INSTALLATION
CONTENU DE LIVRAISON
➢ Unité principale
➢ Microphone
➢ Manuel d'instructions
➢ Câble électrique
➢ Sélectionnez l’emplacement approprié pour installer l’appareil et les enceintes. L’idéal serait
une surface plane et antidérapante sur laquelle vous pouvez utiliser l’appareil en toute
simplicité.
➢ Assurez-vous que l’appareil est convenablement ventilé !
ALIMENTATION
➢ Attention à la tension secteur ! La tension appropriée de l’appareil est indiquée sur la plaque
signalétique.
➢ Branchez la fiche secteur dans une prise d’alimentation installée comme il se doit.
➢ En cas d’inutilisation prolongée, débranchez la fiche secteur.
INSÉREZ LA BATTERIE
1. Ouvrez le compartiment de la batterie
2. Insérez 6 piles UM-2 (taille "C") de 1,5V. Faites attention à la polarité correcte (voir dans le
compartiment des piles).
3. Fermez le compartiment de la batterie
REMARQUE:
Lorsque le cordon d'alimentation est branché, les piles ne fonctionneront pas.
Gestion de l’alimentation ERP
L’appareil s’éteindra automatiquement après 10 minutes en mode veille en l’absence de
signal audio. Pour rallumer l’appareil, appuyez sur la touche « STANDBY / FUNCTION ».
RÉGLAGE DE L’HEURE
Assurez-vous que l’appareil est en veille avant de régler l’heure.
1. Maintenez enfoncé le bouton « PLAY/PAUSE/CLOCK » pendant environ 2 secondes.
2. Appuyez sur les boutons « SKIP+/TUNING+ » et « SKIP-/TUNING- » pour sélectionner le
format d’heure « 12hr » ou « 24hr ».
3. Appuyez sur le bouton « PLAY/PAUSE/CLOCK » pour confirmer le format de l’heure.
4. Appuyez sur les boutons « SKIP+/TUNING+ » et « SKIP-/TUNING- » pour définir le nombre
d’heures. Les chiffres des heures commencent à clignoter.
5. Appuyez sur le bouton « PLAY/PAUSE/CLOCK » pour confirmer le nombre d’heures.
6. Répétez les étapes 4 et 5 pour régler le nombre de minutes et la date.
REMARQUE: Si la tension est interrompue, le temps est perdu
OPÉRATION DE BASE
DISPOSITIF DE COMMUTATION ON / OFF
➢ Appuyez sur le bouton « STANDBY/FUNCTION » pour allumer l’appareil.
➢ Appuyez sur le bouton « STANDBY/FUNCTION » pendant environ 3 s pour entrer en veille.

SCD5800 / Français Manuel d’instructions
3
VOLUME
Appuyez sur le bouton « VOLUME- » ou « VOLUME+ » pour régler le volume.
RADIO
1. Sélectionnez le mode radio avec la touche “STANDBY / FUNCTION” jusqu'à ce que “RAD”
apparaisse à l'écran et ensuite la fréquence radio.
2. Réception FM : Déployez entièrement l’antenne. Changez sa position pour une réception
optimale.
3. Il existe deux modes de recherche et de mémorisation des stations radio.
➢ Recherche automatique :
Maintenez enfoncé le bouton « SCAN / PROG » pendant environ 3 secondes. Le système
recherche les stations radio disponibles sur toute la bande de fréquences. Toutes les
stations trouvées seront mémorisées, suivant l’ordre de fréquence croissant.
➢ Recherche manuelle de stations radio :
Appuyez brièvement et plusieurs fois sur les boutons « SKIP+/TUNING+ »et
« SKIP-/TUNING- » jusqu’à ce que vous retrouviez la station radio désirée. Si vous
appuyez longuement sur l’un des deux boutons, le système recherchera la station radio
précédente ou suivante, respectivement.
Station mémorisée :
Preset station
1. Sélectionnez la station souhaitée.Select the desired station.
2. Appuyez sur le bouton "SCAN / PROG". L'écran affiche "P ..." et la mémoire libre suivante
clignote. En appuyant plusieurs fois sur la touche "PRE + / FOLDER +", vous pouvez
également sélectionner vous-même l'emplacement de mémoire souhaité. Si une station a
déjà été mémorisée sur cette station de programme, elle sera automatiquement remplacée.
3. Appuyez à nouveau sur la touche "SCAN / PROG" pour confirmer la station en émission.
CD
1. Pour sélectionner le mode CD, appuyez longuement sur le bouton
« STANDBY/FUNCTION » jusqu’à ce que « CD » s’affiche à l’écran.
2. Tirez la languette vers le haut pour soulever le couvercle du compartiment CD.
3. Insérez un CD audio sur le cône central, la face imprimée vers le haut, et appuyez jusqu’à
ce que le CD provoque un clic, puis fermez le couvercle du compartiment CD.
4. La lecture du premier titre commencera alors.
5. Pour retirer un CD, veuillez appuyer sur le bouton « STOP », ouvrez le compartiment CD et
retirez celui-ci avec soin.
Toujours garder fermé le compartiment CD.
Pour le fonctionnement, veuillez vous référer à la section “BOUTONS DE COMMANDE”.
REMARQUE :
➢ Si le disque est inséré dans le mauvais sens ou si aucun disque n’est inséré,
« NO » s’affiche à l’écran.
➢ La lecture de CD produits par l’utilisateur ne peut être garantie en raison de la grande
variété de logiciels et de médias CD disponibles.

SCD5800 / Français Manuel d’instructions
4
USB
Cet appareil est conçu suivant les normes technologiques de pointe dans le domaine de l’USB.
En raison de la multiplicité des types de périphériques de stockage USB actuellement
disponible sur le marché, il est malheureusement impossible de garantir qu’ils sont tous
compatibles avec l’appareil. Ainsi, des problèmes de lecture de fichiers contenus dans des
périphériques de stockage USB peuvent exceptionnellement se produire. Cela n’est pas dû à
un mauvais fonctionnement de l’appareil.
1. Pour sélectionner le mode USB, appuyez longuement sur le bouton
« STANDBY/FUNCTION » jusqu’à ce que « USB » s’affiche à l’écran.
2. Branchez un périphérique de stockage USB directement dans le port dédié. La lecture
démarre automatiquement au bout de quelques secondes.
Pour le fonctionnement, veuillez vous référer à la section “BOUTONS DE COMMANDE
REMARQUE :
➢ Branchez toujours directement le périphérique de stockage USB sur le port USB pour éviter
tout dysfonctionnement.
➢ Le port USB n’est pas destiné à la charge de périphériques externes.
ATTENTION :
Commutez le système vers un autre mode de fonctionnement avant de retirer le périphérique
de stockage USB.
BOUTONS DE COMMANDE
REMARQUE:
Selon le lecteur, toutes les fonctionnalités peuvent ne pas être prises en charge.
PLAY/PAUSE/CLOCK
➢ Appuyez brièvement sur ce bouton pour interrompre et reprendre la lecture. Le temps de
lecture écoulé clignote à l’écran. Enfoncez-la de nouveau pour continuer la lecture.
➢ Maintenez enfoncé ce bouton pendant l’opération pour afficher brièvement l’heure qu’il est.
SKIP+ et SKIP-
Le bouton « SKIP+/TUNING+ » permet de passer à la piste suivante ou précédente, etc.
Appuyez longuement dessus pour parcourir les pistes disponibles.
Le bouton « SKIP-/TUNING- » comporte les fonctions suivantes :
Une pression = redémarrer la lecture de la piste en cours à partir du début.
Deux pressions = revenir à la piste précédente.
ARRÊTER
L’appareil est à l’arrêt.
SCAN / PROG
En mode d'arrêt pour programmer n'importe quel ordre de pistes (voir la section «Lecture
programmée»).
Pendant la lecture d’un CD audio :
Une pression = la lecture de la piste en cours se répète en continu. « REP » s’affiche à l’écran.
Deux pressions = l’intégralité du CD est lue en continu. « REP » + « ALL » s’affiche à l’écran.
Trois pressions = lecture aléatoire de toutes les pistes. « RAND » s’affiche à l’écran.
Quatre pressions = retour au mode de lecture normal.
A página está carregando...
A página está carregando...
A página está carregando...
A página está carregando...
A página está carregando...
A página está carregando...
A página está carregando...
A página está carregando...
A página está carregando...
A página está carregando...
A página está carregando...
A página está carregando...
A página está carregando...
A página está carregando...
A página está carregando...
A página está carregando...
A página está carregando...
A página está carregando...
A página está carregando...
A página está carregando...
A página está carregando...
A página está carregando...
A página está carregando...
A página está carregando...
A página está carregando...
A página está carregando...
A página está carregando...
A página está carregando...
A página está carregando...
A página está carregando...
A página está carregando...
A página está carregando...
A página está carregando...
A página está carregando...
A página está carregando...
A página está carregando...
A página está carregando...
A página está carregando...
A página está carregando...
A página está carregando...
A página está carregando...
A página está carregando...
A página está carregando...
A página está carregando...
A página está carregando...
A página está carregando...
A página está carregando...
A página está carregando...
A página está carregando...
A página está carregando...
A página está carregando...
A página está carregando...
A página está carregando...
A página está carregando...
A página está carregando...
A página está carregando...
A página está carregando...
A página está carregando...
A página está carregando...
A página está carregando...
A página está carregando...
A página está carregando...
A página está carregando...
A página está carregando...
A página está carregando...
A página está carregando...
A página está carregando...
A página está carregando...
A página está carregando...
A página está carregando...
A página está carregando...
A página está carregando...
A página está carregando...
A página está carregando...
-
 1
1
-
 2
2
-
 3
3
-
 4
4
-
 5
5
-
 6
6
-
 7
7
-
 8
8
-
 9
9
-
 10
10
-
 11
11
-
 12
12
-
 13
13
-
 14
14
-
 15
15
-
 16
16
-
 17
17
-
 18
18
-
 19
19
-
 20
20
-
 21
21
-
 22
22
-
 23
23
-
 24
24
-
 25
25
-
 26
26
-
 27
27
-
 28
28
-
 29
29
-
 30
30
-
 31
31
-
 32
32
-
 33
33
-
 34
34
-
 35
35
-
 36
36
-
 37
37
-
 38
38
-
 39
39
-
 40
40
-
 41
41
-
 42
42
-
 43
43
-
 44
44
-
 45
45
-
 46
46
-
 47
47
-
 48
48
-
 49
49
-
 50
50
-
 51
51
-
 52
52
-
 53
53
-
 54
54
-
 55
55
-
 56
56
-
 57
57
-
 58
58
-
 59
59
-
 60
60
-
 61
61
-
 62
62
-
 63
63
-
 64
64
-
 65
65
-
 66
66
-
 67
67
-
 68
68
-
 69
69
-
 70
70
-
 71
71
-
 72
72
-
 73
73
-
 74
74
-
 75
75
-
 76
76
-
 77
77
-
 78
78
-
 79
79
-
 80
80
-
 81
81
-
 82
82
-
 83
83
-
 84
84
-
 85
85
-
 86
86
-
 87
87
-
 88
88
-
 89
89
-
 90
90
-
 91
91
-
 92
92
-
 93
93
-
 94
94


Soundmaster SCD5800 Manual do usuário
- Categoria
- Tocadores de CD
- Tipo
- Manual do usuário
em outras línguas
- español: Soundmaster SCD5800 Manual de usuario
- français: Soundmaster SCD5800 Manuel utilisateur
- italiano: Soundmaster SCD5800 Manuale utente
- slovenčina: Soundmaster SCD5800 Používateľská príručka
- Deutsch: Soundmaster SCD5800 Benutzerhandbuch
Artigos relacionados
Outros documentos
-
Bigben RK200CD Manual do usuário
-
-
Muse M-182 DB Manual do usuário
-
Roadstar RCR-4730U/RD Manual do proprietário
-
Roadstar RCR-4950US/RD Manual do proprietário
-
-
Sanyo DC-DA 1400M Manual do usuário
-
-
Roadstar RCR-4650USMPR Manual do usuário