
GB
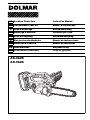
Cordless Chain Saw Instruction Manual
F
Tronçonneuse sans Fil Manuel d’instructions
D
Akku-Kettensäge Betriebsanleitung
I
Motosega a batteria Istruzioni per l’uso
NL
Accu-kettingzaag Gebruiksaanwijzing
E
Electrosierra Inalámbrica Manual de instrucciones
P
Motosserra a Bateria Manual de instruções
DK
Akku-kædesav Brugsanvisning
GR Αλυσπρίν µπαταρίας δηγίες ρήσεως
AS-3625
AS-3626

2
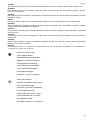
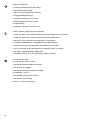
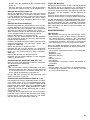
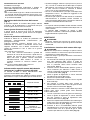
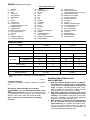
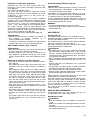
PARTS DESCRIPTION / DESCRIPTION DES PIÈCES / BESCHREIBUNG DER TEILE /
DESCRIZIONE DELLE PARTI / BESCHRIJVING VAN ONDERDELEN / DESCRIPCIÓN DE LAS PARTES /
DESCRIÇÃO DAS PEÇAS / BESKRIVELSE AF DELE / ΠΕΡΙΓΡΑΦΗ ΤΩΝ ΕΑΡΤΗΜΑΤΩΝ
ENGLISH FRANÇAIS
1
3
4
5
9
2
6
8
7
13
12
11
14
10
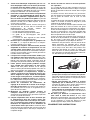
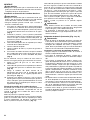
1Lever
2 Front hand guard
3 Top handle
4 Battery cartridge
5 Carabiner or rope attachment point
6 Guide bar
7Saw chain
8 Sprocket cover
9Chain cover
10 Lock off button
11 Switch trigger
12 Front handle
13 Serrated rail (claw stop)
14 Battery cover
1Levier
2 Protège-main avant
3 Poignée supérieure
4 Batterie
5 Point de fixation du mousqueton ou de la corde
6 Guide de chaîne
7 Chaîne
8 Couvre-pignon
9 Cache de chaîne
10 Bouton de sécurité
11 Gâchette
12 Poignée avant
13 Rail dentelé (butée à griffe)
14 Couvercle de batterie

3
DEUTSCH
ITALIANO
NEDERLANDS
ESPAÑOL
1 Hebel
2 Vorderer Handschutz
3Obergriff
4 Akku
5 Befestigungsöse für Karabinerhaken oder Seil
6Schwert
7 Sägekette
8 Kettenraddeckel
9 Kettenabdeckung
10 Einschaltarretierung
11 Schalter
12 Frontgriff
13 Krallenanschlag (Klauenanschlag)
14 Akkuabdeckung
1Leva
2 Protezione mano anteriore
3 Manico superiore
4 Cartuccia batteria
5 Gancio o punto di attacco fune
6 Barra guida
7 Catena sega
8 Coperchio rocchetto
9 Coperchio catena
10 Bottone di sblocco
11 Interruttore a grilletto
12 Manico anteriore
13 Guida dentata (fermo dente)
14 Coperchio batteria
1 Hendel
2 Beschermkap van voorhandgreep
3 Bovenhandgreep
4 Accu
5 Bevestigingsoog voor karabijnhaak of touw
6 Zaagblad
7 Zaagketting
8 Afdekking van kettingwiel
9 Kettingdeksel
10 Ontgrendelknop
11 Trekschakelaar
12 Voorhandgreep
13 Getande kam (klauwaanslag)
14 Deksel van de accu
1Baja
2 Protector de la mano delantera
3 Empuñadura principal
4 Cartucho de batería
5 Punto de sujeción de mosquetón o cuerda
6 Placa de guía
7 Cadena de sierra
8 Cubierta del piñón
9 Cubierta de la cadena
10 Botón de seguro
11 Gatillo interruptor
12 Empuñadura delantera
13 Riel dentado (tope de gancho)
14 Tapa de la batería

4
PORTUGUÊS
DANSK
ΕΛΛΗΝΙΚΑ
1 Alavanca
2 Protector frontal das mãos
3 Pega superior
4 Bateria
5 Ponto de fixação da corda ou gancho
6 Espada
7 Corrente da electroserra
8 Cobertura da roda dentada
9 Cobertura da corrente
10 Botão de bloqueio
11 Gatilho do interruptor
12 Pega frontal
13 Trilho dentado (retentor de garras)
14 Tampa da bateria
1Arm
2 Frontkappe
3 Tophåndtag
4 Akku
5 Fastgørelsespunkt til karabinhage eller reb
6Sværd
7 Savkæde
8 Kædehjulsdæksel
9 Kædedæksel
10 Låseknap
11 Afbryderknap
12 Fronthåndtag
13 Takket kant (hage-stop)
14 Batteridæksel
1 Μλς
2 Μπρστινς πρφυλακτήρας εριών
3 Άνω λαή
4 Κασετίνα µπαταρίας
5 Carabiner ή σηµεί πρσδεσης σινιύ
6 Κατευθυντήρια λάµα
7 Αλυσίδα πρινιύ
8 Κάλυµµα δντωτύ τρύ
9 Κάλυµµα αλυσίδας
10 Πλήκτρ ασφάλειας
11 Σκανδάλη διακπτης
12 Μπρστινή λαή
13 δντωτή ράγα (στπ σιαγνας)
14 Κάλυµµα µπαταρίας

5
12
34
56
78
13
14
11
12
10
4
5
9
78
6
1
2
3
15
16
17
18
13
14
11
12
10
4
5
9
78
6
1
2
3
15
16
17
18

6
910
11 12
13 14
15 16
20
22
15
16
15
22
27
26
18
24
25
2 - 4 mm
23
21
19
15
16

7
17 18
19 20
21 22
23 24
29
31
1
2
40
3
2
29
28
30
2
28
37
36
39
38
32
33
34
35

8
25 26
27 28
29 30
31 32
45
o
2
1
/2
45
o
41
A
B
A
B

9
33 34
35 36
37 38
39 40
48
49
45
3
46
47
42
43
43
44
44

10
41 42
43 44
45
52
53
51
50
19
19
50

11
END005-4
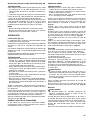
Symbols
The followings show the symbols used for the equipment. Be sure that you understand their meaning before use.
Symboles
Nous donnons ci-dessous les symboles utilisés pour l’outil. Assurez-vous que vous en avez bien compris la significa-
tion avant d’utiliser l’outil.
Symbole
Die folgenden Symbole werden für die Maschine verwendet. Machen Sie sich vor der Benutzung unbedingt mit ihrer
Bedeutung vertraut.
Simboli
Per questo utensile vengono usati i simboli seguenti. Bisogna capire il loro significato prima di usare l’utensile.
Symbolen
Voor dit gereedschap worden de volgende symbolen gebruikt. Zorg ervoor dat u de betekenis van deze symbolen
begrijpt alvorens het gereedschap te gebruiken.
Símbolos
A continuación se muestran los símbolos utilizados con esta herramienta. Asegúrese de que entiende su significado
antes de usarla.
Símbolos
O seguinte mostra os símbolos utilizados para a ferramenta. Certifique-se de que compreende o seu significado antes
da utilização.
Symboler
Nedenstående symboler er anvendt i forbindelse med denne maskine. Vær sikker på, at De har forstået symbolernes
betydning, før maskinen anvendes.
Σύµλα
Τα ακλυθα δείνυν τα σύµλα πυ ρησιµπιύνται για τ µηάνηµα. Βεαιωθείτε τι καταλααίνετε
τη σηµασία τυς πριν απ τη ρήση.
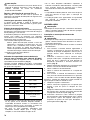
• Read instruction manual.
• Lire le mode d’emploi.
• Bitte Bedienungsanleitung lesen.
• Leggete il manuale di istruzioni.
• Lees de gebruiksaanwijzing.
• Lea el manual de instrucciones.
• Leia o manual de instruções.
• Læs brugsanvisningen.
• ∆ιαάστε τις δηγίες ρήσης.
• Wear eye protection.
• Portez une protection pour les yeux.
• Eine Schutzbrille tragen.
• Indossare gli occhiali di protezione.
• Draag oogbescherming.
• Póngase protección para los ojos.
• Utilize protectores para os olhos.
• Brug øjenbeskyttelse.
• Να φράτε πρστατευτικά µατιών.

12
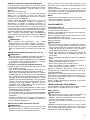
• Wear ear protection.
• Portez une protection pour les oreilles.
• Einen Gehörschutz tragen.
• Indossare la protezione delle orecchie.
• Draag gehoorbescherming.
• Póngase protección para los oídos.
• Utilize protectores para os ouvidos.
• Brug høreværn.
• Να φράτε πρστατευτικά αυτιών.
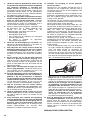
• Wear a helmet, goggles and ear protection.
• Portez un casque, des lunettes de sécurité et une protection pour les oreilles.
• Tragen Sie einen Helm, eine Schutzbrille und einen Gehörschutz.
• Indossare il casco, gli occhiali di protezione e i paraorecchi.
• Draag een veiligheidshelm, veiligheidsbril en oorbescherming.
• Póngase casco, gafas de seguridad y protección para los oídos.
• Use um capacete, óculos de segurança e protectores para os ouvidos.
• Bær hjelm, sikkerhedsbriller og høreværn.
• Να φράτε κράνς και µέσα πρστασίας ρασης και ακής.
• Do not expose to rain.
• N’exposez pas l’outil à la pluie.
• Die Maschine keinem Regen aussetzen.
• Non esporre alla pioggia.
• Stel het gereedschap niet bloot aan regen.
• No exponga a la lluvia.
• Não exponha a ferramenta à chuva.
• Udsæt ikke saven for regn.
• Να µην εκτίθεται στη ρη.

13
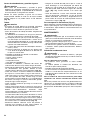
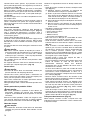
• Hold the saw with both hands while working! One-handed use is extremely hazardous!
• Tenez la scie fermement à deux mains pendant que vous travaillez ! L’utilisation avec une
seule main est extrêmement dangereuse !
• Die Säge während der Arbeit mit beiden Händen halten! Einhändiger Betrieb ist äußerst
gefährlich!
• Tenere la sega con entrambe le mani durante il lavoro! L’uso con una sola mano è estrema-
mente pericoloso!
• Houd de kettingzaag tijdens het werk met beide handen vast! Gebruik met slechts één hand
is uitermate gevaarlijk.
• ¡Sujete la sierra con ambas manos mientras realiza el trabajo! ¡La utilización una sola mano
es muy peligroso!
• Segure a electroserra com as duas mãos ao trabalhar. É muito perigoso segurá-la só com
uma mão.
• Hold i saven med begge hænder under arbejdet! Anvendelse med kun den ene hånd på
saven er yderst farligt!
• Να κρατάτε τ αλυσπρίν µε τα δύ έρια στη διάρκεια της εργασίας! Η ρήση µε τ
ένα έρι είναι εαιρετικά επικίνδυνη!
• Maximum permissible cut length
• Longueur de coupe maximale admise
• Höchstzulässige Schnittlänge
• Lunghezza di taglio massima permissibile
• Maximaal toegestane zaaglengte
• Longitud de corte permitida máxima
• Comprimento máximo de corte permitido
• Maks. tilladt skærelængde
• Μέγιστ επιτρεπµεν µήκς κπής
• Direction of chain travel
• Sens de progression de la chaîne
• Kettenumlaufrichtung
• Direzione di corsa catena
• Draairichting van de ketting
• Dirección de desplazamiento de la cadena
• Sentido de movimento da corrente
• Retning af kædens bevægelse
• Κατεύθυνση διαδρµής αλυσίδας

14
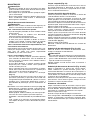
• Saw chain oil adjustment
• Réglage d’huile de la chaîne
• Sägekettenöleinstellung
• Regolazione olio catena sega
• Afstelling voor zaagkettingolie
• Ajuste del aceite de la cadena de sierra
• Regulação da lubrificação da corrente da electroserra
• Justering af savkædeolie
• Ρύθµιση λίπανσης αλυσίδας αλυσπρίνυ
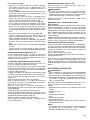
• Only for EU countries
Do not dispose of electric equipment or battery pack together with household waste material!
In observance of European Directive 2002/96/EC on waste electric and electronic equipment, 2006/
66/EC on batteries and accumulators and waste batteries and accumulators and their implementa-
tion in accordance with national laws, electric equipment and battery pack that have reached the
end of their life must be collected separately and returned to an environmentally compatible recy-
cling facility.
• Uniquement pour les pays de l’UE
Ne pas jeter les appareils électriques et les batteries avec les ordures ménagères !
Conformément aux directives européennes 2002/96/CE (relative aux déchets d’équipements élec-
triques et électroniques) et 2006/66/CE (relative aux piles et accumulateurs ainsi qu’aux déchets de
piles et accumulateurs), ainsi qu’à leur application en conformité avec les lois nationales, les appar-
eils électriques et batteries qui ont atteint la fin de leur durée de service doivent être collectés
séparément et renvoyés à un établissement de recyclage respectueux de l’environnement.
• Nur für EG-Länder
Werfen Sie Elektrogeräte oder Akkus nicht in den Hausmüll!
Gemäß der Europäischen Richtlinie 2002/96/EG über Elektro- und Elektronik-Altgeräte, 2006/66/
EG über Batterien, Akkus sowie verbrauchte Batterien und Akkus und ihre Umsetzung gemäß den
Landesgesetzen müssen Elektrogeräte und Akkus, die das Ende ihrer Lebensdauer erreicht haben,
getrennt gesammelt und einer umweltgerechten Recycling-Einrichtung zugeführt werden.
• Soltanto per i Paesi dell'unione europea
Questo apparecchio elettrico o la batteria non devono essere gettati via con i rifiuti domestici.
In osservanza alla Direttiva Europea 2002/96/CE sugli apparecchi elettrici ed elettronici di scarto,
2006/66/CE sulle batterie e gli accumulatori, e sulle batterie e gli accumulatori esausti, e la sua
implementazione secondo le leggi locali, gli apparecchi elettrici e le batterie che hanno raggiunto la
fine della loro vita di servizio devono essere raccolti separatamente e portati in un centro di smalti-
mento ecocompatibile.
• Alleen voor EU-landen
Geef elektrisch gereedschap of accu's niet met het huisvuil mee!
Volgens de Europese richtlijn 2002/96/EC inzake oude elektrische en elektronische apparaten, rich-
tlijn 2006/66/EC inzake batterijen en accu's en wegwerpbatterijen, en de toepassing daarvan bin-
nen de nationale wetgeving, dienen gebruikte elektrisch apparaten en accu's die het einde van hun
levensduur hebben bereikt, gescheiden te worden ingezameld en te worden afgevoerd naar een
recyclebedrijf dat voldoet aan de geldende milieu-eisen.
• Sólo para países de la Unión Europea
¡No tire aparatos eléctricos ni baterías a la basura con los residuos domésticos!
En conformidad con la Directiva Europea 2002/96/EC sobre residuos de aparatos eléctricos y elec-
trónicos y la Directiva Europea 2006/66/EC sobre baterías y acumuladores y residuos de baterías y
de acumuladores y su aplicación de acuerdo con la legislación nacional, los aparatos eléctricos y
las baterías cuya vida útil haya llegado a su fin se deberán recoger por separado y trasladar a una
planta de reciclaje que cumpla con las exigencias ecológicas.
Cd
Ni-MH
Li-ion

15
• Apenas para os países da União Européia
Não deite equipamentos eléctricos nem baterias no lixo doméstico!
De acordo com as directivas europeias 2002/96/CE sobre ferramentas eléctricas e electrónicas
usadas e 2006/66/CE sobre baterias e acumuladores e respectivos resíduos e a implementação
dessas directivas conforme a lei nacional, as ferramentas eléctricas e as baterias que atingem o fim
de sua vida útil devem ser recolhidas em separado e encaminhadas a uma instalação de recicla-
gem compatível com os regulamentos sobre o meio ambiente.
• Gælder kun lande i EU
Undlad at bortskaffe elektrisk udstyr eller akkuer sammen med almindeligt husholdningsaffald.
I henhold til EU-direktiv 2002/96/EC angående brugt elektrisk og elektronisk udstyr, 2006/66/EC
angående batterier og akkumulatorer og brugte batterier og iværksættelse af bortskaffelse af bat-
terier og akkumulatorer i overensstemmelse med nationale love, skal elektrisk udstyr og akkuer, der
har nået slutningen af deres levetid, indsamles separat og afhændes til en genbrugsfacilitet, som er
miljømæssigt kompatibel.
• Μν για ώρες ΕΕ
Μην απρρίπτετε ηλεκτρικ επλισµ ή µπαταρίες µαί µε τα ικιακά απλητα!
Σύµφωνα µε την Ευρωπαϊκή δηγία 2002/96/ΕΚ περί απλήτων ειδών ηλεκτρικύ και
ηλεκτρνικύ επλισµύ και την δηγία 2006/66/EΚ περί µπαταριών και συσσωρευτών και
απλήτων µπαταριών και συσσωρευτών και την εφαρµγή τυς σύµφωνα µε την εθνική
νµθεσία, απαιτείται συλλγή τυ ηλεκτρικύ επλισµύ και των µπαταριών, τ ρι
ωής των πίων έει λήει, εωριστά και επιστρφή τυς σε εγκατάσταση ανακύκλωσης
συµατή µε την πρστασία τυ περιάλλντς.

16
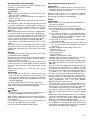
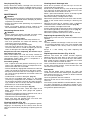
ENGLISH (Original instructions)
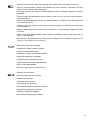
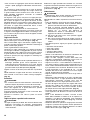
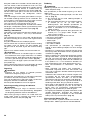
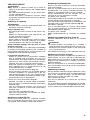
Explanation of general view
1Red part
2Button
3 Battery cartridge
4 Lock-off button
5 Switch trigger
6 Front hand guard
7Lock
8 Unlock
9 Adjusting screw
10 Carabiner
(rope attachment point)
11 Indicator lamps
12 CHECK button
13 Slightly slide
14 Move in the upright position
15 Press in
16 Loosen
17 Sprocket cover
18 Adjusting dial
19 Sprocket
20 Adjusting pin
21 Small hole
22 Tighten
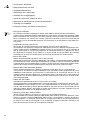
23 Lever
24 Low
25 High
26 Guide bar
27 Saw chain
28 Adapter
29 Hook
30 Tool
31 Belt
32 Arm cord hook band
33 Holder
34 Extension cord (Battery
adapter)
35 Adapter (Battery adapter)
36 Oil tank cap
37 Oil tank opening
38 Oil inspection window
(for refilling the tank with oil)
39 Oil inspection window
40 Lower guide
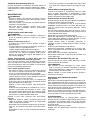
41 Felling area
42 Felling direction
43 Danger zone
44 Escape route
45 Scabbard (chain cover)
46 File forward stroke
47 1/5 of the file diameter
48 Small dust or particles
49 Slotted bit screwdriver
50 Locking ring
51 Limit mark
52 Brush holder cap
53 Screwdriver
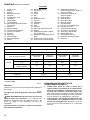
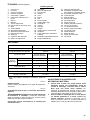
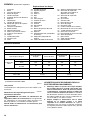
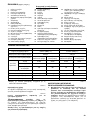
SPECIFICATIONS
• Weight, with battery cartridge, according to EPTA-Pro-
cedure 01/2003
ENE031-1
Intended use
The tool is intended for cutting lumbers and logs.
GEA010-1
General Power Tool Safety Warnings
WARNING Read all safety warnings and all
instructions. Failure to follow the warnings and
instructions may result in electric shock, fire and/or
serious injury.
Save all warnings and instructions for future reference.
GEB071-5
CORDLESS CHAIN SAW SAFETY WARNINGS:
1. Keep all parts of the body away from the saw
chain when the chain saw is operating. Before
you start the chain saw, make sure the saw chain
is not contacting anything. A moment of inatten-
tion while operating chain saws may cause entan-
glement of your clothing or body with the saw chain.
2. Always hold the chain saw with your right hand
on the rear handle and your left hand on the
front handle. Holding the chain saw with a reversed
hand configuration increases the risk of personal
injury and should never be done.
3. Hold the power tool by insulated gripping sur-
faces only, because the saw chain may contact
hidden wiring. Saw chains contacting a “live” wire
may make exposed metal parts of the power tool
“live” and could give the operator an electric shock.
Model AS-3625 AS-3626
Chain speed per minute 8.3 m/s (500 m/min) 8.3 m/s (500 m/min)
Length of guide bar 250 mm 250 mm
Guide bar type
Sprocket nose
bar
Carving bar
Sprocket nose
bar
Carving bar
Saw chain
Type 91VG 25AP 91VG 25AP
Pitch 3/8”1/4”3/8”1/4”
No. of drive links 40 60 40 60
Number of teeth 6 9 6 9
Overall length 576 mm 589 mm 577 mm 590 mm
Net weight 4.5 kg 4.5 kg
Rated voltage D.C. 36 V D.C. 36 V

17
4. Wear safety glasses and hearing protection. Fur-
ther protective equipment for head, hands, legs
and feet is recommended. Adequate protective
clothing will reduce personal injury by flying debris
or accidental contact with the saw chain.
5. Before starting work, check that the chain saw is in
proper working order and that its condition complies
with the safety regulations. Check in particular that:
• The chain brake is working properly;
• The run-down brake is working properly;
• The bar and the sprocket cover are fitted cor-
rectly;
• The chain has been sharpened and tensioned in
accordance with the regulations;
6. Do not operate a chain saw in a tree. Operation of
a chain saw while up in a tree may result in personal
injury.
7. Always keep proper footing and operate the
chain saw only when standing on fixed, secure
and level surface. Slippery or unstable surfaces
such as ladders may cause a loss of balance or con-
trol of the chain saw.
8. When cutting a limb that is under tension be
alert for spring back. When the tension in the wood
fibres is released the spring loaded limb may strike
the operator and/or throw the chain saw out of con-
trol.
9. Use extreme caution when cutting brush and
saplings. The slender material may catch the saw
chain and be whipped toward you or pull you off bal-
ance.
10. Carry the chain saw by the front handle with the
chain saw switched off and away from your body.
When transporting or storing the chain saw
always fit the guide bar cover. Proper handling of
the chain saw will reduce the likelihood of accidental
contact with the moving saw chain.
11. Follow instructions for lubricating, chain ten-
sioning and changing accessories. Improperly
tensioned or lubricated chain may either break or
increase the chance for kickback.
12. Keep handles dry, clean, and free from oil and
grease. Greasy, oily handles are slippery causing
loss of control.
13. Cut wood only. Do not use chain saw for pur-
poses not intended. For example: do not use
chain saw for cutting plastic, masonry or non-
wood building materials. Use of the chain saw for
operations different than intended could result in a
hazardous situation.
14. Causes and operator prevention of kickback:
Kickback may occur when the nose or tip of the
guide bar touches an object, or when the wood
closes in and pinches the saw chain in the cut.
Tip contact in some cases may cause a sudden
reverse reaction, kicking the guide bar up and back
towards the operator.
Pinching the saw chain along the top of the guide
bar may push the guide bar rapidly back towards the
operator.
Either of these reactions may cause you to lose con-
trol of the saw which could result in serious personal
injury. Do not rely exclusively upon the safety
devices built into your saw. As a chain saw user, you
should take several steps to keep your cutting jobs
free from accident or injury.
Kickback is the result of tool misuse and/or incorrect
operating procedures or conditions and can be
avoided by taking proper precautions as given
below:
- Maintain a firm grip, with thumbs and fingers
encircling the chain saw handles, with both hands
on the saw and position your body and arm to
allow you to resist kickback forces. Kickback
forces can be controlled by the operator, if proper
precautions are taken. Do not let go of the chain
saw.
- Do not overreach and do not cut above shoul-
der height. This helps prevent unintended tip
contact and enables better control of the chain
saw in unexpected situations.
- Only use replacement bars and chains speci-
fied by the manufacturer. Incorrect replacement
bars and chains may cause chain breakage and/
or kickback.
- Follow the manufacturer’s sharpening and
maintenance instructions for the saw chain.
Decreasing the depth gauge height can lead to
increased kickback.
15. Do not start the chain saw with the chain cover
being installed on it. Starting the chain saw with
the chain cover being installed on it may cause the
chain cover to thrown out forward resulting in per-
sonal injury and damage to objects around the oper-
ator.
SAVE THESE INSTRUCTIONS.
WARNING:
DO NOT let comfort or familiarity with product
(gained from repeated use) replace strict adherence
to safety rules for the subject product. MISUSE or
failure to follow the safety rules stated in this instruc-
tion manual may cause serious personal injury.

18
ENC007-6
IMPORTANT SAFETY INSTRUCTIONS
FOR BATTERY CARTRIDGE
1. Before using battery cartridge, read all instruc-
tions and cautionary markings on (1) battery
charger, (2) battery, and (3) product using battery.
2. Do not disassemble battery cartridge.
3. If operating time has become excessively
shorter, stop operating immediately. It may
result in a risk of overheating, possible burns
and even an explosion.
4. If electrolyte gets into your eyes, rinse them out
with clear water and seek medical attention right
away. It may result in loss of your eyesight.
5. Do not short the battery cartridge:
(1) Do not touch the terminals with any conduc-
tive material.
(2) Avoid storing battery cartridge in a container
with other metal objects such as nails, coins,
etc.
(3) Do not expose battery cartridge to water or
rain.
A battery short can cause a large current flow,
overheating, possible burns and even a break-
down.
6. Do not store the tool and battery cartridge in
locations where the temperature may reach or
exceed 50°C (122°F).
7. Do not incinerate the battery cartridge even if it
is severely damaged or is completely worn out.
The battery cartridge can explode in a fire.
8. Be careful not to drop or strike battery.
9. Do not use dropped or struck battery.
SAVE THESE INSTRUCTIONS.
Tips for maintaining maximum battery life
1. Charge the battery cartridge before completely
discharged.
Always stop tool operation and charge the bat-
tery cartridge when you notice less tool power.
2. Never recharge a fully charged battery cartridge.
Overcharging shortens the battery service life.
3. Charge the battery cartridge with room tempera-
ture at 10°C – 40°C (50°F – 104°F). Let a hot bat-
tery cartridge cool down before charging it.
FUNCTIONAL DESCRIPTION
CAUTION:
• Always be sure that the tool is switched off and the bat-
tery cartridge is removed before adjusting or checking
function on the tool.
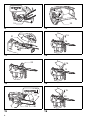
Installing or removing battery cartridge (Fig. 1)
CAUTION:
• Hold the tool and the battery cartridge firmly when
installing or removing battery cartridge. Failure to
hold the tool and the battery cartridge firmly may cause
them to slip off your hands and result in damage to the
tool and battery cartridge and a personal injury.
• Always switch off the tool before installing or removal of
the battery cartridge.
• To remove the battery cartridge, withdraw it from the
tool while sliding the button on the front of the cartridge.
• To insert the battery cartridge, align the tongue on the
battery cartridge with the groove in the housing and slip
it into place. Always insert it all the way until it locks in
place with a little click. If you can see the red part on
the upper side of the button, it is not locked completely.
Insert it fully until the red part cannot be seen. If not, it
may accidentally fall out of the tool, causing injury to
you or someone around you.
• Do not use force when inserting the battery cartridge. If
the cartridge does not slide in easily, it is not being
inserted correctly.
Switch action (Fig. 2)
CAUTION:
• Before inserting the battery cartridge into the tool,
always check to see that the switch trigger actuates
properly and returns to the “OFF” position when
released.
To prevent the switch trigger from being accidentally
pulled, a lock-off button is provided.
To start the tool, depress the lock-off button and pull the
switch trigger. Release the switch trigger to stop.
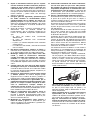
Checking the chain brake (Fig. 3)
NOTE:
• If the chain saw fails to start, the chain brake must be
released. Pull the front hand guard backwards firmly
until you feel it engage.
Hold the chain saw with both hands when switching it on.
Hold the top handle with your right hand, the front handle
with your left. The bar and the chain must not be in con-
tact with any object.
First press the lock-off button, then the switch trigger.
The saw chain starts immediately.
Press the front hand guard forwards using the back of
your hand. The saw chain must come to an immediate
standstill.
CAUTION:
• Should the saw chain not stop immediately when this
test is performed, the saw may not be used under any
circumstances. Consult a DOLMAR specialist repair
shop.

19
Checking the run-down brake
Switch on the chain saw.
Release the switch trigger completely. The saw chain
must come to a standstill within one second.
CAUTION:
• Should the saw chain not come to a stop within one
second when this test is performed, the saw must not
be used. Consult a DOLMAR specialist repair shop.
Adjusting the chain lubrication (Fig. 4)
You can adjust the oil pump feed rate with the adjusting
screw. The amount of oil can be adjusted using the uni-
versal wrench.
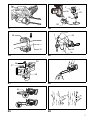
Carabiner (rope attachment point) (Fig. 5)
Carabiner (Rope attachment point) is for use of tool
hanging. Before using carabiner, pull it out and tie it with
a rope.
Battery protection system
The tool is equipped with the protection system, which
automatically cuts off the output power for its long service
life.
The tool may stop during operation when the tool and/or
battery are placed under the following situation. This is
caused by the activation of protection system and does
not show the tool trouble.
• When the tool is overloaded:
At this time, release the switch trigger and remove
causes of overload and then pull the switch trigger
again to restart. When the tool does not work even
after pulling the switch trigger, the battery power
auto-stop is still at work. Charge the battery car-
tridge before use.
• When the remaining battery capacity becomes low:
Recharge the battery cartridge.
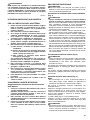
Battery remaining capacity indicator (only for
models with Battery AP-3622)
Battery AP-3622 is equipped with the battery remaining
capacity indicator. (Fig. 6)
Press the CHECK button to indicate the battery remain-
ing capacity. The indicator lamps will then light for
approx. three seconds.
• When only the lowermost indicator lamp (next to the
“E”) blinks, or when none of the indicator lamps light,
the battery charge has run out, so the tool does not
operate. In these cases, charge the battery or replace
the empty battery with a fully charged one.
• When two or more indicator lamps do not light even
after charging is complete, the battery has reached the
end of its service life.
• When the upper two and lower two indicator lamps light
alternately, the battery may have malfunctioned. Con-
tact your local DOLMAR authorized service center.
NOTE:
• The indicated charge may be lower than the actual
level during use or immediately after using the tool.
• Depending on the conditions of use and the ambient
temperature, the indication may differ slightly from the
actual capacity.
ASSEMBLY
CAUTION:
• Always be sure that the tool is switched off and the bat-
tery cartridge is removed before carrying out any work
on the tool.
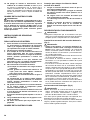
Installing or removing saw chain
CAUTION:
• Always be sure that the tool is switched off and the bat-
tery cartridge is removed before installing or removing
the saw chain.
• Always wear gloves when installing or removing the
saw chain.
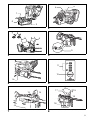
1. To remove the saw chain, slightly slide the lever in
the direction of arrow so that it can be released from
the locked position and move the lever in the upright
position as shown in the figure. (Fig. 7)
2. Press the lever and with the lever pressed in, turn it
counterclockwise to loosen the nut until sprocket
cover comes off. (Pressing in the lever leads to the
fitting of lever into the nut.) (Fig. 8)
3. Turn the adjusting dial counterclockwise to release
the saw chain tension.
4. Remove the sprocket cover.
5. Remove the saw chain and guide bar from the chain
saw.
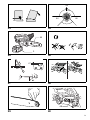
6. To install the saw chain, fit in one end of the saw
chain on the top of the guide bar and the other end
of it around the sprocket. (Fig. 9)
At this time, fit the saw chain as shown in the figure
because it rotates in the direction of arrow.
7. Rest the guide bar in place on the chain saw.
8. Turn the adjusting dial counterclockwise to slide the
adjusting pin in the direction of arrow. (Fig. 10)
9. Place the sprocket cover on the chain saw so that
the adjusting pin is positioned in a small hole in the
guide bar. (Fig. 11)
10. Press in the lever and with the lever depressed turn
it fully clockwise to tighten the nut. Then make it
about a quarter turn counterclockwise to loosen the
nut lightly. (Fig. 12)
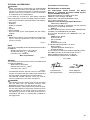
Indicator lamps
Remaining capacity
70% to 100%
45% to 70%
20% to 45%
0% to 20%
Charge the battery.
The battery may have
malfunctioned.
Lighted
Off
Blinking
E
F

20
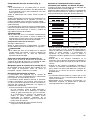
Adjusting saw chain tension
The saw chain may become loose after many hours of
use. From time to time check the saw chain tension
before use. (Fig. 13)
Move the lever in the upright position.
Press in the lever. With the lever depressed, make a
quarter turn on it counterclockwise to loosen the nut
lightly. (Pressing in the lever leads to the fitting of lever
into the nut.) (Fig. 14)
Turn the adjusting dial to adjust saw chain tension. Grasp
the saw chain in the middle of the guide bar and lift up.
The gap between the guide bar and the tie strap of the
saw chain should be approx. 2 – 4 mm. If the gap is not
approx. 2 – 4 mm, slightly turn the adjusting dial which
secures the guide bar. At this time, adjust with the tip of
guide bar slightly pointing up. (Fig. 15)
With the lever depressed, turn it fully clockwise to tighten
the nut firmly. (Fig. 16)
Return the lever to its original position. (Fig. 17)
CAUTION:
• Excessively high tension of saw chain may cause
breakage of saw chain, wear of the guide bar and
breakage of the adjusting dial.
• Installing or removing saw chain should be carried out
in a clean place free from sawdust and the like.
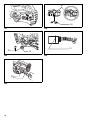
Battery adapter (Accessory) (Fig. 18 & 19)
CAUTION:
• Before using battery adapter, read all instructions on
tools using battery.
• When charging a battery cartridge, first remove it from
the battery adapter and then charge it. It is not allowed
to charge the battery cartridge while using battery
adapter.
Installing or removing battery adapter
• Always switch off the tool before insertion or removal of
the battery adapter.
• To remove the battery adapter, withdraw it from the tool
while sliding the button on the adapter.
• To insert the battery adapter, align the tongue on the
battery adapter with the groove in the housing and slip
it into place. Always insert it all the way until it locks in
place with a little click. If you can see the red part on
the upper side of the button, it is not locked completely.
Insert it fully until the red part cannot be seen. If not, it
may accidentally fall out of the tool, causing injury to
you or someone around you.
• Do not use force when inserting the battery adapter. If
the adapter does not slide in easily, it is not being
inserted correctly.
• The way of removing or installing a battery cartridge
from or on the battery adapter is the same as that of
removing or installing it from or on the tools.
• Press down the hook securely as far as it will go when
the battery adapter is hooked on the waist belt and sim-
ilar objects.
Arm cord hook (Accessory) (Fig. 20)
CAUTION:
• Do not attach the holder of arm cord hook to other than
the extension cord. Failure to do so may cause an acci-
dent or personal injury.
Using the arm cord hook helps to minimize a risk of cut-
ting off the extension cord unexpectedly caused by the
loose extension cord.
Attach firmly the arm cord hook band placing around
your arm and pass the extension cord through the holder.
The length of the arm cord hook band is adjustable.
NOTE:
• Do not pass the extension cord through the band.
• Do not force the opening of the holder. Failure to do so
may cause deflection and damage to it.
OPERATION
Lubrication (Fig. 21)
Saw chain is automatically lubricated when the tool is in
operation.
Check the amount of remaining oil in the oil tank through
the oil inspection window.
To refill the tank, remove the cap from the oil tank open-
ing. The oil tank capacity is 85 ml.
After refilling the tank, always screw the provided oil tank
cap on the chain saw.
CAUTION:
• When filling the chain saw with chain oil for the first
time, or refilling the tank after it has been completely
emptied, add oil up to the bottom edge of the filler neck.
The oil delivery may otherwise be impaired.
• As a saw chain oil, use oil exclusively for Dolmar chain
saws or oil available in market.
• Never use oil including dust and particles or volatile oil.
• When pruning trees, use botanical oil. Mineral oil may
harm trees.
• Never force the chain saw when pruning trees.
• Before cutting out, make sure that the provided oil tank
cap is screwed in place.
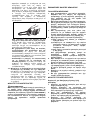
Hold the chain saw away from the tree. Start it and wait
until lubrication on saw chain is adequate.
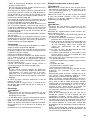
Bring the lower guide into contact with the branch to be
cut before switching on. Cutting without bringing the
lower guide into contact with the branch may cause the
guide bar to wobble, resulting in injury to operator.
Saw the wood to be cut by just moving it down. (Fig. 22)
A página está carregando ...
A página está carregando ...
A página está carregando ...
A página está carregando ...
A página está carregando ...
A página está carregando ...
A página está carregando ...
A página está carregando ...
A página está carregando ...
A página está carregando ...
A página está carregando ...
A página está carregando ...
A página está carregando ...
A página está carregando ...
A página está carregando ...
A página está carregando ...
A página está carregando ...
A página está carregando ...
A página está carregando ...
A página está carregando ...
A página está carregando ...
A página está carregando ...
A página está carregando ...
A página está carregando ...
A página está carregando ...
A página está carregando ...
A página está carregando ...
A página está carregando ...
A página está carregando ...
A página está carregando ...
A página está carregando ...
A página está carregando ...
A página está carregando ...
A página está carregando ...
A página está carregando ...
A página está carregando ...
A página está carregando ...
A página está carregando ...
A página está carregando ...
A página está carregando ...
A página está carregando ...
A página está carregando ...
A página está carregando ...
A página está carregando ...
A página está carregando ...
A página está carregando ...
A página está carregando ...
A página está carregando ...
A página está carregando ...
A página está carregando ...
A página está carregando ...
A página está carregando ...
A página está carregando ...
A página está carregando ...
A página está carregando ...
A página está carregando ...
A página está carregando ...
A página está carregando ...
A página está carregando ...
A página está carregando ...
A página está carregando ...
A página está carregando ...
A página está carregando ...
A página está carregando ...
A página está carregando ...
A página está carregando ...
A página está carregando ...
A página está carregando ...
A página está carregando ...
A página está carregando ...
A página está carregando ...
A página está carregando ...
-
 1
1
-
 2
2
-
 3
3
-
 4
4
-
 5
5
-
 6
6
-
 7
7
-
 8
8
-
 9
9
-
 10
10
-
 11
11
-
 12
12
-
 13
13
-
 14
14
-
 15
15
-
 16
16
-
 17
17
-
 18
18
-
 19
19
-
 20
20
-
 21
21
-
 22
22
-
 23
23
-
 24
24
-
 25
25
-
 26
26
-
 27
27
-
 28
28
-
 29
29
-
 30
30
-
 31
31
-
 32
32
-
 33
33
-
 34
34
-
 35
35
-
 36
36
-
 37
37
-
 38
38
-
 39
39
-
 40
40
-
 41
41
-
 42
42
-
 43
43
-
 44
44
-
 45
45
-
 46
46
-
 47
47
-
 48
48
-
 49
49
-
 50
50
-
 51
51
-
 52
52
-
 53
53
-
 54
54
-
 55
55
-
 56
56
-
 57
57
-
 58
58
-
 59
59
-
 60
60
-
 61
61
-
 62
62
-
 63
63
-
 64
64
-
 65
65
-
 66
66
-
 67
67
-
 68
68
-
 69
69
-
 70
70
-
 71
71
-
 72
72
-
 73
73
-
 74
74
-
 75
75
-
 76
76
-
 77
77
-
 78
78
-
 79
79
-
 80
80
-
 81
81
-
 82
82
-
 83
83
-
 84
84
-
 85
85
-
 86
86
-
 87
87
-
 88
88
-
 89
89
-
 90
90
-
 91
91
-
 92
92


Dolmar AS-3625 Manual do proprietário
- Categoria
- Motosserras elétricas
- Tipo
- Manual do proprietário
em outros idiomas
- español: Dolmar AS-3625 El manual del propietario
- français: Dolmar AS-3625 Le manuel du propriétaire
- italiano: Dolmar AS-3625 Manuale del proprietario
- Nederlands: Dolmar AS-3625 de handleiding
- Deutsch: Dolmar AS-3625 Bedienungsanleitung
- dansk: Dolmar AS-3625 Brugervejledning
Artigos relacionados
-
Dolmar AS3731 Manual do proprietário
-
-
-
Makita UC4020A Manual do proprietário
-
Makita DUC122 Manual do proprietário
-
-
-
-
Dolmar AS1925C Manual do proprietário
-
Makita DUC254C Manual do proprietário
Outros documentos
-
Makita BUC250 Manual do proprietário
-
Makita BUC121 Manual do proprietário
-
Ryobi OPP1820 ONE+ Pole Saw Bare Tool Manual do usuário
-
-
Makita UC4550A Manual do proprietário
-
DeWalt DCM575 Manual do usuário
-
DeWalt DCM565 Manual do usuário
-
DeWalt DCM585 Manual do usuário
-
Black & Decker DE40 Manual do usuário
-