Rowenta PERFECTO Manual do proprietário
- Categoria
- Cafeteiras
- Tipo
- Manual do proprietário
Este manual também é adequado para

www.rowenta.com
EN p. 5 - 11
DE p. 12 - 19
FR p. 20 - 27
NL p. 28 - 35
ES p. 36 - 43
PT p. 44 - 51
IT p. 52 - 59
DA p. 60 - 66
NO p. 67 - 73
SV p. 74 - 80
FI p. 81 - 87
EL p. 88 - 95
AR p. 102 - 96
FA p. 109 - 103
NC00025894-01
EN
DE
FR
NL
ES
PT
IT
DA
NO
SV
FI
EL
AR
FA
f
h
b
g
j
e
i
c
a
d1-3
d
d1-2
d1-1
d2 d4
d3
d1-4
d1
IFU_RO_PERFECTO_4400_NC00025894-01_eo 27/09/11 11:25 PageA1

1
2
3
3
1
2
11
2
1L
x2 =
x1 =
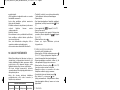
fig.1a
fig.1c
fig.2
fig.5
fig.3
fig.4
fig.8
fig.9
fig.10a
fig.6
fig.7
fig.1b
11
2
1
2
3
2
1
33
fig.10b
fig.12
fig.13
fig.16
fig.14
fig.15
fig.19
fig.20
fig.17
fig.18
fig.11
IFU_RO_PERFECTO_4400_NC00025894-01_eo 27/09/11 11:25 PageA4

OK
NO
fig.21a
fig.21b
fig.21c
IFU_RO_PERFECTO_4400_NC00025894-01_eo 27/09/11 11:26 PageA7

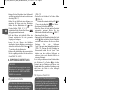
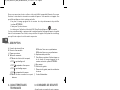
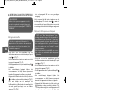
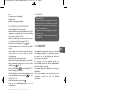
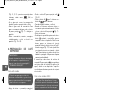
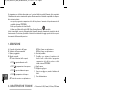
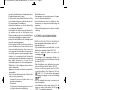
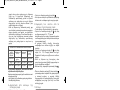
2- TECHNICAL
CHARACTERISTICS
• Electromagnetic pump: 15-bar
• Filter holder with used coffee ejection system
• 1 or 2 cups
• Adjust the volume of coffee in the cup
• Automatic serving of the selected volume of coffee
• Compatible with all types of pods, E.S.E or soft
• Steam function
•
Auto off after 9 minutes (environmental protection).
• Removable tank (capacity: 0,86 litre)
• Power rating: 1350-1600 W
• Tension: 220-240 V 50/60 Hz
• Overheating safety devices
• Dimensions: H. 322,5 mm, L. 291 mm, W. 214 mm
3. SAFETY INSTRUCTIONS
• Before using your espresso machine, please read the
instructions carefully.
• Only plug the appliance in to a socket with an earth
pin. Check that the voltage on the rating plate of the
appliance matches that of your electrical installation.
• Do not place your espresso machine on a hot surface
(an electric hob for example) or close to flames.
• Do not remove the filter holder containing the
ground coffee when water is passing through it as
the appliance is pressurised at that time.
• Do not use the appliance unless the drip tray and the
grill are fitted.
• Always unplug your appliance in the case of
problems when making coffee or before cleaning
your appliance.
• Do not unplug the appliance by pulling on the power
cord and do not place the power cord on a sharp
edge or corner.
• Avoid contact between the power cord or your hands
with the hot parts of the appliance (cups warming
tray, filter holder, steam nozzle).
• Do not immerse the appliance in water.
• Keep out of the reach of children and do not allow the
power cord to dangle.
5
EN
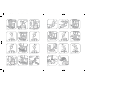
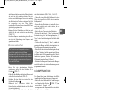
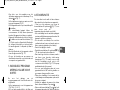
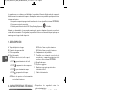
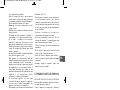
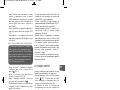
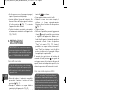
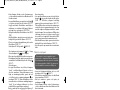
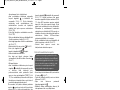
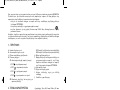
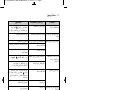
1- DESCRIPTION
a Water tank cover
b Removable water tank
c Cup tray
d Control panel:
d.1 Selection knob (coffee or steam)
d.1-1 = preheating of coffee
d.1-2 = preparation of an espresso
d.1-3 = preheating of steam vapeur
d.1-4 = preparation of steam
d.2 ON/OFF button with LED
d.3 Button 1 cup with indicator light
d.4 Button 2 cups with avec indicator light
e Position for the filter holder
f Filter holder with ejection system for the
used coffee or pod and progressive
compression of the ground coffee or pod:
OPTIPRESS system.
g Steam nozzle
h Drip tray grill
i Drip tray with level indicator
j Power cord
Thank you for purchasing this ROWENTA product. You have just purchased the latest innovation
in terms of espresso machines. Your machine is equipped with a filter holder that has three
exclusive systems:
• One is for the progressive compression of the ground coffee when positioning the filter
holder. (OPTIPRESS system).
• The second is for ejecting the used coffee.
• The last one is for the use of E.S.E. (Easy Serving Espresso) pods or soft pods.
It can also be removed, so that you can clean it regularly to keep it in perfect working order. For
your safety, the filter holder is fitted with a locking system so that it remains in place when the
pressure rises.
IMPORTANT!
Operating voltage:
This appliance is designed to operate solely
with an alternating current of 220-240 V
Type of use: This product has been designed
for domestic use only. Any commercial use,
inappropriate use or failure to comply with the
instructions, the manufacturer accepts no res-
ponsibility and the guarantee will not apply.
IFU_RO_PERFECTO_4400_NC00025894-01_eo 27/09/11 11:26 Page5

6
EN
• Follow the instructions for descaling operations.
• Do not use the appliance if it is damaged or if the
power cord has been damaged.
• If the power cord or any other specific element is
defective, in order to avoid any danger they must
only be replaced by a Rowenta approved service
centre. Under no circumstances must the appliance
be opened by the user.
• Check that the filter holder has been tightened before
making the coffee.
• This appliance is not designed to be used by persons
(including children) with reduced physical, sensory
or mental capacities or persons with no experience
or knowledge unless they have been provided with
suitable instructions concerning the use of the
appliance from a person responsible for their safety.
Children should be supervised to ensure that they do
not play with the appliance.
• The accessories and removable parts of the
appliance are not dishwasher proof.
• Place on a flat, stable, heat-resistant work surface
away from water splashes and sources of heat.
• This appliance is intended to be used only in the
household.
• It is not intended to be used in the following
applications, and the guarantee will not apply for :
- staff kitchen areas in shops, offices and other
working environments,
- farm houses,
- by clients in hotels, motels and other residential type
environments,
- bed and breakfast type environments.
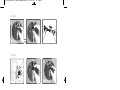
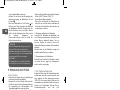
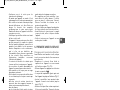
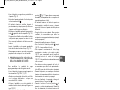
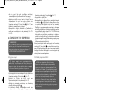
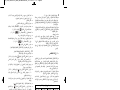
4. PRACTICAL ADVICE
Remember to release the filter holder while pressing
the “EJECT” button lightly before removing it from
the appliance
(fig. 1a).
• To obtain an espresso with an intense aroma, we
recommend that you use freshly ground special
espresso coffee that is suited to the delicate
preparation of this type of coffee, as well as cups that
are not bigger than 50 ml.
• Keep the ground coffee in the refrigerator, it will
conserve its aroma for longer.
• Do not fill your filter holder to the top, use the
measuring spoon (1 spoonful for 1 cup, 2 spoonfuls
for 2 cups). Remove any excess ground coffee from
the edge of the filter holder.
• If the appliance is not used for more than 5 days,
empty and rinse the water tank.
• Before removing the tank to fill or empty it, always
remember to switch off the appliance.
• Always ensure that the appliance is placed on a flat,
stable, heat-resistant surface.
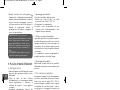
5. FIRST USE
Rinsing before first use
Before using your coffee machine, clean all of the
accessories in water and washing up liquid then dry them.
• Fill the tank with cold water and fit it onto the
appliance, ensuring that it is fitted correctly
(fig. 1b).
• Switch on the appliance by pressing the ON/OFF
button d2 .
• The temperature light flashes then remains lit. The
appliance is ready for use (fig. 2).
• Insert the filter holder (without ground coffee) into
the appliance: turn it towards the right as far as
possible
(fig. 3).
• Place a container with a volume of over ½ litre under
the filter holder. Turn the switch d1 to the “coffee”
position
(fig. 4, 5, 6), then press on the two
cup position , several times if necessary.
• If the water doesn’t run off (pump priming), repeat
the process from the beginning.
• Let the water run from the tank. To stop the flow of
water, turn the selector d1 to the position
(fig. 7)
and unplug the appliance.
• Remove the tank, empty it and rinse it carefully and
fit it back onto the appliance
(fig. 1b and 8).
6. PREPARING AN ESPRESSO
With ground coffee
• Before removing the removable tank, place the
selector d1 in the position
(fig. 7).
• Fill the tank with cold water and fit it back onto the
appliance
(fig. 8).
• Switch on the appliance by pressing the ON/OFF
button d2 .
IMPORTANT!
Before first use, after prolonged periods of
non-use or after descaling, the appliance
must be cleaned as described in the para-
graph: “FIRST USE”
IMPORTANT!
If the espresso machine is being used for
the first time, the appliance must be
cleaned as described in paragraph 5
“FIRST USE”.
The type of ground coffee that you use
will determine the strength and taste of
your espresso: the finer your coffee is
ground, the stronger the espresso.
IFU_RO_PERFECTO_4400_NC00025894-01_eo 27/09/11 11:26 Page6

7
EN
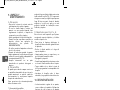
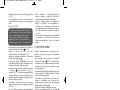
• The LED flashes while the machine is warming up,
then remains lit. The appliance is then ready for use.
• Release the filter holder by pressing the button
lightly and turning it towards the left
(fig.
9)
. Using the measuring spoon, place the ground
coffee into the filter holder: one measuring spoon
(filled to the top) per cup for a good espresso
(fig.
10a)
.
• Remove the excess ground coffee from the edge of
the filter holder
(fig. 10b).
• Insert the filter holder into the appliance tightening it
by turning it towards the right as far as possible
(fig.
12).
• Place a cup on the grill of the drip tray under the filter
holder
(fig. 13).
• Turn the selector d1 to the position (coffee) (fig. 4).
• Press either the d3 button for 1 cup or the D4
button for 2 cups.
• After a few moments, the coffee stars to flow.
• When the cups are full, the coffee stops flowing
automatically. Move the selector d1 back to the
position
(fig. 7).
• Remove the cup.
• Release the filter holder: press the button lightly
while turning the filter holder towards the left and
remove it from the appliance. Throw away the used
coffee using the ejection system by pressing the
"push" button on the handle fully
(fig. 16). Wash the
filter holder under running water, while pressing the
"push" button to eliminate the remains of ground
coffee (see also paragraph 8.B for deeper cleaning).
It is normal that each time the control selector d1
returns to the position there is a low noise of
running water or steam, due to a specific device which
eliminates the pressure from the circuits.
With an E.S.E espresso pod
• Before removing the removable tank, remember to
place the selector d1 in the position
(fig. 7).
• Fill the tank with cold water and fit it back onto the
appliance
(fig. 8).
• Switch on the appliance by pressing the ON/OFF
button d2 .
• The LED flashes during preheating, then remains lit.
The appliance is then ready for use.
• Release the filter holder by pressing the button
lightly and turning it towards the left
(fig. 15). If
required, remove the paper around the pod
following the dotted lines
(fig. 11). Place the E.S.E
pod with the red writing facing downwards (fold the
corners of the filter paper back). Ensure that the
paper is placed inside the filter, otherwise this could
cause leaks. For creamier and thicker froth, the E.S.E
pod must be positioned correctly. The pod is
designed to make one cup of coffee. The use of 2
E.S.E pods on top of one another is not
recommended.
• Insert the filter holder into the appliance tightening it
by turning it towards the right as far as possible
(fig.
12).
• To prepare your espresso, follow the same
procedure as for the preparation of an espresso with
ground coffee.
With a soft pod
• Before removing the removable tank, remember to
place the selector d1 in the position
(fig. 7).
• Fill the tank with cold water and fit it back onto the
appliance
(fig. 8).
• Switch on the appliance by pressing the ON/OFF
button d2 .
• The LED flashes during preheating, then remains lit.
The appliance is then ready for use.
• Release the filter holder by pressing the button
lightly and turning it towards the left
(fig. 15). Place
a soft pod into the filter holder. The pod is designed
to make one cup of coffee. The use of 2 pods on top
of one another is not recommended.
• Insert the filter holder into the appliance tightening it
by turning it towards the right as far as possible
(fig.
12).
• To prepare your espresso, follow the same
procedure as for the preparation of an espresso with
ground coffee.
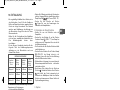
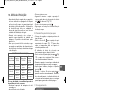
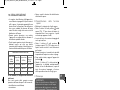
7. INDIVIDUAL PROGRAMMING
OF THE VOLUME OF COFFEE:
To change the pre-programmed amount of water,
proceed as follows:
• Fill the water tank and turn the machine on
(fig.
1 abc, 2, and 4)
.
• Put a spoonful of coffee in the filter by using a
measuring spoon or use an E.S.E. or soft pod.
"ESE" for "Easy Serving Espresso" is a
pod (44 mm in diameter) of 7g of coffee
that has been selected, ground and com-
pacted between two filter papers especially
designed to make Italian style espresso
("ristretto" short coffee).
This system permits easy, simple, clean
and comfortable use of your machine.
Your machine is also compatible with soft
pods (generally 60 mm in diameter).
As this type of pod is not specifically designed
for espresso machines, you will obtain a wea-
ker espresso than with an E.S.E. pod.
IFU_RO_PERFECTO_4400_NC00025894-01_eo 27/09/11 11:26 Page7

• Put the filter holder in place and lock it by turning
it to the right as far as it will go, up to the stop
(fig. 12).
• Place a cup under the filter holder.
• Hold down the "1 cup" button (> 3 sec) until the
"1 cup" light flashes quickly. The coffee flows out.
• When the desired amount of espresso is
obtained, press the "1 cup" button. This amount
will be saved automatically.
• The next time when you press the "1 cup" button,
you will obtain the most recently recorded
amount. Programming for 2 cups uses the same
method, by pressing the "2 cups" button (> 3 sec).
• If you turn off the device, the volumes will need
to be reprogrammed the next time you use it.
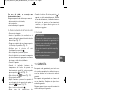
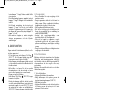
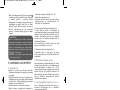
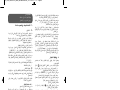
8. STEAM FUNCTION
Steam is used to foam milk (for example to make
a cappuccino).
• To produce steam, turn the switch d1 to the
position
(fig. 17) (to obtain more steam, the
temperature needs to be higher than when making
coffee).
• The ON/OFF button LED flashes again then remains
lit. The appliance is then ready for use.
• Put the milk into a container. For best results, we
recommend you use a container with a small
opening (small jug for example).
• Plunge the steam nozzle into the liquid.
• Turn the switch d1 to the position (steam)
(fig.
18): the steam comes out into the milk.
• In order to give the milk plenty of froth, move the
appliance in a circular direction from top to bottom
(fig. 19)
, making sure that the steam nozzle
remains upright at the centre of the container.
(figs. 21c)
.
The pump operates intermittently, this
is normal.
• To obtain a good froth on your milk, we recommend
that you use fresh cold pasteurised semi-skimmed
milk, skimmed milk or UHT milk.
• During operation, it is normal for the temperature
light of the ON/OFF button to light up and then
extinguish.
• When frothing is completed, stop the appliance
device (switch d1 in position )).
• When the selector d1 is in the position , the
appliance cools down automatically. During the
cooling down phase, the LED of the ON/OFF button
flashes, and hot water runs into the drip tray. When
the optimal temperature for preparing an espresso is
reached, the LED remains lit.
9. MAINTENANCE AND
CLEANING
A. The appliance
• Unplug the machine each time before cleaning and
leave the appliance to cool down.
• Clean the outside of the appliance from time to time
with a damp sponge. Wash the tank, the drip tray and
its grill regularly and dry them.
• Rinse the inside of the tank regularly.
• When a fine white film obscures the tank, carry out a
descaling operation. (see paragraph 10. DESCALING).
• Do not use alcohol or solvent based cleaning
products.
• Once the appliance has been unplugged, clean the
hot water grill and the seal regularly, using a damp
sponge
(fig. 16).
• Only clean with a damp cloth, do not use detergents
or abrasive products.
B. The filter holder
The appliance that you have purchased is equipped
with a removable ejecting filter holder, which allows
you to maintain it in perfect working order. We
recommend that you clean it each time after use.
These removal/fitting operations must be carried out
when the machine has cooled down.
1. Removal of the filter holder:
• Remove the filter holder from your machine.
• Dispose of the used coffee or pod by pressing the
"push" button
(fig. 16).
• Rinse in clear water.
• Remove the back of the filter holder by turning to the
left, while pressing in the two brackets.
2. Cleaning and rinsing the filter holder:
The filter holder may then be cleaned using a
household detergent and a scouring pad, but must be
rinsed afterwards in clear water. For best results, you
may press the ejection button several times while
rinsing.We recommend shaking your filter holder
vigorously in order to remove all water.
3. Fitting the filter holder:
Replace the bottom of the filter holder by rotating it
anti-clockwise to lock.
C. The drip tray
When the drip tray full level is displayed, it must be
emptied after removing the grid (fig. 20). The
presence of water is normal, and does not mean there
is a leak. If necessary, clean the drip tray and its grid
with water and a little gentle washing-up liquid. Rinse
and dry.
8
EN
IMPORTANT!
Once the steam has been stopped, clean the
steam nozzle immediately and thoroughly
using a damp sponge (to avoid residues from
sticking) and let a little more steam run through
into free air to rinse the inside of the nozzle.
WARNING!
The steam nozzle is still hot!
Be careful not to burn yourself.
IFU_RO_PERFECTO_4400_NC00025894-01_eo 27/09/11 11:26 Page8

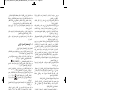
D. The steam nozzle
(Fig 21 a, b)
This accessory consists of 2 parts: one part which is
the plastic support and the other which is the metal
protection cylinder.
•
Before cleaning, unlock the nozzle from the
articulated arm by turning it to the left.
•
Then slide the metal cylinder along the plastic
support.
•
Clean these two parts with tap water and some
mild washing-up liquid.
•
Rinse and dry.
•
Once the parts have been properly cleaned, put the
metal cylinder back on the support.
•
Make sure that you don’t damage the silicone seal
which makes the nozzle watertight.
•
Insert the nozzle on the articulated arm then twist
to the right.
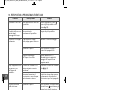
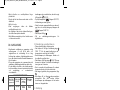
10. DESCALING
• Regular descaling of your appliance, as mentioned in
paragraphs A and B for the coffee and steam
functions, is the best guarantee of your machine's
long life. The frequency of the descaling operations
must be adapted to suit the hardness of your water.
Ask for advice from your local water authority.
• During the operation, do not stand your appliance on
a marble surface. The descaler could affect it.
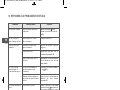
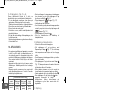
• To make this clearer, please find below a summary
table of the frequencies of the descaling operations
according to the hardness of water and use:
If in doubt, we recommend carrying out a descaling
operation every month.
No repairs to your machine will be carried out due to:
• descaling not being carried out,
• scale.
A. Descaling of the coffee function
• Unplug the appliance.
• Insert the filter holder (without ground coffee) into
the appliance and lock it into place by turning it
towards the right as far as possible
(fig. 3).
• Place a container with a volume of more than 1/2 litre
under the filter holder
(fig. 6).
• Check that the selector d1 is in the position .
• Empty the tank and put it in place.
• Fill the tank with a mixture of three parts water to one
part commercially available white vinegar (available
from hardware stores) or citric acid.
• Switch on the appliance.
• Place the d3 button in the maximum volume
position.
• When the temperature light of the ON/OFF button
remains lit, you can then switch to the position
(coffee)
(fig. 4).
• Press the d4 2 cups button
(fig. 14).
• Let the mixture flow through.
• Wait for 2 minutes then repeat the operation twice,
from the step of pressing the d4 2 cups button
(fig. 14).
• Turn the selector to the position .
• Now follow the instructions for descaling the steam
function.
B. Descaling the steam function
• Next place the container under the steam nozzle.
• Turn the selector d1 to the position (steam heat)
(fig. 17) (to obtain steam, the temperature must be
higher than that required for coffee).
• the LED of the ON/OFF button flashes then remains
lit.
• Turn the selector d1 to the position (steam
extraction) (fig. 18): the steam pours into the liquid.
Let the rest of the mixture flow for 2 minutes.
• During the operation, it is normal for the water
temperature light to light up and then go out.
• After a few moments, stop the appliance (position ).
• When the selector d1 is in the position , the
appliance cools down automatically. During the
cooling down phase, the LED of the ON/OFF button
flashes and hot water runs into the drip tray.
C. Rinsing
11. GUARANTEE
Your appliance is supplied with a guarantee but any
incorrect connection, handling or use other than those
described in the instructions will invalidate this
guarantee.
The warranty for this appliance covers it exclusively
for domestic use; any other type of use voids the
warranty.
No repairs due to scale are covered by the guarantee.
For any after sales or spare parts problems, contact
your dealer or an approved service centre.
9
EN
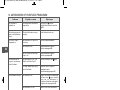
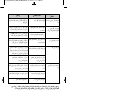
DESCALING FREQUENCY
Av. number of
coffees per week
Soft water
(<19°th)
Hard water
(19-30°th)
Very hard water
(>30°th)
Less than 7 Once a year Every 8 months Every 6 months
From 7 to 20 Every 4 months Every 3 months Every 2 months
More than 20 Every 3 months Every 2 months Every month
IMPORTANT!
• After descaling, rinse 2-3 times with clear
water (without ground coffee), as described
in paragraph "First use".
• Don't forget to rinse the steam nozzle (Figs.
21 a, b).
The appliance is descaled and ready to use
again.
IFU_RO_PERFECTO_4400_NC00025894-01_eo 27/09/11 11:26 Page9

10
EN
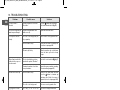
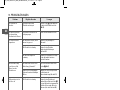
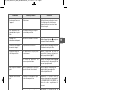
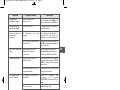
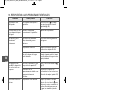
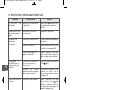
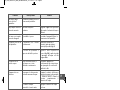
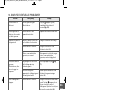
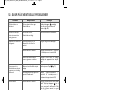
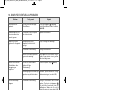
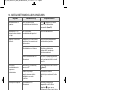
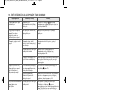
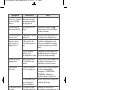
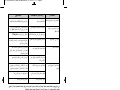
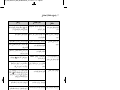
12. TROUBLESHOOTING
Problems Possible causes Solutions
The filter holder is
blocked.
You have forgotten to release the
filter holder.
Press the button while turning the
filter holder towards the left (fig. 15).
The coffee is not dry after the
water has passed through.
You have not tightened the filter
holder correctly.
Tighten the filter holder more.
The espresso flows too
slowly.
The coffee is too finely ground, too
oily or powdery.
Choose a more coarsely ground coffee.
The filter holder is dirty. Clean your filter holder according to the
instructions in paragraph 9.B.
The water grill is dirty. When the appliance has cooled down,
clean the water grill with a damp
sponge.
Water flows from the filter
holder after the espresso
has been made.
The selection knob has not been
placed in the position
"Resistor"
.
Turn the d1 control switch to (fig. 7).
Premature formation of scale due
to very hard water.
Descale the espresso machine according
to the instructions (paragraph 10).
Ground coffee in the cup. The filter holder is dirty. Clean the filter holder with hot water.
Press the button to eliminate any
remaining coffee. Shake it to remove of
any water (also refer to paragraph 9.B.)
The coffee is too finely ground. Use a more coarsely ground coffee.
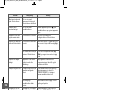
The espresso is not not
frothy/has no crema.
The coffee is too old or has
become stale.
Use a more recently ground fresher
coffee.
The coffee is not suited to making
espresso.
Use a finer espresso ground coffee, and
only use Espresso ground coffee
There is not enough coffee in the
filter holder.
Add more coffee.
The water tank leaks
when it is moved.
The valve at the bottom of the tank
is dirty or faulty.
Wash the water tank and activate the valve
at the bottom of the tank with your finger.
The valve is blocked by scale Descale the appliance as described in
paragraph 10.
Water leaking underneath
the appliance.
Inside leak.
Check that the tank is fitted correctly. If
the problem continues, do not use the
appliance, contact an approved service
centre.
Cracking noises are heard
from the filter holder.
This is normal: safety lock on the
filter holder.
The pump is abnormally
noisy.
No water in the tank. Switch off the appliance (position ), fill
the water tank and switch back on.
IFU_RO_PERFECTO_4400_NC00025894-01_eo 27/09/11 11:26 Page10

11
EN
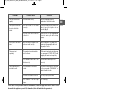
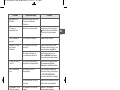
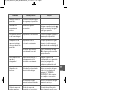
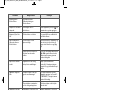
If the cause of the problem cannot be determined, contact an approved service centre. Do not
dismantle the appliance yourself! (If dismantled, this will invalidate the guarantee).
13. ELECTRICAL OR ELECTRONIC PRODUCT TO BE DISPOSED OF
Do your part to protect the environment!
Your appliance contains many materials that may be recovered or recycled.
Please take it to a local civic waste collection point
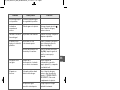
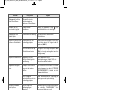
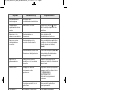
Problems Possible causes Solutions
The cups are not filled
equally.
The filter holder is dirty. Refer to paragraph 9.B for the
maintenance of the filter holder.
The espresso leaks from
the sides of the filter
holder.
The filter holder is not fitted
correctly.
Fit the filter holder in place and lock it
(turn it from left to right as far as
possible) (fig. 3).
The edge of the filter holder has
coffee on it.
Remove the excess coffee (fig. 10b) and
clean the water grill with a damp
sponge.
Your espresso has a bad
taste.
After descaling, the appliance has
not been rinsed correctly.
Rinse the appliance according to the
instructions (paragraph 9) and check
the quality of coffee.
The pump is not
operating
The pump has been drained due
to lack of water.
Fill the water tank and restart the pump
(see paragraph 5. "FIRST USE"). Avoid
emptying the water tank completely.
The removable water tank is not
fitted correctly.
Push the water tank firmly to fit it
correctly.
The steam nozzle does
not froth the milk.
The steam nozzle is blocked or
scaled.
Descale the steam nozzle as described
in the paragraph "DESCALING" or
unblock it with a needle.
The milk is too warm or not fresh. Use very cold, very fresh milk.
The container is not the right
shape.
Use a small jug.
HELPLINE:
If you have any product problems or queries, please contact our Customer Relations Team first
for expert help and advice:
0845 602 1454 - UK
(01) 677 4003 - ROI
or consult our website - www.rowenta.co.uk
IFU_RO_PERFECTO_4400_NC00025894-01_eo 27/09/11 11:26 Page11

12
DE
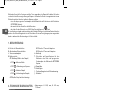
2- TECHNISCHE EIGENSCHAFTEN
• Elektromagnetische Pumpe: 15 bar
• Filterhalter mit Ausstoßsystem für den Kaffeesatz
• 1 oder 2 Tassen
• Einstellung der Kaffeemenge in der Tasse
• Automatisches Auslaufen der ausgewählten
Kaffeemenge
• Kompatibel mit allen Pads E.S.E
• Dampffunktion
• Automatische Abschaltung nach 9 Minuten
(Umweltschutz).
• Abnehmbarer Wasserbehälter (Füllmenge: 0,86
Liter)
• Leistung: 1350-1600 W
• Spannung: 220-240 V 50/60 Hz
• Sicherheitssystem gegen Überhitzung
• Abmessungen: H. 322,5 mm, B. 291 mm,
T. 214 mm
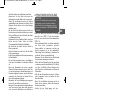
3. SICHERHEITSVORSCHRIFTEN
• Lesen Sie vor dem Einschalten Ihres
Espressogerätes aufmerksam diese
Gebrauchsanweisung. Entfernen Sie alle
Verpackungen und Aufkleber vom Gerät.
• Bei Benutzung entgegen der Gebrauchsanweisung
übernimmt Rowenta keine Haftung und die
Garantie erlischt.
• Schließen Sie das Gerät nur an eine geerdete
Steckdose an. Bei Verwendung eines
Verlängerungskabels, muss dieses über einen
Stecker mit Erdung verfügen und muss so verlegt
werden, dass niemand darüber stolpern kann.
Überprüfen Sie ob die auf dem Typenschild
angegebene Betriebsspannung mit der Spannung
Ihrer Elektroinstallation übereinstimmt.
• Nie Ihr Espressogerät auf einer heißen Oberfläche
abstellen (zum Beispiel eine Kochplatte) oder in der
Nähe einer Flamme.
• Entfernen Sie nie den das Kaffeemehl enthaltenden
Filterhalter während das Wasser durchläuft, denn
WICHTIG!
Betriebsspannung: dieses Gerät ist vorge-
sehen um ausschließlich mit Wechselstrom
220-240 V zu arbeiten.
Anwendungstyp: dieses Gerät ist nur für
den privaten Hausgebrauch in geschlosse-
nen Räumen vorgesehen.
1. BESCHREIBUNG:
a. Deckel des Wasserbehälters
b. Abnehmbarer Wasserbehälter
c. Tassenvorwärmplatte
d. Bedieneinheit:
d1 Wahlknopf (Kaffee oder Dampf)
d.1-1 = Aufheizen Kaffee
d.1-2 = Zubereitung von Espresso
d.1-3 = Aufheizen Dampf
d.1-4 = Vorbereitung des Dampfs
d.2 Ein/Aus Knopf mit Leuchtanzeige
d.3 Schalter 1 Tasse mit Lämpchen
d.4 Schalter 2 Tassen mit Lämpchen
e. Brühkopf
f. Filterhalter mit Ausstoßsystem für den
Kaffeesatz oder Pads und progressives
Feststampfen des Kaffeemehls OPTIPRESS
System.
g. Dampfdüse
h. Abstellgitter
i. Tropfenauffangschale mit Füllstandsanzeige
j. Netzkabel
Wir danken Ihnen für Ihr Vertrauen und Ihre Treue gegenüber den Rowenta-Produkten. Sie haben
soeben die letzte Neuerung in Bezug auf Espresso erstanden. Ihr Gerät ist ausgestattet mit einem
Filterhalter welcher über drei exklusive Systeme verfügt:
• eines für das progressive Feststampfen des Kaffeemehls beim Positionieren des Filterhalters
(OPTIPRESS System).
• das zweite für das Ausstoßen des Kaffeesatzes.
• das letzte für den Gebrauch von E.S.E. (Easy Serving Espresso) Pads.
Er ist außerdem zerlegbar und kann daher durch häufiges Reinigen in perfektem Zustand erhalten
werden. Aus Sicherheitsgründen ist der Filterhalter mit einem Verriegelungssystem ausgestattet
damit er während des Druckanstieges in Position bleibt.
IFU_RO_PERFECTO_4400_NC00025894-01_eo 27/09/11 11:26 Page12

13
DE
das Gerät steht in diesem Moment unter Druck.
• Gebrauchen Sie das Gerät nicht wenn die
Auffangschale und das Gitter nicht montiert sind.
• Ziehen Sie den Netzstecker wenn ein Problem
auftritt während des Auslaufens des Kaffees. Nach
Gebrauch Stecker ziehen und vor dem Reinigen
abkühlen lassen.
• Nie das Gerät vom Netz trennen indem Sie am
Kabel ziehen, und das Kabel nicht über eine scharfe
Kante oder Möbelecke leiten. Halten Sie das Kabel
von Wärmequellen fern.
• Verhindern Sie den Kontakt des Kabels oder Ihrer
Hände mit den heißen Teilen des Geräts
(Tassenwarmhalter, Filterhalter, Dampfdüse).
• Nie das Gerät, das Kabel oder den Stecker in
Wasser eintauchen.
• Halten Sie Kinder fern und lassen Sie das Kabel
nicht herunterhängen.
• Folgen Sie den Angaben der Gebrauchsanweisung
für das Entkalken.
• Nie das Gerät einschalten wenn es beschädigt ist
oder wenn das Netzkabel in schlechtem Zustand
ist.
• Wenn das Stromkabel oder andere spezielle
Elemente Schäden aufweisen, müssen diese Teile
von einem zugelassenen Kundendienstcenter von
Rowenta ausgetauscht werden, um jede Gefahr zu
vermeiden. Das Gerät darf auf keinen Fall von
Ihnen selbst aufgemacht werden.
• Überprüfen Sie ob der Filterhalter gut angezogen
ist bevor Sie den Kaffee auslaufen lassen.
• Überlassen Sie niemals unbeaufsichtigten Kindern
oder Personen das Gerät, wenn deren physische
oder sensorische Fähigkeiten oder Mangel an
Erfahrung und Wissen sie am sicheren Gebrauch
hindern. Sie müssen stets überwacht werden und
zuvor unterwiesen sein.
Kinder müssen beaufsichtigt werden, um sicher zu
gehen, dass sie nicht mit dem Gerät spielen.
• Füllen Sie kein heißes Wasser oder andere
Flüssigkeiten in den Wassertank. Verwenden Sie
nur Originalzubehör und Ersatzteile passend zu
Ihrem Gerät. Achtung : Das Gerät, der austretende
Dampf und das austretende Wasser sind sehr heiß.
Verbrennugsgefahr.
• Das Zubehör und die abnehmbaren Teile des
Geräts sind nicht spülmaschinenfest.
• Dieses Gerät ist ausschließlich für den
Haushaltsgebrauch bestimmt.
• Es ist nicht für folgende Fälle bestimmt, in denen
die Garantie nicht gilt:
- Gebrauch in Kochecken für das Personal in
Geschäften, Büros und sonstigen
Arbeitsumfeldern,
- Gebrauch auf Bauernhöfen,
- Gebrauch durch Gäste von Hotels, Motels und
sonstigen Umfeldern mit Beherbergungscharakter,
- Gebrauch in Umfeldern wie Gästezimmern.
4. PRAKTISCHE RATSCHLÄGE
Denken Sie daran den Filterhalter zu entriegeln
indem Sie die « EJECT » Taste leicht drücken,
bevor Sie versuchen ihn vom Gerät abzunehmen
(Abb. 1a).
• Um aromastarken Kaffee zu erhalten empfehlen
wir Ihnen frisch gemahlenen speziellen
Espressokaffee zu verwenden, welcher am
besten angepasst ist an die empfindliche
Zubereitung dieses Kaffeetyps. Verwenden Sie
am Besten Tassen von maximal 50 ml.
• Bewahren Sie das Kaffeemehl im Kühlschrank
auf um das Aroma länger zu erhalten.
• Füllen Sie Ihren Filterhalter nicht bis zum Rand,
sondern benutzen Sie den Messlöffel (1 Löffel für
eine Tasse, 2 Löffel für 2 Tassen). Entfernen Sie
den Überschuss an Kaffeemehl vom Rand des
Filterhalters.
• Falls Sie das Gerät während mehr als 5 Tagen
nicht verwenden, leeren und spülen Sie den
Wasserbehälter.
• Bevor Sie den Behälter abnehmen um Ihn zu
füllen oder zu entleeren, denken Sie daran das
Gerät auszuschalten.
• Stellen Sie das Gerät immer auf eine ,
unempfindliche und stabile Oberfläche.
• Lassen Sie das Gerät nie ohne Aufsicht im
Betrieb.
• Jeder Eingriff, außer der im Haushalt üblichen
Reinigung und Pflege durch den Kunden, muss
durch den Kundendienst erfolgen.
• Vorsicht im Umgang mit heißen Getränken.
5. ERSTE INBETRIEBNAHME
Spülen vor dem ersten Gebrauch.
Bevor Sie Ihr Gerät gebrauchen, reinigen Sie das
gesamte Zubehör mit Seifenwasser und trocknen
Sie alle Teile.
• Füllen Sie den Behälter mit kaltem Wasser und
bringen Sie ihn in der vorgesehenen Position am
Gerät an
(Abb. 1b).
• Schalten Sie das Gerät ein indem Sie den
Schalter d2 betätigen .
• Die Temperaturkontrolleuchte blinkt und bleibt
schließlich an. Das Gerät ist nun betriebsbereit
(Abb. 2).
WICHTIG!
Vor dem ersten Gebrauch, nach längerem
Nichtgebrauch oder nach dem Entkalken
muss das Gerät gereinigt werden, wie bes-
chrieben im Abschnitt: « ERSTE INBETRIEB-
NAHME ».
IFU_RO_PERFECTO_4400_NC00025894-01_eo 27/09/11 11:26 Page13

14
DE
• Bringen Sie den Filterhalter (ohne Kaffeemehl)
am Gerät an: drehen Sie ihn nach rechts bis zum
Anschlag
(Abb. 3).
• Stellen Sie ein Gefäß mit einem Volumen von
mindesten 0,5 Litern unter den Filterhalter.
Stellen Sie den Wahlschalter d1 auf die
Position (Kaffee)
(Abb. 4, 5, 6)
und drücken Sie die Position Zwei Tassen
(d4), gegebenenfalls mehrmals.
• Falls das Wasser nicht abfließt (Füllen der
Pumpe), wiederholen Sie den gesamten
Vorgang von Anfang an.
• Lassen Sie das Wasser des Behälters
durchlaufen. Um das Ablaufen zu unterbrechen
drehen Sie den Schalter D1 in Position
(Abb.
7)
und ziehen Sie den Netzstecker.
• Entfernen Sie den Behälter, entleeren und spülen
Sie ihn sorgfältig und stellen Sie ihn zurück ins
Gerät
(Abb. 1b und 8).
6. ESPRESSOZUBEREITUNG
Mit gemahlenem Kaffee
• Bevor Sie den Wasserbehälter entnehmen,
stellen Sie den Schalter d1 in Position (
Abb.
7).
• Füllen Sie den Behälter mit frischem Wasser und
stellen Sie ihn in das Gerät
(Abb. 8).
• Schalten Sie das Gerät ein indem Sie den
Schalter d2 betätigen .
• Während des Vorheizens blinkt die
Kontrolleuchte und bleibt danach an. Das Gerät
ist nun betriebsbereit.
• Entriegeln Sie den Filterhalter indem Sie leicht
auf die Taste drücken und ihn nach links
drehen
(Abb. 9). Füllen Sie das Kaffeemehl mit
dem Messlöffel in den Filterhalter: ein Messlöffel
(randvoll) pro Tasse um einen guten Espresso zu
erhalten
(Abb. 10a).
• Entfernen Sie den Überschuss an Kaffeemehl
vom Rand des Filterhalters
(Abb. 10b).
• Bringen Sie den Filterhalter am Gerät an und
drehen Sie ihn nach rechts bis zum Anschlag
(Abb. 12).
• Stellen Sie eine Tasse auf das Gitter der
Auffangvorrichtung unter dem Filterhalter
(Abb. 13).
• Drehen Sie den Schalter d1 in Position Kaffee
(Abb. 4).
• Drücken Sie entweder den Knopf D3 für
1 Tasse oder den Knopf d4 für 2 Tassen.
• Nach kurzer Zeit läuft der Kaffee aus.
• Wenn Ihre Tassen voll sind, wird der Durchlauf
automatisch gestoppt. Stellen Sie den
Wählschalter d1 wieder auf Position
(Abb. 7).
• Entnehmen Sie die Tasse.
• Entriegeln Sie den Filterhalter: drücken Sie leicht
auf die Taste und drehen Sie den Filterhalter
nach links und entfernen Sie ihn vom Gerät.
Entfernen Sie den Kaffeesatz
“push” Taste unter dem Handgriff durchdrücken
(Abb. 16). Reinigen Sie den Filterhalter im
Wasserstrahl indem Sie die “push” Taste
drücken um den restlichen Kaffeesatz zu
entfernen (siehe auch Abschnitt 9.B für ein
intensives Reinigen).
Es ist völlig normal wenn beim Zurückschalten
des Schalters d1 in Position ein leichtes
Geräusch wie ein Zirkulieren von Wasser oder
Dampf auftritt. Eine spezifische Einrichtung sorgt
dafür dass der Druck in allen Leitungen
abgelassen wird.
Mit Espresso Pads E.S.E
• Bevor Sie den Wasserbehälter abnehmen,
stellen Sie den Schalter d1 in Position
(Abb. 7).
• Füllen Sie den Behälter mit frischem Wasser und
stellen Sie ihn in das Gerät (Abb. 8).
• Schalten Sie das Gerät ein indem Sie den
Schalter d2 betätigen .
• Während des Vorheizens blinkt die
Kontrolleuchte und bleibt danach an. Das Gerät
ist nun betriebsbereit.
• Entriegeln Sie den Filterhalter indem Sie leicht
auf die Taste drücken und ihn nach links
drehen
(Abb. 15). Schneiden Sie
gegebenenfalls das am Umfang des Pads
überstehende Papier entlang der gestrichtelten
Linie ab (Abb. 11). Legen Sie das ESE Pad mit
der roten Beschriftung nach unten ein (falten Sie
die Papierecken um). Geben Sie Acht, dass sich
WICHTIG!
Wenn Sie das Espressogerät zum ersten
Mal gebrauchen, müssen Sie es reinigen
wie im Abschnitt 5 « ERSTE INBETRIEB-
NAHME » beschrieben.
Die Wahl des Kaffeemehls bestimmt die
Stärke und den Geschmack Ihres Espresso:
je feiner das Kaffeemehl desto kräftiger
wird Ihr Espresso.
« ESE » für « Easy Serving Espresso »
(vereinfachte Espressozubereitung ) ist ein
verpacktes Pad (44 mm Durchmesser) von
7g ausgewähltem, gemahlenen und zwi-
schen zwei Papierfiltern gepresstem Kaffee.
Dieses Pad ist speziell konzipiert für das
Zubereiten von « ristretto » (konzentrier-
tem) Espresso auf italienische Art.
Dieses System erlaubt einen sofortigen,
einfachen, sauberen und komfortablen
Gebrauch Ihres Geräts.
IFU_RO_PERFECTO_4400_NC00025894-01_eo 27/09/11 11:26 Page14

15
DE
das Papier auf der Innenseite des Filters befindet,
da sonst ein Leck entstehen könnte. Für eine
reichere und dickflüssigere Creme ist es wichtig
das Pad korrekt in Position zu bringen. Das Pad
ist vorgesehen um eine Tasse Kaffee
zuzubereiten. Wir raten Ihnen ab zwei E.S.E Pads
gleichzeitig zu gebrauchen.
• Bringen Sie den Filterhalter am Gerät an und
drehen Sie ihn nach rechts bis zum Anschlag
(Abb. 12).
• Um Ihren Espresso zuzubereiten gehen Sie vor
wie bei der Zubereitung eines Espresso mit
gemahlenem Kaffee.
Mit einem weichen Pad
• Bevor Sie den abnehmbaren Behälter
entnehmen, stellen Sie den Schalter d1 in
Position
(Abb. 7).
• Füllen Sie den Behälter mit frischem Wasser und
stellen Sie ihn in das Gerät
(Abb. 8).
• Schalten Sie das Gerät ein indem Sie den
Schalter d2 betätigen .
• Während des Vorheizens blinkt die
Kontrolleuchte und bleibt danach an. Das Gerät
ist nun betriebsbereit.
• Entriegeln Sie den Filterhalter indem Sie leicht
auf die Taste drücken und ihn nach links
drehen
(Abb. 15). Legen Sie ein weiches Pad in
den Filterhalter. Das Pad ist vorgesehen um eine
Tasse Kaffee zuzubereiten. Wir raten Ihnen ab
zwei Pads gleichzeitig zu gebrauchen.
• Bringen Sie den Filterhalter am Gerät an und
drehen Sie ihn nach rechts bis zum Anschlag
(Abb. 12).
• Je mehr das Pad komprimiert ist, desto stärker
wird der Espresso. Um Ihren Espresso
zuzubereiten, gehen Sie vor wie bei der
Zubereitung eines Espresso mit gemahlenem
Kaffee.
7. INDIVIDUELLE
PROGRAMMIERUNG DER
KAFFEEMENGE:
Gehen Sie zur Modifizierung der
vorprogrammierten Wassermenge bitte wie
nachstehend angegeben vor:
• Befüllen Sie den Wasserbehälter und setzen Sie
das Gerät in Betrieb
(Abb. 1abc, 2 und 4).
• Geben Sie einen Messlöffel Kaffeemehl in den
Filter oder legen Sie ein E.S.E. oder ein weiches
Kaffeepad ein.
• Setzen Sie den Filterhalter ein, indem Sie ihn so
weit wie möglich nach rechts drehen, bis er
einklinkt
(Abb. 12).
• Stellen Sie eine Tasse unter den Filterhalter.
• Drücken Sie den Knopf „1 Tasse“ mindestens 3
Sekunden lang, bis das Anzeigelämpchen „1
Tasse“ schnell zu blinken beginnt. Der Kaffee läuft
durch.
• Drücken Sie den Knopf „1 Tasse“, sobald die
gewünschte Menge an Kaffee durchgelaufen ist.
Diese Menge wird automatisch gespeichert.
• Wenn Sie bei der nächsten Benutzung den Knopf
„1 Tasse“ drücken, läuft die gespeicherte Menge
an Kaffee durch. Die Programmierung für 2 Tassen
funktioniert genauso, drücken Sie mindestens
3 Sekunden lang den Knopf „2 Tassen“.
• Wird das Gerät ausgesteckt, müssen die Mengen
anschließend bei der nächsten Benutzung erneut
programmiert werden.
8. DAMPFFUNKTION
Der Dampf dient zum Aufschäumen der Milch
(zum Beispiel zur Zubereitung von Cappuccino).
• Stellen Sie den Wahlschalter d1 zum Erzeugen
von Dampf auf die Position
(Abb. 17) (um
ausreichend Dampf zu
erzeugen muss die Temperatur höher sein als bei
der Zubereitung von Kaffee).
• Die Kontrolleuchte des Ein/Aus Schalters blinkt
wieder und bleibt danach an. Das Gerät ist nun
betriebsbereit.
• Geben Sie die Milch in ein Gefäß. Zur Erzielung
eines optimalen Ergebnisses sollte ein Gefäß mit
einer kleinen Öffnung benutzt werden (zum
Beispiel ein kleines Kännchen).
• Tauchen Sie die Düse in die Flüssigkeit.
• Stellen Sie den Wahlschalter d1 auf die Position
(Abb.18) : Der Dampf tritt in die Milch aus.
• Um die Milch richtig aufzuschäumen, machen
Sie Kreisbewegungen und bewegen Sie die
Düse hoch und runter
(Abb. 19). Achten Sie
dabei aber darauf, dass die Dampfdose in der
Mitte des Behälters gerade bleibt
(Abb. 21c).
Es ist normal dass die Pumpe zeitweise kurz
aussetzt.
• Während dieses Vorgangs ist es normal dass die
Temperaturkontrolleuchte des Ein/Aus Schalters
aufleuchtet und wieder erlischt.
• Um zu gewährleisten, dass die Milch gut
aufschäumt, sollten Sie am besten pasteurisierte
oder UHT-behandelte Milch und keine Rohmilch
Ihr Gerät ist auch kompatibel mit wei-
chen Pads (gewöhnlich mit 60 mm
Durchmesser). Da diese Pads nicht speziell
für Espressogeräte konzipiert sind, erhalten
Sie einen weniger konzentrierten Espresso
als mit E.S.E Pads.
IFU_RO_PERFECTO_4400_NC00025894-01_eo 27/09/11 11:26 Page15

16
DE
oder entrahmte Milch verwenden.
• Schalten Sie das Gerät nach Beendigung des
Aufschäumvorgangs ab (Wahlschalter d1 auf
Position ).
• Wenn der Wahlschalter d1 auf Position ist,
kühlt sich das Gerät automatisch ab. Während
der Abkühlphase blinkt die Kontrolleuchte des
Ein/Aus Schalters erneut und heißes Wasser
läuft in das die Auffangschale ab. Wenn erneut
die optimale Temperatur zur
Espressozubereitung erreicht ist bleibt die
Kontrolleuchte wieder an.
9. REINIGUNG UND PFLEGE
A. Des Gerätes
• Ziehen Sie den Netzstecker vor jedem Reinigen
und lassen Sie das Gerät abkühlen.
• Reinigen Sie von Zeit zu Zeit die Außenseite des
Geräts mit einem feuchten Schwamm. Reinigen
Sie regelmäßig den Wasserbehälter, den
Tropfenauffangbehälter sowie das Gitter.
• Spülen Sie die Innenseite des Wasserbehälters
regelmäßig.
• Wenn sich eine weiße Schicht in dem Behälter
bildet, führen Sie eine Entkalkung durch (siehe
Abschnitt 10. ENTKALKUNG).
• Verwenden Sie keine Reinigungsmittel auf
Alkohol- oder Lösungsmittelbasis.
• Nachdem Sie das Gerät vom Netz getrennt
haben, reinigen Sie das Sieb des Wasserauslaufs
sowie die Dichtung mit einem feuchten
Schwamm
(Abb. 16).
• Reinigen Sie das Gerät lediglich mit einem
angefeuchteten Tuch ohne Reinigungs- oder
Scheuermittel.
B. Des Filterhalters
Ihr Gerät ist mit einem zerlegbaren Filterhalter mit
Ausstoßsystem ausgestattet, der es erlaubt das
Gerät perfekt in Stand zu halten.. Wir raten Ihnen,
den Filterhalter nach jedem Gebrauch zu reinigen.
Der Vorgang des Zerlegens/Zusammenbauens
muss im kalten Zustand ausgeführt werden.
1. Zerlegen des Filterhalters
• Entnehmen Sie den Filterhalter aus Ihrem Gerät.
• Entfernen Sie den Kaffeesatz oder das Pad indem
Sie die „EJECT“ drücken
(Abb. 16).
• Ihn mit klarem Wasser abspülen.
• Ziehen Sie die Rückseite des Filterhalters ab,
indem Sie sie nach links drehen und dabei auf
die beiden fest installierten Hebel drücken, um
sie abnehmen zu können.
2. Reinigung und Spülen des Filterhalters
Jetzt kann der Filterhalter mit Spülmittel oder
einer Bürste gereinigt werden, und danach mit
klarem Wasser abgespült werden. Um ein
besseres Resultat zu erreichen, können Sie
während des Spülens mehrmals die Auswurftaste
betätigen.
Wir raten Ihnen an, den Filterhalter energisch zu
schütteln um das Wasser zu entfernen.
3. Zusammenbauen des Filterhalters
Setzen Sie das Unterteil des Filterhalters wieder
ein, indem Sie ihn gegen den Uhrzeigersinn
drehen, um ihn zu verriegeln.
C. Der Tropfenauffangschale
Sobald die Füllanzeige der Tropfenauffangschale
sichtbar wird, muss diese geleert werden; dazu
muss zunächst der Rost abgenommen werden
(Abb. 20). Es ist normal, dass sich Wasser in ihr
ansammelt und es handelt sich dabei nicht um ein
Anzeichen für Undichtigkeit. Reinigen Sie die
Tropfenauffangschale und den Rost
gegebenenfalls mit Wasser und ein wenig mildem
Geschirrspülmittel. Abspülen und trocknen.
D. Der Dampfdüse (Abb. 21 a,b)
Dieses Zubehör besteht aus 2 Teilen: einem
Kunststoffträger und dem Metall-Schutzzylinder.
• Entriegeln Sie zu Beginn der Reinigung die Düse
des Schwenkarms, indem Sie sie nach links
drehen.
• Lassen Sie dann den Metallzylinder den
Kunststoffträger entlang gleiten.
• Reinigen Sie diese beiden Teile mit klarem
Wasser und etwas nicht aggressivem
Reinigungsprodukt.
• Spülen Sie sie ab und trockenen Sie sie.
• Wenn die Teile richtig trocken sind, setzen Sie
den Metallzylinder wieder auf den Träger.
• Achten Sie darauf, die Silikondichtung, die die
Düse abdichtet, nicht zu beschädigen.
• Schieben Sie die Düse auf den
Schwenkarm,schrauben Sie sie dann nach
rechts fest.
WICHTIG!
Nach der Dampfanwendung reinigen Sie
sofort die Düse mit einem feuchten
Schwamm (damit keine Rückstände festkle-
ben ) und lassen Sie noch ein wenig Dampf
austreten um die Düse zu reinigen.
ACHTUNG!
Die Dampfdüse ist noch heiß! Seien Sie
vorsichtig um sich nicht zu verbrennen!
IFU_RO_PERFECTO_4400_NC00025894-01_eo 27/09/11 11:26 Page16

17
DE
10. ENTKALKUNG
• Das regelmäßige Entkalken Ihres Geräts, wie in
den Abschnitten A und B für die Funktionen
Kaffee und Dampf beschrieben, garantiert Ihrem
Gerät eine lange Lebensdauer. Der Abstand
zwischen zwei Entkalkungen ist abhängig von
der Wasserhärte. Fragen Sie diese bei Ihrem
Wasserwerk nach.
• Stellen Sie Ihr Gerät während des Entkalkens
nicht auf einer empfindlichen Arbeitsfläche ab.
Das Entkalkungsmittel könnte diese
beschädigen.
• Für ein besseres Verständnis beachten Sie die
folgende Tafel der Entkalkungsfrequenzen
abhängig von der Wasserhärte und vom
Gebrauch des Geräts:
Im Zweifelsfall raten wir ein Entkalken pro Monat an.
Reparaturen des Geräts wegen:
• nicht ausgeführter Entkalkung,
• Kesselsteinablagerung,
werden nicht unter Garantie ausgeführt.
A. Entkalkung der Kaffeefunktion
• Trennen Sie das Gerät vom Netz.
• Bringen Sie den Filterhalter (ohne Kaffeemehl)
am Gerät an, indem Sie ihn nach rechts bis zum
Anschlag drehen
(Abb. 3).
• Stellen Sie einen Behälter von mindestens ½
Liter unter den Filterhalter
(Abb. 6).
• Überprüfen Sie ob der Schalter d1 in Position
steht.
• Entleeren Sie den Wasserbehälter und stellen Sie
ihn zurück ins Gerät.
• Füllen Sie den Behälter mit einer Mischung von
¾ Wasser und ¼ Weinessig oder Zitronensäure
/Sulfaminsäure.
• Schließen Sie das Gerät am Netz an.
• Sobald die Kontrolleuchte des Ein/Aus Schalters
an bleibt, können Sie auf Position Kaffee
schalten
(Abb. 4).
• Drücken Sie auf den Knopf d4 für 2 Tassen
(Abb. 14).
• Lassen Sie die Mischung durchlaufen.
• Warten Sie 2 Minuten, wiederholen Sie dann den
gleichen Vorgang 2 Mal, ab dem Drücken auf den
Knopf Knopf d4 für 2 Tassen (Abb. 14).
• Drehen Sie den Schalter auf Position
. Folgen Sie nun den Anweisungen des
Entkalkens der Dampffunktion.
B. Entkalken der Dampffunktion
• Stellen Sie nun den Behälter unter die
Dampfdüse.
• Drehen Sie den Schalter d1 auf die Position
Vorheizen Dampf
(Abb. 17) (um Dampf zu
erhalten muss die Temperatur höher sein als für
die Kaffeezubereitung).
• Die Kontrolleuchte des Ein/Aus Schalters blinkt
und bleibt dann an.
• Drehen Sie den Schalter d1 auf Position Dampf
(Abb.18): der Dampf strömt in die
Flüssigkeit. Lassen Sie den Rest der Mischung
während 2 Minuten durchlaufen.
• Während dieses Vorgangs ist es normal dass die
Wassertemperaturkontrolleuchte aufleuchtet
und wieder erlischt.
• Nach kurzer Zeit schalten Sie das Gerät aus
(Position ). Sobald der Schalter d1 auf Position
steht kühlt das Gerät automatisch ab.
Während der Abkühlphase blinkt der Ein/Aus
Schalter und etwas warmes Wasser läuft in die
Tropfenauffangeinrichtung.
C. Spülen
11. GARANTIE
Auf Ihrem Gerät besteht eine Garantie, die
allerdings erlischt falls das Gerät anders als in der
Gebrauchsanweisung beschrieben angeschlossen,
bedient oder verwendet wird.
Reparaturen wegen Kesselsteinanlagerung werden
nicht unter Garantie durchgeführt.
Bei Problemen und Ersatzteilfragen wenden Sie
sich bitte an Ihren Händler oder an ein zugelassenes
Service-Center.
WICHTIG!
. Nach dem Entkalken führen Sie 2-3 Spülungen
durch mit klarem Wasser (ohne Kaffeemehl), wie im
Abschnitt « Erste Inbetriebnahme » beschrieben.
. Vergessen Sie nicht die Dampfdüse zu spülen
(Abb. 21 a,b).
Das Gerät ist nun entkalkt und wieder
Betriebsbereit.
ENTKALKUNGSFREQUENZ
Anzahl von
Kaffees pro
Woche
Weiches
Wasser
(<19°th)
Kalkhaltiges
Wasser
(19-30°th)
Sehr
kalkhaltiges
Wasser
(>30°th)
Weniger als 7 1 Mal pro Jahr Alle 8 Monate Alle 6 Monate
Von 7 bis 20 Alle 4 Monate Alle 3 Monate Alle 2 Monate
Mehr als 20 Alle 3 Monate Alle 2 Monate Jeden Monat
IFU_RO_PERFECTO_4400_NC00025894-01_eo 27/09/11 11:26 Page17

18
DE
12. PROBLEMLÖSUNGEN
Probleme Mögliche Ursachen Lösungen
Der Filterhalter ist
blockiert.
Sie haben vergessen den
Filterhalter zu entriegeln.
Drücken Sie den Knopf und drehen
Sie dabei den Filterhalter nach links
(Abb. 15).
Der Kaffeesatz ist nicht
trocken nach dem
Durchlaufen des Wassers.
Sie haben den Filterhalter nicht
richtig angezogen.
Ziehen Sie den Filterhalter fester an.
Der Espresso läuft zu
langsam aus.
Das Kaffeemehl ist zu fein, zu fett
oder zu fest gepresst.
Wählen Sie ein grobkörnigeres
Kaffeemehl.
Der Filterhalter ist schmutzig. Reinigen Sie den Filterhalter
entsprechend der Anleitung in
Abschnitt. 9.B.
Das Wasserauslaufgitter ist
schmutzig.
Wenn das Gerät abgekühlt ist reinigen
Sie das Auslaufgitter mit einem
feuchten Schwamm.
Nach der Zubereitung
eines Espresso läuft
Wasser aus dem
Filterhalter aus.
Der Wahlschalter ist nicht in der
Ruhestellung
„
Heizwendel
“
.
Stellen Sie den Wahlschalter auf die
Position (Abb. 7).
Frühzeitige Kesselsteinbildung in
Folge von besonders kalkhaltigem
Wasser.
Entkalken Sie Ihr Gerät entsprechend
der Anleitung in der
Gebrauchsanweisung (Abschnitt 10).
Kaffeesatz lagert sich in
der Tasse ab.
Der Filterhalter ist schmutzig. Reinigen Sie den Filterhalter mit
warmem Wasser. Bedienen Sie die
Taste um Kaffeemehlreste wegzuspülen.
Schütteln Sie ihn, um das Wasser zu
entfernen (siehe auch Abschnitt 9.B).
Das Kaffeemehl ist zu feinkörnig. Wählen Sie ein grobkörnigeres
Kaffeemehl.
Der Espresso schäumt
nicht.
Das Kaffeemehl ist zu alt. Wählen Sie frisch gemahlenes
Kaffeeme
Das Kaffeemehl ist nicht geeignet
für Espresso.
Verwenden Sie feinkörnigeres
Kaffeemehl.
Es ist zu wenig Kaffeemehl im
Filterhalter.
Füllen Sie Kaffeemehl nach.
Der Wasserbehälter leckt
wenn er transportiert
wird.
Das Ventil am Boden des
Behälters ist schmutzig oder
defekt.
Reinigen Sie den Wasserbehälter und
bewegen Sie das Ventil mit dem Finger.
Die Klappe ist blockiert durch
Kesselstein.
Entkalken Sie das Gerät wie im
Abschnitt 9 beschrieben.
Wasser läuft aus dem
Gerät.
Internes Leck. Überprüfen Sie ob der Wasserbehälter
richtig positioniert ist. Falls der Fehler
bleibt, das Gerät nicht mehr
gebrauchen und sich an einen
zugelassenen Kundendienst wenden.
IFU_RO_PERFECTO_4400_NC00025894-01_eo 27/09/11 11:26 Page18

19
DE
Wenn es nicht möglich ist die Ursache einer Panne festzustellen, wenden Sie sich bitte an einen zugelassenen
Kundendienst. Nie das Gerät demontieren! (im Fall einer Demontage erlischt die Garantie).
13. E
NTSORGUNG VON ELEKTRISCHEN UND ELEKTRONISCHEN PRODUKTEN
Denken Sie an den Schutz der Umwelt!
Ihr Gerät enthält wertvolle Rohstoffe, die wieder verwertet werden können.
Geben Sie Ihr Gerät deshalb bitte bei einer Sammelstelle Ihrer Stadt oder
Gemeinde ab.
Probleme Mögliche Ursachen Lösungen
Knackgeräusche im
Filterhalter.
Normaler Vorgang: blockieren der
Sicherungseinrichtung des
Filterhalters.
Die Pumpe ist
ungewöhnlich laut.
Kein Wasser im Wasserbehälter. Schalten Sie das Gerät aus (Position
), füllen Sie Wasser in den Behälter
und schalten Sie das Gerät wieder
ein.
Die Tassen sind nicht
gleich voll.
Der Filterhalter ist schmutzig. Reinigen Sie den Filterhalter.
Der Espresso leckt aus
den Seiten des
Filterhalters.
Der Filterhalter ist nicht richtig
positioniert.
Bringen Sie den Filterhalter an und
verriegeln Sie ihn (von links nach rechts
drehen bis zum Anschlag) (Abb. 3).
Der Rand des Filterhalters ist
verschmutzt durch Kaffeemehl.
Entfernen Sie den Überschuss an
Kaffeemehl (Abb. 10b) Reinigen Sie das
Filtersieb mit einem feuchtem Schwamm.
Ihr Espresso schmeckt
schlecht.
Das Spülen nach dem Entkalken
wurde nicht korrekt durchgeführt.
Spülen Sie das Gerät entsprechend der
Gebrauchsanweisung (Abschnitt
9)Überprüfen Sie die Qualität des Kaffees.
Das Gerät funktioniert
nicht.
Die Pumpe läuft, leer aus
Wassermangel.
Füllen Sie den Wasserbehälter und
starten Sie die Pumpe (siehe Abschnitt
5. « ERSTE INBETRIEBNAHME »).
Leeren Sie den Behälter nie vollständig.
Der Wasserbehälter ist schlecht
positioniert.
Bringen Sie den Wasserbehälter in Position
indem Sie ihn fest nach untendrücken.
Die Dampfdüse lässt die
Milch nicht schäumen.
Die Dampfdüse ist verstopft oder
verkalkt.
Entkalken Sie die Dampfdüse
entsprechend dem Abschnitt «
ENTKALKEN » oder machen Sie die
Düse frei mit einer Nadel.
Die Milch ist zu heiß. Verwenden Sie gekühlte Milch.
Die Form des Behälters ist nicht
geeignet.
Verwenden Sie einen kleinen Krug.
Sie verwenden entrahmte Milch. Verwenden Sie vorzugsweise Vollmilch
oder halbentrahmte Milch.
IFU_RO_PERFECTO_4400_NC00025894-01_eo 27/09/11 11:26 Page19

20
FR
2- CARACTERISTIQUES
TECHNIQUES
• Pompe électromagnétique : 15 bars
• Porte-filtre avec système d’éjection du marc
• 1 ou 2 tasses
• Ajustement du volume de café en tasse
• Ecoulement automatique de la quantité
sélectionnée de café
• Compatible tous types de dosettes, E.S.E ou
souples
• Fonction vapeur
• Arrêt automatique au bout de 9 minutes
(protection de l'environnement)
• Réservoir amovible (capacité : 0,86 litre)
• Puissance : 1350-1600 W
• Tension : 220-240 V 50/60 Hz
• Dispositifs de sécurité contre les surchauffes
• Dimensions : H. 322.5 mm, L. 291 mm,
P. 214 mm
3. CONSIGNES DE SECURITE
• Avant la mise en marche de votre espresso,
lisez attentivement ce mode d’emploi.
• Ne branchez l’appareil que sur une prise avec
terre. Vérifiez que la tension indiquée sur la
plaque signalétique de l’appareil correspond
bien à celle de votre installation électrique.
• Ne posez pas votre espresso sur une surface
chaude (plaque électrique, par exemple) ou à
proximité d’une flamme.
• N’enlevez pas le porte-filtre contenant la
mouture durant le passage de l’eau car
l’appareil est alors sous pression.
• N’utilisez pas l’appareil si le plateau récolte-
gouttes et la grille ne sont pas mis en place.
• La prise doit être retirée en cas de problème
durant l’écoulement du café ou avant de
nettoyer votre appareil.
• Ne débranchez pas l’appareil en tirant sur le
cordon et ne placez pas le cordon sur un
angle vif ou le coin d’un meuble.
• Evitez le contact du cordon ou de vos mains
avec les parties chaudes de l’appareil (plateau
chauffe-tasses, porte-filtre, buse vapeur).
• Ne plongez jamais l’appareil dans l’eau.
• Tenez les enfants à distance et ne laissez pas
pendre le cordon.
IMPORTANT !
Tension d’utilisation : cet appareil est prévu
pour fonctionner uniquement en courant alter-
natif 220-240 V
Type d’utilisation : cet appareil est prévu pour
une UTILISATION DOMESTIQUE SEULEMENT
1- DESCRIPTION
a Couvercle du réservoir d’eau
b Réservoir d’eau amovible
c Plaque repose-tasses
d Tableau de commande :
d.1 Bouton de sélection (café ou vapeur)
d.1-1 = préchauffage café
d.1-2 = préparation d’un espresso
d.1-3 = préchauffage vapeur
d.1-4 = préparation de la vapeur
d.2 Bouton de mise en marche avec voyant
lumineux
d.3 Bouton 1 tasse avec voyant lumineux
d.4 Bouton 2 tasses avec voyant lumineux
e Emplacement du porte-filtre
f Porte-filtre avec système d’éjection du marc ou
de la dosette et tassage progressif de la
mouture ou dosette : système OPTIPRESS.
g Buse vapeur
h Grille récolte-gouttes
i Plateau récolte-gouttes, muni de son indicateur
de niveau
j Cordon d’alimentation
Nous vous remercions de votre confiance et de votre fidélité aux produits Rowenta. Vous venez
d’acheter la toute dernière innovation en matière d’espresso. Votre machine est équipée d’un
porte-filtre qui dispose de trois systèmes exclusifs :
• L’un pour le tassage progressif de la mouture lors du positionnement du porte-filtre
(système OPTIPRESS).
• L’autre pour l’éjection du marc.
• Le dernier pour l’utilisation de dosettes E.S.E. (Easy Serving Espresso) ou souples.
Il est en outre démontable, ce qui permet de le maintenir, par des nettoyages fréquents, en parfait
état de fonctionnement. Par sécurité, votre porte-filtre est équipé d’un système de verrouillage
pour qu’il reste en place lors de la montée en pression.
IFU_RO_PERFECTO_4400_NC00025894-01_eo 27/09/11 11:26 Page20

21
FR
• Conformez vous à la notice pour les
instructions de détartrage.
• Ne mettez pas l’appareil en marche s’il est
endommagé ou si le cordon est en mauvais état.
• Si le cordon ou tout autre élément spécifique
devenait défectueux, ceci afin d’éviter un
danger ils devront être remplacés
uniquement par le centre service agréé
Rowenta. En aucun cas, l’appareil ne doit être
ouvert par vos soins.
• Vérifiez que le porte-filtre est bien serré avant
de faire couler le café.
• Cet appareil n’est pas prévu pour être utilisé
par des personnes (y compris les enfants)
dont les capacités physiques, sensorielles ou
mentales sont réduites ou des personnes
dénuées d’expérience ou de connaissance,
sauf si elles ont pu bénéficier, par
l’intermédiaire d’une personne responsable
de leur sécurité, d’une surveillance ou
d’instructions préalables concernant
l’utilisation de l’appareil.
• Il convient de surveiller les enfants pour
s’assurer qu’ils ne jouent pas avec l’appareil.
• Les accessoires et parties démontables de
l’appareil ne passent pas au lave-vaisselle.
• Votre machine a été conçue pour un usage
domestique seulement.
• Elle n’a pas été conçue pour être utilisée dans
les cas suivants qui ne sont pas couverts par
la garantie :
- dans des coins de cuisines réservés au
personnel dans des magasins, bureaux et
autres environnements professionnels,
- dans des fermes,
- par les clients des hôtels, motels et autres
environnements à caractère résidentiel,
- dans des environnements de type chambres
d’hôtes.
4. CONSEILS PRATIQUES
Pensez à débloquer le porte-filtre en appuyant
légèrement sur la touche « EJECT » avant de le
désengager de l’appareil
(fig. 1a).
• Pour obtenir un espresso à l’arôme intense,
nous vous recommandons d’utiliser du café
spécial espresso fraîchement moulu qui
convient à la délicatesse de la préparation de
ce type de café, ainsi que des tasses d’une
capacité ne dépassant pas 50 ml.
• Conservez la mouture au réfrigérateur, elle
garde ainsi plus longtemps son arôme.
• Ne remplissez pas votre porte-filtre à ras,
mais utilisez la cuillère mesure (1 cuillère
pour une tasse, 2 cuillères pour 2 tasses).
Enlevez l’excédent de mouture sur le
pourtour du porte-filtre.
• Si vous n’utilisez pas l’appareil pendant plus
de 5 jours, videz et rincez le réservoir d’eau.
• Avant d’enlever le réservoir pour le remplir
ou pour le vider, veillez à toujours éteindre
l’appareil.
• Veillez à toujours poser l’appareil sur une
surface plane et stable.
5. PREMIERE MISE EN SERVICE
Rinçage avant la première utilisation.
Avant d’utiliser votre machine à café, nettoyez
tous les accessoires dans de l’eau savonneuse
puis séchez-les.
• Remplissez le réservoir d’eau froide et
replacez-le sur l’appareil en vous assurant
qu’il est bien en place
(fig. 1b).
• Allumez l’appareil en appuyant sur le bouton
de mise en marche d2 .
• Le voyant de température clignote puis reste
fixe. L’appareil est prêt pour l’utilisation
(fig. 2).
• Insérez le porte-filtre (sans mouture) dans
l’appareil : tournez-le vers la droite jusqu’en
butée
(fig. 3).
• Mettez un récipient d’un volume supérieur à
½ litre sous le porte-filtre. Tournez le sélecteur
d1 sur la position (café)
(fig. 4, 5, 6),
puis appuyer sur la position deux tasses
plusieurs fois ci-nécessaire.
• Si l'eau ne s'écoule pas (amorçage pompe),
répéter l'opération depuis le début.
• Laissez s’écouler l’eau du réservoir. Pour
arrêter l’écoulement de l’eau, tournez le
sélecteur d1 sur la position
(fig. 7) et
débranchez l’appareil.
• Enlevez le réservoir, videz-le, rincez-le
soigneusement et remettez-le dans l’appareil
(fig. 1b et 8).
6. PREPARATION DE L’ESPRESSO
IMPORTANT !
Avant la première utilisation, après des arrêts
prolongés ou après détartrage, l’appareil doit
être nettoyé comme décrit au paragraphe : «
PREMIERE MISE EN SERVICE »
IMPORTANT ! Si l’espresso est utilisé
pour la première fois, l’appareil doit être
nettoyé comme décrit au paragraphe 5
« PREMIERE MISE EN SERVICE »
IFU_RO_PERFECTO_4400_NC00025894-01_eo 27/09/11 11:26 Page21
A página está carregando...
A página está carregando...
A página está carregando...
A página está carregando...
A página está carregando...
A página está carregando...
A página está carregando...
A página está carregando...
A página está carregando...
A página está carregando...
A página está carregando...
A página está carregando...
A página está carregando...
A página está carregando...
A página está carregando...
A página está carregando...
A página está carregando...
A página está carregando...
A página está carregando...
A página está carregando...
A página está carregando...
A página está carregando...
A página está carregando...
A página está carregando...
A página está carregando...
A página está carregando...
A página está carregando...
A página está carregando...
A página está carregando...
A página está carregando...
A página está carregando...
A página está carregando...
A página está carregando...
A página está carregando...
A página está carregando...
A página está carregando...
A página está carregando...
A página está carregando...
A página está carregando...
A página está carregando...
A página está carregando...
A página está carregando...
A página está carregando...
A página está carregando...
A página está carregando...
A página está carregando...
A página está carregando...
A página está carregando...
A página está carregando...
A página está carregando...
A página está carregando...
A página está carregando...
A página está carregando...
A página está carregando...
A página está carregando...
A página está carregando...
A página está carregando...
A página está carregando...
A página está carregando...
A página está carregando...
A página está carregando...
A página está carregando...
A página está carregando...
A página está carregando...
A página está carregando...
A página está carregando...
A página está carregando...
A página está carregando...
A página está carregando...
A página está carregando...
A página está carregando...
A página está carregando...
A página está carregando...
A página está carregando...
A página está carregando...
A página está carregando...
A página está carregando...
A página está carregando...
A página está carregando...
A página está carregando...
A página está carregando...
A página está carregando...
A página está carregando...
A página está carregando...
A página está carregando...
A página está carregando...
A página está carregando...
A página está carregando...
-
 1
1
-
 2
2
-
 3
3
-
 4
4
-
 5
5
-
 6
6
-
 7
7
-
 8
8
-
 9
9
-
 10
10
-
 11
11
-
 12
12
-
 13
13
-
 14
14
-
 15
15
-
 16
16
-
 17
17
-
 18
18
-
 19
19
-
 20
20
-
 21
21
-
 22
22
-
 23
23
-
 24
24
-
 25
25
-
 26
26
-
 27
27
-
 28
28
-
 29
29
-
 30
30
-
 31
31
-
 32
32
-
 33
33
-
 34
34
-
 35
35
-
 36
36
-
 37
37
-
 38
38
-
 39
39
-
 40
40
-
 41
41
-
 42
42
-
 43
43
-
 44
44
-
 45
45
-
 46
46
-
 47
47
-
 48
48
-
 49
49
-
 50
50
-
 51
51
-
 52
52
-
 53
53
-
 54
54
-
 55
55
-
 56
56
-
 57
57
-
 58
58
-
 59
59
-
 60
60
-
 61
61
-
 62
62
-
 63
63
-
 64
64
-
 65
65
-
 66
66
-
 67
67
-
 68
68
-
 69
69
-
 70
70
-
 71
71
-
 72
72
-
 73
73
-
 74
74
-
 75
75
-
 76
76
-
 77
77
-
 78
78
-
 79
79
-
 80
80
-
 81
81
-
 82
82
-
 83
83
-
 84
84
-
 85
85
-
 86
86
-
 87
87
-
 88
88
-
 89
89
-
 90
90
-
 91
91
-
 92
92
-
 93
93
-
 94
94
-
 95
95
-
 96
96
-
 97
97
-
 98
98
-
 99
99
-
 100
100
-
 101
101
-
 102
102
-
 103
103
-
 104
104
-
 105
105
-
 106
106
-
 107
107
-
 108
108


Rowenta PERFECTO Manual do proprietário
- Categoria
- Cafeteiras
- Tipo
- Manual do proprietário
- Este manual também é adequado para
em outras línguas
- français: Rowenta PERFECTO Le manuel du propriétaire
- italiano: Rowenta PERFECTO Manuale del proprietario
- Nederlands: Rowenta PERFECTO de handleiding
- dansk: Rowenta PERFECTO Brugervejledning
- svenska: Rowenta PERFECTO Bruksanvisning
Artigos relacionados
Outros documentos
-
Krups CALVI STEAM XP344010 Manual do proprietário
-
Krups YY8201FD Manual do proprietário
-
 Luca Trazzi X1 DE expressie Manual do proprietário
-
Illy ESE Manual do usuário
-
-
Qilive Q.5014 Manual do usuário
-
Gaggia Milano RI9403 Classic Manual do usuário
-
Aeg-Electrolux EEA120 Manual do usuário
