Logitech Rally Plus Video Conferencing Kit Guia de usuario
- Tipo
- Guia de usuario

R ALLY PLUS
Setup Guide | Guide d’installation


English 3
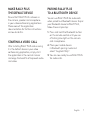
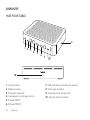
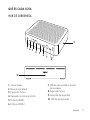
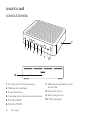
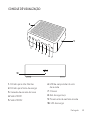
1. Power
2. Mic Pod
3. Future Expansion
4. Connection To Display Hub
5. HDMI 1 In
6. HDMI 2 In
7. Meeting Room Computer USB
8. Future Expansion
9. Security Slot
10. Power LED
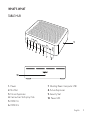
WHAT’S WHAT
TABLE HUB
10
9
12345
67
8

4 English
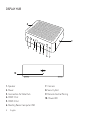
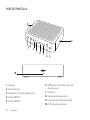
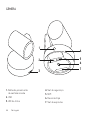
1. Speaker
2. Power
3. Connection To Table Hub
4. HDMI 1 Out
5. HDMI 2 Out
6. Meeting Room Computer USB
7. Camera
8. Security Slot
9. Remote Control Pairing
10. Power LED
DISPLAY HUB
10
9
8
1234
567

English 5
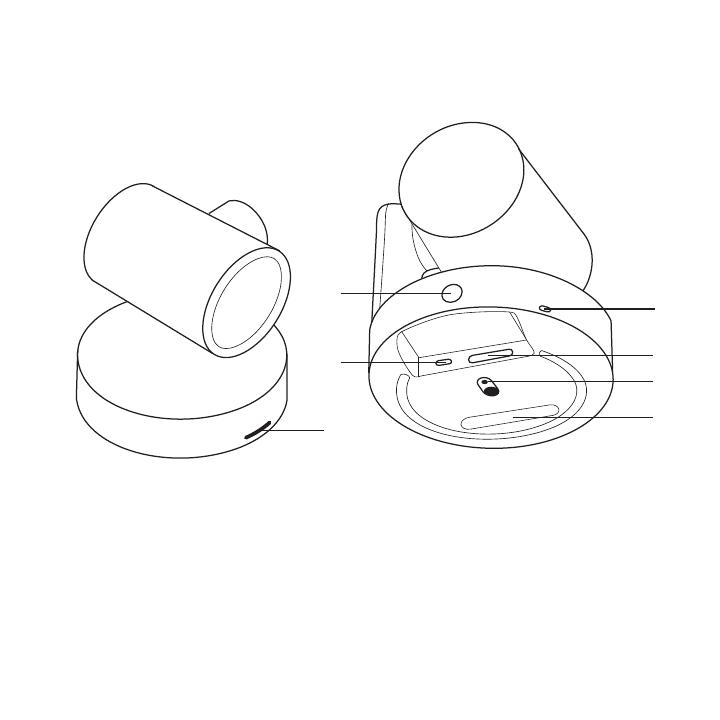
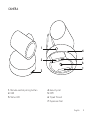
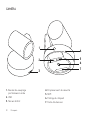
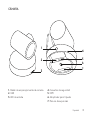
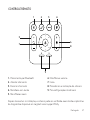
CAMERA
1
2
4
5
6
7
3
1. Remote control pairing button
2. USB
3. Status LED
4. Security slot
5. MIPI
6. Tripod Thread
7. Expansion Slot

6 English
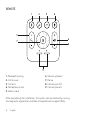
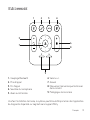
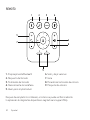
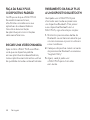
REMOTE
5
7
6
8
9
2 3
1 4
1. Bluetooth pairing
2. Call answer
3. Call end
4. Microphone mute
5. Zoom in/out
6. Volume up/down
7. Home
8. Camera pan/tilt
9. Camera presets
After completing the installation, the system can be checked by running
the diagnostic application available at Logitech.com/support/Rally.

English 7
MAKE RALLY PLUS
THEDEFAULT DEVICE
Ensure that R ALLY PLUS is chosen as
the camera, speaker and microphone
in your video conferencing applications.
Please consult the application
documentation for further instructions
on how to do this.
STARTING A VIDEO CALL
After installing RALLY PLUS and ensuring
it is the default device in your video
conferencing application, simply start
the application in the normal manner
and enjoy the benets of improved audio
and video.
PAIRING RALLY PLUS
TO A BLUETOOTH DEVICE
You can use RALLY PLUS for audio calls
when paired to a Bluetooth device. To pair
your Bluetooth device to R ALLY PLUS,
follow these simple step:
1. Press and hold the Bluetooth button
on the remote control until you see
a ashing blue light on the camera
and microphones.
2. Place your mobile device
in Bluetooth pairing mode and
select “Logitech Rally”.
3. You are now ready to use RALLY PLUS
for audio calls.

8 English
PAIRING A REMOTE CONTROL
TO RALLY PLUS
RALLY PLUS and the remote control are
paired at the factory. You can pair up to
5 remote controls to RALLY PLUS to make
it easier to control the system in larger
rooms. Or, if you need to pair a remote to
the camera, such as when replacing a lost
remote, do the following:
1. Press and hold the button on
the camera until the LED ashes.
2. Press and hold the button on
the Display Hub until the LED ashes.
3. Press and hold the Bluetooth button
on the remote control until the LEDs
on both the camera and Display Hub
stop ashing.
4. If the pairing fails, repeat from step 1.
CAMERA SETTINGS
APPLICATION
Use this program to control the camera
pan, tilt, zoom, focus, and image quality
(like brightness and contrast) from
your computer. The software can be
downloaded from www.logitech.com/
support/Rally.

English 9
ENHANCING RALLY
There are several optional accessories that
ease installation and allow RALLY PLUS
to be used in larger rooms:
1. Rally Mounting Kit: Mounting brackets
for the Table Hub, Display Hub,
Camera and Speakers.
2. Extra Mic Pods: RALLY PLUS
can support up to 7 Mic Pods
allowing great exibility in room size
and conguration.
3. Mic Pod Hub: Used to branch
microphone routing and run most of
the Mic Pod cabling is below the table.
The Mic Pod Hub has 3 jacks that can
be connected to a combination of Mic
Pods or other Mic Pod Hubs.
4. TV mount: Works with one of either
the Camera or Speaker mounting
brackets. The TV Mount can be used
in pairs to mount the Camera and
Speaker above and below the TV.
FOR MORE INFORMATION
You can nd additional information
on RALLY PLUS including:
- FAQs
- Software to enable functions
in various application
- How to order replacement parts
and more at
www.logitech.com/support/Rally

10 Français
1. Alimentation
2. Module audio
3. Extension possible
4. Connexion au hub pour écran
5. Entrée HDMI 1
6. Entrée HDMI 2
7. USB ordinateur de salle de réunion
8. Extension possible
9. Emplacement de sécurité
10. Témoin d'alimentation
DISPOSITIF
HUB POUR TABLE
10
9
12345
67
8

Français 11
1. Haut-parleur
2. Alimentation
3. Connexion au hub pour table
4. Sortie HDMI 1
5. Sortie HDMI 2
6. USB ordinateur de salle de réunion
7. Caméra
8. Emplacement de sécurité
9. Couplage par télécommande
10. Témoin d'alimentation
HUB POUR ÉCRAN
10
9
8
1234
567

12 Français
CAMÉRA
1
2
4
5
6
7
3
1. Bouton de couplage
par télécommande
2. USB
3. Témoin d'état
4. Emplacement de sécurité
5. MIPI
6. Filetage du trépied
7. Fente d'extension

Français 13
TÉLÉCOMMANDE
5
7
6
8
9
2 3
1 4
1. Couplage Bluetooth
2. Prise d'appel
3. Fin d'appel
4. Sourdine du microphone
5. Zoom avant/arrière
6. Volume +/-
7. Accueil
8. Mouvement panoramique/inclinaison
de la caméra
9. Préréglages de la caméra
Une fois l’installation terminée, le système peut être vérié par le biais de l’application
de diagnostic disponible sur Logitech.com/support/Rally.

14 Français
DÉFINIR LE SYSTÈME
RALLYPLUS COMME
LEDISPOSITIF PAR DÉFAUT
Vériez que le système RALLY PLUS
est sélectionné en tant que caméra,
haut-parleur et microphone dans
vos applications de visioconférence.
Veuillez consulter la documentation
fournie avec vos applications pour savoir
comment procéder.
DÉMARRER UN APPEL VIDÉO
Après avoir installé la caméra R ALLY PLUS
et l’avoir congurée comme dispositif
par défaut dans votre application de
visioconférence, démarrez l’application
normalement et protez d’une qualité
audio et vidéo optimale.
COUPLER LA CAMÉRA
RALLY PLUS À UN DISPOSITIF
BLUETOOTH
Vous pouvez utiliser la caméra
RALLY PLUS pour des appels audio
lorsqu’elle est couplée à un dispositif
Bluetooth. Pour coupler votre dispositif
Bluetooth à la caméra RALLY PLUS,
procédez comme suit:
1. Maintenez appuyé le bouton
Bluetooth de la télécommande
jusqu’à ce que le témoin de la caméra
et des microphones clignote en bleu.
2. Activez le couplage Bluetooth de
votre dispositif mobile et sélectionnez
«Logitech Rally».
3. Vous pouvez maintenant utiliser
la caméra RALLY PLUS pour
vos appels audio.

Français 15
COUPLER
UNETÉLÉCOMMANDE
ÀLACAMÉRA RALLY PLUS
La caméra RALLY PLUS et
la télécommande sont couplées
en usine. Vous pouvez coupler jusqu’à
5 télécommandes à la caméra
RALLY PLUS pour faciliter le contrôle
du système dans les grandes pièces.
Sinon, si vous souhaitez coupler une autre
télécommande à la caméra (lorsque vous
avez égaré la télécommande d’origine,
par exemple), procédez comme suit:
1. Appuyez sur le bouton de la caméra
et maintenez-le enfoncé jusqu’à ce
que le témoin lumineux clignote.
2. Appuyez sur le bouton du hub d’écran
et maintenez-le enfoncé jusqu’à ce
que le témoin lumineux clignote.
3. Appuyez sur le bouton Bluetooth
de la télécommande et maintenez-le
enfoncé jusqu’à ce que les témoins
lumineux de la caméra et du hub
d’écran cessent de clignoter.
4. Si le couplage échoue, répétez les
opérations depuis l’étape 1.
APPLICATION
CAMERASETTINGS
Utilisez ce programme pour contrôler
les fonctions de panoramique et
d'inclinaison, le zoom, la mise au point
et la qualité d'image de la caméra
(comme la luminosité et le contraste)
depuis votre ordinateur. Le logiciel est
téléchargeable sur www.logitech.com/
support/Rally.

16 Français
OPTIMISER LE SYSTÈME RALLY
Plusieurs accessoires en option facilitent
l'installation et permettent d'utiliser
RALLY PLUS dans des pièces plus grandes:
1. Kit de xation murale: xations pour
le hub pour table, le hub pour écran,
la caméra et les haut-parleurs.
2. Modules audio supplémentaires:
RALLY PLUS peut prendre en charge
jusqu'à 7 modules audio permettant
une grande exibilité au niveau
de la taille et de la conguration de
la pièce.
3. Hub pour module audio: utilisé pour
connecter les microphones et placer
la plupart des câblages du module
sous la table. Le hub pour module
audio dispose de 3 prises pouvant être
connectées à plusieurs modules audio
ou à d'autres hubs pour module audio.
4. Support de télévision: compatible
avec l'une des xations de la caméra
ou du haut-parleur. Le support de
télévision peut être utilisé par paires
pour xer la caméra et le haut-
parleur au-dessus et en dessous de
la télévision.
POUR PLUS D'INFORMATIONS
Des informations supplémentaires
sur la caméra Rally Plus sont disponibles,
notamment:
- Questions fréquentes
- Logiciels permettant d'activer
des fonctions dans diérentes
applications
- Modalités de commande de pièces
de rechange et plus sur
www.logitech.com/support/Rally

Español 17
1. Alimentación
2. Base de micrófono
3. Expansión futura
4. Conexión al hub de pantalla
5. Entrada HDMI 1
6. Entrada HDMI 2
7. USB de computadora de sala
de reuniones
8. Expansión futura
9. Conector de seguridad
10. LED de alimentación
QUÉ ES CADA COSA
HUB DE SOBREMESA
10
9
12345
67
8

18 Español
1. Altavoz
2. Alimentación
3. Conexión a hub de sobremesa
4. Salida HDMI 1
5. Salida HDMI 2
6. USB de computadora de sala
de reuniones
7. Cámara
8. Conector de seguridad
9. Emparejamiento de remoto
10. LED de alimentación
HUB DE PANTALLA
10
9
8
1234
567
Español 19
CÁMARA
1
2
4
5
6
7
3
1. Botón de emparejamiento de remoto
2. USB
3. LED de estado
4. Conector de seguridad
5. MIPI
6. Adaptador para trípode
7. Ranura de expansión

20 Español
Después de completar la instalación, el sistema se puede vericar mediante
la aplicación de diagnóstico disponible en Logitech.com/support/Rally.
REMOTO
5
7
6
8
9
2 3
1 4
1. Emparejamiento Bluetooth
2. Respuesta de llamada
3. Finalización de llamada
4. Silenciamiento de micrófono
5. Zoom para ampliar/reducir
6. Subir y bajar volumen
7. Inicio
8. Panorámica/inclinación de cámara
9. Preajustes de cámara
A página está carregando...
A página está carregando...
A página está carregando...
A página está carregando...
A página está carregando...
A página está carregando...
A página está carregando...
A página está carregando...
A página está carregando...
A página está carregando...
A página está carregando...
-
 1
1
-
 2
2
-
 3
3
-
 4
4
-
 5
5
-
 6
6
-
 7
7
-
 8
8
-
 9
9
-
 10
10
-
 11
11
-
 12
12
-
 13
13
-
 14
14
-
 15
15
-
 16
16
-
 17
17
-
 18
18
-
 19
19
-
 20
20
-
 21
21
-
 22
22
-
 23
23
-
 24
24
-
 25
25
-
 26
26
-
 27
27
-
 28
28
-
 29
29
-
 30
30
-
 31
31


Logitech Rally Plus Video Conferencing Kit Guia de usuario
- Tipo
- Guia de usuario
em outras línguas
Artigos relacionados
Outros documentos
-
Thrustmaster 2960726 Manual do usuário
-
TRUSTMASTER T500 RS Manual do proprietário
-
Garmin Rally XC100 Manual do proprietário
-
Breitling Bentley B55 Supersport Guia de usuario
-
KTM 890 Adventure R 2021 Manual do proprietário
-
KTM 790 Adventure R 2020 Manual do proprietário
-
 Joytech NITRO TRI-FORCE 3IN1 RACING WHEEL Manual do proprietário
