Dali E-50 Manual do usuário
- Categoria
- Alto-falantes do carro
- Tipo
- Manual do usuário

DALI PHANTOM E and K Series
MANUAL
ENGLISH - DEUTSCH - 零部件 - FRANÇAIS - ESPAÑOL
E-50
E-60
E-60 S
E-80
K-60
K-60 LP
K-80

2
FIGURE 1A
FIGURE 1C
FIGURE 1B
X X
ITEM E-series K-series
Speakers 1 pc 1 pc
Grilles 1 pc 1 pc
Cut-out template 1 pc 1 pc
DALI logo badge 1 pc -
Owner’s manual 1 pc 1 pc
TABLE 1

3
UK DE CN FR ES
FIGURE 5 FIGURE 6 FIGURE 6B
FIGURE 7 FIGURE 7B
FIGURE 2 FIGURE 3 FIGURE 4
FIGURE 8 FIGURE 9 FIGURE 10
-165
-150
-135
-120
+165
+150
+
F
H
R
l
a
m
r
o
N
+
F
H
L
l
a
m
r
o
N
-165
+165
+150
+
F
H
R
l
a
m
r
o
N
+
F
H
L
l
a
m
r
o
N
-15
-30
-45
-60
-75
-90
+90
+75
+60
+45
+30
+15
-165
-150
-135
-120
-105
+165
+150
+135
+120
+105
+
F
H
R
l
a
m
r
o
N
+
F
H
L
l
a
m
r
o
N
LR
-15
-30
-45
-60
-75
-90
+75
+60
+45
+30
+15
-165
-150
-135
-120
-105
+165
+150
+135
+120
+105
.
b
i
r
t
s
i
D
.
s
u
c
o
F
t
l
i
T
+
F
H
l
a
m
r
o
N
DALI PHANTOM
-15
-30
-45
-60
-75
-90
+90
+75
+60
+45
+30
+15
-165
-150
-135
-120
-105
+165
+150
+135
+120
+105
.
b
i
r
t
s
i
D
.
s
u
c
o
F
t
l
i
T
+
F
H
l
a
m
r
o
N
DALI PHANTOM
-15
-30
-45
-60
-75
-90
+90
+75
+60
+45
+30
+15
-165
-150
-135
-120
-105
+165
+150
+135
+120
+105
.
b
i
r
t
s
i
D
.
s
u
c
o
F
t
l
i
T
+
F
H
l
a
m
r
o
N
DALI PHANTOM
FIGURE 6C
-
9
0
-
1
2
0
-
1
5
0
+
1
5
0
+
1
2
0
-
6
0
-
3
0
+
3
0
+
6
0
N
o
r
m
.
H
i
g
h
+
0
-
3
0
+
3
0
+
6
0
N
o
r
m
.
H
i
g
h
+

4
PHANTOM E-50 PHANTOM E-60 PHANTOM E-60 S PHANTOM E-80
Frequency range 58 - 25,000 Hz ±3 dB 52 - 25,000 Hz ±3 dB 57 - 25,000 Hz ±3 dB 49 - 25,000 Hz ±3 dB
Sensitivi 87 dB @ 1 m for 2.83 V 88 dB @ 1 m for 2.83 V 90 dB @ 1 m for 2.83 V (both
channels) 89.5 dB @ 1 m for 2.83 V
Nominal impedance 8 ohm 8 ohm 8 + 8 ohm 6 ohm
Maximum SPL 104 dB 105 dB 105 dB 107 dB
Crossover frequency 3,600 Hz 3,300 Hz 2,600 Hz 3,200 Hz
Crossover principle 2-way 2-way 2+2-way 2-way
Recommended amplifier power 40 - 120 Wa 30 - 120 Wa 2 x 20 - 80 Wa 30 - 150 Wa
High frequency driver 1 x 28 mm so dome 1 x 28 mm so dome 2 x 20 mm so dome 1 x 28 mm so dome
High frequency diaphragm So woven fabric So woven fabric So woven fabric So woven fabric
Low/Mid frequency driver 1 x 5¼ inch 1 x 6½ inch 1 x 6½ inch dual voice coil 1 x 8 inch
Low/Mid frequency diaphragm Polypropylene Polypropylene Polypropylene Polypropylene
Connection input Single wire Single wire 2 x Single wire Single wire
Enclosure pe Open back Open back Open back Open back
Other features Normal/HF Tilt
Focus/Distributed
Normal/HF Tilt
Focus/Distributed
Normal/HF Tilt
Focus/Distributed
Normal/HF Tilt
Focus/Distributed
Installation location In-ceiling/In-wall In-ceiling/In-wall In-ceiling/In-wall In-ceiling/In-wall
Recommended placement Ceiling/Front/Centre/Surround Ceiling/Front/Centre/Surround Ceiling/Front/Centre/Surround Ceiling/Front/Centre/Surround
Outer dimensions incl. grille
(H x W x D)
Ø 230 x 100 mm
Ø 9.1 x 3.9 inches
Ø 258 x 100 mm
Ø 10.2 x 3.9 inches
Ø 258 x 112 mm
Ø 10.2 x 4.4 inches
Ø 294 x 118 mm
Ø 11.6 x 4.6 inches
Outer dimensions excl. grille
(H x W x D)
Ø 214 x 95 mm
Ø 8.4 x 3.7 inches
Ø 242 x 95 mm
Ø 9.5 x 3.7 inches
Ø 242 x 106 mm
Ø 9.5 x 4.2 inches
Ø 278 x 113 mm
Ø 11.0 x 4.5 inches
Cut-out dimensions Ø 197 mm
Ø 7.8 inches
Ø 225 mm
Ø 8.9 inches
Ø 225 mm
Ø 8.9 inches
Ø 261 mm
Ø 10.3 inches
Mounting depth 95 mm
3.7 inches
95 mm
3.7 inches
101 mm
4 inches
109 mm
4.3 inches
Recommended rear volume
(backbox) 5 - 35 litres 5 - 50 litres 5 - 35 litres 10 - 100 litres
Optimum rear volume 12 litres 15 litres 15 litres 30 litres
Ceiling/wall thickness
(total dog-leg span)
10 - 70 mm
0.4 - 2.8 inches
10 - 70 mm
0.4 - 2.8 inches
10 - 70 mm
0.4 - 2.8 inches
10 - 70 mm
0.4 - 2.8 inches
Weight incl.grille 2 kg
4.40 lb
2 kg
4.40 lb
2 kg
4.40 lb
2.50 kg
5.51 lb
Shipping weight 2.50 kg
5.51 lb
3 kg
6.60 lb
3 kg
6.60 lb
3.50 kg
7.71 lb
Finish White White White White
Accessories
Manual
Cut-out template
Front grille
Logo badge
Manual
Cut-out template
Front grille
Logo badge
Manual
Cut-out template
Front grille
Logo badge
Manual
Cut-out template
Front grille
Logo badge
Optional accessories
E Series grille (square)
Pre-construction Kit
PHANTOM UNIVERSAL 25
backbox
E series grille (square)
K series grille (white or black)
Pre-construction Kit
PHANTOM UNIVERSAL 25
backbox
E Series grille (square)
K Series grille (white or black)
Pre-construction Kit
PHANTOM UNIVERSAL 25 backbox
E series grille (square)
K series grille (white or black)
Pre-construction Kit
PHANTOM UNIVERSAL 25
backbox
TABLE 2 - PHANTOM E Series TECHNICAL SPECIFICATIONS
All technical specifications are subject to change without notice.


6
CONTENTS
1.0 OWNER’S MANUAL 7
2.0 SAFETY PRECAUTIONS 7
3.0 UNPACKING/PARTS LIST 7
4.0 DALI PHANTOM E- AND K-SERIES – SETUP AND POSITIONING 7
5.0 CUT-OUT TEMPLATE 10
6.0 INSTALLATION 11
7.0 RUNNING-IN 11
8.0 MAGNETIC SHIELDING 12
9.0 MAINTENANCE 12
10.0 ENVIRONMENTAL INFORMATION AND DISPOSAL 12
11.0 TECHNICAL SPECIFICATIONS 12

7
UK DE CN FR ES
1.0 OWNER’S MANUAL
Congratulations on your new speakers. Please read this manual carefully before
you unpack and install your new speakers to get the most out of your purchase. You
can find more information on our website: www.dali-speakers.com or by contacting
your authorized DALI dealer.
2.0 SAFETY PRECAUTIONS
• Always follow all safe guidelines.
• DALI PHANTOM E- and K-series are intended for indoor use.
• The speaker must only be used indoors and never in extreme hot or cold
temperatures.
• DALI PHANTOM E- and K-series must not be exposed to direct sunlight.
• Power o the amplifier when connecting the loudspeaker cables to the
loudspeaker and the amplifier.
• DALI PHANTOM E- and K-series must be installed by professionals.
• Always make sure that there are no installations such as gas pipes, ventilation,
cables, etc. in the ceiling or wall at the mounting location.
• The wall or ceiling must be able to support the speaker’s weight – see the
technical specifications.
• If the speakers are mounted in a ceiling or wall where there is a vapor barrier
inside the wall, make sure not to pierce/damage the barrier.
• For extreme SPL performance we advise to low cut the signal in the amplifier
or processor driving the speaker.
3.0 UNPACKING/PARTS LIST
Be careful not to damage the contents when you unpack the parts. Check that all
parts are contained in the cardboard box, see table 1. Keep the packaging materials
if your speakers should need to be relocated or serviced.
4.0 DALI PHANTOM E- AND K-SERIES –
SETUP AND POSITIONING
DALI PHANTOM E- and K-series provide the unique, acclaimed sound of a true
DALI PHANTOM loudspeaker for easy and discreet integration into your home.
DALI PHANTOM E- and K-series are equally suited for stereo and home cinema
systems where good sound quali is a high priori. DALI PHANTOM E- and K-series
are also very suitable in larger areas where high quali sound is desired, e.g. in
hallways or shop areas. DALI recommends the use of a subwoofer together with
DALI PHANTOM E- and K-series to permit reproduction of the lowest frequencies
and an overall enhancement of your sound system.
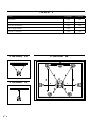
For stereo and home cinema we recommend that you position the speakers
symmetrically around your favorite listening position to achieve optimum soundstage
(see figure 1A + 1B + 1C). To avoid compromising clari from the loudspeaker, it is
also important, that you do not position the speaker too far away from the listening
position. We recommend that the greatest o axis listening angle is 45 degrees

8
(measured between the center axis of the loudspeaker and the listening position
– see figure 2).
In a distributed sound system setup it is important, that the speakers are positioned
so that the main area of the room(s) is covered with sound (see chapter 4.4). To
achieve an even sound coverage, the speakers should be installed evenly in the
room(s) (see figure 3).
Objects positioned between the speaker and listening position might negatively
aect the sound quali. The PHANTOM E- and K-series are designed to meet our
wide dispersion sound principle. By using speakers with wide dispersion technology,
the distortion in the main listening area will be lowered and the room integration will
be beer. The wide dispersion principle will also ensure that sound is spread evenly
within a large area in the listening room.
Every room has its own distinctive acoustics, which influence the way we experience
sound from a speaker. The sound you hear consists of both direct sound from the
speakers and reflected sound from the floor, ceiling and walls. The laer will aect
how you experience the sound. As a basic rule, try to avoid large, hard and reflective
areas in the immediate vicini of your loudspeakers as it will pically cause strong
reflections, which might disturb the precision and spatial eect of the sound
reproduction. So items such as carpets, curtains etc. might help if the sound is
too bright.
Both the amount and quali of the deep bass depend on the size and shape of the
room, and the position of the speakers. Positioning the speakers near a side or
back wall will accentuate the bass. A corner location will accentuate it even more,
but will also increase the reflections.
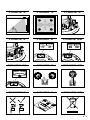
4.1 Mounting the dogleg brackets
DALI PHANTOM E- and K-series incorporate dogleg brackets for ceiling/wall
mounting. The brackets aach the loudspeaker firmly to the rear of the surface
on which it is mounted. The dogleg brackets extend out at a 90-degree angle when
the screws are tightened (see figure 4). The screws should be tightened so that the
loudspeaker sits securely in place – but be careful not to over tighten the screws.
To tighten the screws, use an appropriate bit. The bit should be used with a hand
bit screwdriver or a drilling machine with build-in torque seing. If using a drilling
machine, set the torque to the minimum seing. The screws are appropriately
tightened, when the gasket on the rear of the speaker is compressed and the bezel
of the speaker is flush with the mounting surface.
If you need to remove the loudspeaker, loosen the screws approximately 5 to 20
turns counter clockwise and the brackets will loosen their grip. NOTE: do not
unscrew more than 20 to 25 turns or the brackets may fall o the screws.
If you are mounting the loudspeaker in very thick wall material, it might be needed
to dismount the dogleg brackets from the screws and aerwards mounting them
upside down. Opposite mounting of the doglegs will make it possible to mount the
loudspeaker in boards with up to 2.55”/ 65mm thickness (see figure 5). It is not

9
UK DE CN FR ES
possible to turn the doglegs around on the K-60 LP due to its low profile installation
depth. The max board thickness for the K-60 LP is 27 mm / 1.1”, and minimum board
thickness is 11 mm / 0.43”.
4.2 Grille
The front grille is fixed in place by the magnets incorporated into the front bae of
the DALI PHANTOM E- and K-series.
NOTE: There is an optional square grille available for order.
NOTE: On the inside of the grille there is a piece of non-woven. The non-woven is
on the grille to protect the drivers against dust and dirt. Therefore the non-woven
must remain on the grille.
4.3 Adjustment of Switches
When the grille is removed from the loudspeaker, you will see the woofer and the
tweeter and one or two switches (see figure 6). The switches can be used to adjust
the sound from the loudspeaker to a custom setup. The switches can be operated
independent of each other.
PHANTOM E-series
One switch can increase the tweeter level 3dB if it is switched from the “Normal”
seing to the “HF tilt” seing.
The other switch can focus or distribute the sound from the loudspeaker. When
the listeners are relatively close to the center axis of the loudspeaker (closer than
25 degrees o-axis) we recommend seing the switch to the “Focus” seing. When
listening far away from the center axis of the loudspeaker (more than 25 degrees
o-axis) or if the speaker is used to fill a large area with sound, we recommend
seing the switch to “Distributed”.
The PHANTOM E-60S comprises a woofer, two tweeters and two switches (see
figure 6B). The switches can be used to adjust the sound to suit the listening room
and personal preferences. The switches can be operated independent of each
other.
One switch will increase the le channel tweeter level by 3dB between the “Normal”
and “HF+” seings. The second switch similarly adjusts the right channel tweeter.
When listeners are relatively close to the center axis of the loudspeaker (closer
than 25 degrees o-axis) we recommend seing the switches to the “Normal”
seing. When listeners are further away from the center axis of the loudspeaker
(more than 25 degrees o-axis), or if the loudspeaker is required to fill a large
listening area, we recommend seing the switches to “HF+”.
PHANTOM K-series
One switch can increase the tweeter level 3dB if it is switched from the “Normal”
seing to the “High+” seing.

10
The other switch can increase the midrange level by 3dB when switched from the
“Normal” seing to the “Mid+” seing. The K-60 LP features the High+ switch only.
4.4 Speaker Rotation – Using the Compass
When the grille is removed you can see a compass ring round the edge of the
loudspeaker bezel, which can be used to read out the rotation of the loudspeaker
relatively to, for example, a fixed line on the ceiling. The tweeter is slightly o-center
and should be positioned so it is closest to the main listening position (see figure 7).
The PHANTOM E-60S incorporates a compass ring around the edge of its bezel
(see figure 7B), that can be used to read out the rotation of the loudspeaker relative
to, for example, a fixed line on the ceiling. The tweeters should be positioned so they
are closest to the main listening position.
4.5 Connection of Cables/Selection of Cables
Your choice of cables is a crucial element in your installation. Be aware that replacing
cables aer installation is a dicult task. Therefore, select quali cables from the
beginning. Please consult your authorized DALI dealer for further advice on which
cable to select.
When connecting the cable to the loudspeaker and the amplifier, it is important that
the loudspeaker is connected in correct phase. The red (+) loudspeaker terminal
must be connected to the red (+) amplifier terminal. The black (-) loudspeaker
terminal must be connected to the black (-) amplifier terminal. If the loudspeakers
are not connected in correct phase, the soundstage will pically be diuse and the
bass will be weak.
Additionally for the E-60S, the stereo (le and right) cables require connection
to the correct terminals. Connect the le channel cable to the terminals on the
side marked “L” on the product label, and connect the right channel cable to the
terminals on the side marked “R”.
To insert the cable end into the spring loaded terminals of the speaker, remove
cable insulation so that approximately. ½” / 12mm of bare wire is exposed. Press
the top of the terminal down and insert the bare wire into the opening. When the
wire is fully in place with no loose strands exposed, release the terminal. The cable
is now connected. Please refer to figure 8 for correct cable connection.
5.0 CUT-OUT TEMPLATE
The enclosed cut-out template (see figure 9) can be used to initially visualize how
your speakers should be mounted and for marking where the cut-out should be
made. Tape the template at the preferred mounting position, so that you can mark
the necessary opening. The minimum mounting depth for the DALI PHANTOM
E-50, E-60 and E-60S is 95mm / 3.7”, for the DALI PHANTOM K-60 it is 100 mm /
3.9”, for the DALI PHANTOM E-80 it is 106mm / 4.2”, and for the DALI PHANTOM
K-80 it is 113 mm /4.3”. The minimum mounting depth for the DALI PHANTOM K-60
LP is 38 mm / 1.5”.

11
UK DE CN FR ES
6.0 INSTALLATION
Please study and follow the safe guidelines found in chapter 2.0 of this manual! Use
a trained professional to ensure that all safe requirements are met to prevent the
speaker from falling.
The following tools and items are necessary for proper installation:
• Tape measure
• Pencil and saw or knife
• Appropriate bit or screwdriver
• Tape
• Cut-out template
When the correct placement has been found, tape the mounting template to the
surface. Outline the cut-out area with a pencil.
Remove the template and drill holes for insertion of saw or knife. Saw/cut carefully
along the line marked with pencil.
When the hole for the loudspeaker is made, make sure that the loudspeaker cable
is not hanging loose inside the ceiling/wall. It must be securely fastened to the inside
of the ceiling/wall to prevent tension on the cable when the cable is connected with
the terminals of the loudspeaker. If le unsupported, cable can gradually come
loose, creating a poor electrical connection between wire and terminals (see figure
8 for correct fastening of the cable).
When the loudspeaker cable is fastened and the hole for the loudspeaker is prepared,
you are ready to connect the speaker cables. Connect cable to the terminals –
being careful to connect the amplifier’s red (+) terminal to the loudspeaker’s red (+)
terminal and the amplifier’s black (-) terminal to the loudspeaker’s black (-) terminal.
Please refer to chapter 4.5 of this manual.
When the cables are connected, turn on the system and listen to the loudspeakers
before final mounting to make sure that all connections are correct. Insert the
loudspeaker in the ceiling/wall opening and align the loudspeaker as described in
chapter 4.4.
NOTE: Be careful not to touch the drivers during installation. When the loudspeaker
is aligned, tighten the 4 screws in the loudspeaker brackets with an appropriate
screwdriver or bit so that the speaker is firmly mounted in place. Be careful to avoid
over-tightening the screws and shredding the threads.
7.0 RUNNING-IN
You should expect the sound quali from your new speakers to gradually improve
during the first period of use. Nothing particular has to be done in order to run in
the speakers – but expect up to 100 hours of playback (depending on playback level)
before full performance level is reached.

12
8.0 MAGNETIC SHIELDING
The speaker drive units produce a magnetic field which may interfere with CRT
televisions/monitors, hard drives, audio and video tapes as well as swipe cards etc.
Therefore keep such items away from the speakers to avoid damage. LCD and
plasma televisions/monitors are not aected by magnetic fields.
9.0 MAINTENANCE
Cleaning the speaker surfaces can be done with ordinary household cleaning
agents. Avoid using products that are abrasive, or contain acid, alkali or anti-
bacterial agents. Avoid using aerosols. Avoid using cleaning agents directly on the
drive units and clean them with extreme care, particularly the tweeter. The grille
may be cleaned using a vacuum cleaner or a normal clothes brush.
10.0 ENVIRONMENTAL INFORMATION
AND DISPOSAL
DALI products are designed to meet the international directives concerning
Restriction of Hazardous Substances (RoHS) and disposal of Waste Electrical
and Electronic Equipment (WEEE). The waste symbol indicates that the speakers
meet the directives (see figure 10). The speakers must be processed or recycled
appropriately. Please consult your local waste authori for guidance.
11.0 TECHNICAL SPECIFICATIONS
In Table 2/3 (see page 4/41) you will find most common specifications for our
speakers. Please bear in mind, that the sound quali from a speaker cannot be
judged by technical specifications only. To compare the dierent speakers, we
recommend you to listen to the dierent speakers in question.

13
UK DE CN FR ES
INHALT
1.0 BENUTZERHANDBUCH 14
2.0 VORSICHTSMASSNAHMEN 14
3.0 AUSPACKEN/PACKLISTE 14
4.0 DALI PHANTOM E UND DALI PHANTOM K – ANSCHLUSS UND EINBAU 14
5.0 AUSSCHNITTSCHABLONE 18
6.0 EINBAU 18
7.0 EINLAUFZEIT 19
8.0 MAGNETISCHE ABSCHIRMUNG 19
9.0 REINIGUNG 19
10.0 UMWELTINFORMATIONEN UND ENTSORGUNG 19
11.0 TECHNISCHE DATEN 19

14
1.0 BENUTZERHANDBUCH
Herzlichen Glückwunsch zu Ihren neuen Lautsprechern. Bie lesen Sie diese Anleitung
sorgfältig durch, bevor Sie Ihre neuen Lautsprecher auspacken und montieren, damit
Sie viel Freude an Ihrem Kauf haben. Weitere Informationen erhalten Sie auf unserer
Homepage www.dali-speakers.com oder indem Sie sich an Ihren autorisierten DALI-
Händler wenden.
2.0 VORSICHTSMASSNAHMEN
• Beachten Sie bie alle Sicherheitsregeln.
• Die Lautsprecher der Serien DALI PHANTOM E und DALI PHANTOM K sind für
die Verwendung in Innenräumen gedacht.
• Die Lautsprecher dürfen nur im Innenbereich und nie bei extrem warmen oder
kalten Temperaturen verwendet werden.
• Die Produkte der Serien DALI PHANTOM E und DALI PHANTOM K dürfen keinem
direkten Sonnenlicht ausgesetzt werden.
• Schalten Sie den Verstärker aus, wenn Sie die Lautsprecher an den Verstärker
anschließen.
• Die Produkte der Serien DALI PHANTOM E und DALI PHANTOM K sollten von
einem professionellen Installateur montiert werden.
• Stellen Sie auf jeden Fall sicher, dass sich dort, wo die Lautsprecher in der
Wand oder Decke montiert werden sollen, keine Installationen wie Gasleitungen,
Ventilationsschächte usw. befinden.
• Die Wand bzw. Decke muss das Gewicht der Lautsprecher tragen können –
beachten Sie hierzu die technischen Daten.
• Sollten Sie die Lautsprecher in eine Decke oder Wand mit einer Dampfsperre
einbauen, ist dringend darauf zu achten, dass diese Sperre keinesfalls beschädigt
wird.
3.0 AUSPACKEN/PACKLISTE
Achten Sie darauf, beim Auspacken die Teile nicht zu beschädigen. Kontrollieren Sie,
dass der Karton alle Teile enthält – siehe Tabelle 1. Bewahren Sie die Verpackung für den
Fall auf, dass die Lautsprecher später einmal transportiert werden müssen.
4.0 DALI PHANTOM E UND DALI
PHANTOM K – ANSCHLUSS UND EINBAU
Die Modelle der Serien DALI PHANTOM E und DALI PHANTOM K bieten den einzigarti-
gen, renommierten Klang von DALI-Lautsprechern und lassen sich einfach und diskret
in Ihrem Heim montieren.
Die Serien DALI PHANTOM E und DALI PHANTOM K sind sowohl für Stereosysteme
als auch für mehrkanalige Heimkinos geeignet, bei denen es besonders auf eine gute
Klangqualität ankommt. Die Produkte der Serien DALI PHANTOM E und DALI PHAN-
TOM K lassen sich auch sehr gut in größeren Räumen verwenden, in denen Klang in ho-
her Qualität gewünscht wird – zum Beispiel in Gängen oder Verkaufsbereichen. DALI
empfiehlt, in Kombination mit den Serien DALI PHANTOM E und DALI PHANTOM K
einen Subwoofer einzusetzen, weil so auch tiefste Frequenzen wiedergegeben werden
können und die Klangqualität insgesamt verbessert wird.

15
UK DE CN FR ES
Bei Stereosystemen und Heimkinos empfehlen wir, dass Sie die Lautsprecher symme-
trisch um die am meisten genutzte Hörposition herum platzieren, weil so ein optimaler
Klangeindruck entsteht (siehe hierzu die Abbildungen 1A, 1B und 1C). Um die Klarheit des
Klangbildes nicht zu beeinträchtigen, ist es ebenfalls wichtig, die Lautsprecher nicht zu
weit entfernt von der Hörposition anzubringen. Wir empfehlen, dass der Winkel von der
Mielachse (Linie von Hörposition zur Mie zwischen den Lautsprechern – siehe Ab-
bildung 2) zu den Lautsprechern nicht mehr als 45 Grad betragen sollte.
Bei der Aufstellung eines aus mehreren Lautsprechern bestehenden Systems ist es
wichtig, dass die Lautsprecher so aufgestellt werden, dass der Hauptbereich des Rau-
mes beschallt wird (siehe Kapitel 4.4). Um eine gleichmäßige Klangabdeckung zu errei-
chen, sollten die Lautsprecher gleichmäßig im Raum verteilt installiert werden (siehe Ab-
bildung 3).
Wenn sich zwischen den Lautsprechern und der Hörposition Gegenstände befinden,
kann dies die Klangqualität verschlechtern. Die Lautsprecher der Serien DALI PHAN-
TOM E und DALI PHANTOM K wurden so konstruiert, dass ein möglichst breiter Ab-
strahlwinkel erzielt wird. Lautsprecher mit einer breiten Abstrahlung weisen weniger
Verzerrungen im Haupthörbereich auf und lassen sich besser im Raum integrieren. Eine
breite Abstrahlung stellt auch sicher, dass der Klang gleichmäßig in einem großen Be-
reich des jeweiligen Raumes zu hören ist.
Jeder Raum besitzt seine eigene Akustik, welche die Art und Weise, wie wir den Klang
eines Lautsprechers erleben, beeinflusst. Der Klang, den Sie hören, besteht sowohl aus
dem Schall, welchen die Lautsprecher direkt abstrahlen, als auch aus dem von Wänden
und Decke reflektierten Schall. Letzteres wird in wesentlichem Umfang Ihr Klangerlebnis
beeinflussen. Grundsätzlich sollte die Montage der Lautsprecher in unmielbarer Nähe
von größeren harten und stark reflektierenden Bereiche vermieden werden. Solche
Flächen bewirken pischerweise starke Reflexionen, was die Präzision sowie die Räum-
lichkeit der Klangwiedergabe negativ beeinflusst. Weiche Gegenstände wie Teppiche,
Vorhänge o. ä. schaen eventuell Abhilfe, wenn der Klang zu höhenreich ist.
Die Intensität sowie Qualität der tiefen Bässe hängen von Größe und Form des Raumes
sowie der Platzierung der Lautsprecher ab. Eine Platzierung der Lautsprecher nahe ei-
ner Seiten- oder Rückwand hebt die Bässe hervor. In einer Raumecke werden sie noch
weiter verstärkt, dort erhöhen sich auch die Schallreflexionen.
4.1 Montagehalterungen
Zu den Serien DALI PHANTOM E und DALI PHANTOM K gehören Halterungen für
die Wand- beziehungsweise Deckenmontage. Diese Halterungen verbinden die Laut-
sprecher fest mit der Rückseiten der Fläche, auf denen sie angebracht werden. Die
Halterungen stehen in einem rechten Winkel heraus, wenn die Schrauben angezogen
werden (siehe Abbildung 4). Die Schrauben sollten so weit angezogen werden, dass der
Lautsprecher sicher verankert ist. Achten Sie jedoch darauf, die Schrauben nicht zu
fest anzuziehen. Verwenden Sie zum Anziehen der Schrauben ein 3mm-Inbus-Bit. Die
Inbusschrauben sollten mit einem Handbitschraubenzieher oder einem Akkuschrauber
mit Drehmomentvorwahl angezogen werden. Wenn Sie einen Akkuschrauber verwen-
den, wählen Sie bie den geringsten Widerstand. Die Schrauben sitzen optimal, wenn die
Dichtung auf der Rückseite des Lautsprechers komprimiert wird und die Frontblende
mit der Einbauoberfläche plan sitzt.

16
Wenn Sie den Lautsprecher wieder ausbauen wollen, lösen Sie die Schrauben um circa
5 bis 20 Umdrehungen entgegen dem Uhrzeigersinn. Dadurch werden die Halterungen
gelöst. BITTE BEACHTEN: Drehen Sie die Schrauben nicht weiter als 20 bis 25 Umdre-
hungen heraus, weil sonst die Halterungen von den Schrauben fallen.
Wenn Sie den Lautsprecher in einer sehr dicken Wand montieren, kann es erforderlich
sein, die Schauben aus den Halterungen ganz herauszudrehen und die Halterungen da-
nach umzudrehen. Wenn die Halterungen auf diese Weise umgedreht montiert werden,
können die Lautsprecher in Plaen von bis zu 65 mm / 2,55 Zoll Dicke eingebaut werden
(siehe Abbildung 5).
4.2 Abdeckung
Die Lautsprecher-Abdeckungen werden durch Magnete in Position gehalten, die in den
Gehäusen der Lautsprecher der Serien DALI PHANTOM E und DALI PHANTOM K in-
tegriert sind.
HINWEIS: Als optionales Zubehör gibt es für die Lautsprecher quadratische Abde-
ckungen.
HINWEIS: Auf der Innenseite der Abdeckung befindet sich ein Stück Vlies. Dieses Vlies
schützt die Chassis vor Staub und Schmutz. Deshalb muss es auf der Abdeckung ver-
bleiben.
4.3 Schalter einstellen
Wenn Sie die Abdeckung vom Lautsprecher abgenommen haben, sind Tieöner, Hoch-
töner und zwei Schalter zu sehen (siehe Abbildung 6). Mit den Schaltern kann der Klang
des Lautsprechers verändert werden. Die Schalter können voneinander unabhängig
eingestellt werden.
PHANTOM E Serie
Wenn Sie den ersten Schalter von „Normal“ auf „HF tilt“ stellen, wird der Schalldruck-
pegel der Hochtöner um 3dB erhöht.
Mit dem zweiten Schalter kann der Klang des Lautsprechers fokussiert oder verteilt
werden. Wenn die Zuhörer relativ nahe an der Achse des Lautsprechers sitzen (nicht
mehr als 25 % von der Achse entfernt), empfehlen wir, die Einstellung „Normal“ zu ver-
wenden. Wenn die Zuhörer hingegen mehr als 25% von der Achse entfernt sein werden
oder der Lautsprecher zur Beschallung eines größeren Raumes verwendet wird, emp-
fehlen wir, den Schalter auf „Distributed“ (verteilt) einzustellen.
Der PHANTOM E-60 S ist mit einem Tieöner, zwei Hochtönern und zwei Schaltern
ausgestaet (siehe Abbildung 6B). Mit den Schaltern können Sie den Klang an den Hör-
raum und Ihre persönlichen Vorlieben anpassen. Die Schalter können unabhängig von-
einander eingestellt werden.
Mit dem einen Schalter können Sie den Pegel für den Hochtöner des linken Kanals um 3
dB erhöhen, indem Sie ihn von „Normal“ auf „HF +“ umstellen. Mit dem zweiten Schalter
können Sie den Pegel für den Hochtöner des rechten Kanals in derselben Weise ein-
stellen.

17
UK DE CN FR ES
Wenn die Zuhörer relativ nahe an der Achse des Lautsprechers sitzen (nicht mehr als
25 % von der Achse entfernt), empfehlen wir, die Schalter auf „Normal“ einzustellen.
Wenn die Zuhörer hingegen mehr als 25% von der Achse entfernt sein werden oder der
Lautsprecher zur Beschallung eines größeren Raumes verwendet wird, empfehlen wir,
den Schalter auf „HF+“ einzustellen.
PHANTOM K Serie
Wenn Sie den ersten Schalter von „Normal“ auf „High+“ stellen, wird der Schalldruck-
pegel der Hochtöner um 3dB erhöht.
Wenn Sie den anderen Schalter von „Normal“ auf „Mid+“ stellen, wird der Schalldruck-
pegel der Mien um 3dB erhöht.
4.4 Drehung der Lautsprecher – Kompass benutzen
Wenn die Frontabdeckung entfernt wurde, sehen Sie die Skaleneinteilung eines Kom-
passrings um den Rand des Lautsprechers. Diese Skaleneinteilung kann benutzt wer-
den, um den Lautsprecher an Fixpunkten (Beispielsweise: Orientierung an einer Linie an
der Decke) auszurichten. Der Hochtöner ist etwas außerhalb des Zentrums und sollte
so platziert sein, dass er dem Haupthörplatz näher ist (siehe Bild 7).
Am Rand des PHANTOM E-60 S befindet sich ein Kompassring mit Skaleneinteilung
(siehe Abbildung 7B). Sie kann verwendet werden, um den Lautsprecher an Fixpunkten
(Beispielsweise: Orientierung an einer Linie an der Decke) auszurichten. Die Hochtöner
sollten so ausgerichtet werden, dass sie der zentralen Hörposition am nächsten sind.
4.5 Auswahl und Anschluss der Kabel
Die Auswahl der Kabel hat einen großen Einfluss auf die Klangqualität der Lautsprecher.
Denken Sie daran, dass es schwierig ist, die Kabel nach dem Einbau auszuwechseln.
Wählen Sie deshalb gleich von Anfang an Qualitätskabel. Bie wenden Sie sich an Ihren
autorisierten DALI-Händler, um sich bei der Wahl der Kabel beraten zu lassen.
Achten Sie auf einen phasenrichtigen Anschluss der Kabel an Lautsprecher und Ver-
stärker. Die rote (+) Lautsprecherklemme muss mit dem roten (+) Ver stärker an schluss
verbunden werden. Die schwarze (-) Lautsprecherklemme muss mit dem schwarzen (-)
Verstärkeranschluss verbunden werden. Wenn die Lautsprecher nicht phasenrichtig
angeschlossen sind, wird der Klang wahrscheinlich dius und bassschwach wirken.
Beim E-60 S müssen außerdem die Stereokabel (links und rechts) an die richtigen Klem-
men angeschlossen werden. Verbinden Sie das Kabel für den linken Kanal mit den An-
schlüssen auf der Seite, die mit „L“ gekennzeichnet ist, und verbinden Sie das Kabel des
rechten Kanals mit den Anschlüssen auf der Seite, die mit „R“ gekennzeichnet ist.
Um die Kabelenden in die Federklemmen einzusetzen, entfernen Sie die Isolierung so
weit, dass circa 12 mm blankes Kabel freigelegt ist. Drücken Sie das Oberteil der Klem-
me herunter und führen Sie das blanke Kabel in die Önung ein. Wenn das Kabel einge-
setzt ist, lassen Sie die Anschlussklemme los. Achten Sie darauf, dass anschließend kei-
ne einzelnen Kabeladern herausstehen. Das Kabel ist jetzt angeschlossen. Siehe auch
Abbildung 8 – hier wird der korrekte Anschluss dargestellt.

18
5.0 AUSSCHNITTSCHABLONE
Verwenden Sie die beiliegende Ausschnischablone (siehe Abbildung 9), um die Einbau-
position des Lautsprechers zu bestimmen und den Ausschni für den Einbau zu markie-
ren. Heen Sie die Schablone mit Klebeband an die gewünschte Stelle, so dass Sie den
Ausschni markieren können. Die minimale Einbautiefe für die Modelle DALI PHANTOM
E-50, E-60 und E-60S ist 95mm / 3,7 Zoll. Für die DALI PHANTOM K-60 sind es 100
mm / 3,9 Zoll. Für die DALI PHANTOM E-80 sind es 106mm / 4,2 Zoll, und für die DALI
PHANTOM K-80 sind es 113 mm / 4.4 Zoll.
6.0 EINBAU
Bie lesen und beachten Sie die Sicherheitshinweise in Kapitel 2.0 dieser Anleitung! Die
Lautsprecher der DALI PHANTOM E Serie und DALI PHANTOM K Serie sollten von
einem ausgebildeten Installateur eingebaut werden, der gewährleisten kann, dass alle Si-
cherheitsanforderungen erfüllt werden und der Lautsprecher nach der Montage nicht
herausfällt.
Für einen ordnungsgemäßen Einbau werden die folgenden Werkzeuge und Gegenstän-
de benötigt:
• Maßband
• Bleisti und Säge oder Messer
• 3 mm Inbusschlüssel bzw. -bit
• Klebeband
• Ausschnischablone
Wenn der richtige Platz für den Einbau gefunden wurde, ist die Ausschnischablone
mit Klebeband auf der Oberfläche anzuheen. Markieren Sie mit dem Bleisti den Aus-
schni.
Entfernen Sie die Schablone, und bohren Sie Löcher für den Einstich der Säge bzw. des
Messers. Schneiden bzw. sägen Sie sorgfältig entlang des Bleististriches.
Wenn Sie den Ausschni für den Lautsprecher vorgenommen haben müssen Sie si-
cherstellen, dass das Lautsprecherkabel in der Wand bzw. Decke nicht lose hängt. Das
Kabel muss auf sichere Weise an der Innenseite der Decke bzw. Wand befestigt werden,
um eine Zugspannung zu verhindern, wenn das Kabel mit den Lautsprecheranschlüssen
verbunden ist. Wenn das Kabel nicht befestigt wird, kann es sich allmählich lösen, wo-
durch sich die elektrische Verbindung zwischen Kabel und Anschlüssen verschlechtern
kann. Abbildung 8 zeigt die korrekte Befestigung des Kabels.
Wenn das Lautsprecherkabel befestigt und der Ausschni für den Lautsprecher vor-
bereitet ist, können Sie das Lautsprecherkabel anschließen. Verbinden Sie das Kabel
mit den Anschlüssen. Achten Sie dabei darauf, den roten (+) Anschluss des Verstärkers
mit der roten (+) Klemme des Lautsprechers und den schwarzen (-) Anschluss des Ver-
stärkers mit der schwarzen (-) Klemme des Lautsprechers zu verbinden. Bie lesen Sie
hierzu Abschni 4.5 dieser Anleitung.
Wenn die Kabel angeschlossen sind, schalten Sie das System ein und machen vor dem
endgültigen Einbau eine Hörprobe, um sicherzustellen, dass alle Verbindungen korrekt
sind. Setzen Sie den Lautsprecher in den Wand- bzw. Deckenausschni und richten Sie
ihn wie in Abschni 4.4 beschrieben aus.

19
UK DE CN FR ES
HINWEIS: Achten Sie beim Einbau darauf, die Chassis nicht zu berühren. Wenn der
Lautsprecher ausgerichtet ist, ziehen Sie die vier Schrauben der Halterungen mit einem
3 mm Inbusschlüssel an, so dass der Lautsprecher sicher an seinem Platz gehalten wird.
Achten Sie darauf, die Schrauben nicht zu fest anzuziehen und die Gewinde nicht zu be-
schädigen.
7.0 EINLAUFZEIT
Sie sollten damit rechnen, dass sich die Klangqualität der neuen Lautsprecher im Laufe
der ersten Zeit allmählich verbessert. In dieser Einlaufzeit ist nichts Besonderes zu tun.
Rechnen Sie jedoch mit bis zu 100 Betriebsstunden (abhängig von der Lautstärke), bis
das volle Leistungsniveau erreicht ist.
8.0 MAGNETISCHE ABSCHIRMUNG
Die Lautsprecherchassis erzeugen ein Magnetfeld, das die Bildröhren von Fernsehge-
räten oder Monitoren, Festplaen, Ton- und Videobänder sowie Magnetkarten stören
kann. Daher sollten sich solche Gegenstände nicht in der Nähe der Lautsprecher be-
finden, um Störungen oder Beschädigungen zu vermeiden. LCD- und Plasmabildschirme
werden von Magnetfeldern nicht beeinflusst.
9.0 REINIGUNG
Die Oberfläche der Lautsprecher kann mit gewöhnlichen Haushaltsreinigungsmit-
teln gereinigt werden. Es dürfen jedoch keine Reinigungsmiel verwendet werden, die
scheuern; Säuren, Alkali oder antibakterielle Wirkstoe enthalten. Verwenden Sie keine
Sprays. Es sollten grundsätzlich keine Reinigungsmiel an die Lautsprecherchassis ge-
langen. Reinigen Sie die Chassis nur mit größter Vorsicht. Dies gilt insbesondere für den
Hochtöner. Die Lautsprecherabdeckung kann mit einem Staubsauger oder einer nor-
malen Kleiderbürste gereinigt werden.
10.0 UMWELTINFORMATIONEN UND
ENTSORGUNG
Die Erzeugnisse von DALI entsprechen der EU-Richtlinie 2002/95/EG zur Beschrän-
kung der Verwendung bestimmter gefährlicher Stoe in Elektro- und Elektronikgeräten
sowie der EU-Richtlinie 2002/96/EG zur Entsorgung von Elektro- und Elektronik-Altge-
räten. Das Abfall-Kennzeichen zeigt an, dass die Lautsprecher den genannten Direktiven
entsprechen (siehe Abbildung 10). Die Lautsprecher müssen ordnungsgemäß entsorgt
und recycelt werden. Bie wenden Sie sich für weitere Informationen an Ihr örtliches
Entsorgungsunternehmen.
11.0 TECHNISCHE DATEN
In Tabelle 2/3 (Seite 4/41) finden Sie eine Aufstellung der wichtigsten technischen Daten
Ihrer Lautsprecher. Bie denken Sie jedoch daran, dass die Klangqualität eines Laut-
sprechers nicht allein aufgrund technischer Daten beurteilt werden kann. Um verschie-
dene Lautsprecher zu vergleichen, empfehlen wir Ihnen, sich diese anzuhören.

A página está carregando ...
A página está carregando ...
A página está carregando ...
A página está carregando ...
A página está carregando ...
A página está carregando ...
A página está carregando ...
A página está carregando ...
A página está carregando ...
A página está carregando ...
A página está carregando ...
A página está carregando ...
A página está carregando ...
A página está carregando ...
A página está carregando ...
A página está carregando ...
A página está carregando ...
A página está carregando ...
A página está carregando ...
A página está carregando ...
A página está carregando ...
A página está carregando ...
-
 1
1
-
 2
2
-
 3
3
-
 4
4
-
 5
5
-
 6
6
-
 7
7
-
 8
8
-
 9
9
-
 10
10
-
 11
11
-
 12
12
-
 13
13
-
 14
14
-
 15
15
-
 16
16
-
 17
17
-
 18
18
-
 19
19
-
 20
20
-
 21
21
-
 22
22
-
 23
23
-
 24
24
-
 25
25
-
 26
26
-
 27
27
-
 28
28
-
 29
29
-
 30
30
-
 31
31
-
 32
32
-
 33
33
-
 34
34
-
 35
35
-
 36
36
-
 37
37
-
 38
38
-
 39
39
-
 40
40
-
 41
41
-
 42
42


Dali E-50 Manual do usuário
- Categoria
- Alto-falantes do carro
- Tipo
- Manual do usuário
em outros idiomas
- español: Dali E-50 Manual de usuario
- français: Dali E-50 Manuel utilisateur
- English: Dali E-50 User manual
- Deutsch: Dali E-50 Benutzerhandbuch
- 日本語: Dali E-50 ユーザーマニュアル
Artigos relacionados
Outros documentos
-
JBL Simply Cinema SCS 146 Manual do proprietário
-
Yamaha DSP-E390 Manual do proprietário
-
-
Nexo M6 Manual do usuário
-
-
-
-
-
-