
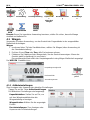
Scout
TM
Series Balances - STX
Instruction Manual
Balanzas Scout
TM
Series - STX
Manual de instrucciones
Balances Scout
TM
Séries - STX
Mode d’emploi
Scout
TM
Waagen - Serien - STX
Bedienungsanleitung
Bilance Serie Scout
TM
- STX
Manuale d’Istruzioni

STX EN-0
TABLE OF CONTENTS
1. INTRODUCTION ............................................................................................... 1
1.1 Description ................................................................................................................................................... 1
1.2 Definition of Signal Warnings and Symbols ................................................................................................. 1
1.3 Safety Precautions ....................................................................................................................................... 1
1.4 Features ......................................................................................................................................................... 2
2. INSTALLATION ................................................................................................. 4
2.1 Installing Components ................................................................................................................................. 2
2.1.1 Releasing the Transportation Lock .......................................................................................................... 2
2.1.2 Installing the Weighing Pan ..................................................................................................................... 2
2.1.3 Security Slot ............................................................................................................................................. 2
2.2 Selecting the Location .................................................................................................................................. 3
2.3 Leveling the Balance ..................................................................................................................................... 3
2.4 Connecting Power ........................................................................................................................................ 3
2.5 Calibration .................................................................................................................................................... 4
3. OPERATION...................................................................................................... 5
3.1 Controls ........................................................................................................................................................ 5
3.2 Overview of Display, Home Screen ............................................................................................................. 5
3.3 Principal Functions and Main Menu ............................................................................................................ 6
4. APPLICATIONS ................................................................................................ 8
4.1 Weighing ...................................................................................................................................................... 7
4.1.1 Item Settings ............................................................................................................................................ 7
4.1.2 Sample Name .......................................................................................................................................... 8
4.1.3 Print / Save to USB .................................................................................................................................. 8
4.1.4 Menu……………………………………… .................................................................................................. 8
4.2 Parts Counting ............................................................................................................................................. 8
4.2.1 Item Settings ............................................................................................................................................ 9
4.2.2 APW/Samples .......................................................................................................................................... 9
4.3 Percent Weighing ....................................................................................................................................... 10
4.3.1 Item Settings .......................................................................................................................................... 11
4.3.2 Recalculate Reference Weight .............................................................................................................. 11
4.4 Dynamic/Animal Weighing ......................................................................................................................... 12
4.4.1 Item Settings .......................................................................................................................................... 13
4.5 Density Determination ................................................................................................................................ 14
4.5.1 Measuring the Density of a Solid Using Water (default) ........................................................................... 14
4.5.2 Measuring the Density of a Solid Using an Auxiliary Liquid ..................................................................... 16
4.5.3 Measuring the Density of a liquid using a Calibrated Sinker (not supplied) .............................................. 16
4.5.4 Measuring the Density of Porous Material Using Oil ................................................................................ 18
4.6 Check Weighing ......................................................................................................................................... 19
4.6.1 Item Settings .......................................................................................................................................... 20
4.6.2 Limits…………………………………………. ........................................................................................... 20
4.7 Display Hold ............................................................................................................................................... 21
4.7.2 Display Hold Mode .................................................................................................................................... 22
4.7.3 Peak hold mode ........................................................................................................................................ 22
4.8 Totalization ................................................................................................................................................... 22
4.9 Mole Weighing ............................................................................................................................................. 23
4.9.1 Item Settings ............................................................................................................................................. 23
4.9.2 Enter Molar Mass ...................................................................................................................................... 24
4.9.3 Calculate Molarity ..................................................................................................................................... 24
4.10 Additional Features .................................................................................................................................... 24
4.10.1 Weigh Below ........................................................................................................................................... 24
4.10.2 Connecting the Interface ......................................................................................................................... 24
5. MENU SETTINGS ........................................................................................... 26
5.1 Menu Navigation ........................................................................................................................................ 26
5.1.1 Changing Settings .................................................................................................................................. 26
5.2 Main Menu ................................................................................................................................................. 26
5.2.1 Calibration .................................................................................................................................................. 27
5.2.1.1 Span Calibration ..................................................................................................................................... 27
5.2.1.2 Linearity Calibration ................................................................................................................................ 27
5.2.2 Balance Setup ............................................................................................................................................ 28

STX EN-1
5.2.3 Weighing Units ........................................................................................................................................... 30
5.2.4 Data Maintenance ...................................................................................................................................... 31
5.2.5 Communication .......................................................................................................................................... 31
5.2.6 GLP and GMP Data ................................................................................................................................... 36
5.2.7 Factory Reset ............................................................................................................................................. 37
5.2.8 Lockout ....................................................................................................................................................... 37
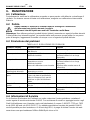
6. MAINTENANCE .............................................................................................. 39
6.1 Calibration ................................................................................................................................................... 38
6.2 Cleaning ...................................................................................................................................................... 38
6.3 Troubleshooting .......................................................................................................................................... 38
6.4 Service Information ..................................................................................................................................... 38
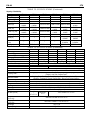
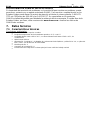
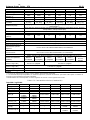
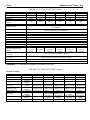
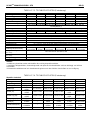
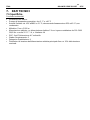
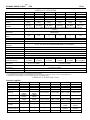
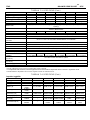
7. TECHNICAL DATA ......................................................................................... 40
7.1 Specifications .............................................................................................................................................. 39
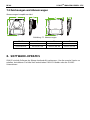
7.2 Drawings and Dimensions .......................................................................................................................... 41
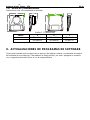
8. SOFTWARE UPDATES .................................................................................. 42
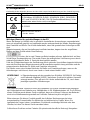
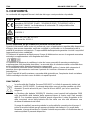
9. COMPLIANCE ................................................................................................. 43


STX EN-1
1. INTRODUCTION
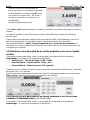
1.1 Description
The Scout STX balance is a high quality weighing instrument that will provide you with years of
service if properly cared for. Models are available with ranges from 120g to 8200g.
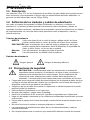
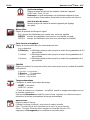
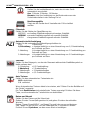
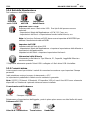
1.2 Definition of Signal Warnings and Symbols
Safety notes are marked with signal words and warning symbols. These show safety issues and
warnings. Ignoring the safety notes may lead to personal injury, damage to the instrument,
malfunctions and false results.
Signal Words
WARNING For a hazardous situation with medium risk, possibly resulting in injuries or
death if not avoided.
CAUTION For a hazardous situation with low risk, resulting in damage to the device or
the property or in loss of data, or injuries if not avoided.
Attention For important information about the product.
Note For useful information about the product.
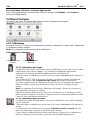
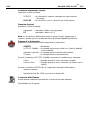
Warning Symbols
General Hazard
Electric Shock Hazard
1.3 Safety Precautions
Caution: Read all safety warnings before installing, making connections, or servicing
this equipment. Failure to comply with these warnings could result in personal injury
and/or property damage. Retain all instructions for future reference.
Verify that the input voltage range printed on the data label and the plug type matches
the local AC power to be used.
Make sure that the power cord does not pose a potential obstacle or tripping hazard.
Use the balance only in dry locations.
Do not drop loads on the pan.
Use only approved accessories and peripherals.
Operate the equipment only under ambient conditions specified in these instructions.
Disconnect the equipment from the power supply when cleaning.
Do not operate the equipment in hazardous or unstable environments.
Service should only be performed by authorized personnel.
Do not position the balance such that it is difficult to reach the power connection.

EN-2 STX
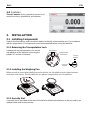
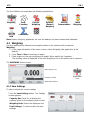
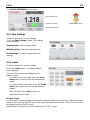
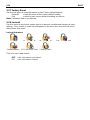
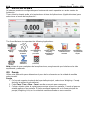
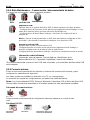
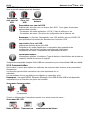
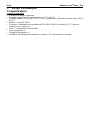
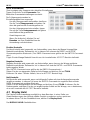
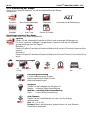
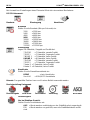
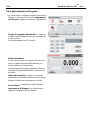
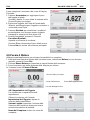
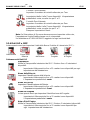
1.4 Features
Touch Controls: Quick, graphical access to all
control functions, applications and features.
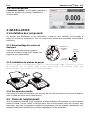
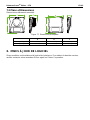
2. INSTALLATION
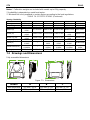
2.1 Installing Components
Refer to the illustrations and instructions below to identify and assemble your Scout balance
with its components. All components must be assembled before using the balance.
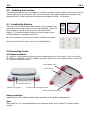
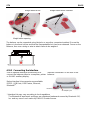
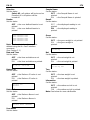
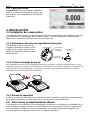
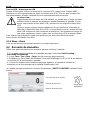
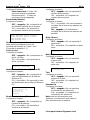
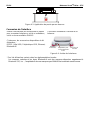
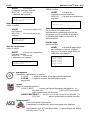
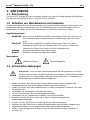
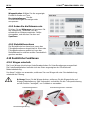
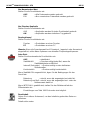
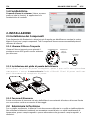
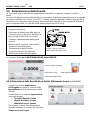
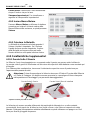
2.1.1 Releasing the Transportation Lock
Release the red transportation lock on the
sub-platform of the balance by turning the
pointer 90 counter-clockwise.
2.1.2 Installing the Weighing Pan
Balances with a rectangular platform are placed into the sub-platform and rotated counter-
clockwise until it locks. Round platforms are placed straight down on sub-platform.
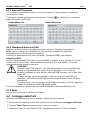
2.1.3 Security Slot
A security slot is provided at the rear of the balance allowing the balance to be secured by an
optional cable and lock accessory.
Unlocked
Position
Locked
Position
Sub-platform
Transportation
Lock Pointer

STX EN-3
2.2 Selecting the Location
For best performance, the Scout balance should be used in a clean, stable environment. Do not
use the balance in environments with excessive drafts, with rapid temperature changes, near
magnetic fields or near equipment that generates magnetic fields, or vibrations.
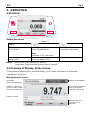
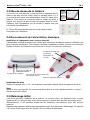
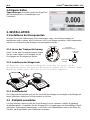
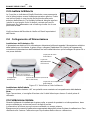
2.3 Leveling the Balance
The Scout has an illuminated level indicator as a reminder that
the balance should be leveled for accurate weighing. There is a
level bubble in a small round window on the front of the
balance. To level the balance, adjust the feet at each corner
until the bubble is centered in the circle.
Be sure the balance is level each time its location is changed.
See the Level Assist screen in the User Settings Menu.
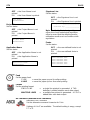
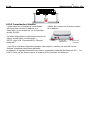
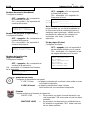
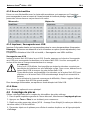
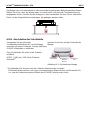
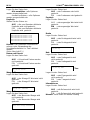
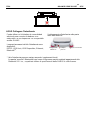
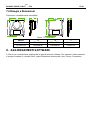
2.4 Connecting Power
AC Adapter Installation
AC power is used to power the balance when battery power is not needed. First, connect the
AC Adapter (supplied) to the AC Adapter Input jack at the rear of the balance then connect the
AC plug to an electrical outlet.
Battery Installation
Install the four “AA” batteries with polarity as shown in the battery compartment.
Note:
After power on, it is recommended to let the balance warm up for at least 5 minutes before
using it.
AC Adapter Input Jack
Battery Compartment Cover
Interface Connection
Security Switch
Weigh Below Hole
Security slot (Anti-theft lock slot)

EN-4 STX
2.5 Calibration
When the Balance is first installed, and when it is moved to another location, it must be
calibrated to ensure accurate weighing results. If preferred, the balance can be manually
calibrated with external masses. Have the appropriate calibration masses available before
beginning calibration. Refer to the Calibration and Specification Sections for masses and
calibration procedure.

STX EN-5
3. OPERATION
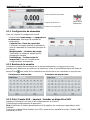
3.1 Controls
Button Functions
Table 3-1.
Button
Primary Function
(Short Press
1
)
On
Turns the balance on
Zero
If balance is On, sets Zero
Tare
Enter/clear a tare value.
Secondary Function
(Long Press
2
)
Off
Turns the balance Off.
Notes:
1
Short Press: Press less than 1 second.
2
Long Press: Press and hold for more than 2 seconds.
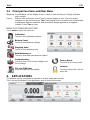
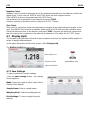
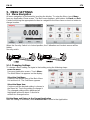
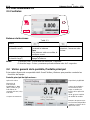
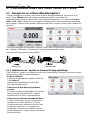
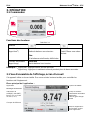
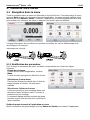
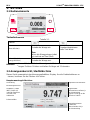
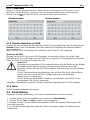
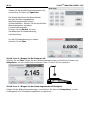
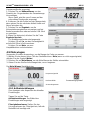
3.2 Overview of Display, Home Screen
This equipment utilizes a touch-sensitive display. Touch areas and Buttons to control the
equipment’s functions.
Main Application Screen:
Application
Instructional Messages
Stability (*), Net (NET),
Gross (G) and/or center
of zero (>0<) indicators
Reference Fields
Application Buttons:
Functions vary by
application
Result Field: Information
varies by application
Touch g to change unit
Capacity and readability

EN-6 STX
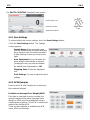
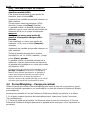
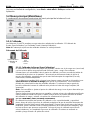
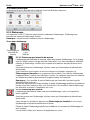
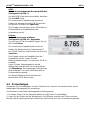
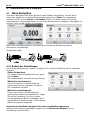
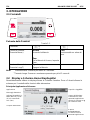
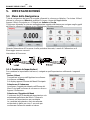
3.3 Principal Functions and Main Menu
Weighing: Press Zero to set the display to zero. Place an item on the pan. Display indicates
gross weight.
Taring: With no load on the pan, press Tare to set the display to zero. Place an empty
container on the pan and press Tare. Add material to the container and its net weight
is displayed. Remove container and container’s weight appears as a negative
number. Press Tare to clear.
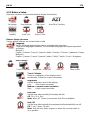
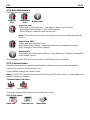
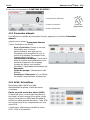
MENU & SCREEN NAVIGATION
Touch Menu to open the menu list.
Calibration:
Touch to view calibration options.
Balance Setup:
Touch to view balance settings.
Weighing Units:
Touch to view weighing units.
Data Maintenance:
Touch to view data maintenance options.
Communication:
Touch to view COM Device Settings and
Print Settings.
Factory Reset:
Touch to do a Factory reset.
GLP and GMP Data:
Insert user data for traceability.
Lockout:
Touch to access the Lockout
menu list.
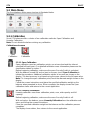
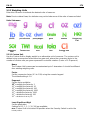
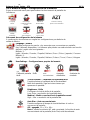
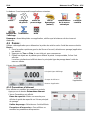
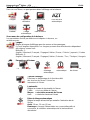
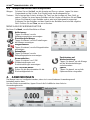
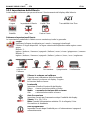
4. APPLICATIONS
The balance can be configured to operate in various Application modes.
Touch the top left button in the Application area to choose the mode:
Secondary
result line and
unit-of-measure
indicator
Instructional Message
line
Stability indicator,
NET, G, and/or
>0< (center of 0).
Capacity Bar:
Color indicates capacity
used. Meaning varies by
application.
Primary
result line and
unit-of-measure
indicator
Results lines –
meaning varies by
application.
Touch control
function Icons
to…
…access more functions
…Call up the menu or specific functions…
Tare and application
buttons – functions vary
by application
Touch control
function Icons
to…
…access more functions
…Call up the menu or specific functions…

STX EN-7
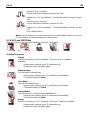
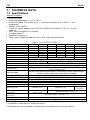
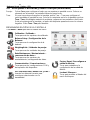
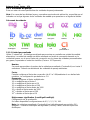
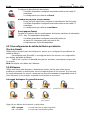
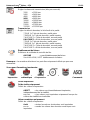
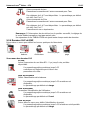
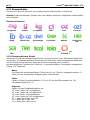
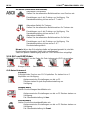
The Scout Balance incorporates the following Applications.
Weighing
Parts
Counting
Percent
Weighing
Dynamic
(Animal)
Weighing
Density
Determination
Check
Weighing
Display
Hold
Totalization
Mole
Note: Before using any application, be sure the balance has been leveled and calibrated.
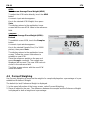
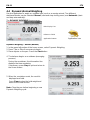
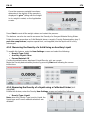
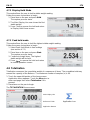
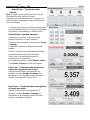
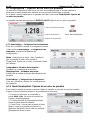
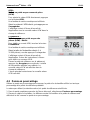
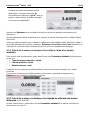
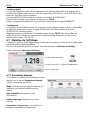
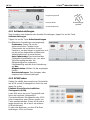
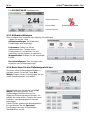
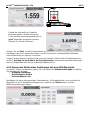
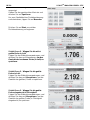
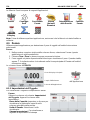
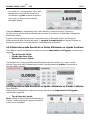
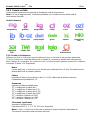
4.1 Weighing
Use this application to determine the weight of items in the selected unit of measure.
Weighing
1. In the upper left portion of the home screen, select Weighing (this application is the
default).
2. Press Tare or Zero if necessary to begin.
3. Place objects on the pan to display the weight. When stable, the * appears.
The resulting value is displayed in the main Weighing Line in the active unit of measure.
The WEIGHING Home screen:
Main Display Line
Reference Fields
Application Buttons
Application
Icon
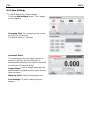
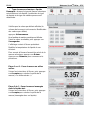
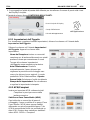
4.1.1 Item Settings
To view or adjust the current settings
Touch the
Item Settings
button. The Settings
screen appears.
Capacity Bar:
Set to On to display the
capacity guide on the weighing main screen.
Weighing Units:
Select the displayed unit.
Print Settings:
To view or adjust the print
settings.

EN-8 STX
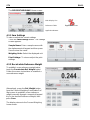
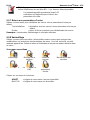
4.1.2 Sample Name
Enter a sample name with the alphanumerical keypad and then press Save to store the name
and return to weighing mode main screen. Press to alternate between Lower and Upper
case characters.
Lower Case:
Upper Case:
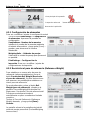
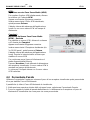
4.1.3 Print / Save to USB
Print the information based on the settings in Print Settings menu.
Note: This button will be disabled if the optional interface kit (buy separately) is not installed.
When the USB Host interface kit is installed, “Save to USB” will be shown.
Save to USB
Insert the USB flash drive into the USB slot. Next, press the Save to USB button to save the
data to the USB flash drive. Once saved, the button will momentarily change color to orange.
CAUTION:
Depending on the USB drive used, all data might not be transferred from the
balance or the display might freeze. If this happens, unplug the USB flash drive
and try another USB flash drive.
Ohaus takes no responsibility if data on USB flash drive is erased or if the USB
flash drive breaks while it is connected to the balance.
To minimize the risk of problems arising, Ohaus suggests using a high quality
USB flash drive.
For more information, please refer to USB Host instruction manual.
4.1.4 Menu
To view the Main Menu options.
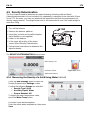
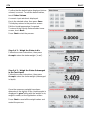
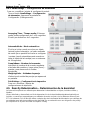
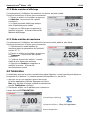
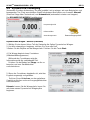
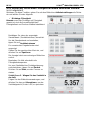
4.2 Parts Counting
Use this application to count samples of uniform weight.
1. In the upper left portion of the home screen, select Parts Counting.
2. Press Tare or Zero if necessary to begin.
3. Establish an Average Piece Weight (APW), the default (or last) APW is displayed.
4. Place objects on the pan to display the number of pieces on Main Display Line.

STX EN-9
The PARTS COUNTING Standard Home screen:
Main Display Line
Reference Fields
Application Buttons
Application
Icon
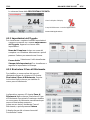
4.2.1 Item Settings
To view or adjust the current settings, touch the Item Settings button:
Touch the
Item Settings
button. The Settings
screen appears.
Sample Name: Enter a sample name
with the alphanumerical keypad and then
press Save to store the name and return
to Item Settings screen as shown to the
right.
Auto Optimization:
It re-calculates the
piece weight automatically to improve
counting accuracy as parts are added.
By default Auto Optimization is
Off
.
Weighing Units:
Select the displayed
unit.
Print Settings:
To view or adjust the print
settings.
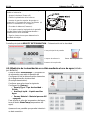
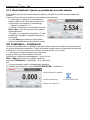
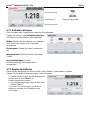
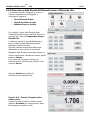
4.2.2
APW/Samples
Enter to set APW and Sample size in pieces by
the numerical keypad.
Establish an Average Piece Weight (APW)
Each time a new type of part is counted, the
nominal weight of one piece (Average Piece
Weight or APW) must be established using a
small quantity of pieces. This APW is stored until
replaced by another APW.
There are two methods to establish the APW
value: APW and Samples.

EN-10 STX
APW:
Set a known Average Piece Weight (APW)
To adjust the APW value directly, touch the
APW
button
.
A numeric input window appears.
Key in the desired APW Weight, then press
Save.
The display returns to the application home
screen with the new APW value in the reference
field.
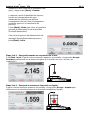
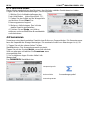
Samples:
Set a new Average Piece Weight (APW) –
Derived
To establish a new APW, touch the Samples
button.
A numeric input window appears.
Key in the desired Sample Size (1 to 10000
pieces), then press
Save
.
The display returns to the application home
screen. Follow the screen instructions to
establish a new APW.
Place the reference weight on the pan and
press Accept to continue. The sample size
displayed will be used. The new APW value is
shown in the reference field.
The Main screen returns with the new APW
value calculated.
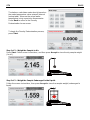
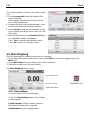
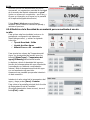
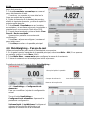
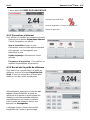
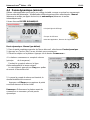
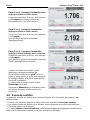
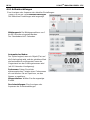
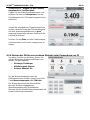
4.3 Percent Weighing
Use Percent Weighing to measure the weight of a sample displayed as a percentage of a pre-
established Reference Weight.
The default (or last) Reference Weight is displayed.
1. In the upper left portion of the home screen, select Percent Weighing.
2. Place an object on the pan. The difference between the sample and the Reference Weight
is displayed as both a weight and a percentage.

STX EN-11
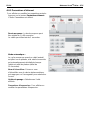
The PERCENT WEIGHING Home screen:
Main Display Line
Reference Fields Application Icon
Application Buttons
4.3.1 Item Settings
To view or adjust the current settings
Touch the
Item Settings
button. The Settings
screen appears.
Sample Name:
Enter a sample name with
the alphanumerical keypad and then press
Save to store the name.
Weighing Units:
Select the displayed unit.
Print Settings:
To view or adjust the print
settings.
4.3.2 Recalculate Reference Weight
To establish a new reference weight value,
touch the Recalculate Ref. Weight button.
Follow the screen instructions to establish a
new reference weight.
Alternatively, press the Ref. Weight button
from the Percent Weighing Recalculate Ref.
Wgt screen to establish a new reference
weight manually through a numerical keypad.
Key in the desired Reference Weight, then
press Save.
The display returns to the Percent Weighing
home screen.

EN-12 STX
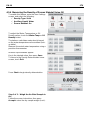
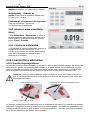
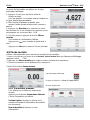
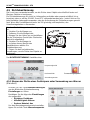
4.4 Dynamic/Animal Weighing
Use this application to weigh an unstable load, such as a moving animal. Two different
start/reset modes can be selected: Manual (start and stop via key press) and Automatic (start
and stop automatically).
The DYNAMIC WEIGHING Home screen:
Main Display Line
Reference Fields
Application Buttons Application Icon
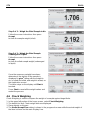
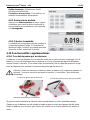
Dynamic Weighing – Manual (default)
1. In the upper left portion of the home screen, select Dynamic Weighing.
2. Press Tare or Zero if necessary to begin.
3. Place objects on the pan. Press the
Start
button.
4. The balance begins a countdown (averaging
process).
During the countdown, the information line
displays the time remaining.
If necessary, press
Stop
to quit and return to
the Home screen.
5. When the countdown ends, the result is
displayed and held.
Press Clear to clear the held weight and
return to the Initial screen.
Note:
Clear the pan before beginning a new
Dynamic Weighing cycle.

STX EN-13
4.4.1 Item Settings
To view or adjust the current settings:
Touch the
Item Settings
button. The Settings
screen appears.
Averaging Time:
The Averaging Time can be
set from 1 to 99 seconds.
The default value is 5 seconds.
Automatic Mode:
The cycle begins when an object (animal) is
placed on the pan, and the held value is
automatically reset when the object is removed
from the pan (10-second delay).
Sample Name:
Enter a sample name with the
alphanumerical keypad and then press Save to
store the name.
Weighing Units:
Select the displayed unit.
Print Settings:
To view or adjust the print
settings.

EN-14 STX
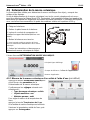
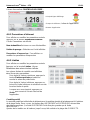
4.5 Density Determination
The Scout can be used to determine an object’s density including solid and liquid.
A density determination kit (not included, buy separately) is designed to be used with Ohaus
Scout STX. However, you may use whatever lab apparatus that suits the requirements for
density measurements. The weigh below hook is recommended to use if the solids weight is
more than 200g.
Prepare the balance as shown right
1. Turn off the balance.
2. Remove the balance platform.
3. Insert they up hook and install the beaker
stand (beaker is not supplied).
4. Power on the balance
5. In the upper left portion of the home
screen select Density Determination.
6. Follow below instructions to determine the
object’s density.
The DENSITY DETERMINATION Home screen:
Main Display Line
Reference Fields Application Icon
Application Buttons
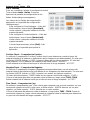
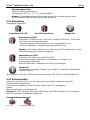
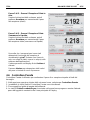
4.5.1 Measuring the Density of a Solid Using Water (default)
Press the Item Settings button to open the
Density Determination Settings screen.
Confirm the following Setups are selected:
Density Type: Solid
Auxiliary Liquid: Water
Porous Material: Off
To adjust the water temperature value,
touch the Water Temp button.
A numeric input window appears.
Enter the actual water temperature, then press
Save.

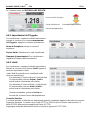
STX EN-15
The balance calculates water density based on
the water temperature value entered (internal
lookup table). Measure the actual water
temperature using a precision thermometer.
Press
Back
to return to the Density
Determination home screen.
To begin the Density Determination process,
press
Start
.
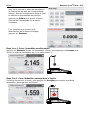
Step 1 of 2 – Weigh the Sample in Air.
Press Start. Follow screen instructions, and then press Accept to store the dry sample weight
(“in air”).
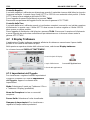
Step 2 of 2 – Weigh the Sample Submerged in the Liquid.
Follow the screen instructions, then press Accept to store the sample weight (submerged in
liquid).

EN-16 STX
Once the necessary weights have been
determined, the density of the sample is
displayed in
g/cm
3
(along with the weight
in air, weight in water) on the Application
screen.
Press
Start
to reset all the weight values and restart the process.
The balance can also be used to measure the Density of a Buoyant Material Using Water.
Follow the same procedure as Solid Material above, except in Density Determination step 2,
push the sample down (requires special tool, not supplied) into the liquid until it is fully
submerged.
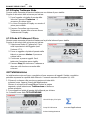
4.5.2 Measuring the Density of a Solid Using an Auxiliary Liquid
To enable this feature, enter the Item Settings screen and select the following:
Density Type: Solid
Auxiliary Liquid: Other
Porous Material: Off
Confirm the default values displayed (Liquid Density, etc) are correct.
Begin the Density determination process by pressing Start and following the screen
instructions.
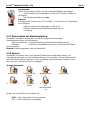
4.5.3 Measuring the Density of a liquid using a Calibrated Sinker (not
supplied)
Enable this feature, enter the Density Item Settings screen and select the following;
Density Type: Liquid
Note: when the Density Type is set to Liquid, the
Liquid type and Porous material selections are
disabled.
A página está carregando...
A página está carregando...
A página está carregando...
A página está carregando...
A página está carregando...
A página está carregando...
A página está carregando...
A página está carregando...
A página está carregando...
A página está carregando...
A página está carregando...
A página está carregando...
A página está carregando...
A página está carregando...
A página está carregando...
A página está carregando...
A página está carregando...
A página está carregando...
A página está carregando...
A página está carregando...
A página está carregando...
A página está carregando...
A página está carregando...
A página está carregando...
A página está carregando...
A página está carregando...
A página está carregando...
A página está carregando...
A página está carregando...
A página está carregando...
A página está carregando...
A página está carregando...
A página está carregando...
A página está carregando...
A página está carregando...
A página está carregando...
A página está carregando...
A página está carregando...
A página está carregando...
A página está carregando...
A página está carregando...
A página está carregando...
A página está carregando...
A página está carregando...
A página está carregando...
A página está carregando...
A página está carregando...
A página está carregando...
A página está carregando...
A página está carregando...
A página está carregando...
A página está carregando...
A página está carregando...
A página está carregando...
A página está carregando...
A página está carregando...
A página está carregando...
A página está carregando...
A página está carregando...
A página está carregando...
A página está carregando...
A página está carregando...
A página está carregando...
A página está carregando...
A página está carregando...
A página está carregando...
A página está carregando...
A página está carregando...
A página está carregando...
A página está carregando...
A página está carregando...
A página está carregando...
A página está carregando...
A página está carregando...
A página está carregando...
A página está carregando...
A página está carregando...
A página está carregando...
A página está carregando...
A página está carregando...
A página está carregando...
A página está carregando...
A página está carregando...
A página está carregando...
A página está carregando...
A página está carregando...
A página está carregando...
A página está carregando...
A página está carregando...
A página está carregando...
A página está carregando...
A página está carregando...
A página está carregando...
A página está carregando...
A página está carregando...
A página está carregando...
A página está carregando...
A página está carregando...
A página está carregando...
A página está carregando...
A página está carregando...
A página está carregando...
A página está carregando...
A página está carregando...
A página está carregando...
A página está carregando...
A página está carregando...
A página está carregando...
A página está carregando...
A página está carregando...
A página está carregando...
A página está carregando...
A página está carregando...
A página está carregando...
A página está carregando...
A página está carregando...
A página está carregando...
A página está carregando...
A página está carregando...
A página está carregando...
A página está carregando...
A página está carregando...
A página está carregando...
A página está carregando...
A página está carregando...
A página está carregando...
A página está carregando...
A página está carregando...
A página está carregando...
A página está carregando...
A página está carregando...
A página está carregando...
A página está carregando...
A página está carregando...
A página está carregando...
A página está carregando...
A página está carregando...
A página está carregando...
A página está carregando...
A página está carregando...
A página está carregando...
A página está carregando...
A página está carregando...
A página está carregando...
A página está carregando...
A página está carregando...
A página está carregando...
A página está carregando...
A página está carregando...
A página está carregando...
A página está carregando...
A página está carregando...
A página está carregando...
A página está carregando...
A página está carregando...
A página está carregando...
A página está carregando...
A página está carregando...
A página está carregando...
A página está carregando...
A página está carregando...
A página está carregando...
A página está carregando...
A página está carregando...
A página está carregando...
A página está carregando...
A página está carregando...
A página está carregando...
A página está carregando...
A página está carregando...
A página está carregando...
A página está carregando...
A página está carregando...
A página está carregando...
A página está carregando...
A página está carregando...
A página está carregando...
A página está carregando...
A página está carregando...
A página está carregando...
A página está carregando...
A página está carregando...
A página está carregando...
A página está carregando...
A página está carregando...
A página está carregando...
A página está carregando...
A página está carregando...
A página está carregando...
A página está carregando...
A página está carregando...
A página está carregando...
A página está carregando...
A página está carregando...
A página está carregando...
A página está carregando...
A página está carregando...
A página está carregando...
A página está carregando...
A página está carregando...
A página está carregando...
A página está carregando...
A página está carregando...
A página está carregando...
A página está carregando...
A página está carregando...
A página está carregando...
A página está carregando...
A página está carregando...
A página está carregando...
A página está carregando...
A página está carregando...
A página está carregando...
A página está carregando...
A página está carregando...
A página está carregando...
A página está carregando...
A página está carregando...
A página está carregando...
A página está carregando...
-
 1
1
-
 2
2
-
 3
3
-
 4
4
-
 5
5
-
 6
6
-
 7
7
-
 8
8
-
 9
9
-
 10
10
-
 11
11
-
 12
12
-
 13
13
-
 14
14
-
 15
15
-
 16
16
-
 17
17
-
 18
18
-
 19
19
-
 20
20
-
 21
21
-
 22
22
-
 23
23
-
 24
24
-
 25
25
-
 26
26
-
 27
27
-
 28
28
-
 29
29
-
 30
30
-
 31
31
-
 32
32
-
 33
33
-
 34
34
-
 35
35
-
 36
36
-
 37
37
-
 38
38
-
 39
39
-
 40
40
-
 41
41
-
 42
42
-
 43
43
-
 44
44
-
 45
45
-
 46
46
-
 47
47
-
 48
48
-
 49
49
-
 50
50
-
 51
51
-
 52
52
-
 53
53
-
 54
54
-
 55
55
-
 56
56
-
 57
57
-
 58
58
-
 59
59
-
 60
60
-
 61
61
-
 62
62
-
 63
63
-
 64
64
-
 65
65
-
 66
66
-
 67
67
-
 68
68
-
 69
69
-
 70
70
-
 71
71
-
 72
72
-
 73
73
-
 74
74
-
 75
75
-
 76
76
-
 77
77
-
 78
78
-
 79
79
-
 80
80
-
 81
81
-
 82
82
-
 83
83
-
 84
84
-
 85
85
-
 86
86
-
 87
87
-
 88
88
-
 89
89
-
 90
90
-
 91
91
-
 92
92
-
 93
93
-
 94
94
-
 95
95
-
 96
96
-
 97
97
-
 98
98
-
 99
99
-
 100
100
-
 101
101
-
 102
102
-
 103
103
-
 104
104
-
 105
105
-
 106
106
-
 107
107
-
 108
108
-
 109
109
-
 110
110
-
 111
111
-
 112
112
-
 113
113
-
 114
114
-
 115
115
-
 116
116
-
 117
117
-
 118
118
-
 119
119
-
 120
120
-
 121
121
-
 122
122
-
 123
123
-
 124
124
-
 125
125
-
 126
126
-
 127
127
-
 128
128
-
 129
129
-
 130
130
-
 131
131
-
 132
132
-
 133
133
-
 134
134
-
 135
135
-
 136
136
-
 137
137
-
 138
138
-
 139
139
-
 140
140
-
 141
141
-
 142
142
-
 143
143
-
 144
144
-
 145
145
-
 146
146
-
 147
147
-
 148
148
-
 149
149
-
 150
150
-
 151
151
-
 152
152
-
 153
153
-
 154
154
-
 155
155
-
 156
156
-
 157
157
-
 158
158
-
 159
159
-
 160
160
-
 161
161
-
 162
162
-
 163
163
-
 164
164
-
 165
165
-
 166
166
-
 167
167
-
 168
168
-
 169
169
-
 170
170
-
 171
171
-
 172
172
-
 173
173
-
 174
174
-
 175
175
-
 176
176
-
 177
177
-
 178
178
-
 179
179
-
 180
180
-
 181
181
-
 182
182
-
 183
183
-
 184
184
-
 185
185
-
 186
186
-
 187
187
-
 188
188
-
 189
189
-
 190
190
-
 191
191
-
 192
192
-
 193
193
-
 194
194
-
 195
195
-
 196
196
-
 197
197
-
 198
198
-
 199
199
-
 200
200
-
 201
201
-
 202
202
-
 203
203
-
 204
204
-
 205
205
-
 206
206
-
 207
207
-
 208
208
-
 209
209
-
 210
210
-
 211
211
-
 212
212
-
 213
213
-
 214
214
-
 215
215
-
 216
216
-
 217
217
-
 218
218
-
 219
219
-
 220
220
-
 221
221
-
 222
222
-
 223
223
-
 224
224
-
 225
225
-
 226
226
-
 227
227
-
 228
228
-
 229
229
-
 230
230
-
 231
231
-
 232
232
-
 233
233
-
 234
234
-
 235
235
-
 236
236
-
 237
237
-
 238
238
-
 239
239
-
 240
240


em outras línguas
- español: Ohaus STX2201 Manual de usuario
- français: Ohaus STX2201 Manuel utilisateur
- italiano: Ohaus STX2201 Manuale utente
- Deutsch: Ohaus STX2201 Benutzerhandbuch
Artigos relacionados
Outros documentos
-
Xavax Jewel Manual do usuário
-
Baxtran ADA Manual do usuário
-
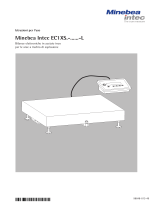 Minebea Intec Economy EC1XS Bilance elettroniche in acciaio inox per le aree a rischio di esplosione Manual do proprietário
-
Xavax Stella Manual do usuário
-
-
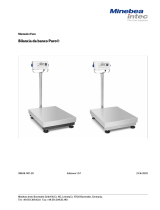 Minebea Intec Bilancia da banco Puro® Manual do proprietário
-
-
Tanita 1479J Manual do proprietário
-
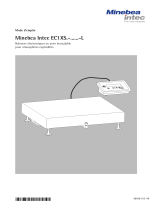 Minebea Intec Economy EC1XS Balances électroniques en acier inoxydable pour atmosphères explosibles Manual do proprietário
-


