Philips FC8740/01 Manual do usuário
- Categoria
- Aspirador de pó
- Tipo
- Manual do usuário

FC8740 - FC8710

2

3
20
19
18
14
6
6
10
33
9
15
16
21
38
37
22
11
12
173
36
35
23
26
25
27 28
24
30
31
29
32
45
39
40
41
42
43
44
46
1
2
8
7
3
4
13
5
34
1

4

FC8740-FC8710
ENGLISH 6
INDONESIA 20
한국어 34
PORTUGUÊS DO BRASIL 48
繁體中文 62
87
100

6
Introduction
Congratulations on your purchase and welcome to Philips! To fully benet
from the support that Philips offers, register your product at www.philips.
com/welcome.
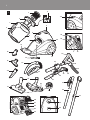
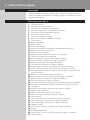
General description (Fig. 1)
1 Filter cylinder
2
Filter cylinder case
3
Hose connection opening
4
Dust bucket handle
5
Dust bucket
6
Filter cylinder lock
7
Motor protection lter
8
Suction power knob
9
Top handle
10 On/off button
11 Rear wheel
12 Cleaning brush
13 Hinged dust bucket retainer
14 Cord rewind button
15 Hose connector
16 Hose connector release buttons
17 Hose fastening hook
18 Small brush (specic types only)
19 Small nozzle (specic types only)
20 Crevice tool (specic types only).
21 Standard handgrip (specic types only)
22 Accessory holder (specic types only)
23 Tube release button (specic types only)
24 Accessory holder release levers (specic types only)
25 Crevice tool (specic types only)
26 Accessory holder (specic types only)
27 Small nozzle (specic types only).
28 Brush attachment (specic types only)
29 Ergonomic ComfortControl handgrip (specic types only)
30 Flexible hose connection (specic types only)
31 Hose
32 Combination nozzle (specic types only)
33 Parking ridge
34 Rocker switch
35 Tri-Active nozzle (specic types only)
36 Side brush
37 Accessory clip (specic types only)
38 Telescopic tube (specic types only)
39 Telescopic tube (specic types only)
40 Filter grille
41 Super Clean Air lter (specic types only)
42 Mains plug
43 Parking slot
44 Super Clean Air HEPA lter (specic types only)
45 Swivel wheel
46 Type plate
ENGLISH

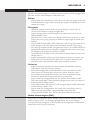
Important
Read this user manual carefully before you use the appliance and save it for
future reference.
Danger
Never suck up water or any other liquid. Never suck up ammable
substances and do not suck up ashes until they are cold.
Warning
Check if the voltage indicated on the appliance corresponds to the
local mains voltage before you connect the appliance.
Do not use the appliance if the mains cord, the plug or the appliance
itself is damaged.
If the mains cord is damaged, you must have it replaced by Philips, a
service centre authorised by Philips or similarly qualied persons in
order to avoid a hazard.
This appliance is not intended for use by persons (including children)
with reduced physical, sensory or mental capabilities, or lack of
experience and knowledge, unless they have been given supervision or
instruction concerning use of the appliance by a person responsible for
their safety.
Children should be supervised to ensure that they do not play with the
appliance.
Do not point the hose, the tube or any other accessory at the eyes
or ears nor put it in your mouth when it is connected to the vacuum
cleaner and the vacuum cleaner is switched on.
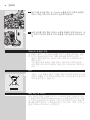
Caution
Do not suck up large objects as this may cause the air passage in the
tube or hose to become obstructed.
When you use the vacuum cleaner to vacuum ashes, ne sand, lime,
cement dust and similar substances, the pores of the lter cylinder
become clogged. If you notice a strong decrease in suction power, clean
the lter cylinder.
Never use the appliance if the lter cylinder, lter cylinder case and
the dust bucket are not properly installed or if the cover is not closed
properly.
Always unplug the appliance before you empty the dust bucket or
clean the lter cylinder.
Never use the appliance without the motor protection lter. This could
damage the motor and shorten the life of the appliance.
Only use the Philips lter cylinder supplied with the appliance.
Electromagnetic elds (EMF)
This Philips appliance complies with all standards regarding electromagnetic
elds (EMF). If handled properly and according to the instructions in this
user manual, the appliance is safe to use based on scientic evidence
available today.
-
-
-
-
-
-
-
-
-
-
-
-
-
ENGLISH 7

Preparing for use
Ergonomic advice
ComfortControl handgrip (specic types only)
The unique ComfortControl handgrip is ergonomically designed to
give you sufcient comfort during vacuum cleaning.
To gain optimal benet from this handgrip, it is important that you do
not position your second hand on the tube. When you do so, you twist
and bend your back, which could result in back problems.
Our ergonomist advises you to adjust the length of the tube so that
the hand holding the standard handgrip is at hip level.
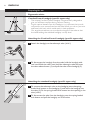
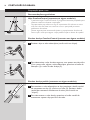
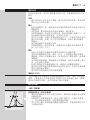
Attaching the ComfortControl handgrip (specic types only)
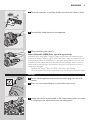
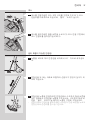
1 Attach the handgrip to the telescopic tube (‘click’).
2 To disconnect the handgrip from the tube, hold the handgrip with
one hand. With the other hand, hold the telescopic tube and press
the tube release button (1) and pull the tube off the handgrip (2).
Attaching the standard handgrip (specic types only)
1 To connect the telescopic tube to the handgrip, press the spring-
loaded lock button on the handgrip (1) and insert the handgrip into
the tube (2). Fit the spring-loaded lock button into the opening in the
tube (‘click’).
2 To disconnect the tube from the handgrip, press the spring-loaded
lock button and pull the handgrip out of the tube.
-
-
-
ENGLISH8

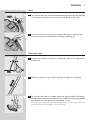
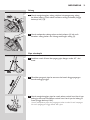
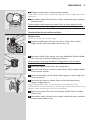
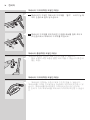
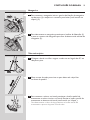
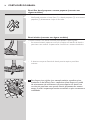
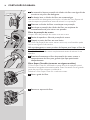
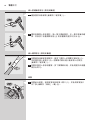
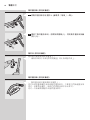
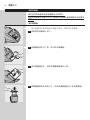
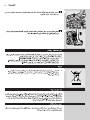
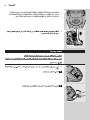
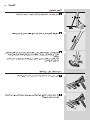
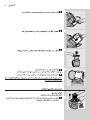
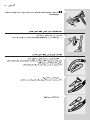
Hose
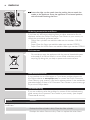
1 To connect the hose, insert the hose fastening hook into the opening
(1) and then push the hose connector downwards (‘click’) (2).
2 To disconnect the hose, press the release buttons (1) and pull the
hose connector out of the hose connection opening (2).
Telescopic tube
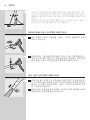
1 Positionthenozzleontheoorandholdthetubeatanangleof45°
totheoor.
2 Move the tube lock up or down until the handgrip is at hip level.
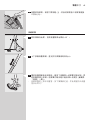
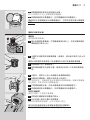
3 To connect the tube to a nozzle, press the spring-loaded lock button
on the tube and insert the tube into the nozzle. Fit the spring-loaded
lock button into the opening in the nozzle (‘click’).
To disconnect the tube from the handgrip, press the spring-loaded lock
button and pull the handgrip out of the tube.
-
ENGLISH 9

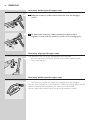
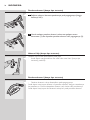
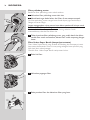
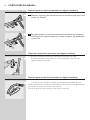
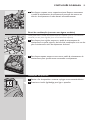
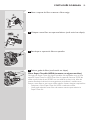
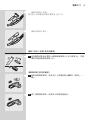
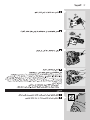
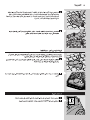
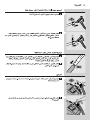
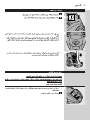
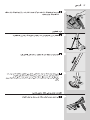
Accessory holder (specic types only)
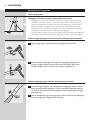
1 Slide the accessory holder with accessories onto the handgrip
(‘click’).
2 To detach the accessory holder, squeeze the release levers
together (1) and slide the accessory holder off the handgrip (2).
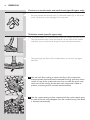
Accessory clip (specic types only)
The accessory clip can simply be snapped onto the tube.
You can snap the crevice tool and the small nozzle (specic types
only) onto the clip.
Accessory holder (specic types only)
The accessory holder can simply be snapped onto the handgrip.
You can store accessories in the accessory holder by pushing them into the
holder. To detach the accessories, pull them out of the holder.
You can store two accessories at a time in the accessory holder:
-
-
ENGLISH10

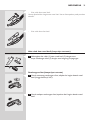
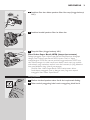
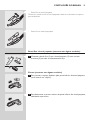
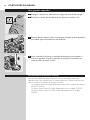
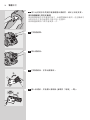
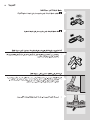
Crevice tool and small nozzle.
Please note the way in which the small nozzle must be placed in the
accessory holder.
Crevice tool and small brush.
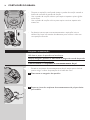
Crevice tool and small nozzle (specic types only)
1 Connect the crevice tool (1) or small nozzle (2) with or
without brush attachment (3) to the tube or directly to the handgrip.
Brush attachment (specic types only)
1 To assemble the brush attachment, slide it onto the bottom of the
small nozzle (‘click’).
2 To disassemble the brush attachment, slide it off the bottom of the
small nozzle.
-
-
33
ENGLISH 11

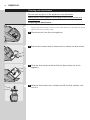
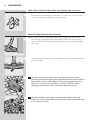
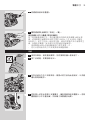
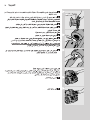
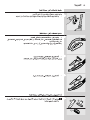
Crevice tool, small nozzle and small brush (specic types only)
You can connect the crevice tool (1), the small nozzle (2) or the small
brush (3) directly to the handgrip or to the tube.
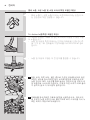
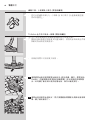
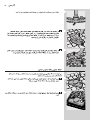
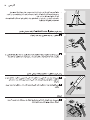
Tri-Active nozzle (specic types only)
The Tri-Active nozzle is a multi-purpose nozzle for carpets and hard oors.
The side brushes catch more dust and dirt at the sides of the nozzle
and allow you to clean better along furniture and other obstacles.
The opening at the front of the nozzle allows you to suck up larger
particles.
1 Usethehardoorsettingtocleanhardoors(forinstancefor
tiled,parqueted,laminatedandlinoleumedooring):pushtherocker
switch on top of the nozzle with your foot to make the brush strip
come out of the housing. At the same time, the wheel is lifted to
prevent scratching and to increase manoeuvrability.
2 Usethecarpetsettingtocleancarpets:pushtherockerswitchagain
to make the brush strip disappear into the nozzle housing. The wheel
is lowered automatically.
-
-
-
ENGLISH12

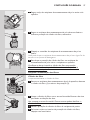
Combination nozzle (specic types only)
You can use the combination nozzle on carpets (with the brush strips
folded in) or on hard oors (with the brush strips folded out).
1 Tocleanhardoors,pushtherockerswitchontopofthe
combination nozzle with your foot. The brush strips come out of the
nozzle housing.
2 To clean carpets, push the rocker switch again to make the brush
strips disappear into the nozzle housing again.
Using the appliance
1
Pull the cord out of the appliance and put the mains plug in the wall
socket.
2 Press the on/off button to switch on the appliance.
During vacuuming, you can adjust the suction power with the suction
power knob.
Use maximum suction power to vacuum very dirty carpets and hard
oors.
Use minimum suction power to vacuum curtains, table carpets, etc.
If you want to pause for a moment, insert the ridge on the nozzle into
the parking slot to park the tube in a convenient position.
-
-
-
-
ENGLISH 13

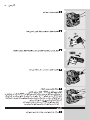
Cleaning and maintenance
Do not clean any parts of the appliance in the dishwasher.
Always switch off the appliance and unplug it before you remove and
clean any parts.
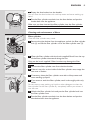
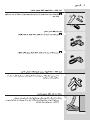
Emptying the dust bucket
Empty the dust bucket as soon as the dust level has reached the round
disc of the lter cylinder case.
1 Disconnect the hose from the appliance.
2 Pull the dust bucket retainer downwards to release the dust bucket.
3 Grab the dust bucket handle and lift the dust bucket out of the
appliance.
4 Holdthedustbucketoveradustbinandlifttheltercylindercase
out of it.
-
ENGLISH14

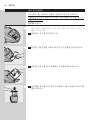
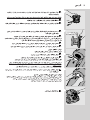
5 Empty the dust bucket into the dustbin.
You can clean the dust bucket with cold tap water and some washing-up
liquid.
6 Puttheltercylindercasebackintothedustbucketandputthe
bucket back into the appliance.
Makesureyouhaveinsertedtheltercylinderintotheltercylinder
case, otherwise it is not possible to close the dust bucket retainer.
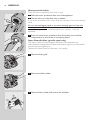
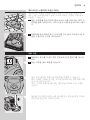
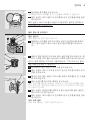
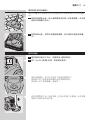
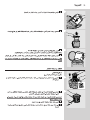
Cleaning and maintenance of lters
Filter cylinder
Clean the lter cylinder every week.
1 Removethedustbucketfromtheappliance,unlocktheltercylinder
lock(1)andlifttheltercylinderoutoftheltercylindercase(2).
2 Cleantheltercylinderwiththebrushsupplied.Brushfromthetop
oftheltercylinderdownwardsalongtheribs.
Onlyusethebrushsupplied!Otherbrushesmaydamagethelter
cylinder.
3 Removetheltercylindercasefromthedustbucket.
4 Ifthereisanydirtontheinsideoftheltercylindercase,emptythe
case over a dustbin.
5 Ifnecessary,cleantheltercylindercasewithcoldtapwaterand
some washing-up liquid.
6 Ifyouwanttowashtheltercylinder,washitthoroughlywithonly
water.
Do not use any soap, washing-up liquid or other detergent to clean the
lter cylinder. Let the lter cylinder dry completely before you reinsert it
into the case.
7 Unlocktheltercylinderlockandputtheltercylinderbackinto
theltercylindercase.
8 Puttheltercylindercasebackintothedustbucketandputthe
dust bucket back into the appliance.
ENGLISH 15

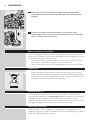
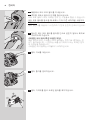
Motor protection lter
Clean the motor protection lter once a year.
1 Takethemotorprotectionlteroutoftheappliance.
2 Tapthedustoutofthelteroveradustbin.
If the motor protection lter is very dirty, you can also rinse it with cold tap
water.
Do not use washing-up liquid or any other cleaning agent to clean the
motorprotectionlter!
Let the lter cylinder dry completely before you reinsert it into the
appliance.
3 Pressthecleanmotorprotectionlterrmlybackintothelter
compartment to ensure that it is properly placed.
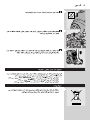
Super Clean Air lter (specic types only)
The Super Clean Air lter located in the back of the appliance has
electrostatically charged bres. These bres lter a large part of the smaller
particles from the exhaust air.
Replace the Super Clean Air lter every six months.
1 Opentheltergrille.
2 Removethelterholder.
3 Openthelterholderandremovetheoldlter.
ENGLISH16

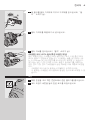
4 Placethenewlterinthelterholderandclosetheholder(‘click’).
5 Putthelterholderbackintotheappliance.
6 Closetheltergrille(‘click’).
Super Clean Air HEPA lter (specic types only)
Instead of with the Super Clean Air lter, some types are equipped with
the special Super Clean Air HEPA lter. This lter is able to remove 99.5%
of all particles down to 0.0003mm in size from the outlet air. This not only
includes normal house dust, but also harmful microscopic vermin such as
house dust mites and their excrements, which are well-known causes of
respiratory allergies.
Replace the Super Clean Air HEPA lter every six months.
You can replace this lter in the same way as the Super Clean Air lter.
Storage
1
Switch off the appliance and remove the mains plug from the wall
socket.
2 Press the cord rewind button to rewind the mains cord.
3 Always put the Tri-Active nozzle in the carpet setting when you store
it and prevent the side brushes from becoming bent.
-
-
ENGLISH 17

4 Insert the ridge on the nozzle into the parking slot to attach the
nozzle to the appliance. Store the appliance in horizontal position,
withallwheelstouchingtheoor.
Ordering accessories and lters
If you have any difculties obtaining lters or other accessories for this
appliance, contact the Philips Consumer Care Centre in your country or
consult the worldwide guarantee leaet.
Philips lter cylinders are available under service number 4322 004
93320.
Super Clean Air lters are available under type number FC8032.
Super Clean Air HEPA lters are available under type number FC8044.
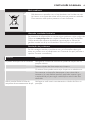
Environment
Do not throw away the appliance with the normal household waste
at the end of its life, but hand it in at an ofcial collection point for
recycling. By doing this, you help to preserve the environment.
Guarantee & service
If you need service or information or if you have a problem, please visit
the Philips website at www.philips.com or contact the Philips Consumer
Care Centre in your country (you nd its phone number in the worldwide
guarantee leaet). If there is no Consumer Care Centre in your country, go
to your local Philips dealer.
Troubleshooting
If you are unable to solve the problem by means of this troubleshooting
guide, contact the Consumer Care Centre in your country (see chapter
‘Guarantee & service’).
Problem Solution
The suction power is
insufcient.
Make sure the suction power knob is in maximum position.
Perhaps the lter cylinder is dirty. Clean the lter cylinder.
Perahaps the other lters are dirty. Clean or replace the other lters.
-
-
-
-
ENGLISH18

Problem Solution
To remove the obstruction, disconnect the blocked-up item and
connect it (as far as possible) the other way around. Switch on the
vacuum cleaner to suck the obstruction out of the blocked-up item.
The dust bucket retainer
cannot be closed.
Make sure you have inserted the lter cylinder properly into the lter
cylinder case.
ENGLISH 19

20
Pendahuluan
Selamat atas pembelian Anda dan selamat datang di Philips! Untuk
memanfaatkan sepenuhnya dukungan yang ditawarkan Philips, daftarkan
produk Anda di www.philips.com/welcome.
Gambaran umum (Gbr. 1)
1 Silinder lter
2
Wadah silinder lter
3
Lubang sambungan selang
4
Penahan wadah debu
5
Wadah debu
6
Kunci silinder lter
7
Filter pelindung motor
8
Tombol daya isap
9
Pegangan atas
10 Tombol on/off
11 Roda belakang
12 Sikat pembersih
13 Katup penahan wadah debu
14 Tombol penggulung kabel
15 Konektor selang
16 Tombol pelepas konektor selang
17 Kait pengencang selang
18 Sikat kecil (hanya tipe tertentu)
19 Nozel kecil (hanya tipe tertentu)
20 Alat celah (hanya tipe tertentu).
21 Pegangan standar (hanya tipe tertentu)
22 Penahan aksesori (hanya tipe tertentu)
23 Tombol pelepas pipa (hanya tipe tertentu)
24 Tuas pelepas penahan aksesori (hanya tipe tertentu)
25 Alat celah (hanya tipe tertentu)
26 Penahan aksesori (hanya tipe tertentu)
27 Nozel kecil (hanya tipe tertentu).
28 Sambungan sikat (hanya tipe tertentu)
29 Pegangan ComfortControl ergonomis (hanya tipe tertentu)
30 Sambungan pipa eksibel (hanya tipe tertentu)
31 Selang
32 Nozel kombinasi (hanya tipe tertentu)
33 Bubungan parkir
34 Sakelar rocker
35 Nozel Tri-Aktif (hanya tipe tertentu)
36 Sikat samping
37 Aksesori klip (hanya tipe tertentu)
38 Pipa teleskopik (hanya tipe tertentu)
39 Pipa teleskopik (hanya tipe tertentu)
40 Kisi lter
41 Filter Udara Super Bersih (hanya tipe tertentu)
42 Steker listrik
43 Slot penahan
44 Filter Udara Super Bersih HEPA (hanya tipe tertentu)
45 Roda putar
46 Pelat jenis
INDONESIA
A página está carregando...
A página está carregando...
A página está carregando...
A página está carregando...
A página está carregando...
A página está carregando...
A página está carregando...
A página está carregando...
A página está carregando...
A página está carregando...
A página está carregando...
A página está carregando...
A página está carregando...
A página está carregando...
A página está carregando...
A página está carregando...
A página está carregando...
A página está carregando...
A página está carregando...
A página está carregando...
A página está carregando...
A página está carregando...
A página está carregando...
A página está carregando...
A página está carregando...
A página está carregando...
A página está carregando...
A página está carregando...
A página está carregando...
A página está carregando...
A página está carregando...
A página está carregando...
A página está carregando...
A página está carregando...
A página está carregando...
A página está carregando...
A página está carregando...
A página está carregando...
A página está carregando...
A página está carregando...
A página está carregando...
A página está carregando...
A página está carregando...
A página está carregando...
A página está carregando...
A página está carregando...
A página está carregando...
A página está carregando...
A página está carregando...
A página está carregando...
A página está carregando...
A página está carregando...
A página está carregando...
A página está carregando...
A página está carregando...
A página está carregando...
A página está carregando...
A página está carregando...
A página está carregando...
A página está carregando...
A página está carregando...
A página está carregando...
A página está carregando...
A página está carregando...
A página está carregando...
A página está carregando...
A página está carregando...
A página está carregando...
A página está carregando...
A página está carregando...
A página está carregando...
A página está carregando...
A página está carregando...
A página está carregando...
A página está carregando...
A página está carregando...
A página está carregando...
A página está carregando...
A página está carregando...
A página está carregando...
A página está carregando...
A página está carregando...
-
 1
1
-
 2
2
-
 3
3
-
 4
4
-
 5
5
-
 6
6
-
 7
7
-
 8
8
-
 9
9
-
 10
10
-
 11
11
-
 12
12
-
 13
13
-
 14
14
-
 15
15
-
 16
16
-
 17
17
-
 18
18
-
 19
19
-
 20
20
-
 21
21
-
 22
22
-
 23
23
-
 24
24
-
 25
25
-
 26
26
-
 27
27
-
 28
28
-
 29
29
-
 30
30
-
 31
31
-
 32
32
-
 33
33
-
 34
34
-
 35
35
-
 36
36
-
 37
37
-
 38
38
-
 39
39
-
 40
40
-
 41
41
-
 42
42
-
 43
43
-
 44
44
-
 45
45
-
 46
46
-
 47
47
-
 48
48
-
 49
49
-
 50
50
-
 51
51
-
 52
52
-
 53
53
-
 54
54
-
 55
55
-
 56
56
-
 57
57
-
 58
58
-
 59
59
-
 60
60
-
 61
61
-
 62
62
-
 63
63
-
 64
64
-
 65
65
-
 66
66
-
 67
67
-
 68
68
-
 69
69
-
 70
70
-
 71
71
-
 72
72
-
 73
73
-
 74
74
-
 75
75
-
 76
76
-
 77
77
-
 78
78
-
 79
79
-
 80
80
-
 81
81
-
 82
82
-
 83
83
-
 84
84
-
 85
85
-
 86
86
-
 87
87
-
 88
88
-
 89
89
-
 90
90
-
 91
91
-
 92
92
-
 93
93
-
 94
94
-
 95
95
-
 96
96
-
 97
97
-
 98
98
-
 99
99
-
 100
100
-
 101
101
-
 102
102


Philips FC8740/01 Manual do usuário
- Categoria
- Aspirador de pó
- Tipo
- Manual do usuário
em outras línguas
- English: Philips FC8740/01 User manual
Artigos relacionados
-
Philips FC9222 AutoClean ParquetCare Manual do usuário
-
Philips FC8712/01 Manual do usuário
-
-
Philips FC9258/01 Manual do usuário
-
Philips FC8712/03 Manual do usuário
-
Philips FC8146/01 Manual do usuário
-
Philips FC9258/01 Manual do usuário
-
-
-