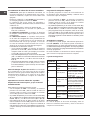
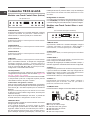
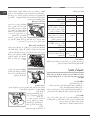
Ariston HLQB 9.8 LTI X Guia de usuario
- Categoria
- Exaustores
- Tipo
- Guia de usuario

HLQB 9.8 LT X
English
Operating Instructions
COOKER HOOD
Français
Mode d’emploi
HOTTE DE CUISINE
Español
Manual de instrucciones
CAMPANA
Portuges
Instruções para a utilização
EXAUSTOR
Contents
Operating Instructions,1
Warnings,8
Assistance,15
Installation,16
TBOX-GLASS controls,17
Maintenance and care,19
Troubleshooting,20
Sommaire
Mode d’emploi,1
Avertissements,9
Assistance,15
Installation,21
Commandes TBOX-GLASS,22
Entretien et soin,25
Anomalies et remèdes,26
Sumario
Manual de instrucciones,1
Advertencias,10
Asistencia,15
Instalación,27
Mandos TBOX-GLASS,28
Mantenimiento y cuidados,31
Anomalías y soluciones,32
Índice
Instruções para a utilização,1
Advertências,12
Assistência,15
Instalação,33
Comandos TBOX-GLASS,34
Manutenção e cuidado,37
Anomalias e soluções,38
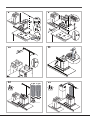
COOKER HOOD
1
13
15
44
43TBOX-GLASS
40
39
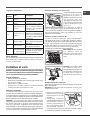
I

2
6x Ø 8 x 40
6x Ø 5 x 45
1x
2x
1x
ø 150-125mm
ø 150mm
1x
1x
6x Ø 3,5 x 9,5
2
3
4
5

3
32
cm
min.
1A
Ø150mm
1B
Ø150mm
Ø120mm
Ø120
Ø150
Ø120mm
Ø120
Ø150
Ø150mm

4
4
6
3
7
5
2
=
=
=
=
650 mm
550
mm
x6
Ø 8 mm
x6
x6
x2
5 mm

5
10
ø 120 ø 150
8 9
1
2
3
x2
x2
11
12 13

6
ø 3,5 x 9,5
x2
14
15
ø 3,5 x 9,5
x2
ø 150
16

7
ø 3,5 x 9,5
x2
A
18
20 21
B
17
19

8
Warnings
! Keep this manual for reference. If you
sell, transfer or move the unit to another
location, make sure to keep the manual
with the product.
! Read the instructions carefully - they
contain important installation, user and
safety information.
! Do not tamper with the electrical or
mechanical equipment of the product or
its exhaust ducts.
General safety information
support surface on top of the cooking
appliance and the lowest part of the
cooker hood must be at least:
65 cm if the hood is installed over a gas
cooktop
55 cm if the hood is installed over an
electric cooktop.
If the installation instruction manual for
greater distance, this measurement
should be taken into account.
plugs which are suitable for use with
most walls/ceilings.
technician to check the suitability of the
materials in relation to the type of wall/
ceiling, which must be strong enough
to support the weight of the unit.
its electrical power supply until the
installation has been completed.
disconnect it from the mains by pulling
the power plug or disconnecting the
main circuit breaker.
and servicing the unit.
or persons with sensory or mental
disability and lack of experience or
familiarity, except under the supervision
or instruction of a person responsible
for their safety.
unit.
unless expressly instructed to do so.
if the hood is used at the same time with
other equipment burning gas or other
fuels.
a duct used for exhausting combustion
fumes from gas or other fuel-fired
equipment.
extraction.
under the hood; open flames will

9
in relation to the technical and safety
measures to be employed in fumes
extraction.
and in observance of the maintenance
instruction given in this manual).
properly installed - electrocution hazard.
by the unit as a result of failure to
observe the instructions given in this
manual.
get very hot when used with cooking
equipment.
Avertissements
! Il est important de conserver ce manuel
afin de pouvoir le consulter à tout
moment. En cas de vente, cession ou
accompagne toujours le produit.
!
instructions : elles contiennent des
!
électriques ou mécaniques sur le produit
Sécurité générale
où sont posés les récipients de cuisson
et la partie la plus basse de la hotte de
cuisine doit être d’au moins :
65 cm si la hotte est installée au-dessus
55 cm si la hotte est installée au-dessus
cuisson à gaz préconise une distance
plus grande, veuillez en tenir compte.
ou plafonds. Il est toutefois nécessaire
type de mur ou plafond, lequel doit être
le poids de la hotte.
réseau électrique en retirant la prise
travail.
par des enfants ou des personnes aux
capacités physiques, sensorielles ou
mentales limitées et qui ne possèdent
responsable de leur sécurité ou que
cette personne leur ait appris comment

10
cela ait été expressément indiqué.
hotte est utilisée en même temps que
appareils de combustion utilisant du
interdit dans tous les cas.
à trop haute température ne prenne feu.
techniques et de sécurité à adopter
tenir étroitement aux dispositions des
autorités locales compétentes.
MOIS, en respectant dans tous les cas
ce qui est expressément indiqué dans
dans ce manuel).
de la hotte et de remplacement et
ampoules correctement installées, sous
peine de vous exposer à un risque de
secousse électrique.
dommages ou incendies subis par
des instructions présentes dans ce
peuvent devenir très chaudes en cas
cuisson.
Advertencias
! Es importante conservar este manual
para poder consultarlo en cualquier
momento. En caso de venta, cesión o
traslado, el manual debe permanecer
junto al aparato.
! Lea atentamente las instrucciones:
contienen información importante sobre
la instalación, el uso y la seguridad.
!
o mecánicas en el aparato ni en los
conductos de evacuación.

11
Seguridad general
de apoyo de los recipientes en la placa
de cocción y la parte inferior de la
campana debe ser de al menos:
65 cm si la campana se instala sobre
una placa de gas;
55 cm si la campana se instala sobre
una placa eléctrica.
Si las instrucciones de instalación de la
mayor, es necesario respetarla.
las paredes y los techos.
técnico especializado para comprobar
la idoneidad de los materiales de
acuerdo con el tipo de pared o techo,
para sostener el peso de la campana.
a la red eléctrica hasta no terminar
totalmente la instalación.
limpieza o mantenimiento, desconectar
la campana de la red eléctrica mediante
la clavija o el interruptor general de la
vivienda.
y mantenimiento se deben realizar
utilizando guantes de trabajo.
con capacidades físicas, sensoriales
o mentales reducidas, o carentes de
la experiencia y los conocimientos
necesarios para utilizarlo, salvo
que lo hagan bajo la vigilancia o
las instrucciones de una persona
responsable de su seguridad.
aparato.
grasas instalado correctamente.
como plano de apoyo, a no ser que esto
sea expresamente indicado.
ventilación cuando la campana se utiliza
simultáneamente con otros aparatos
que empleen gas u otros combustibles.
conducto utilizado para los humos
generados por otros aparatos que
empleen gas u otros combustibles.
la evacuación del aire.
alimentos con llama libre debajo de la
campana; el empleo de llamas libres
originar incendios; por lo tanto, se debe
evitar en cualquier circunstancia.
constantemente bajo control la cocción
de alimentos por fritura, para evitar que
el aceite recalentado arda.
seguridad que se deben adoptar para
la evacuación de los humos, atenerse
estrictamente a los reglamentos
establecidos por las autoridades
competentes.
frecuencia, tanto por dentro como
MES, respetando las instrucciones
de mantenimiento contenidas en este
manual).

12
de limpieza de la campana y de
sustitución y limpieza de los filtros
implica riesgos de incendio.
estén correctamente montadas. De
lo contrario, no utilizar la campana,
ya que podrían producirse descargas
eléctricas.
incendios derivados del incumplimiento
de las instrucciones contenidas en este
manual.
recalentarse considerablemente
durante el uso de la placa de cocción.
Advertências
! É importante guardar este manual
para poder consultá-lo a qualquer
momento. Em caso de venda, cessão ou
transferência, assegure-se de que este
permanece junto com o produto.
! Leia atentamente as instruções:
contêm informações importantes sobre
a instalação, o uso e a segurança.
!
mecânicas no produto ou nas condutas
de descarga.
Segurança geral
suporte dos recipientes no dispositivo
de cozedura e a parte mais baixa do
exaustor de cozinha não deve ser
inferior a:
65 cm se o exaustor for instalado sobre
uma placa de cozedura a gás
55 cm se o exaustor for instalado sobre
uma placa de cozedura eléctrica.
Se as instruções de instalação
do dispositivo de cozedura a gás
especificam um distância maior, é
necessário considerá-la.
adequadas à maioria das paredes/
tectos.
Ainda assim, é necessário contactar
a idoneidade dos materiais consoante
o tipo de parede/tecto, que deve ser
o peso do exaustor.
eléctrica até que a instalação esteja
totalmente concluída.
ou manutenção, desligue o exaustor
tomada ou desligando o interruptor
geral da casa.
e manutenção, utilizar luvas de
protecção.
parte de crianças ou pessoas com
capacidades físicas sensoriais e/ou
mentais reduzidas ou sem experiência
e conhecimentos, a menos que se
encontrem sob a supervisão ou tenham
recebido instruções sobre o uso do
aparelho por parte de uma pessoa
responsável pela sua segurança.
para que não brinquem com o aparelho.

13
como plano de apoio, salvo indicação
expressa em contrário.
em simultâneo com outros aparelhos
que utilizem gás ou outros combustíveis.
para uma conduta usada para a
descarga de fumos produzidos por
aparelhos de combustão a gás ou
outros combustíveis.
à descarga do ar.
alimentos em chama livre sob o
exaustor; a utilização de chamas
incêndios, como tal, deve ser evitada.
constante a fritura de alimentos, para
evitar que o óleo aquecido entre em
combustão.
segurança a adoptar para a descarga
dos fumos, siga escrupulosamente os
regulamentos das autoridades locais
competentes.
o produto, quer interna quer
respeite as instruções de manutenção
indicadas neste manual).
limpeza do exaustor e da substituição
incêndio.
lâmpadas correctamente montadas,
por possível risco de choque eléctrico.
por eventuais inconvenientes, danos
ou incêndios provocados pelo aparelho
derivados do incumprimento das
instruções presentes neste manual.
aparelhos de cozedura.
!
!
!
65
55

14

15
Assistance
!
The latter two pieces of information can be found on the
data plate located on the appliance.
Assistance
!
Lui indiquer :
Ces informations figurent sur la plaque signalétique
apposée sur l’appareil
Asistencia
!
Comunique:
Esta información se encuentra en la placa de características
colocada en el aparato.
La siguiente información es válida solo para España.
Para otros países de habla hispana consulte a su vendedor.
Ampliación de garantía
Llame al 902.363.539 y le informaremos sobre el fantástico
Consiga una cobertura total adicional de
Y NO PAGUE AVERIAS NUNCA MAS
Servicio de asistencia técnica (SAT)
Llame al 902.133.133 y nuestros técnicos intervendrán con
condiciones óptimas de funcionamiento.
En el SAT encontrará recambios, accesorios y productos
específicos para la limpieza y mantenimiento de su
electrodoméstico a precios competitivos.
ESTAMOS A SU SERVICIO
Assistência
!
Comunique:
!
.(Mod.
.(

16
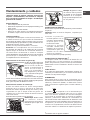
GB
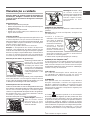
Installation
of this manual.
Electrical hook up
The mains voltage must match that given on the ratings
label inside the hood itself. If the hood has a power plug,
connect the hood to an easily accessible regulatory power
socket. If it does not (direct connection to the mains), or the
socket is not easily accessible, install a two-pole regulatory
switch to enable total disconnection from the mains in case
of category III overvoltage, as required by the installation
regulations.
Caution! Always check that the mains cable is hooked
up properly and check that it operates correctly before
reconnecting the hood to the mains.
Air exhaust
(for ducted units)
Connect the hood to a duct and wall exhaust hole of a
diameter tube and exhaust hole reduces the extraction
capacity of the hood and also increases its running noise.
The manufacturer is not liable for any consequences of
doing so.
!
!
! Avoid suddenly changing the diameter of the duct.
! The duct must have as smooth an inner surface as
possible.
! The duct must be made of regulatory material.
!
fumes from other equipment (boilers, TBOX-GLASSs,
stoves, etc.).
! Observe the instructions of the competent authorities in
relation to the air exhaust. The air being exhausted may not
be exhausted into a wall cavity unless the cavity in question
! Equip the room with air intakes to prevent the hood creating
suction pressure in the interior (this must not exceed 0.04
mbar).
! The manufacturer is not liable for any consequences of
failure to observe these instructions.
Filter or ducted?
! Your hood is supplied as a ducted unit.
ACCESSORY KIT.
Note: If supplied with the hood, the accessory active
Instructions for transforming the hood from the ducted to the
Ducted version
The diameter of the exhaust tube must be equal to that of
Caution! The exhaust duct is not supplied and must be
purchased separately.
When routed horizontally, the tube must be angled slightly
upwards (around 10°) to enable the air to be conveyed
Filter version
version of the hood requires installation of an accessory
outlet slots uppermost.
Technical data
Model
Height
(cm)
Width
(cm)
Depth
(cm)
dia. of
exhaust tube
(cm)
TBOX-GLASS 60cm 61-82 59.8 50 15/12
TBOX-GLASS 90cm 61-82 89.9 50 15/12
Model code Bulb (V) Bulb draw (W) Total draw (W)
HLQB 9.8 LTI X Led 2 x 3 256
Power Voltage Cap Dimensions
Halogen 25 W 2 x 25 W G9 L40xØ14
Halogen 20 W 2 x 20 W G4 L30xØ10
LED
*
The hoods are conforming to the following EC
Directives:
* Only available in certain models

GB
17
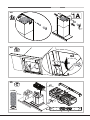
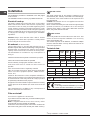
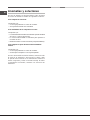
TBOX-GLASS controls
Models with Touch control glass (basic)
HLQB 9.8 LTI X
T1 T2 T3 T4 T5 T6 T7 T8
T1 motor ON/OFF
is set. When the button is pressed during operation, the
T2 Speed 1
When the button is pressed the hood switches from the
previous status to speed 1.
T3 Speed 2
When the button is pressed the hood switches from the
previous status to speed 2.
T4 Speed 3
When the button is pressed the hood switches from the
previous status to speed 3.
T5 Booster
When the button is pressed the hood switches from the
previous status to intense speed. The setting is limited by
time; when the time elapses the hood goes back to the speed
set previously; when a speed button is pressed (T2, T3 or
T4), the selected speed is set as you leave the booster mode.
The antigrease (A) and odour (B
replacing after a certain number of hours of use (the latter
The time for cleaning/replacement is signalled by the
The LED is turned off by pressing the T7 button after
T8 lights ON/OFF
It turns the work lights of the hood on and off.
by pressing T5 and T6 for 6 seconds. T7 turns on at this
point to indicate the type of installation through two colours
of the LED: white for extractor installation (default), red for
by pressing T7 cyclically with the consequent alternation
of the LED colours.
Hood off
The hood can be turned off manually by pressing the T1
button (ON/OFF). If the timer is set, the hood turns off
automatically when the set time runs out.
Models with Touch control glass + display
(medium)
(Only available in certain models)
T1 T2 T3 T4 T5 T6
T1 motor ON/OFF
is set. When the button is pressed during operation, the
T2 Speed –
When the button is pressed the hood switches to the
previous speed.
T3 Speed +
If the hood is set to speed 3, the intensive speed activates
when this button is pressed
The setting is limited by time; when it elapses the hood goes
back to the speed set previously.
T4 Timer “–”
Set a time to turn OFF the hood with the timer; if the timer
is set and the speed is subsequently changed by pressing
T2, T3 or T4, the timer is deactivated.
T4 to decrease the timer by 5 minutes.
T5 Timer “+”
to 5 minutes; this value is increased by 5 additional minutes
every time the button is pressed after that.
T6 lights ON/OFF
It turns the work lights of the hood on and off
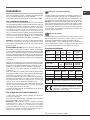
D1I1 D2 I5
I2 I4
D1: DGT Speed
D2: Assembly of 2 DGT Time
I1:
I2:
I4: Menu Indicator
I5: Timer Indicator
T6 Timer
By pressing T6 once, a timer setting can be associated
to each speed
V) [v1 – 30 min, v2 – 20 min, v3 – 10 min]
, after which the hood turns OFF automatically. The timer
can be set for manual speeds only and not for the booster.

18
GB
replacing after a certain number of hours of use (the latter
The indicator light I1
is saturated, while the indicator light I2 on indicates that the
T5 + T4 for 3 seconds with the hood on to reset the
counter.
Hood type setting
mode. To change the setting proceed as follows:
OFF, the menu is accessed by pressing the
T4 e T5 buttons for a prolonged time; this is signalled by
a sound emitted by the hood and by the I4 icon lighting
up and the writing C1-0 appearing on the display;
T4 and T5
T4 to go through the various menu items (C1, C2, C3,
C4, etc) and T5 to select them (0, 1 or 0, 1, 2);
C6 with
T4 and set the value 0 with T5 to set the hood on ventilation
T1 at the end.
Hood off
The hood can be turned off manually by pressing the T1 button
(ON/OFF). If the hood stays on in manual mode, it turns off
the hood turns off automatically when the set time runs out.
Models with Touch control glass + display
(high)
(Only available in certain models)
T1 T2 T3 T4 T5 T6 T7 T8
T1 motor ON/OFF
is set. When the button is pressed during operation, the
T2 Speed –
When the button is pressed the hood switches to the
previous speed.
T3 Speed +
When the button is pressed the hood switches to the next
speed. If the hood is off, speed 1 is set when pressing this
button.
T4 Booster
When the button is pressed, the hood switches from the
b
slowly on the display. The setting has a limited timeframe;
when the time elapses the hood goes back to the speed set
previously; when a speed button is pressed (T2, T3 or T4),
the selected speed is set as you leave the booster mode.
T5 AUTO
T5 button to activate the automatic mode, which
turns the hood on based on the steam level detected. While
in normal operation the sensor regulates the motor speed
within the admitted values (0,1,2,3 or booster). The hood
switches from automatic to manual mode when the Booster
or Speed button is pressed.
The sensor needs calibrating before use; for more information
T6 Timer “–”
With the timer, a time can be set, after which the hood
turns OFF; if the timer is set and the speed is subsequently
changed by pressing T2, T3 or T4, the timer is deactivated.
T6 button to decrease the previously set value
by 5 minutes.
T7 Timer “+”
to 5 minutes; this value is increased by 5 additional minutes
every time the button is pressed after that.
T8 lights ON/OFF
It turns the work lights of the hood on and off.
D1I1 D2 I5
I2 I4
D1: DGT Speed
D2: Assembly of 2 DGT Time
I1:
I2:
I4: Menu Indicator
I5: Timer Indicator
replacing after a certain number of hours of use (the latter
The indicator light I1
saturated, while the indicator light I2 on indicates that the
only).
T5 + T6 for 3 seconds with the hood on to reset the
counter.
Automatic sensor calibration procedure
- Calibration: the calibration procedure must be carried
out in a clean environment to be effective; therefore, the
hob must be off during the calibration.
During the calibration procedure the AUTO button is on
and the AUTO
The sensor calibration may be automatic or manual
- Automatic calibration: occurs when the hood is power
menu.

GB
19
- Manual calibration: (or upon request) is set in the
be started, in case of malfunctioning of the sensor (which,
for example, may occur in case of blackout while cooking
or after a long time since the use).
OFF or in standby, the menu is accessed
by pressing the T6 and T7 buttons for a prolonged
time; this is signalled by a sound emitted by the hood
and by the I4 icon lighting up and the writing C1-0
appearing on the display;
T6 and T7 to go through the menu.
T6 to go through the various menu items (C1, C2,
C3, C4, etc) and T7 to select them (0, 1 or 0, 1, 2);
item C4 with T6 and set value 1 with T7. Then press
T1 and wait for the time suggested for the calibration.
Selecting the hob type: the type of hob (electric, induction,
gas) present under the hood is select upon installation. A
complete automatic calibration procedure is carried out
immediately after selecting the hob.
Important: do not force the calibration “upon request”
after selecting the hob as this activates automatically.
To select the hob, proceed as follows:
OFF or in standby, the menu is accessed by
pressing the T6 and T7 buttons for a prolonged time; this is
signalled by a sound emitted by the hood and by the I4 icon
lighting up and the writing C1-0 appearing on the display;
T6 and T7
T6 to go through the various menu items (C1, C2, C3,
C4, etc) and T7 to select them (0, 1 or 0, 1, 2);
C3 with
T6 and set the value with T7 to 0 if you have a gas hob,
1 if you have a radiant hob and 2 if you have an induction
T1 to leave the menu mode and wait the time
needed for the sensor calibration.
Hood type setting
operating mode. To change the type proceed as follows:
OFF or in standby, the menu is accessed by
pressing the T4 and T5 buttons for a prolonged time; this is
signalled by a sound emitted by the hood and by the I4 icon
lighting up and the writing C1-0 appearing on the display;
T4 and T5
T4 to go through the various menu items (C1, C2, C3,
C4, etc) and T5 to select them (0, 1 or 0, 1, 2);
C6 with T4 and set the value 0 with T5 to set the hood on
ventilation mode or 1T1.
Hood off
The hood can be turned off manually by pressing the T1
button (ON/OFF). If the hood stays on in manual mode, it
timer is set, the hood turns off automatically when the set
time runs out.
The Automatic mode activates after 10 minutes from the
sensor turning off the hood motor.
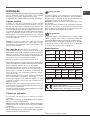
Regulation
code
Meaning Explanation
C1
It resets the grease
C2
timer
C3 Hob type
It changes the hob type
may be gas, electric or
induction
C4 Sensor calibration
It calibrates the sensor.
If item 1 is select, the
sensor carried out the
calibration the next
time the hood is turned
on
C5 Audio levels
emitted (not even when
C5 Hood type
C6
default
It resets the DGT menu
values to default values
(including installation)
General notes
If the display buttons become locked, unplug and plug
in again the hood from the mains before contacting the
Assistance Service.
Maintenance and care
Caution! Before cleaning or servicing the unit,
disconnect it from the mains by pulling the power plug
or disconnecting the main circuit breaker.
First cleaning
Periodic cleaning
The hood must be cleaned frequently (at least as often as
cloth and a neutral liquid detergent with lukewarm water.
Do not use abrasive or corrosive products.
Warning:
the instructions carefully. The manufacturer is not liable for
or failure to follow the above instructions.

20
GB
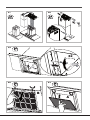
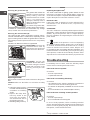
A
particles of grease produced
during cooking; it must be
cleaned at least once a month
with a non-aggressive
detergent, either by hand or
with a low temperature, short
dishwasher cycle.
pull the spring loaded handle.
colour, but this does not affect its performance.
The cartridge must be replaced at least once every twenty
months.
B
Disassembly: Remove the
activated-carbon filter by
pressing the two front levers
which secure it to the hood.
B
Assembly: Secure the
metal tabs and then in the
front by pressing the two
levers.
Replacing the bulbs
Disconnect the unit from the mains and remove the grease
Caution! Make sure the bulbs are cool before touching
them.
1. Extract the guard by prising
screwdriver or something
similar.
2. Replace the faulty bulb.
same type (for details,
see the technical data in
the following manual).
Replacing the lights LED *
technology. The LEDs ensure optimal lighting, longer life
and lower consumption compared with traditional lights. To
replace them please contact the assistance service.
Electrical cable
If the power cable is damaged, it can be replaced by the
manufacturer or his technical service, to prevent any
attendant risks.
SCRAPPING
The unit is marked for conformity with European Directive
2012/19/EC, Waste Electrical and Electronic Equipment
(WEEE). By ensuring that the unit is scrapped properly,
the user contributes to safeguarding the environment and
public health.
The
symbol on the product or on its accompanying
documents indicates that the product may not be treated
as domestic waste but must be handed over to a sorting
centre for electrical and electronic waste. Dispose of it
further information on the handling, recovery and recycling
of this product, contact the local authority, domestic waste
disposal service or the reseller from whom you purchased it
Troubleshooting
If something does not work, make the following simple
checks before contacting Technical Service:
If the hood does not operate:
Check that:
If the hood is not working effectively:
Check that:
amount of smoke and steam being produced.
air in.
If the hood turns off during normal operation:
Check that:
In case of faulty operation, before contacting Technical
least 5 seconds by pulling its plug, then reconnect it. If the
fault persist, contact Technical Service.
* Only available in certain models
A página está carregando...
A página está carregando...
A página está carregando...
A página está carregando...
A página está carregando...
A página está carregando...
A página está carregando...
A página está carregando...
A página está carregando...
A página está carregando...
A página está carregando...
A página está carregando...
A página está carregando...
A página está carregando...
A página está carregando...
A página está carregando...
A página está carregando...
A página está carregando...
A página está carregando...
A página está carregando...
A página está carregando...
A página está carregando...
A página está carregando...
A página está carregando...
-
 1
1
-
 2
2
-
 3
3
-
 4
4
-
 5
5
-
 6
6
-
 7
7
-
 8
8
-
 9
9
-
 10
10
-
 11
11
-
 12
12
-
 13
13
-
 14
14
-
 15
15
-
 16
16
-
 17
17
-
 18
18
-
 19
19
-
 20
20
-
 21
21
-
 22
22
-
 23
23
-
 24
24
-
 25
25
-
 26
26
-
 27
27
-
 28
28
-
 29
29
-
 30
30
-
 31
31
-
 32
32
-
 33
33
-
 34
34
-
 35
35
-
 36
36
-
 37
37
-
 38
38
-
 39
39
-
 40
40
-
 41
41
-
 42
42
-
 43
43
-
 44
44


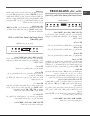
Ariston HLQB 9.8 LTI X Guia de usuario
- Categoria
- Exaustores
- Tipo
- Guia de usuario
em outras línguas
- español: Ariston HLQB 9.8 LTI X Guía del usuario
- français: Ariston HLQB 9.8 LTI X Mode d'emploi
- English: Ariston HLQB 9.8 LTI X User guide